Instructor-Led Training
This article explains how Instructor-Led Training (ILT) enables admins to host and manage online or in-person training events efficiently.
Overview
Instructor-Led Training (ILT) enables organizations to host and manage structured training sessions within their academy. ILT supports both in-person and online training events, allowing learners to register, track, and participate in sessions seamlessly.
ILT events consist of one or more sessions that learners can register for. Using the ILT module you can perform the following:
- View and manage registrations and attendance.
- Track and update learner attendance for each session.
- Configure email notifications for session updates.
With ILT, admins can:
- Create and manage events with one or multiple sessions.
- Enable event discovery through the Discover Events page.
- Track registrations and attendance efficiently.
- Automate learner notifications for registrations and attendance updates.
- Provide calendar integration for easy session scheduling.
With ILT, learners can:
- Browse upcoming events through the Discover Events page.
- Register and manage training session enrollments.
- Receive automated notifications for session reminders and attendance updates.
- Track registered sessions in the My Events section of My Dashboard.
- Add sessions to their calendar for easy scheduling.
Note: Before enabling ILT in a production environment, Gainsight recommends testing it in a sandbox account to ensure compatibility with your academy’s customizations.
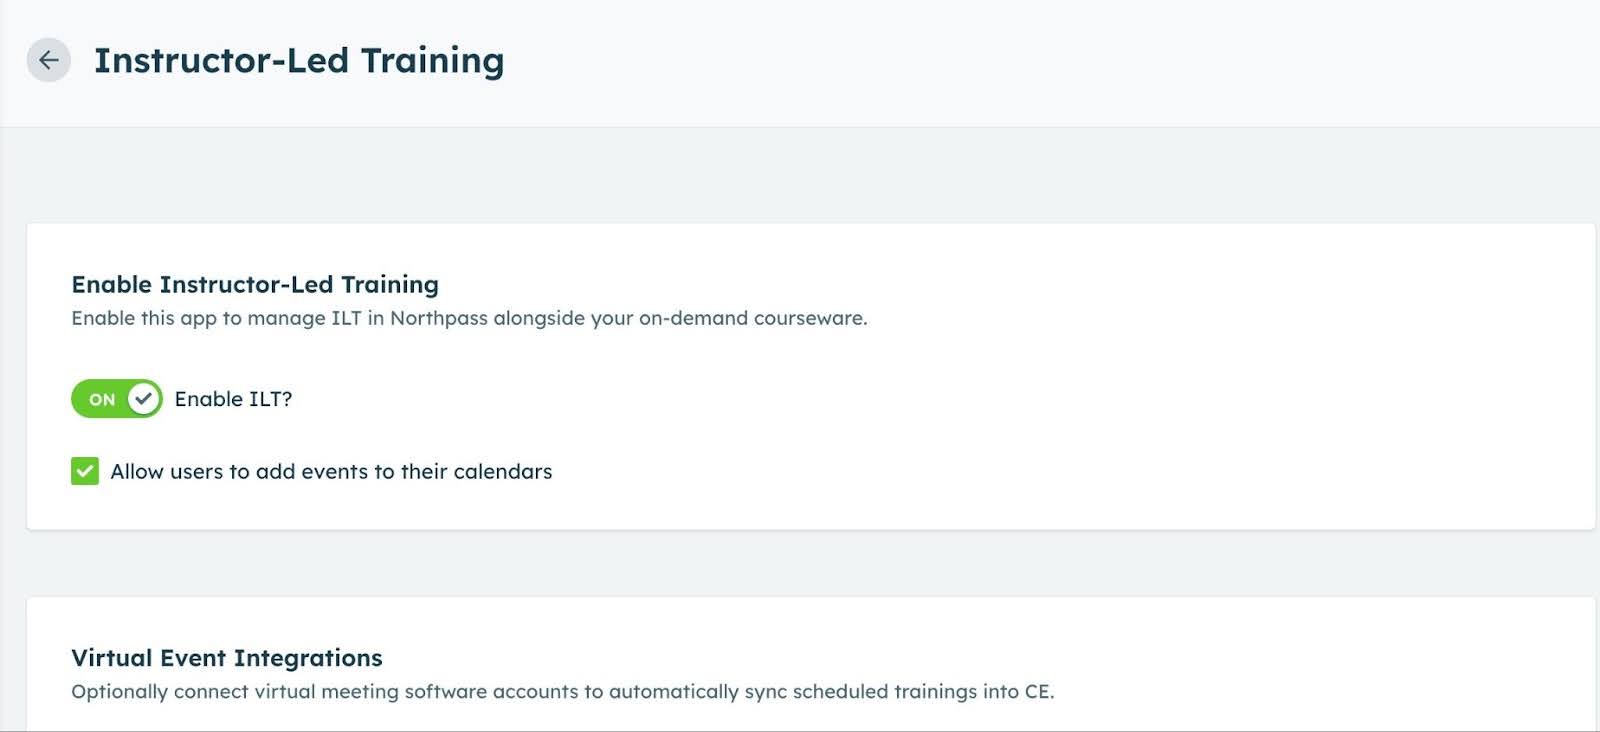
Enable ILT
Enable ILT to manage instructor-led training sessions in your academy. To enable ILT:
- Navigate to Apps > Add-Ons. The Add-Ons page appears.
- Click Instructor-Led Training.
- Turn on the Enable ILT toggle.
-
(Optional) Select the checkbox to allow learners to add session registrations to their calendars. The following calendars are supported:
- Google Calendar
- Outlook.com Calendar
- Office 365 Calendar
- iCalendar (.ics file): Downloads a universal calendar file that can be imported into most calendar applications.
Create an ILT Event
Set up event details, manage visibility settings, and schedule sessions for effective ILT management. To create an ILT event:
-
Navigate to Content > Instructor-Led Trainings.

- Click Create Event. The Create new ILT event window appears.
- Choose the Event Type (cannot be changed later):
- In-Person Event
- Online Event
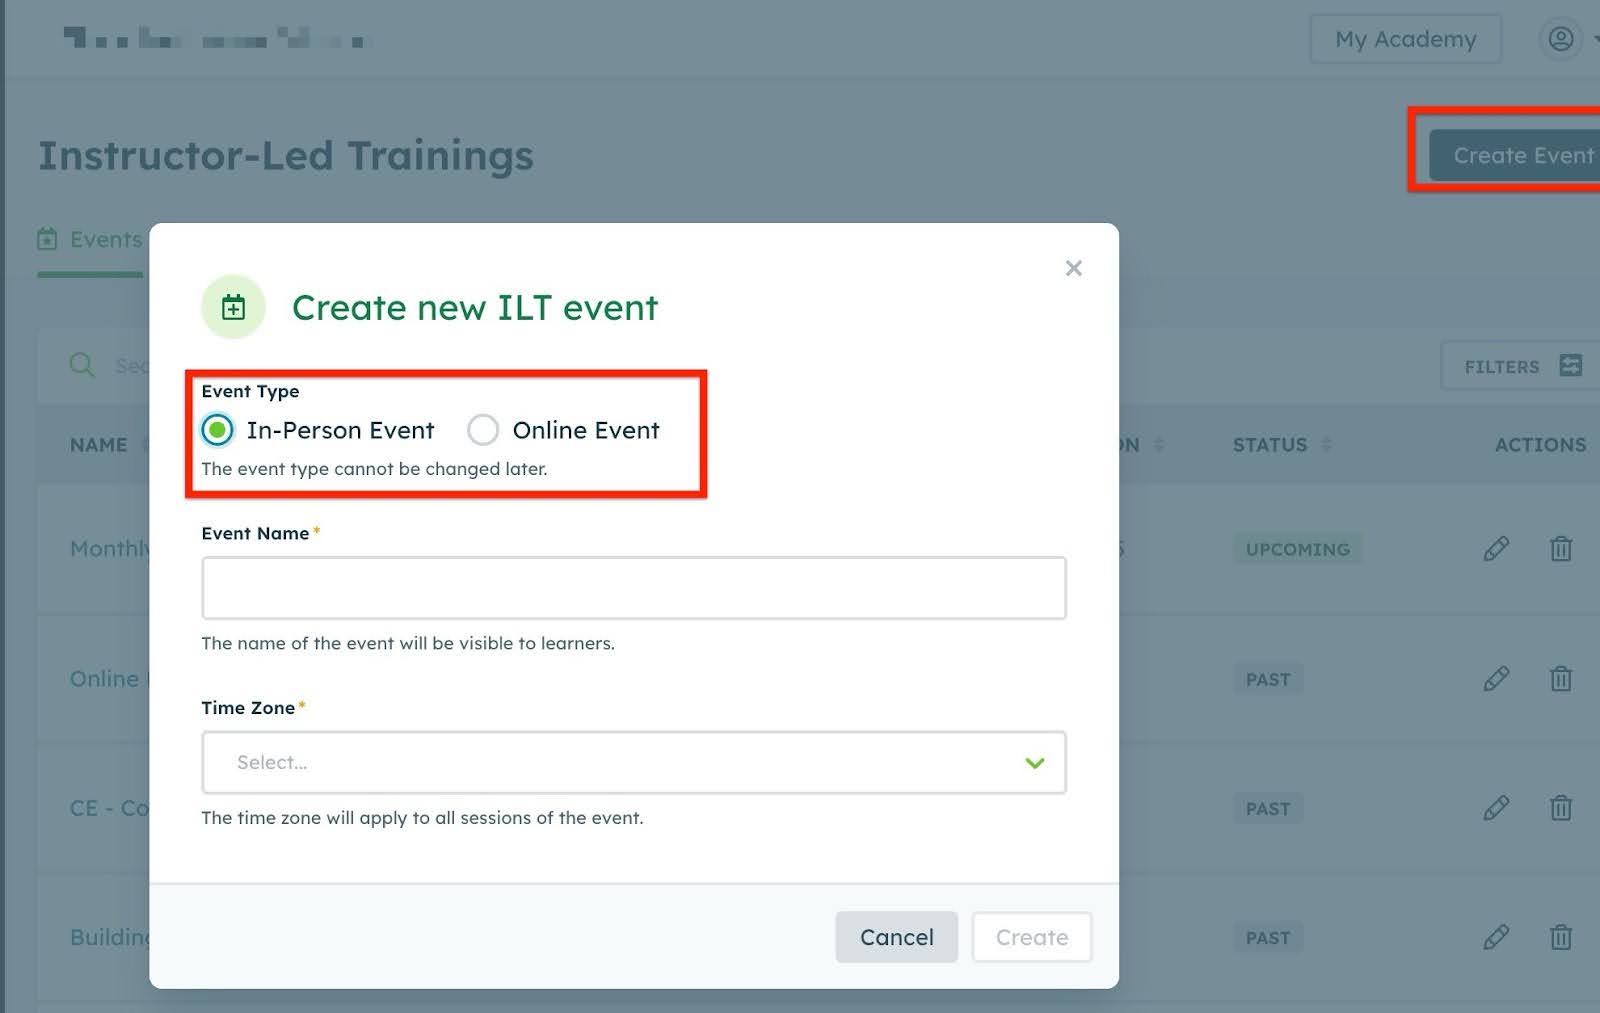
- Enter the following event details:
- Event Name: Display name visible to learners.
- Time Zone: Default time zone for the event, applied to all sessions and visible to learners.
- Click Create to save the event. The Event Details page appears with the entered details. You can modify the information, if needed.
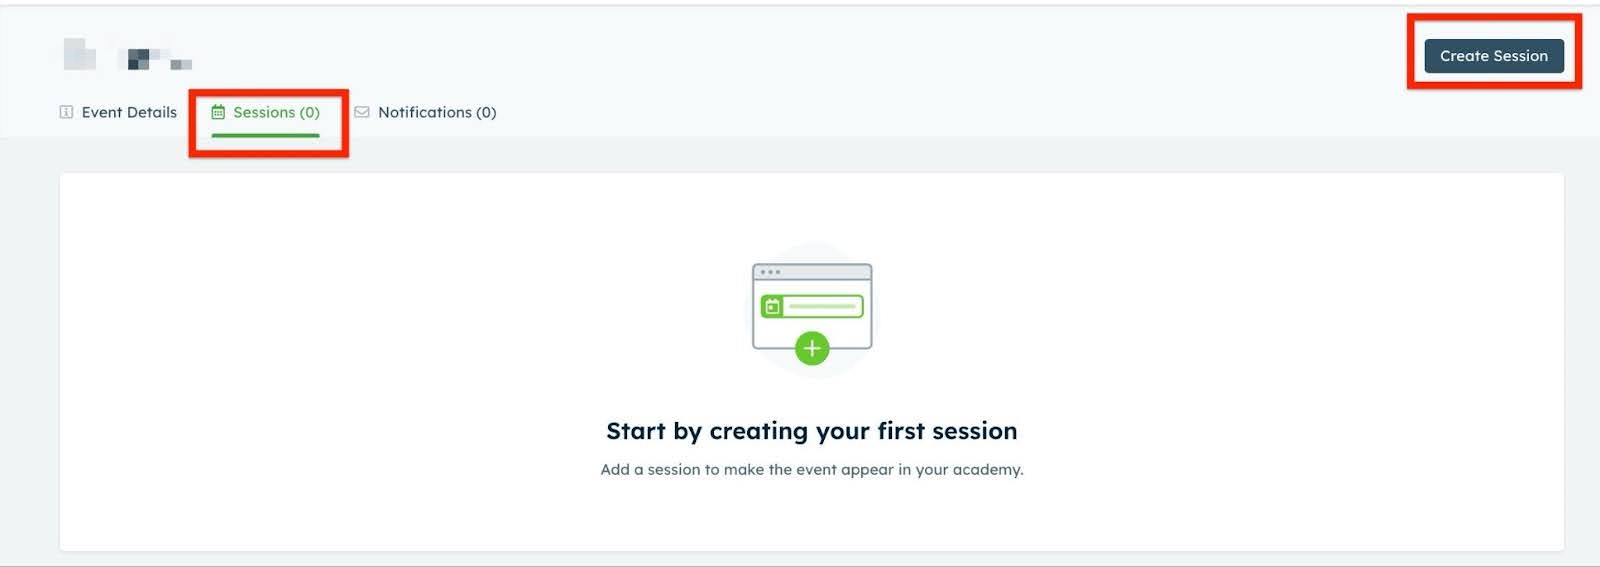
Create a Session
You can create a session to schedule and manage online or in-person events. The required details depend on the event type selected during event creation. To create an online session:
- In the newly created or an existing event, navigate to the Session tab.
- Click Create Session.
- Enter session details, such as start date, start time, session duration.
- Based on the event type, perform one of the following:
- For Online event:
- Select Online from the Session Type dropdown.
- Enter the Session URL (such as a webinar or external meeting link).
Note: If you choose Zoom Meeting, refer to the Create a Zoom Meeting Session in Gainsight CE section in the Zoom Integration in Gainsight CE article.

-
For In-Person event:
-
Select the Location and Room for the session.
-

- In the Instructor field, select the name of the person facilitating the session.
- In the Seats available field, enter the maximum number or allowed participants in the session, or select the Unlimited option to configure no upper limit..
- (Optional) In the Waitlist section, turn the Enable waitlist for this session toggle on to allow participants to be added to a waitlist if the maximum capacity is reached. Turning off the waitlist automatically removes all waitlisted participants and notifies them, with no option to reverse this action.
- Click Create or Create and Add Another to proceed.
Create a Notification
You can create custom notifications for ILT events to send session-related updates to learners. The ILT module comes with several pre-built notifications out of the box, including:
- Successful registration emails
- Attendance confirmation
When enabled, these notifications are sent to all registrants for every session of an event. You can manage these emails in the Communications > Messages > Administer. Each notification can be customized or turned off as needed.
To create a notification:
- Navigate to the Notifications tab of the ILT event.
- Click the Create Notification button. The Create New Notification window opens.
- In the Name field, enter the name of the notification.

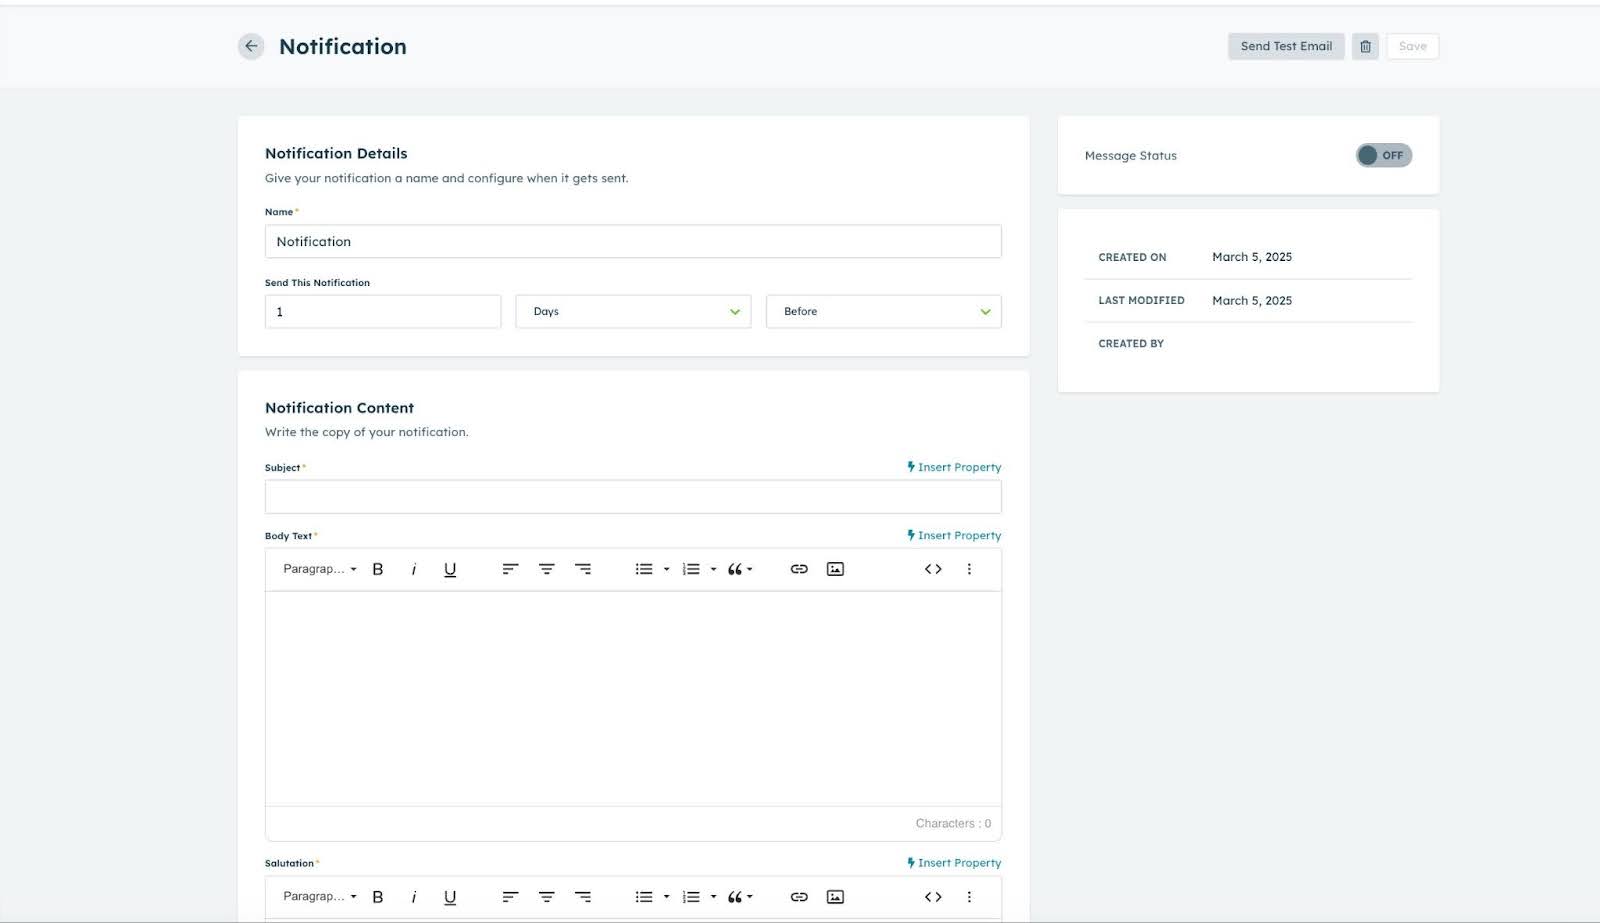
- Click Create to proceed. The Notification details page appears.
- Enter the following notification details:
- Notification Name: Update the notification title (if needed).
- Send This Notification: Choose when the notification should be sent, such as X days before or after the event.
- Notification Content: Enter the subject and body text using the rich text editor. You can insert properties to personalize the message. For more information on properties, refer to the Which properties can be used in new Communications messages article.
- Salutation: Customize the greeting to address recipients appropriately. By default, placeholders are replaced with actual user details when sent.
- Message Status: Toggle on to activate the notification.
- Send Test Email: Send a test email to preview the notification. For more information refer to the Send a Test Email section.
-
Click Save to create the notification.
Send a Test Email
You can preview notifications before sending them to ensure the content and formatting are correct. To send a test email:
- Navigate to the required notification in an ILT event.
- Click Send Test Email from the top-right corner.
- Review the email preview.
- Confirm and send the test email to verify the formatting and content.
Note: The Test Email feature replaces the body and salutation fields with actual event details when the notification is sent.
Manage ILT Events
The Instructor-Led Trainings page allows you to view and manage all events in your academy. You can perform the following actions:
- Create: Create new events.
- Edit: Modify an existing event and its details.
- Delete: Remove an event permanently from your academy.
- Filter: Narrow down specific events using multiple criteria.
- Search: Search for specific events using the name.
- View event details: View event type, session count, next session date, and status of all notifications at a glance.

Note: An event must have at least one session to be visible in your academy. Events without sessions are marked Incomplete.

Modify Event Details
You can modify ILT event details, including the event name, description, time zone, and visibility settings. To edit an ILT event:
- Navigate to Content > Instructor-Led Trainings.
- Locate the event you want to edit.
- Click the Edit icon under the Actions column. The Event Details page appears.
- Update the required event details:
- General Information
- Modify the Event Name. This is the name visible to learners.
- Add or edit the Description using the rich text editor.
- Event Settings
- Select the Time Zone. This applies to all event sessions.
- In the Event Visibility field, choose who should be able to view the event - everyone, specific people or no one.
- Click Save to apply your changes.

Note:
- The Event Type (In-Person or Online) cannot be changed once an event has been created.
- The event's creation date and last modified date are displayed on the right panel.
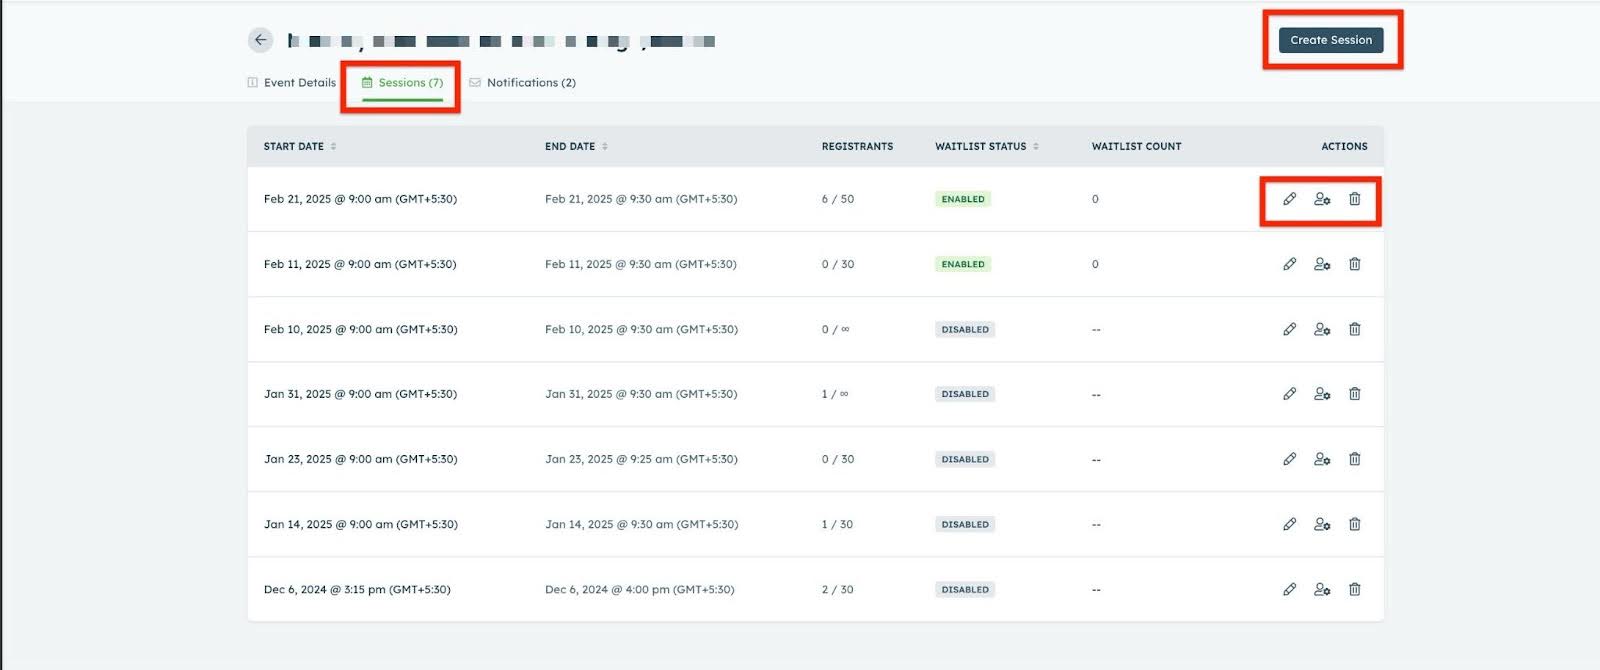
Modify Sessions
You can edit, delete, and manage sessions in an ILT event. The Sessions tab displays all sessions created for the event, along with important details such as start and end date, registrant limits, waitlist status, and availability.
To manage a session:
- Navigate to Content > Instructor-Led Trainings.
- Locate the event you want to manage.
- Click the Edit icon under the Actions column. The Event Details page appears.
- Click the Sessions tab.
- You can perform the following actions:
- Create: Create a new session. For more information, refer to the Create a Session section.
- Edit: Modify session details.
- Registrants: View and manage attendees. For more information on managing registrants, refer to the Manage Registrants section.
- Delete: Remove a session permanently.
Manage Registrants
Manage registrants by viewing, adding, removing, or updating learner details. Filter, sort, and search for participants, export registrant lists, and update attendance for one or multiple learners. To view a session’s registrants:
- Select an Event.
- Choose a Session.
- Click the Registrants icon.

On the Registrants page, you can perform the following actions:
- Filter, sort, or search registrants.
- Register, remove, or update registrants manually.
- Export and download the list of registrants.
- Mark, modify, or track attendance for registrants manually, or in bulk. For more information on how to mark attendance in bulk, refer to the Modify Attendance for Multiple Registrants section.
Modify Attendance for Multiple Registrants
You can use the bulk selection feature to update attendance for multiple learners at once, simplifying attendance tracking for large sessions. To update attendance in bulk:
- Navigate to Content > Instructor-Led Trainings.
- Select the Event for which attendance is to be updated.
- Click on the Sessions tab to view all scheduled sessions.

-
For the required session, click the Registrants icon to open the registrants list.

-
Select the checkbox next to the attendees’ names.

-
Click the Edit Attendance icon at the top center of the Registrants page to update multiple attendees at once.

Note: To only update the attendance for a single registrant, click the Edit Attendance icon corresponding to their name.

-
In the Confirm Attendance window, select one of the following statuses:
- Attended
- Not Attended
- Pending
-
Click Save to apply the changes.

Modify Notifications
Once a notification sequence is set up, you can modify it as needed to accommodate changes for a specific event.
To manage notifications:
- Navigate to Content > Instructor-Led Trainings.
- Locate the Event for which you wish to modify the notifications.
- Click the Edit icon under the Actions column. The Event Details page opens.
- Click the Notifications tab.
- You can perform the following actions:
- Create: Create a new notification, enter the details, and save. For more information, refer to the Create a Notification section.
- Edit: Modify and update notification settings, including delivery timing, content, salutation, and status.
- Delete: Remove a notification permanently.
- Filter: Find specific notifications using the filter option.

Learner Experience
Learners can explore, register, and manage their training sessions in Instructor-Led Training (ILT). Learners can easily find upcoming events, enroll in sessions, and receive automated notifications, ensuring a smooth and organized learning experience.
Access ILT Events
Learners can browse and explore the available ILT events in the academy. To access ILT events, learners can perform the following:
- Navigate to the Events tab in the academy.
- Browse the list of available ILT events. (Events are displayed in chronological order based on the next session date.)
- Click View to proceed.

Register for a Session
Learners can sign up for ILT sessions and manage their enrollments. To register for a session, learners can perform the following:
- Select a session from the Session Details page and click the View button to display its details.
- Review the session information, including time, description, and location.
- Click Register to enroll in the session.
- (Optional) Add the session to your calendar.

Note:
- Learners receive automated notifications based on event settings.
- Each session has a unique URL for easy sharing.