Add and Manage Products in Commerce
This article explains how to create, manage, and organize educational products, courses, and bundles in Gainsight’s Customer Education platform.
Overview
Gainsight’s Commerce feature enables administrators to monetize educational products such as individual courses, learning paths, ILT (Instructor-Led Training), and bundles. By managing pricing, availability, and course offerings, organizations can offer flexible learning options for their customers and learners.
Key Benefits
- Customizable Product Listings: Easily manage various products and adjust settings as needed.
- Bundle Management: Add multiple courses, learning paths, and groups into a single offering for greater value.
- Flexible Availability: Activate or deactivate products as per learner requirements and course availability.
Prerequisites
- You must be an administrator to manage commerce features, configure the payment gateway, and create products or coupons.
- Courses, learning paths and/or Instructor Led Training (assigned to a group) are already created in the academy.
Add and Manage Products
The Products feature enables administrators to create and manage various educational products, such as courses, learning paths, and bundles.
Steps to Add and Manage Products:
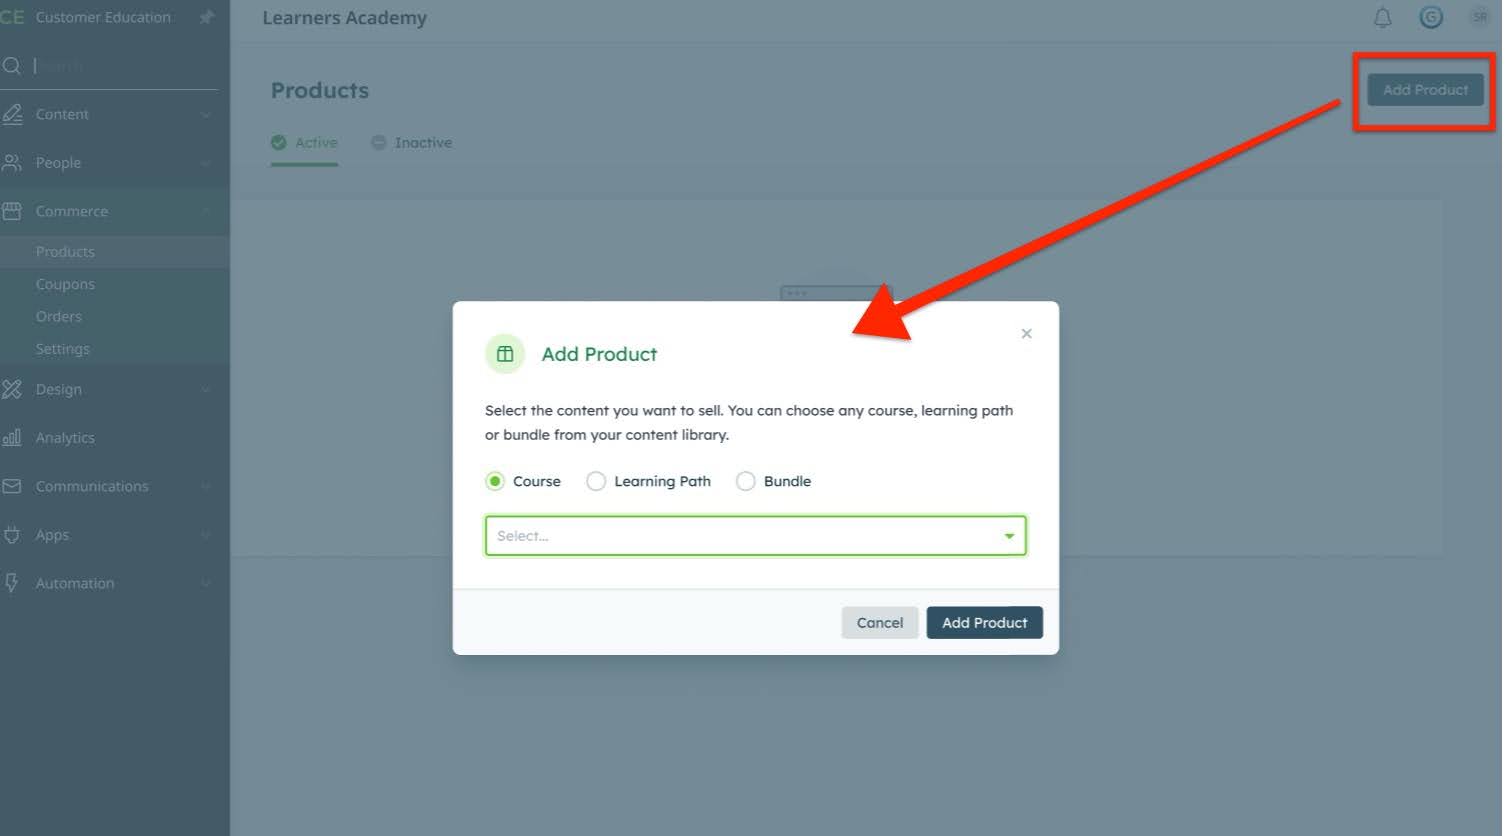
- From the main menu, navigate to Commerce > Products.
- Click Add Product. The Add Product window appears.

- Select the Course checkbox.
- From the dropdown menu, select an existing course that you wish to add as a product.

- Click Add Product.
- Set the pricing and availability options. The specific course/product should be in active status for purchase.

- Click Save Changes at the top right to create the product. A success message appears.

-
Once the product is saved, it will appear on the Catalog page, where learners can easily discover it.
Note: Admins can use the same process to add and manage learning paths as they do for products and individual courses.
Manage Existing Products
- View the list of existing products.
- Click on a product to edit its details, update pricing, or manage availability.
Note: Only inactive products are editable. - Delete products that are no longer needed by clicking Delete.
Note: Only inactive products are eligible for deletion.
Inactivate a Product
Inactivating a product or course in Gainsight's Customer Education platform allows administrators to hide offerings that are no longer available without permanently deleting them.
- From the main menu on the left-hand side, expand the Commerce section.
- Click on Products to access the product management page.
- On the Products page, you will see a list of all active products and courses.

- Identify the product you wish to inactivate from the list.
- To edit, click pencil icon.

- Click the toggle switch next to the product or course you want to inactivate.
- Once the toggle is switched to inactive, the product will no longer be available for purchase or access, but it will remain in your system for future use or reactivation.
- Click Save Changes.

-
After switching the product to inactive, you can view the updated status by switching to the "Inactive" tab at the top of the Products page. The inactivated product should now appear in this list.

Create and Manage Bundle
Bundle in Gainsight's Customer Education product allows administrators to add multiple groups, courses, or learning paths together for easier management and sales.

The following section provides detailed instructions on how to add products to a bundle in Gainsight's Customer Education platform. Follow these steps to effectively manage and organize your educational offerings.
-
Navigate to Commerce > Products.

-
Click Add Products at the top right. The Add Product window appears.

- Select the Bundle checkbox.
- Enter a unique name for the bundle.
- Click Add Product.
- After you click 'Add Product,' the newly created bundle will open by default. You can then adjust additional details, like the price, description, or access duration.
- Scroll down to the Add Content section.
- From the list of courses, learning paths and groups, click on the content that you want to add to the bundle.
Note: To monetize Instructor-Led Trainings, assign them to specific groups and include those groups in a bundle. For more information, refer to the Adding Admins, Managers, or Learners article. - Click Add to include the selected courses, groups, and learning paths in the bundle.

- Change the Product Status to Active using the toggle.
- Once changes are made, click Save Changes to apply them.

Delete a Product From a Bundle
To delete a product from a bundle:
- Follow the same steps as above to access the bundle from the Products section.
- Click the edit icon of an existing Bundle.
![]()
- In the Add Content section, locate the product or course you wish to remove from the bundle.
- Click the Delete icon (trash can icon) next to the product name to remove it from the bundle.

- Confirm the removal when prompted.
- After removing the product, click Save Changes to ensure that the bundle is updated without the deleted product.
- If you want to delete the entire bundle, scroll down to the Delete Product section.
- Click the delete icon to remove the bundle from your catalog permanently.
Note: This action cannot be undone. If the product status is active, you cannot delete the bundle.

Best Practices
- Review Before Saving: Always review your changes before saving to ensure that the bundle’s contents and settings are correct.
- Communicate Changes: If a product is deleted or significantly altered, inform learners who have already purchased the bundle to avoid confusion.
- Use Descriptive Names: When editing bundle contents, ensure that products and learning paths have clear, descriptive names to help learners easily identify the contents.