Fields and Derived Fields in Object
Gainsight NXT
This article explains the options available on the All fields in Object tab and how to configure derived fields in the Adoption Explorer objects.
Note: This article is the fourth item in a series of Adoption Explorer configuration articles. Gainsight recommends you to refer to the initial articles of the series and then start with this article.
Overview
Gainsight recommends configuring a source connection and adding the required fields to the Adoption Explorer objects, before configuring derived fields. For more information on how to configure objects, refer to the Configure Adoption Explorer Objects article from the Additional Resources section.
Fields in Object
Once a source connection is established, navigate to the All fields in Object tab to view the list of fields ingested. Adoption Explorer has the following four types of fields:
- Dimension: This field cannot be aggregated.
- Measure: This field can be measured, aggregated, or used for mathematical operations
- Derived Dimension: It is the custom dimension created in an object, using the ingested dimension field.
- Derived Measure: It is the custom measure created in an object, using the ingested measure field.
To access the fields of an object:
- Navigate to Adoption Explorer > Administration.
- Click the name of the required project
- Select the Object for which you wish to view the fields.
- Click the All fields in Object tab to view the list of fields.
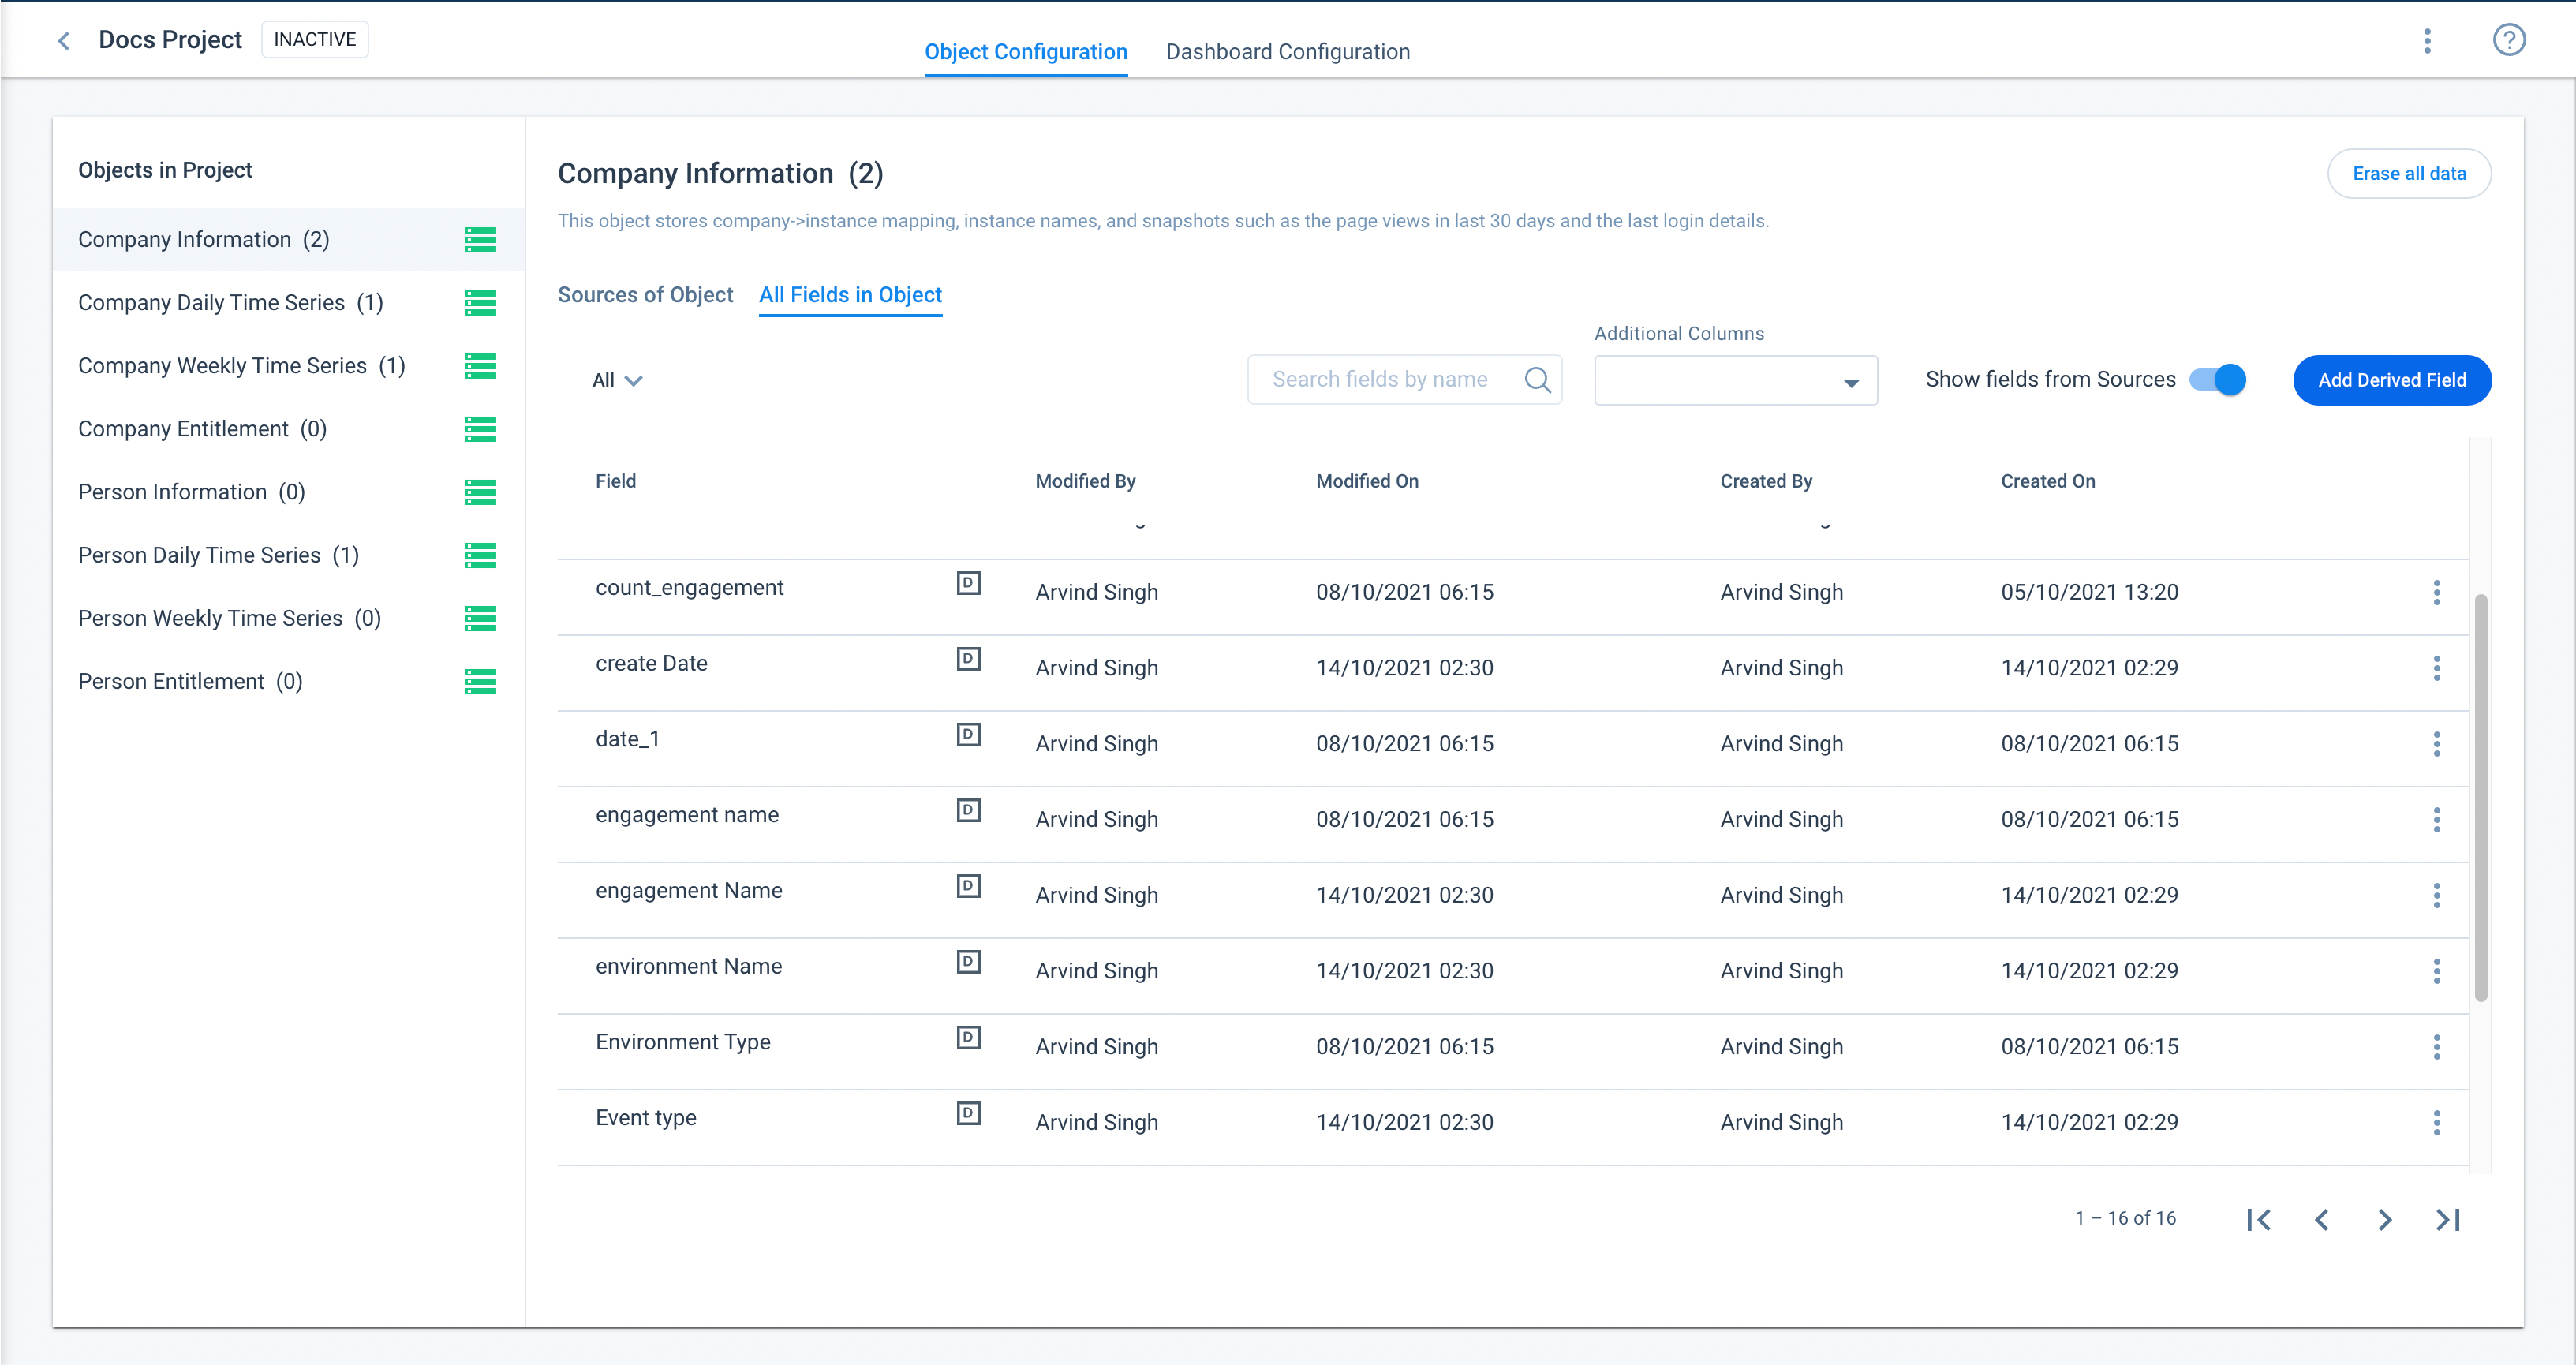
The following are the components of the All Fields in Object tab:
- List of fields: All fields listed under the object are displayed, along with their relevant information.
- Columns: Field (name), Modified By, Modified On, Created By, and Created On are the default information displayed for each field. You can use the Additional Columns dropdown to add columns. For more information on how to customize the columns, refer to the Field List section.
- Show fields from Sources: Switching ON the Show fields from Sources toggle button displays all the ingested fields along with the Derived fields. Switching it OFF displays only the derived fields.
- Derived Fields: Click Add Derived Field to create a new derived field, using the ingested measures and dimensions. For more information on how to create a derived field, refer to the Configure Derived Fields section.
Field List
The All Fields in Object tab lists all the fields that have been ingested for the selected object. By default, the list displays the following information for each field:
- Field: Name of the field.
- Modified By: Name of the Admin who created that particular field.
- Modified On: Date and time stamp of when the field was last modified.
- Created By: Name of the Admin who created that particular field.
- Created On: Date and time on which the field was created.
While the default view displays the above information, you can use the Additional Columns dropdown to add the following columns to the list view:
- Source Name: Source name of the field.
- Source Data Type: Type of the data source, such as All, String, Number, Boolean, Date and Datetime.
- Source Display Name: Display name of the fields ingested from Source.
- Source Type: Source types with the available sources such as S3, MDA, SFDC and GA. For derived fields, the source type would be the object from which it has been derived for ex- Usage Info/Time Series.
Note: Additional Columns are not state preserved; once you navigate to another tab, you will lose the column selection.
For each field listed, click the three-vertical dots menu icon for the following options:
- Select the Edit option to edit a derived field. For more information about Derived Fields, refer to the Configure Derived Fields section.
Note: You cannot edit the fields ingested from source data.
- Select the Delete option to delete a field.
- Select the Clone option to clone an existing derived field and change the function list, based on your business requirements.
Create Lookup for Fields
Once a lookup is set, you can use the Lookup fields from Gainsight standard/low volume custom/system objects, in the Filter conditions and Usage Reports.
Limitations
- Maximum of five lookup fields can be selected in a usage report.
- Only one level of lookup is allowed.
Example Business Use Case: Admin wants to create a report on an Adoption Explorer project that includes the Feature Name and Feature ID fields. But, the Feature ID field is available in the Adoption Explorer project and the Feature Name field is available in Gainsight’s custom object.
To achieve this business use case, Lookup in the Adoption Explorer project helps create a link from the Adoption Explorer project to Gainsight’s custom/standard object. With this configuration, while building reports on this project, you can now see the Feature Name field in the custom lookup object.
This creates a lookup between the Adoption Explorer project and selected Gainsight object. While building reports on this Adoption Explorer project, you can see the fields in the custom lookup object as well.
To create a lookup:
- Click the three-vertical dots menu icon of the required field and select Lookup. The Create Lookup popup is displayed.
- From the Choose Object Type dropdown, select the required object type.
- From the Choose Object dropdown, select the required object.
- From the Choose Field dropdown, select the required field.
- Click Save.
Configure Derived Fields
Derived Fields are custom measures and dimensions created in an object, using the ingested measures and dimensions. For example, if you have a Page Views field, you can derive the Sum of Page Views by applying Aggregate > Sum function.
Once the Adoption Explorer objects are configured and saved, you can create derived fields from the All Fields in Object tab. You can add/edit/delete a field in both Active and Inactive status of a project.
To configure derived fields:
- Navigate to Adoption Explorer > Administration.
- Click the project name.
- Select the object from the Objects in Project section and switch to the All fields in Object tab.
- Click Add Derived Field.
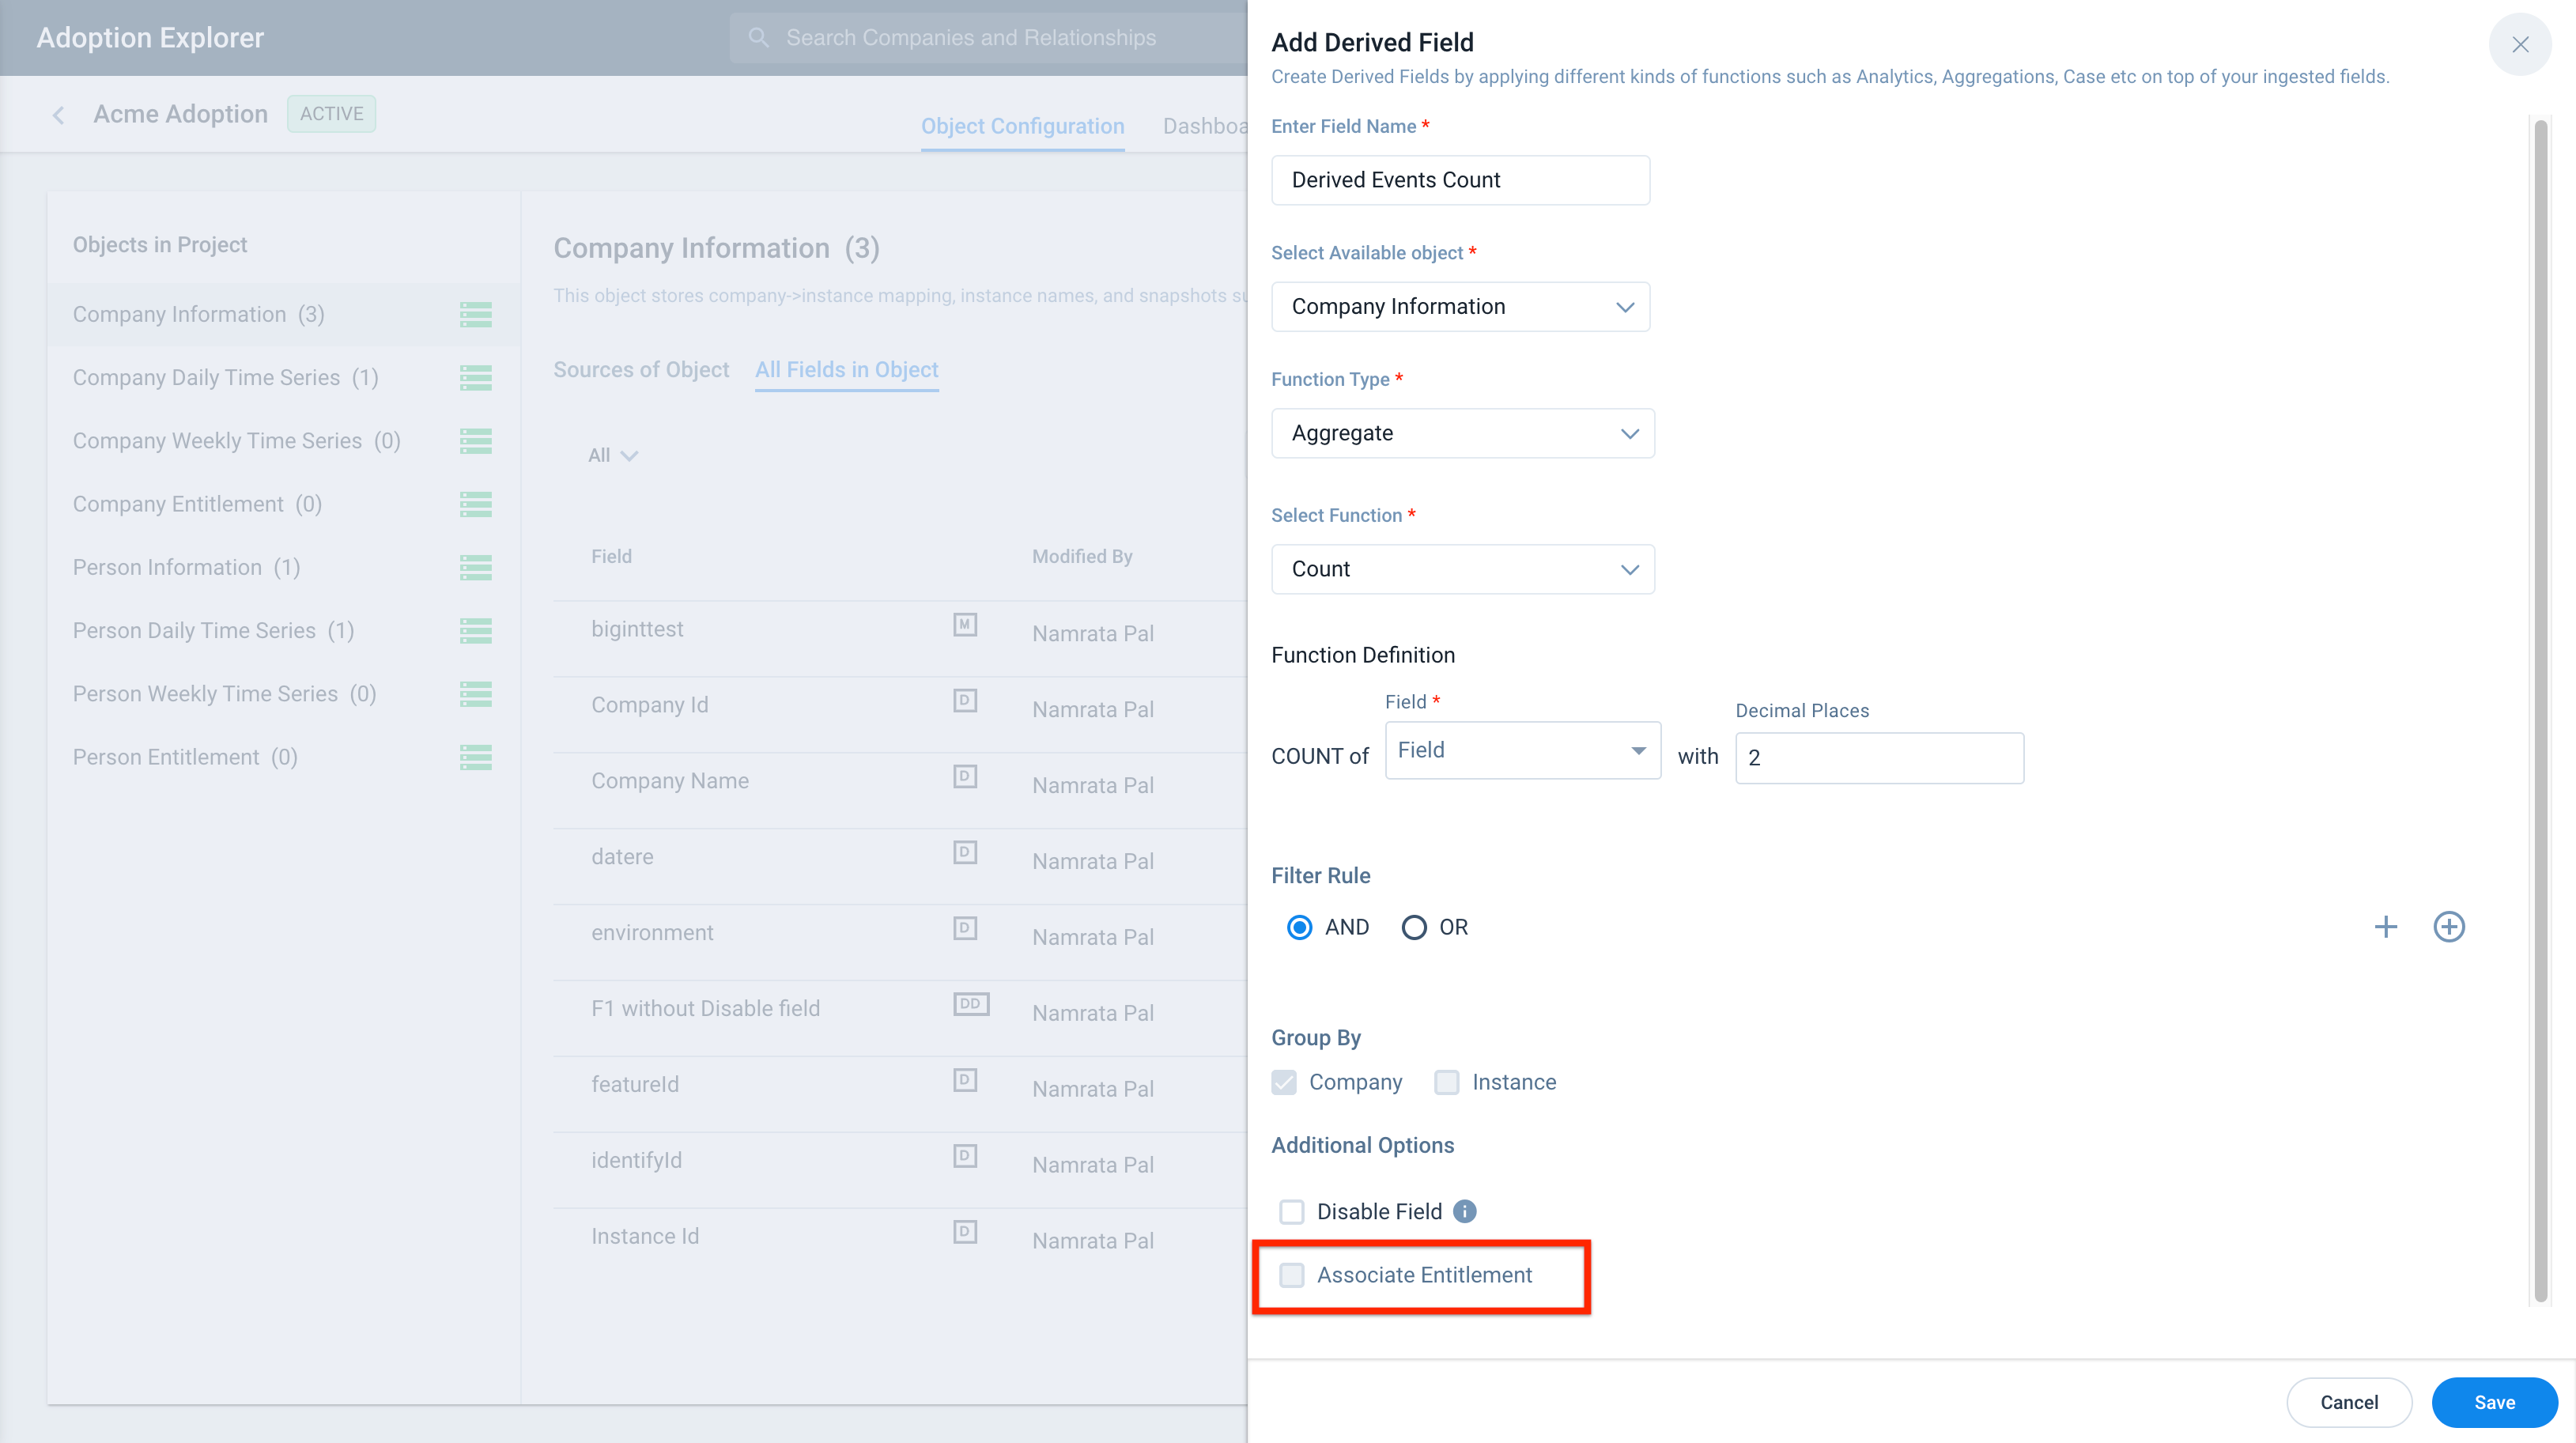
- Enter the field name.
- From the Select Available Object field, select the source object.
- From the Function Type dropdown, select the one of the following function types:
- Segment a customer - Segment (ARR), Segment (TotalPageViews)
- Last time a user logged into your product - Max (LoginDate) by User
- Number of days a User has been active in X days - COUNT(Distinct Date) in the Last X days by User
- Number of Pages viewed by user - Sum of PageViews by user in Last X days
- When a customer is using a feature not purchased - Sum of PageViews by PageTitle or feature by Date
- Alert when customers usage of a feature increases dramatically - WindowsGrowth (PageViews) week over week.
- Cumulative of Page views in the current month - Cumulative Sum of PageViews in the Current Month
Note: Function type is an important part of creating a derived field. It is recommended to go-through the help text of the functions, if you are not aware of what a function does.For information about Functions in Adoption Explorer, refer to the Adoption Explorer Functions article from the Additional Resources section.
- Select the Function. The list of functions is grouped based on the function type. Selecting a function displays the associated functions.
- In the Function Definition section, enter the following information:
- In the Field dropdown, select the field you want to apply the function to.
Note: This dropdown contains all the fields that are eligible for that particular function. For example, if you select the function type as Aggregate, you will only see the Number data type fields.
- In the Decimal Places field, enter the number of decimal places (digits) you want to assign after the decimal point.
Note: Decimal points are available only if the resultant data type is number. You need to specify up to what decimal point you want your data to be extracted and saved
- In the Field dropdown, select the field you want to apply the function to.
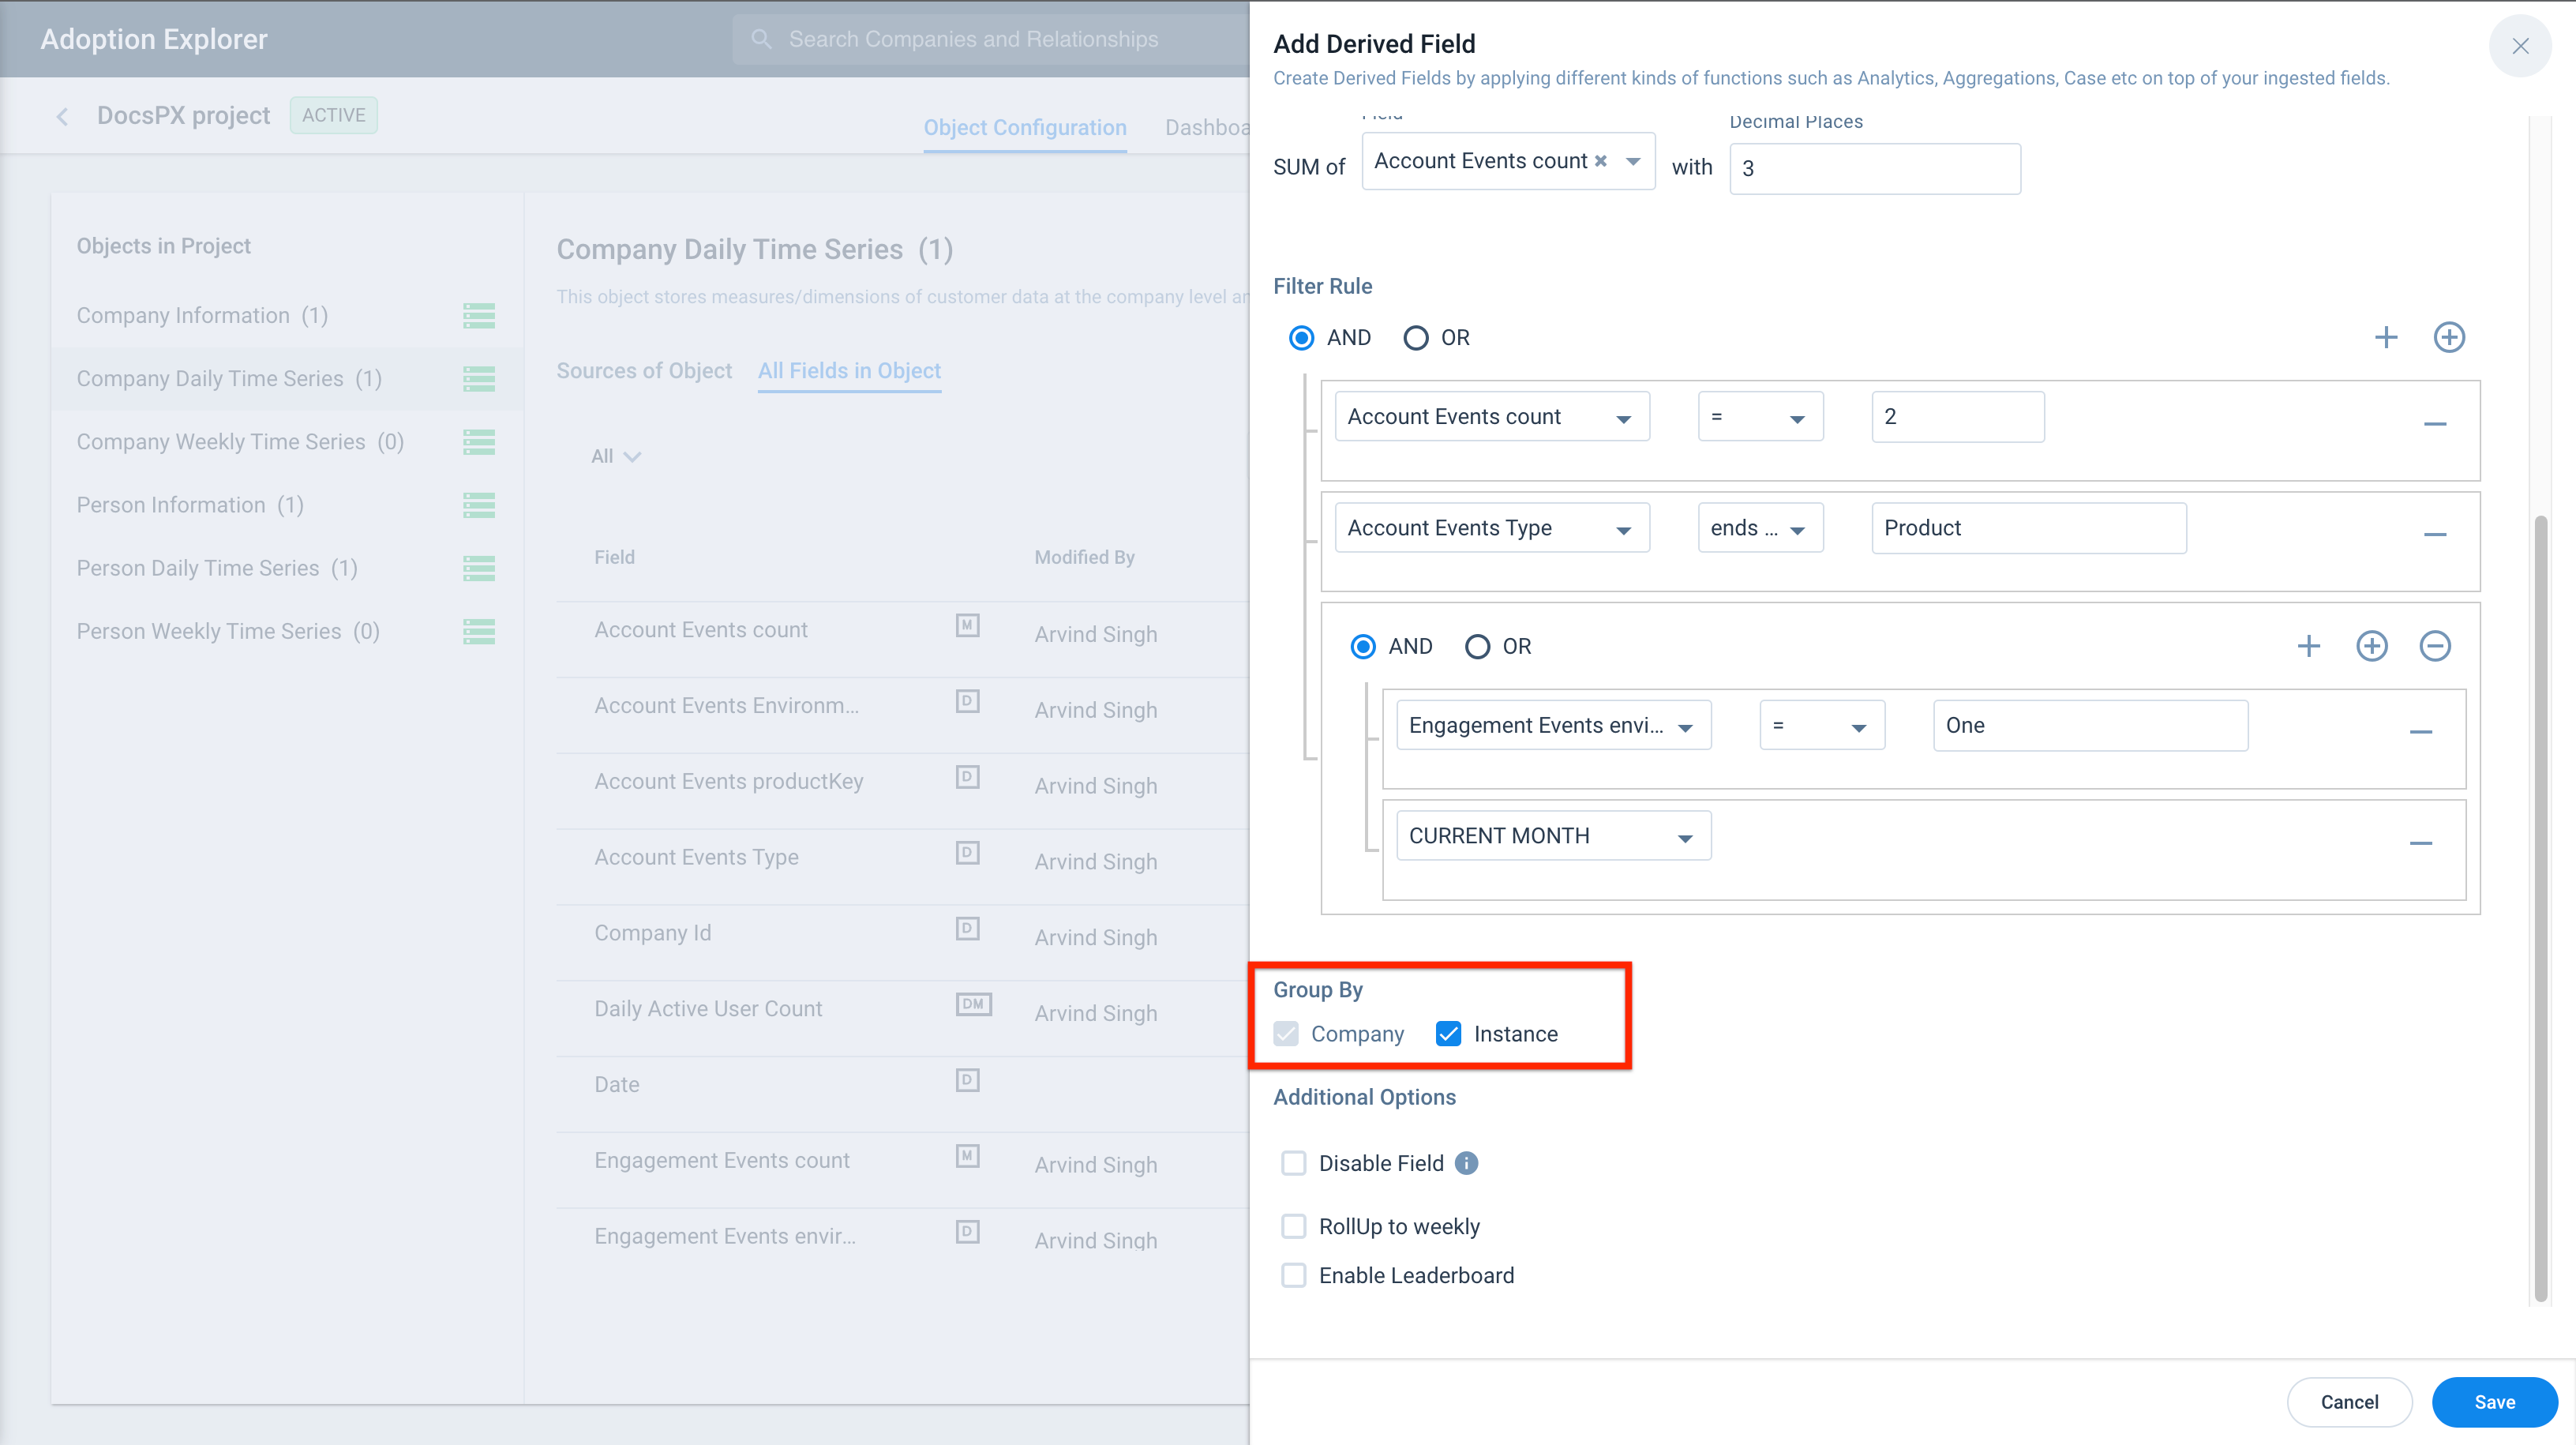
Filter Rule
In the Filter Rule section, you can apply logic for filtering the records, based on your business needs.
To apply filters:
- Select the required Filter Rule, either AND (or) OR.
- Click + to add a filter. You can add multiple filters in a single filter rule, by clicking +.
- Select the required field from the dropdown list on which you want to apply the criteria.
- Select the required operator from the dropdown list that meets your criteria/(business needs).
- Enter the required value of the field that meets your criteria (business needs).
You can also add multiple Sub filter rules/Nested filter conditions under the filter rule. The data filtering after applying the sub filter rule starts from the lowest level filter.
To add a sub filter rule within a filter rule:
- Click the Rounded-Plus button.
- Select the sub filter rule, either AND (or) OR.
- Select the required field from the dropdown list, on which you want to apply the criteria.
- Select the required operator from the dropdown list, which meets your criteria /(business needs).
- Enter the required value of the field that meets your criteria (business needs).
Use Case: For example, in the above expression, the filters applied on the Page Views field are:
OR Filters:
- Filter Condition 1: “time on page = 180 sec”
- Filter Condition 2: “LAST N DAYS (includes current run date) = 30”
AND Filters:
- Filter Condition 1: “page title = ”Account Widget - RelatedList - Cases”
- Filter Condition 2: “exit rate > 40”
This means, the data filtering first happens using the AND filters (starts from lowest level filter), and if both the AND filter conditions are satisfied, then the OR filter conditions are applied on the resultant data.
Note: You can set filter rules on Date Functions while creating derived fields. Date Functions help you aggregate the measures from a specific time period, like Current Month, Current Quarter, Current Year, etc. You can apply Date Functions on Time Series Objects only.
Group By
The Group By section allows you to group records by Company, Person, or Instance.
Notes:
- For Company Information and Time Series objects, the Company checkbox will be selected by default
- For Person Information and Time Series objects, the Company and Person checkboxes will be selected by default
Additional Options
You can configure the following options for a derived field:
- Select the Disable Field checkbox, if you want to stop further calculation on the selected field.
- Select the RollUp to weekly checkbox, to aggregate the data on this field, on a weekly basis. If checked, select the function type of your choice from the Aggregation Function dropdown. Selecting the RollUp to weekly checkbox from the Daily Time Series object creates a derived field in the Weekly Time Series object.
- Select the Enable Leaderboard checkbox to create a derived field in the Weekly Time Series object. This enables you to create a leaderboard usage report from the Dashboard Configuration page.
Notes:
- The Enable Leaderboard option is available only in the Time Series objects.
- Leaderboard can be enabled only on Measures/Derived Measures.
-
Select the Associate Entitlement checkbox to create a derived field in the same object. This enables you to create a usage report from the Dashboard Configuration page.
Note: Leaderboard fields are always calculated on a weekly basis, whereas Entitlement depends on the source field configuration, either Daily/Weekly.
- Click Save to add the derived field.
Once a derived field is created, you can navigate to the Dashboard Configuration page and create a usage report using the derived field (measure or dimension). For information on how to create a usage report, refer to the Dashboard article from the Additional Resources section.