Create Engagements for Mobile App
This article explains how to create engagements for your mobile app. Gainsight recommends that you refer to the Anatomy of Engagements article and then proceed with this enhancement.
Overview
Gainsight PX allows you to create engagements in all mobile SDKs. You can create and launch engagements for your mobile application. Currently, you can only create Dialog, Slider, NPS®, CES, and Rating survey engagements for Mobile applications.
Create Mobile Engagements
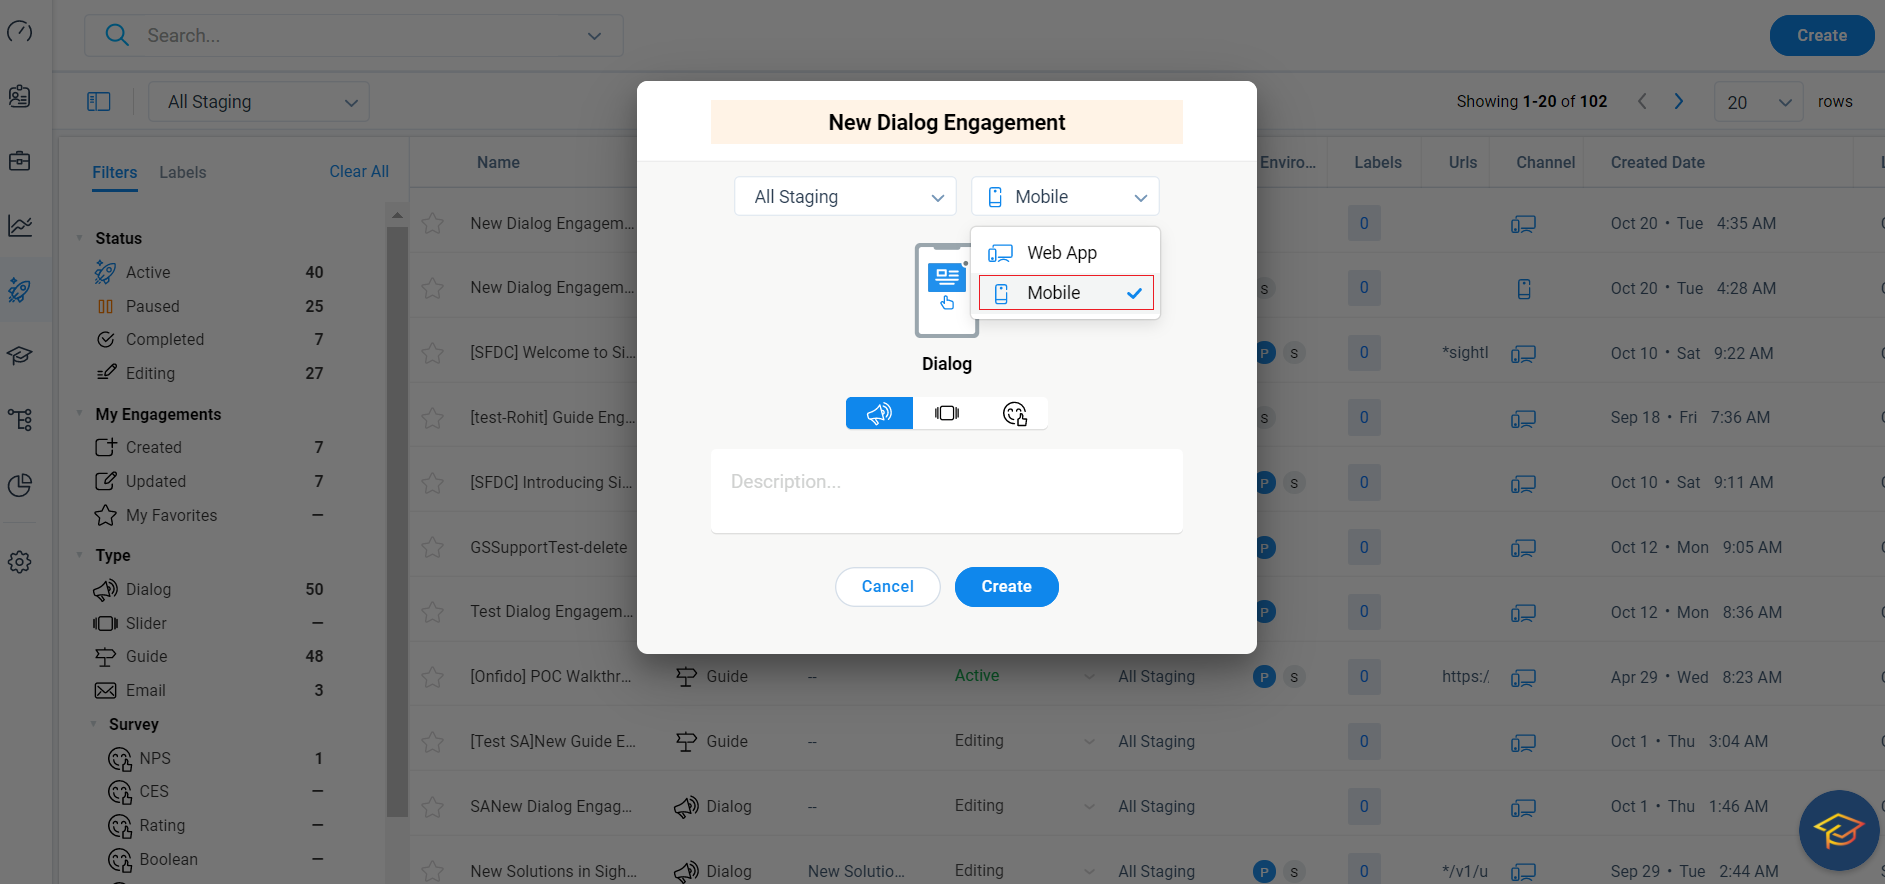
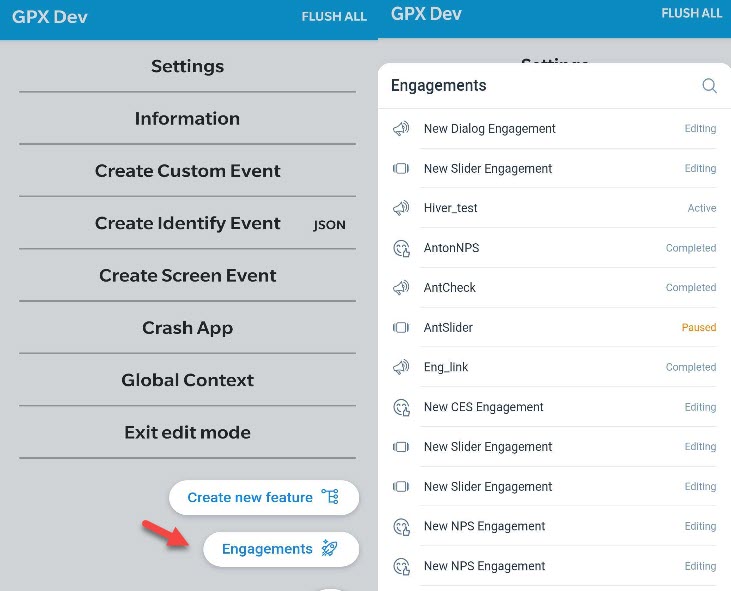
When you click the Create button in the Engagement list view, you can now select the channel from the newly introduced drop-down. This drop-down menu has two options; Web App and Mobile. Once you select the Mobile option, you can see the list of available engagements.
Configure Mobile Engagements
Mobile Engagements are configured nearly the same as Web App engagements, but mobile engagements have an additional section known as Activation. This section allows you to choose the trigger method for the engagement.
Audience
The audience section helps you configure the set of users who qualify to view the engagement. You can create rules to match your requirements.
For example, the below rule ensures that the engagement is displayed only to the user with the specified email ID, and who resides in the United States as the AND logic is selected. You can use the AND or OR logic within a rule, to configure multiple parameters. Click + Add to add multiple parameters.
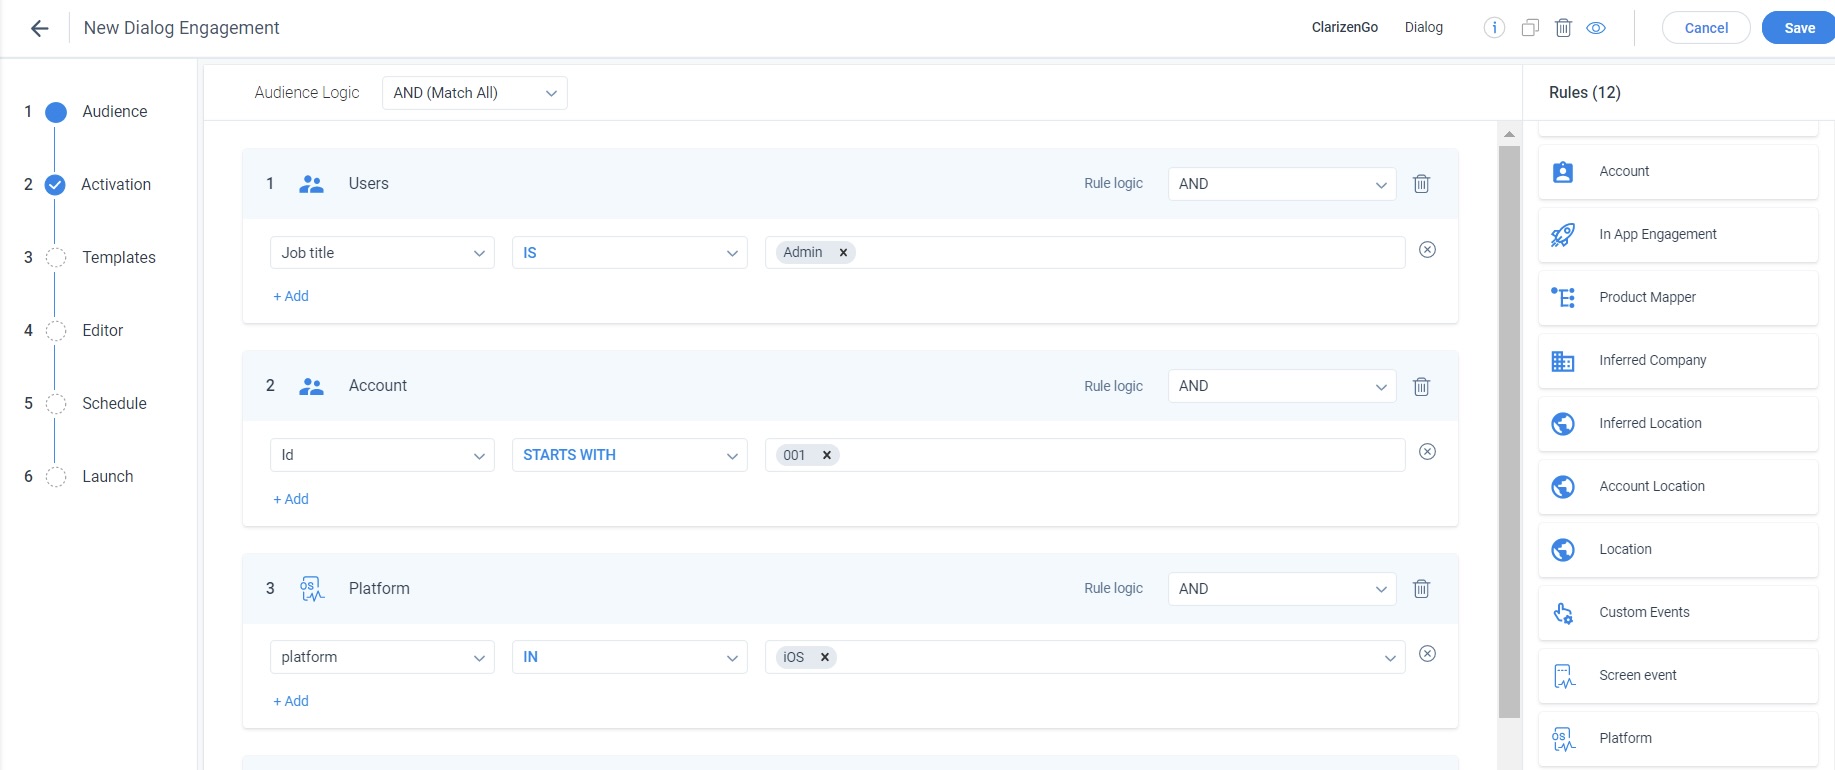
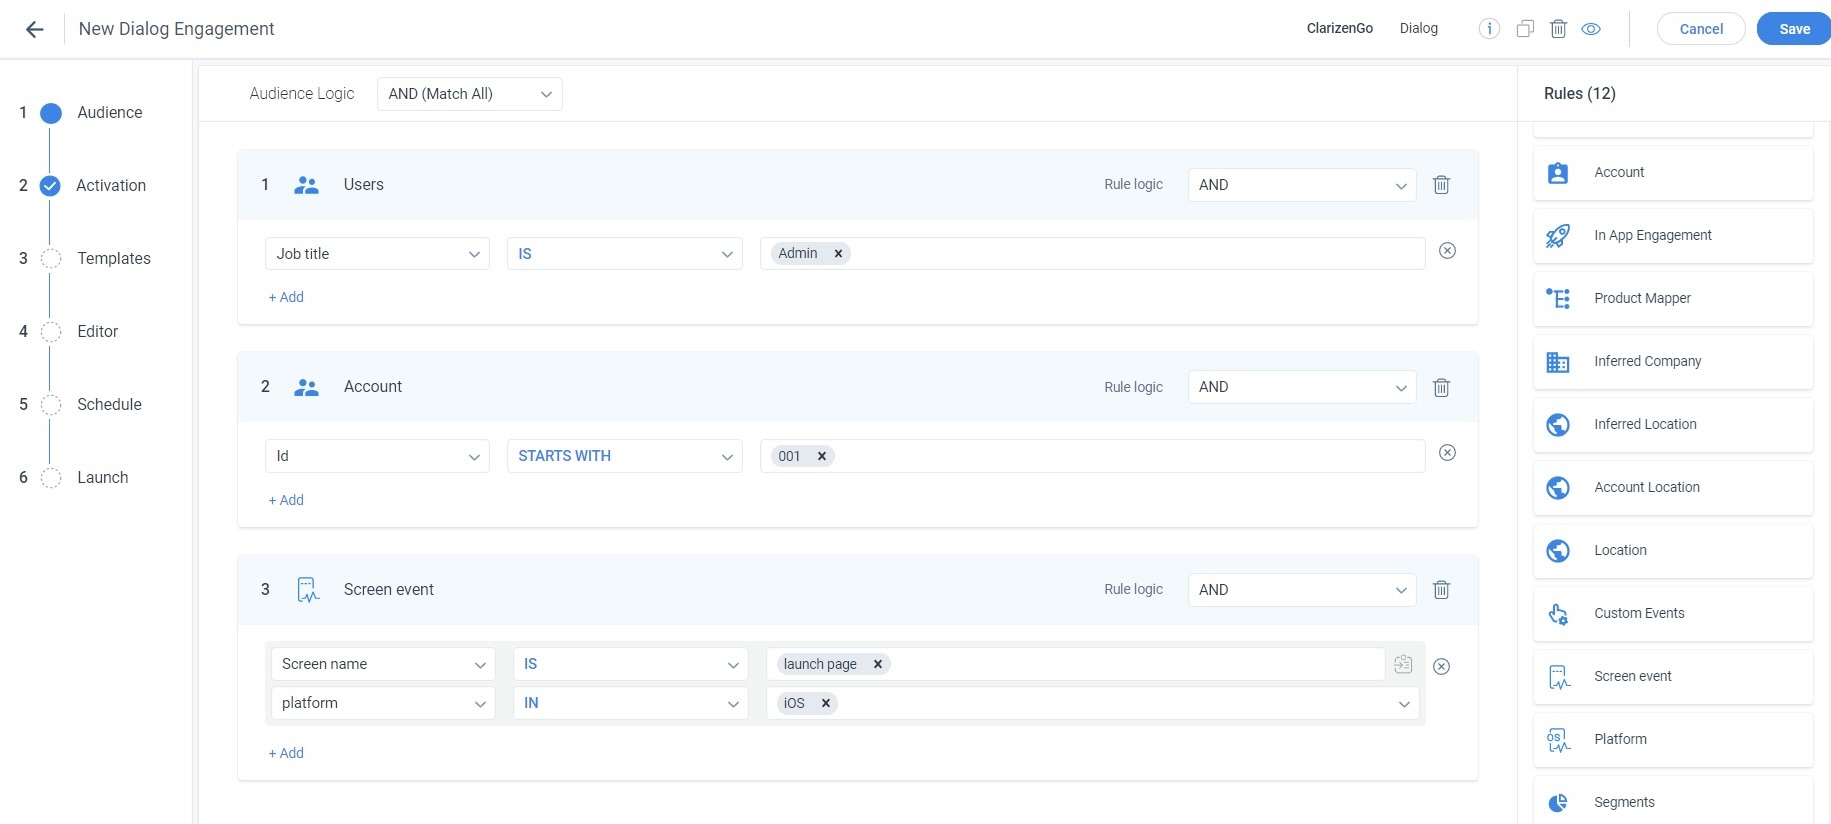
The Audience section has two new rules for Mobile engagements; Screen event and Platform. The screen event rule allows you to select a Screen name in your app or a Screen class of your app. The engagement is launched on the selected screen or class. Apart from selecting the screen name or class, you must also select the platform of your app (eg. iOS, Android) on which you wish to launch the engagement. The screen name/screen class and platform together form a single Screen rule.
In the following image, the engagement is launched on the Launch page screen of the app. Also, the engagement is launched only for the iOS version.
IMPORTANT: If you are using multiple screen event rules, ensure that you set the Rule logic to OR for the Screen event rule block. The overall Audience Logic can be OR or AND.
The Platform rule allows you to select your app’s platform (iOS or Android) on which you wish to launch the engagement. If you do not want to launch your engagement on any specific screen or class of your app, you can use this rule to select only the platform. The engagement can be viewed on all the screens/classes of the selected platform.
Tip: If you wish to launch the engagement on all the screens and on all the platforms, do not use the above two rules.
Apart from these two new rules, you can use Users, Account, In-app engagement, Product Mapper, Inferred Company, Inferred Location, Account Location, Location, Custom Events, and Segments rules in a Mobile engagement. The behavior of these rules is the same as with a Web App engagement.
IMPORTANT
- While using an In-app engagement rule in a Mobile engagement, you can select a Web App engagement as well.
- While using the Segment rule in mobile engagement, you can only select those Segments that were created for Mobile.
Activation
This is a new section exclusively for mobile engagements. This section allows you to set events that trigger your mobile engagement. While Audience rules allow you to determine where exactly on your application the engagement must be displayed, the Activation rules help you configure the events. Once the configured event is triggered, the engagement is displayed on the selected screen/class.
There are three events in this section. OR operation is applied between the events you add in this section.
Custom Events
Custom Events are a set of events that are configured to exclusively track those activities which are not readily available on the UI. An example of a custom event can be when a user tries to perform an editing activity on a specific screen of your app.
To track such custom events, a javascript call must be made from your mobile application for each event and then configured in PX. You can use one of the custom events as a trigger method for your engagement. When you select the Custom event rule, all the custom events configured in your PX subscription are displayed. You can select the required event.
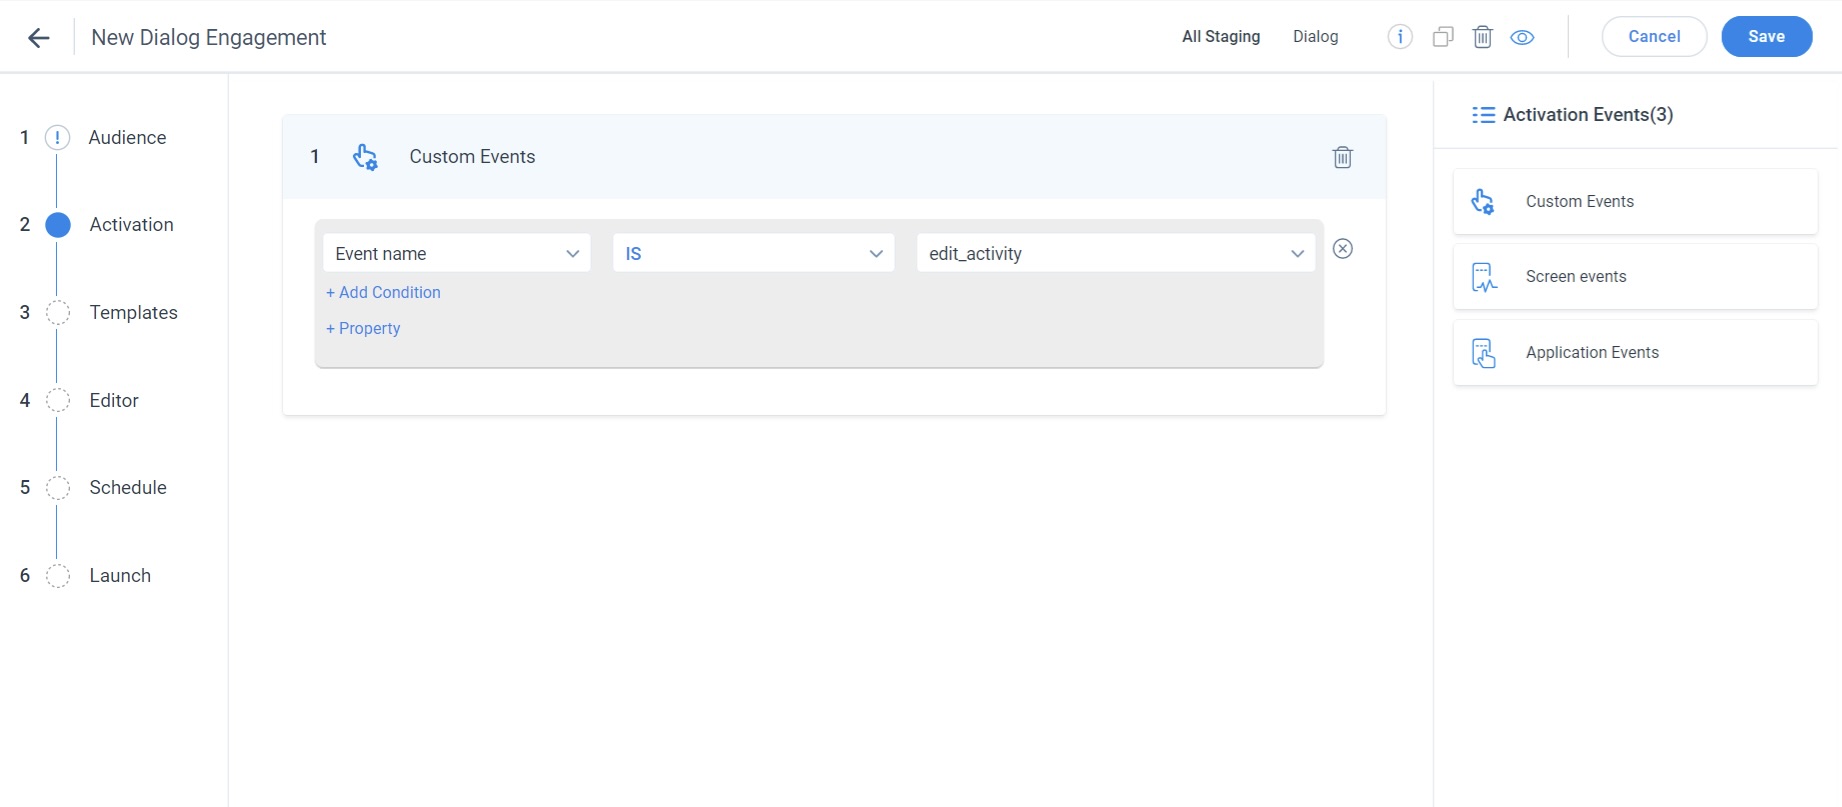
Apart from selecting a custom event, PX also allows you to set conditions for your custom events. For instance, in the above example, if edit activity is configured as a custom event, then a condition for that can be the screen on which these were performed.
You can set an Activation rule to trigger an engagement when a user performs an edit activity on a specific screen of your application.
In the following image, the engagement is triggered when the edit activity event is executed on the reports screen of the Android app.
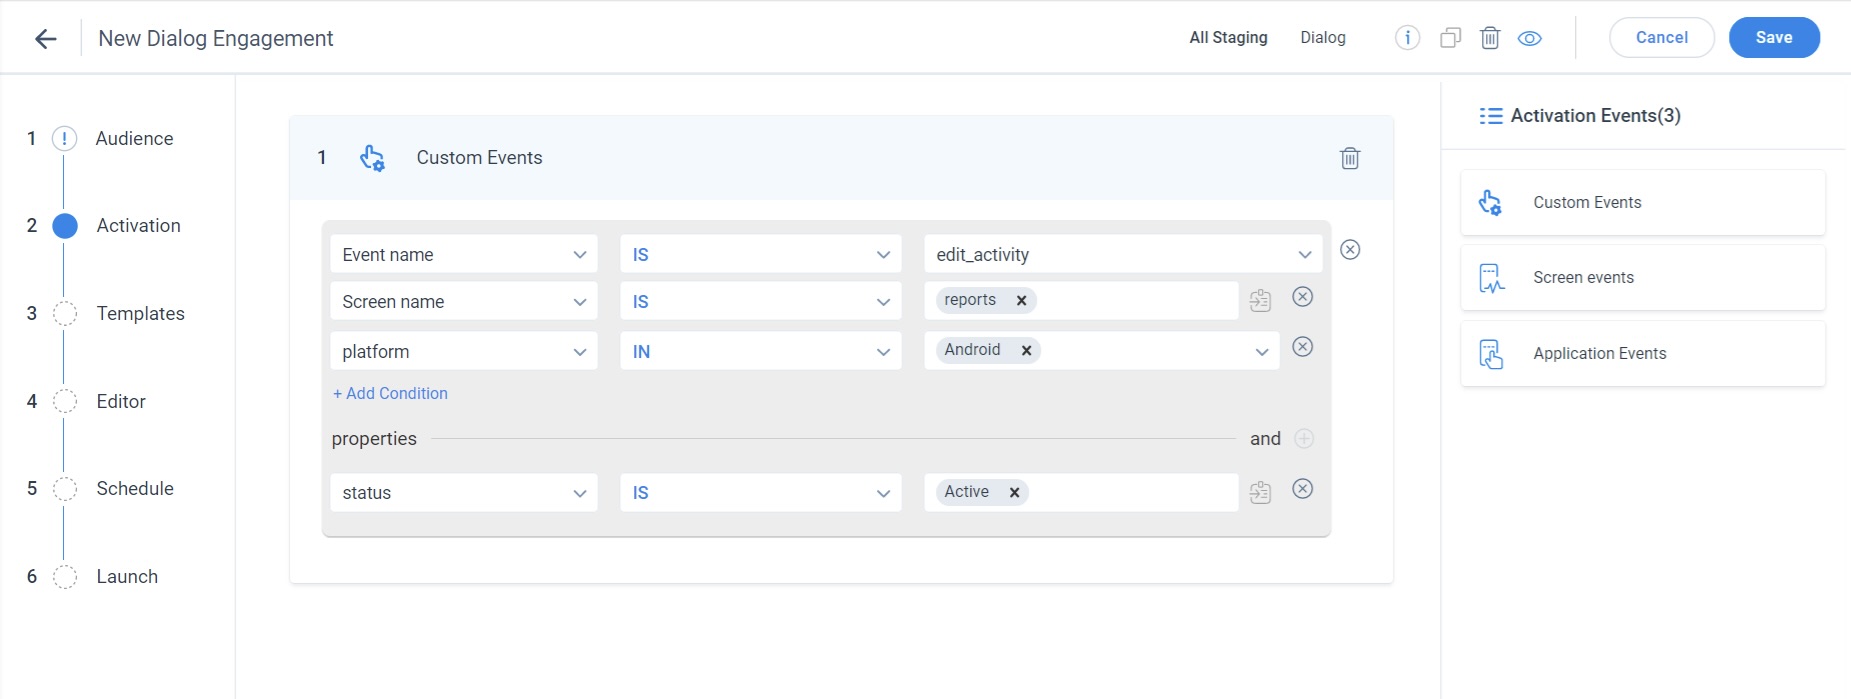
The AND operation is applied between custom events and their conditions. You cannot change this operation. You cannot use two conditions of the same type. For example, you cannot use two screen name rule conditions or platform conditions within a single Custom event rule. This is because the AND operation is applied by default.
Some events also have properties configured with them. You can change the logical operation between events and their properties.
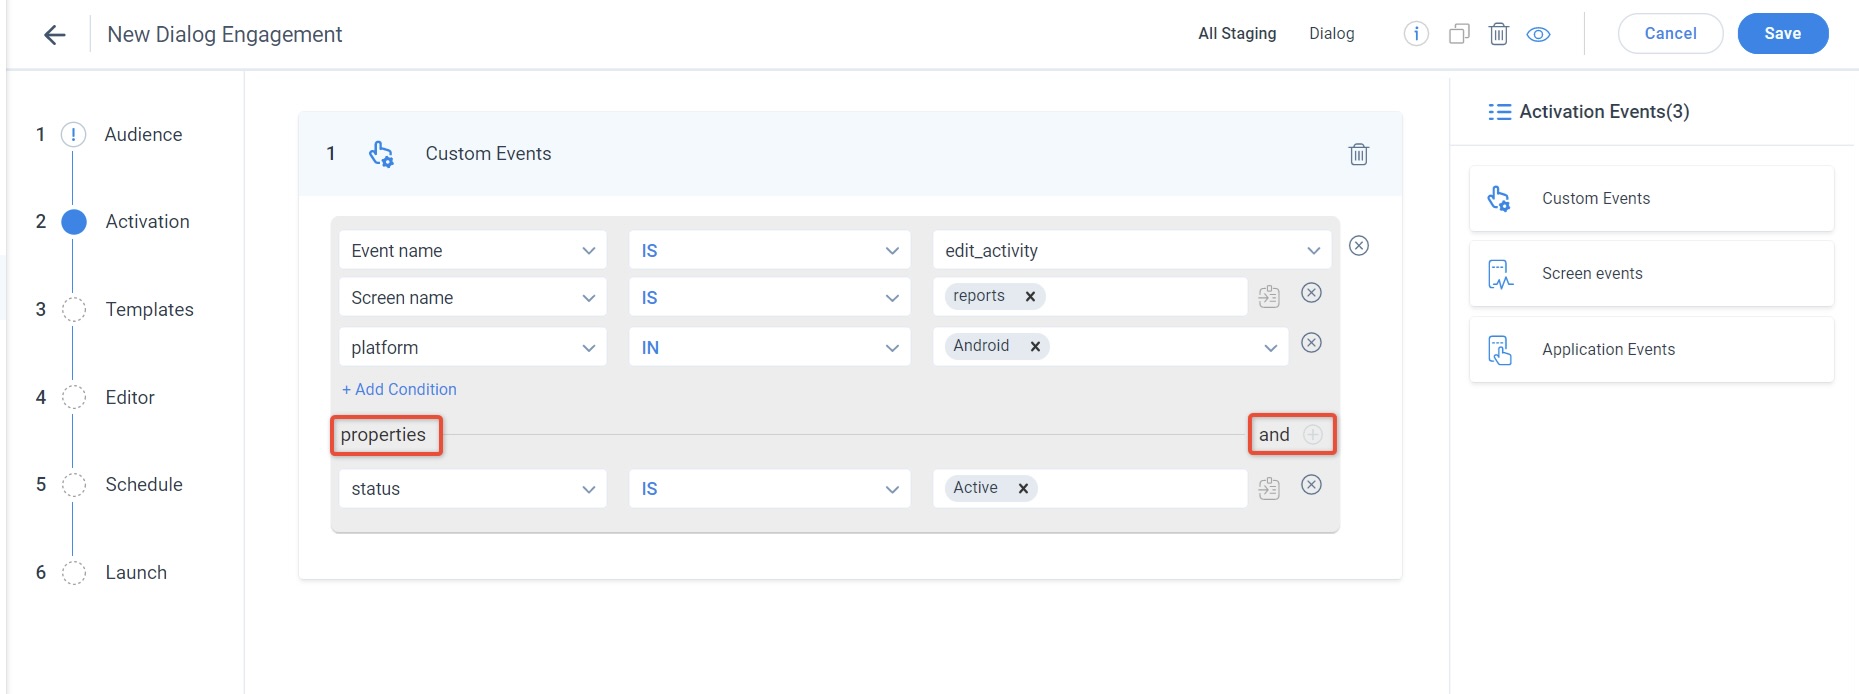
Note: Event properties and conditions are optional and only provide you with more granular levels of activation. You can trigger your engagement even without configuring them.
Screen Events
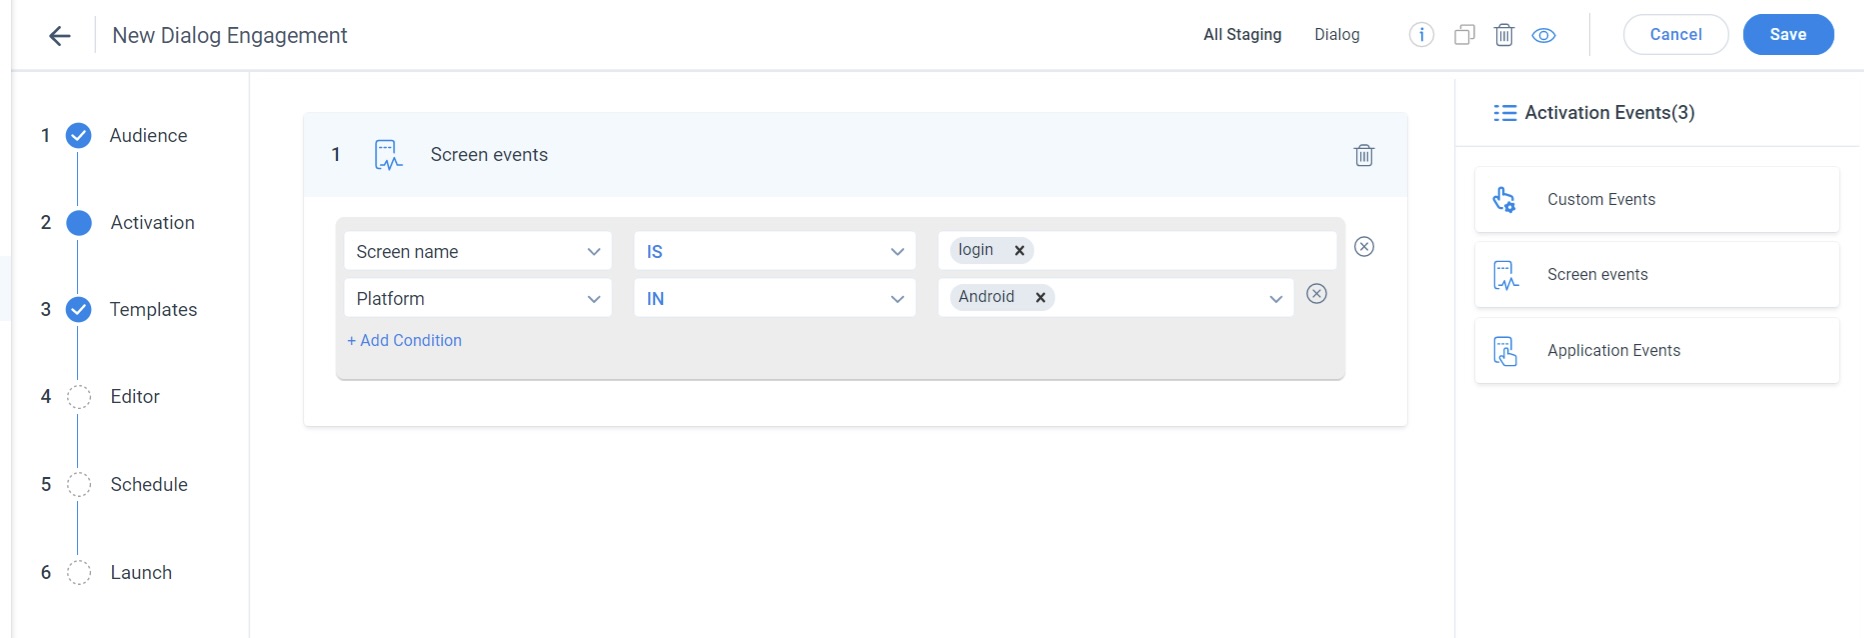
You can use Screen events rules in the Activation section as well, apart from the Audience section. Screen events consist of Screen name or Screen class. When you select a Screen name or a screen class as the Activation method, the engagement is launched when the selected screen or class is accessed.
When you select a Screen name or Screen class, you can also set conditions. The Platform option can be used as a condition. For example, you can trigger an engagement when a user accesses the login screen of the Android app, as shown in the following image.
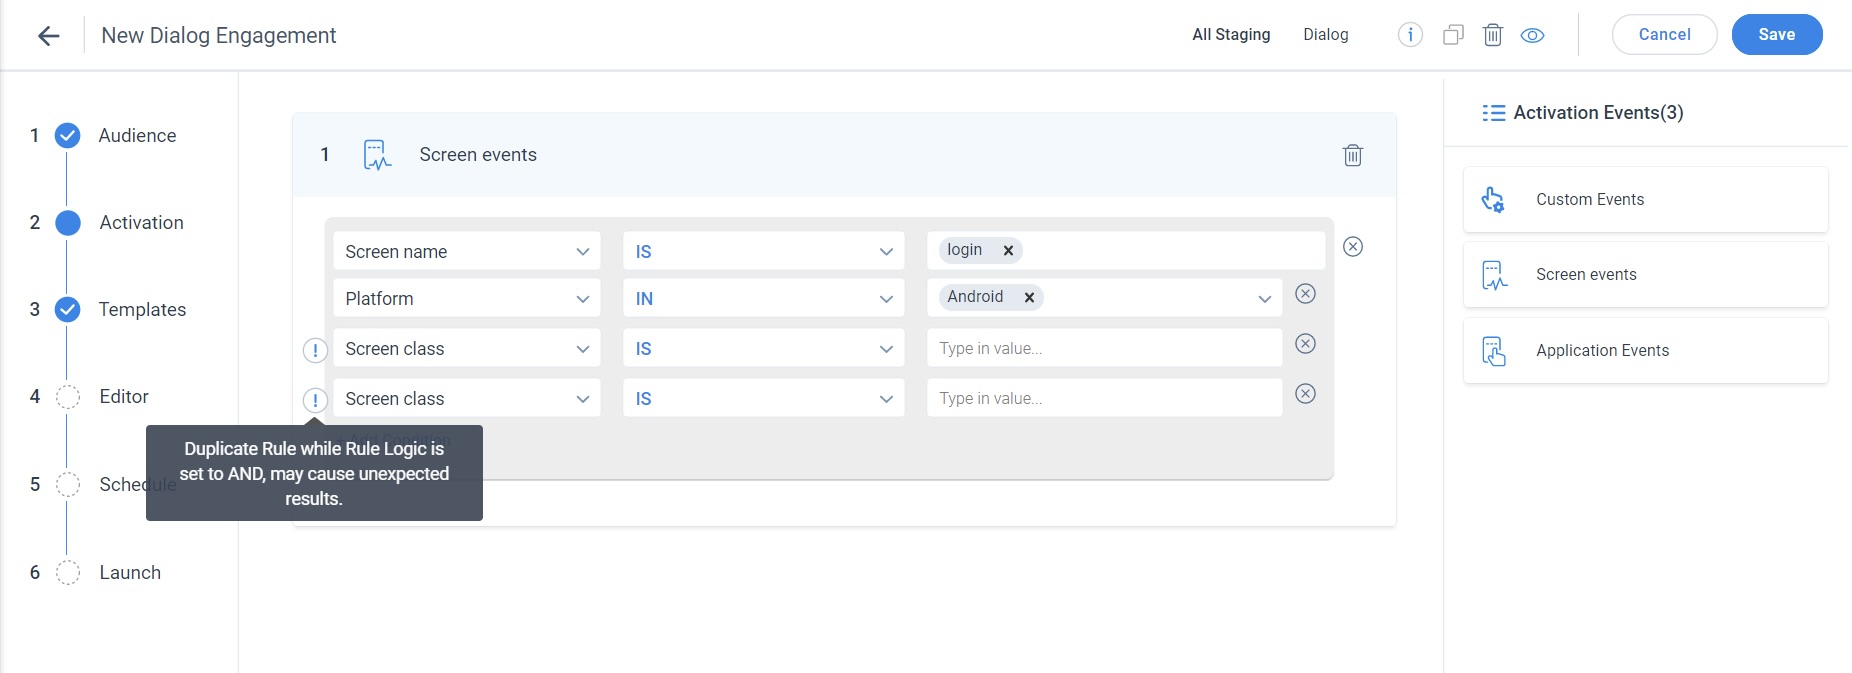
The AND operation is applied between Screen name/class and the Platform rules. You must not use multiple rules with the same rule type; you cannot configure two-screen name rules, screen class rules or two platform rules, within a single block of Screen event rule, since the AND operation is applied between them.
IMPORTANT: You can also use the same combination of Screen event rules in the Audience section and Activation section. However, this is not recommended as it leads to duplication of two conditions in an engagement.
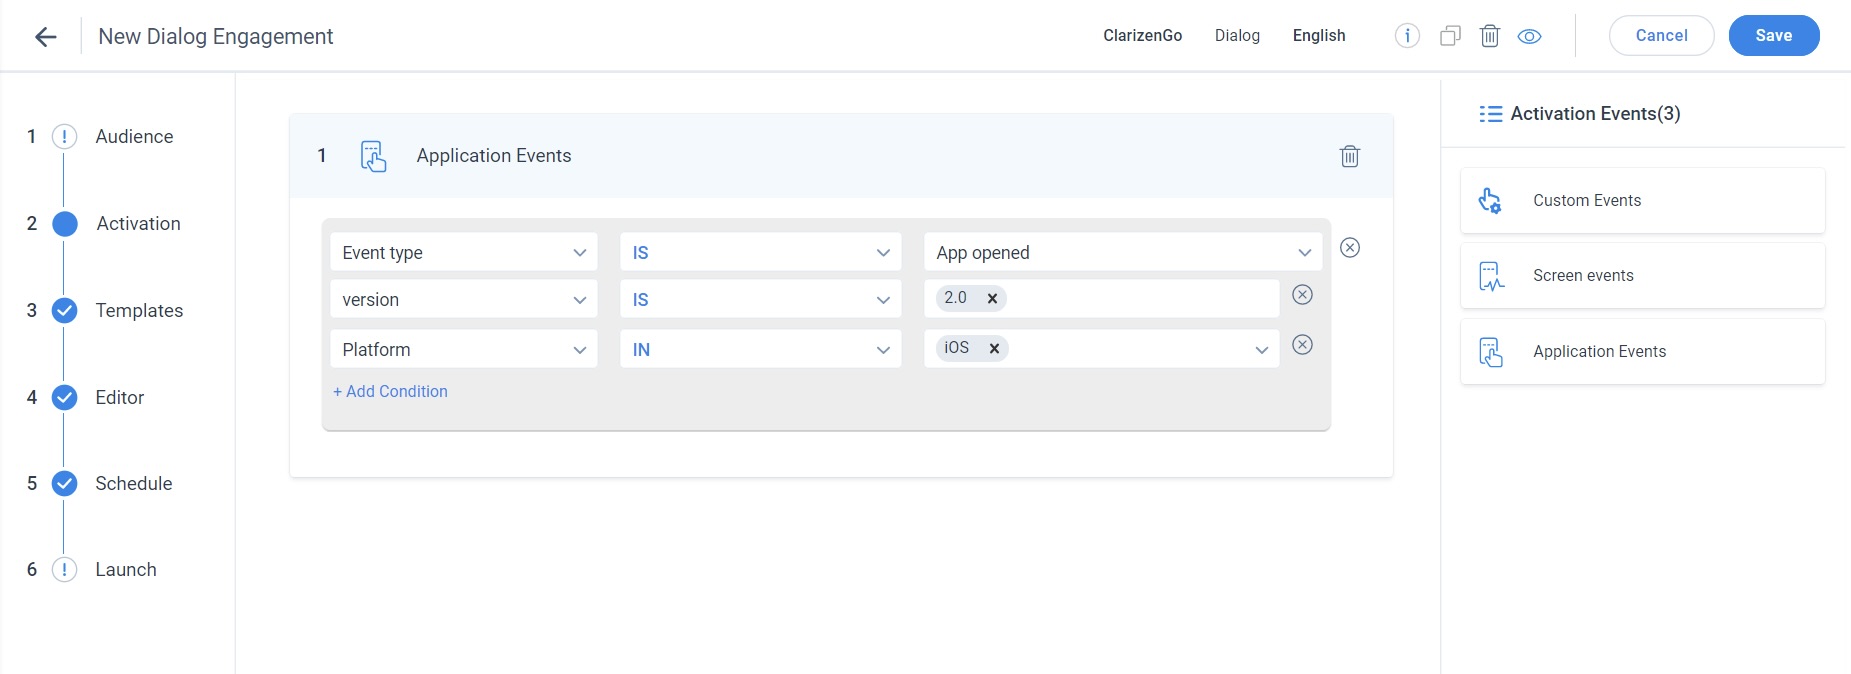
Application Events
An application event rule block consists of three rules; App opened, App installed, and App updated. You can select any of the rules as your trigger method. For example, if you select the trigger method to be updated, the engagement is launched when the user updates your app and opens it for the first time after updating.
You can also add conditions to the application event rules. A condition can either be a platform or the app version. For example, the following image displays a condition in which the engagement is triggered when the app is opened. The app version is 2.0 and the platform is iOS.
IMPORTANT: You can also use the same combination of Screen event rules in the Audience section and Activation section. However, this is not recommended as it leads to duplication of two conditions in an engagement.
The AND operation is applied between event type and its conditions. You should not use two events or two platform rules within the same rule block.
Apart from the above two sections, the other area of difference between a mobile engagement and Web App engagement is the Schedule section. The Schedule section of a mobile engagement only has two Qualification Scopes; Only once and Intervals.
Templates
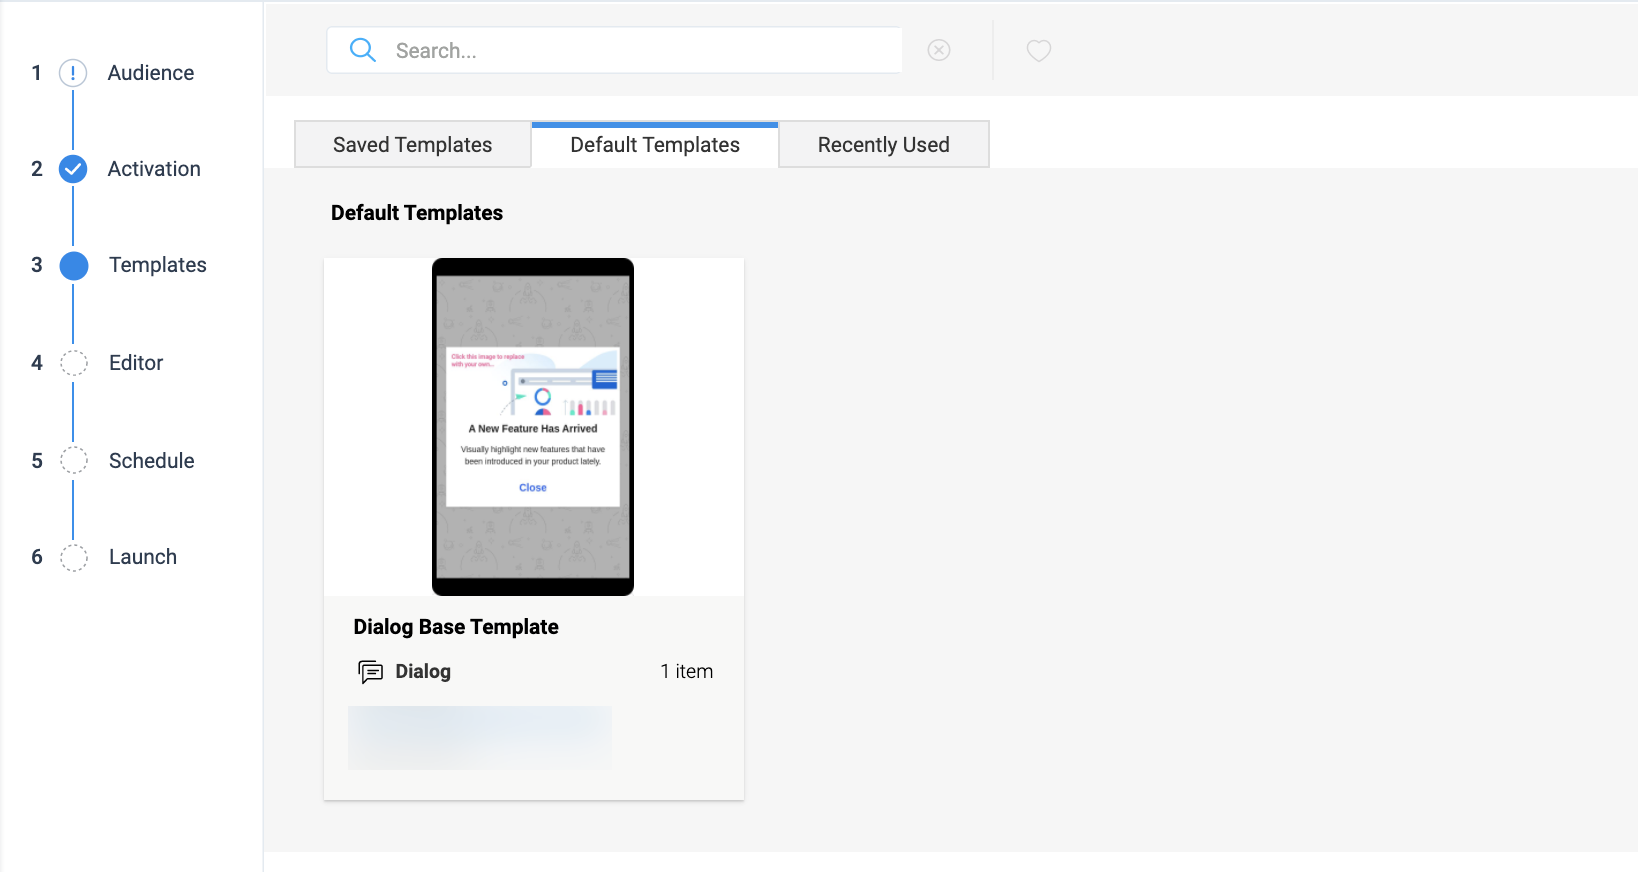
This section explains the process of selecting templates and creating content for your Mobile engagement:
- Navigate to the Templates section.
- Select a template from the Saved Templates/Default Templates/Recently Used options.
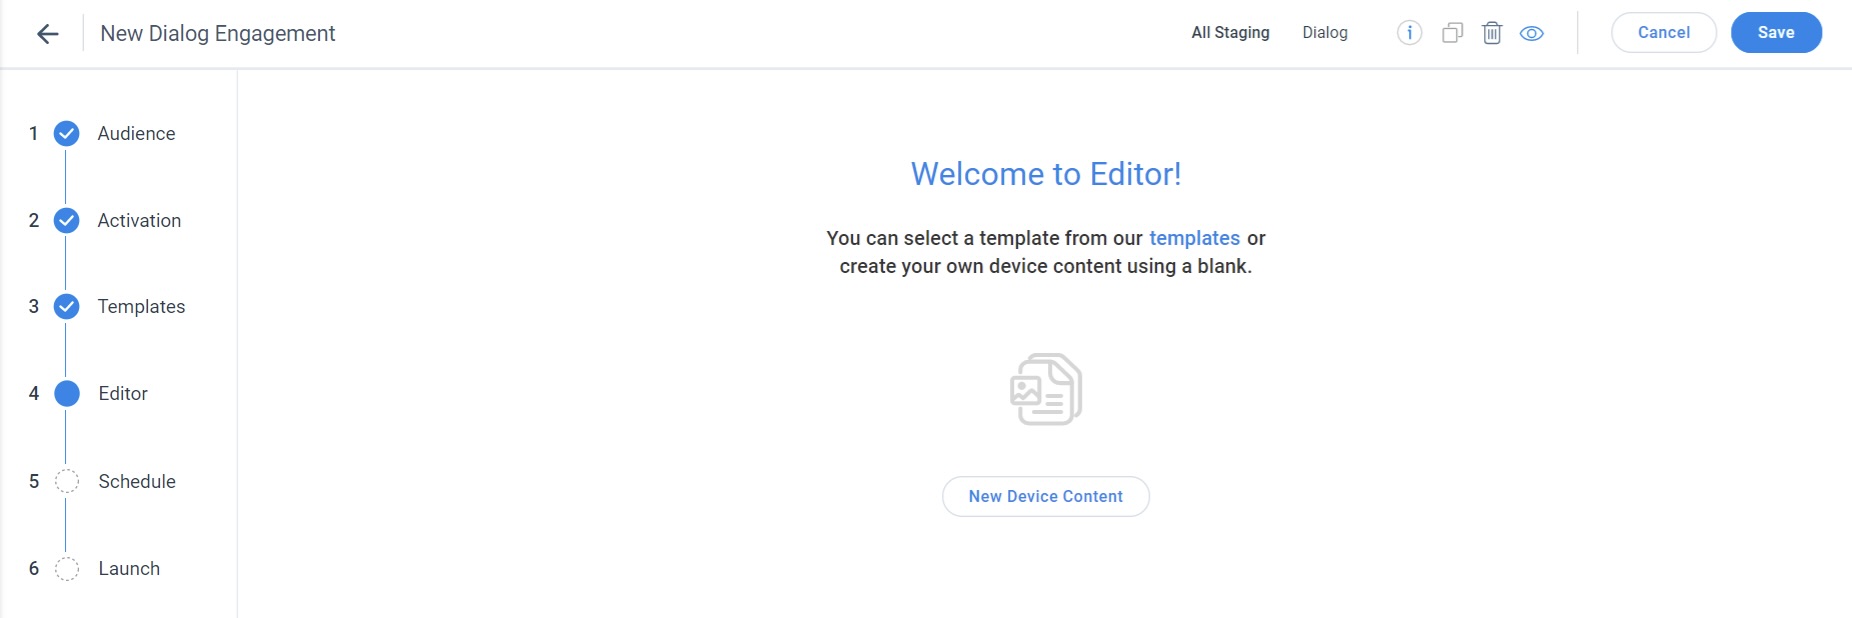
Editor
You can select a template from the Templates section or create your own device content using a blank.
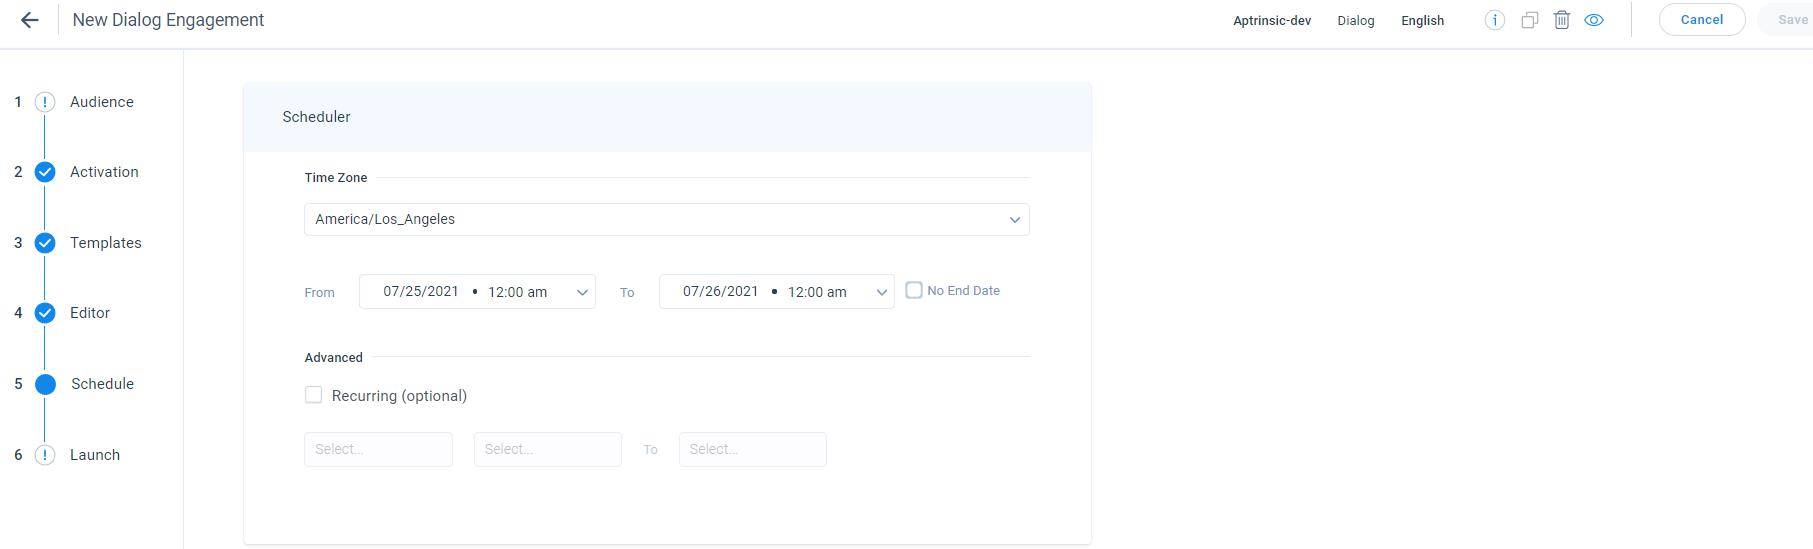
Schedule
Schedule your engagement to define when and how it should be evaluated and triggered.
In-App Engagement Scheduler
Triggering in-app guides, announcements or surveys is defined by the following elements:
- Scheduler: Date range for the engagement
- From: A date range from when the in-app engagement is active.
- To: Date and time until which the in-app engagement is active.
- No End Date: To show the engagement for an indefinite period.
- Advanced: Recurring is optional in case you would like to hide/show on different hours within the range.
- Qualification Scope: How often (thresholds) for when a user will see an engagement
- Only Once: Choosing this scope means the user will see the engagement a single time across any number of visits under the specified date range.
- Once per visit: Choosing this scope means the user will be qualified once per visit, mostly used for 'continues critical announcements' or testing purposes. If user is Inactive for 30 minutes, Gainsight PX automatically resets it to a New visit/session.
- Every time: This scope triggers an engagement every time the user qualifies for the engagement audience criteria, even if it means triggering the engagement multiple times in the same session. When the schedule is active, the engagement is displayed multiple times to all the qualified users.
Note: This qualification scope is not applicable for users who use Gainsight PX SDK version lower than 1.8.0. For these users, the engagement is shown only once in a session even if the Everytime Qualification Scope is enabled for them. - Intervals: This qualification scope allows you to display the engagement multiple times with recurring intervals during a specific time period. The advantage of this scope is that you can set a time gap between two views of engagement. The Interval schedule differs for Dialog and the other engagements.
Note: The Gainsight PX SDK versions lower than 1.9.0 will receive the engagement once per visit. When the engagement interval is configured to show X times with Y minutes / hours between views, the engagements is shown provided the user is in a new session.
In the image below, the engagement is displayed three times with a gap of one day between each display.
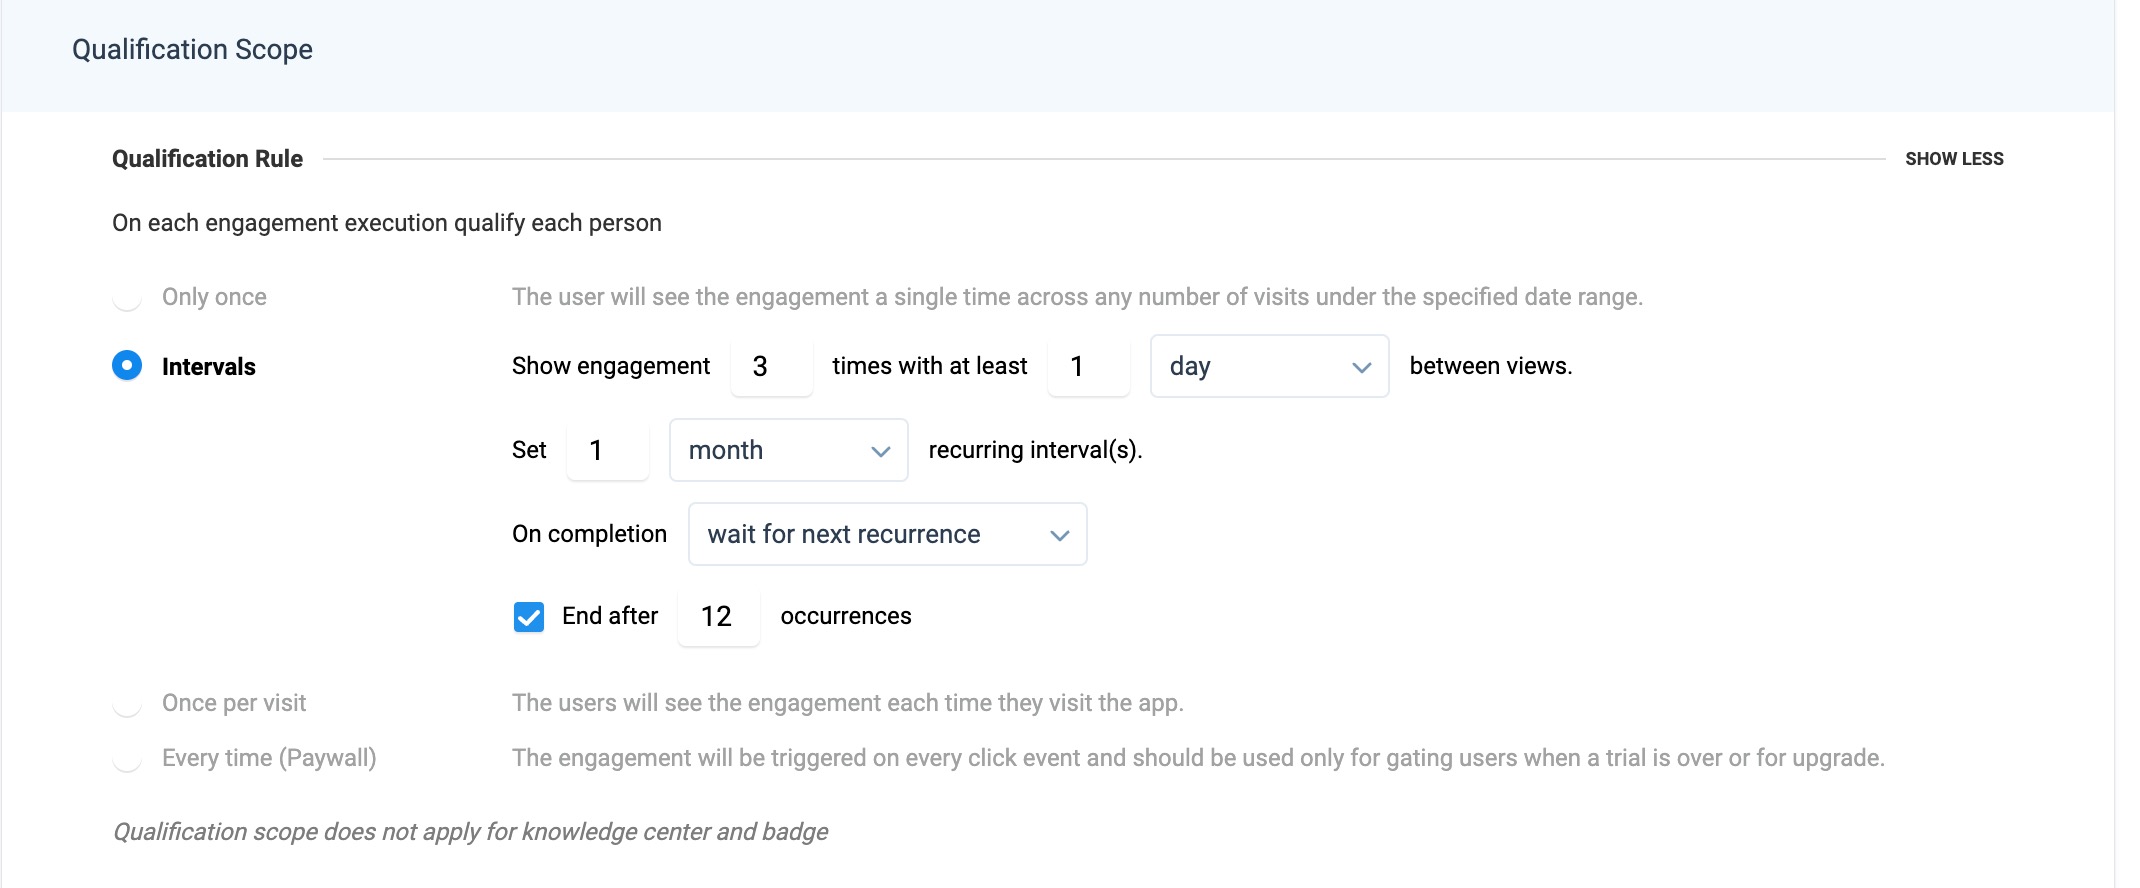
Cycle completion is achieved if any one of the following events occurs:
- If a user does not respond to the survey or does not complete the Guide during the specified time period. (4 months in the above example)
- If a user responds to the survey or completes the Guide/Slider engagement before the specified time period ends.
Once the cycle is completed, you can select one of the following options to decide what needs to happen further.
On Completion: Wait for next occurrence
In the above example, the recurring interval is set to four months. So, the engagement is displayed to users again after four months and a new cycle begins. Once the cycle is completed, the engagement is displayed for another four months. This engagement continues to display until 12 cycles are completed as the End after field is set to 12 occurrences.
On Completion: Quit
If you set the On Completion field to quit, the engagement is never displayed if the user completes (attempts/responds) it. The recurring Interval schedule is applicable only if you set the number of occurrences in the End after field to be more than one.
Configure Recurring Interval for Slider, Guide, and Surveys
Working Method: In the following image, the engagement is displayed three times with a gap of one day between each display. Gainsight PX considers a cycle to be completed if either of the following events occurs:
- If a user does not respond to the survey or complete the Guide or Slider engagement during the specified time period.
- If a user responds to the survey or completes the Guide/Slider engagement during the specified time period.
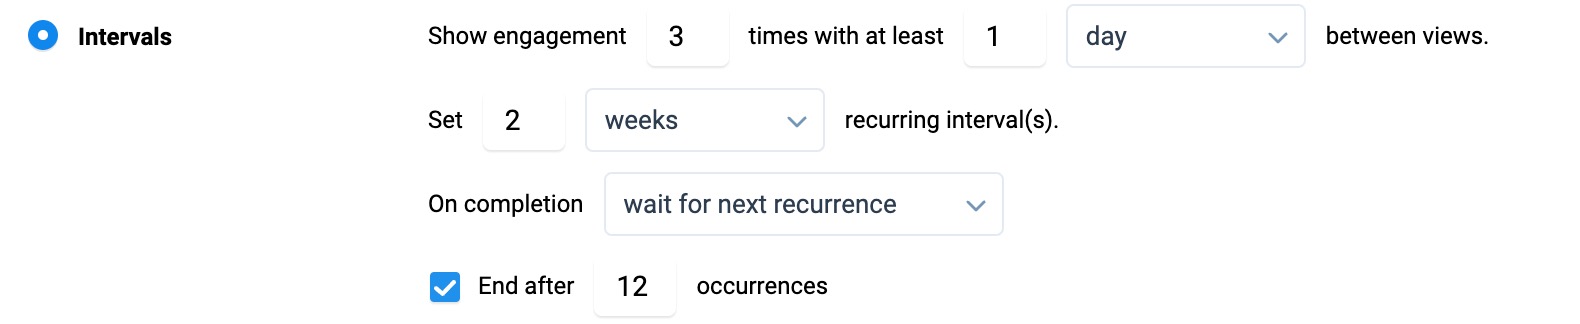
Once the cycle is completed, the engagement looks for the value set in the On completion field. In this case, the On completion field is set to wait for next recurrence. The recurring interval(s) is set to two weeks. So the engagement is displayed to users again after two weeks, one time a day for three alternate days and a new cycle begins. Once the cycle is completed, the engagement is displayed again after two weeks.
This engagement continues to display until 12 cycles are completed as the End after field is set to 12 occurrences.
Notes:
- If you set the On Completion field to quit, the engagement is never displayed if the user completes (attempts/responds) it.
- The recurring Interval schedule is applicable only if you set the number of Occurrences in the End after field to be more than one.
Business Use Cases:
-
Consider that you wish to receive responses for an NPS® Survey every 3 months. You can use this feature to show the Survey three times with at least one day gap between each of the three displays. You can set the recurring interval(s) to be four months. You can set the On completion field to wait for next recurrence. This ensures that your Survey is displayed in a cycle of three months. During a cycle, the survey is displayed with a gap of one day until the users respond to the survey, or the maximum number of display attempts are completed.
-
Consider that you wish to display a Slider or Guide engagement until a user views it. You can use this feature to set the engagement to display the required number of times with a suitable time gap. Once a User completes the Guide or Survey, the cycle is said to be completed. You can set the On completion field to quit to ensure that the engagement is not displayed again, once a user completes it.
Preview Engagements
Preview your engagement in your mobile application to predict and prevent real-time issues and errors while launching.
To preview an engagement:
- Click the preview icon. The screen displays a QR Code.
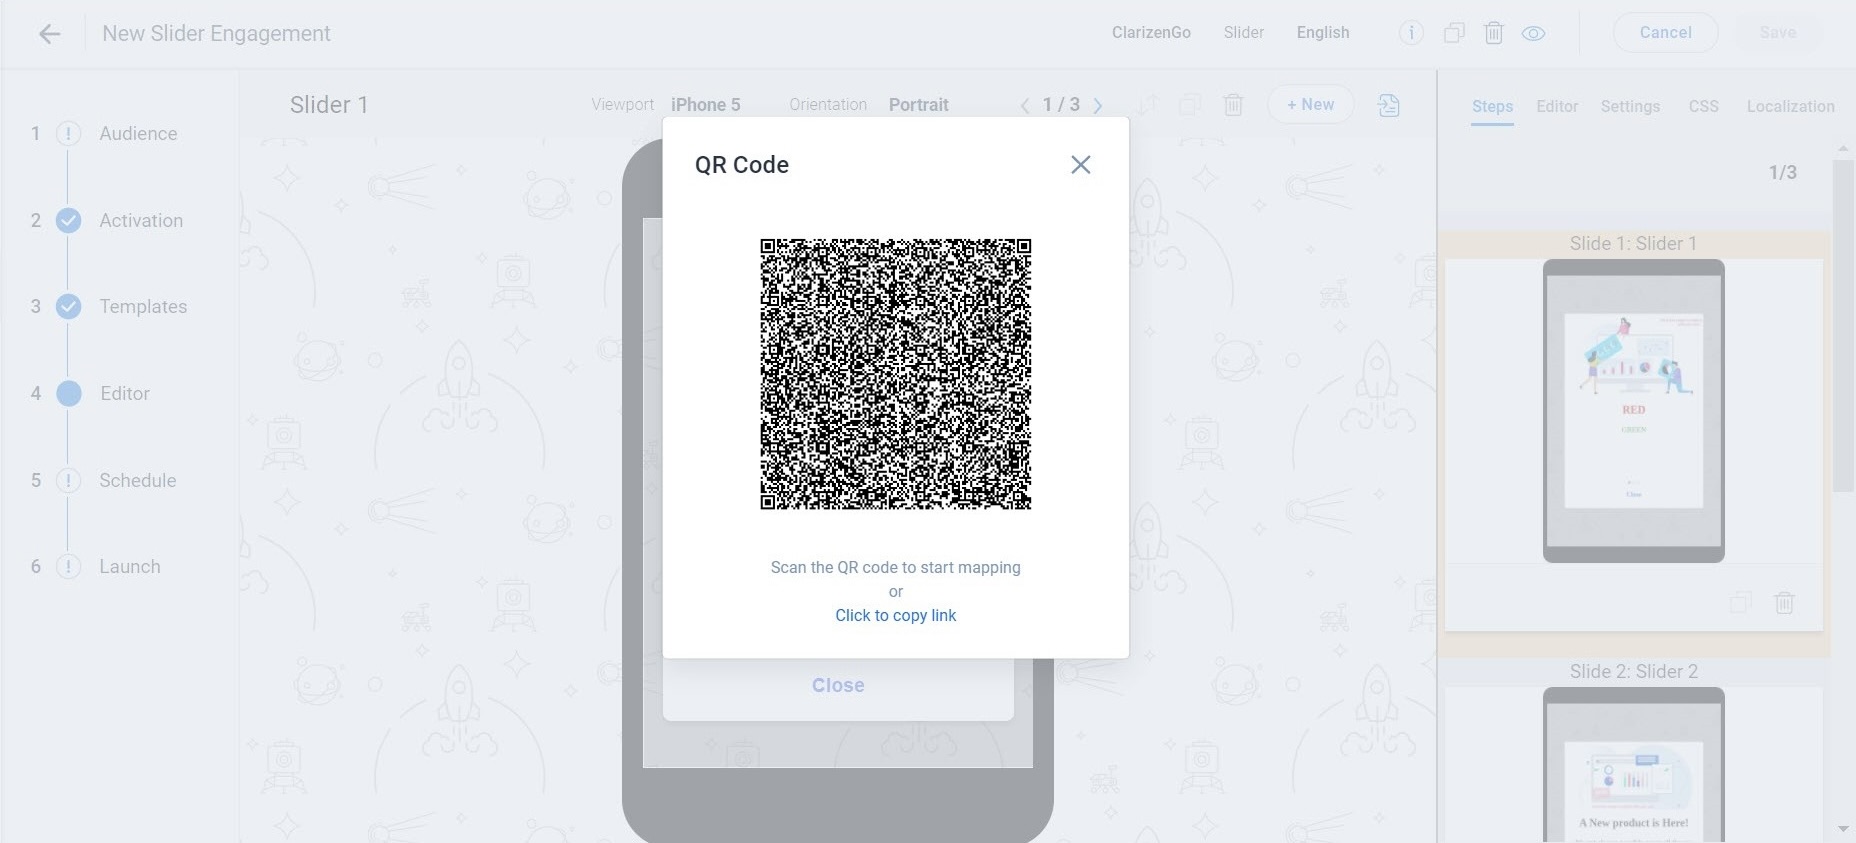
- Scan the QR code with an app on your mobile device or copy an URL using Click to copy link and send the link to your mobile device.
- From the displayed screen, click the OPEN IN APP link. Your mobile application is launched. (that has Gainsight mobile SDK).
- Preview the engagement in the mobile application.
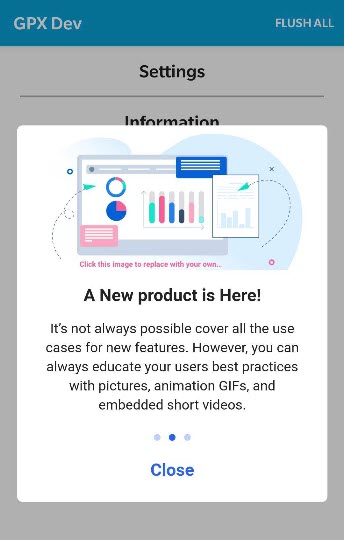
- Alternatively, when you click the PX icon on the home screen, and then click Engagements, a list view of engagements appears.
- Click on the required engagement to see the preview.
Business Use Case
Mobile engagements can be used only in three types of Surveys. Surveys are used to collect feedback about your product. To give useful feedback about your app, users must get acquainted with your app. Based on these criteria, here is a sample use case.
-
You can use a User rule and set the Number of visits rule to be more than 25. This ensures that only those users who have visited your app more than 25 times, see your feedback survey.
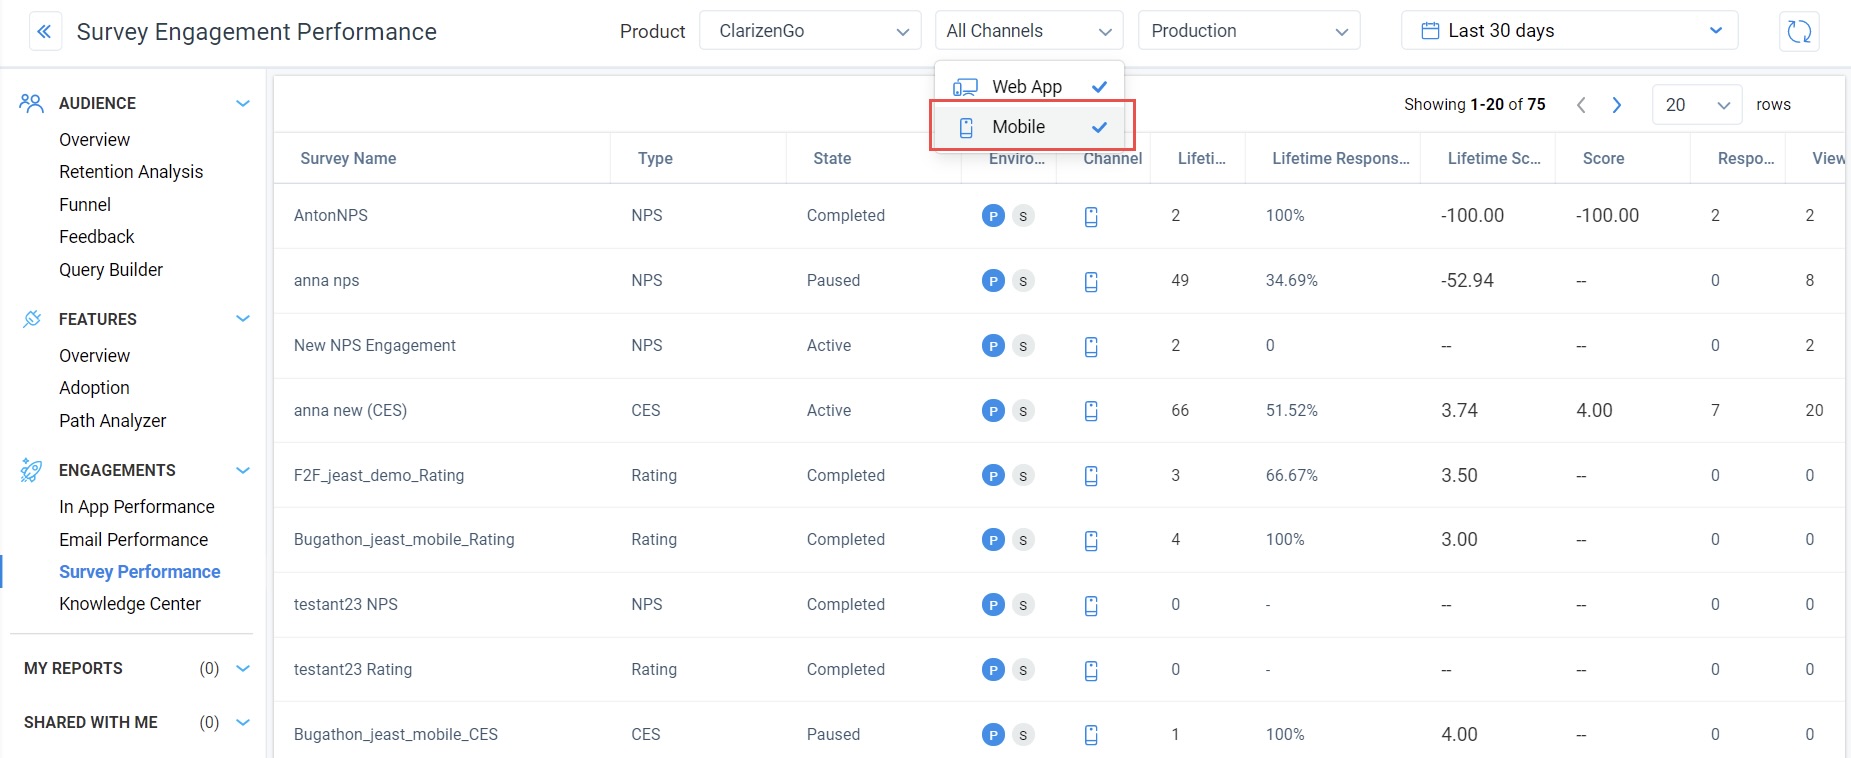
View Mobile Engagement Analytics
You can view the mobile engagement Analytics by clicking the eye icon for the required engagement. You can also view the Analytics by navigating to Analytics > Engagements > Survey Performance page by selecting the Mobile option from the Channels dropdown.
| Net Promoter®, NPS®, NPS Prism®, and the NPS-related emoticons are registered trademarks of Bain & Company, Inc., NICE Systems, Inc., and Fred Reichheld. Net Promoter ScoreSM and Net Promoter SystemSM are service marks of Bain & Company, Inc., NICE Systems, Inc., and Fred Reichheld. |