Install Gainsight PX Hybrid Mobile SDK
This article explains how developers can use the Gainsight PX mobile SDK for iOS and Android applications built on hybrid mobile frameworks that are based on web technologies such as Cordova, Ionic, Blazor, and Sencha Touch/ ExtJS.
Overview
Gainsight PX can effectively monitor your application, track usage data, provide real-time analytics, and display engagements. You can use Gainsight PX mobile SDK in your mobile application development. This codebase is platform-independent, and works with Android and iOS operating systems. The Gainsight PX code can be ingested into any web based mobile application developed using JavaScript.
Prerequisite
The iOS and Android projects must be created from web apps using Cordova, Ionic, Sencha Touch/ExtJS, Blazor, or similar hybrid mobile frameworks.
Note: For apps created using Blazor, ensure that the bindings are generated. For more information, refer to the Gainsight PX Github repo.
Install Hybrid Mobile SDK
The installation of the hybrid SDK requires the same procedure as the native mobile SDK. For more information on the installation steps, refer to the Install Gainsight PX SDK for iOS and Install Gainsight PX SDK for Android articles from the Additional Resources section.
Configuration
After you integrate native SDK, provide the webView that is used to display web content on respective platforms to the Gainsight PX mobile SDK.
iOS
Import PXKit into the files where GainsightPX is used.
For iOS Applications Created using Cordova
Gainsight PX recommends setting the webView in the MainViewController viewDidLoad method as shown below:
- (void)viewDidLoad
{
    [super viewDidLoad];
    [self startJSBridge];
}

- (void)startJSBridge {
    NSArray *filtered = [[[self view] subviews] filteredArrayUsingPredicate:[NSPredicate predicateWithBlock:^BOOL(id  _Nullable evaluatedObject, NSDictionary<NSString *,id> * _Nullable bindings) {
        return [evaluatedObject isKindOfClass:[WKWebView class]];
    }]];
    WKWebView *webview = [filtered firstObject];
    if (webview != nil) {
        [[GainsightPX shared] startJSBridgeWithWebview:webview];
    }
}
For iOS Applications Created using (Ionic) Capacitor:
Gainsight recommends setting the webView in AppDelegate as shown below:
func application(_ application: UIApplication, didFinishLaunchingWithOptions launchOptions: [UIApplication.LaunchOptionsKey: Any]?) -> Bool {
        // Override point for customization after application launch.
        if let webview = window?.rootViewController?.view as? WKWebView {
            GainsightPX.shared.startJSBridge(webview: webview)
        }
        return true
    }
Android
As a best practice, if you use a web-based platform to develop your mobile app without any native screens, Gainsight recommends you to attach the GainsightPX Hybrid SDK on the Main activity created. To attach GainsightPX, you need to find the web view that is being used by your platform. Use the following generic code that looks for the web view on your UI hierarchy.
Note: You can skip this step if you have identified the web view already.
private ViewGroup findRoot() {
 View temp = this.findViewById(android.R.id.content);
 ViewParent parent = temp.getParent();
 while (parent instanceof ViewGroup) {
   temp = (View) parent;
   parent = temp.getParent();
 }
 return (ViewGroup) temp;
}
private WebView findWebView(ViewGroup temp) {
 for (int i = (temp.getChildCount() - 1); i >= 0; --i) {
   View child = temp.getChildAt(i);
   if (child instanceof WebView) {
     return (WebView) child;
   }
   if (child instanceof ViewGroup) {
     child = findWebView((ViewGroup) child);
     if (null != child) {
       return (WebView) child;
     }
   }
 }
 return null;
}
To attach GainsightPX to the web view, run the following code:
GainsightPX.attachToWebView(findWebView(findRoot())); // or use your webview instead of `findWebView(findRoot())’
Note: Set the web view to GainsightPX to access Gainsight PX in JS.
Blazor
Provide the webview to GainsightPX as shown below:
...
blazorWebView.BlazorWebViewInitialized += (one, two) =>
{
#if IOS
        GainsightPX.Shared.StartTrackingWithWebview(two.WebView);
#elif ANDROID
          GainsightPX.AttachToWebView(two.WebView);
 #endif
}
...
Handling Multiple Page Webview
When you have multiple page screens where you navigate from one page to other, you need to reload the Gainsight script on every page you move into. This can be done by calling the following command:
GainsightPX.loadScript(view);
or as a full command section:
    webView.setWebViewClient(new WebViewClient(){
      @Override
      public void onPageFinished(WebView view, String url) {
        super.onPageFinished(view, url);
        GainsightPX.loadScript(view);
      }
    });
Configure Editor
Gainsight PX Mobile Editor helps you manage PX Engagements and Product Mapper from your mobile application.
For more information on Editor, refer to the Integrate Gainsight PX Editor with your Mobile Platform article from the Additional Resources section.
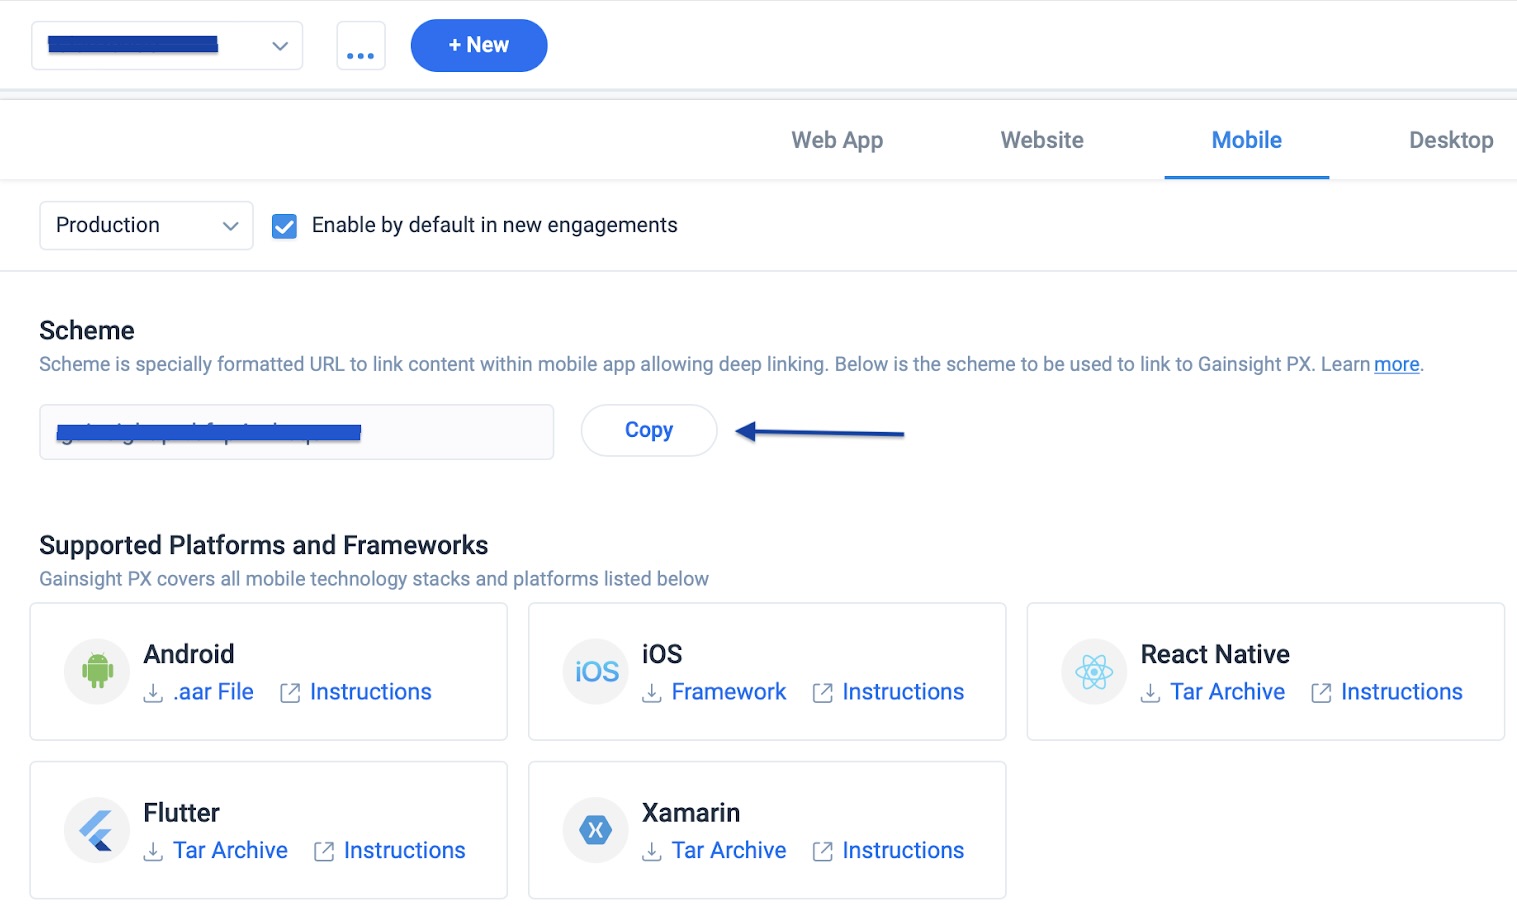
Integrate URL Scheme
Copy the editor scheme from the dashboard as shown in the following image and add it to iOS and Android projects.
For iOS
Register for editor scheme in Info.plist as per the guidelines mentioned in the Defining a Custom URL Scheme for Your App article.

For Android
Register for editor deep link by adding the following to your app android manifest into the MainActivity XML part (in addition to the existing IntentFilter). We recommend not merging both.
<intent-filter>
        <data android:scheme="{EDITOR_SCHEME}" />
        <action android:name="android.intent.action.VIEW" />
        <category android:name="android.intent.category.BROWSABLE" />        <category android:name="android.intent.category.DEFAULT" />
</intent-filter>
Configure Editor for Applications Created using Capacitor
Use the code below and listen to appUrlOpen. Then provide the link to the Gainsight PX Editor.
import { App, URLOpenListenerEvent } from '@capacitor/app';
import { Component, NgZone } from '@angular/core';
export class AppComponent {
 constructor(private zone: NgZone) {
   this.setupDeeplinks();
 }

 setupDeeplinks() {
   App.addListener('appUrlOpen', (event: URLOpenListenerEvent) => {
     this.zone.run(() => {
       (window as any).gainsightpx?.enterEditingMode(event.url);
     });
   });
 }
}
Configure Editor for Applications Created using Cordova
Use the code below and listen to the handleOpenURL of the window. Then provide the link to the Gainsight PX Editor.
window.handleOpenURL = function(url){
   window.gainsightpx.enterEditingMode(url);
};
Note: handleOpenURL will not be called when the application is not launched.
Configure Editor for Sencha Based Applications
Use the link below to handle openUrl, if the configuration is not done already. You can skip to the index.js section of the setup in the link below since the editor scheme is already configured in the Configure Editor step above. Use the code given below to change the code in the onURLLaunch method.
https://www.sencha.com/blog/using-url-schemes-with-sencha-touch-ios-and-cordova/
onURLLaunch : function(url, type) {
    window.gainsightpx.enterEditingMode(url);}
Using Gainsight PX
This section explains how to get started with Gainsight PX mobile app development. You can customize the default settings as required. For more information, refer to the Gainsight PX Configuration section of this article.
Initialize
You can set up Gainsight PX using default configurations by entering your product ID in the #APIKey#> field. You can also change some of the default settings for the improved performance of Gainsight client.
initialize(PXConfiguration)
PXConfiguration and its properties are explained in the Tables section of this article.
JavaScript:
Initialize SDK using following code in javascript environment.
window.gainsightpx.initialize({apiKey: <#APIKEY#>})
TypeScript:
Initialize SDK using following code in typescript environment.
(window as any).gainsightpx?.initialize({apiKey:<#APIKEY#>})
Create Events
Events help you track data from your mobile application. Events are actions associated with your app. Events let you track various actions performed by a user on your app.
Gainsight PX SDK supports the following four types of events.
- App Events
- Page Events
- Identify Events
- Custom Events
App Events
App Events are mostly auto-collected by Gainsight PX client, unless disabled. These events include APP_OPENED, APP_INSTALLED, APP_UPDATED, and APP_BACKGROUNDED for every instance of an app crash.
Page Events
When you set shouldTrackPages and autoTrackHash to true while initializing the SDK, the page events are automatically tracked. If you want to manually create page events, use the following two APIs to achieve this:
window.gainsightpx.screenEventWithName(string)
window.gainsightpx.screenEvent({screenName: string, screenClass: string, properties: object})
Note: screenName is mandatory whereas screenClass and properties are optional.
Identify Event
You can generate more accurate information about the usage of the app by identifying the users.
Run the following code to identify users:
window.gainsightpx.identifyWithID(string)
window.gainsightpx.identifyUser({user: PXuser, account: PXAccount})
Notes:
- PXUser and PXAccount properties are listed in the Tables section of this article.
- userID is required to identify a user.
PXUser
The following table contains the PXUser properties that can be sent during user Identify:
|
Property |
Type |
|
id |
string |
|
|
string |
|
userhash |
string |
|
gender |
string |
|
lastName |
string |
|
firstName |
string |
|
signUpDate |
object |
|
title |
string |
|
role |
string |
|
subscriptionId |
string |
|
phone |
string |
|
countryCode |
string |
|
countryName |
string |
|
stateCode |
string |
|
stateName |
string |
|
city |
string |
|
street |
string |
|
continent |
string |
|
postalCode |
string |
|
regionName |
string |
|
timeZone |
string |
|
latitude |
number |
|
longitude |
number |
|
organization |
string |
|
organizationEmployees |
string |
|
organizationRevenue |
string |
|
organizationIndustry |
string |
|
organizationSicCode |
string |
|
organizationDuns |
string |
|
accountId |
string |
|
firstVisitDate |
object |
|
score |
string |
|
sfdcContactId |
string |
|
customAttributes |
object |
PXAccount
The following table contains the PXAccount properties that can be sent during user Identify:
|
Property |
Type |
|
id |
string |
|
name |
string |
|
trackedSubscriptionId |
string |
|
industry |
string |
|
numberofEmployees |
number |
|
sicCode |
string |
|
website |
string |
|
naicsCode |
string |
|
plan |
string |
|
countryCode |
string |
|
countryName |
string |
|
stateCode |
string |
|
stateName |
string |
|
city |
string |
|
street |
string |
|
continent |
string |
|
postalCode |
string |
|
regionName |
string |
|
timeZone |
string |
|
latitude |
number |
|
longitude |
number |
|
sfdcId |
string |
|
customAttributes |
object |
Custom Events
Custom events let you to track specific events of your choice that are not provided by the SDK by default. You can view these custom events on your dashboard just like other events
window.gainsightpx.customEvent({eventName: string, properties: object})
General Methods
You need to configure the following general methods.
Flush
Call flush directly to send all events in the queue to the server without waiting for the next automatic flush (that happens every 60 seconds). You may not need to use it directly, but there are some scenarios where you need to make sure that the events are flushed. A few examples of such scenarios are when the user's characteristics change and you want to identify the person right away, or when you want to show an engagement right after a screen event occurs.
window.gainsightpx.flush()
Reset
You need to reset the Gainsight PX client when a user is signing out of the account and you want to associate all the new events as part of the future user behavior. If reset is not done by the user, the events will be registered as part of the logged out user events since the logout action is performed only in the context of your app and not the GainsightPX framework.
Note: This step is not mandatory.
window.gainsightpx.reset()
Enable/Disable
Enabling and disabling the Gainsight PX instance lets you control the events collection. When the instance is disabled, no events are registered to the server (except for SESSION_INITIALIZED). This feature helps you to turn off events that could be auto collected in data-sensitive areas of your application.
window.gainsightpx.enable()
window.gainsightpx.disable()
Global Context
Global Context or Super Properties is a feature in Gainsight PX that allows you to collect data at more granular levels. You can set the levels of granularity as required. By default, PX collects all your usage data and stores it. You can use Global context to slice and dice the data and segregate it based on the required parameters.
After you create all the required events, you can set the global context for the events. You can set a global context with key-value pairs and send it with the payload. Global context can be set on Date, String, Double, and Boolean data types. Global Context data is stored at the memory level and not at the disk-level.
Note: If an application is terminated, all the key-value pairs are erased.
Use the following code snippet to set globalContext:
window.gainsightpx.setGlobalContext(PXGlobalContextMap)
PXGloablContextMap accepts key as string and value as boolean | number | string | null | Date
Use the following APIs to check for the global context key, and remove the key pair value:
window.gainsightpx.hasGlobalContext(string)
window.gainsightpx.removeGlobalContextKeys(string[])
window.gainsightpx.hasGlobalContextKeyListener((key: string, isExists: boolean) => void)
hasGlobalContextKeyListener is the listener for a key existence, when hasGlobalContext is invoked with a key.
Engagement Callback
Gainsight PX provides the Engagement Callback feature for mobile engagements that you create for mobile applications. This feature helps in receiving a callback for all button actions and URL clicks that the end-user performs on an engagement. Once you receive the callback, you can decide your next action like to help the user navigate to a new screen, or perform an API call, and so on.
For more information on this feature, refer to the Engagement Callback article from the Additional Resources section.
To listen to user behaviours on engagements, add the listener as below.
window.gainsightpx.addEngagementListener((engCallback: PXEngagementCallback) => void)
PXEngagementCallback and PXEngagementCallbackModel have the following two properties:
- model?: PXEngagementCallbackModel
- errorMessage?: string
Use the following method to remove the engagement listener.
window.gainsightpx.removeEngagementListener()
EngagementMetaData Properties
The following table describes the properties in the arguments received from the PXEngagementCallback event listener :
|
Property |
Type |
Description |
|
actionText |
string |
The text of the linked element. |
|
actionType/ |
string |
Refers to the element that invoked the Engagement Callback. |
|
engagementName |
string |
Name of the engagement for which the callback is received |
|
scope |
object |
Mobile screen scope where the engagement is shown. |
|
engagementId |
string |
ID of the engagement for which the callback is received . |
Error Handling
Listening to errorListener helps you identify any error while creating events.
window.gainsightpx.errorListener((error: PXErrorCallback) => void)
PXErrorCallback includes the following three parameters:
- functionName: Name of the API when exception occured.
- properties: Event properties when an event is created.
- errorMessage: Information about the exception occurred.
Gainsight PX Configuration
The following table describes methods for which you can modify the configurations during the initialization stage:
|
Property |
Default Value |
Description |
|
shouldTrackPages |
false |
Whether or not the client should auto-track page events |
|
autoTrackHash |
false |
Whether or not the client should auto-track hash changes |
|
shouldTrackTapEvents |
false |
Should the client auto-track tap events |
|
trackApplicationLifecycleEvents |
true |
Should be the client auto track app related events (APP_OPENED, APP_INSTALLED and APP_UPDATED) |
|
reportTrackingIssues |
false |
Whether or not sdk should send sdk errors to the server. |
|
enableLogs |
false |
Whether or not to print the logs from SDK |
|
flushQueueSize |
20 |
The number of events that are considered to form a batch to be sent to the server. Once this limit is reached, PX sends the events to the server even if it's still not the time for that (by the timer) |
|
flushInterval |
20 sec |
The time interval during which the client checks if there are any new events to send to the server |
| host | “us” | Set this value to "us" or "eu" or "us2" to point to the desired environment. |
| maxQueueSize | 1000 | The maximum number of items to queue before starting to drop old ones. |