Install Gainsight PX Flutter
This article explains how developers can use the Gainsight PX Flutter code in their Flutter application and the various facets of ingesting Gainsight PX Flutter code in your iOS application.
Overview
Gainsight PX is capable of effectively monitoring your application, tracking usage data, and providing real-time analytics.
You can use Gainsight PX Flutter in your mobile application development. This codebase is platform-independent and works with Android, iOS, and Windows operating systems. Ingest the Gainsight PX code into any mobile application that is developed using the Flutter programming language. When you ingest Gainsight PX Flutter code into your Flutter based application code, Gainsight PX starts tracking all the data on your application.
Install Gainsight PX
Install the Gainsight PX from https://github.com/Gainsight/px-flutter.
dependencies:
  ...
  gainsightpx:
    git: git@github.com:Gainsight/px-flutter.git
For iOS
import gainsightpx

override func application(

     _ application: UIApplication,

     didFinishLaunchingWithOptions launchOptions: [UIApplication.LaunchOptionsKey: Any]?

  ) -> Bool {
        if let registrar = registrar(forPlugin: "GainsightpxFlutterPlugin") {
            SwiftGainsightpxFlutterPlugin.register(with: registrar)
        }
        ...
        return super.application(application, didFinishLaunchingWithOptions: launchOptions)
    }
Now you can run your application on Xcode.
Integrate Gainsight PX Editor
Gainsight PX Mobile Editor helps you manage PX engagements and Product Mapper from your mobile application.
The In-app Editor allows you to:
- Preview engagements in the mobile app
- View the Product Tree
- Create, edit and delete Module/Features
- Add Tap Rules for Module/Features
To use the in-app editor, copy the Scheme to integrate your mobile application with the your platforms that Gainsight supports.
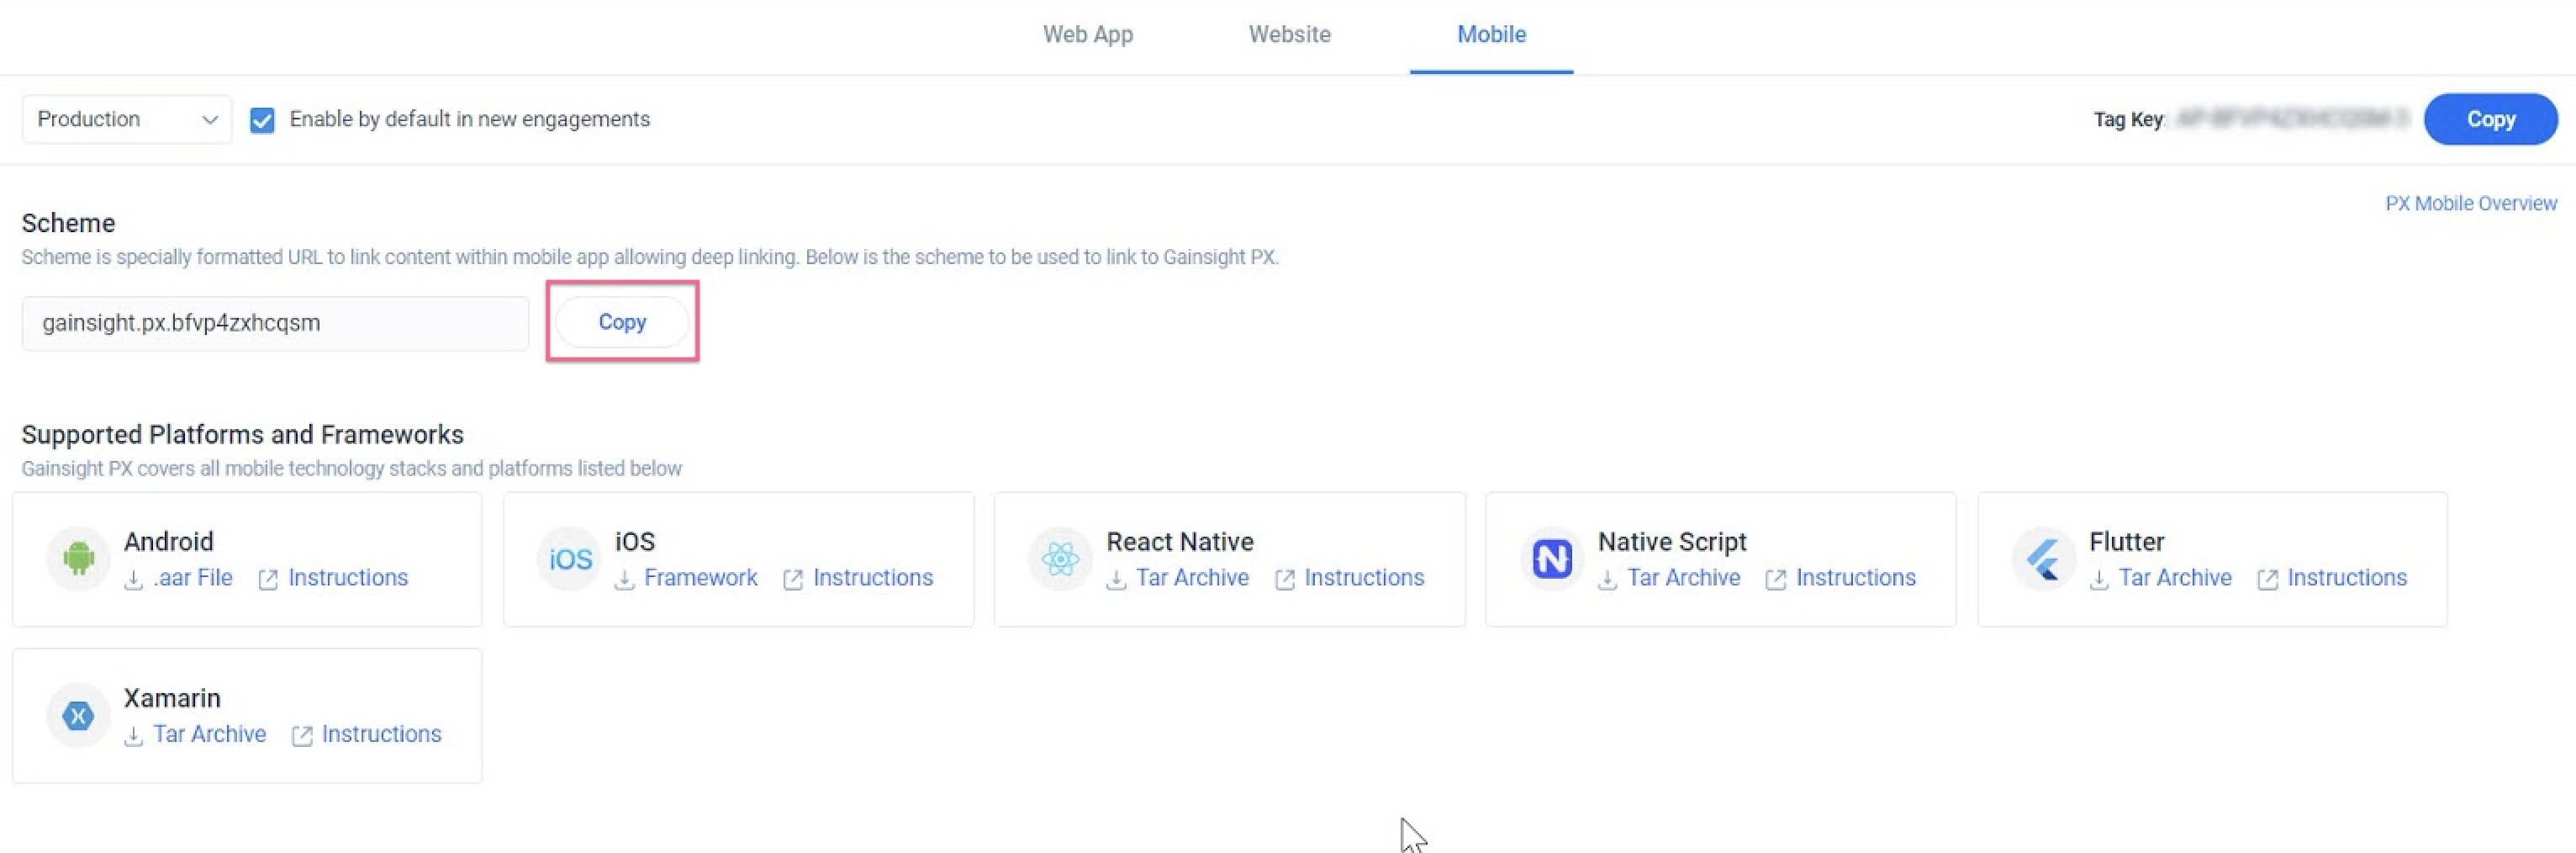
You can activate the editor using deep linking and forwarding the link to the SDK. While forwarding the information, you as a developer have the ability to implement your own logic and permissions before launching the editor.
The integration procedure is based on Uni Link plugin method, but supported by all deep linking plugins:
Android
On your android/app/src/main/AndroidManifest.xml, add the following code in the MainActivity section:
<intent-filter>
               <data android:scheme="{SCHEME}" />
               <action android:name="android.intent.action.VIEW" />
               <category android:name="android.intent.category.BROWSABLE" />
               <category android:name="android.intent.category.DEFAULT" />
</intent-filter>
iOS
Prerequisite: The scheme must be added to your iOS project, by referring to this article.
Alternatively, you can follow one of the following approaches to add the editor scheme to iOS project:
-
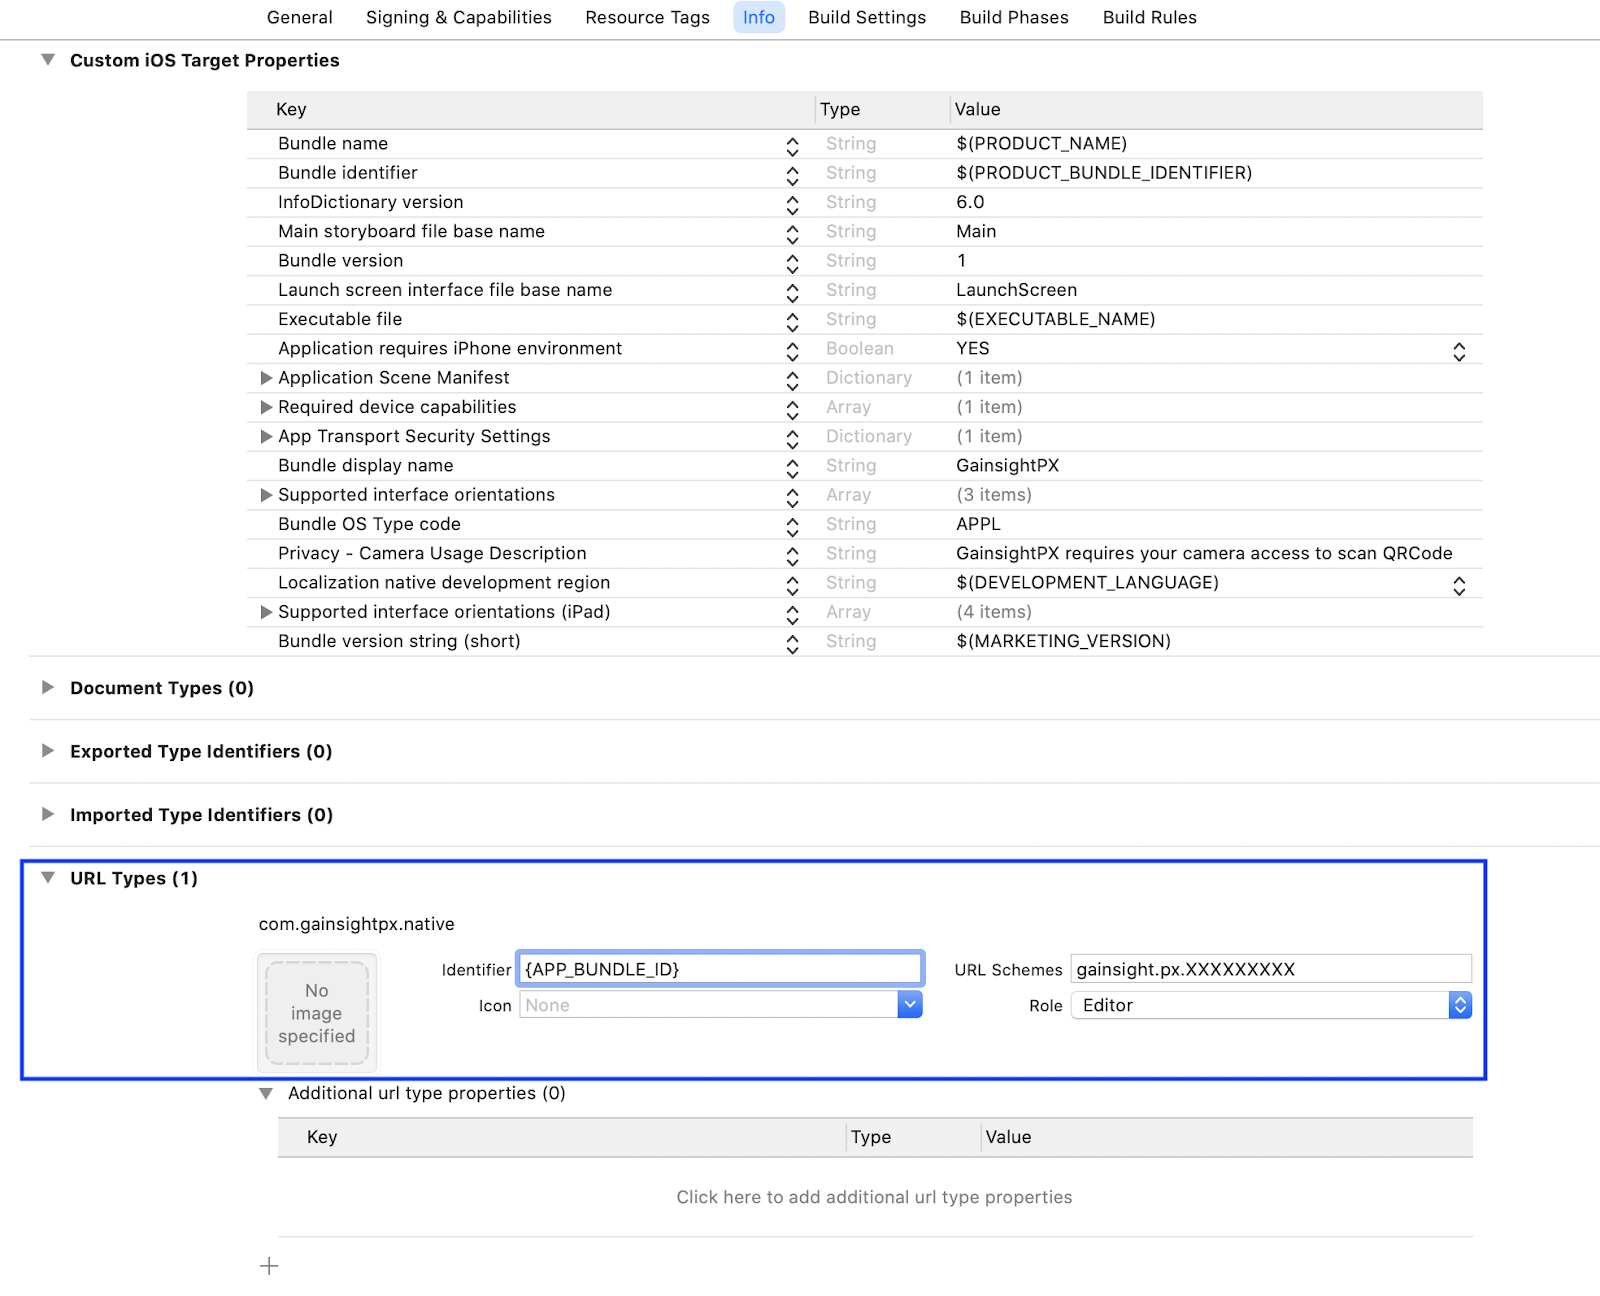
Use Xcode Project settings:
-
Open the project(Runner.xcodeproj or Runner.xcworkspace if pods are present) in the ios folder using Xcode.
-
In project settings, select the Info tab.
-
Add a new URL item by choosing Add items under URL Types.
-
Add {SCHEME} to URL Schemes.
-
-
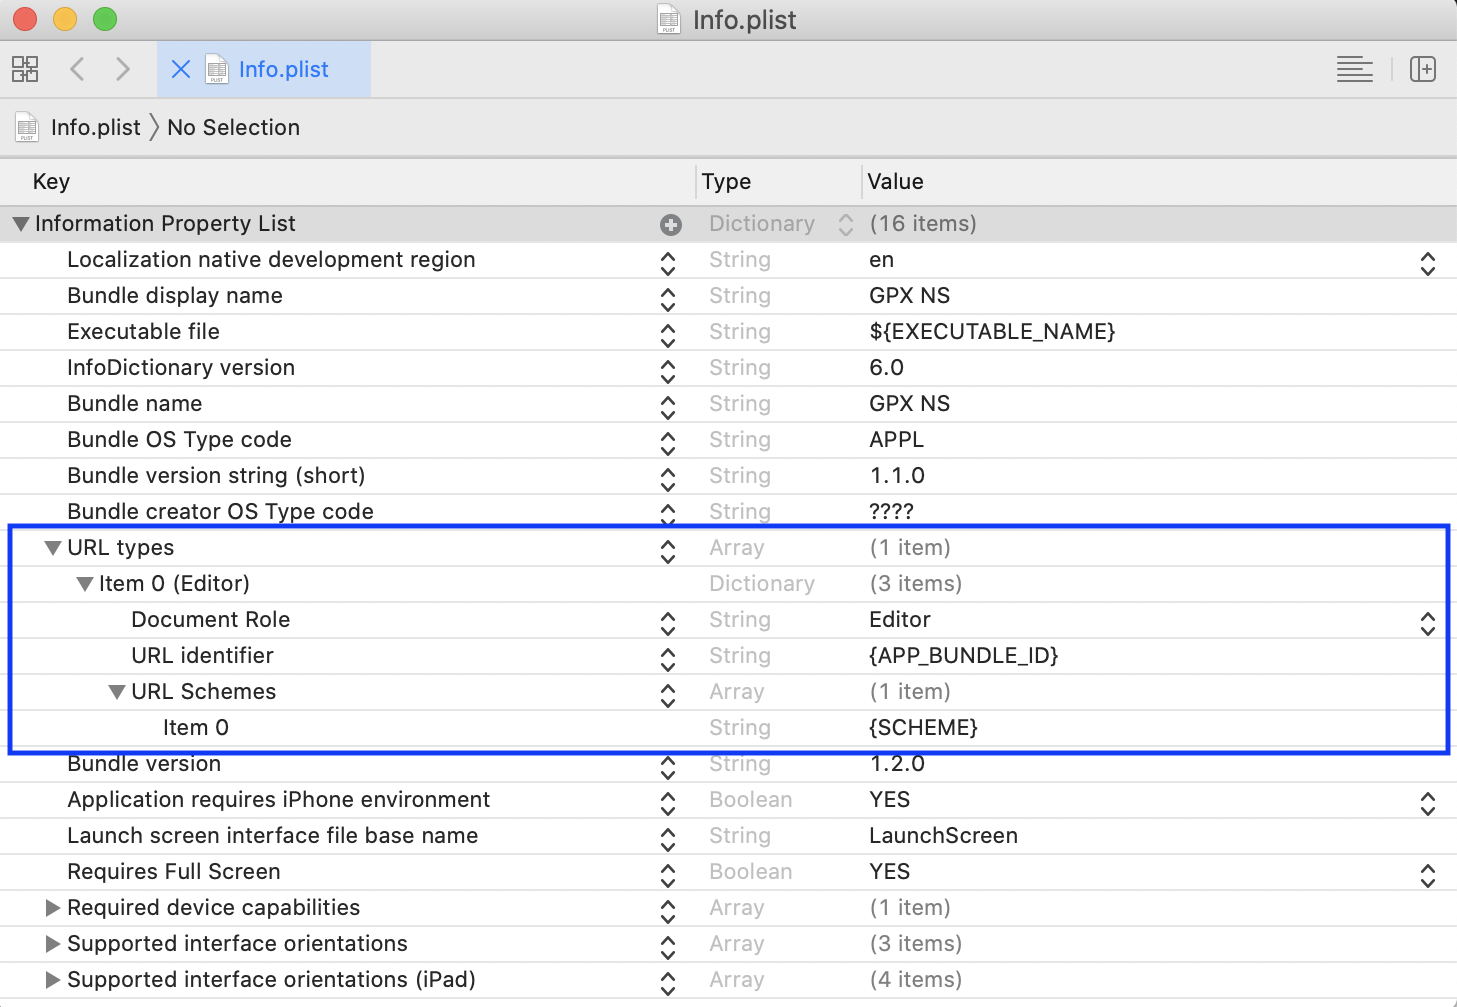
Using Xcode:
-
Navigate to ios/Runner/ folder.
-
Open Info.plist using Xcode.
-
Add URL Types to plist file.
-
Add {SCHEME} for URL Schemes items.
-
-
Using Xcode:
-
Navigate to ios/Runner/ folder.
-
Open the info.plist file as a TextEdit file.
-
Add the following code snippet in the file:
-
<array>
       <dict>
             <key>CFBundleTypeRole</key>
             <string>Editor</string>
             <key>CFBundleURLName</key>
             <string>{APP_BUNDLE_ID}</string>
             <key>CFBundleURLSchemes</key>
             <array>
                    <string>{SCHEME}</string>
             </array>
       </dict>
</array>
On Flutter main.dart
While starting the app state, call the following code if the app was started using deep linking:
{
  String initialLink = await getInitialLink();
  if (initialLink != null) GainsightPX.instance.enterEditing(initialLink);
} on PlatformException {
         print('Failed to get initial link.');
} on FormatException {
         print('Failed to parse the initial link as Uri.');
}
Also, if you want to use deep linking even when the application is active in the background, you must register to the link stream. It is recommended to save the stream so that it can be canceled when exiting the app:
Use the following code to register:
getLinksStream().listen((String link) {
         if (link != null) {
                   GainsightPX.instance.enterEditing(link);
         }
}, onError: (err) {
       print('got err: $err');
});
Using Gainsight PX
This section explains how to get started with Gainsight PX mobile app development. You can customize the default settings as required. For more information, refer to the Gainsight PX Configuration section of this article.
Initialize
After you complete the download and installation of Gainsight PX, you can use it in your application to track data. The code used in this section is platform-independent and can be used in Android, iOS, or Windows-based mobile applications.
To track data with Gainsight PX:
-
Insert the following import code in the header section:
import 'package:gainsightpx/gainsightpx.dart';
-
Use the following code to initialize Gainsight PX. You must use the initialization code only once in your entire application. Gainsight PX recommends using this code in the app widget so that tracking can be initialized from the first page of your application.
  Future<void> _initialiseGainsightPX() async {
    try {
      Configurations configurations = Configurations('<#product-key#>');
      GainsightPX.instance.initialise(configurations);
    } catch (error) {
      print(error.toString());
    }
  }
Note:
All the Gainsight PX methods return a Future<dynamic>. in case of an error the type of the value will be PlatformException.
ExceptionCallback
All exceptions that occur when creating events are passed into catch as error using a Future<dynamic>. If there is an error then the returned type is PlatformException.
For example, you can make the calls using:
GainsightPX.instance.customEvent(eventName, properties)
.then((value) => {
if (value is PlatformException) {
// on Failure ...
} else {
// on Success ...
}
});
Sending Events
This section explains how to create events that can track data from your mobile application. Events are actions associated with your app and that allows you to track various actions performed by users in your app.
Gainsight PX SDK supports four types of events.
Screen Events
You can use the Screen event to track each of your screens visited by the user.
The syntax to capture screen events is as follows:
GainsightPX.instance.screen(<#ScreenEvent-object#>[, <#properties-map#>]);
You can also create a screen event to just capture the name of the screen and exclude all of the other details. Use one of the following calls:
GainsightPX.instance.screenEvent(<#screen-name#>[, <#properties-map#>]);
Automatic Screen Capture
By default, Screen events are not reported automatically on flutter. In order to have something similar to automated Screen event reporting add the following code to your application widget:
return MaterialApp(
...
navigatorObservers: [PXRouteObserver()],
...
);
Custom Events
Custom Events are used to track specific actions in your app.
The syntax to track custom events is:
GainsightPX.instance.customEvent(<#custom_event_name#>[, <#properties-map#>]);
Tap Events
Track the tap events by wrapping the application in main.dart into GainsightPX TouchListener as given below:
@override
  Widget build(BuildContext context) {
    return TouchListener (
      child: MaterialApp(
      …
      );
    );
  }
For the tap events to be tracked, enable `shouldTracktapEvents` in the configuration when initializing the GainsightPX as shown below:
Future<void> _initialiseGainsightPX() async {
    try {
      Configurations configurations = Configurations('<#product-key#>');
      configurations.shouldTrackTapEvents = true
      GainsightPX.instance.initialise(configurations);
    } catch (error) {
      print(error.toString());
    }
  }
Note: You need to enable tap events when using TouchListener.
Identify Events
Identify events are used to uniquely identify a user or an Account.
The syntax to track identify events is:
GainsightPX.instance.identify(<#user-id as a string#>);
GainsightPX.instance.identifyUser(<#User-object#>[, <#Account-object#>]);
Use the following line of code to track a user:
User user = User("<#user_id#>");
user.email = "david@gmail.com";
The above line of code identifies the user, since you have added email property to define the user.
If you want to set a custom attribute for the user, add it to the customAttributes map object.
final Map<String, dynamic> customAttributes = {'isOwner': true};
customAttributes['counts'] = 20;
user.customAttributes = customAttributes;
The list of properties supported for User tracking is given in the table below:
| Property | Data type |
|---|---|
| ide | String |
| String (Email) | |
| userHash | String |
| gender | String |
| lastName | String |
| firstName | String |
| signUpDate | Date |
| title | String |
| role | String |
| subscriptionId | String |
| phone | String |
| countryCode | String |
| countryName | String |
| stateCode | String |
| stateName | String |
| city | String |
| street | String |
| continent | String |
| postalCode | String |
| regionName | String |
| timezone | String |
| longitude | Double |
| latitude | Double |
| organization | String |
| organizationEmployees | String |
| organizationRevenue | String |
| organizationIndustry | String |
| organizationSicCode | String |
| organizationDuns | Int |
| accountID | String |
| firstVisitDate | Date |
| score | Int |
| sfdcContactId | String |
| customAttributes | Map<String, dynamic> |
The list of Attributes for Account Object is given in the table below:
| Property | Data type |
|---|---|
| name | String |
| trackedSubscriptionId | String |
| industry | String |
| numberOfEmployees | int |
| sicCode | String |
| website | String |
| naicsCode | String |
| plan | String |
| countryCode | String |
| countryName | String |
| stateCode | String |
| stateName | String |
| city | String |
| Street | String |
| continent | String |
| postalCode | String |
| regionName | String |
| timezone | String |
| latitude | Double |
| longitude | Double |
| sfdcId | String |
| customAttributes | Map<String, dynamic> |
General Methods
This section describes the general methods (functions) of Gainsight PX SDK. There are three general methods:
| Method Name | Method | Description |
|---|---|---|
| Flush | GainsightPX.flush() | This method sends all events in the queue to the server, by ignoring the scheduled auto flush. Generally, you need not use this method but there could be situations in which you may need to flush out events. |
| Enable/Disable | GainsightPX.enable() GainsightPX.disable() |
These methods help you to enable or disable event tracking on your app. When you use the disable method, no event is sent to the server. You can use the disable method on data sensitive areas of your app. |
Global Context
You can set events with a global context after you create all the required events. You can set a global context with key-value pairs and send them with the payload. Global context can be set on Date, String, Double, and Boolean data types. Global Context data is stored at the memory level and not disk-level. The key-value pairs are sent with the Payloads. If an application is terminated, all the key-value pairs are erased.
Use the following code snippet to set the global context:
GainsightPX.instance.setGlobalContext(<#properties-map#>);
Use the following code snippet to check if the key is available:
GainsightPX.instance.hasGlobalKey(<#Name of the key#>);
Use the following code snippet to remove the key:
GainsightPX.instance.removeGlobalContextKeys(<#Array Of Keys#>);
EngagementCallBack
Gainsight PX provides the Engagement Callback feature for mobile engagements that you create for mobile applications. This feature helps in receiving a callback for all button actions and URL clicks that the end-user performs on an engagement. Once you receive the callback, you can decide your next action like helping the user to navigate to a new screen, or perform an API call and so on.
Prerequisite
Ensure that you have installed/configured the Gainsight PX Mobile SDK v1.5.1 or above.
To use the Engagement Callback feature, you need to implement the engagementCallback completion when initializing gainsightPX.
Example:
import 'package:gainsightpx/engagement_meta_data.dart';
import 'utils.dart';

class GlobalEngagementCallback {
 static bool onEngagementCompletion(EngagementMetaData engagementMetaData) {
   print(engagementMetaData.toString());
   if (engagementMetaData.actionType == 'link') {
     Utils.displayToast(text: engagementMetaData.toString());
   }
   return true;
 }
}
try {
   final Configurations configurations = Configurations(<##API_KEY##>)
     ..reportTrackingIssues = true
     ..shouldTrackTapEvents = true
     ..enableLogs = true;

   await GainsightPX.instance.initialise(
       configurations, GlobalEngagementCallback.onEngagementCompletion);
   print('GPX InitialiseWith: ${settings.host}');
 } on Exception catch (error) {
   print(error.toString());
 }
EngagementMetaData Properties
The following table describes the properties in the arguments received from the EngagementCallBack event listener :
|
Property |
Type |
Description |
|
actionText |
string |
The text of the linked element. |
|
actionType/ |
string |
Refers to the element that invoked the Engagement Callback. |
|
engagementName |
string |
Name of the engagement for which the callback is received |
|
scope |
object |
Mobile screen scope where the engagement is shown. |
|
engagementId |
string |
ID of the engagement for which the callback is received . |
* actionData - reserved property for future usage; currently functions similar to actionText
* params - reserved property for future usage to send any custom parameters.
Gainsight PX Configurations
This section describes methods, for which you can modify configurations during the initialization stage.
| Method Call | Default | Description | Override by Server? |
| host(PXHost host) | PXHost.us | Setting the data center that Gainsight PX instance will send the events to. | No |
| flushQueueSize | 20 | The number of events that are considered to form a batch to be sent to server. Once this limit is reached, PX sends the events to the server even if it's still not the time for that (by the timer) | Yes |
| flushInterval | 20 sec | The time interval during which the client checks if there are any new events to send to the server | Yes |
| collectDeviceId (this method is applicable only to Android application) | true | Whether or not to collect the device id from the device | No |
| enableLogs | False | Which log level should be logged to CatLog. By default, false is logged | No |
| trackApplicationLifecycleEvents | true | Should the client auto track app related events (APP_OPENED, APP_INSTALLED and APP_UPDATED) | No (Server can drop the event based on remote configuration) |
| shouldTrackTapEvents | fale | Should the client auto track tap events | Yes |
| proxy (string) | null | There's an option to send the network requests via proxy (mainly for security reviews) | Yes |
|
maxQueueSize |
1000 | The maximum number of items to queue before starting to drop old ones. | No |