Add Participants to a Simple Program
Gainsight NXT
This article explains the configuration options available when adding participants to a Simple Program.
Overview
The customers that you select as recipients for Simple Program emails are called Participants. On the Program Configuration page, admins must complete the following configurations to add participant sources to a Simple Program:
Add Participant Sources
Admins can add a single source of participants to a Simple Program. The available source types are:
To configure a simple program:
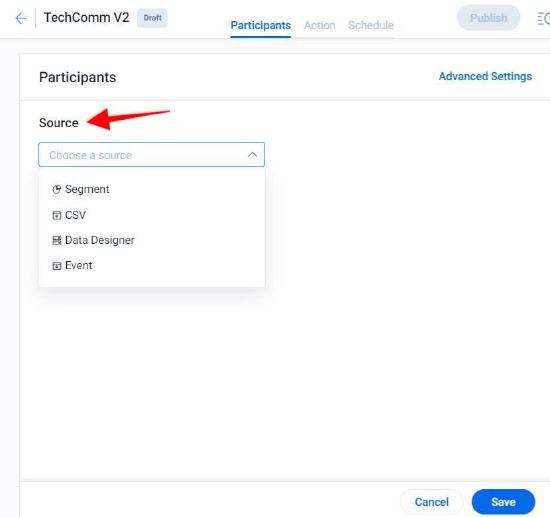
- Navigate to Folders > Program tab > select any Simple Program > Participants. The Participants screen appears.
- From the Source drop-down menu, select the source type.
Notes:
- Following are the mandatory fields required for each Program Type:
- For Company Type Simple Program, GS Company ID and Recipient Email Address fields value are mandatory to provide.
- For Relationship Type Simple Program, GS Relationship ID and Recipient Email Address fields value are mandatory to provide.
- For the User Type Simple Program, the Recipient Email Address field value is mandatory to provide.
- It is mandatory for a program to configure the Uniqueness Criteria using one or more source fields mapped to the Program.
For more information on how to map source fields to a program, refer to the Map Participants Sources section.
Segments
Admins can create Segments based on source objects to fetch a sub-group of customers, relationships, and contacts that meet your selected criteria. You can use a Segment as your Simple Program participant source. For more information on how to create Segments, refer to the Segments article mentioned in the Additional Resources section in this article.
IMPORTANT: Admins must turn on the 'Refresh segment before participant sync' while setting up a segment as a best practice
Limitation: Admins cannot select Segment as a source type if the User option is selected as the Program Type.
To add a Segment as a participant source, take the following actions:
- Navigate to Digital Journey > Programs.
- Click to open an existing program, or click Add Program > Simple Program to create a new program. The New Simple Program dialog box appears on the screen.
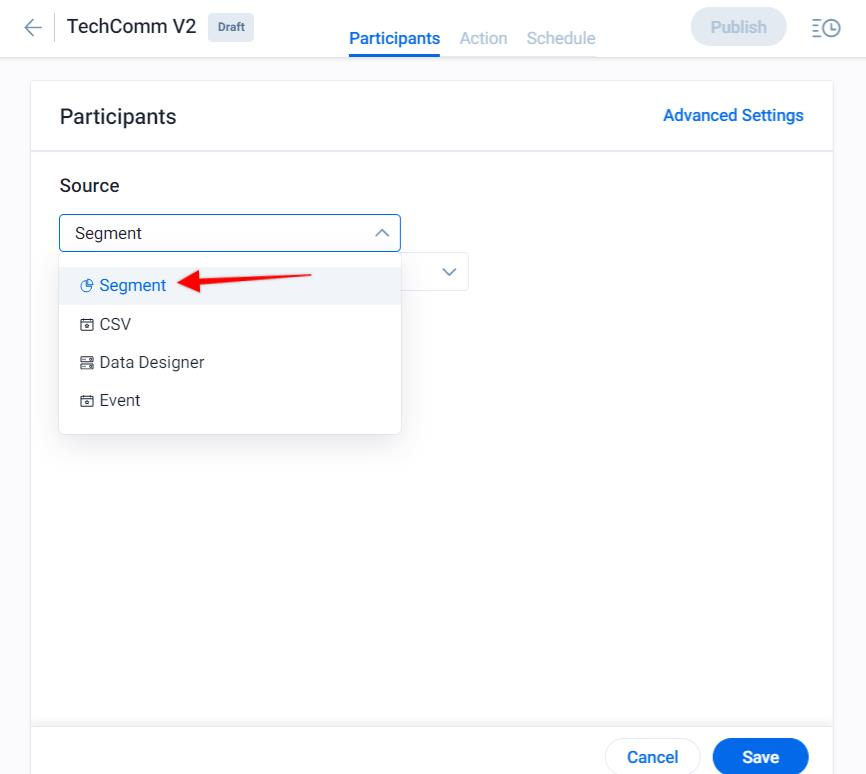
- Click Source dropdown list. The available options for program sources appears.
- Select any configured Segment or create a new Segment.
Note: Admins can click the Create New Segment option to navigate to the Segments creation page directly. For more information on how to create Segments, refer to the Segments article mentioned in the Additional Resources section in this article.
-
Click Sync Participants to fetch the participants from all of the sources that can be synced.
Note: Initially, only 20 participants are synchronized. The remaining participants will be synchronized once the program is published. -
Click Save.
Notes:
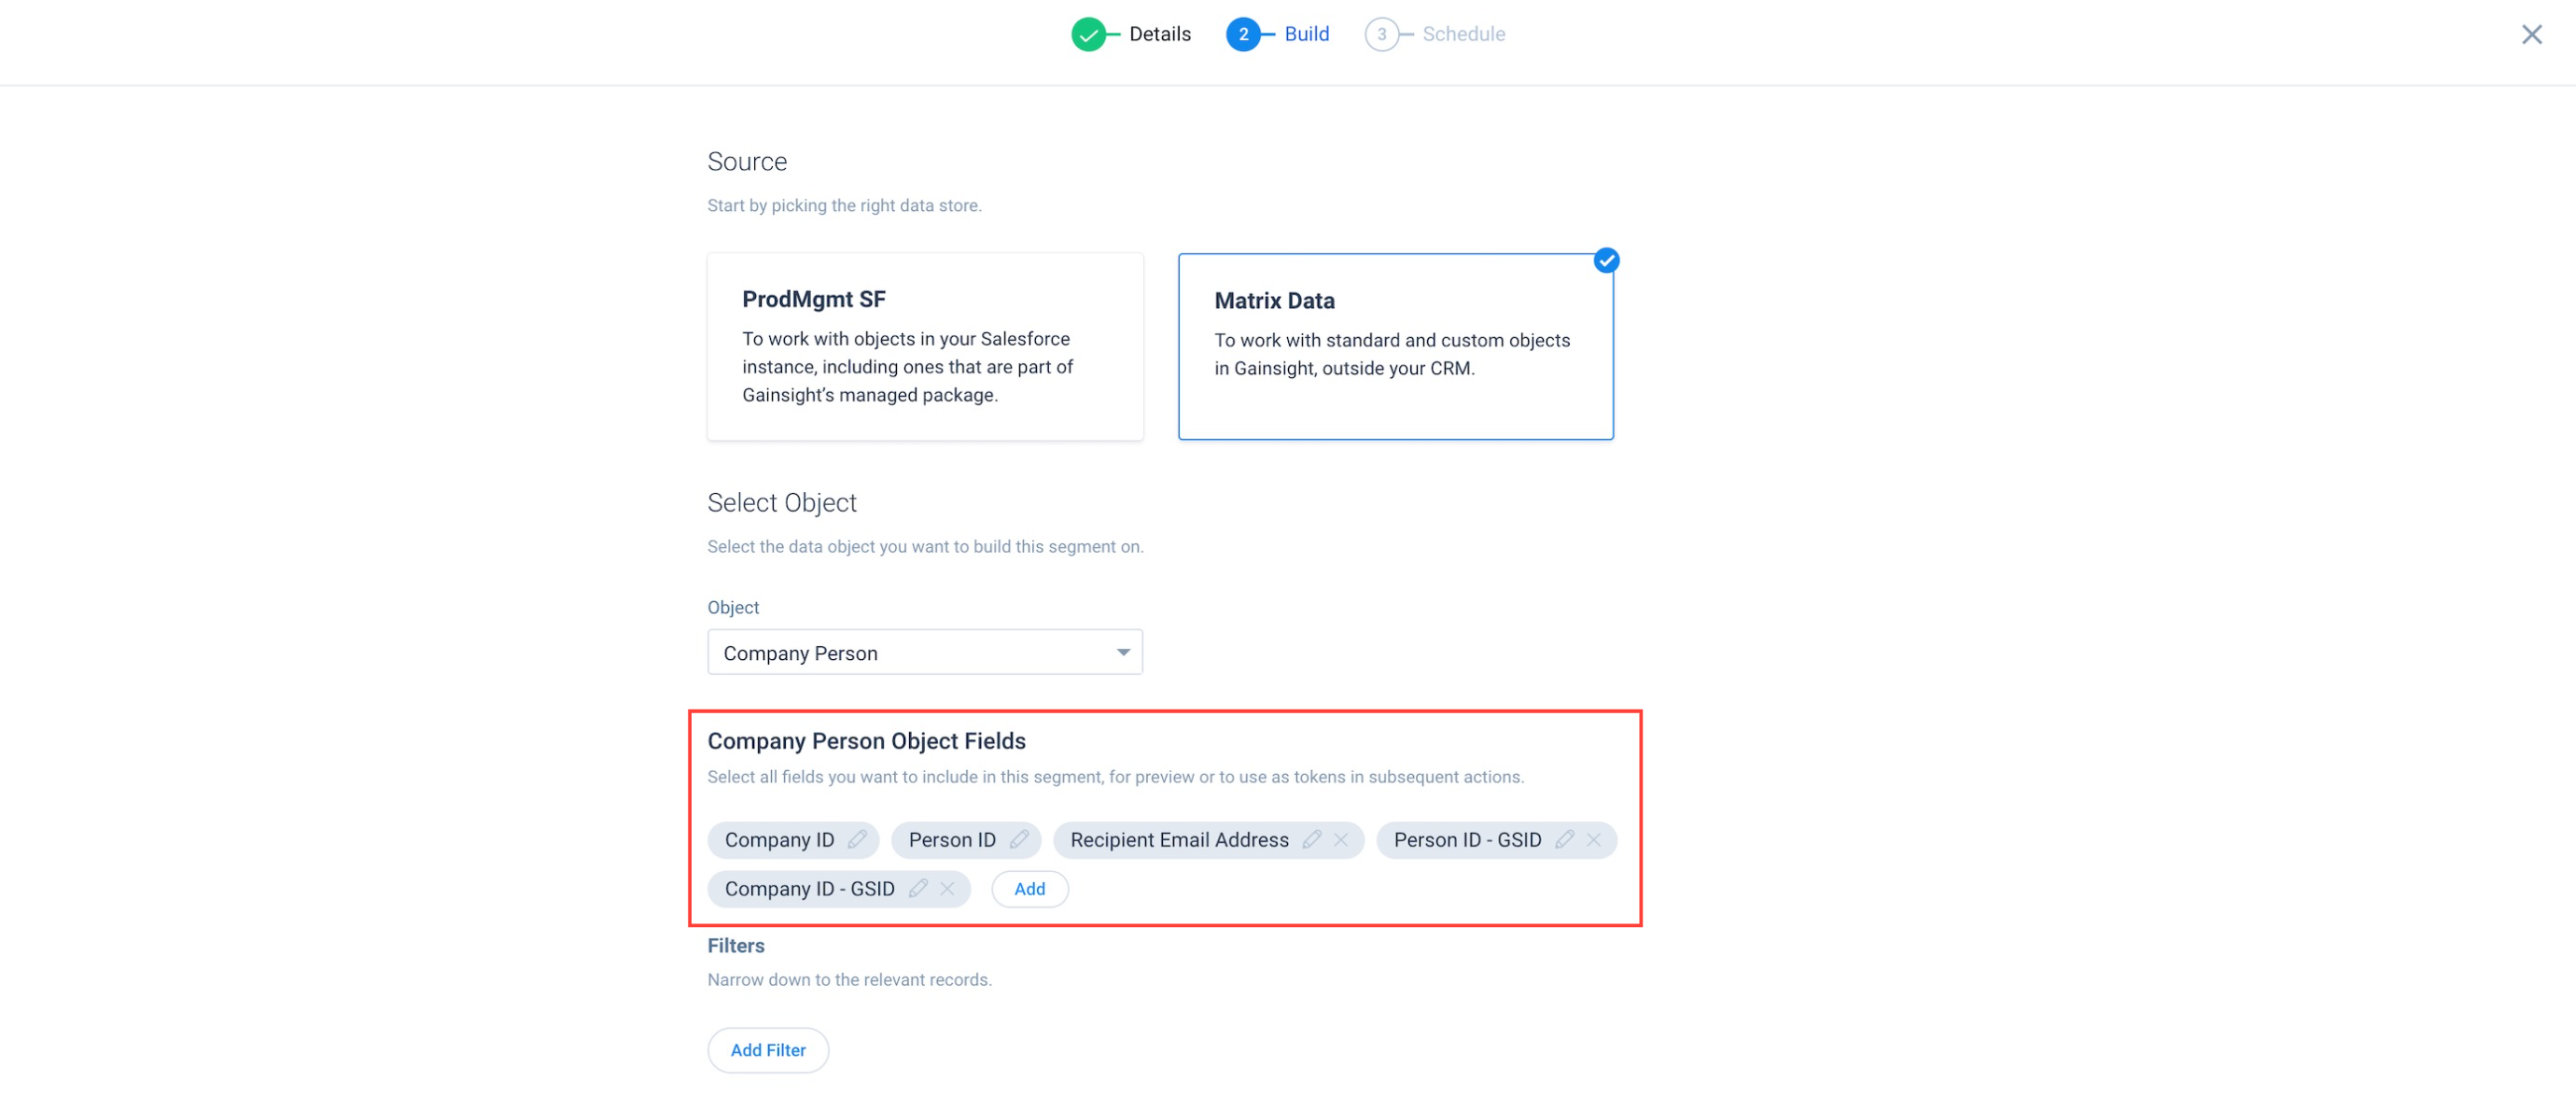
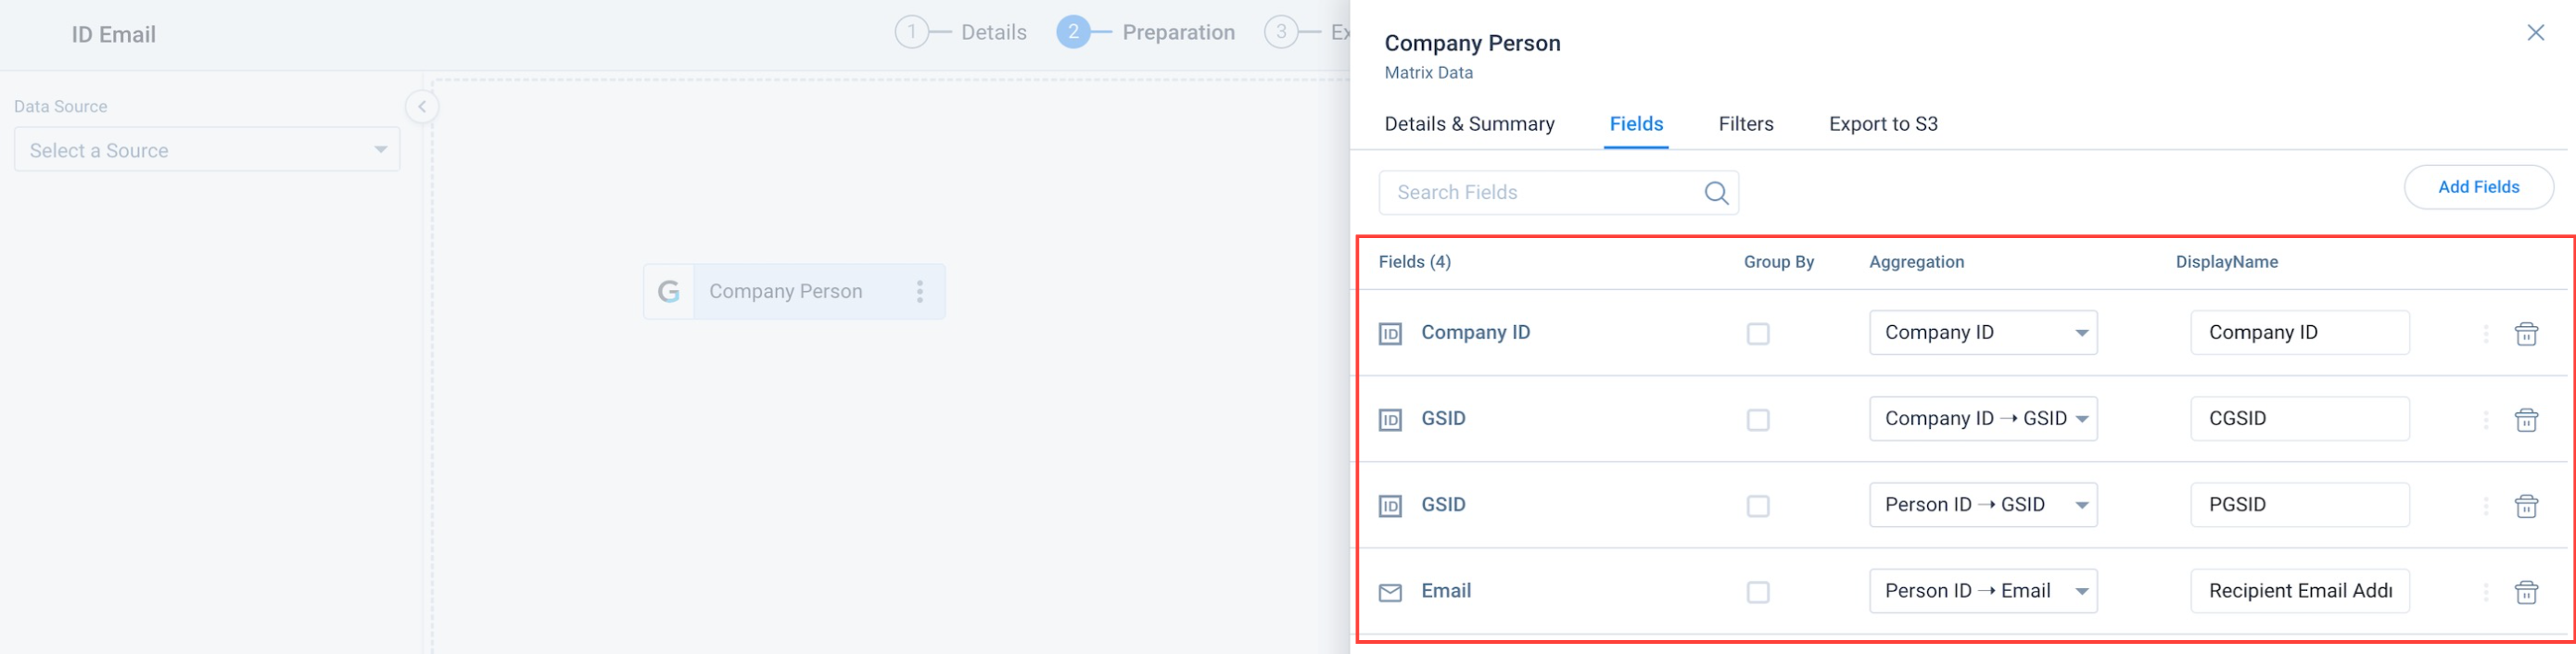
- When adding fields to the segments, it is required to include the Company ID-GSID and Person ID-GSID fields in addition to the Company ID and Recipient Email Address fields.
- Segments limit is capped at participants' daily limit or 500,000, whichever is lower.
CSV
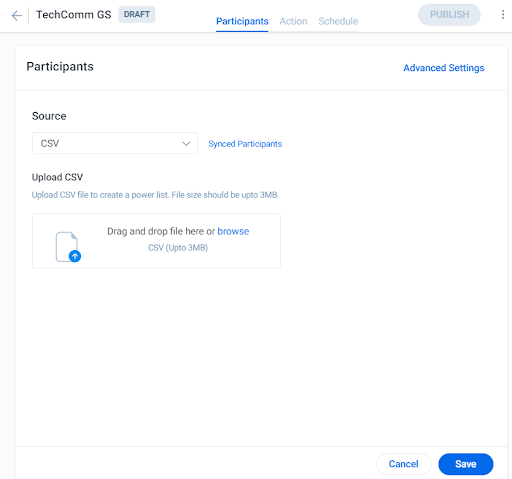
Select this option to directly upload a CSV file as your Simple Program participant source.
Note: You can upload a CSV with a maximum file size of 50 MB and 100,000 records per file.
To add a CSV as a participant source, take the following actions:
- Navigate to Digital Journey > Programs.
- Click to open an existing program, or click Add Program > Simple Program to create a new program. The New Simple Program dialog box appears on the screen.
- From the Participants tab > Source drop-down menu, select CSV.
- Click Browse to upload a CSV file.
- Click Sync Participants to fetch the participants from all of the sources that can be synced.
- Click Save.
Data Designer
Admins can use Data Designer to merge and transform customer data to discover meaningful insights. You can use a Data Designer as your Simple Program participant source. For more information on Data Designer, refer to the Data Designer Overview article mentioned in the Additional Resources section in this article.
To add a Data Designer as a participant source, take the following actions:
- Navigate to Digital Journey > Programs.
- Click to open an existing program, or click the Add Program button to create a new program. The Program Configuration page is displayed.
- From the Participants tab > Source drop-down menu, select Data Designer.
- Select any data designer that is set to run on a schedule periodically.
Note: Admins can click the Create New Data Designer option to navigate to the New Design page directly. - Click Save.
Note: Data Designer limit is capped at participants’ daily limit or 500,000, whichever is lower.

Notes:
- When adding fields to the Data Designer, it is required to include the Company ID-GSID and Person ID-GSID fields in addition to the Company ID and Recipient Email Address fields.
- When adding fields to the Data Designer, include the GSID field from the User lookup from where Recipient Email Address fields is added.
Event
Events are triggers that are the result of some other activity. You can select Events as your Simple Program participant source to add participants based on triggers from Gainsight’s Even Framework. Admins can configure Events under Administration > General > Events. Events must be configured before they can be configured as a participant source. For more information on the event fields resolution configuration, refer to the Events Framework article mentioned in the Additional Resources section in this article.
To select Event as a participant source, take the following actions:
- Click to open an existing program, or click Add Program > Simple Program to create a new program. The configuration page is displayed.
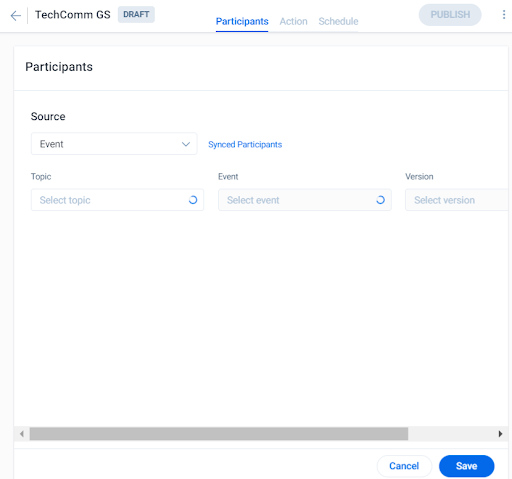
- From the Participants tab> Source dropdown menu, select Event.
- Select the required topic from the Topic dropdown menu.
- From the Event dropdown menu, select an event associated with the topic.
Note: Values in the Event dropdown menu are populated based on the topic selected in the previous step. - Select a version associated with the event. The required event is added as a participant in the Program.
- Click Save.
Note: The Event participant source supports all events configured in the Events Framework, including PX custom events. Using Event as a source in Simple Programs, admins can take the following actions:
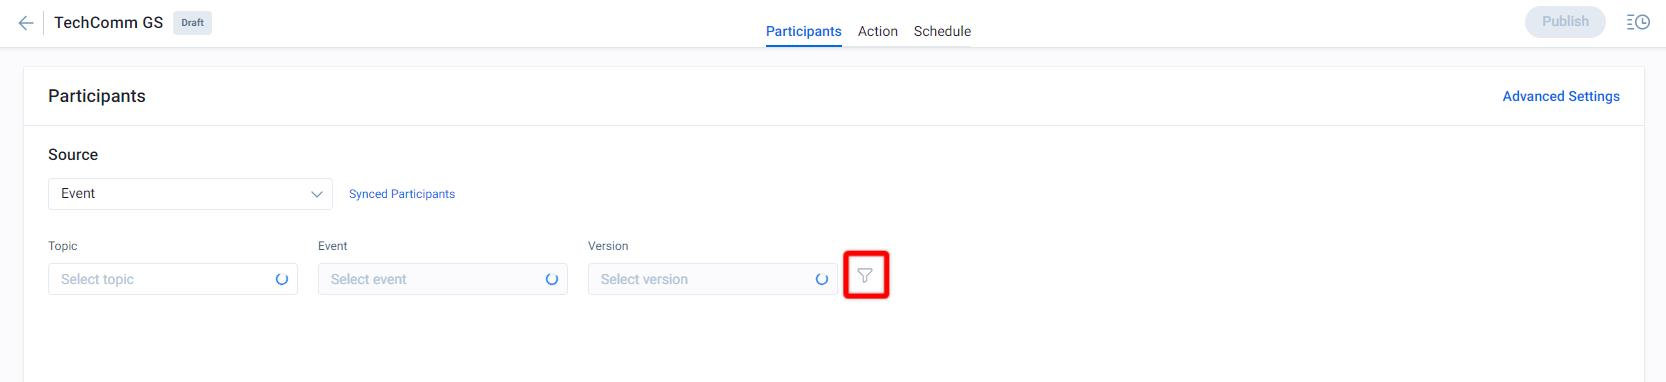
- Configure filters for the events
- Select lookup fields for filters
- Map lookup fields in the Mapping selection
In the Event source, an Event Source Filter is applied to the source to define which contacts must be added as Program participants. Based on the filter criteria, contacts from the event source are added as participants.
Map Participant Sources
You must select fields from the source to map data from a participant source to any relevant Standard and Dynamic Fields. You can select both Standard and Dynamic fields as tokenization options in an email step. The field mapping section is only displayed after you have added a participant source.
Standard Field Mapping
In this section, all mandatory fields are automatically mapped to participant source fields. Click the Add option to add additional fields and map them accordingly. The data stored in standard fields are refreshed only once during program creation.

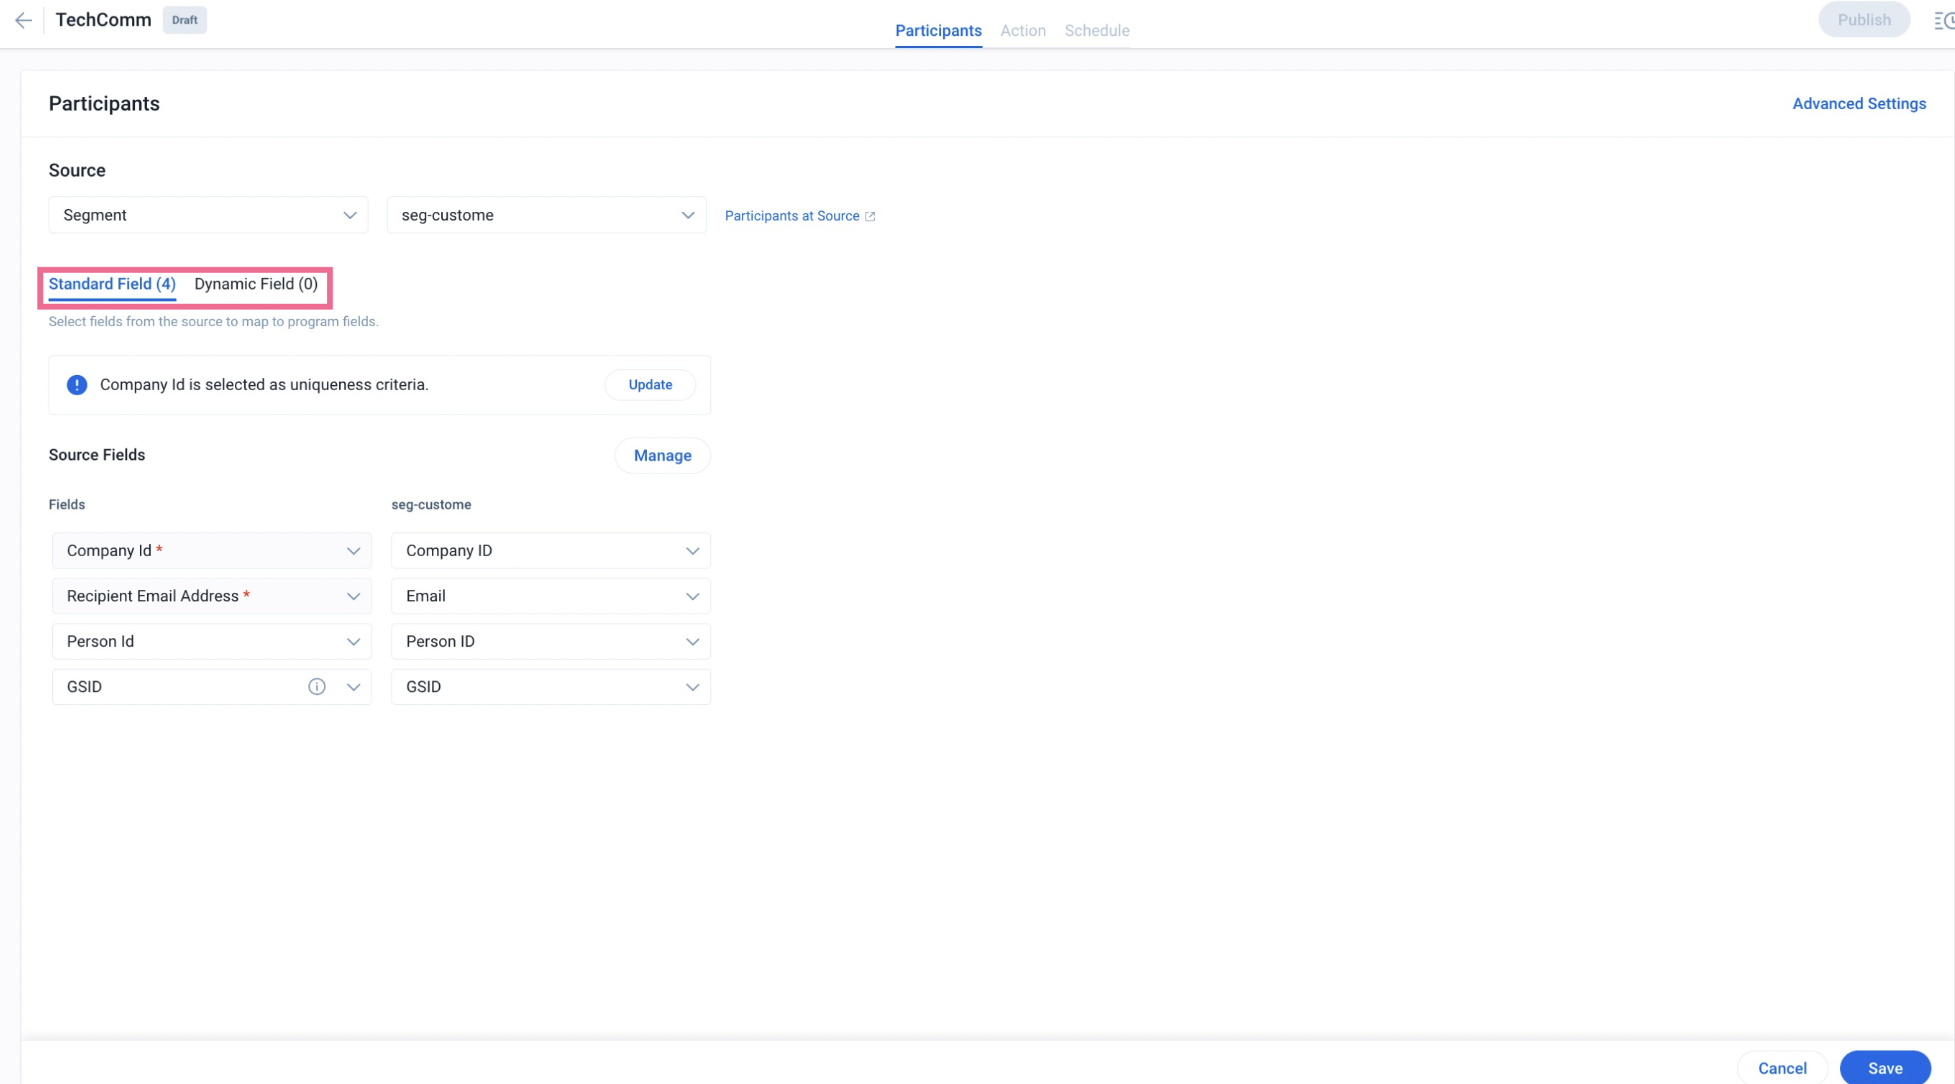
Standard fields are mapped to each selected participant source field automatically. You can change the mapping by clicking Manage to use each source field and selecting different options.
You can mark a selected participant(s) as unique to prevent participants from being sent multiple, identical emails as part of the Simple Program. This can be achieved by selecting the fields to be added as Uniqueness Criteria for each field to determine the unique participant.
Standard Field Mapping helps you map all mandatory fields to participant source fields.
- Navigate to Simple Program > Participants. The Participants screen appears.
- From the Source dropdown menu, select the source type.
- Based on the selected Source, select the segment from the Segment dropdown.
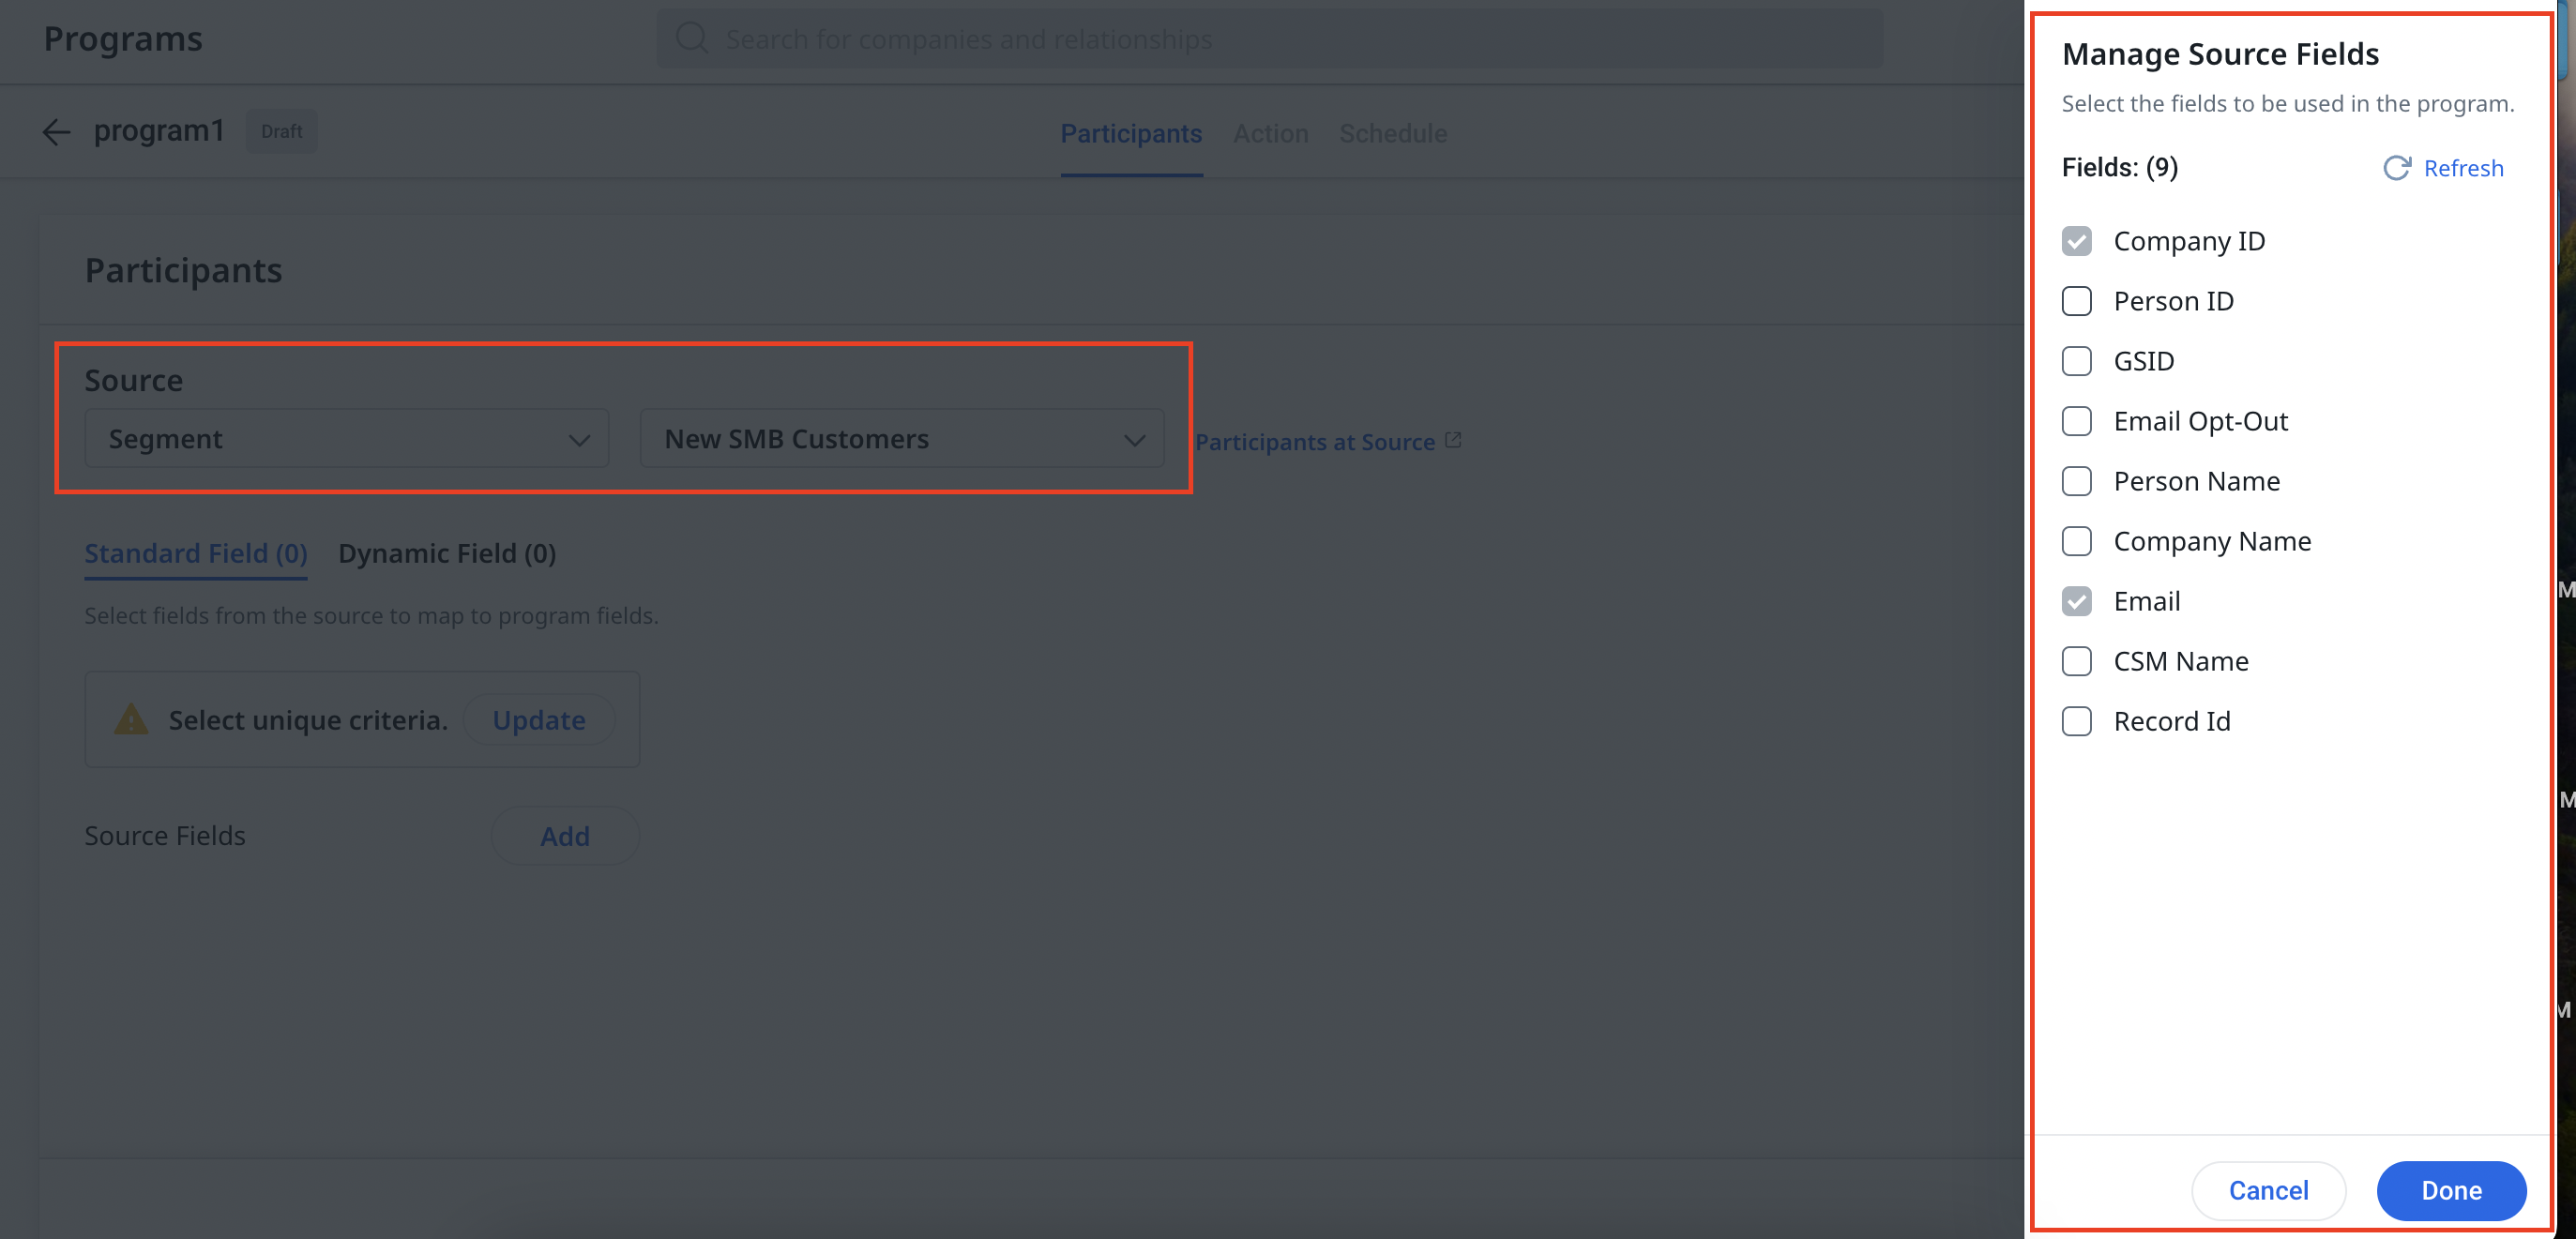
- In the Manage Source Fields slide-out panel, perform the following actions:
- Select the fields to be used in the program.
Note : The source fields which are already in use in the program cannot be reselected and are grayed out .
- Click the Save button. The Standard fields are mapped to each selected participant source field automatically.
Note: Admins can check and modify the program fields after mapping if the correct field is not automatically mapped.
Add or Delete Source Fields in Segments
Source fields that are added or deleted from the Segments page are reflected in the Participants page's source fields section. For more information about Segments and its functionality, refer to the Segments article from the Additonal Resources section.
To add a Source field in the Segments page:
- Navigate to Administration > General > Segments page. The Segments List View page appears.
- Click the three-vertical dots icon against the desired segment.
- Select the Edit option from the block list. The Segment Configuration page.
- Click the Add button.
- Select the object from the dropdown list.
- Click View Records. The Records slide-out panel appears.
- Click Next. The Schedule page appears.
- Click Done. The Segment list page appears.
- Click the three-vertical dots icon of the modified segment.
- Select Run Now.
To view the impact of add source to a segment in the Participants:
- Navigate to Simple Program > Participants. The Participants screen appears.
- From the Source fields, click the Manage button. The Manage Source Fields slide-out panel appears.
- Click Refresh. The Manage Source Fields slide- out panel appears with added and deleted fields.
To delete a Source field in the Segments page:
- Navigate to the Administration > General > Segments page. The Segments List View page appears.
- Click the three-vertical dots icon against the desired segment.
- Select the Edit option from the block list. The Segment Configuration edit page appears on the screen.
- From Company Person Object Fields, click the Remove icon.
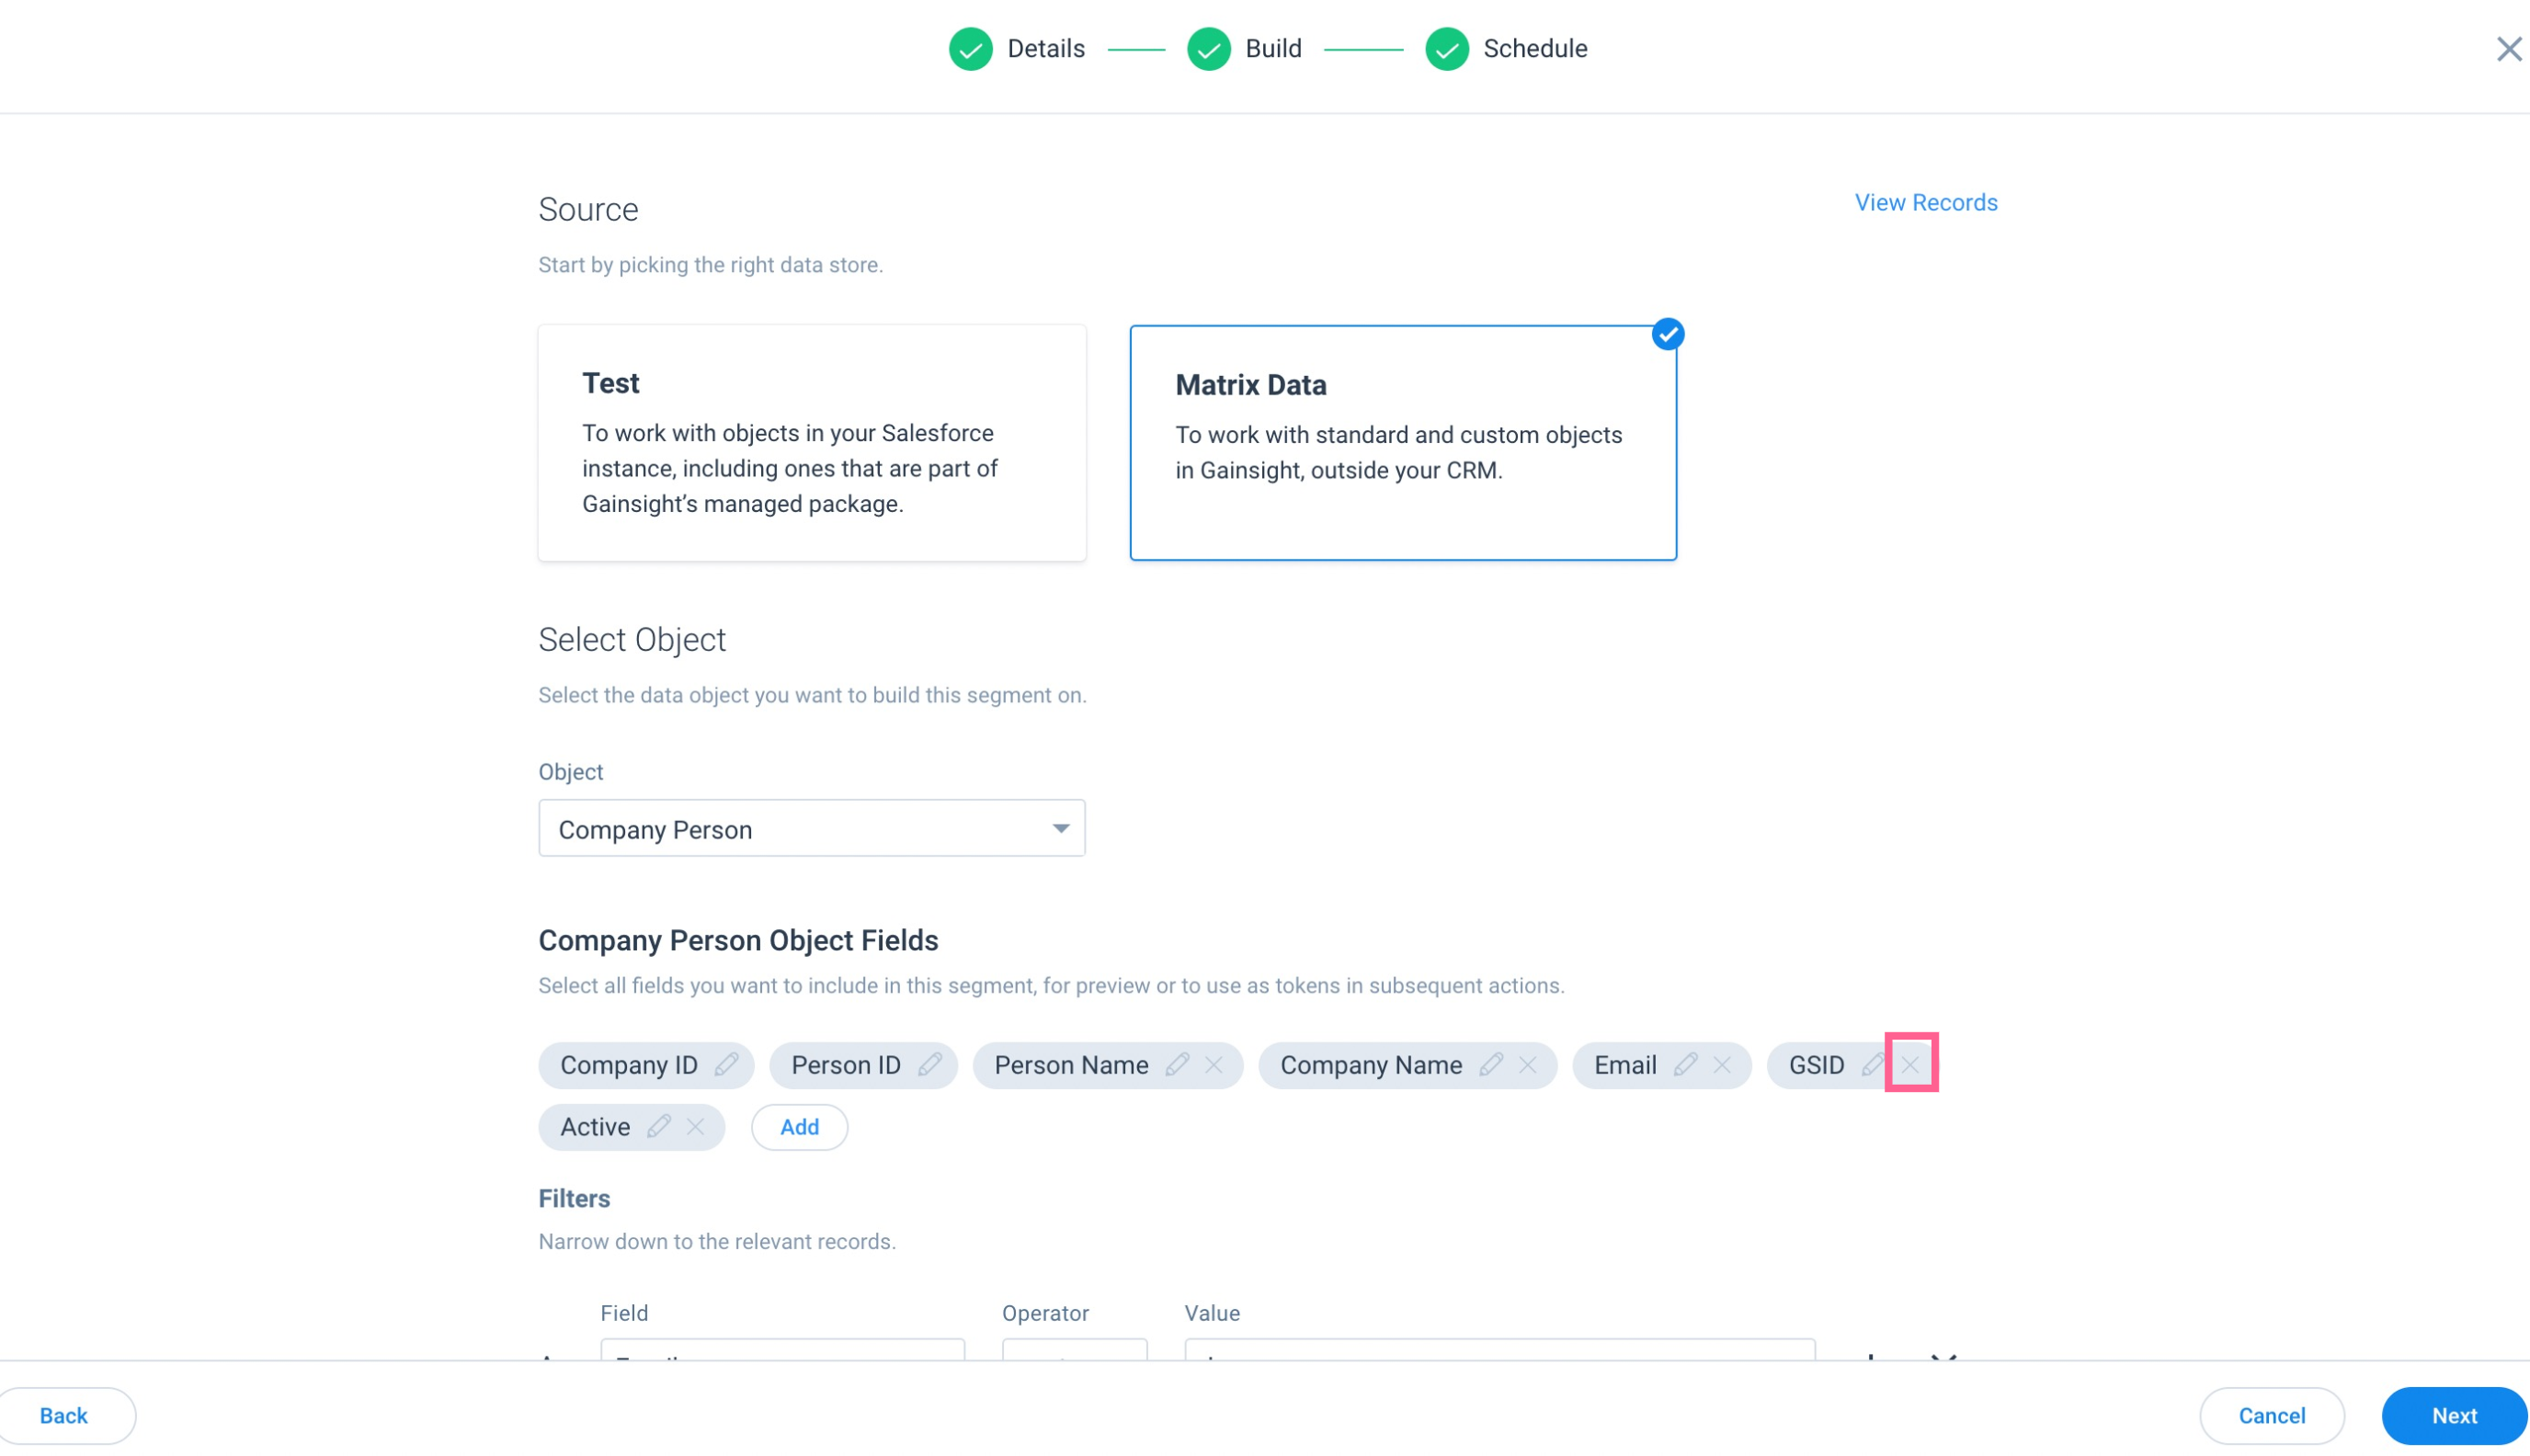
- Click View Records. The Records slide-out panel appears.
- Click Next. The Schedule page appears.
- Click Done. The Segment list page appears.
- Click the three-vertical dots icon of the modified segment.
- Select Run now.
To view the impact of delete source to a segment in the Participants:
- Navigate to Simple Program > Participants. The Participants screen appears.
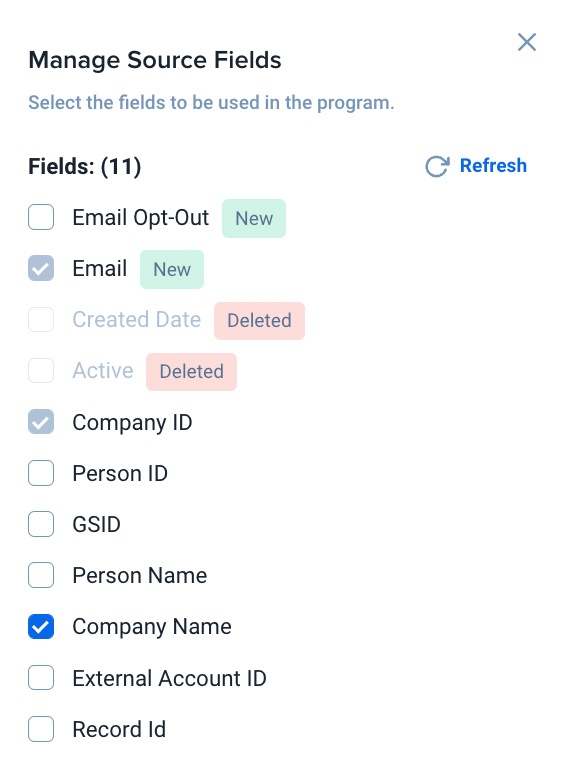
- From the Source fields, Click the Manage button. The Manage Source Fields slide out panel appears on the screen.
- Click Refresh. The Manage Source Fields slide- out panel appears on the screen with added and deleted fields as shown below
Note : The fields which are added/ deleted are updated in the Participants page as well as in the source fields section.
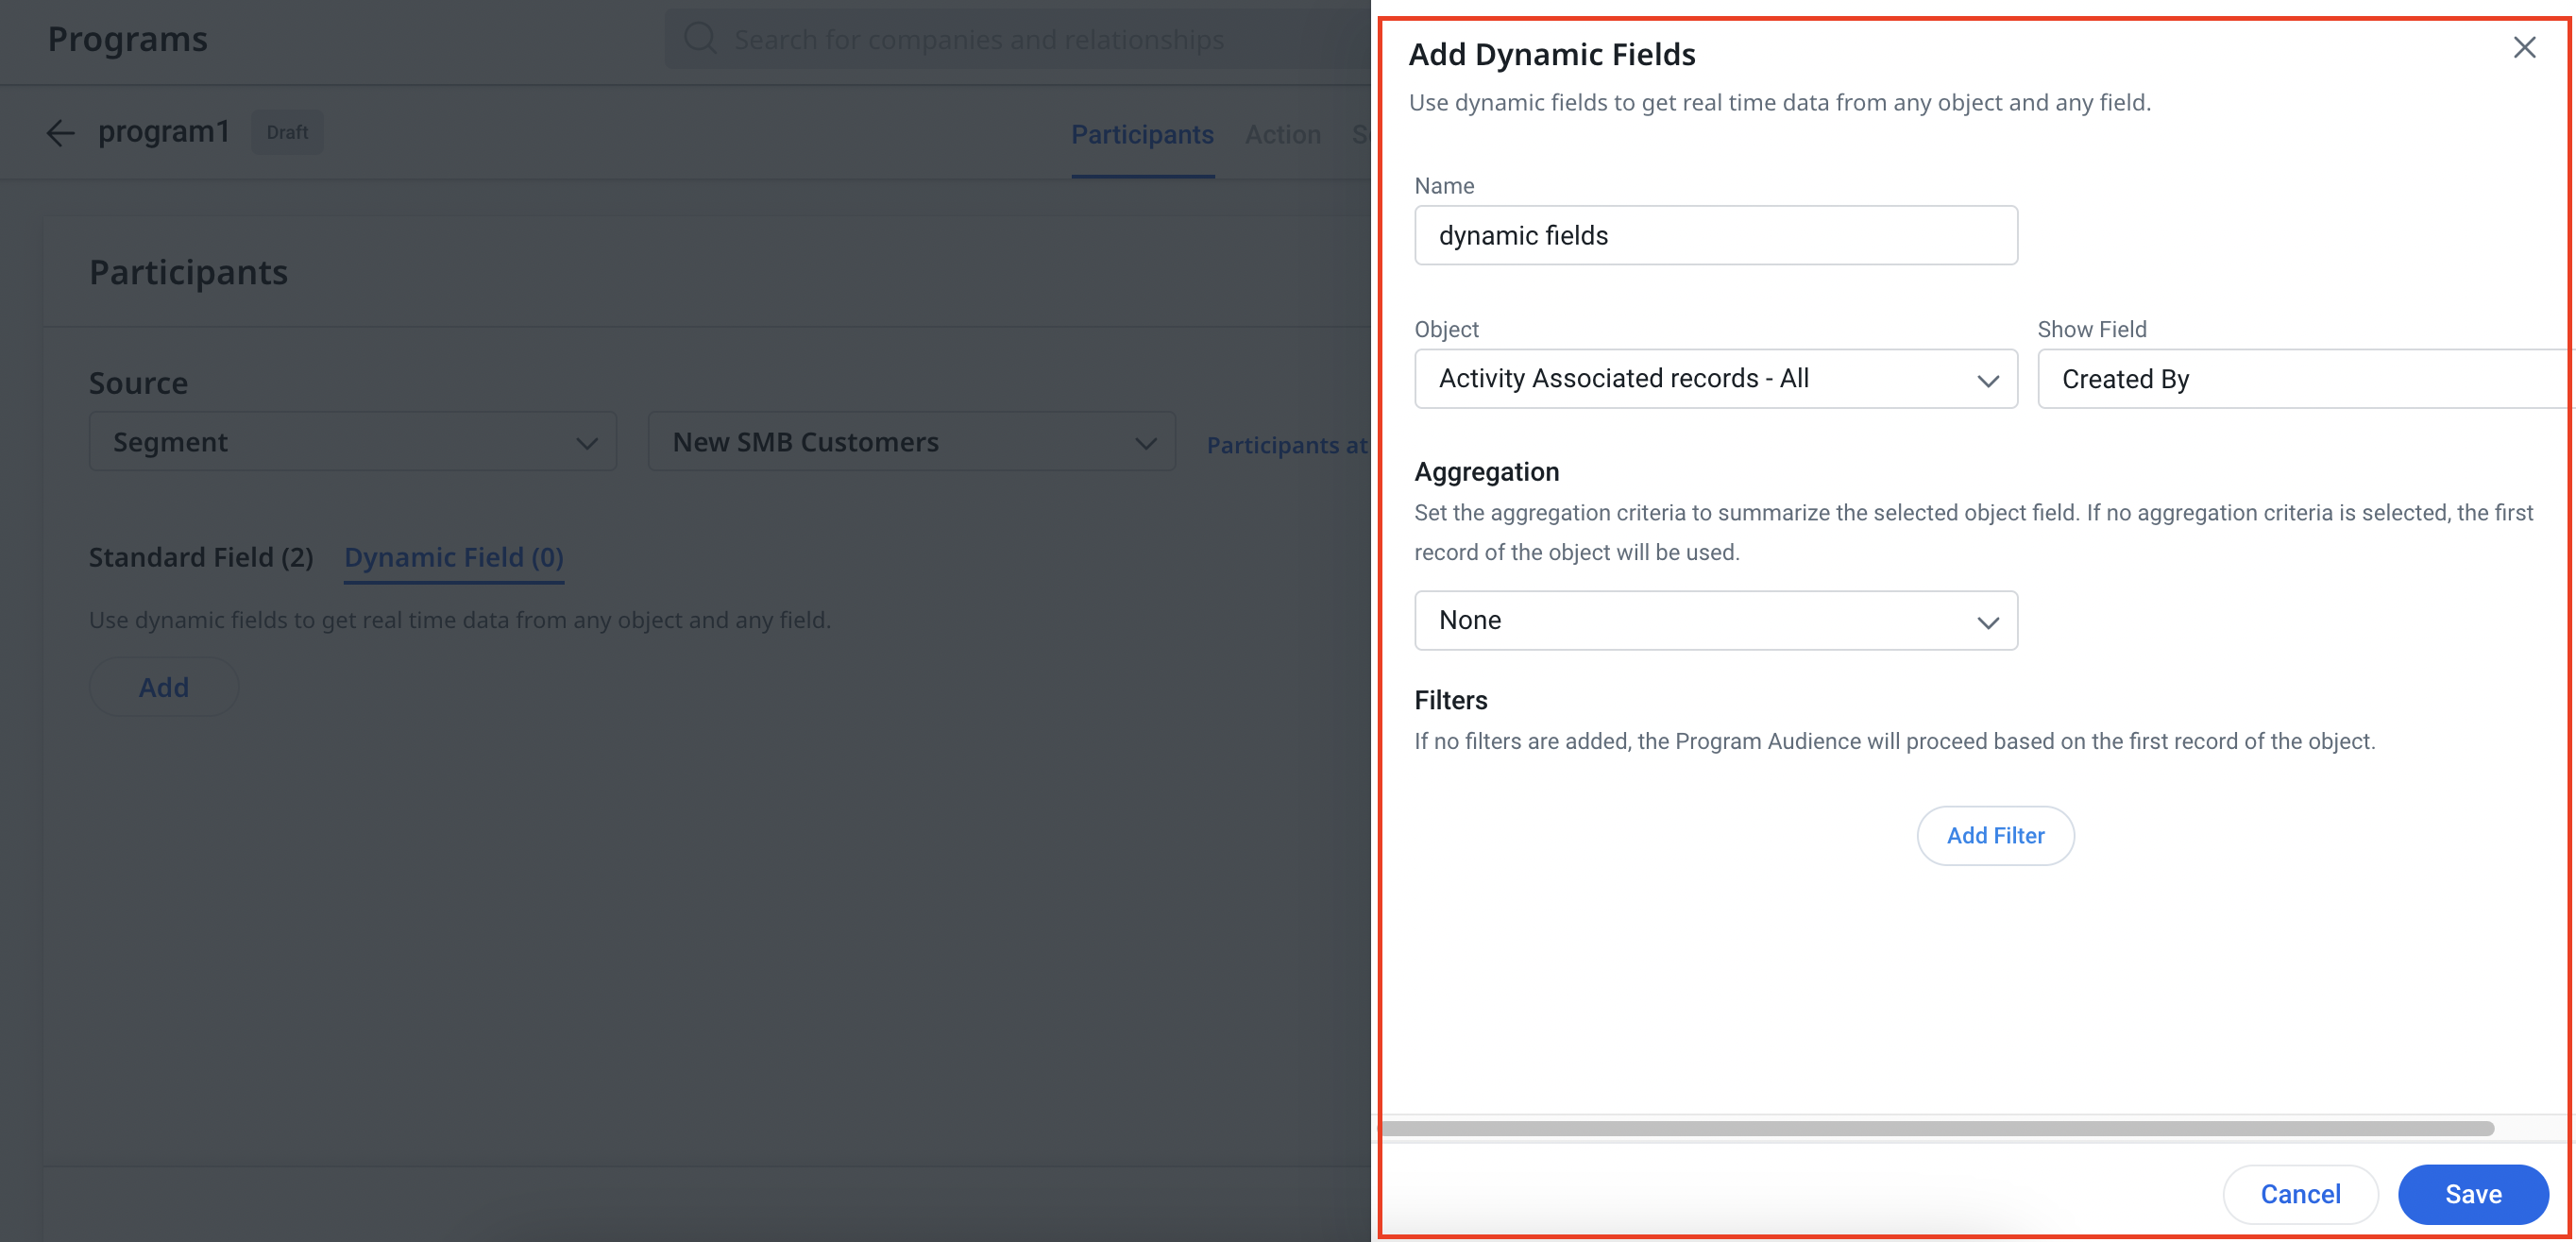
Add Dynamic Fields
Use Dynamic Fields to get real-time data from any object and field. You can add Dynamic Fields and use them in the Send Email action step in a Simple Program. In this section, you can add Dynamic Fields by clicking Add. You can also view any dynamic fields that have been added to this program.
Configure Advanced Settings
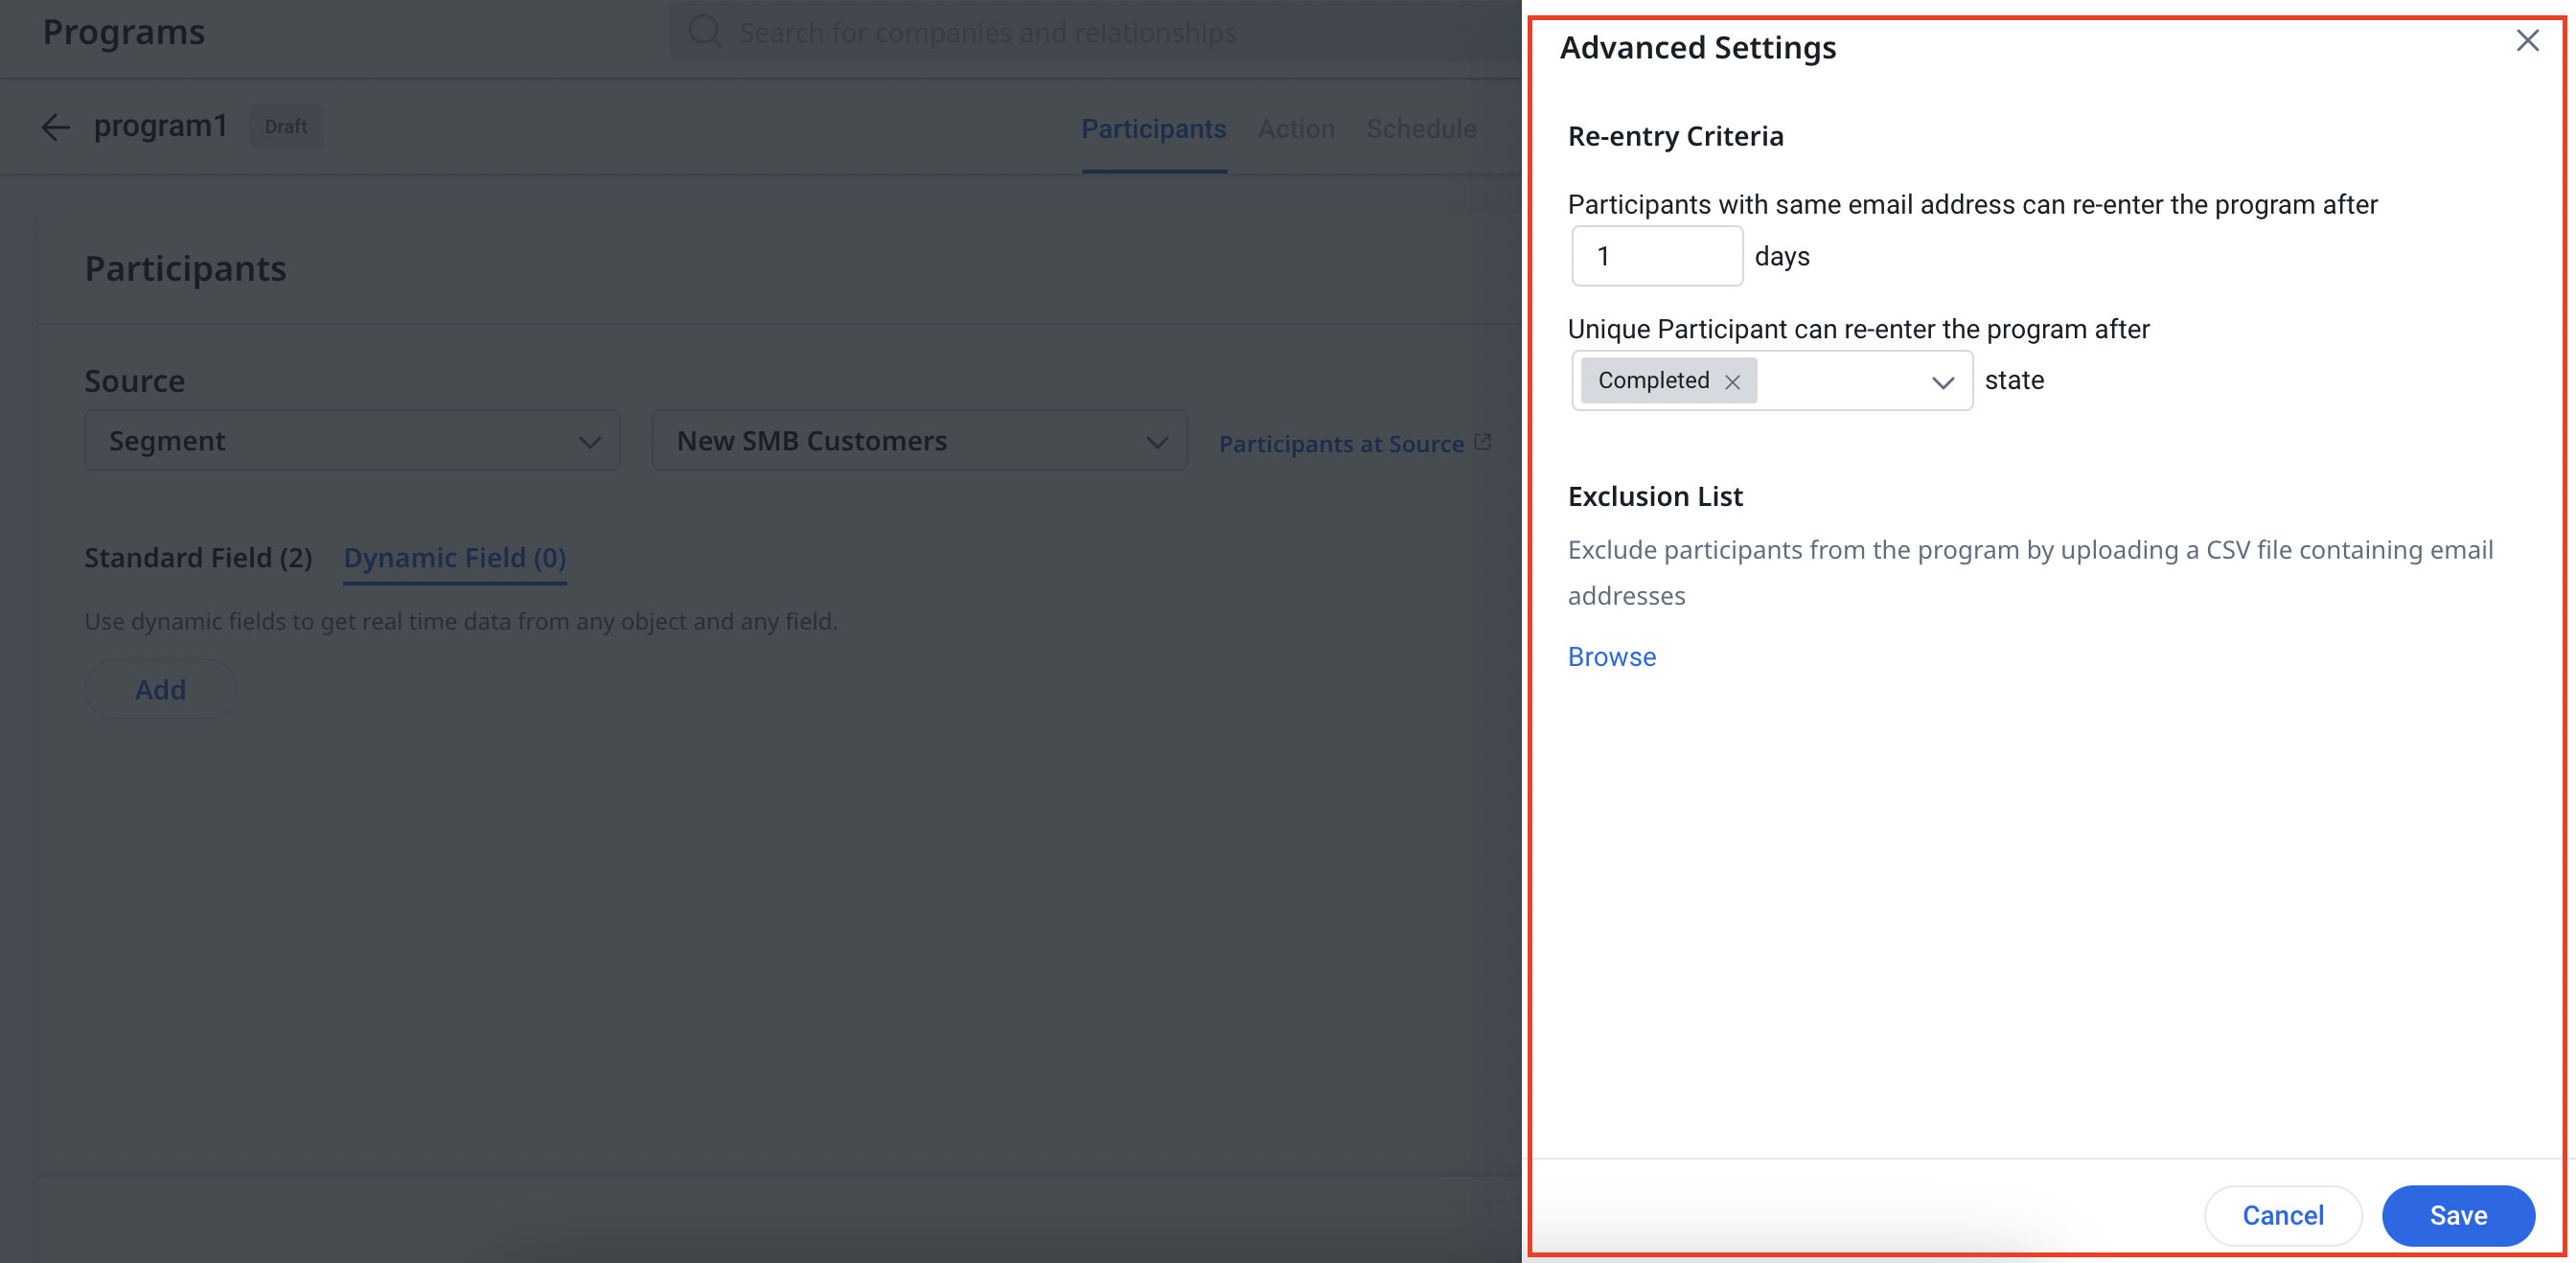
The Advanced Settings section provides several options to define further how Participants are filtered and added to a Simple Program.
Re-entry Criteria
You can select Re-Entry Criteria options for determining how participants are added to the program lifecycle. You can select the following:
-
Participant with the same email address can re-enter the program after X Days: Select this option to prevent a Participant with the same email address from being added to the Program within the number of days you select.
-
Unique Participant can re-enter the program after __ state: A participant with unique criteria can be re-added after reaching a participant state that you select. For example, if you would like people to be re-added after they leave the Participant Lifecycle, as they were “Knocked Off” or encountered a “System Error”, you can select those options. This option can also be configured after the Program is published.
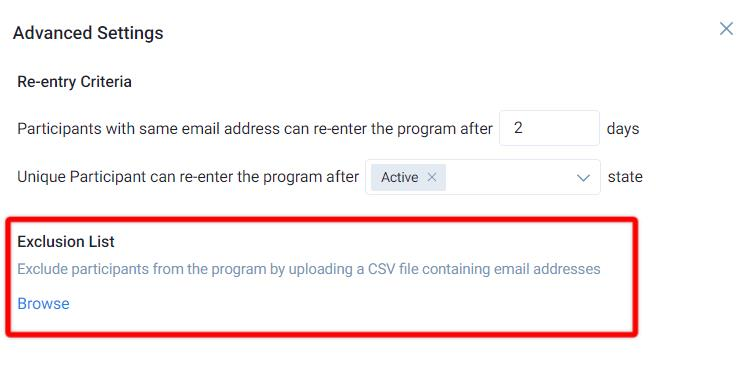
Exclusion List
You can upload a CSV that contains the list of users to be excluded from the simple program, even if they are added as unique participants from a source. A user in the Exclusion List is not added by a source during the sync.
To add an exclusion list, take the following steps:
- Navigate to Digital Journey > Programs.
- Click to open an existing program, or click the Add Program option to create a new program. The Program Configuration page is displayed.
- Click Advanced Settings. The settings screen is displayed.
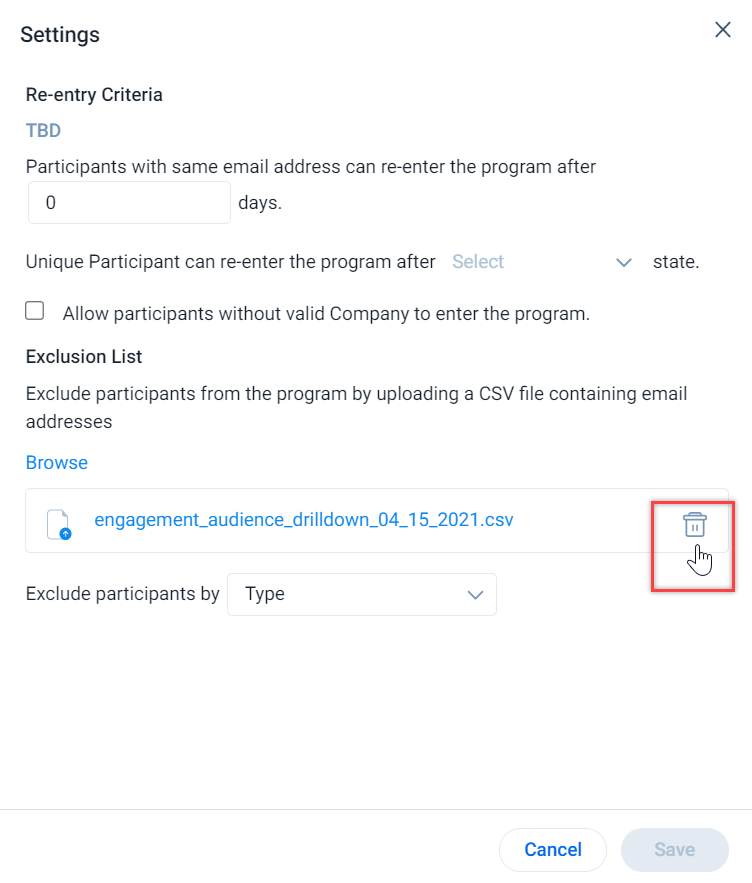
- In the Exclusion section, click Browse to upload a CSV file.
-
Select criteria to exclude the participants. The available values are pulled from the uploaded CSV’s headers.
-
Click Save.
Exclusion lists can be deleted after a Program has been published by clicking on the trash can icon next to an uploaded list.
Note: The Exclusion list will only apply to the Email Address field; participants will not be excluded if we select any other non-email address fields.
Additional Participant Configuration Options
You can access additional options on the participant configuration page. These options include:
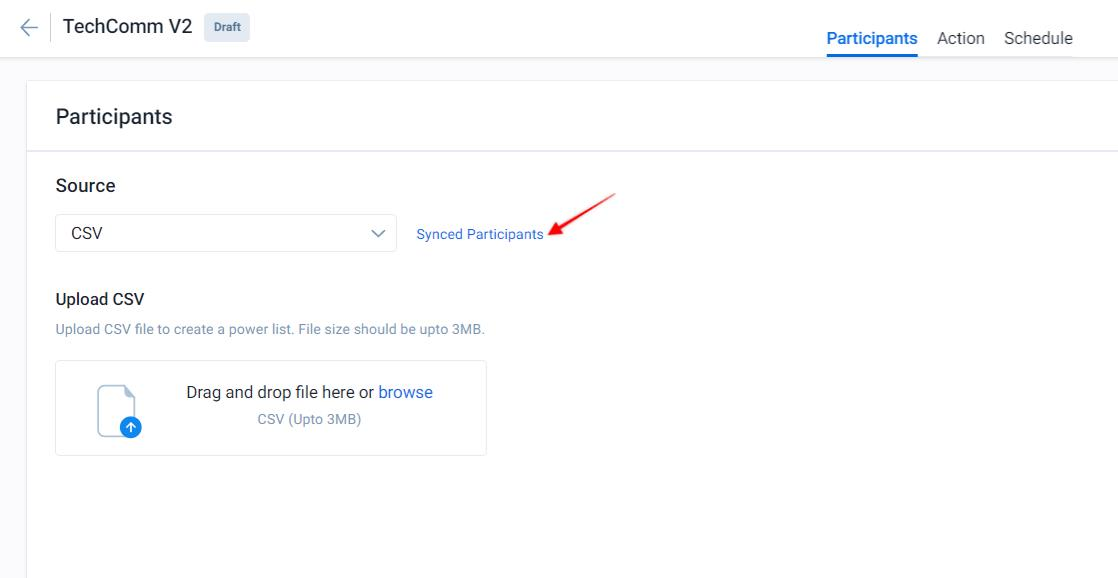
Synced Participants
The participant list displays the state of each participant within the Participant Lifecycle.
You can view the list of all people who were not added as program participants for any reason. To view these records, click the Failed Participants tab. After participants are synced (manually or via schedule), the list is generated, and after uniqueness criteria and advanced criteria are applied.
After adding any Participant source (Segment, CSV, Data Space, or Event) and complete Participant configuration, you must sync the records from each source into the single participant list. To initiate this process, click the refresh icon of each Participant source to sync participants from the respective source to the program.
Note: The participant sync can only be completed after defining the program’s Uniqueness Criteria and mapping each participant source.
The list will include a column displaying the Failure Reason. For more information on why a potential participant might fail, refer to the Participant Failure Conditions section.
Participants At Source
The Participants at source lists out the segment details of all source types.
To view the segment records:
- Navigate to Simple Program > Participants. The Participants screen appears.
- Click Participants at Source. It redirects to the Segments Records page.

Enable Communication Usage Email Notifications
You can view the total and available daily, monthly, and operational email communication limits for your Gainsight instance from the Communication Usage window. Furthermore, you can enable email alerts when specific communication usage limits are reached.
To enable communication usage email notifications:
- Navigate to Digital Journey > Programs. The programs list page appears.
- Click Communication Usage from the top-right corner. The Communication Usage window appears.
- Turn ON the respective toggle switches for Daily Usage, Daily Operational Email Usage or Monthly Usage to send email notification to JO admins when the 100% limit is reached.
- (Optional) Turn ON the 75% or 60% toggle switch for Monthly Usage Limit to send email notifications to JO admins when the 75% or 60% monthly usage limit is consumed, respectively.
![list -5 - V4 Advanced Programs [Q1-2023] - Zeplin 2023-07-26 at 2.26.49 PM.jpg](https://support.gainsight.com/@api/deki/files/22902/list_-5_-_V4_Advanced_Programs_%255BQ1-2023%255D_-_Zeplin_2023-07-26_at_2.26.49_PM.jpg?revision=1)
IMPORTANT: The above Communication Usage window appears only for new customers who have purchased packages or add-ons after July 29, 2023. The existing customers will continue with the old communication usage limits.