X-Org Migration Overview
Gainsight NXT
| IMPORTANT: This article applies to the old version of X-Org. If you are using new version of X-Org, you can find the support documentation by clicking here. |
IMPORTANT: Based on customer feedback, it is important that you have the right level of support from Gainsight to use this feature effectively. If you are interested in leveraging X-Org in your implementation migration, please contact your Gainsight Project Manager or Gainsight CSM for more information.
In Administration > X-Org, Gainsight offers tools to migrate your Custom Object's schema, Reports, Rules, Playbook assets, data spaces, and reports from a source org to a target org. For example, if you have built and tested rules in your sandbox org, you may want to migrate them to your production org. This feature saves Admins valuable time and is enabled within your org by default.
Notes:
- The Migration tool can be used to migrate Scorecard and Survey configurations. For more information on migrating Scorecards and Surveys, refer to Migrating Scorecards using X-Org and Migrate Surveys with X-Org respectively.
- You can re-run migrations that you've ran before with the same configurations. For more information on this process, refer to Re-run Migrations.
Prerequisites
You must be a Super Admin in order to complete a migration.
Supported Items
For a full list of supported items, refer to Supported Migration Items.
Limitation in Asset Migration
Currently, Upsert operation is not supported for any of the Assets, during migration. So if an Asset with same name already exists in the target org, the migration fails (if unique name constraint is applicable for the asset) or a new asset is created (if unique name constraint is not applicable for the asset). Upsert operation is supported only for Configurations and Objects.
For instance, if you have a rule called CTA Rule in both source and target orgs, the migration job creates a new rule with the same name (CTA Rule) in the target org, since the Rules do not have the unique name constraint and the Upsert operation is not supported for Rules during migration. If your source and target orgs have a Scorecard called Company Scorecards and if you try to migrate this scorecard, the migration job fails because unique name constraint is applicable to Scorecards and Scorecard migration does not support Upsert operation.
Procedure
To migrate assets from a source org to a target org, take the following steps:
Setup Migration
-
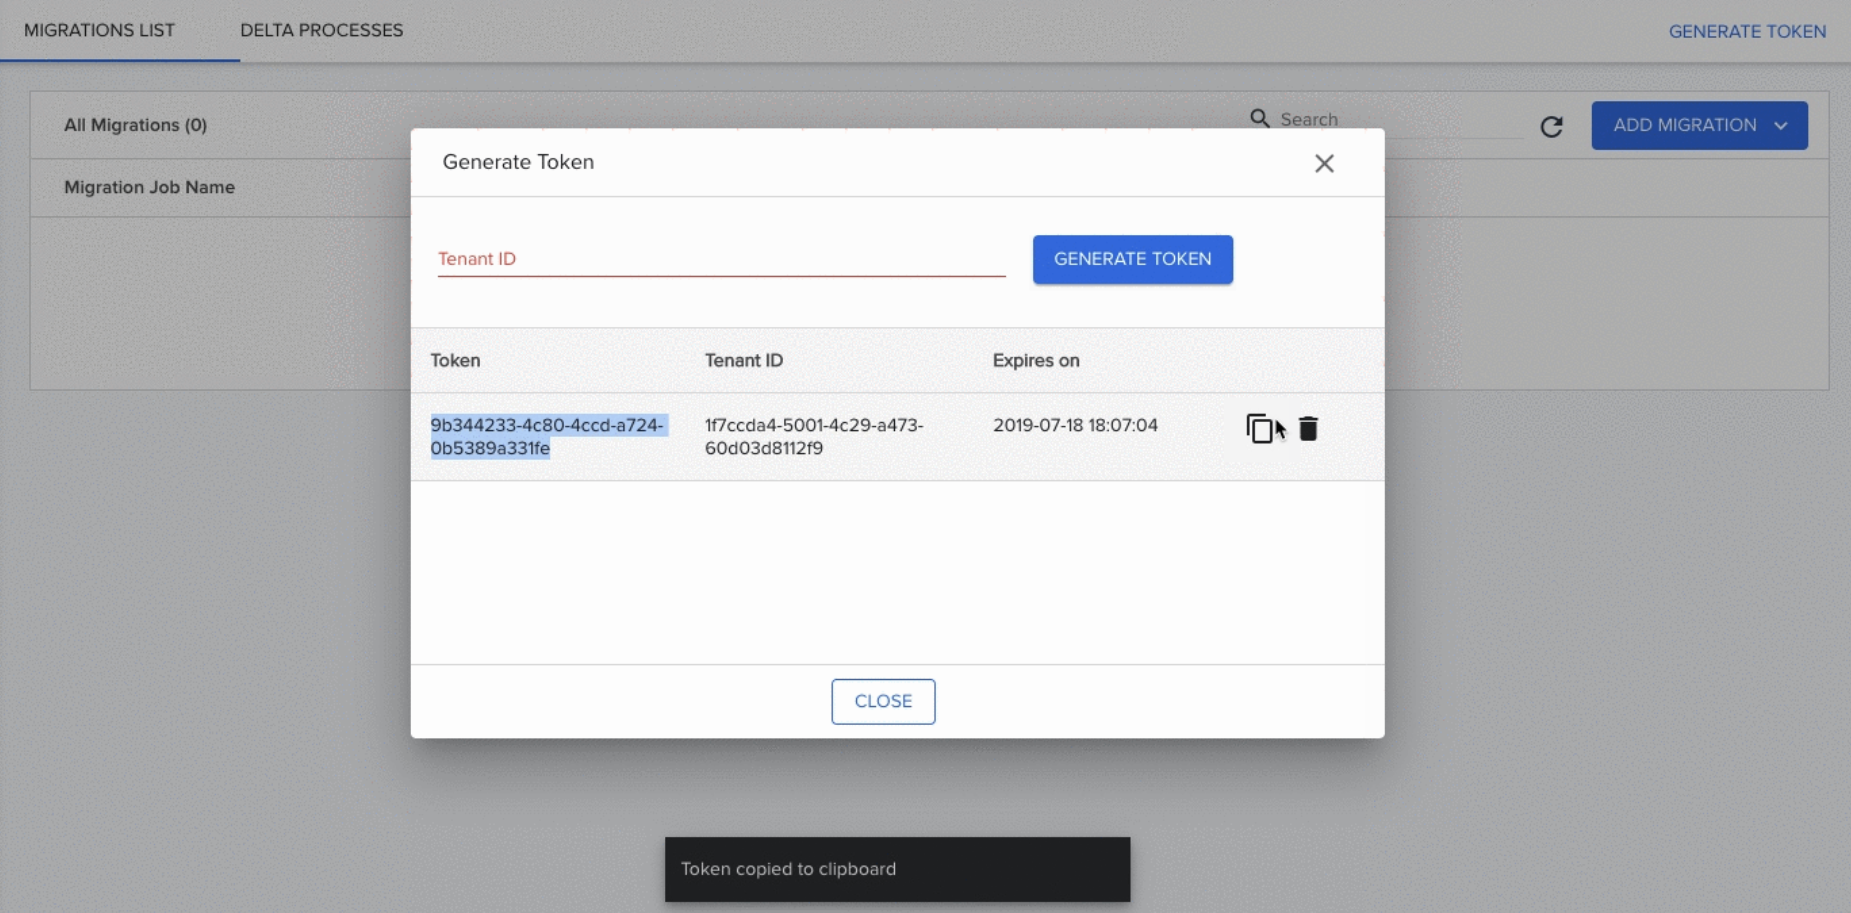
Within the target org, navigate to Administration > X-org
-
Click GENERATE TOKEN.
-
Enter the Tenant Id of the source org.
-
Click GENERATE TOKEN.
-
Click the copy icon to copy the token and click CLOSE.
Note: If you have already generated the token for the target org, you can use the existing token.
-
Within the source org, navigate to Administration > X-org
-
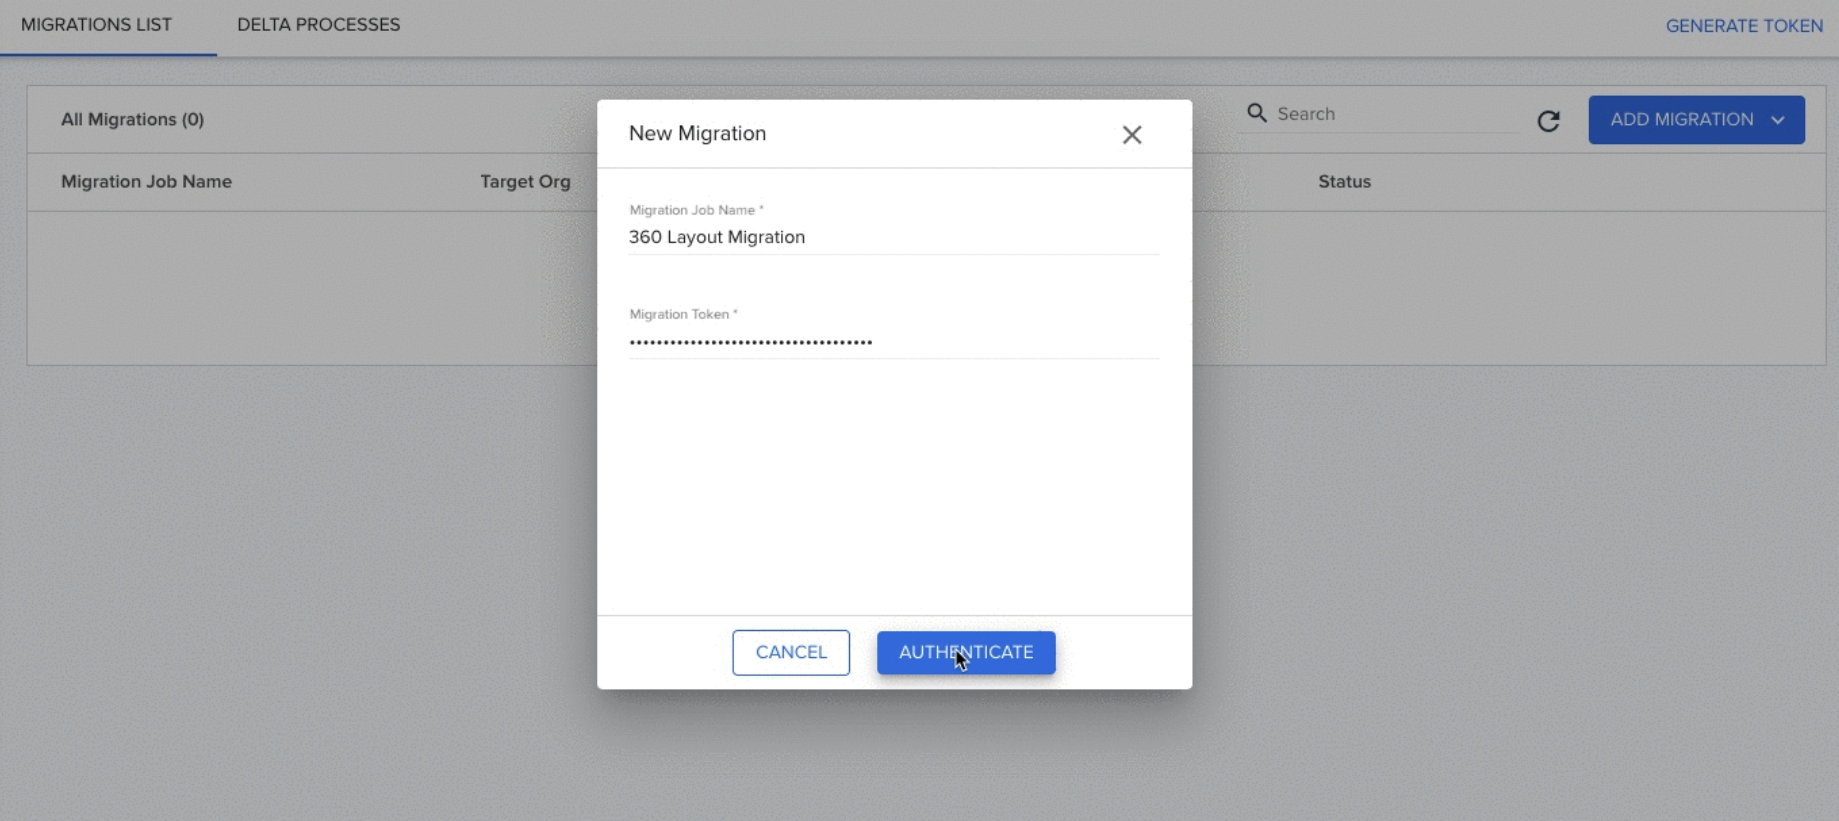
Select New Migration from the ADD MIGRATION menu. You can also select the Upload Change Set option, to upload a configuration file from the re-run job.
-
Enter a name for the Migration.
-
Enter the Migration Token.
-
Click AUTHENTICATE. This will display the Migration Assets window.
-
(Optional) Click RUN, to execute the Delta process. This process returns the difference in assets and other data between source and target orgs. For more information on this process, refer to Run Delta Process Overview.
-
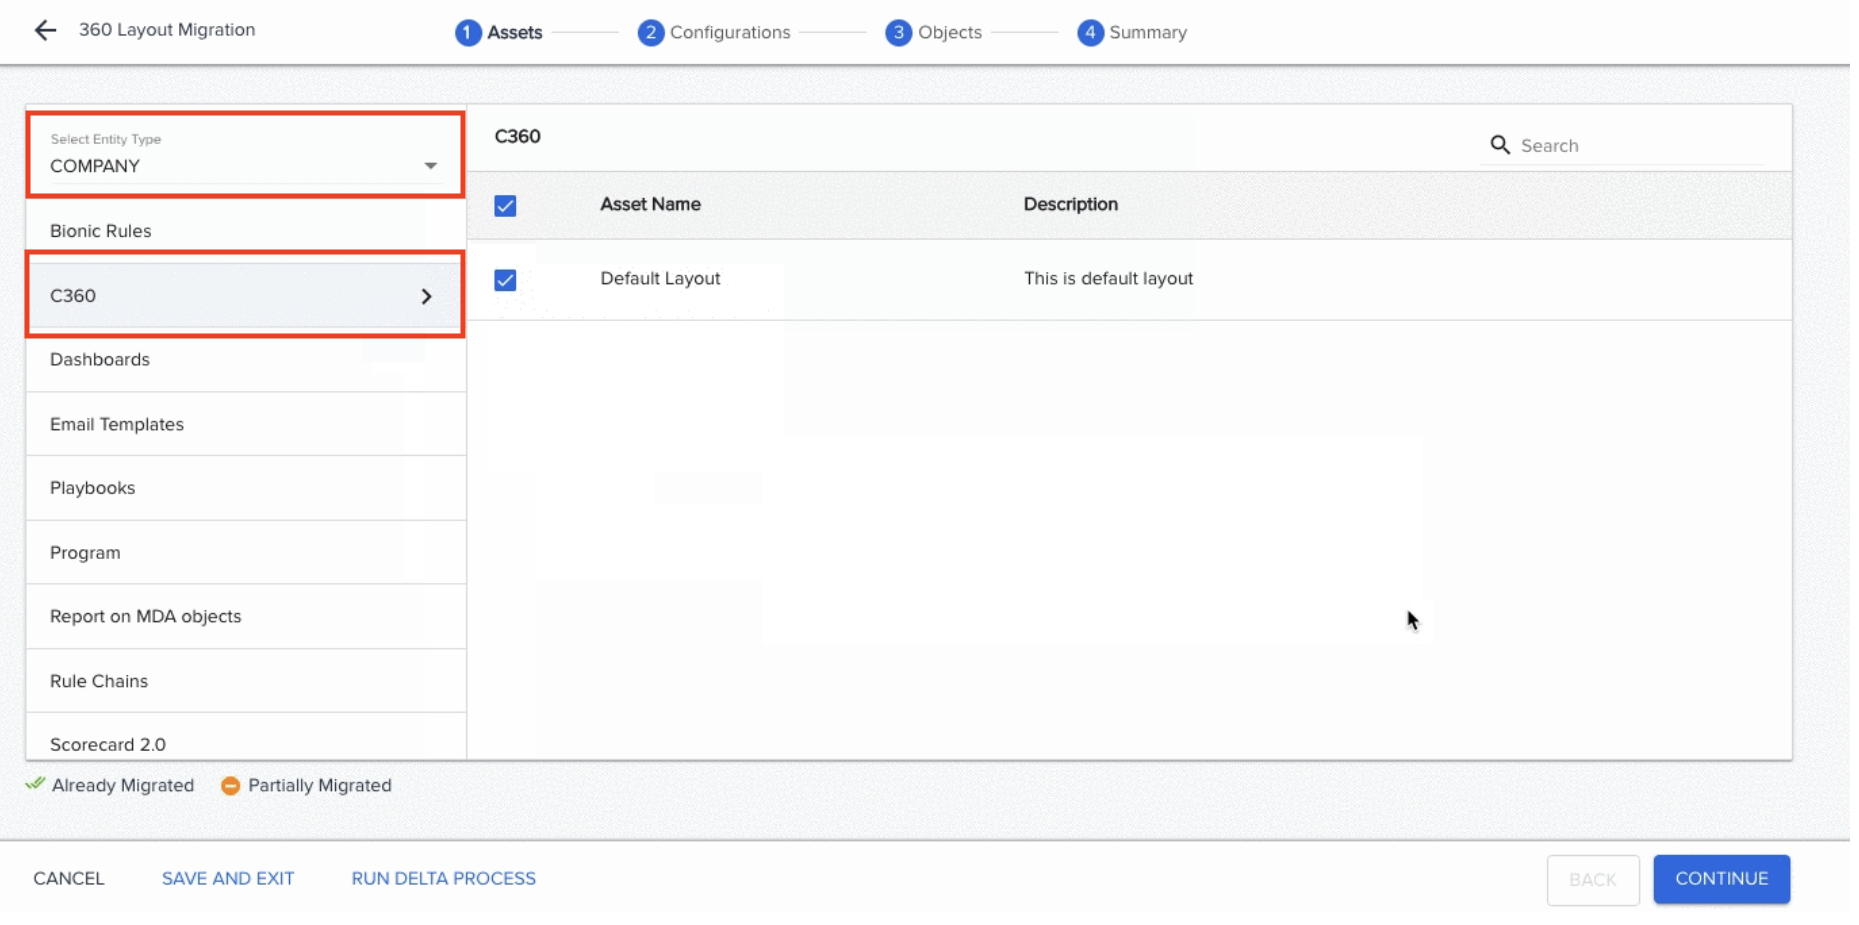
Select an entity from the Select Entity Type drop down menu. All the assets related to selected entity type are displayed.
-
Select the asset to be migrated, from the left pane. All the items related to that asset are displayed. Here, C360 is selected.
-
Select the check box for the items (here C360 Layouts) to be migrated.
Note: The bionic rules which are already migrated are shown with a double green check mark next to them. You must only select those rules which do not have this symbol (here S3 Dataset Rule). -
Click Continue. The Configurations section is displayed.
-
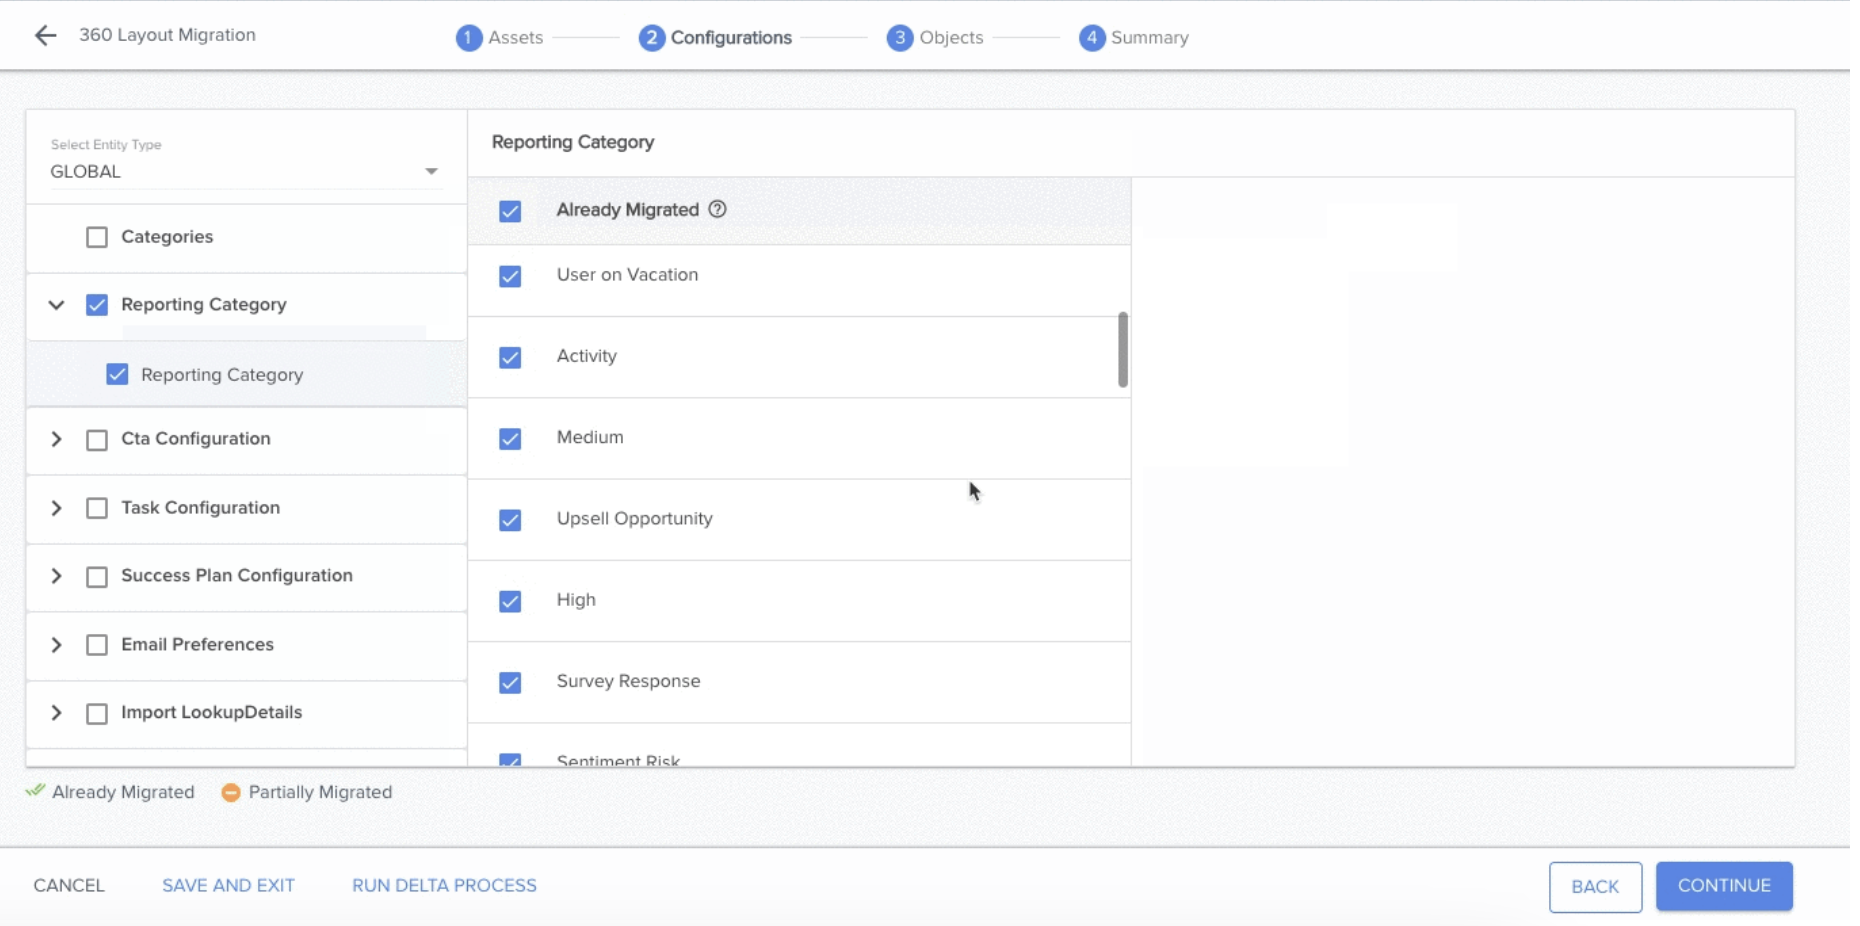
Select an entity from the Select Entity Type drop down menu. Each section of meta data related to selected entity type are displayed.
-
Select the section of meta data to be migrated. By default, all of the items associated with that section of meta data will also be selected. Items can be unselected from the list if they don’t need to be migrated. (Here, the Reporting Category section is being selected and all of the Reporting Category items are migrated).
-
Click CONTINUE. The Objects section is displayed.
-
Select a Collection Type from the Collection Type drop down menu. Each object related to collection type is displayed.
-
Select the objects to be migrated. Each field associated with the object is displayed and selected.
Note: If you are selecting custom objects, select either a target object, or Insert as New from the Target Object drop down menu.
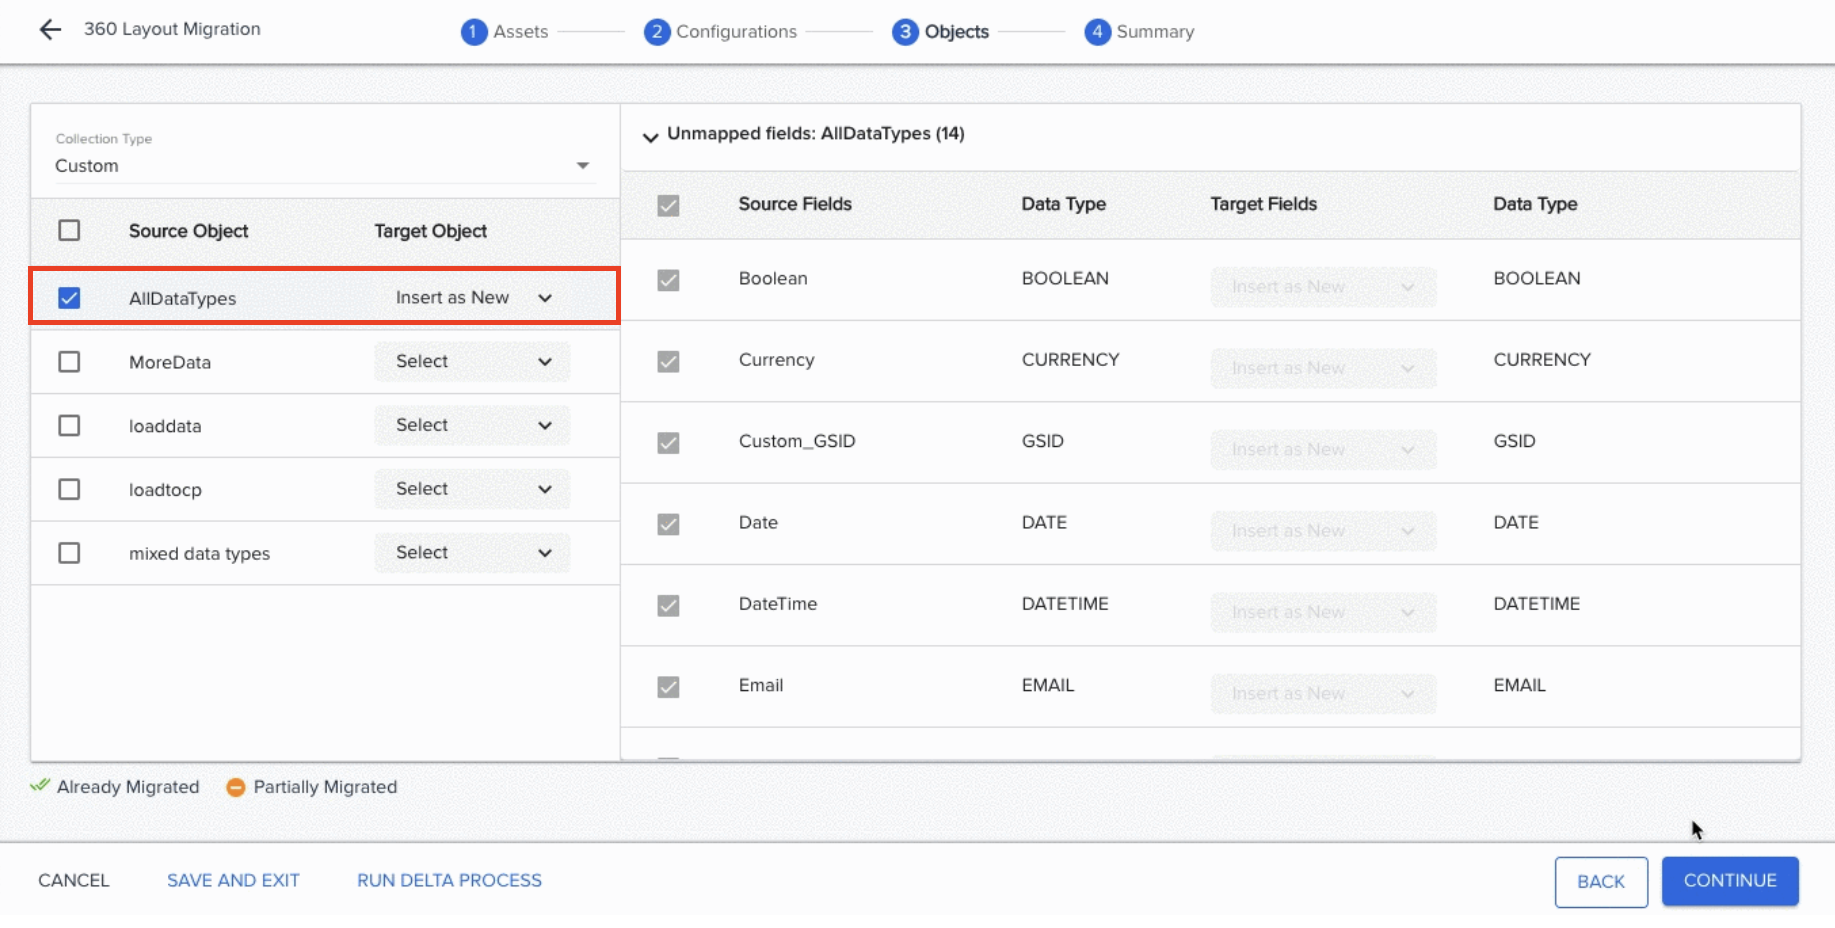
-
Click CONTINUE. The Summary section is displayed.
-
Verify if all the items selected in the prior sections are included in the Summary section.
-
(Optional) Click the Download or Print icons, to print or download the configuration, respectively.

-
Click MIGRATE. The Migrate window is displayed.
a. (Optional) Select the Test Run check box to perform a test/dummy migration. This process will not migrate any assets but will inform you if the migration will succeed or fail, if performed. The migration logs are identical to the logs of an actual migration.
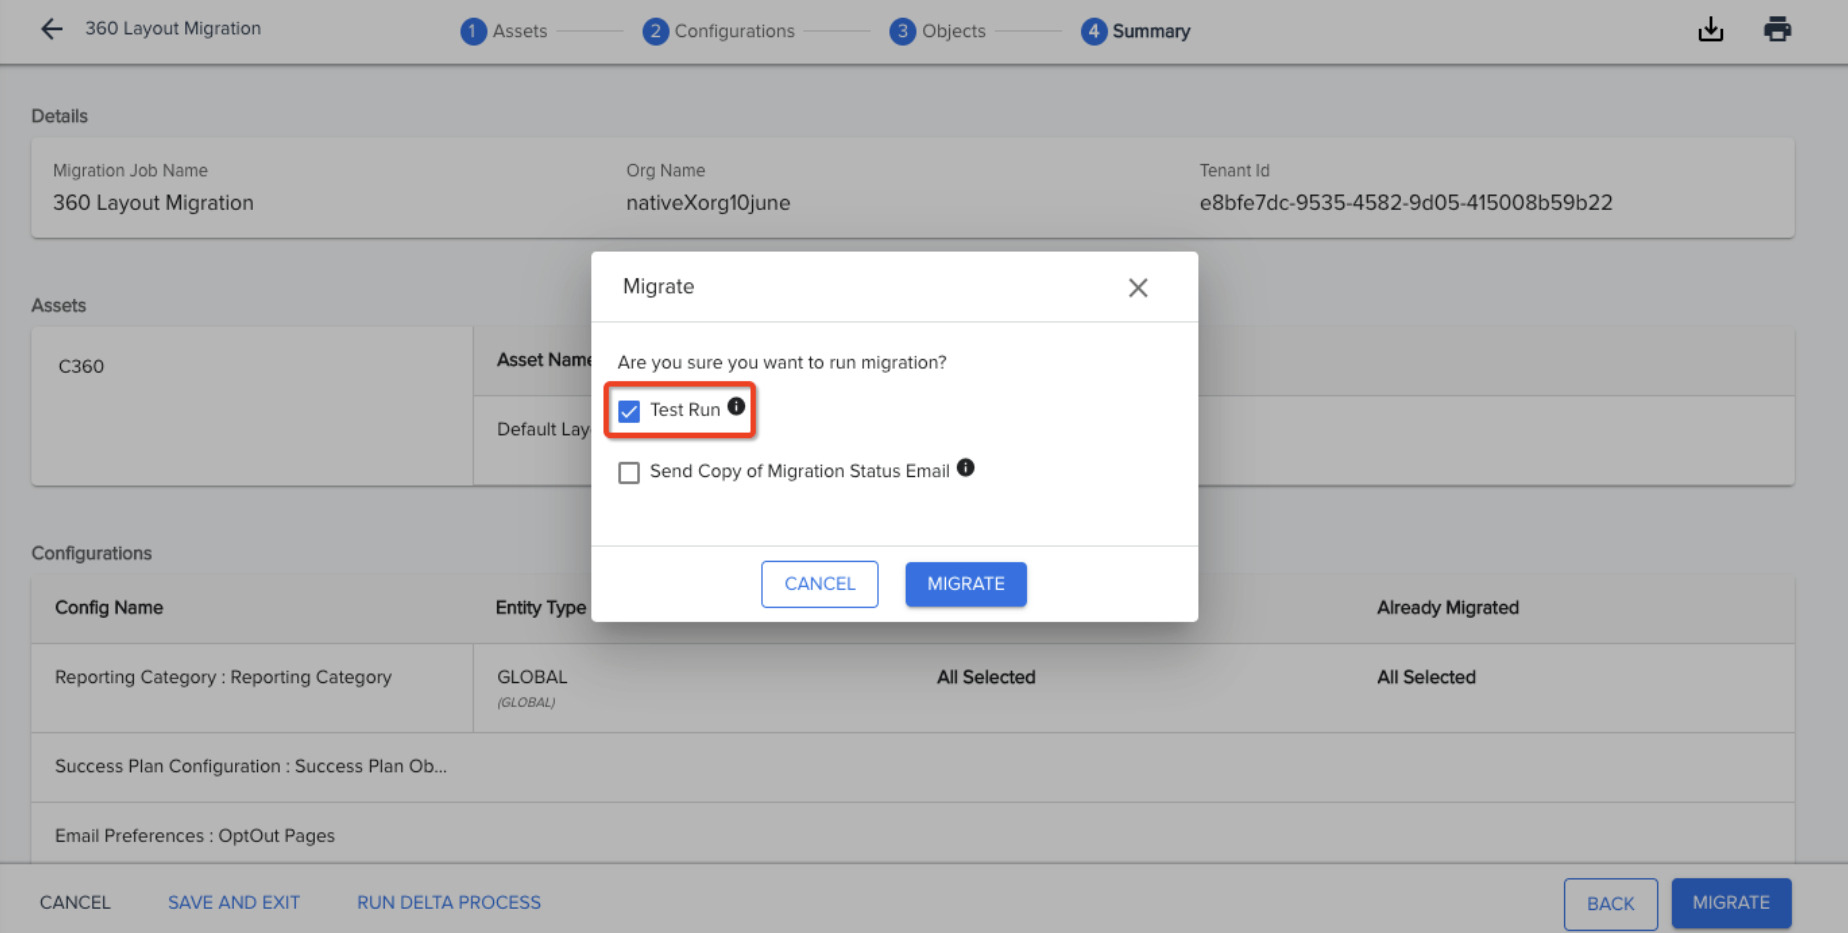
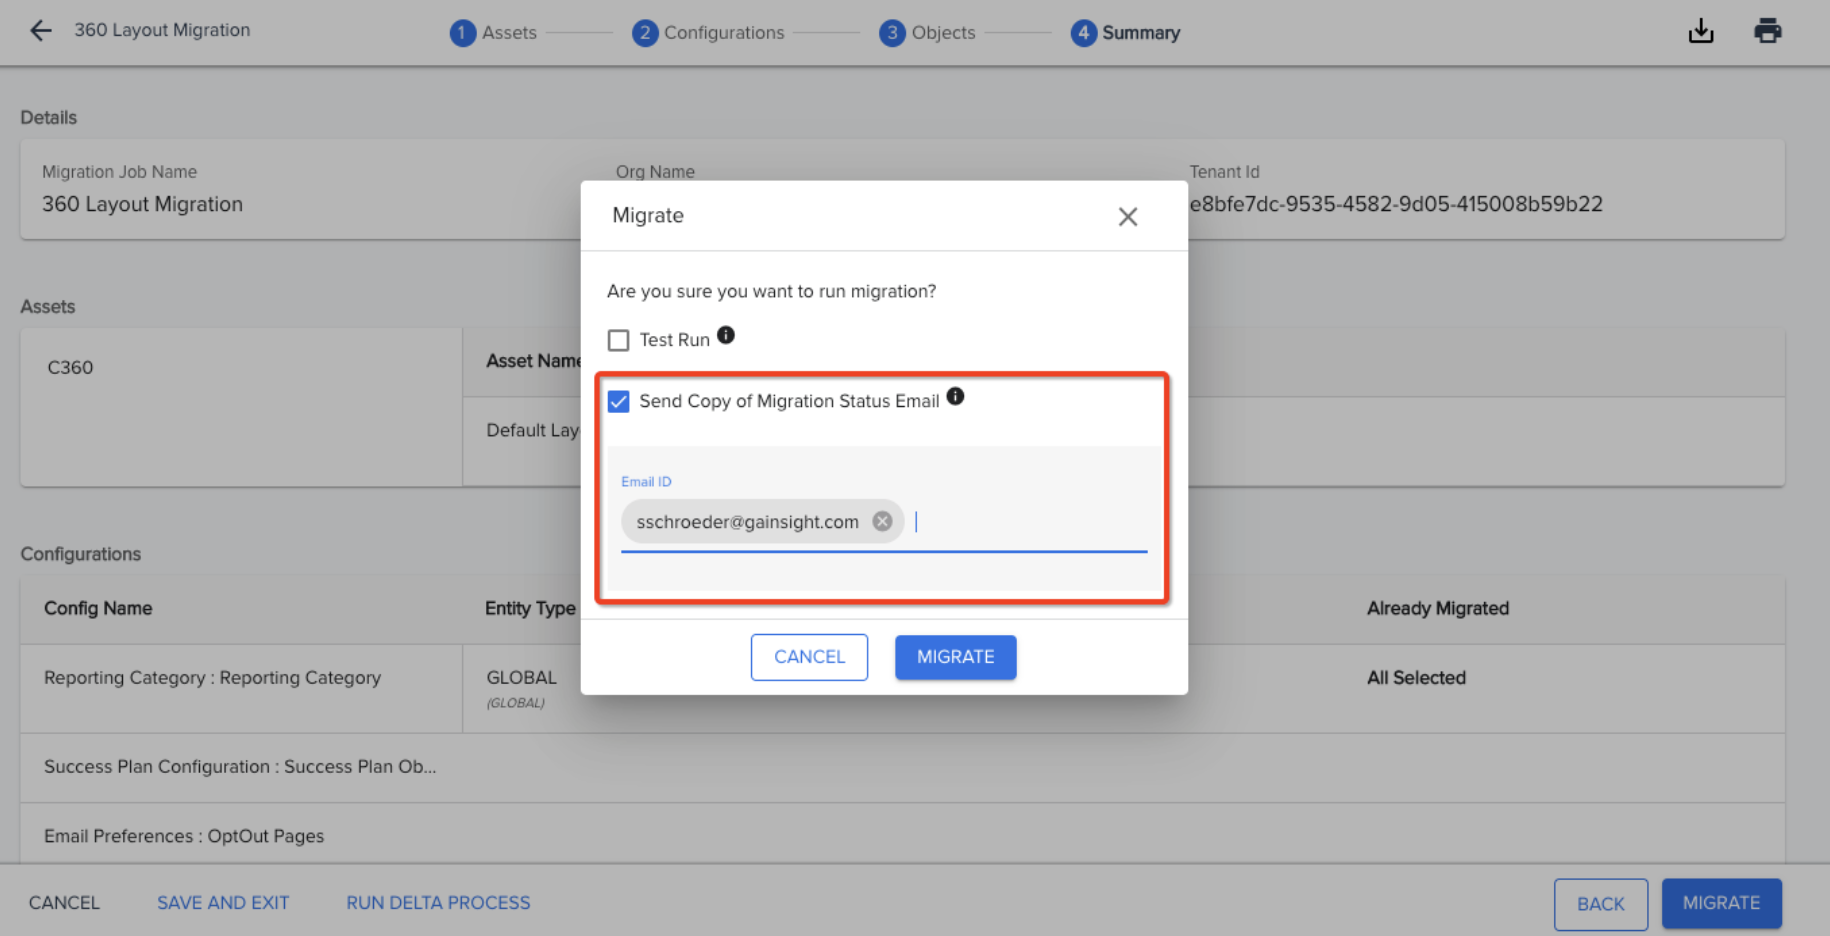
b. (Optional) Select the Send Copy of Migration Status Email check box to send the migration status email to additional recipients. By default, only the logged in user receives an email on the status of the migration task. In the Email ID field enter the email addresses of additional recipient.
-
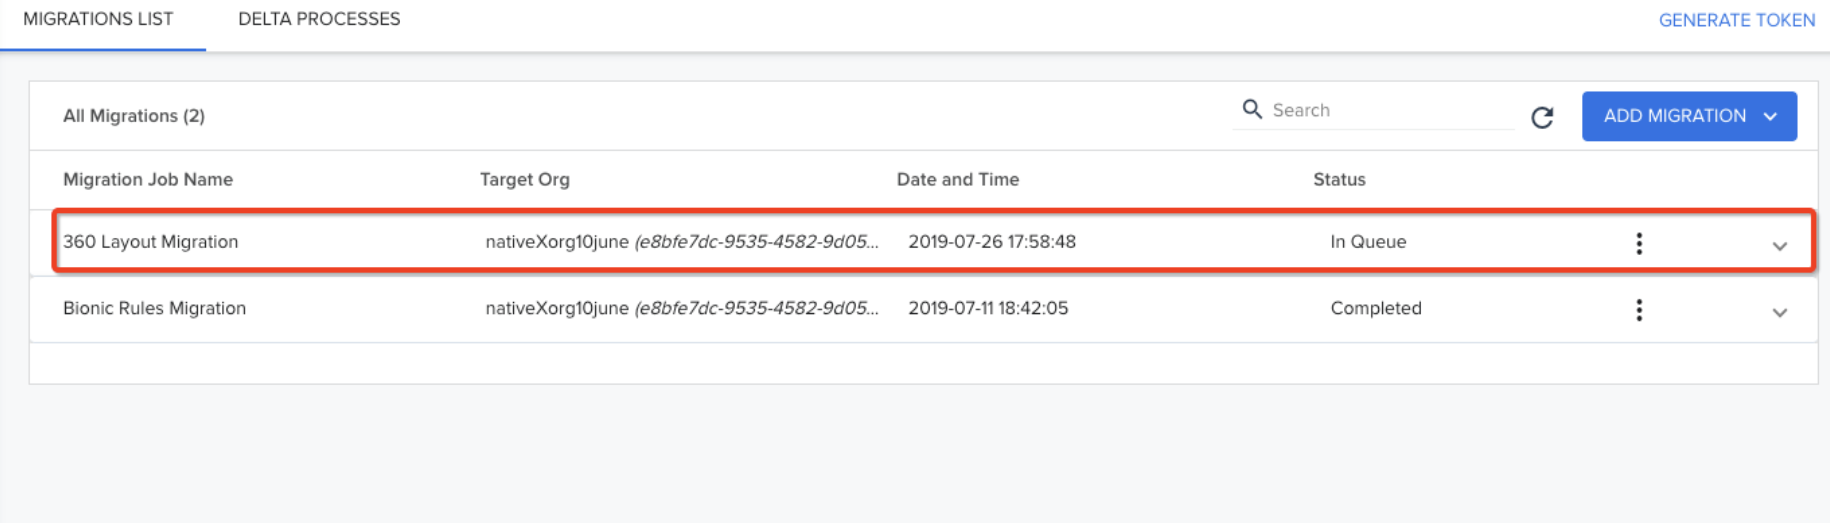
Click MIGRATE, to start the migration process. This displays the Migrations List page. The migration you initiated should be displayed with the status In Queue.
Note: If you selected the Test Run option in the previous step, only a test migration will be performed.
Save and Exit Migration Task
If you wish to pause a Migration task before completing all the configurations, you can use the Save and Exit option to save your progress. After saving, you will be able to resume the migration process when you return to the migration screen.
To save the migration task, click the Save and Exit button. This will navigate you back to the migration list page.

To resume a saved migration task, click the ellipsis menu for the required migration task, and select Continue. You must re-enter the migration token to resume the migration task.
 Migrate Rules with S3 Dataset
If you migrate a Rule with an S3 dataset task, the bucket details are also migrated successfully. When you migrate a Rule with an S3 Dataset:
-
The rule and the associated S3 bucket (Gainsight Managed or Custom) are successfully migrated.
-
The bucket associated with an S3 dataset task is migrated as an independent asset. You can view this asset on the Assets page of the Migration process screen.
-
A corresponding bucket with the same name as in the source org is created in the target org. However, if the target org already has a bucket with the same name as in the source org, a new bucket will not be created.
-
When a new bucket is created in the target org, the associated Access Key and Security Token are not copied from the source org.
-
You must go to the Connectors 2.0 page and update the Access Key and Security Token for the bucket which was created due to migration.