Creating and Closing CTAs from Rules Engine
Administrators can use the Rules Engine to create or to close multiple CTAs. You might want to create CTAs automatically for a drop in usage data, drop in revenue, low NPS® score, high priority support cases open for more than 14 days, product usage more than the issued licenses, and so on. The examples below are for addressing drops or increases in usage.
The following sections describe how to create and close CTAs using the Rules Engine:
- Creating CTAs from Rules Engine
- Closing CTAs from Rules Engine
Creating CTAs from Rules Engine
The following procedure helps you create multiple CTAs using Rules Engine. For example, you want to trigger a CTA when utilization drops below a certain percentage.
- Navigate to Administration > Rules Engine > click +RULE.
- On the New Rule page, enter the following details used in the following example:
- Rule For: Select Company if you want to create CTAs created on a Company. Otherwise, select Relationship if you want to create CTAs that are created on a relationship.
- Rule Name: Enter the name for the rule being created.
- Description: Enter appropriate description for the rule being created.
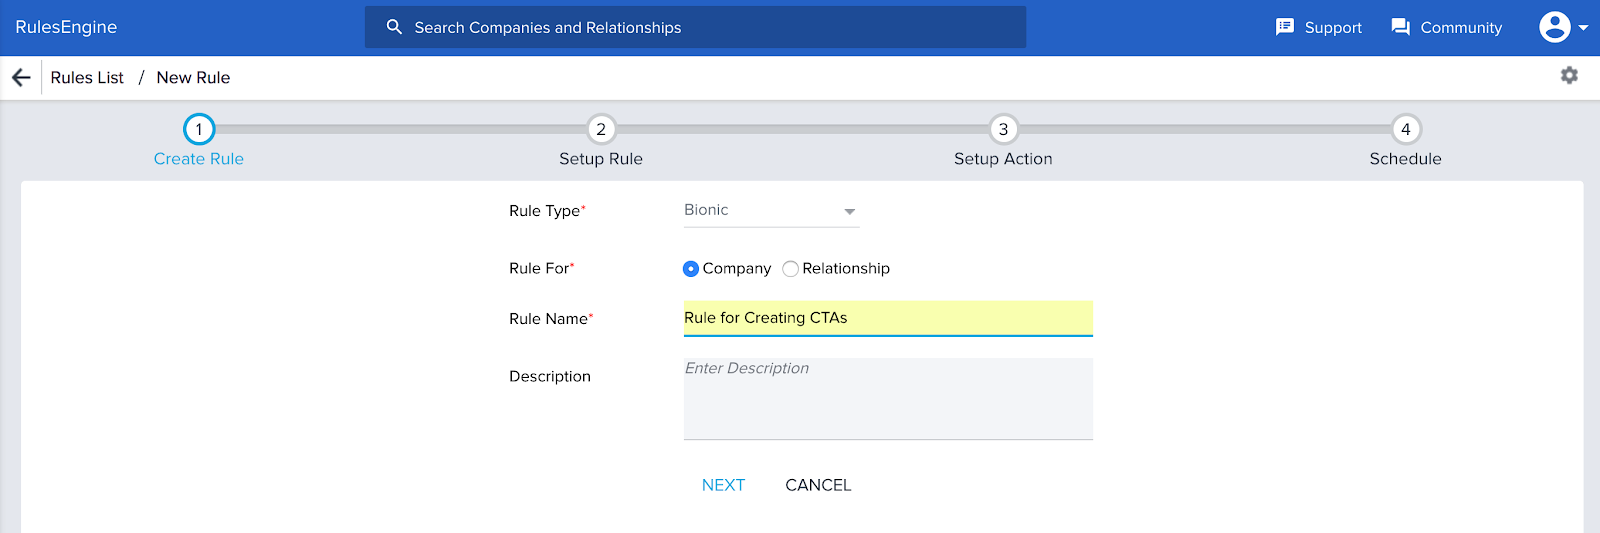
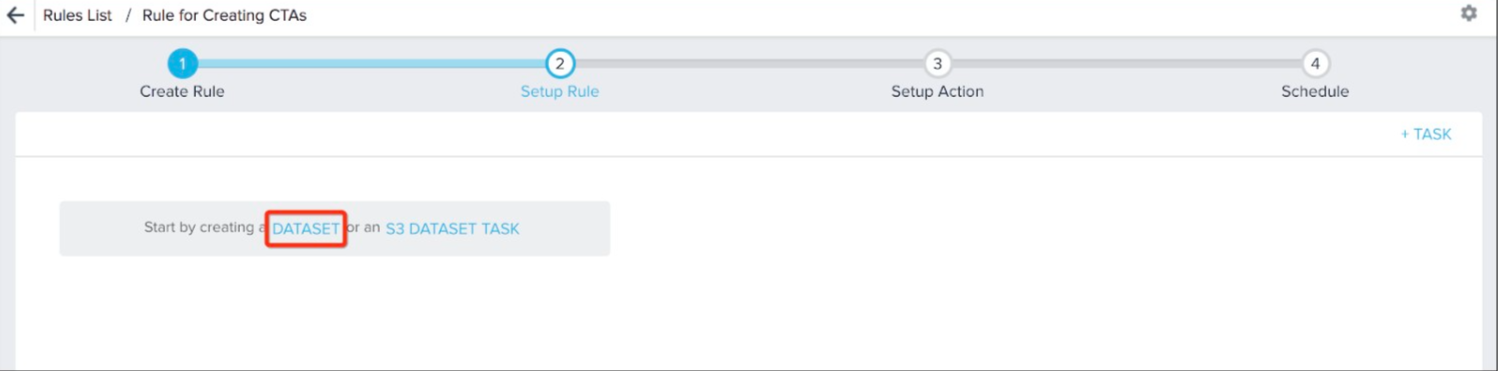
- Click NEXT. This navigates you to the Setup Rule page.
- Click DATASET TASK.
- Select the source object for the task, such as the Company object.
- Drag-and-drop fields from the left hand side panel in the Show area. For example, Company Name, Company ID, etc.
Note: The Company ID field from any source object must be added to the Show area to complete creating a rule that creates a Call to Action. - Drag-and-drop appropriate fields in the Filters area to filter for data you want to reference to create CTAs.

- Name the task in the Task Name field.
- Click SAVE.
- Click CANCEL.
- Click NEXT or Setup Action.
- Click +ACTION.
- Action Type: Select Call to Action 2.0 from this drop-down list. This action type will not be available unless the Company ID field from the source object is added to the Show area of the Dataset Task. To create a CTA, select the Create CTA check box and fill out the following fields:
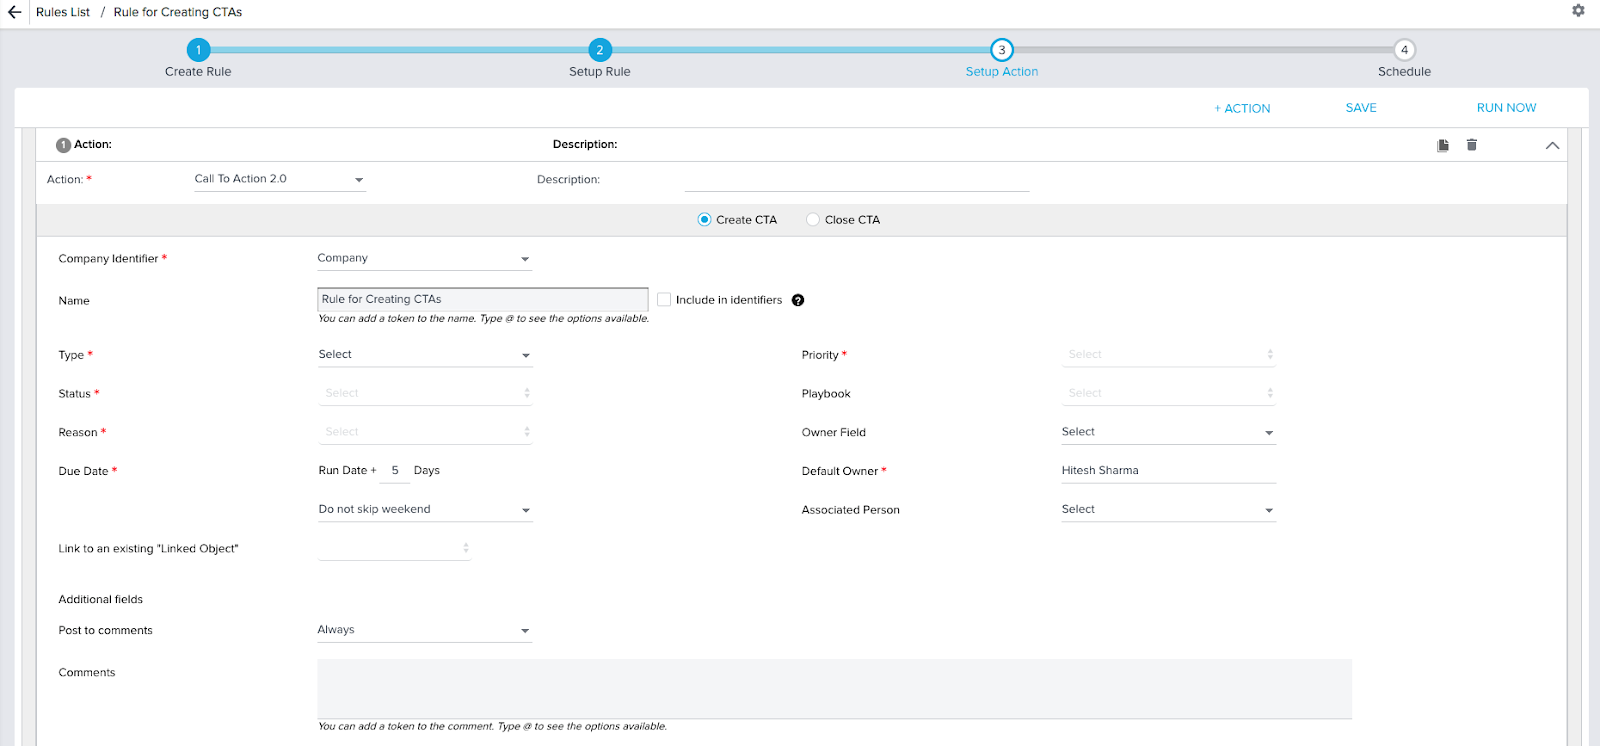
- Name: Used to title your CTA. Type @ to see the options available for tokenized comments.
- Include in identifiers: If this option is selected, CTA name is used as an identifier along with the account, CTA Type, Reason, and Status (open and closed) while looking for open CTAs that should be updated. If there's an existing CTA for an account, but the CTA names have different values, then the rule will create the new CTA. If the CTA names are the same, and the CTA Type, Reason, and Status (open and closed) are the same, then a new CTA will not be created. The rule simply updates the existing CTA. The playbook chosen in this step will only be applied if a playbook was not previously assigned.
- Priority: Based on previously established Severity Types
- Type: Based on previously established Types in Company and Relationship tabs in Administration > Call to Action.
- Status: Based on previously established Status Types
- Playbook: Optional. Based on previously established Playbooks
- Reason: Based on previously established Reason Types
- Owner Field: Optional. From the company level can be based on any user lookup field. Only ID fields are allowed to map in this field.
- Due Date: Run Date + x Days. Run Date is the date on which the rule is executed. Drop-downs below Due Date address treatment of weekends.
Note: Run Date can be different from Rule Date, if a different date is selected in RUN NOW dialog. For more information, refer to the Scheduling Rules article. - Default Owner: Lookup field of all Gainsight Users. This will be used if the Task Owner field is not filled in OR if a company has not been assigned an owner.
- Associated Person: Optional. Select a person from the Company to associate with the CTA.
Note: The object must have a lookup to the Company object. There must be a field in the current object which is enabled with lookup to GSID field from the Company object. - Link to an existing "Linked Object": Multiple relevant objects can be linked in a rule. All Linked Objects that are linked to the CTA type, will be available in the drop-down. When a linked object is selected from the drop-down, Admins can choose the field to which it should be linked from the Show fields.
- Additional Fields: The fields available here will depend on what has been configured for the CTA type selected.
- Post to Comments: Used to control the frequency of Comments updates.
- Comments: Optional and shows up in the comments section of the CTA. Type @ to see options available for tokenized comments.
- Create CTA once in: Following are the conditions when this option is unchecked or checked:
- Unchecked: if this checkbox is not selected then every time the rule is run, Rules Engine triggers a CTA only if the previously triggered CTA is closed.
- Checked: If this checkbox is selected then every time the rule is run, Rules Engine restricts the creation of CTA irrespective of the previously triggered CTA’s status (open/closed), until the selected timeframe. Once the timeframe is reached, a CTA is triggered.
However, when both Include in Identifiers and Create CTA once in X days checkboxes are selected, the Create once in X days takes precedence and a new CTA is created on X+1 day even if there is a CTA open with the same identifiers.- Do not create the CTA if the previously created is not closed: If this checkbox is selected then every time the rule is run, Rules Engine restricts the creation of CTA even after X+1 day, until the previously triggered CTA is closed.
Note: If a triggered CTA is deleted, a new CTA is triggered after the next rule execution irrespective of the checkbox selected or not.
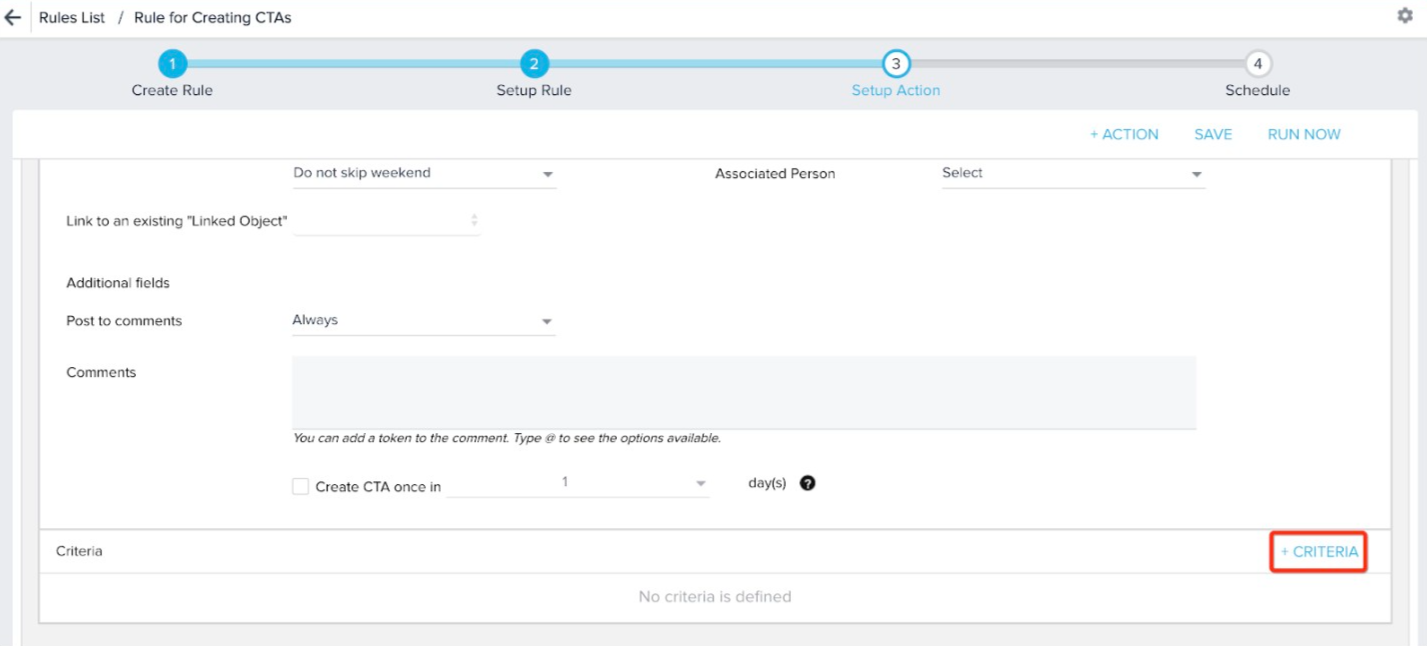
- Click SAVE to move to the next step or click +ACTION to add more actions.
- Click +CRITERIA and add the appropriate criteria. For example, you might want to create a high priority CTA if the utilization percentage is less than or equal to 40. You can repeat steps 6 and 7 to create additional CTAs for different criteria. For example, apart from creating High priority CTAs, you might also want to create Low and Medium priority CTAs based on utilization percentage.
Notes:
- If you select a Relationship Type, you will see the GLOBAL CTA Types and the Local CTA Types created on this particular Relationship Type.
- If you select all the Relationship Types, you will only see the GLOBAL CTA Types but not the local CTA Types created for each of the Relationship Type.
Populate Custom fields while creating CTAs from Rules Engine
If you want to create a CTA with Custom Fields along with the Default Group of fields in Rules Engine > Setup Action, perform the following steps:
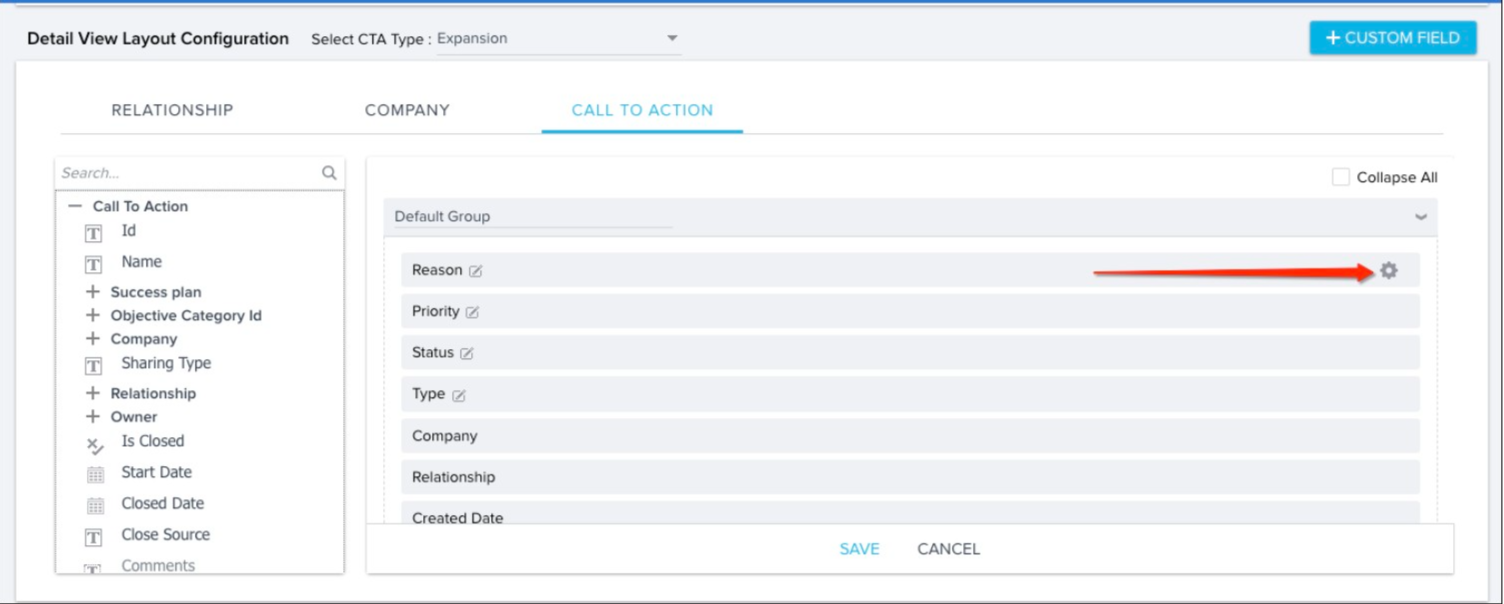
- Ensure that you have configured the Default Group containing the Custom Fields first from Administration > Calls to Action (CTA) > GLOBAL tab > Select the Default type > Detail view layout configuration section > CALL TO ACTION tab. Click the Settings or Gear icon to configure each field.
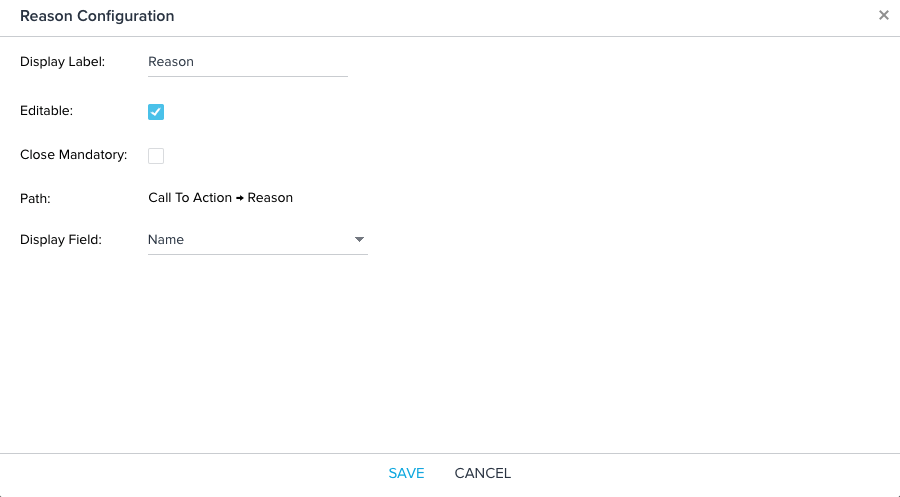
- In the field configuration screen, users can:
- Select the field’s Display Label, Display Field (only available for certain fields)
- View the field’s Path
- Select if the field is Editable or Close Mandatory. Standard fields are not Editable by default and it is not possible to check the Editable box when configuring them. Custom fields that are not marked to be Editable, will not be displayed in the Setup Action screen in Rules Engine.
- Custom fields that are marked as Close Mandatory, must have values provided in the Setup Action screen in Rules Engine.
Note: The Close Mandatory option is not supported for SFDC linked objects.
- In Administration > Rules Engine > + RULE > Setup Rule screen, click NEXT after adding the required fields in the Show and Filters sections and navigate to Setup Action screen.
- Click +ACTION and from the Action Type drop-down list, select Call To Action 2.0.
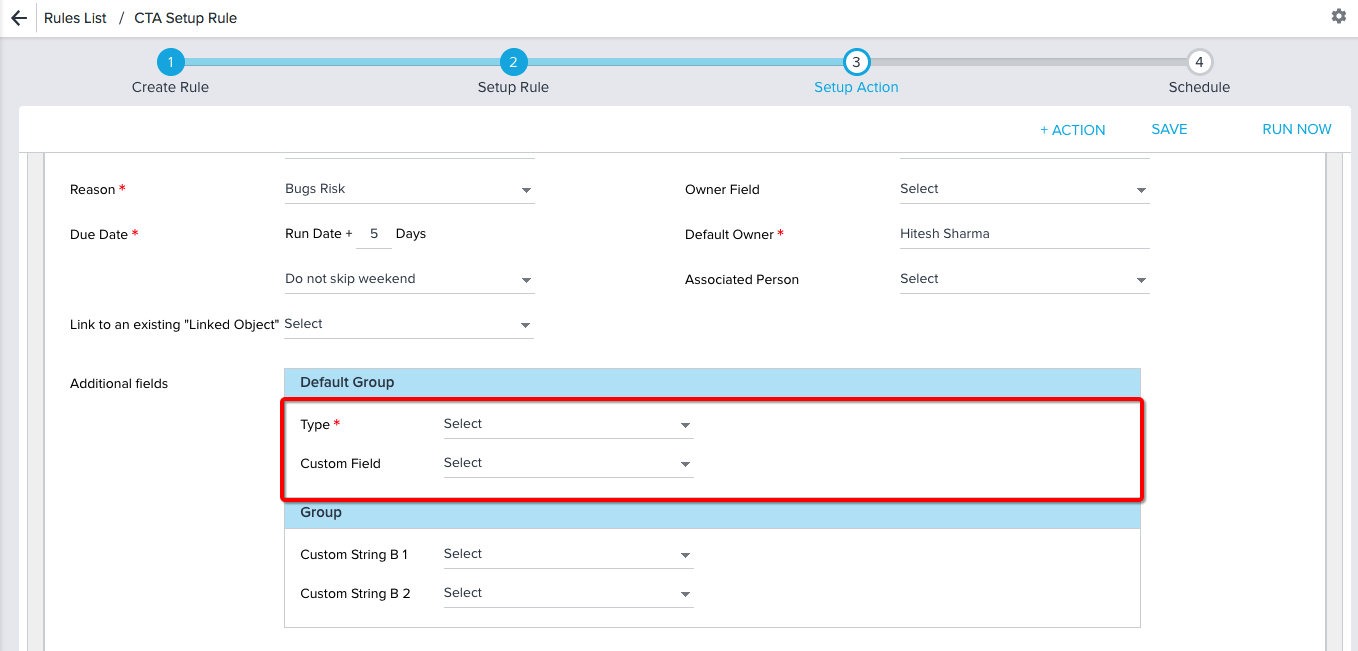
- Select the CTA Type. Depending upon CTA Type, it will show all the custom fields (under Additional Fields) that you configured in Detail view layout configuration section > CALL TO ACTION tab. The following image shows an example of Additional fields section that contains custom fields configured from Calls to Action > GLOBAL tab > Detail view layout configuration section > CALL TO ACTION tab.
Updating Existing CTAs with Rules
Based on the identifiers used in the CTA action, CTAs are upserted (Type and Reason are default identifiers). If there is an existing CTA that matches the identifiers, then it is updated.
While updating:
- Priority is updated if the new Priority is higher than the existing CTA's priority.
- Comments are updated based on the "Post to comments" flag.
- If the existing CTA does not have a playbook and the new CTA has a playbook, then the playbook will be applied.
Manage Calls to Action (CTA's)
To see the list of CTAs created from the Rules Engine, navigate to Cockpit > List View. For more information about how to manage CTA workflow, refer to the Create manual Calls to Action & Tasks article.

Closing CTAs from Rules Engine
The following procedure helps you close multiple CTAs using the Rules Engine. For example, let's say that some time after a CTA is triggered due to low usage, the usage actually increases above a certain threshold, and the Admin wants to use rules to automatically close the CTA.
- Navigate to Administration > Rules Engine > click +RULE.
- On the New Rule page, enter the following details:
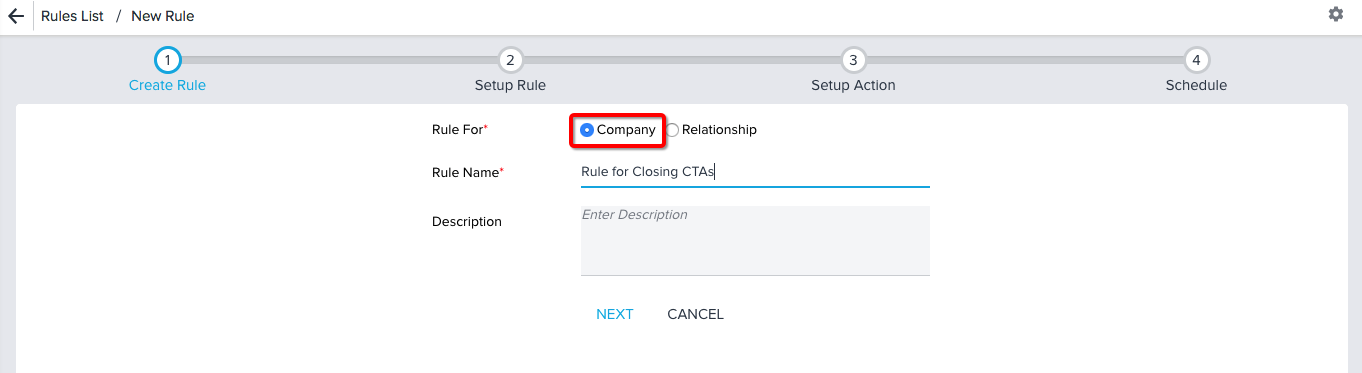
- Rule For: Select Company if you want to close CTAs created on a Company as shown in the following image.
- Rule Name: Enter the name for the rule being created.
- Description: Enter appropriate description for the rule being created.
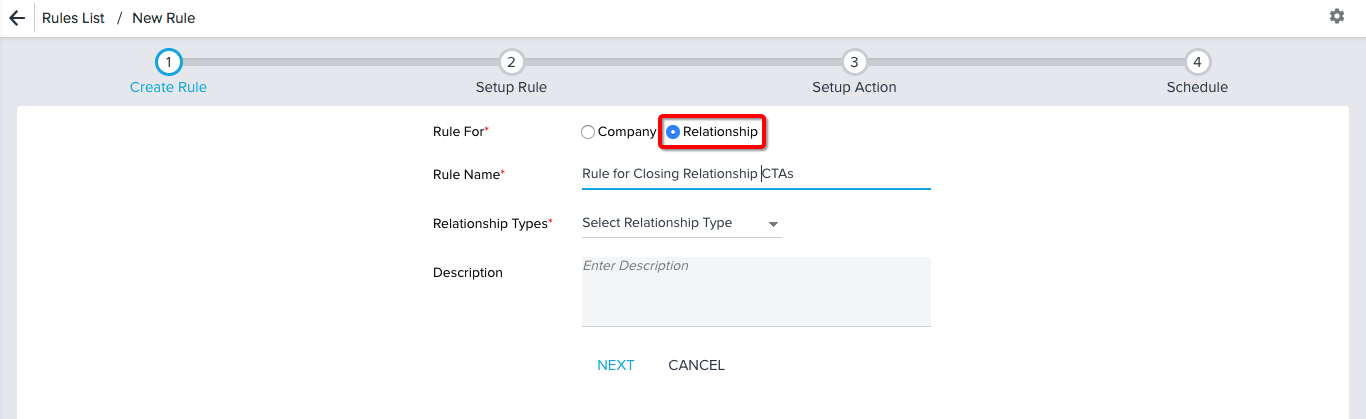
Note: On the New Rule page, enter the following details to close Relationship CTAs:
- Rule For: Select Relationship if you want to close CTAs created on a Relationship as shown in the following image.
- Rule Name: Enter the name for the rule being created.
- Relationship Type: Select the type from the drop-down list.
- Description: Enter an appropriate description for the rule being created.
- Click NEXT. The Setup Rule page is displayed.
- Click DATASET TASK.
- Drag-and-drop fields from the left hand side panel in the Show area. For example, Company Name.
- Drag-and-drop appropriate fields in the Filters area to filter out CTAs that you want to close.
- Click SAVE.
- Click Setup Action.
- Click +ACTION, and then enter the following details:
- Action Type: Select Call to Action 2.0 from this drop-down box. The following page is displayed.
- To close a CTA, select the Close CTA check box and fill out the following fields:
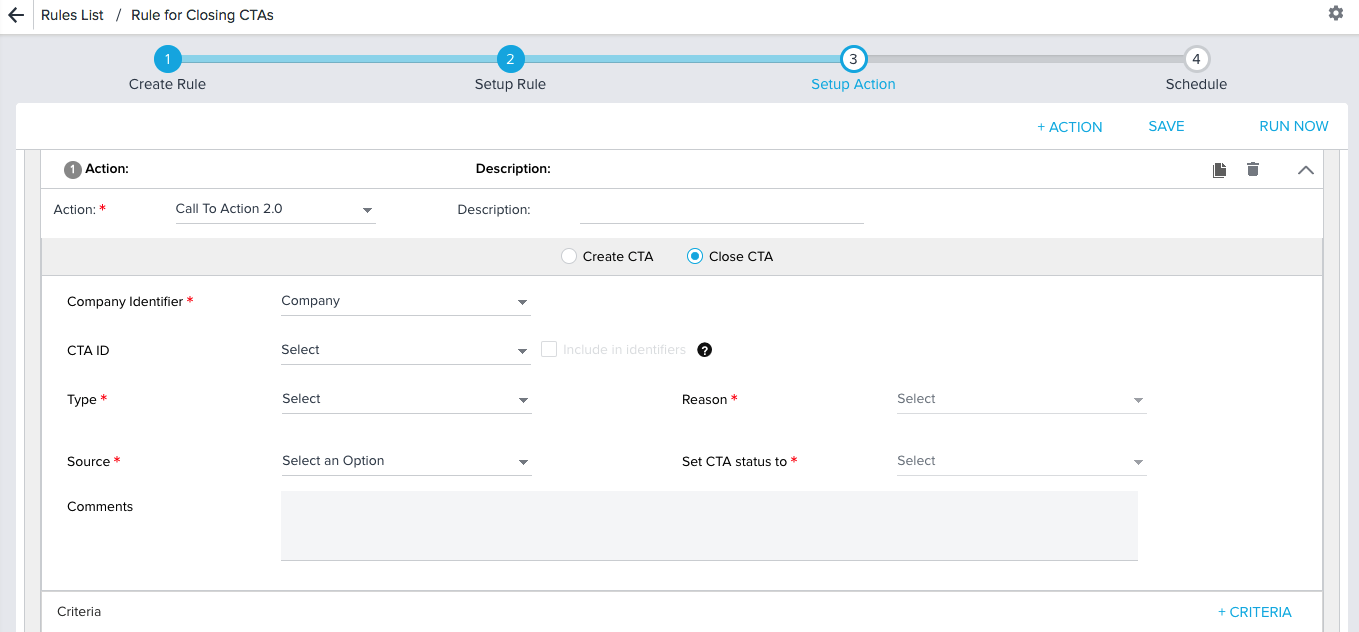
- CTA ID: Select ID from the drop-down list.
- Include CTA ID as Identifier: In the Close CTA action, Admins can now select the CTA ID > Include in identifiers check box to validate if the CTA ID should be included in identifiers while closing CTAs.
Notes:- When you select the Include in identifiers check box, the rule action will use only CTA ID as an identifier and will close every CTA that is brought into the query in the rule setup. The Type, Source, Reason, and Set CTA status to fields will become disabled and restricts the rule to mapping only with the CTA ID field.
- When you don't select Include in identifiers check box, the rule action will close any CTA that meets the Type and Reason specified in the Close CTA action for the companies that are pulled into the query.
- Include CTA ID as Identifier: In the Close CTA action, Admins can now select the CTA ID > Include in identifiers check box to validate if the CTA ID should be included in identifiers while closing CTAs.
- Type: You can select Global and Company specific CTA types to close CTAs for Company. You can select Global and Relationship specific CTA types to close CTAs for Relationship.
Note: You cannot close Objective type CTAs via Rules Engine. - Reason: Based on previously established Reason Types.
- Source: Manual, Rules, Timeline, Program. Select one or multiple.
- Set CTA status to: Closed Lost, Closed Success, or Deprecated Internal Escalation.
- Comments: Optional and shows up in the comment section of the CTA. Type @ to see options available for tokenized comments.
Notes:
- The Call to Action action type will not be available unless the Company::ID field is added to the Show section of the of the rule.
- If a CTA with the same Type, Reason, and Source exists, this rule will close the CTA. You can then click SAVE to move to the next step, or click +ACTION to add more actions.
- CTA types associated with relationship types are available in the CTA type drop-down. CTA status associated with the Relationship type, CTA type, Global active All, and Private All are available. CTAs of the selected Relationship type can be closed.
- While Closing CTA's, the Criteria configured is used only to filter out the applicable Accounts. While closing CTA's it is recommended to close by CTA ID.
- Click +CRITERIA and add the appropriate criteria. For example, you might want to close CTAs where the Utilization % exceeds 80.
Note: The +CRITERIA option is disabled when you close the CTA using Type and Reason because the Type and Reason already act as a filter to Close CTA. Instead, use close by ID to be more explicit.
| NPS, Net Promoter, and Net Promoter Score are registered trademarks of Satmetrix Systems, Inc., Bain & Company and Fred Reichheld. |