Schedule and Execute Rules
Gainsight NXT
This article explains how to schedule your rules.
Overview
The rule that is ready with the dataset and required action setup can be scheduled as per Time -Based and Event-Based schedules. You can schedule the execution of an individual rule in chronological order.
Schedule Types
Rules Engine scheduler allows you to run rules using Time - Based and Event Based schedules.
_(1).jpg?revision=1)
Time - Based
Basic Time Based
The basic schedule type allows you to schedule a rule on a daily, weekly, or monthly basis.
-
Frequency: Select any of the following radio-buttons to set the rule frequency:
-
Daily: The following options are available:
-
Every Weekday (MON - FRI): Select Every Weekday (MON - FRI) to run the rule only on weekdays.
-
Every day: Select Every day to run the rule every day.
-
-
-
Weekly: Select the particular day of the week the rule should be applied.
-
Monthly: The following options are available when you select Monthly option:
-
On Day: Select the day of the month on which the rule must run.
-
On the: Select the number of any weekday in a month on which the rule must run.
-
-
Start Date: Select the start date from which the rule execution starts.
-
(Optional) End Date: Select the end date after which the rule execution ends.
-
Rule Run Time: From the drop down menu,select the Rule run time.
-
Once - The Rule runs once only at a given time.
-
Repeat - The Rule run process repeats as per the given time interval.
Note: The minimum time period between rule runs is two hours.
-
-
Preferred Start Time: Select the preferred start time in hours and minutes.
-
Time Zone: This is set automatically depending on the Timezone selected in the Application settings > Default Time zone field. You can change the timezone to UTC.
-
Rule run preference: Select how to run the rule from the following options:
-
Optimize run with other Rules: Select this option to stop other rules from running while this rule is running if they are dependent on the same objects. This option is selected by default.
-
Run independent of other Rules: Select this option to allow all other rules to run in parallel with this rule while it is running.
-
-
Send notification email: By default, Rule success or failure messages are sent to the logged in user. However, you can add email of other users, who must be notified about Success or failure of this rule.
-
On Failure: Add email address of users who must be notified when this rule fails. You can add multiple emails separated by a comma.
-
On Success: Add email address of users who must be notified when this rule succeeds. You can add multiple emails separated by a comma.
-
Run for historical periods: If start date provided is in the past, checking this option will run the rule from the selected start date to the present date. The number of runs is limited when the rules are run for a historical period. Refer to the following additional note -
Note:
When the start date in this scheduler is set to a date in the past, it will run for the historic period, and load data.
Example: If you have the rule scheduled to run daily, then you can run it for the historical period of last 200 days. In the case of a weekly schedule, it will run for a maximum of 200 weeks. This basically helps prevent a huge number of rule runs being triggered by mistake, or when you do not realize how much time it is going to take for all the runs to complete. It puts all of the other rules in queue and delays other important rule runs.
Advanced
Using the Advanced schedule type enables you to run the rules as frequently as every two hours.
-
Cron Expression: Enter the Cron expression that allow the rule runs accordingly.
Note: The minimum time period between rule runs is two hours. -
Timer icon: Click this icon to view the next five rule run schedules for the cron expression provided (as displayed in the image provided).
-
Start Date: Select the start date for the rule runs.
-
End Date: Select the end date for the rule runs (Optional).
-
Time Zone: This is set automatically depending on the time zone selected in the Application settings > Default Time zone field. You can change the time zone to UTC.
-
Rule run preference: Select how to run the rule from the following options:
-
Optimize run with other Rules: Select this option to stop other rules from running while this rule is running if they are dependent on the same objects. This option is selected by default.
-
Run independent of other Rules: Select this option to allow all other rules to run in parallel with this rule while it is running.
-
-
Send notification email: By default Rule success or failure messages are sent to the logged in user. However, you can add email of other users, who must be notified about Success or failure of this rule.
-
On Failure: Add email address of users who must be notified when this rule fails. You can add multiple emails with a comma.
-
On Success: Add Email address of users who must be notified when this rule succeeds. You can add multiple emails separated by a comma.
Event Time Based
This Schedule Type executes a rule when an Event is triggered. There are two types of Schedules under this scheduling method:
Events Framework
You can run a rule using an event from the Events Framework in Gainsight. Using the Event Schedule Type, you can run the rule using CURL command. CURL command is a handy way to trigger a rule outside of Gainsight. In a broader sense, event-based triggering of a rule enables you to integrate rules deeper with non-Gainsight services if you have developer support. Events-based triggering of a rule helps you avoid unnecessary scheduling of a rule. For example, you might have scheduled a rule to run every two hours to check if the S3 bucket has data, this rule runs every two hours adding some load to the server. In this scenario, you can trigger the rule using CURL command only when you are sure that data is present in the S3 bucket.
Limitations/Recommended Usage
-
Use the events-based triggering of a rule only when it is required. For example, when you are sure that the rule has fetched data from the S3 bucket, then you can use the CURL command to trigger the rule.
-
If there is a pending execution of a rule, the event-based execution request will be rejected. You can find the rejection reason in the rule’s execution history.
-
For a Customer, 100 event-triggered rule executions are allowed in a day (24-hour period). The 24-hour period is between 12 am in a day to the next 12 am UTC.
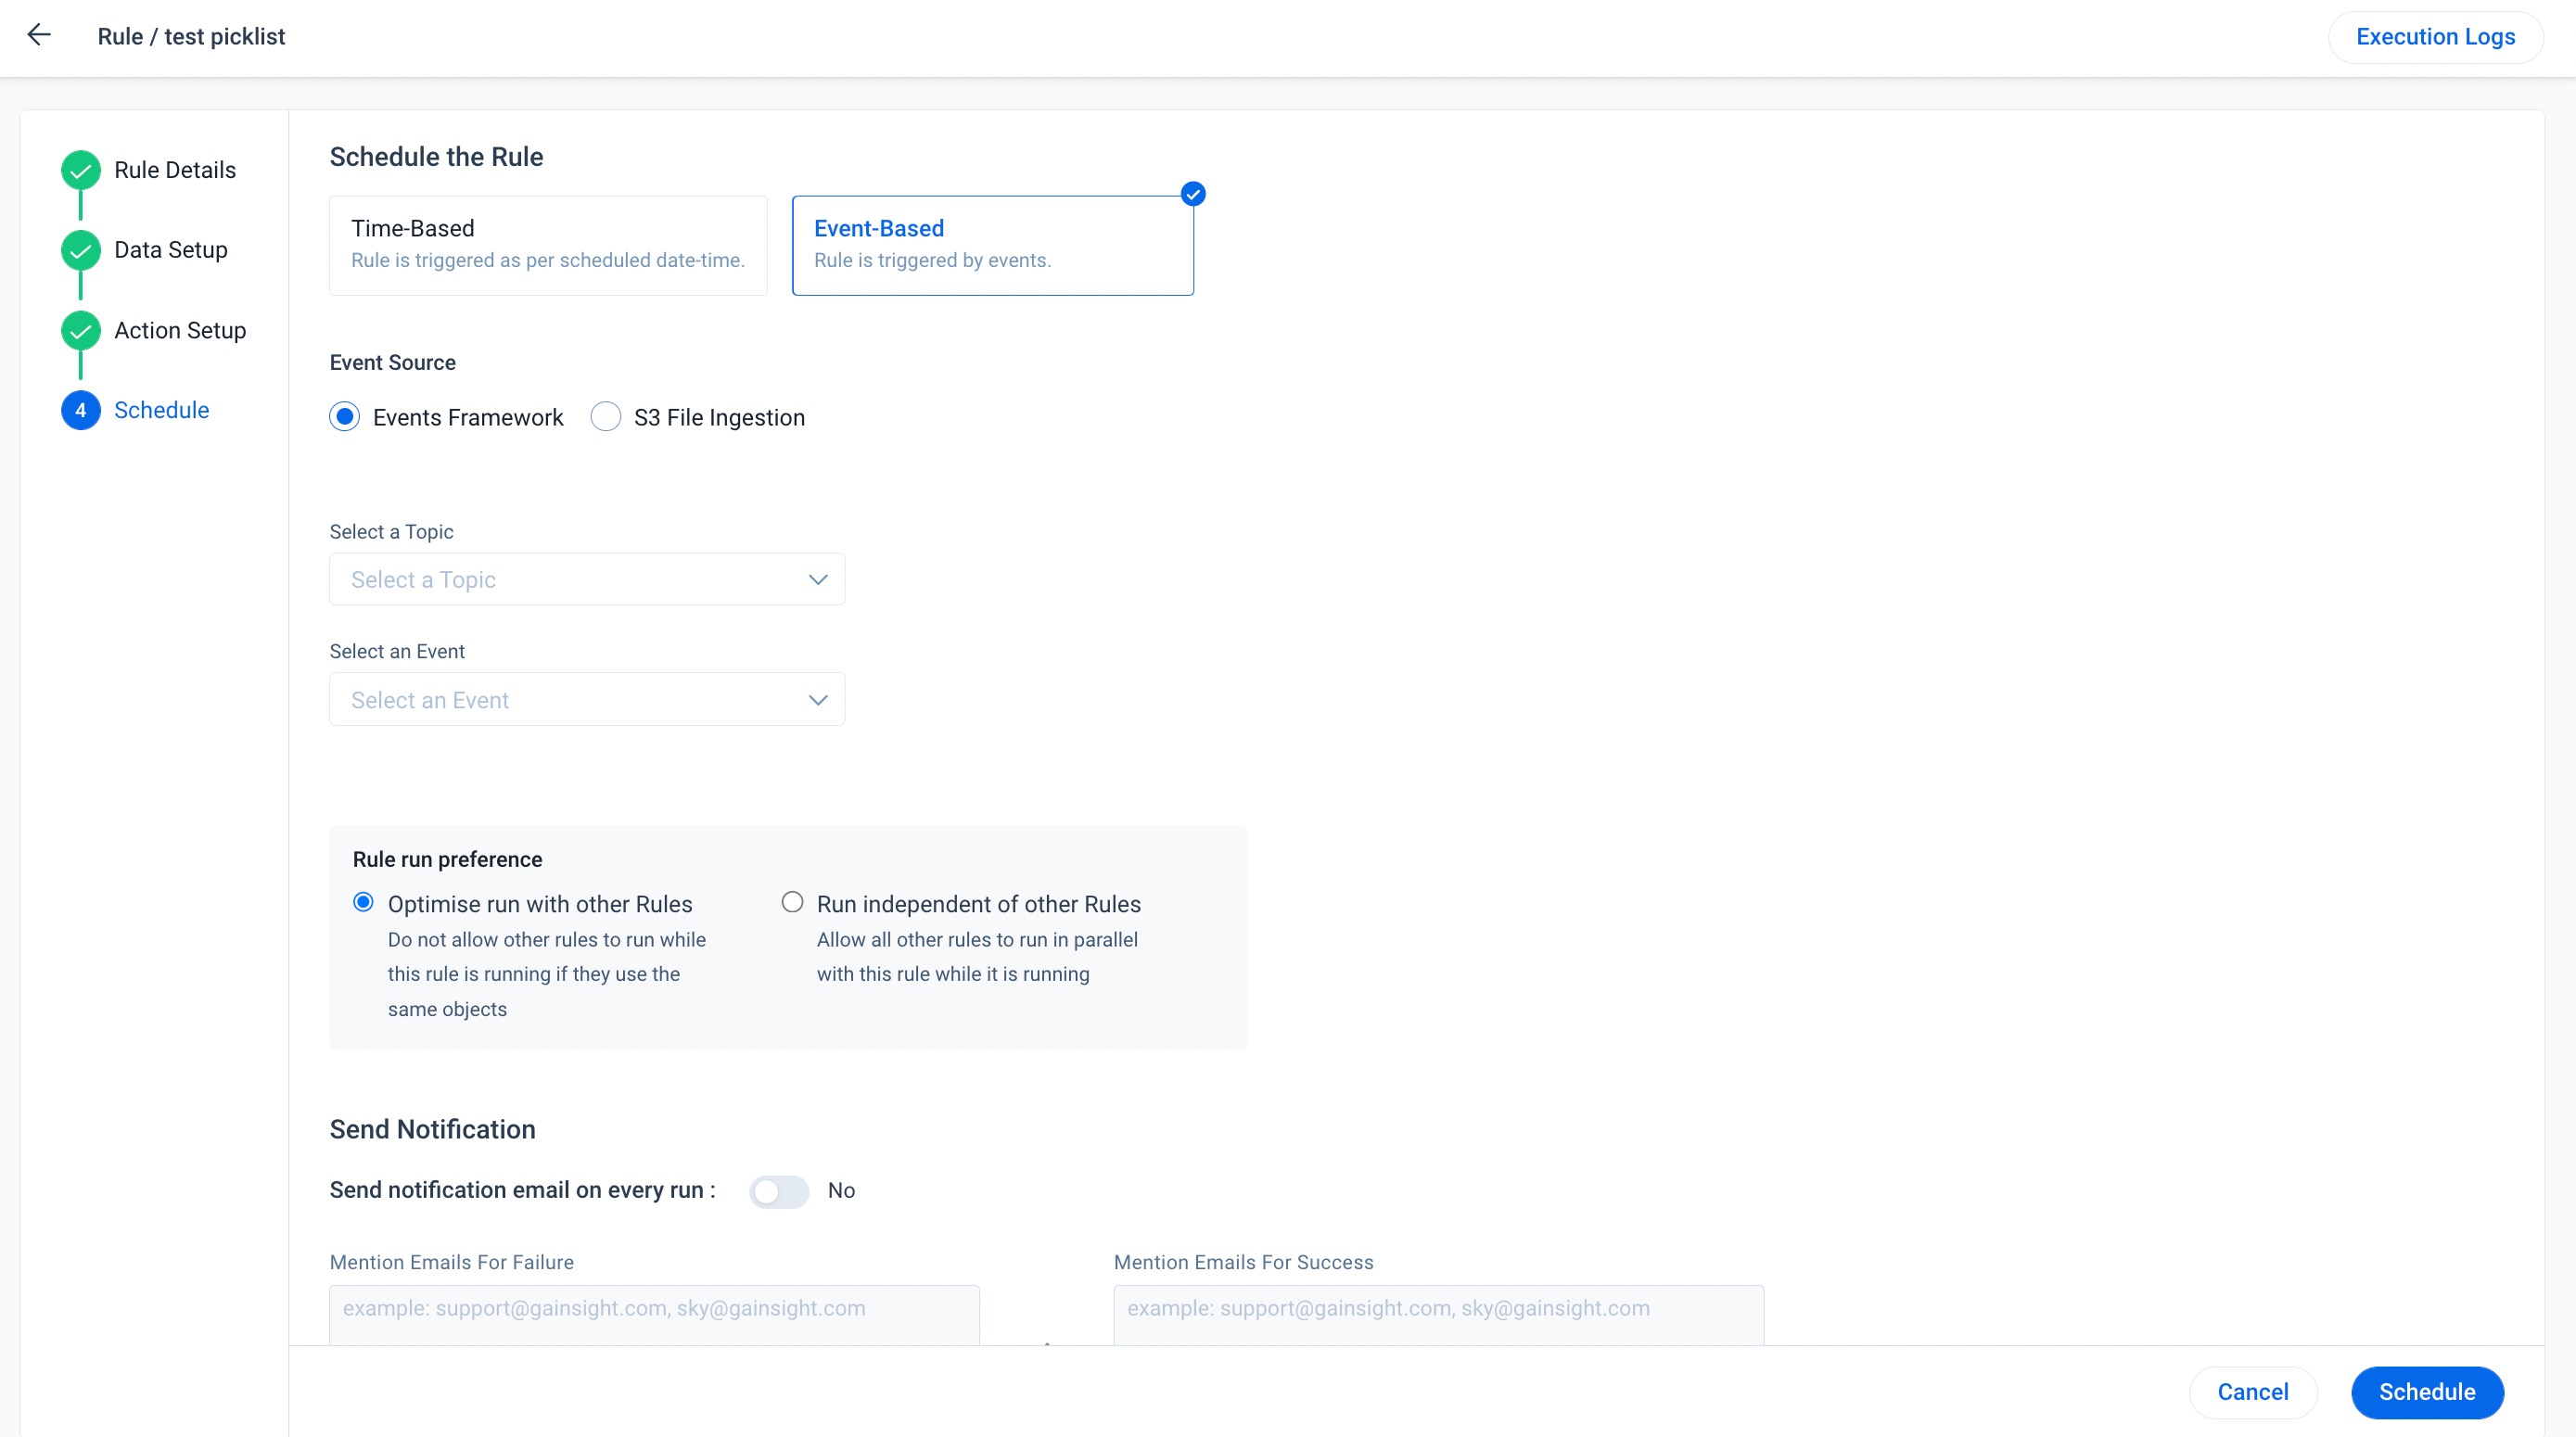
Schedule Rules based on events
To use events in the Rules Schedule, you must first create a Topic and then add Events related to that topic.
-
Navigate to Administration > Rules Engine.
-
Create and configure a Rule.
-
Go to the Schedule step.
-
In the Schedule Type list, select Event.
-
Select a Topic from the list.
-
Select an event from the list.
-
Select the Rule run preference from the following options:
-
Optimize run with other Rules: Select this option to stop other rules from running while this rule is running if they are dependent on the same objects. This option is selected by default.
-
Run independent of other Rules: Select this option to allow all other rules to run in parallel with this rule while it is running.
-
- Click Schedule
S3 File
This schedule type is applicable only if your rule has an S3 dataset. You can use this schedule type to automatically trigger a rule which has an S3 dataset, whenever a new file is uploaded to the configured S3 bucket. When you upload a new CSV file which has the same configuration as defined in S3 dataset, the S3 dataset rule is triggered automatically.
To schedule a rule based on an Event for S3 File option:
-
Navigate to Administration > Operations > Rules Engine.
-
Create and configure a Rule.
-
Navigate to the Schedule step.
-
In the Schedule Type list, select Event.
-
Select the S3 File option.
-
From the Task drop-down menu, select the S3 dataset.
-
Select the Rule run preference from the following options:
-
Optimize run with other Rules: Select this option to stop other rules from running while this rule is running if they are dependent on the same objects. This option is selected by default.
-
Run independent of other Rules: Select this option to allow all other rules to run in parallel with this rule while it is running.
-
-
In the Send Email Notification field, enter the email addresses of the users to be notified in case of Success or Failure of the Rule.
-
Click Schedule.
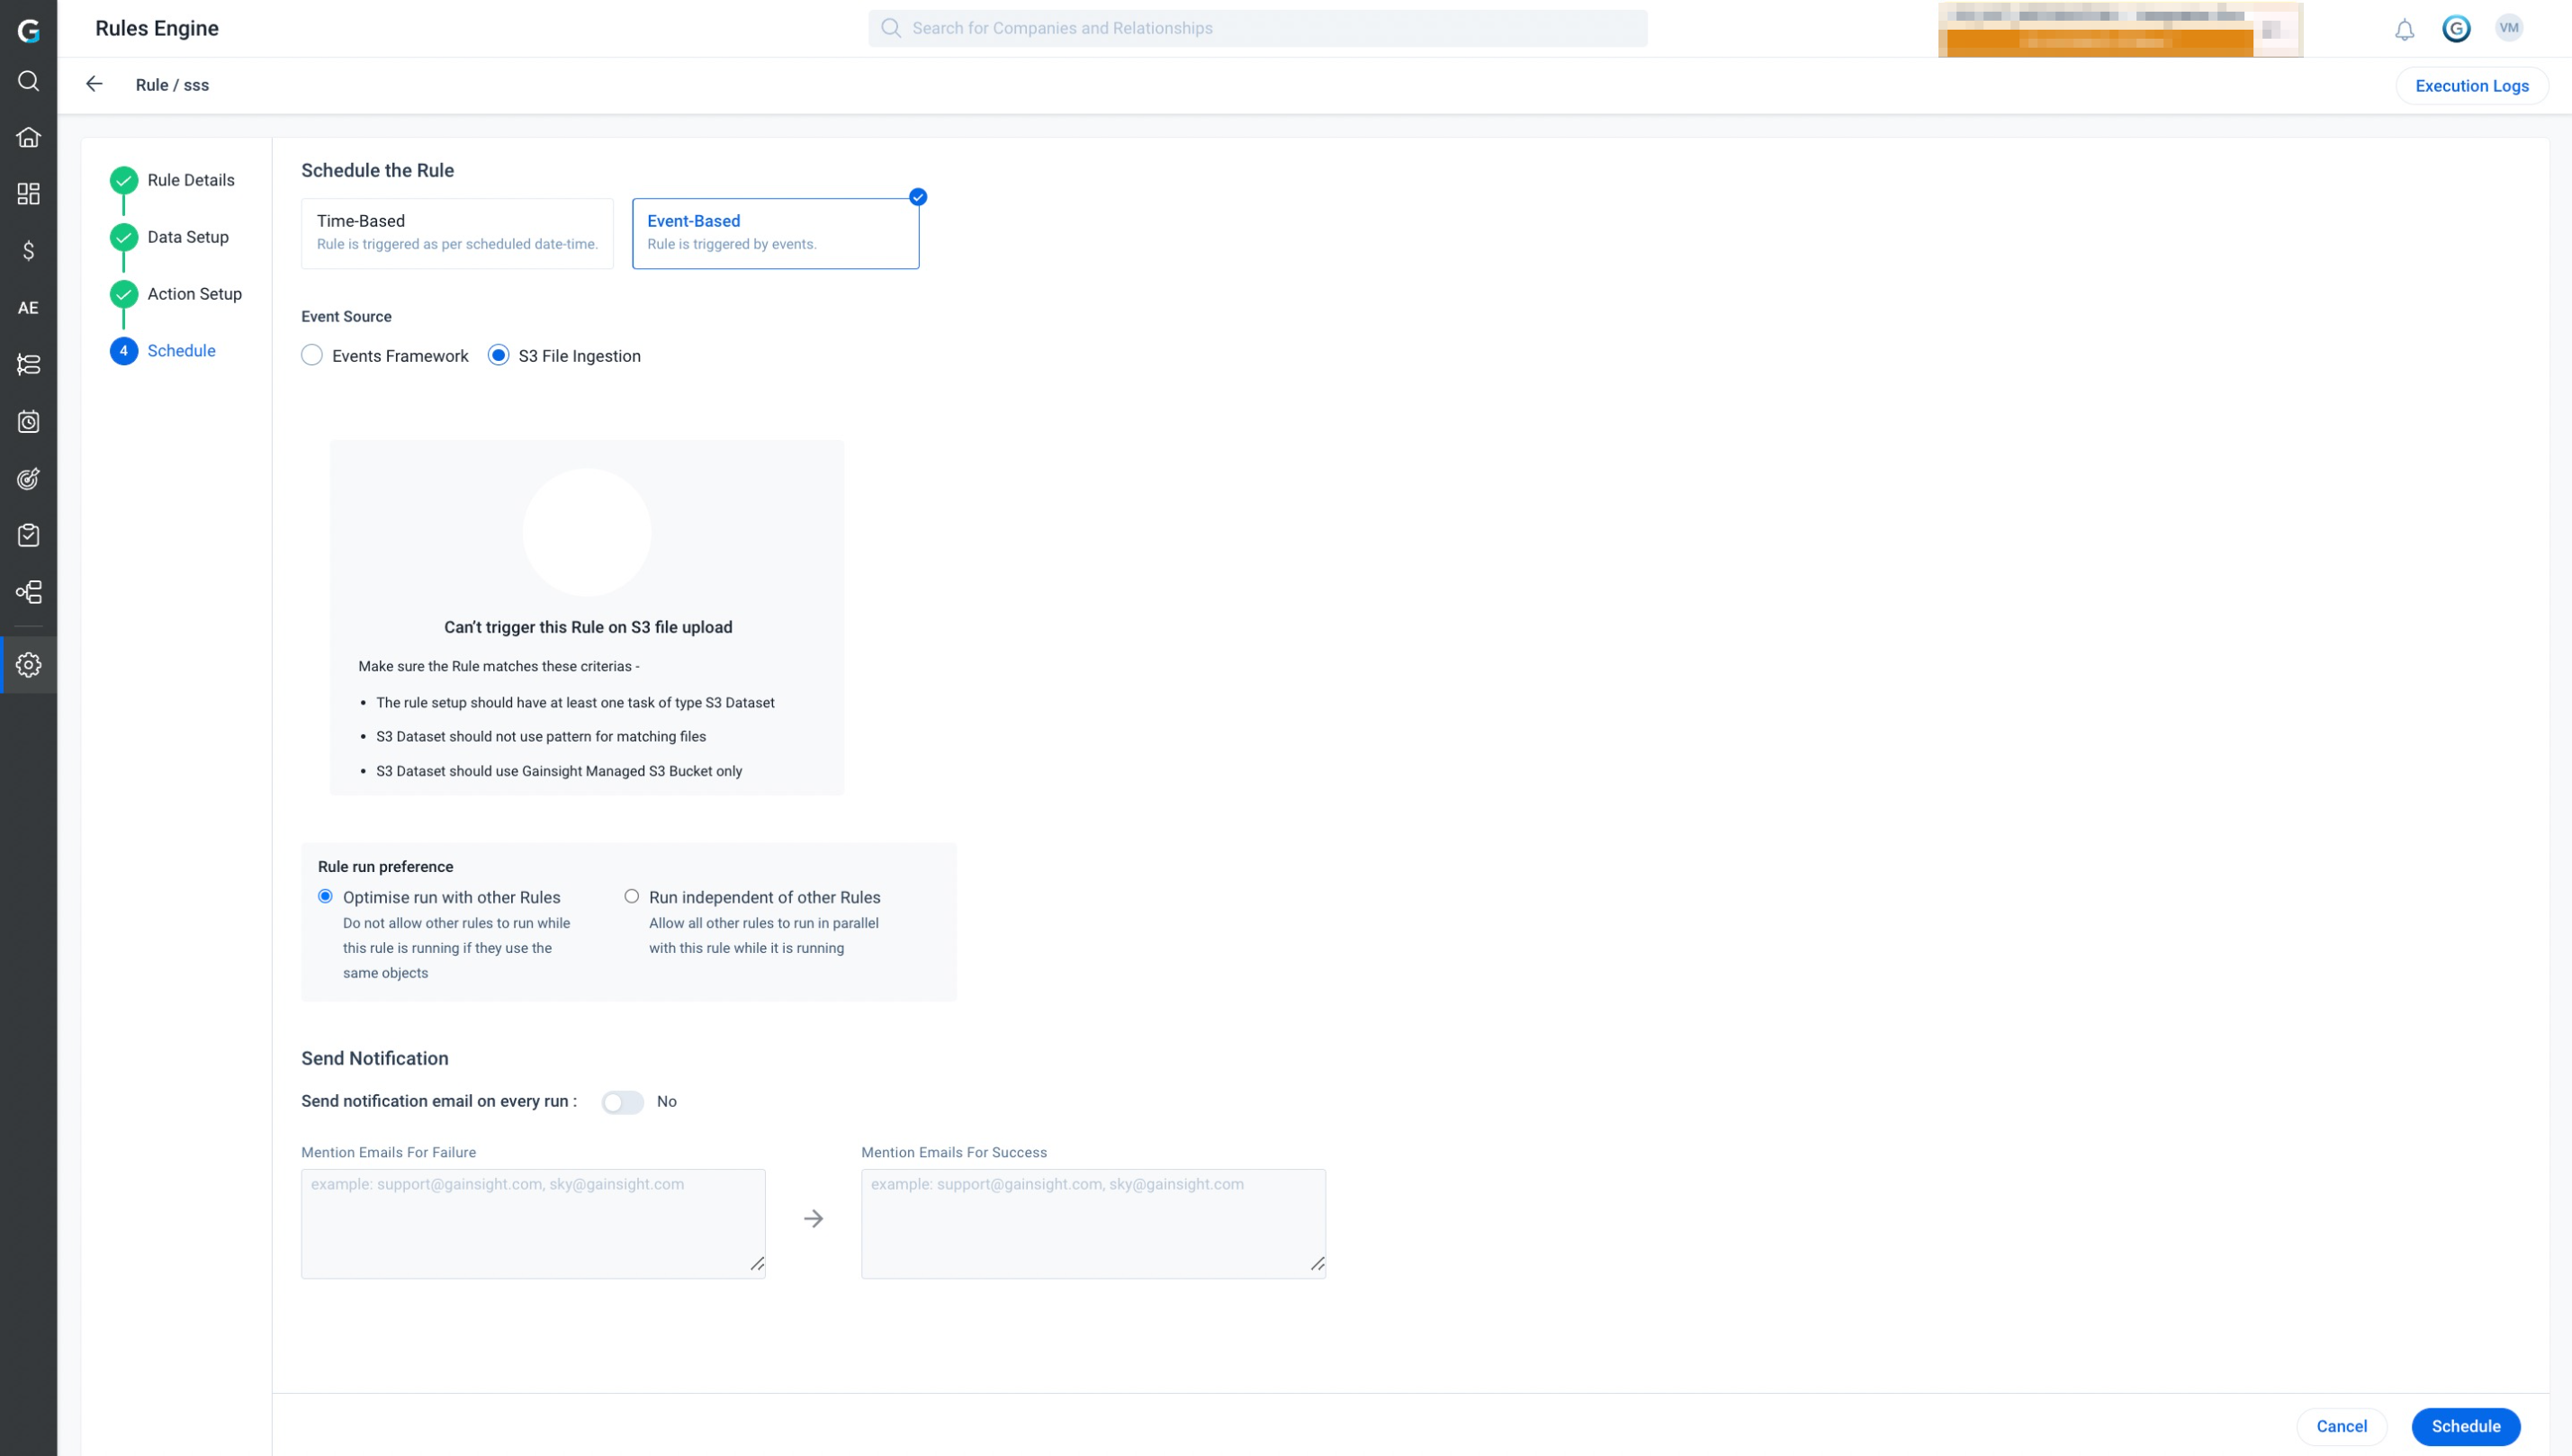
Limitations of S3 file Schedule type
-
The S3 Dataset rule can not be part of a rule chain.
-
The File Name setting in the S3 Dataset Task configuration cannot use "Date Pattern".
-
If a rule has multiple S3 datasets, you can auto trigger the rule only for any one of the S3 datasets. This Dataset must be selected from the Task drop-down menu.
-
Your CSV file must be located in the Gainsight Managed S3 bucket. Rule is not auto triggered if file is configured from any custom bucket.
Rule Date
In cases where there are S3 exports or date-specific filters, the rule date is the one that is utilized inside the rule. The Rule Date is calculated as the date (in the org timezone) when the rule is triggered.
Run Now
After a Rule is created, you can use the Run Now option to configure the rule to run once or at regular intervals using the Historical Periods option.
Run Once Option
To run the rule only once:
-
Click the three dots icon of a specific rule and click Run Now. The rule scheduler dialog box appears.
-
In the Run This Rule For field, select Once.
-
Select the date of when you want to run the rule in the Select Rule Run Date field.
-
(Optional) Select the Test Run check box if you want to test-run a rule and receive an email with a summarized results list.
-
In the Send Rule results to these emails section, enter additional email addresses in the field to send them a copy of the Rule result email. Logged-in user’s email ID is auto-populated for sending rule results. In addition, you can send rule execution details to the email IDs entered in this field.
-
Click Run Now.
Historical Run Option
To run the rule at regular intervals over a period of time:
-
Click the three dots icon of a specific rule and click Run Now. The rule scheduler dialog box appears.
-
In the Run This Rule For field, select the For Historical Periods option.
-
Select the options to set the rule frequency as required:
-
Daily: The following options are available when you select the Daily option:
-
Every Weekday (MON-FRI): Select this option to run the rule only on weekdays.
-
Every day: Select this option to run the rule every day.
-
-
Weekly: Select the day of the week when the rule must run.
-
Monthly: The following options are available when you select the Monthly option:
-
On Day: Select the day and any weekday in a month of when the rule must run.
-
-
Select the date range in the Select Rule Run Date Range field of when you want to run the rule.
-
(Optional) Select the Test Run check box if you would like to test-run a rule and receive an email with a summarized list of results.
-
Select the Run at non-peak hours checkbox to run the Rule during non-peak hours. This helps optimize the run queue for other Rules in the queue.
-
In the Send Rule results to these emails section, enter additional email addresses in the field to send them a copy of the Rule result email. Logged-in user’s email ID is auto-populated for sending rule results. In addition, you can send rule execution details to the email IDs entered in this field.
-
Click Run Now.
Schedule of Duplicate Rules
When you clone a rule, the schedule of the source rule is not applied to the target rule. You must schedule the cloned rule manually. However, if the source rule is active, cloned rule is also active and if the source rule is inactive, cloned rule is also inactive.
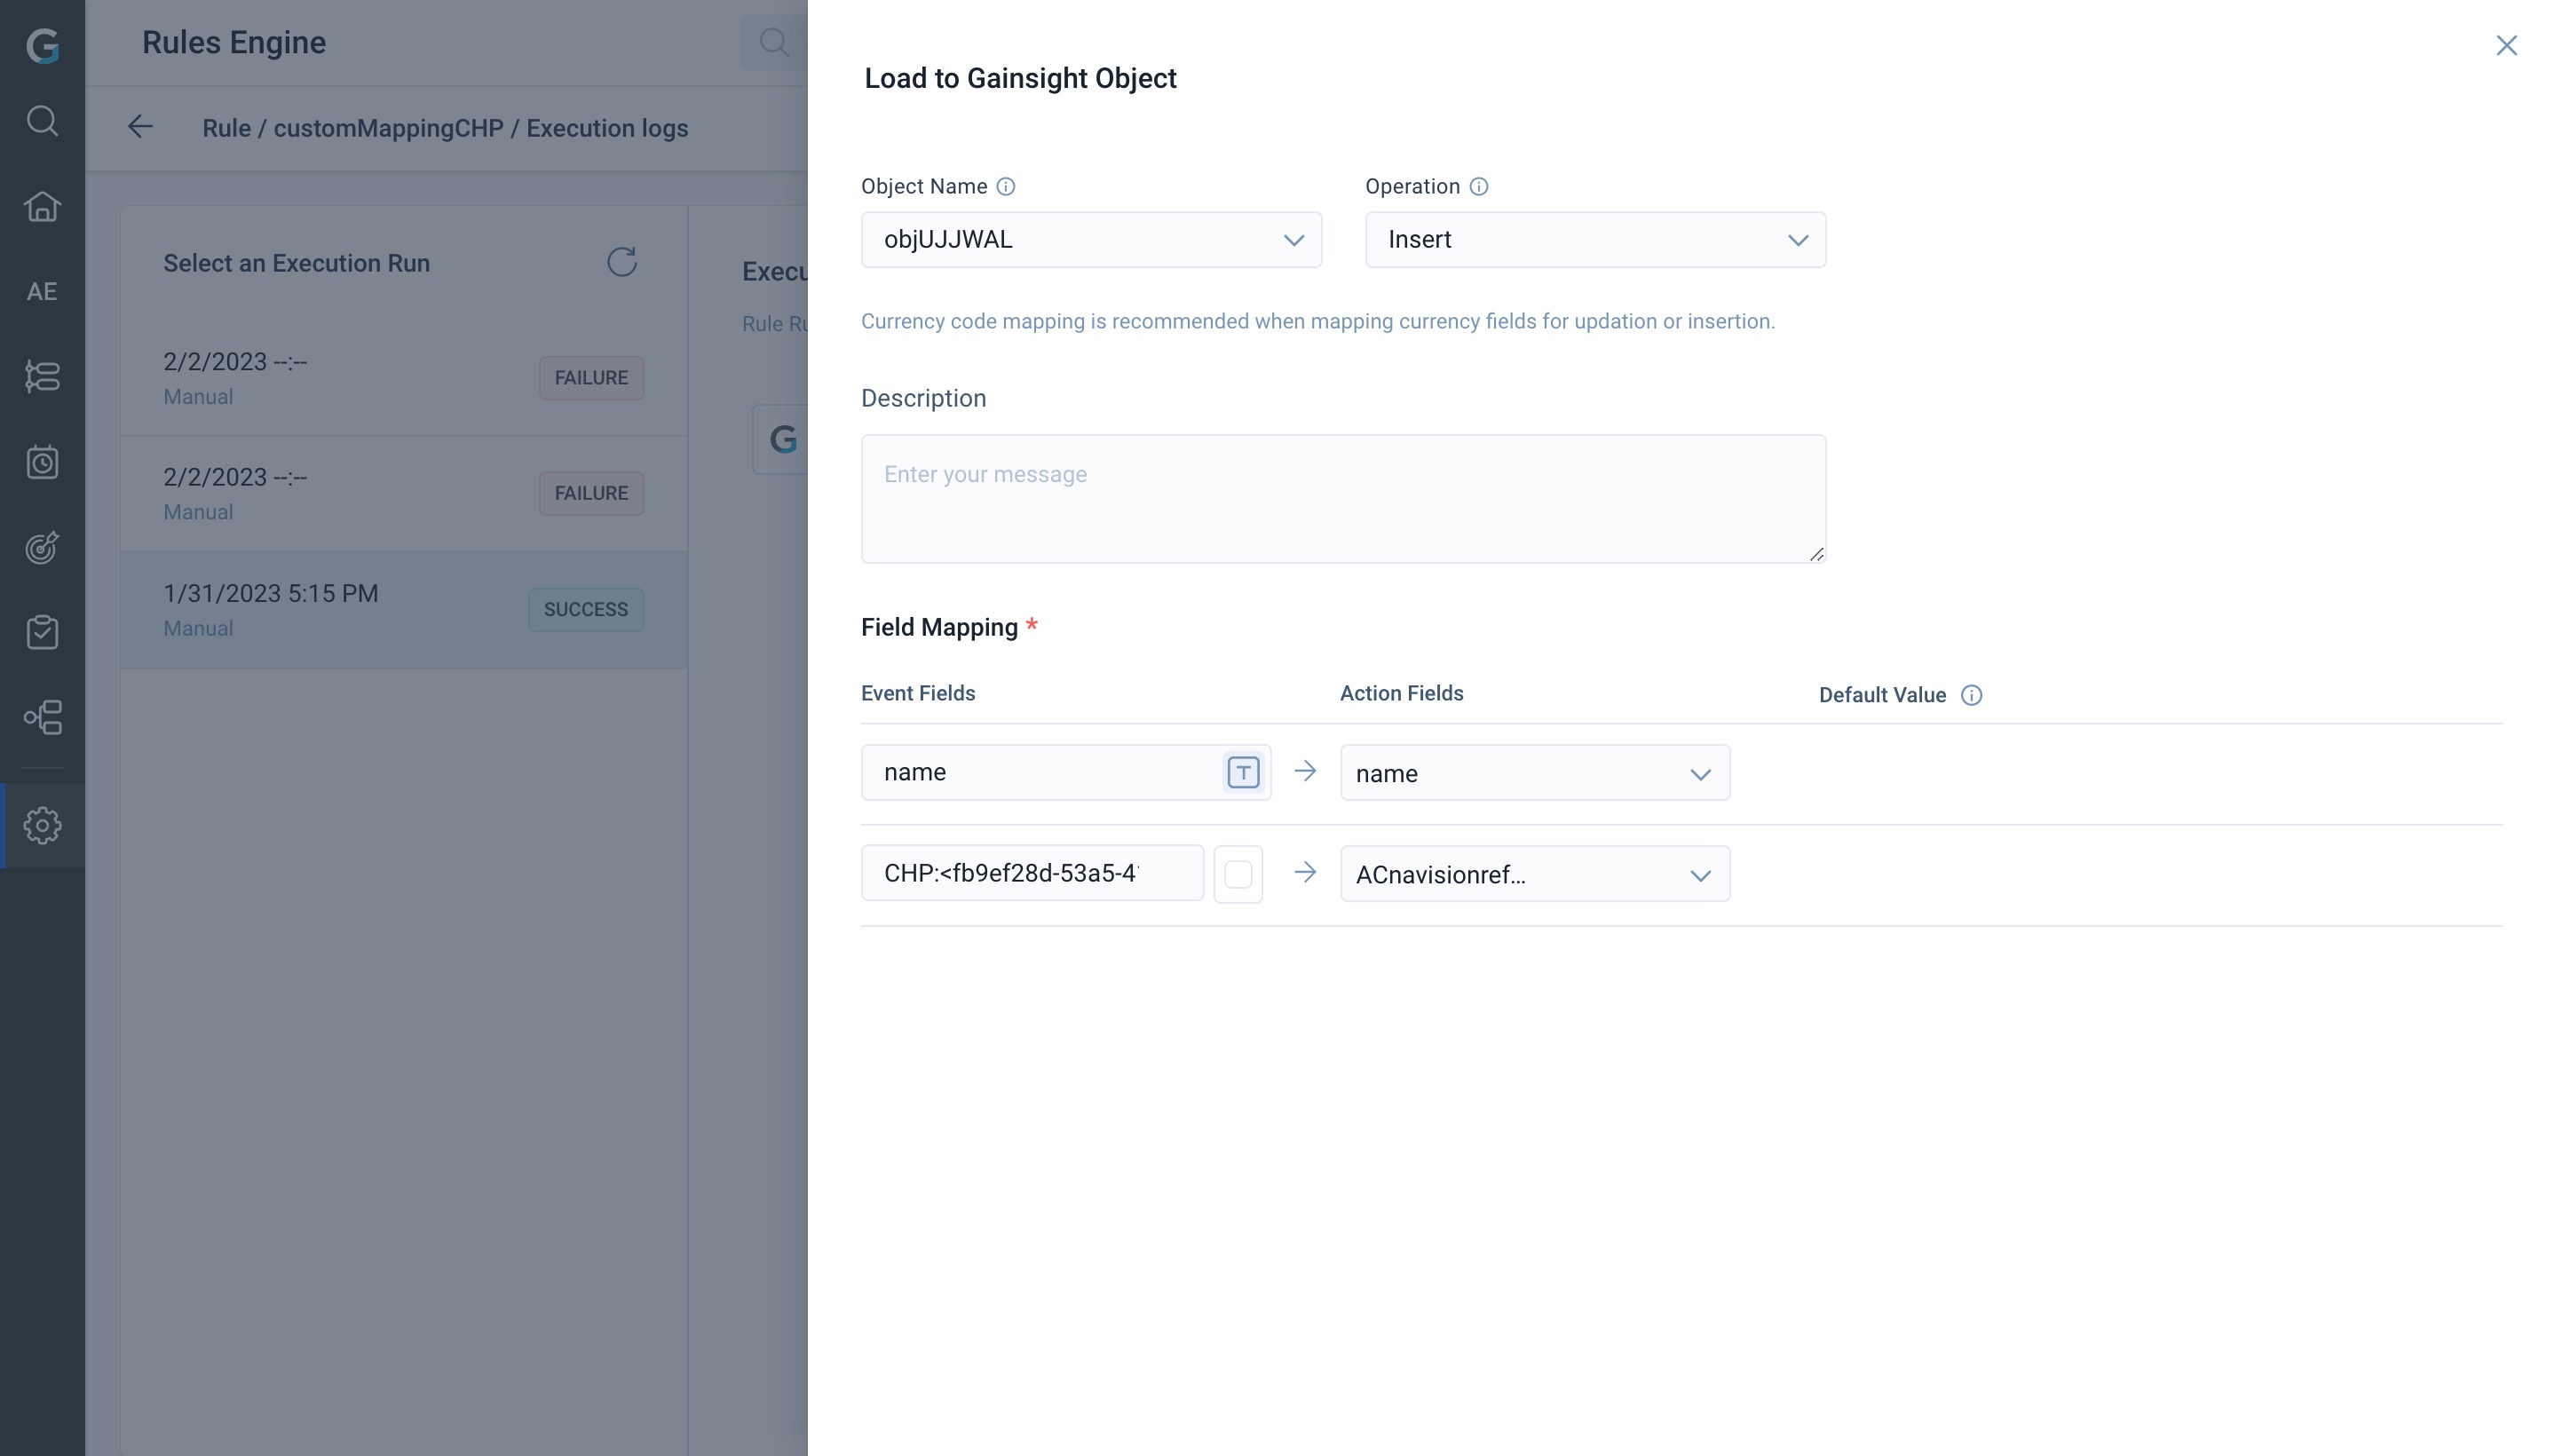
Execution Logs
You can see the execution history of any rule. There are two ways to navigate to see the Execution Logs:
-
Click on the Last Run Status to view the execution logs of a rule.
Following are the various rule statuses:
- Status: Identifies the status of the rule. The various status are:
- Success: When a rule is successfully executed.
- Failure: When a rule fails to execute.
- Aborted: When the execution of a rule is stopped. For more information about how to abort a rule, refer to the Abort Rule section of this article.
- Queued: When a rule is in a queue and the rule execution has not started.
- In progress: When a rule is being executed.
- Partial Success: This status is applicable only for Rules which have an S3 Dataset. When a rule with an S3 dataset executes and some records fail to ingest, the rule is executed partially.
.jpeg?revision=1)
- You can also click on Execution Logs in the Rule Details page to view the execution history of the rule.
Notes:
- Click refresh to view the latest version of execution logs.
- Rule updates are saved if a user modifies the rule, or if the user clicks Continue to navigate through a rule.
- If a user navigates through a rule using the breadcrumb trail (tabs) present at the top of the rule pages, the user’s actions are not registered as a rule update.
.jpg?revision=1)
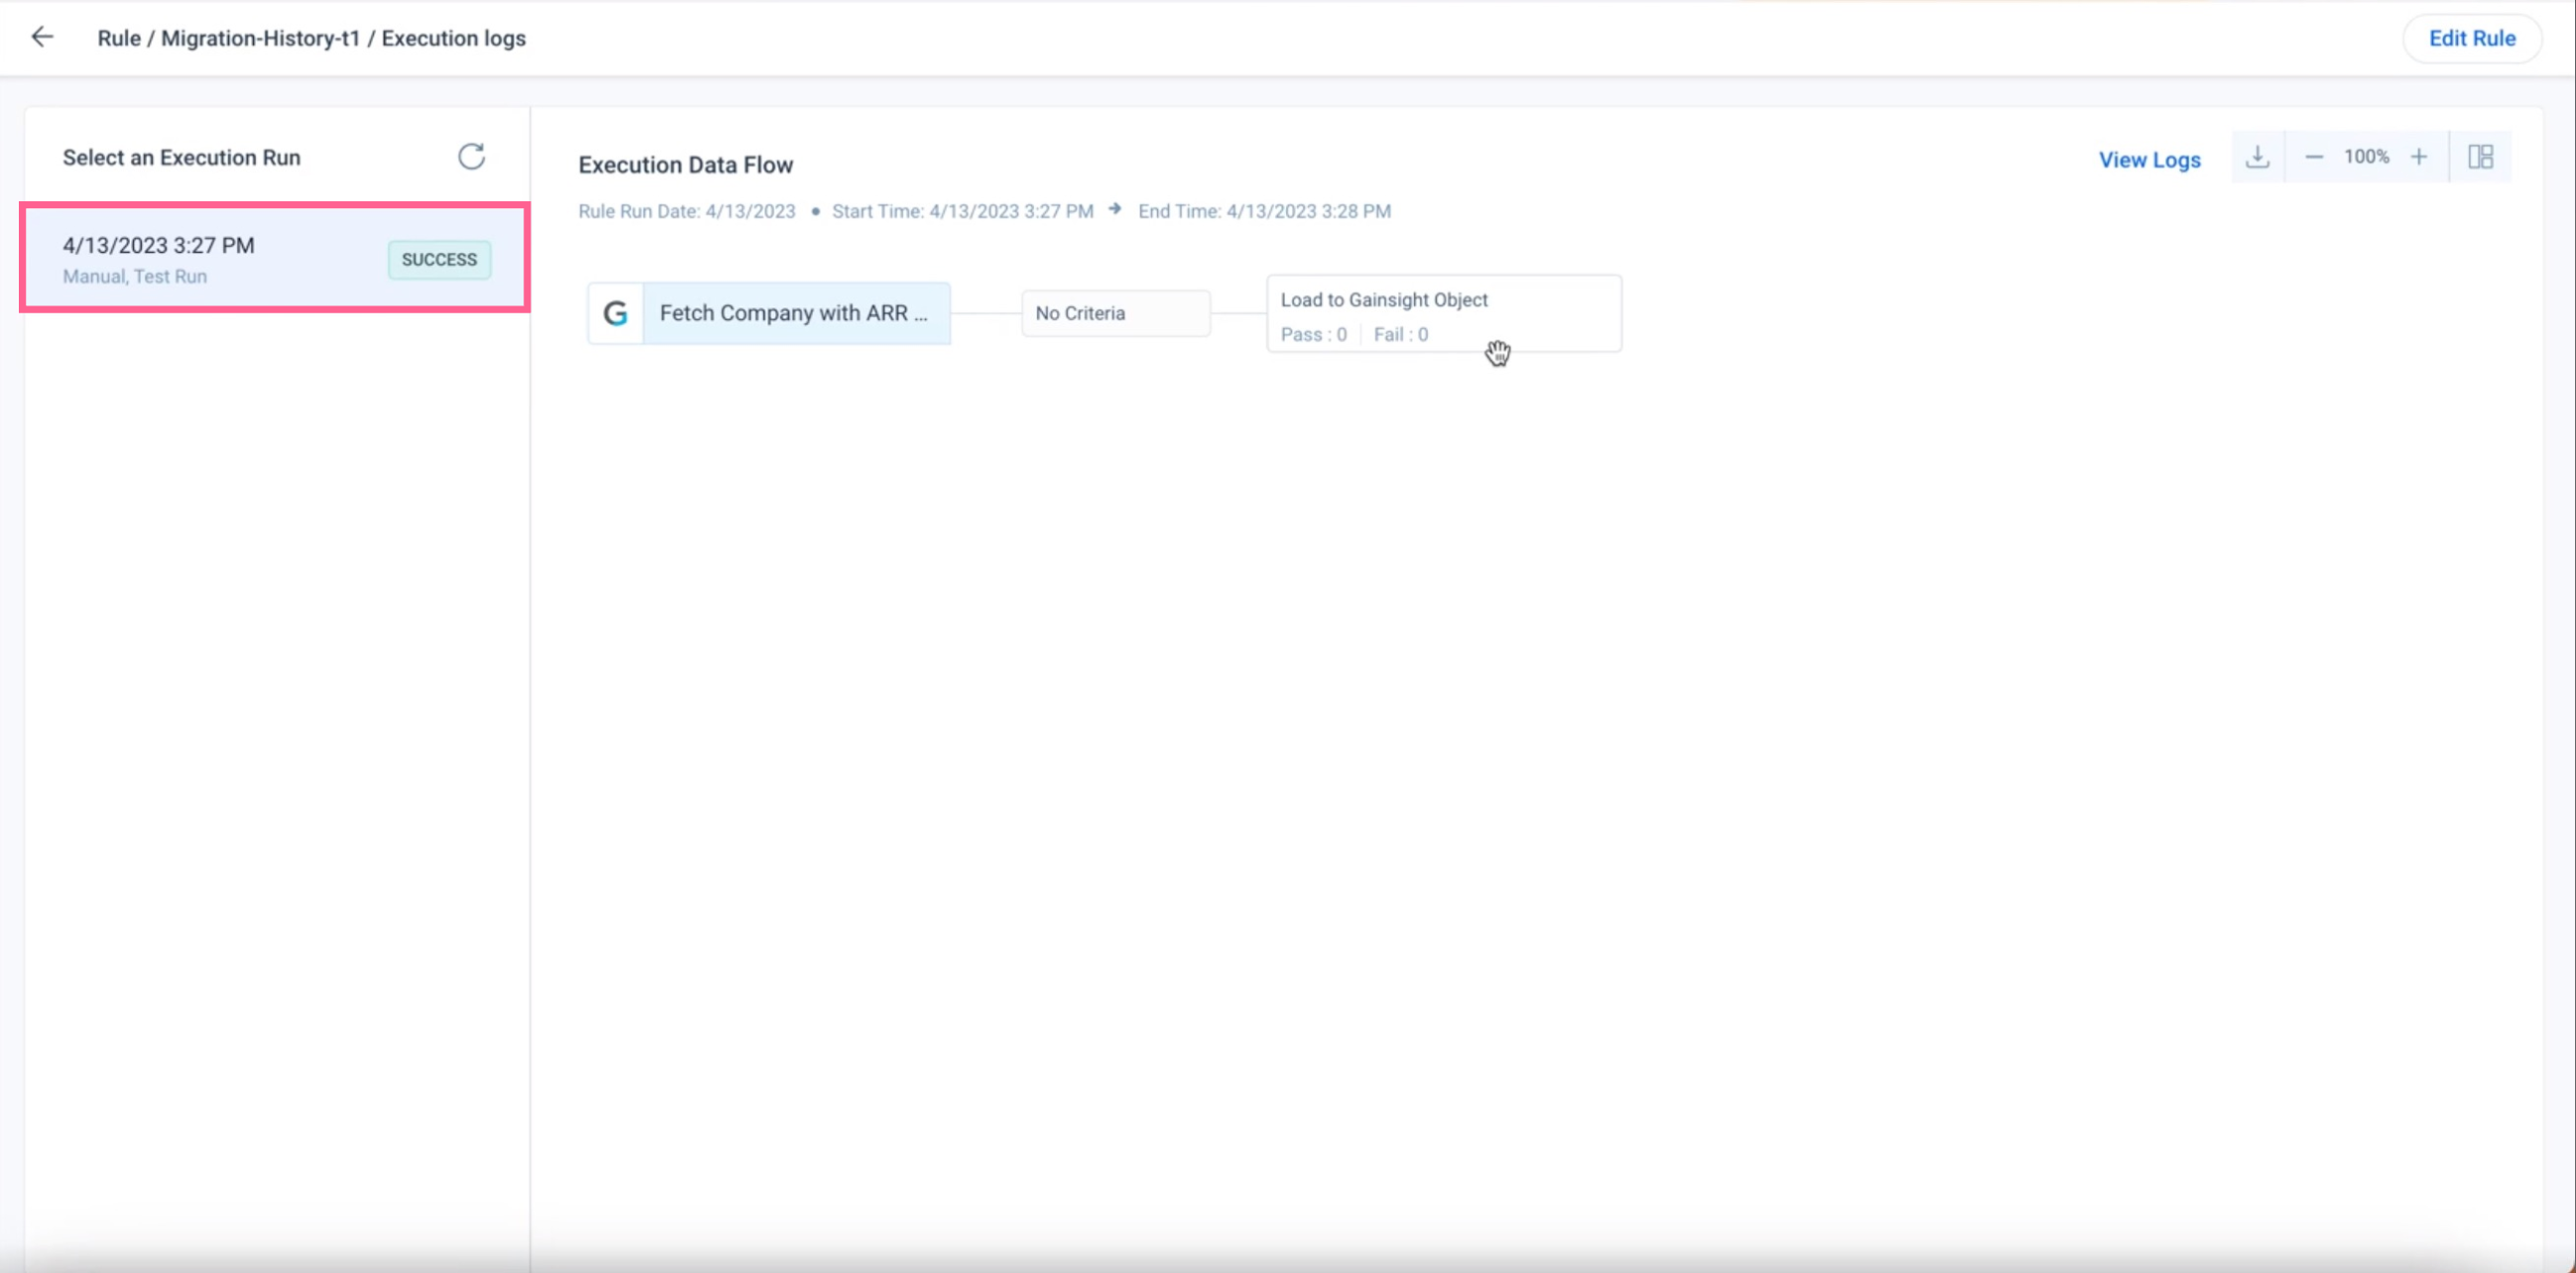
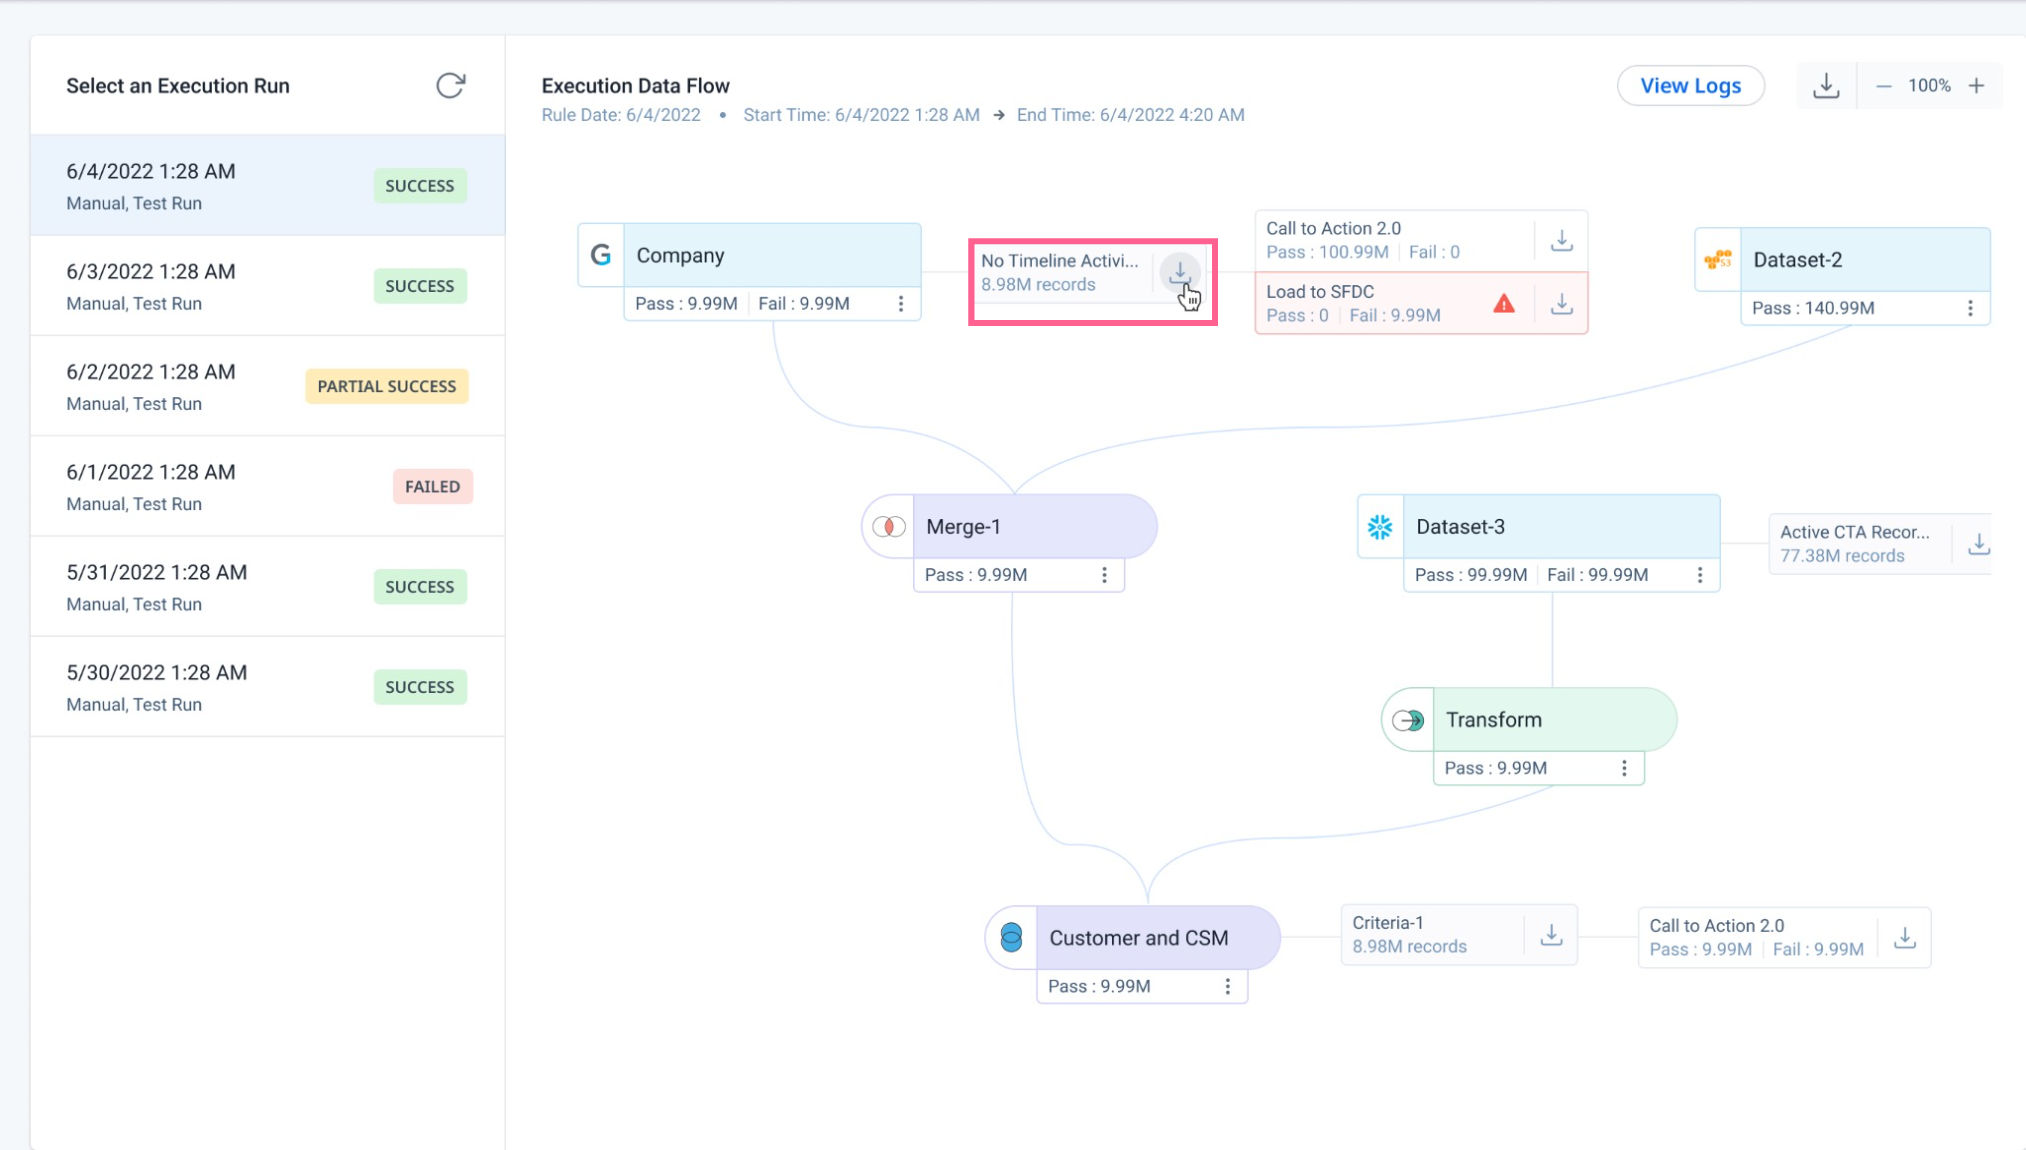
Preview and Download Task Results
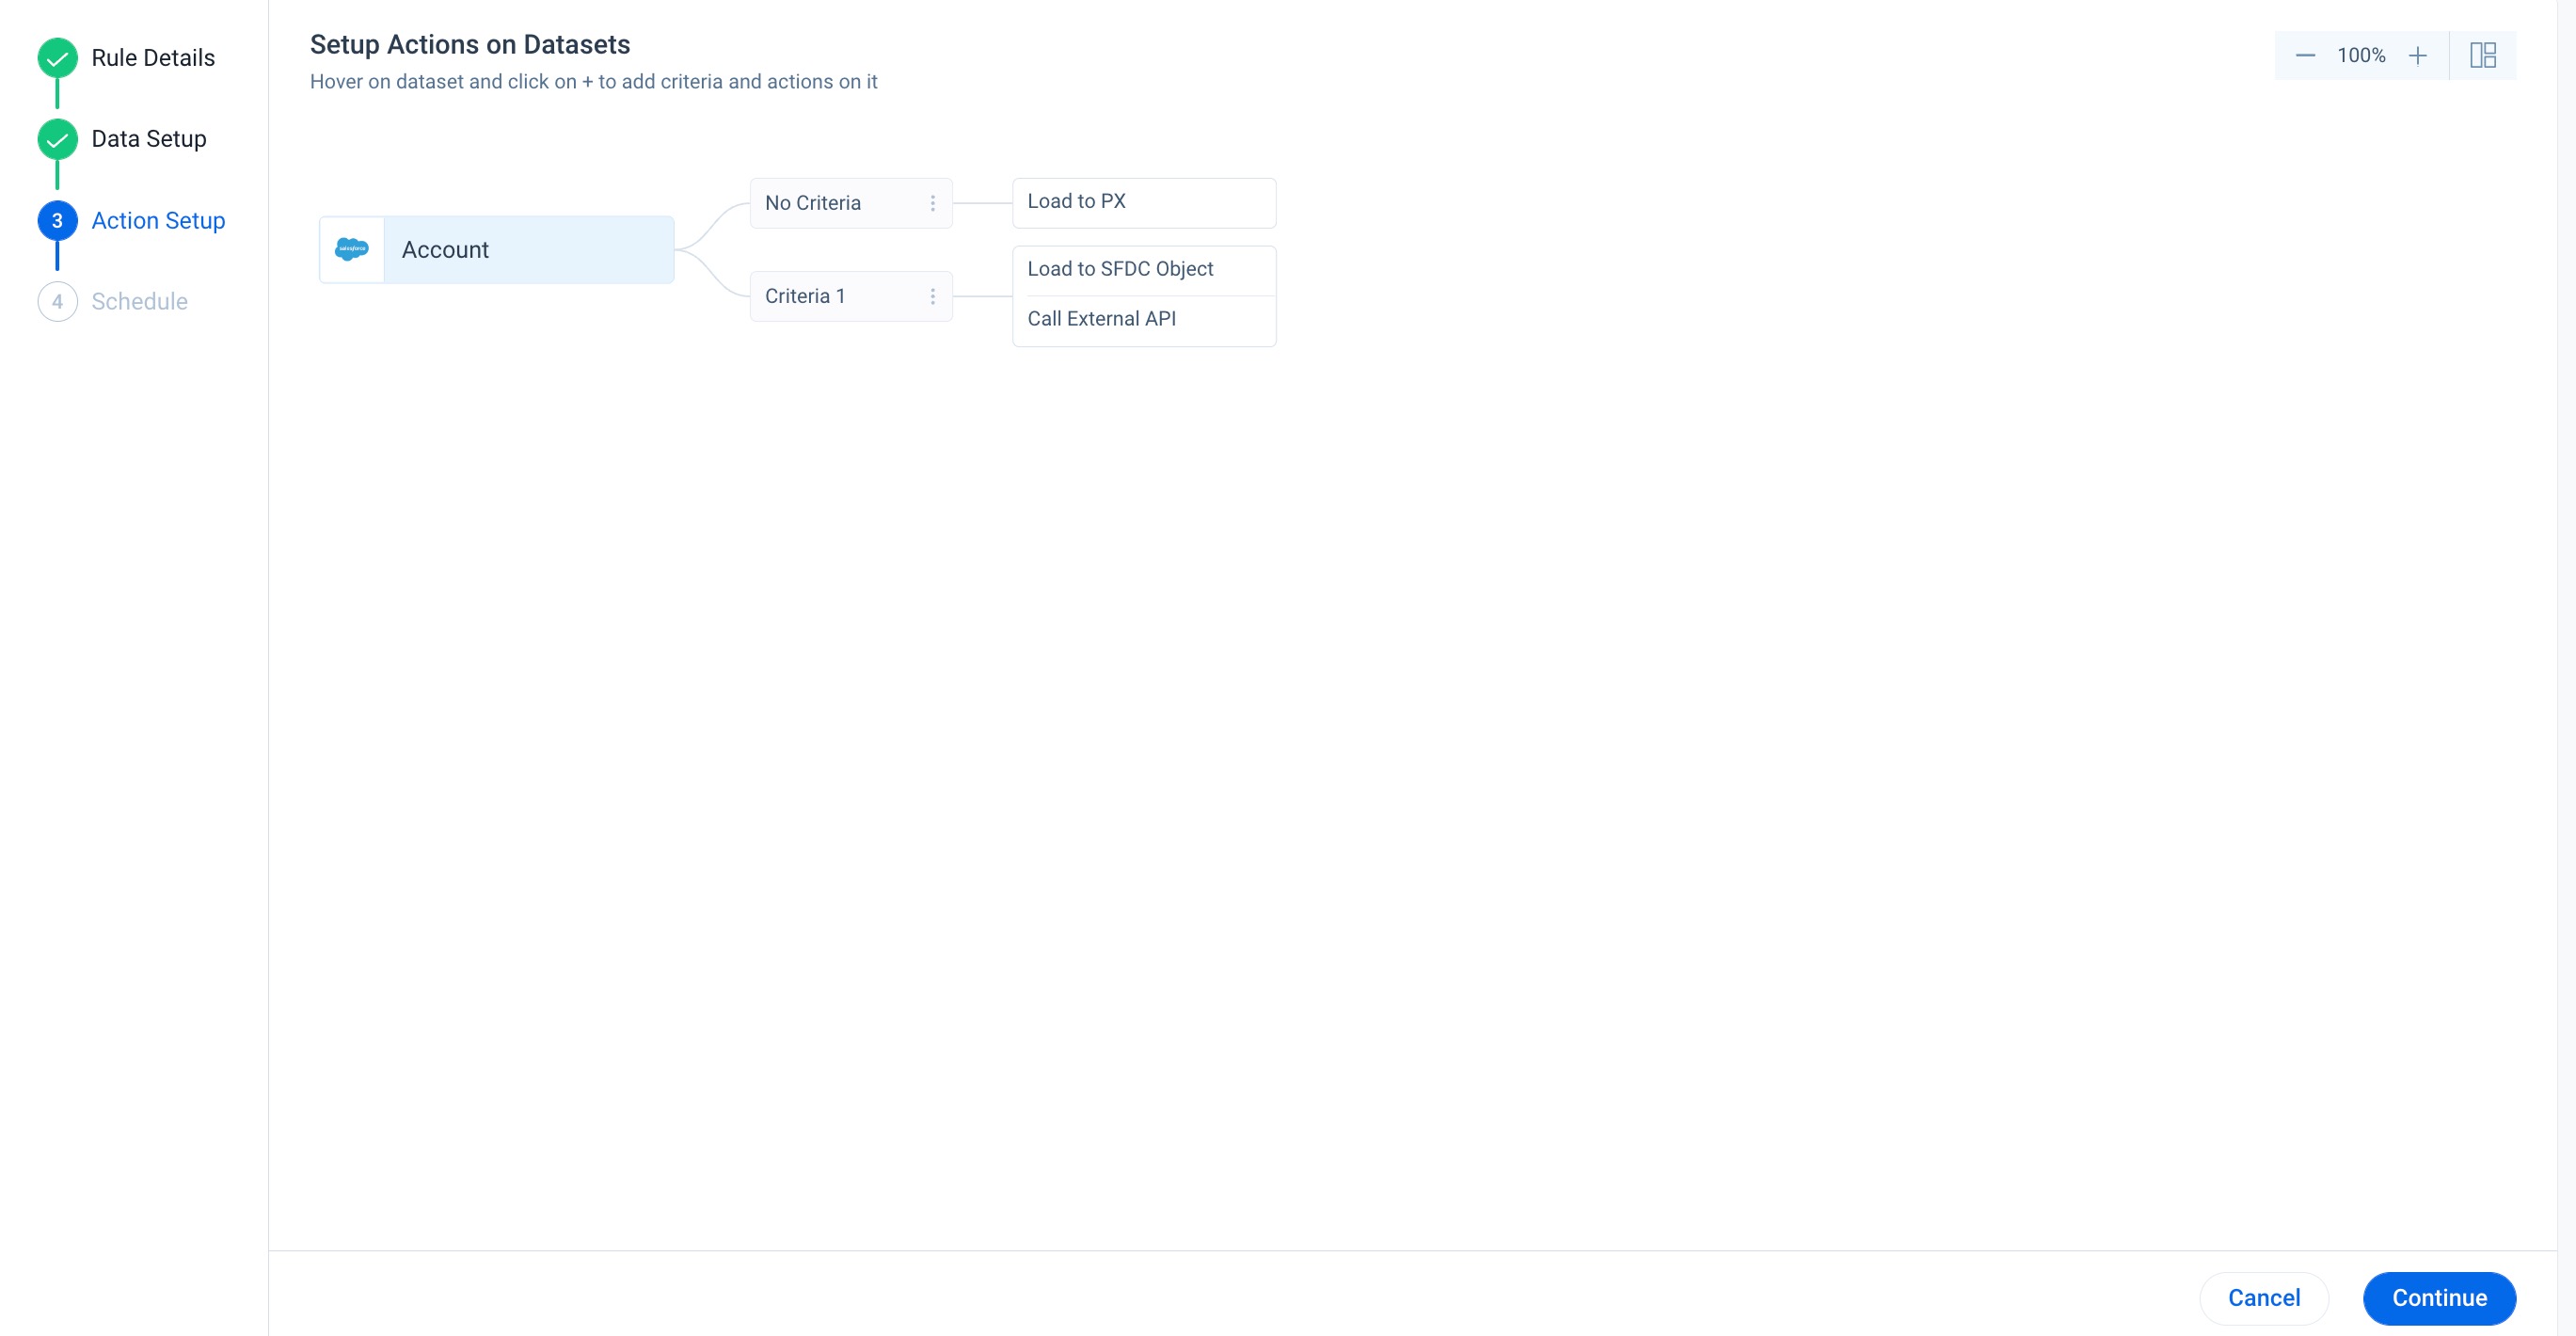
The output details of all the tasks are displayed under Execution Data Flow. Select a task to view the following details:
- Task Type: The task type that is defined while creating the Rule.
- Status: The status of the rule.
- Records: The number of records fetched for the defined task.
- Click the Download icon to download the results of the task.
.png?revision=1)
- Click Criteria to preview the criteria of the task.
- Click the Action to preview the action of the task.
- Edit Rule: Click Edit Rule. The Action Setup page appears.
- Download Criteria Records: The ability to download criteria records in rule executions gives admins more comprehensive insights. It helps admins debug the records identified as criteria and determine which records are actually processed as part of the action.
Note: The Download icon is out of action when the rule run is aborted.
In the Rule results excel sheet, a separate worksheet for each action item is displayed with details of the number of records processed in each action, if the rule is executed manually or scheduled. This feature is not enabled for scheduled runs by default. To enable this feature, you can contact support@gainsight.com.
IMPORTANT: If you enable this feature, system performance might be impacted significantly because there can be multiple rules scheduled every hour and it becomes a tedious job for the system to collect the data for every scheduled rule.
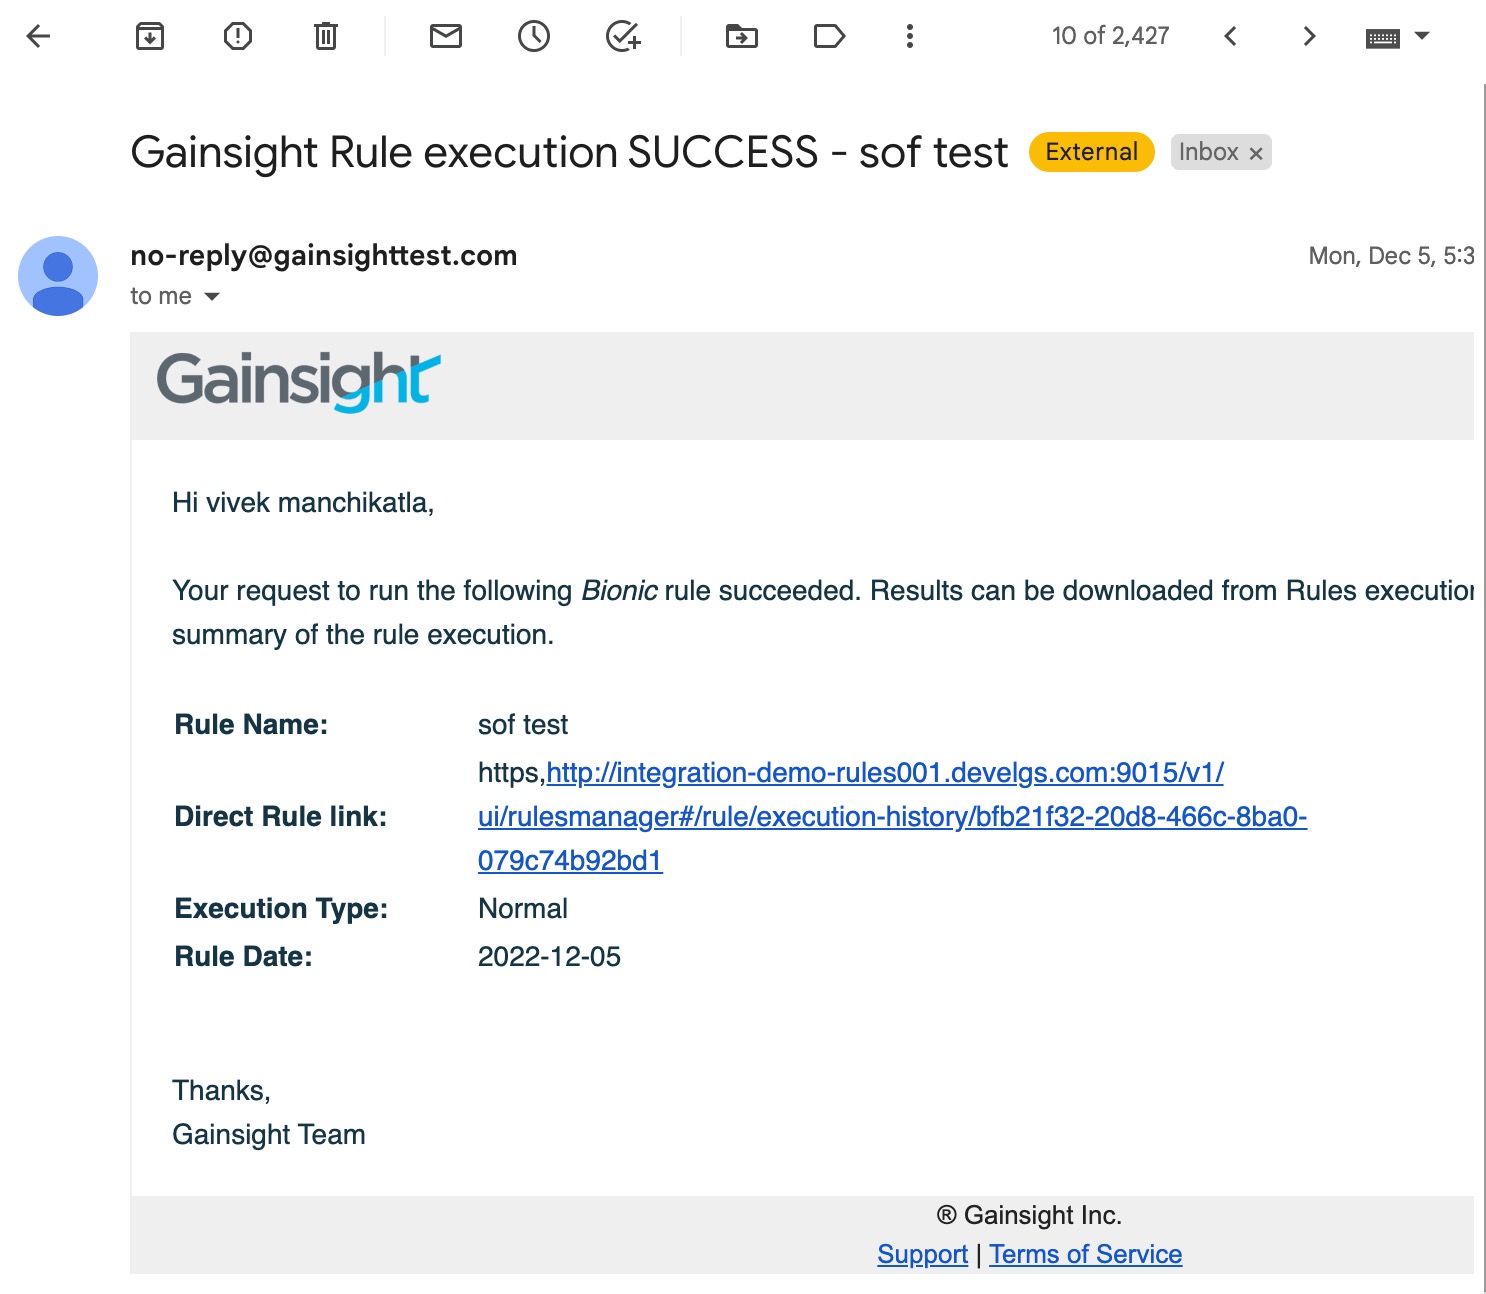
Note: After completion of the rule run, an email notification is sent to the user with all the details as shown in the below image.
View Logs
Click View Logs to see detailed information about the execution history of the specific rule.
Abort Rule
You can use the Abort tab when the rule run is initiated unintentionally, or if the rule is not configured as required.
When a rule is in progress, click Abort tab. The rule gets aborted.
.jpeg?revision=1)
You can also abort a rule from the Activity tab. Click Abort Rule to stop the execution of a rule in progress.
_(1).jpg?revision=1)
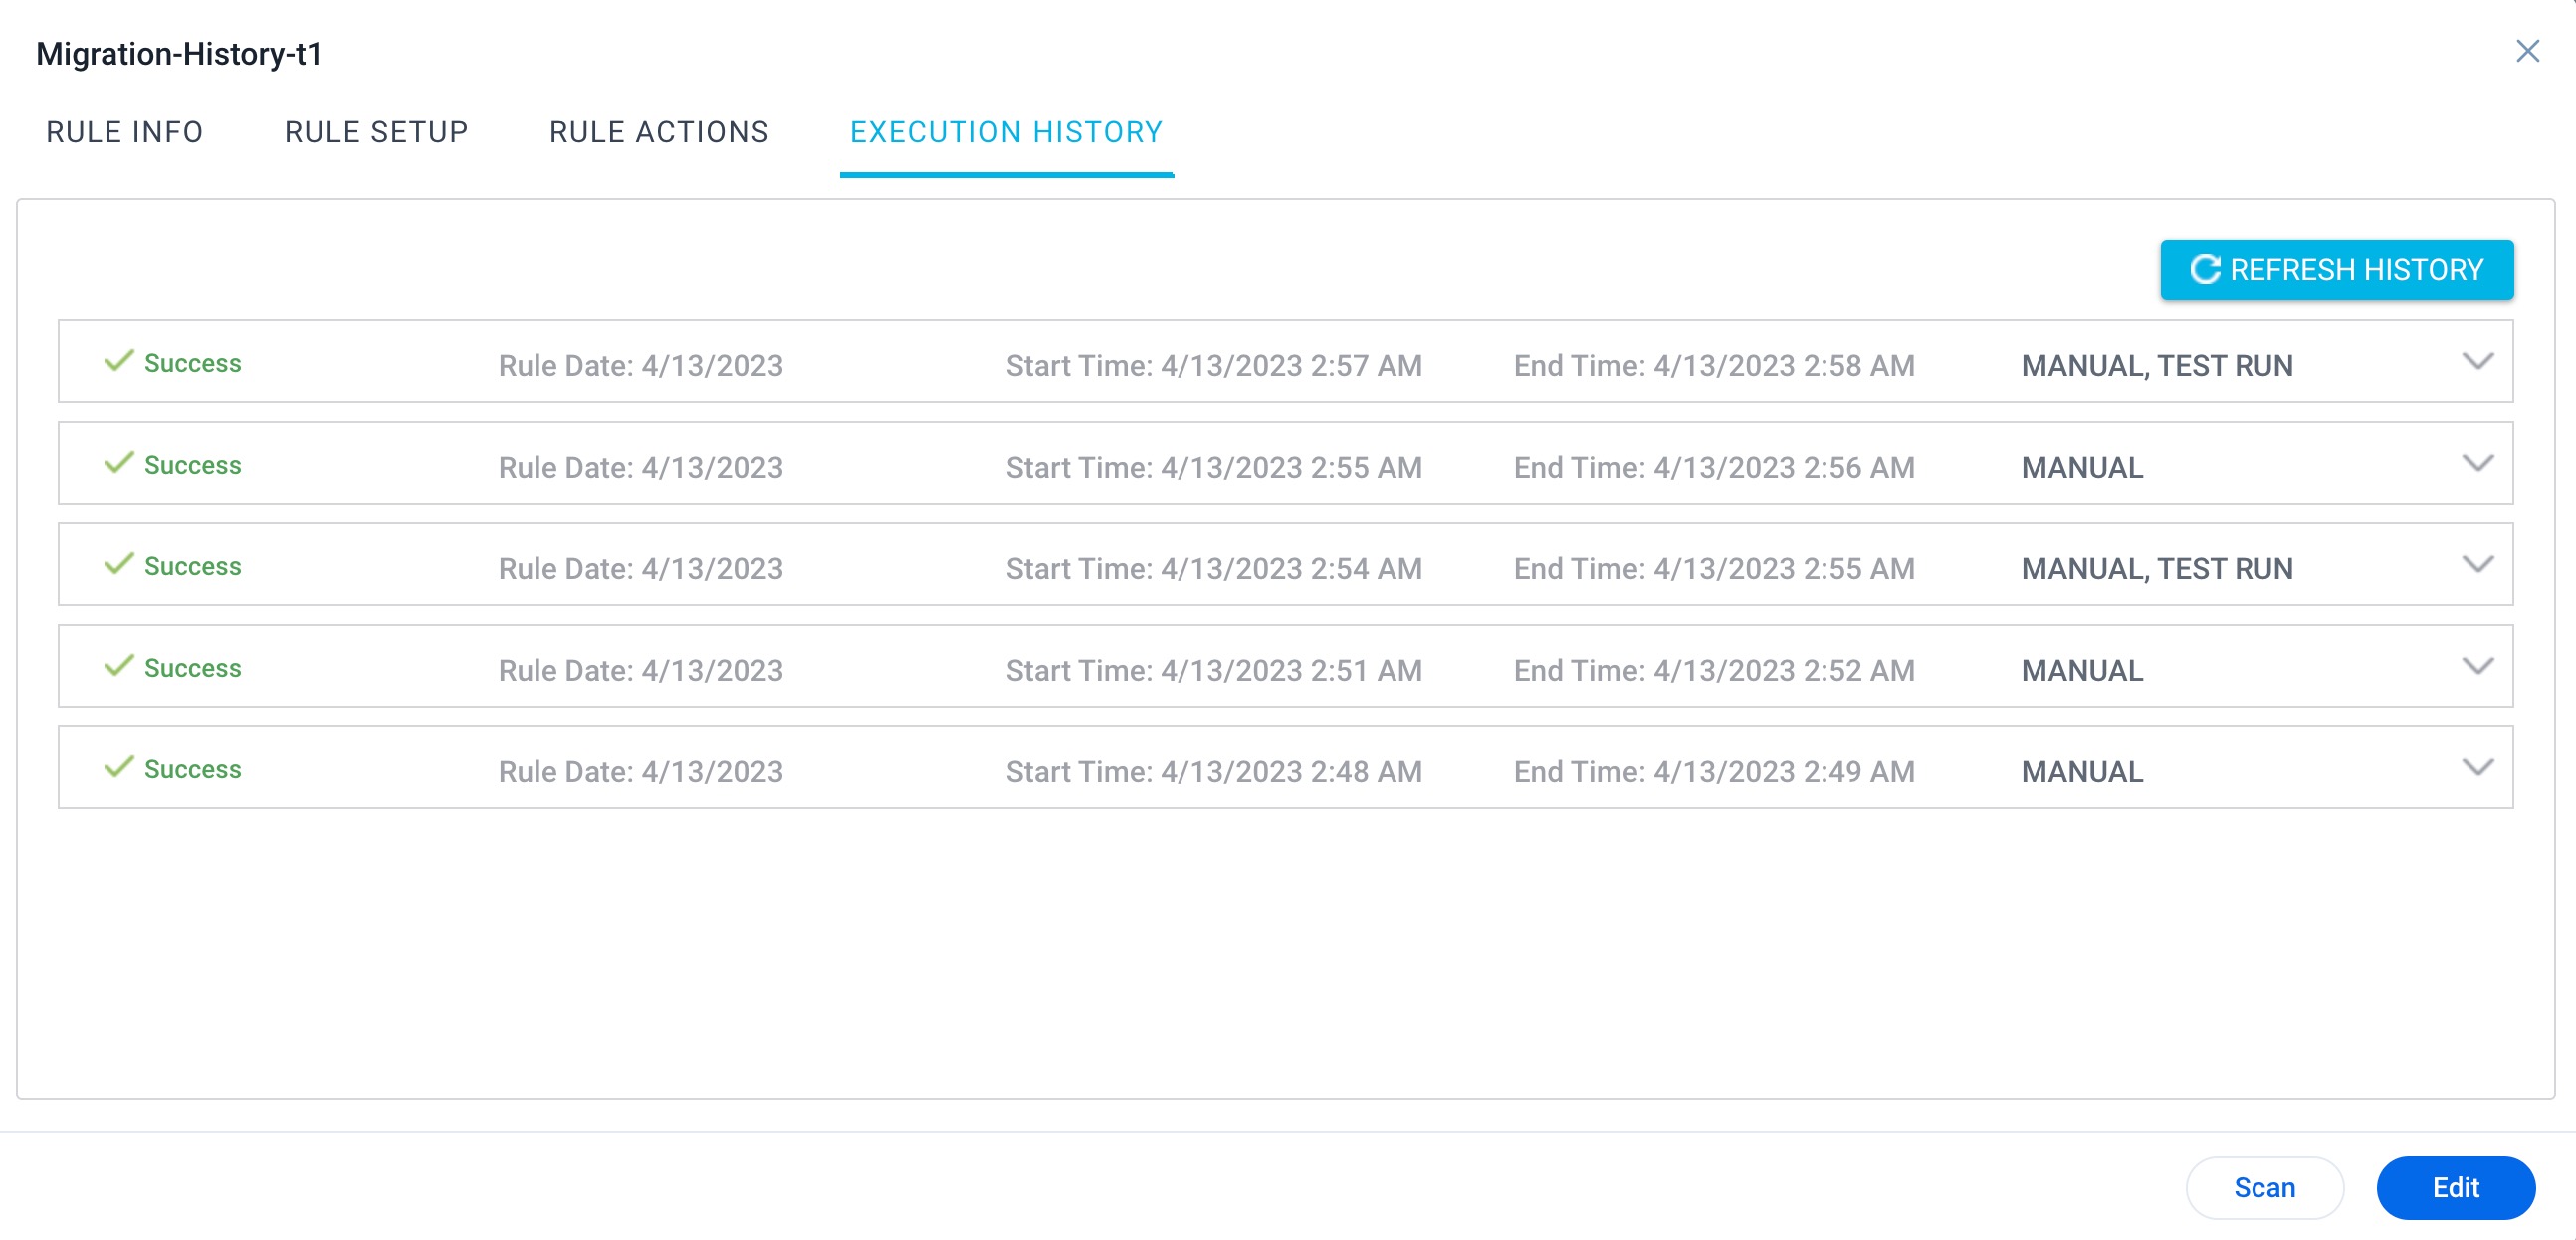
Impact of Migration from Bionic Rules to Horizon Rules in Execution History
When a Bionic Rule migrates to Horizon Rule, its execution history is also transferred with every run in Bionic and Horizon Rules, respectively.
The following image displays the Bionic Rule Execution History:
.jpg?revision=1)
Once the Bionic Rule is migrated to the Horizon Rule, the image below shows that the execution history is transferred from the Bionic Rule to the Horizon Rule.
.jpg?revision=1)
However, if the Horizon Rule is later deleted and the Bionic Rule is again migrated, the previous execution history is erased, and only the most recent activity is displayed in the execution history of the Horizon Rule.
The following image displays the Bionic Rule Execution History:
After the migration of the Bionic Rule to the Horizon Rule, the image below displays the execution history of the Horizon Rule.