User License Management
Gainsight NXT
This article explains admins about how to view or assign licenses and Permission Bundles through various channels.
Overview
Admins can manage users and their licenses from the Administration > Users and Permission > User Management page. They can filter the users based on license type and create reports on the licensed users in a company. The following topics are covered in this article:
- Gainsight License Types
- Comparison of Gainsight License Types
- View and Update License Type of a User
- Filter Users Based on License Type
- Assign Licenses to Multiple Users
- Assign Permission Bundles to Multiple Users
- Assign License through Uploading CSV file
- Assign Licenses through External Systems
- Make Users Inactive or Remove License
- Create Report on License Type
Gainsight License Types
Admins can view and manage user license types in the Gainsight User Management or User Details pages. The License Type field is selected by default in user attributes in the User Management page. The following are the license types:
- Full License (paid)
- Viewer+ Analytics License (paid)
- Viewer License (paid)
- Internal Collaborator License (free)
- External (free)
Note: Admins can control restrictions to apps through Data Permissions.
Full License
Users will have access to products based on the Permission Bundles assigned to them in Gainsight. Refer to the following table for more information about this license:
|
Who are the users |
What's Included |
App Access |
Data Access |
|---|---|---|---|
|
Customer Success Manager, Account Managers, Technical Account Managers, Renewal Managers, Install-base Sales. |
Full Read or Write access to Gainsight data and functionality |
Read or Write access to all purchased apps. Restrictions to apps can be controlled through Permission Bundles. |
Access to all Gainsight data. Restrictions to data can be controlled through Permission Bundles. |
Viewer+ Analytics License
Users can view and access insights across the entire customer base (or segments) instead of only specific customers. Admins can enable this license to Support Representatives, Project Managers, Service Managers, Executives, New-logo Sales and Channel Partners.
Refer to the following table for more information about this license:
|
Module |
Access Details |
|---|---|
|
C/R 360 |
|
|
Timeline/Global Timeline |
|
|
Sally |
Users can view Quick Insights from Sally. |
|
Sponsor Tracking |
|
|
Scorecards |
|
|
People Maps (Only for Customers who have purchased this application) |
|
|
Dashboards (Horizon Analytics) |
|
|
Text Analytics (Only for Customers who have purchased this application) |
Read-only access to the Default View and Public views within the Text Analytics dashboard. |
|
Renewal Center (Only for Customers who have purchased this application) |
Read-only access to Analyze tab only:
|
|
Adoption Explorer > Analytics |
|
| Cockpit | Read-only access in Global Cockpit and C360 (even if the CTAs are shared to them). |
| Success Plans | Read-only access in Global Success Plans and C360 (even if the plans are shared in edit mode). |
| My Settings | Users can access Notifications, Inbound Emails, and Calendar configurations tab in this page. |
| My Profile | Users can update their profile information such as name, email, title, timezone, user locale, and profile picture. |
Viewer License
Users can view pages assigned to them as part of the Viewer Permission Bundle. Admins can assign this license to Support Representatives, Project Managers, Service Managers, Executives, New-logo Sales, and Channel Partners.
Refer to the following table for more information about this license:
|
Module |
Access Details |
|---|---|
|
C/R 360 |
|
|
Timeline/Global Timeline |
|
|
Sally |
Users can view Quick Insights from Sally. |
|
Sponsor Tracking |
|
|
Scorecards |
|
|
People Maps (Only for Customers who have purchased this application) |
|
|
Adoption Explorer > Analytics |
|
| Cockpit | Read-only access in Global Cockpit and C360 (even if the CTAs are shared to them). |
| Success Plans | Read-only access in Global Success Plans and C360 (even if the plans are shared in edit mode). |
| My Settings | Users can access Notifications, Inbound Emails, and Calendar configurations tab in this page. |
| My Profile | Users can update their profile information such as name, email, title, timezone, user locale, and profile picture. |
Internal Collaborator License
This type of license can be assigned to employees within an organization who do not use the product directly but need to collaborate with other internal teams.
For example, Sales, Services, and Marketing teammates can be added as Internal Collaborators. Users with any other License types except ‘External’ can be assigned this License.
Refer to the following table for more information about this license:
|
Who are the users |
What's Included |
App Access |
Data Access |
|---|---|---|---|
|
Teammates who do not use Gainsight but are needed in specific events (Timeline Activities) |
Users can search for other users with the Internal collaborator license in Gainsight. For example, they can add them as Internal Attendees in meetings from Timeline. |
Can be searched in all the modules. Users cannot login to Gainsight. Success Plans cannot be shared with the users. |
NA |
External License
A user with the External license type is created when a C/R360 or a Success Plan is shared with a Person/Contact record. Admins cannot assign this license to any user from the User Management page. Refer to the following table for more information about this license:
|
Who are the users |
What's Included |
App Access |
Data Access |
|---|---|---|---|
|
Active users with whom C/R 360 and Success Plan are shared. |
Access Shared C/R 360 and Success Plans. |
Users cannot login to Gainsight. |
NA |
Note: When an existing External user is made inactive, then they cannot be made active again in Gainsight. The inactive External user will not be able to access the previously shared asset (C/R 360 or Success Plan).
However, if the asset is shared again with the same inactive External user, then another active record will be created in Gainsight and the person will be able to access the shared asset.
IMPORTANT:
- Super admins will have the Full license type by default.
- While importing users from external systems, users' status (active/inactive) will be honored.
- Inactive users will not have any licenses in Gainsight which means their license type field will be blank in User Management.
You can view the total number of active Full, Viewer, Viewer+ Analytics, Internal Collaborator Licensed Users and Inactive users in the User Management page > Stats section.
Note: Users from Gainsight in a customer org and inactive users are not included in the total count of Full Licensed Users and View Licensed Users.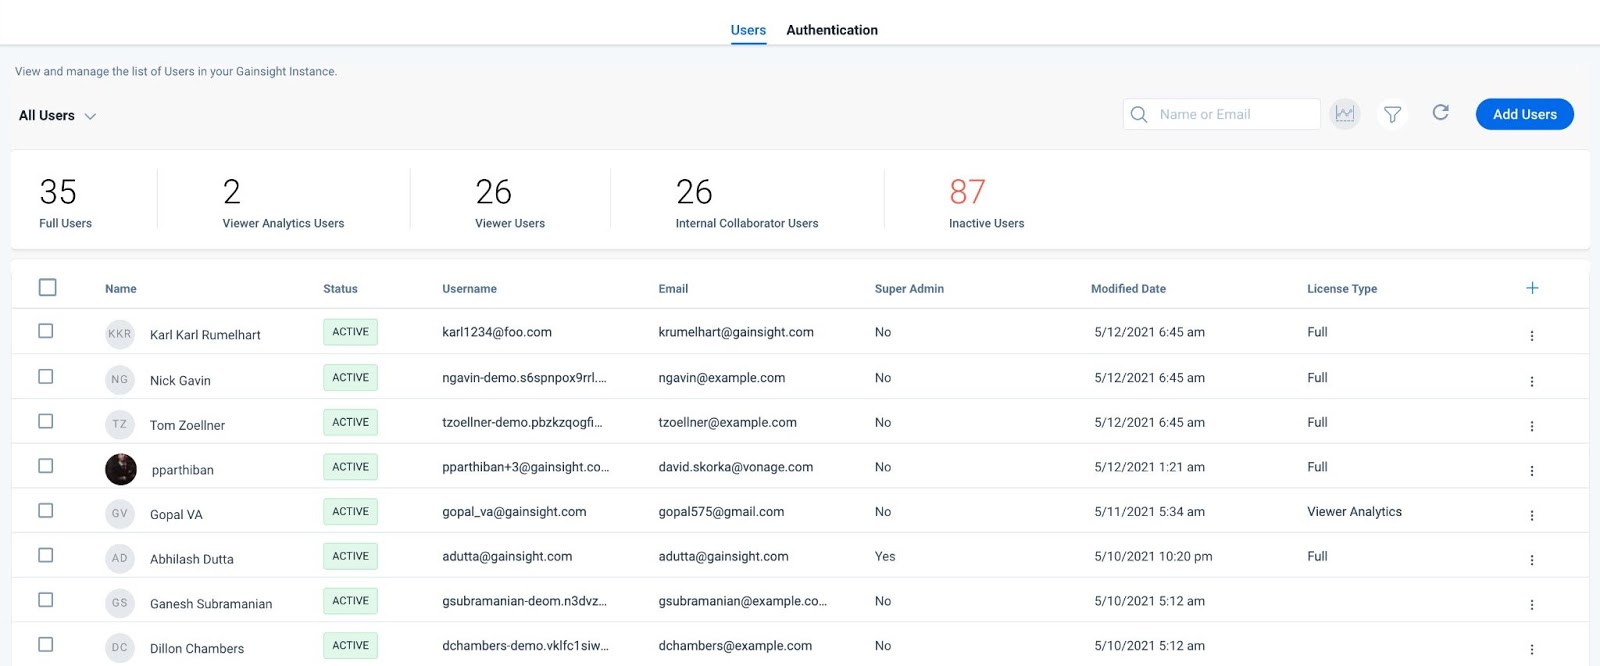
The License Type field is added in the Add Users Manually page. The following are the four options for the License Type field:
- Full License: Admins can assign the required Permission Bundles to the user in the Permission field.
- Viewer License: VIEW_GROUP Permission Bundle is assigned by default to the user in the Permission field.
- Viewer+ Analytics: VIEWANALYTICS_GROUP Permission Bundle is assigned by default to the user in the Permission field
- Internal Collaborator: Admins cannot assign any permission bundles to the user.
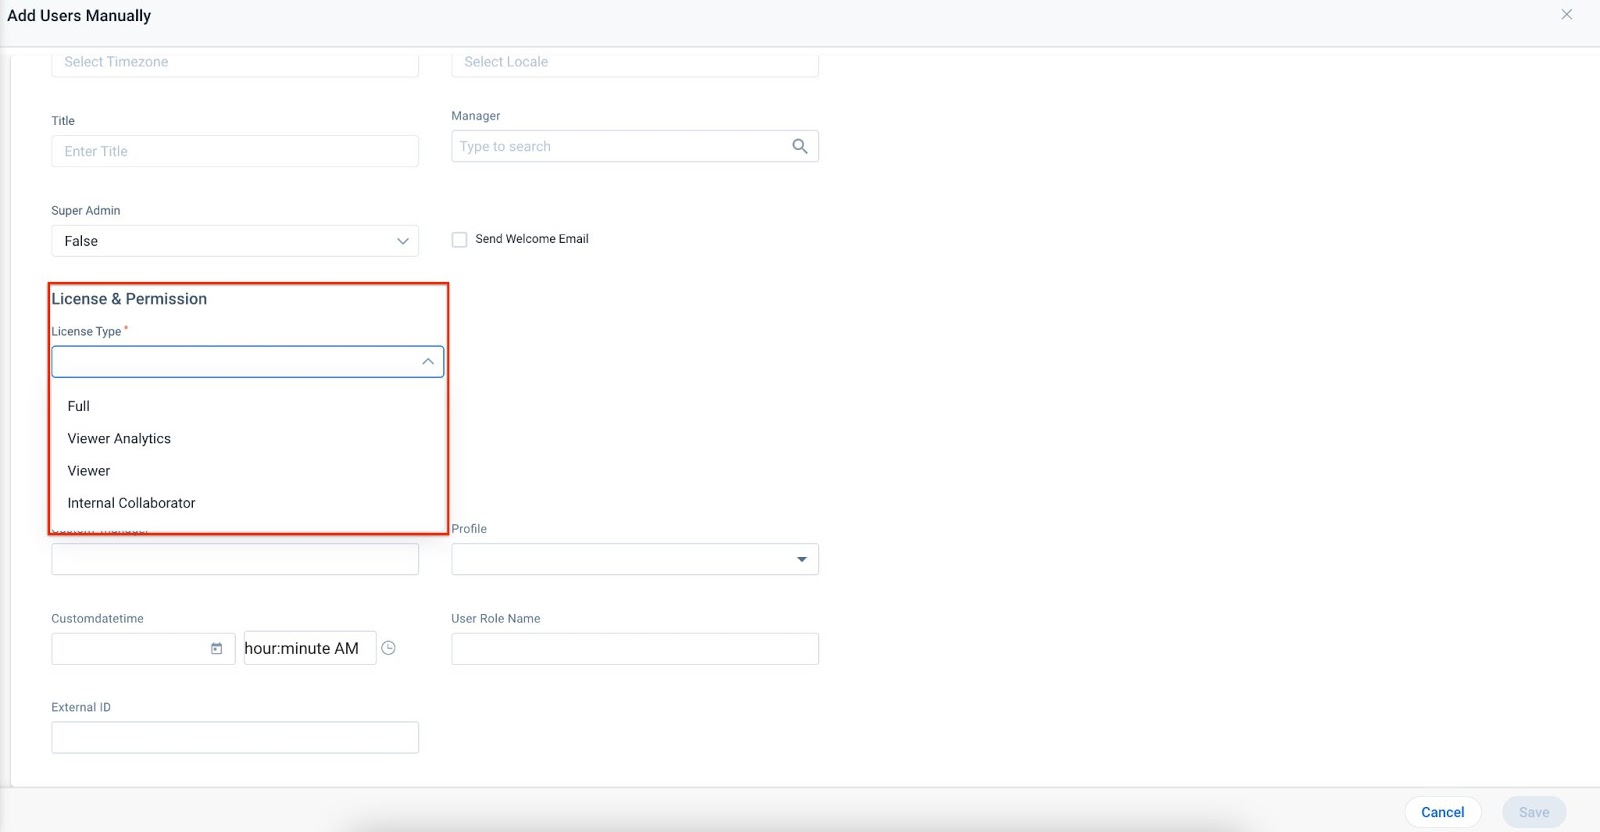
- For more information on how to add users manually, refer to the Add Users Manually article.
Comparison of Gainsight License Types
|
Product Area |
Viewer |
Viewer+ Analytics |
Full |
|
|---|---|---|---|---|
|
360 |
Summary Section |
Read Only |
Read Only |
Full Access |
|
Scorecards |
Read Only |
Read Only |
Full Access |
|
|
Timeline |
Full Access |
Full Access |
Full Access |
|
|
Business Modeler & Company Hierarchy |
Read Only |
Read Only |
Full Access |
|
|
Adoption Explorer |
Read Only |
Read Only |
Full Access |
|
|
Survey |
Read Only |
Read Only |
Full Access |
|
|
Success Plans |
Read Only |
Read Only |
Full Access |
|
|
Sponsor Tracking |
Full Access |
Full Access |
Full Access |
|
|
Person / People Maps |
Full Access |
Full Access |
Full Access |
|
|
Company Intelligence |
Read Only |
Read Only |
Full Access |
|
|
All other sections |
Read Only |
Read Only |
Full Access |
|
|
Timeline (Global) |
Full Access |
Full Access |
Full Access |
|
|
Adoption Explorer (Global) |
Read Only |
Read Only |
Full Access |
|
|
Cockpit |
Read Only |
Read Only |
Full Access |
|
|
Surveys |
- |
- |
Full Access |
|
|
Journey Orchestrator |
- |
- |
Full Access |
|
|
Dashboards |
- |
Read Only |
Full Access |
|
|
Report Builder |
- |
- |
Full Access |
|
|
Renewal Center |
Analyze |
- |
Read Only |
Full Access |
|
Forecast |
- |
- |
Full Access |
|
|
Text Analytics |
- |
Read Only |
Full Access |
|
| Gainsight Home | - | - | Full Access | |
View and Update License Type of a User
To view and update the license type for a user:
- Navigate to Administration > Users and Permissions > User Management.
- Click the context menu of the user and select Edit User.
- If the user is not a Super Admin, then select any of the following license types in the License Type field.
- Full: For Full license, admins can add any other Permission Bundles they require.
- Viewer+ Analytics: When you select this license type, the VIEWANALYTICS_GROUP permission bundle is assigned by default. You cannot add or remove any other permission bundles to the Viewer+ Analytics Licensed user.
- Viewer: For the Viewer license, VIEW_GROUP Permission Bundle is selected by default and the user cannot add any other Permission Bundles.
- Internal Collaborator: Admins cannot assign any Permission Bundles to this license type.
Note: If the user is a Super Admin, then the Full license is assigned by default.
- (only applicable for Full license) Click Add Permission Bundles.
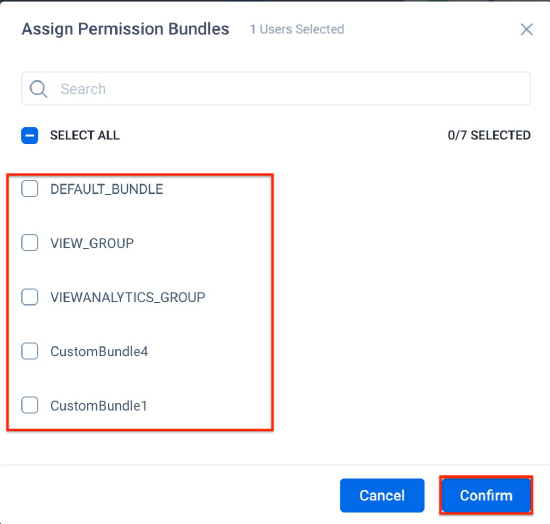
- In the Assign Permission Bundles pop-up, select the required Permission Bundles.
- Click Confirm.
- Click Update in the User Detail page. The selected license type and Permission Bundles are updated for the user.
Note: By default, Super Admins will always have the Full license in Gainsight.
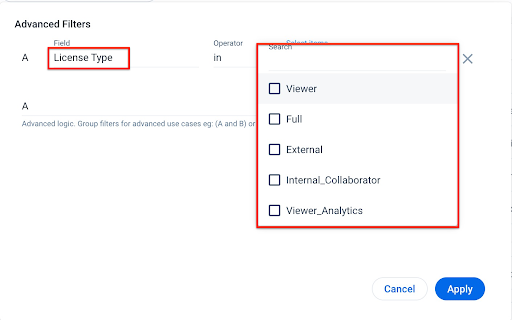
Filter Users Based on License Type
Admins can filter the users based on the license type or state (Active or Inactive) in the User Management page. Select the License Type in the field and select in as an operator. Select any of the following License types in filter values to view the respective users:
- Full
- Viewer
- Viewer+ Analytics
- Internal Collaborator
- External
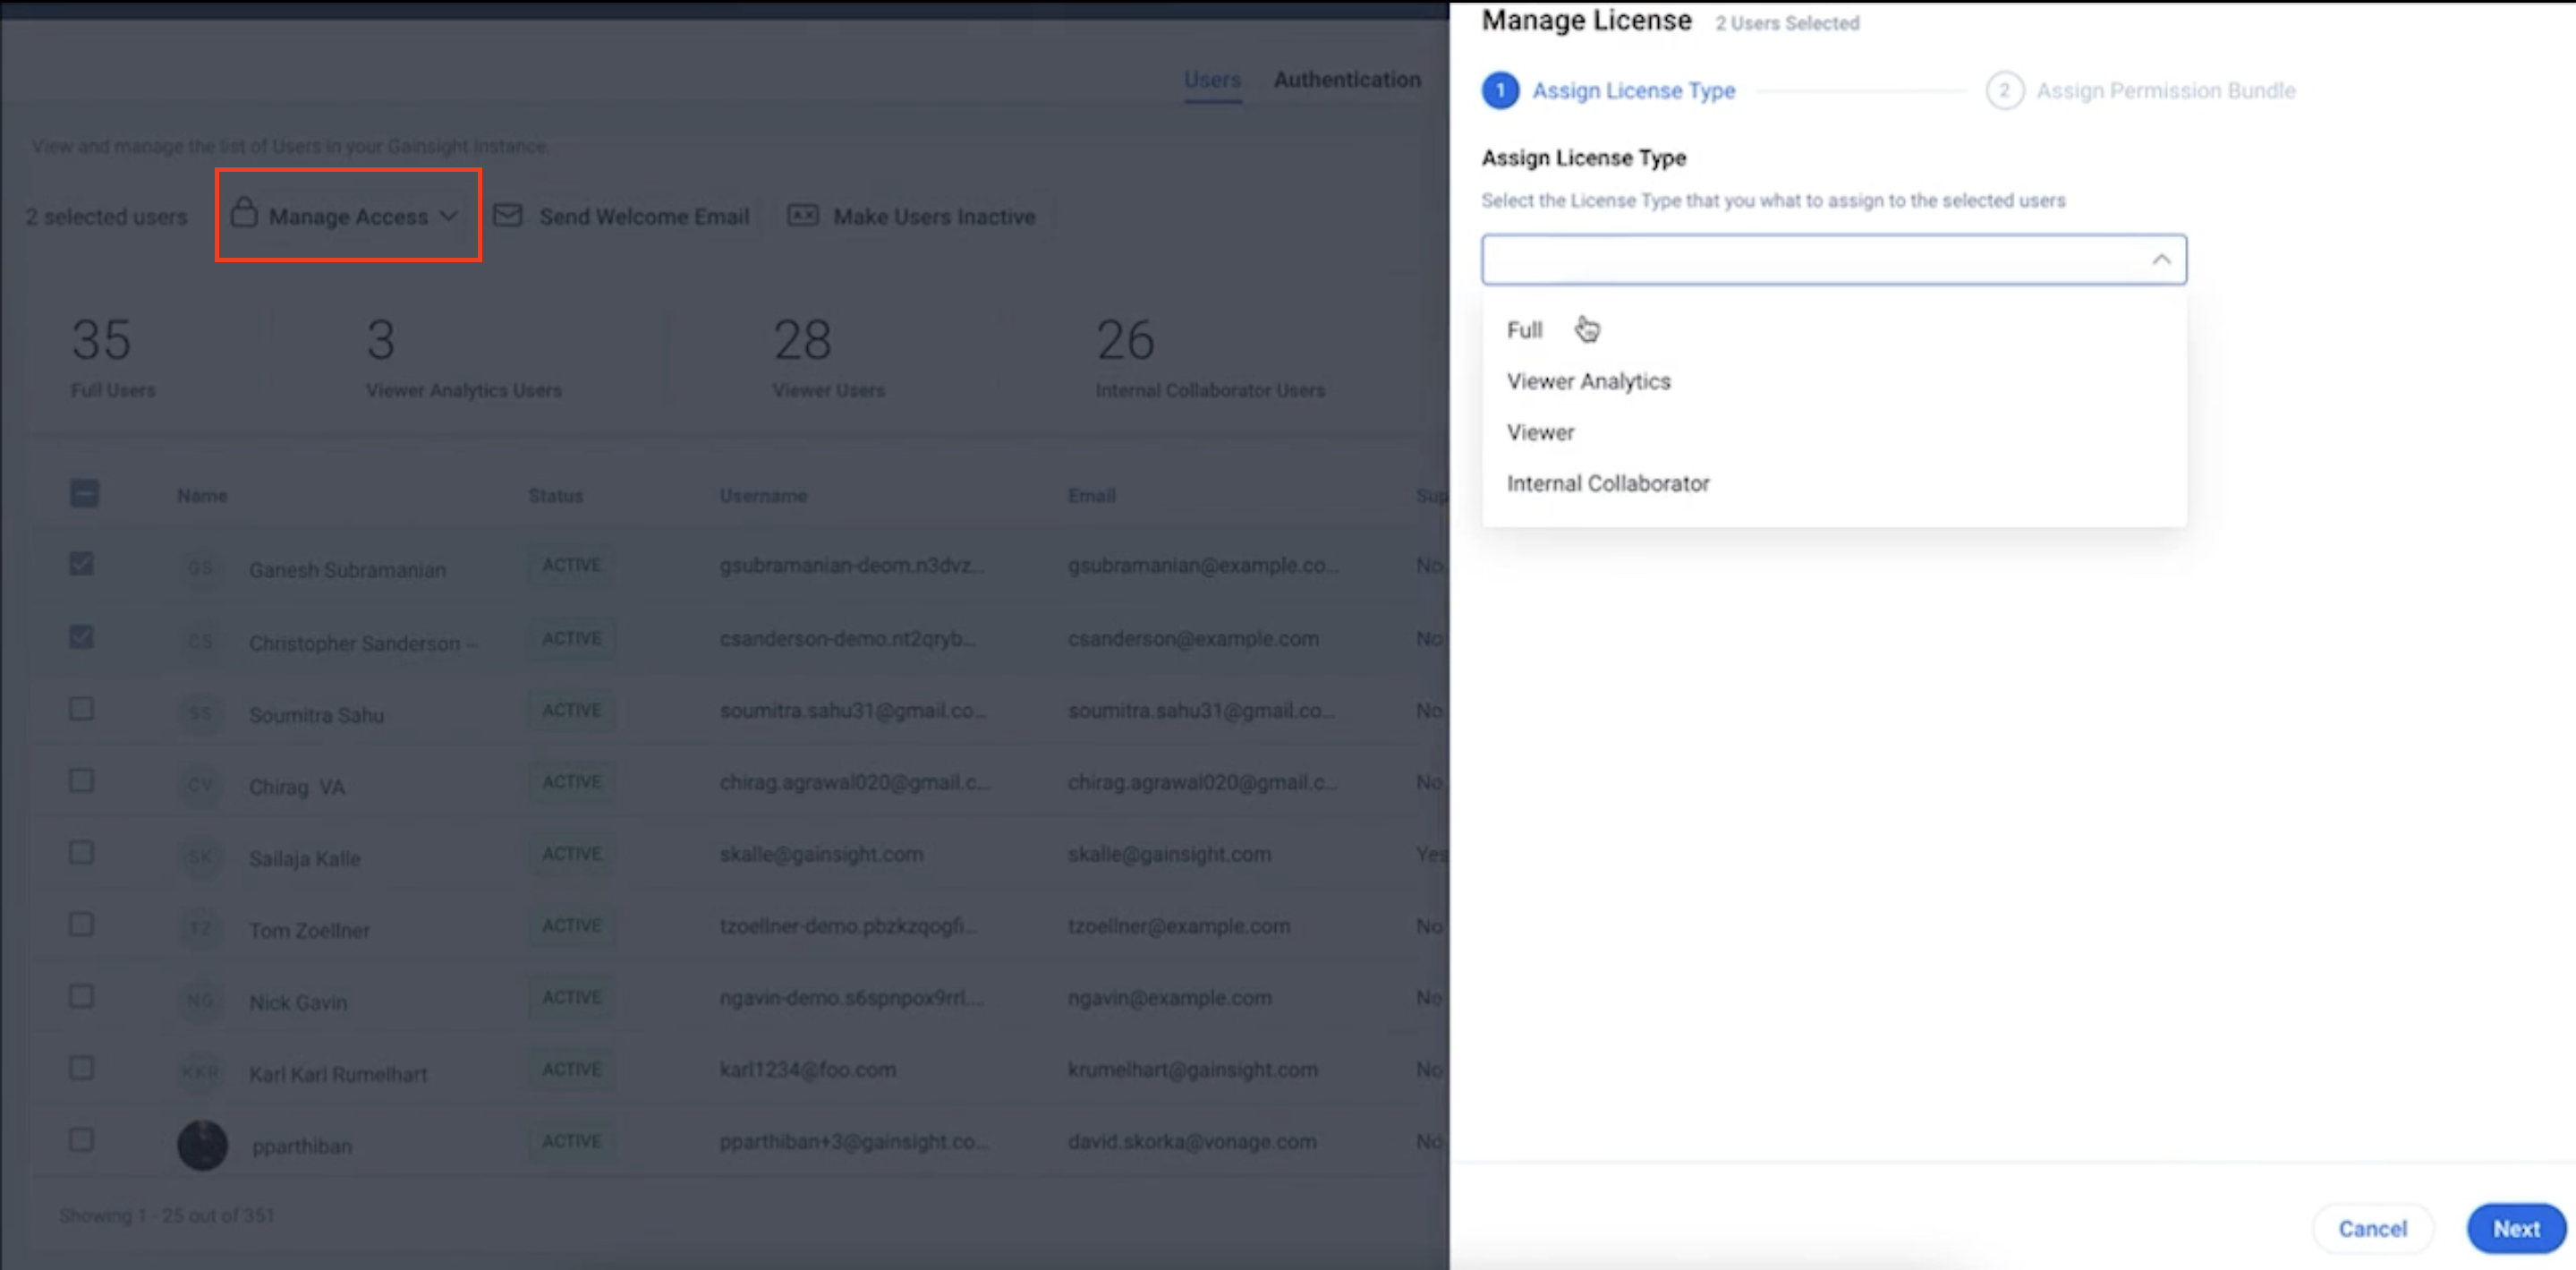
Assign Licenses to Multiple Users
Admins can assign licenses to multiple users in the User Management page.
To assign user licenses to multiple users:
- Navigate to Administration > Users and Permission > User Management.
- Select the required users. The Manage Access button is enabled.
- Click Manage Access and select Manage License.
- Select the license type from the Assign License Type dropdown list.
- Click Next. The Assign Permissions page is displayed.
-
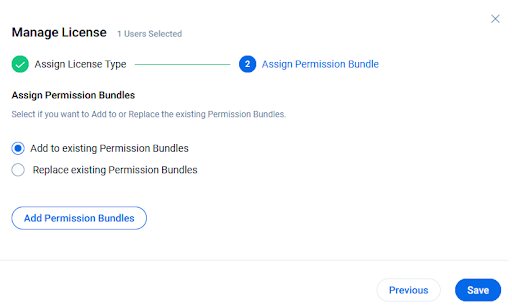
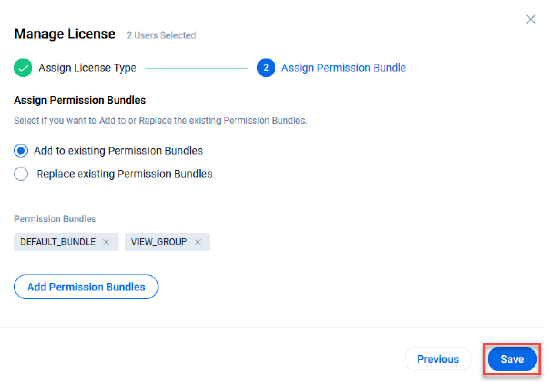
In the Assign Permission Bundle page, the following are the options based on the selected license type:
-
Full: If you select this license type, then you can select to add or replace the existing Permission Bundles to the selected users.
-
Add to existing Permission Bundles: Selecting this option adds the new Permission Bundles keeping the existing Permission Bundles.
-
Replace existing Permission Bundles: Selecting this option replaces the existing Permission Bundles with the new Permission Bundles.
-
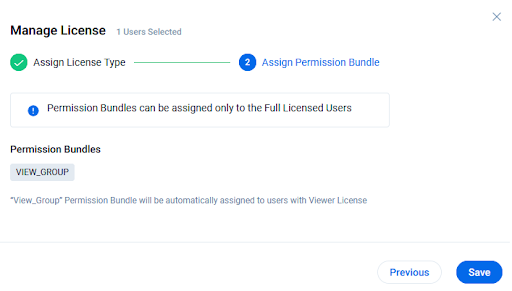
- Viewer: If you select this license type, VIEW_GROUP Permission Bundle is assigned by default. You cannot add or remove any other Permission Bundle to the Viewer Licensed user.

-
Viewer+ Analytics: When you select this license type, the VIEWANALYTICS_GROUP permission bundle is assigned by default. You cannot add or remove any other permission bundles to the Viewer+ Analytics Licensed user.
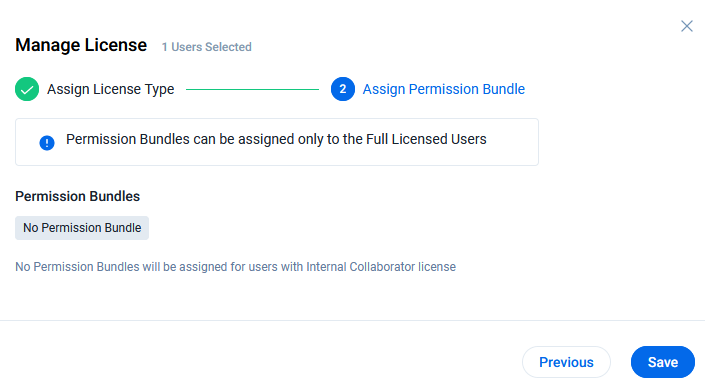
- Internal Collaborator: You cannot add or remove any Permission Bundles to the Internal Collaborator Licensed user.
- If the Full license is selected in the Assign License Type step, then click Add Permission Bundles in the Assign Permission Bundle step.
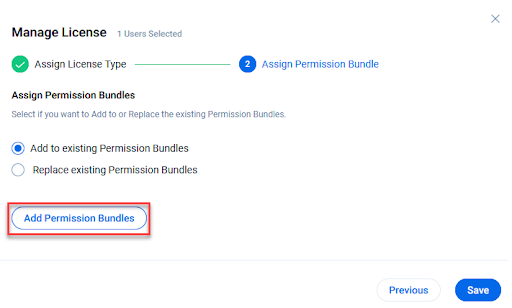
- In the Assign Permission Bundles popup window, select the required permission bundles.
- Click Confirm.
- Click Save. The selected license and Permission Bundles are assigned to the selected users.
Assign Permission Bundles to Multiple Users
Admins can assign Permission Bundles to Full licensed users in the User Management page.
To assign user Permission Bundles to Full licensed users:
- Navigate to Administration > Users and Permission > User Management.
- Select the required users. The Manage Access button is displayed.
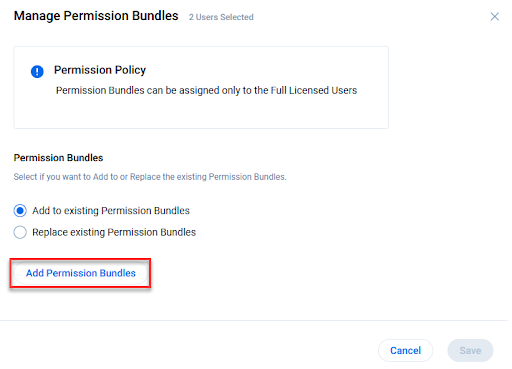
- Click Manage Access and select Manage Permission Bundles.
- In the Manage Permission Bundles page, select any of the following options:
- Add to existing Permission Bundles: Selecting this option adds the new Permission Bundles keeping the existing Permission Bundles.
- Replace existing Permission Bundles: Selecting this option replaces the existing Permission Bundles with the new Permission Bundles.
-
Click Add Permission Bundles.
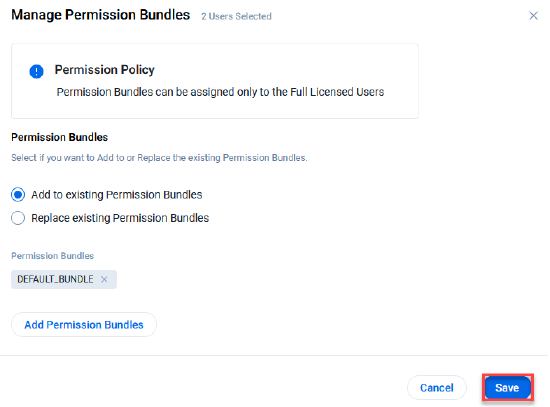
- In the Assign Permission Bundles popup window, select the required permission bundles.
- Click Confirm.

- Click Save. The selected Permission Bundles are assigned to the selected users.
Assign License through CSV file
While adding users through a CSV file, licenses are assigned to users in the Gainsight application based on the following criteria mentioned in the License type field of CSV:
- Full License
- Viewer License
- Viewer_Analytics
- Internal_Collaborator
After uploading the CSV file, you need to map the source License Type field to the target License Type field in the Gainsight application.
Note: If the Super Admin and License Type fields are not added in the CSV, users will be added with Internal Collaborator license to Gainsight.
The following table explains the license type assigned in Gainsight, based on the values in the Super Admin and License Type fields in the CSV:
|
Super Admin Field in CSV |
License Type Field in CSV |
License Type Assigned in Gainsight |
|---|---|---|
|
FALSE |
No value |
Internal Collaborator |
|
FALSE |
Invalid Value |
Error |
|
FALSE |
Internal Collaborator |
Error |
|
FALSE |
Internal_Collaborator |
Internal Collaborator |
|
FALSE |
Full |
Full |
|
FALSE |
Viewer |
Viewer |
|
No Value |
No Value |
Internal Collaborator |
|
TRUE |
Invalid value/No value |
Full License |
|
FALSE |
Viewer Analytics |
Error |
|
FALSE |
Viewer_Analytics |
Viewer Analytics |
For more information on how to add users through a CSV file, refer to the GainsightUser Management article.
Assign Licenses through External Systems
When users are pulled from the external systems, all active users are assigned an Internal Collaborator license. Inactive users pulled from all the External Systems (Salesforce, Dynamics, Zendesk, and Hubspot) are not assigned a license and are stored as inactive users in Gainsight.
Note: Inactive users from Slack are not synced into Gainsight.
For more information on how to add users from external system, refer to the Add User from External Systems section in the Gainsight User Management articles.
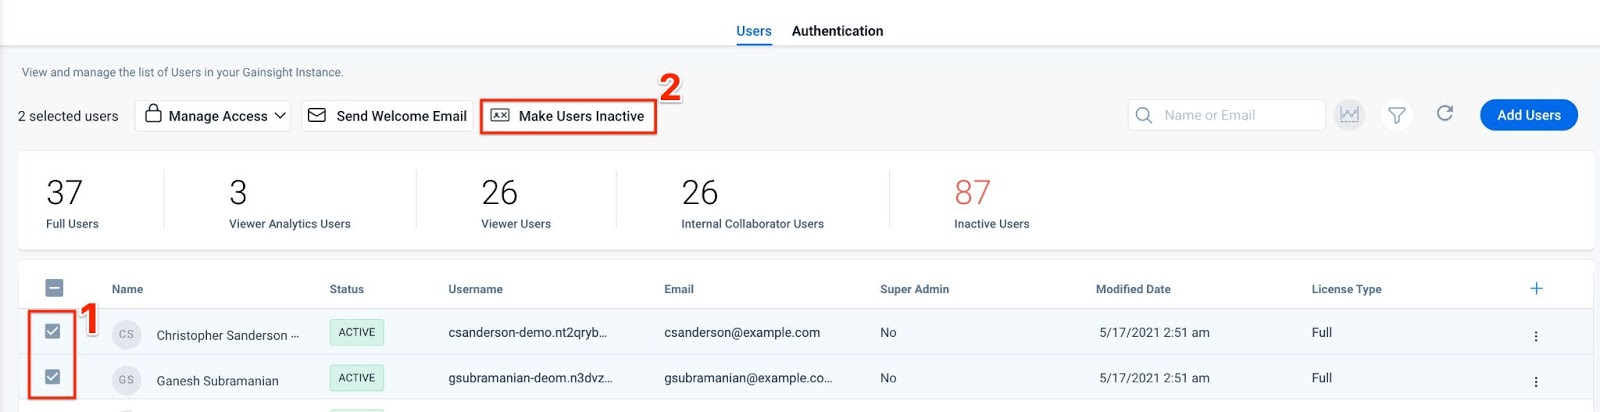
Make Users Inactive or Remove License
Admins can make users inactive to remove their assigned license from the User Management page. Once the users are inactive, the assigned license type is removed from them. To make the users active again, admins must edit the user details and assign licenses to the users from the User Detail page.
Note: Admins can only be assigned Full license in the User Detail and User Management page.
To make a user inactive or remove their license:
- Select the required users in the User Management page.
- Click Make Users Inactive. The selected users are inactive and their license is removed.
Create Report on License Type
Admins can create a report of the users and license types in the Report Builder page. To create a report on license type, you can select the User object in the Data Source field and add other required fields in the Show me section.
For more information on how to create a report, refer to the How to Build Basic Reports article.
To create a report on license type:
- Navigate to Administration > Report Builder.
- Click +REPORT.
- Select User object in the Data Source field.
- Click + button each time to add Name, Email ID, Status, and License Type in the Show me field.
- Click RUN to view the report.
- Click the Save icon at the top of the page.
- Enter a Name and Description (Optional).
- Click SAVE to save the Report.