Use 'Write with AI' to Send Emails from Timeline
- Last updated
- Save as PDF
Gainsight NXT
This article explains how to share email from Timeline using Email Assist 2.0.
Overview
Users can share the Timeline Activities as an email using the Share via Email option within any activity.
Note: Separate emails cannot be sent from Timeline using Email Assist 2.0.
Business Use Case: A CSM can share the details of the Executive Business Review (EBR) meeting with the customer directly from the Timeline page.
Share Timeline Activity via Email
Share Timeline Activities using the Share via Email option within any activity.
To share any Timeline Activity:
- Navigate to the Timeline page.
- Click on the context menu of the required Timeline activity.
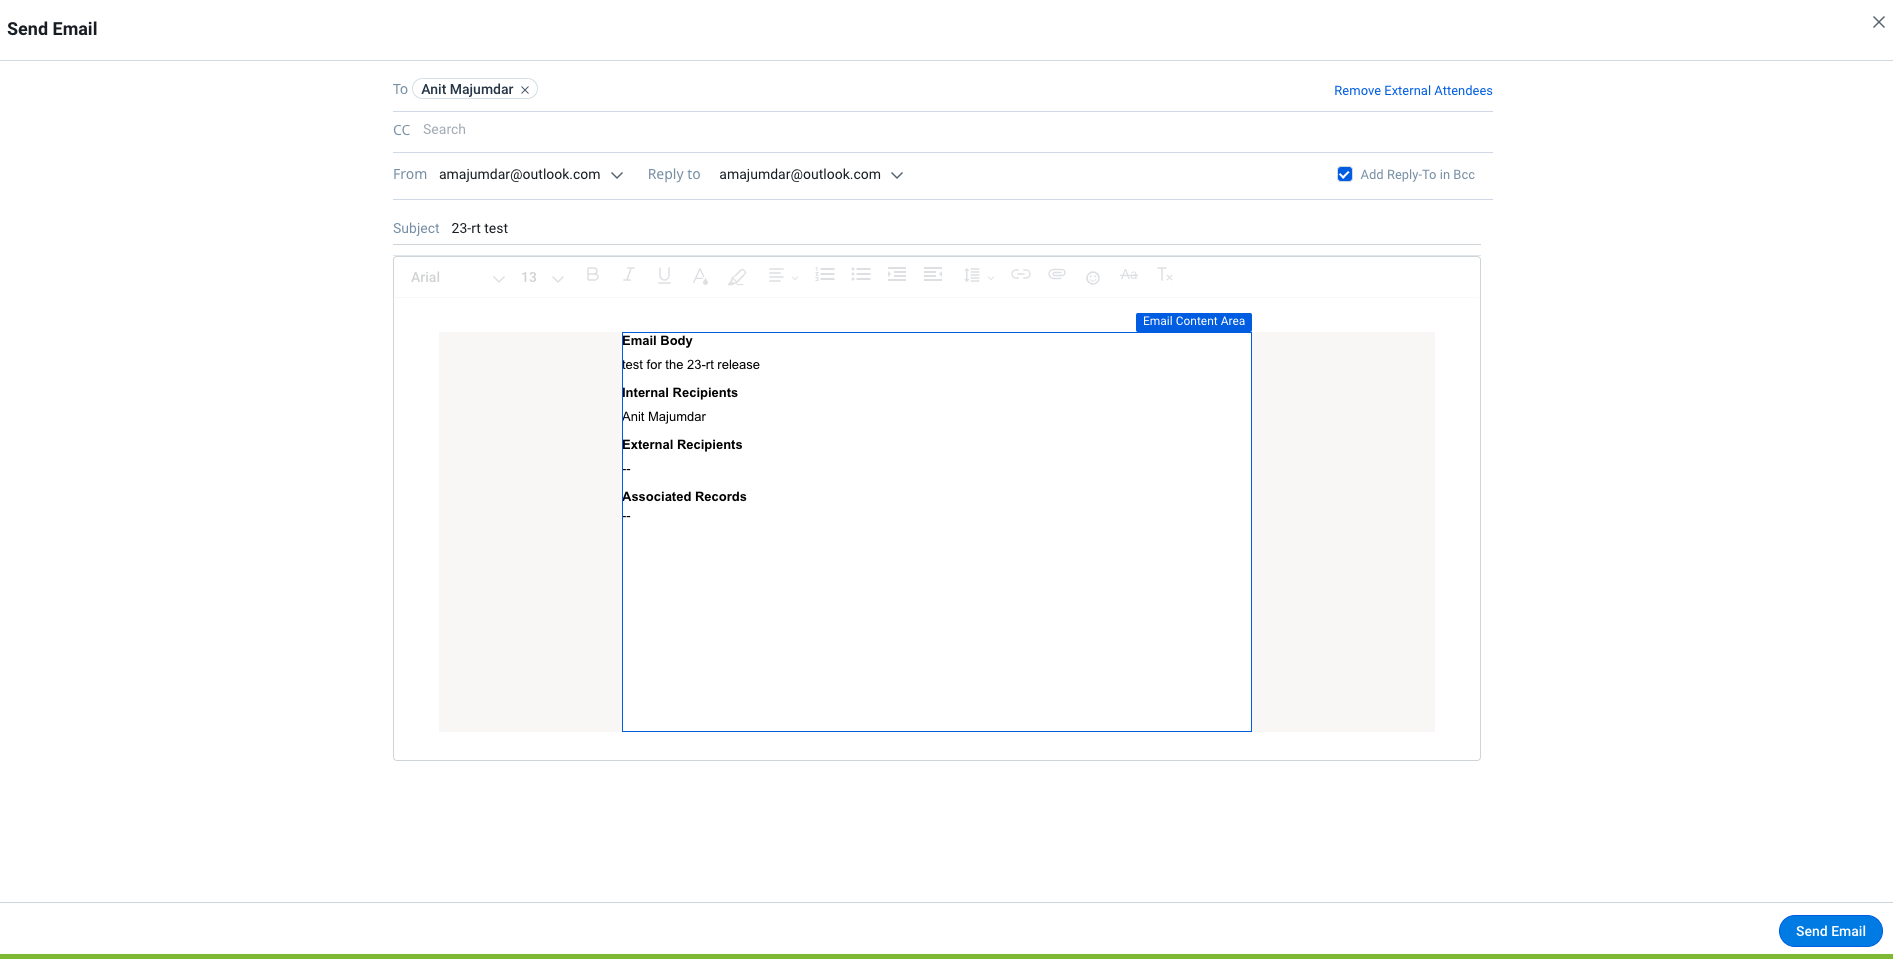
- From the vertical dropdown, select Share via Email. The Send Email window is displayed.

- Review the information in the Send Email window. The information in the following fields is auto-populated with the details created in the Timeline activity.
- To: This is populated with the Internal and External attendees' information from the Timeline Activity.
Note: Users can add additional participants in the To address field.
For more information on Internal and External attendees, refer to the Timeline FAQs article from the Additional Resources section. - (Optional) Click Remove External Attendees in the email composer to remove the external attendees from the To field.
- (Optional) Cc: Users can add email ID(s) in the Cc field.
- Select the sender’s email ID in the From dropdown list.
Note:- Admins can limit the email Id options in the From field, allowing selection of email Id from only a single domain. To use an email Id from a different domain, please contact your Gainsight Administrator.
- Toggle the Organization Wide Email Address option to send an email on behalf of the team. For more information on how to enable this feature, refer to the What’s New in Email Assist 2.0 article from the Additional Resources section.
- From the Reply-To dropdown, select the sender’s email to receive the email response.
Note: Admins can limit the email options in the Reply to field, allowing selection of email Id from only a single domain. To use an email Id from a different domain, please contact your Gainsight Administrator. - (Optional) Select the Add Reply-To in the BCC checkbox, if the email id of the sender needs to be added in the BCC field.
Note: The BCC field is auto-populated with email ID(s) added in the Administration > Email Configuration page. - Review the subject of the email as the name of the Timeline Activity.
- Review the body of the email consisting of the details of the activity.
- Review the attachments in the activity that are included if present within the Timeline Activity.
Note:- Users can edit the body of the email if required.
- Emails sent from Timeline can support up to 20 attachments.
- The maximum size of each file you can attach is 5 MB, and the cumulative size of your attachments and email body must not exceed 30 MB.
- To: This is populated with the Internal and External attendees' information from the Timeline Activity.
- Click Send Email.
After a Timeline Activity is shared, an Email icon is displayed next to that activity.
![]()
Note: An activity can be shared multiple times. If the recipient is the same, a new entry is created in the Email Stats.
Write with AI
The Write with AI feature helps in drafting email content. It uses AI to automatically generate text for your email templates based on user prompts. It elevates your email experience by leveraging AI to boost efficiency and personalization in your email communications.
To add texts to the email using AI:
- Click Write with AI. A list of available prompts appears.
- Select the required prompt. The suggested AI-generated text appears.
- (Optional) Select a different prompt from the dropdown to make further edits to the suggested text.
- (Optional) Click the Regenerate icon to revise the suggested text.
- (Optional) Click Type prompt or Edit to add a different prompt that is not listed. You can type the required prompt directly into the text bar.
- Click Add or Replace to insert or substitute the original text with the AI-suggested text.

Note:
- Ensure the following key points regarding the use of AI model in Gainsight:
- All responses are generated solely by the AI model and may include inaccuracies or hallucinations. We advise users to exercise discretion and verify all information as needed.
- Gainsight does not apply any additional intelligence or modifications to the responses generated by the GPT model. Our platform simply facilitates the delivery of these AI-generated responses.
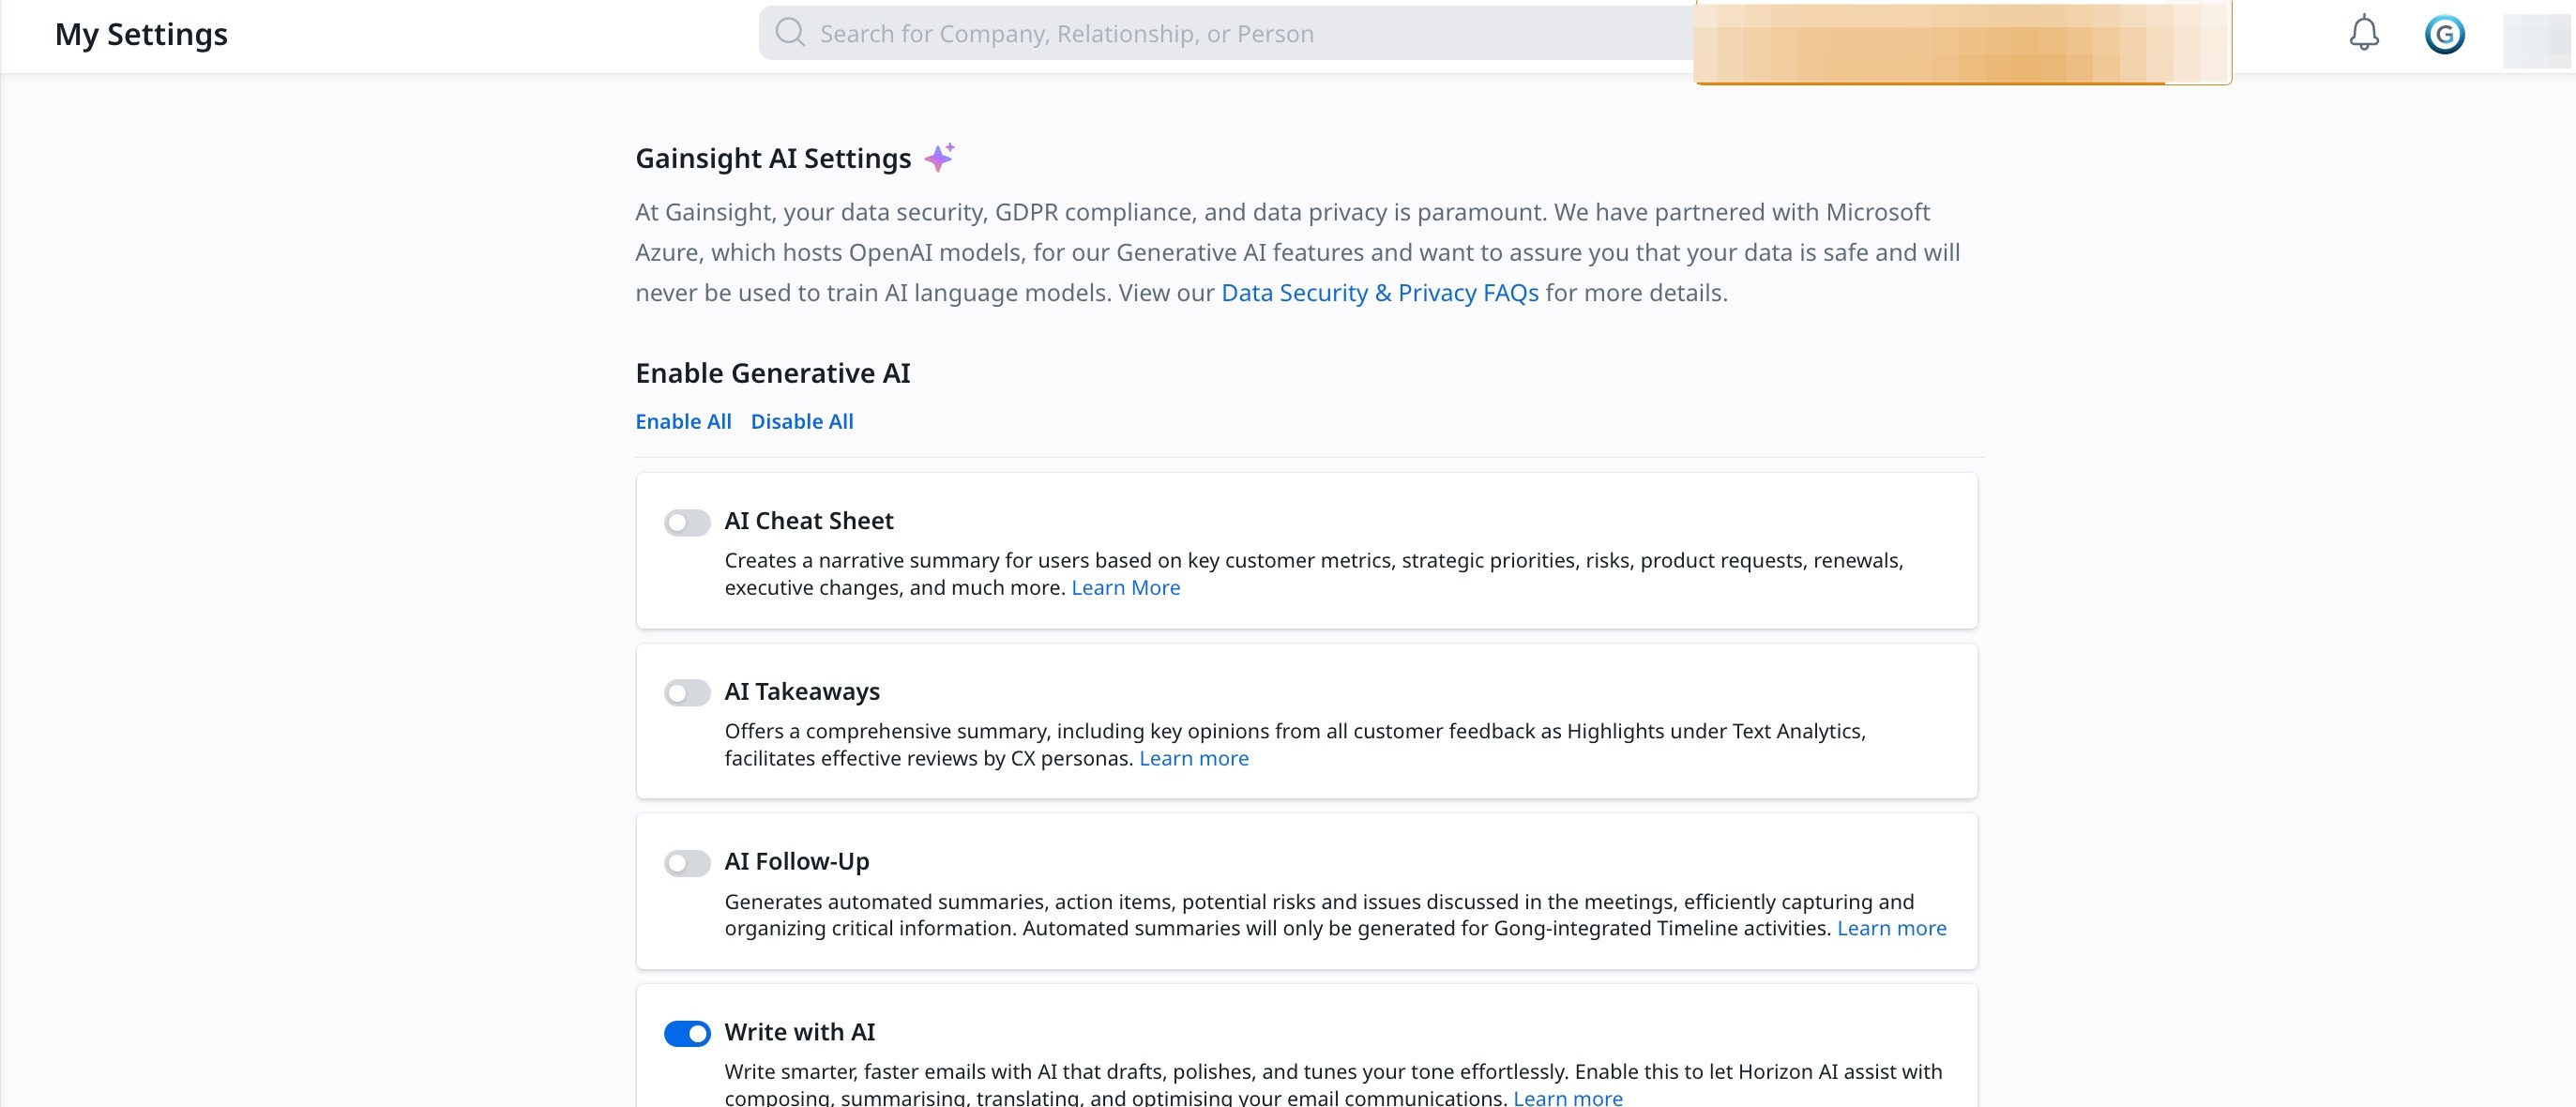
- To enable the Write with AI feature, ensure to Turn ON the toggle switch for Write with AI option from Administration > Gainsight AI > AI Settings.
.jpg?revision=1)
Email Stats
Email Stats contain details of all the instances when an activity was shared as an email.
To view the email stats:
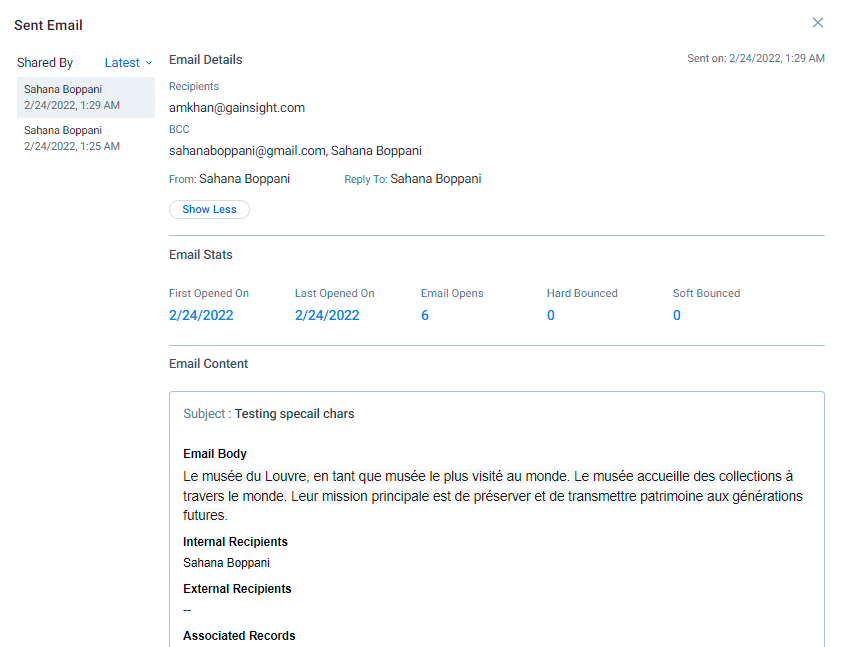
- Click the Email icon next to the required Timeline Activity. The Sent Email window is displayed.

The following information is displayed.
- Sent Email sort list: The Sent Emails are by default displayed in descending order by the latest sent.
- Click the arrow icon to reverse the list order.
- Click each entry to display the Recipient’s name, Email Stats, and Email Body.
- Email Details: Shows the details of the Recipients, CC (if any), BCC (if any), From ID, and Reply-To ID.
- Email Stats: The following stats are displayed for a selected Timeline Activity email:
- First Opened On: Displays the date on which the email was first viewed.
- Last Opened On: Displays the date on which the email was last viewed.
- Hard Bounced: Displays the number of times the email was returned to the sender because the recipient’s address is invalid.
- Soft Bounced: Displays the number of times the email failed to send as it was temporarily denied by the recipient’s email servers. Click the number displayed here to see a list of recipients that experienced the Soft Bounce. You can then trigger to resend the email. For more information on how to resend an email, refer to the Resend Emails section of this article.
- Email Content: Displays the details of the Timeline activity as the email body, including the internal and external attendees, and the email attachments.
- Email Opens: Displays the total number of times the email has been viewed.
Note: Email Opened stats do not exclude machine-opened email numbers; they reflect the actual number of emails opened by humans.
Resend Emails
In the Email Stats section, users can click the number displayed for soft-bounced emails to display a list of bounced messages. They can resend the bounced emails to the respective email IDs if required.
To resend the email:
- In the Email Stats section, click the number displayed under the Soft Bounced section. The Bounced Emails section is displayed.
- Select the checkbox for the email id to which you want to send the email again.
- Click Resend. The email is sent to the selected email address.
Additional Resources