Copilot Overview (BETA)
Note - BETA Article
Please note that this is a BETA document. You might notice changes in the final version of this document.
If you have any feedback, feel free to share with us at docs@gainsight.com.
This document provides comprehensive information on the Copilot feature within the Gainsight CS application.
Overview
Copilot is an AI-powered conversational assistant integrated directly into the Gainsight application to transform the way Customer Success (CS) teams interact with data. By leveraging both unstructured insights from customer interactions and structured data from company records, Copilot empowers users to effortlessly extract context-based answers about customer activities, timelines, and best practices. In its inaugural feature, Copilot: Ask, users can pose a wide range of questions about customer portfolios and CS strategies, receiving immediate, tailored responses drawn from a rich reservoir of information. By eliminating the need to sift through multiple data sources, Copilot boosts efficiency and enhances the Gainsight experience.
How Copilot Works
Copilot is powered by four specialized AI agents, each designed to handle specific types of customer queries:
- Timeline Agent - Retrieves and analyzes Timeline activities to provide relevant insights based on customer interactions - whether you're exploring a single customer’s history or comparing activities across multiple companies.
- Company Agent - Leverages structured data from the Company object, enabling sorting, filtering, and grouping to provide clear, organized customer information.
- CS Expert Agent - Provides guidance on Customer Success best practices, helping users with tailored engagement strategies and industry recommendations.
- Gainsight CS Product Expert Agent - Acts as your in-house expert about Gainsight CS features and functionality and answers product-specific questions by referencing official documentation.
Portfolio Based Search Enhancements
Copilot supports portfolio-based queries that allow you to retrieve insights specific to companies assigned to you through the Company Object's user lookup fields. This ensures the responses you receive are tailored and personalized based on your portfolio..
- Automatic Portfolio Recognition – Identifies a user’s portfolio based on their logged-in credentials and assigned filters in Gainsight Home.
- Targeted Search – Restricts searches to the companies in a user’s portfolio, ensuring accurate and efficient results.
- Guided Setup – If portfolio filters are not configured yet, Copilot prompts users to either search across all companies or update their Gainsight Home filters.
Example Queries:
Below are some example queries to illustrate how Copilot uses portfolio information to deliver precise insights:
- List my portfolio companies.
Copilot identifies the user’s portfolio and returns only the companies assigned to them. - What are the risks identified in my portfolio?
Copilot retrieves risks only from Timeline entries related to the user’s portfolio companies, ensuring focused and relevant responses.
Access Copilot
In the Beta program, this AI-supported feature is automatically enabled for participating Beta customers, so administrators do not need to manually activate it. Once the feature is available to all customers, administrators will be able to enable or disable the Generative AI functionality and its associated features, including Copilot, within Horizon AI.
In the Beta program, perform the following steps to access Copilot:
- Navigate to the left navigation pane in the Gainsight application.
- Click Copilot.
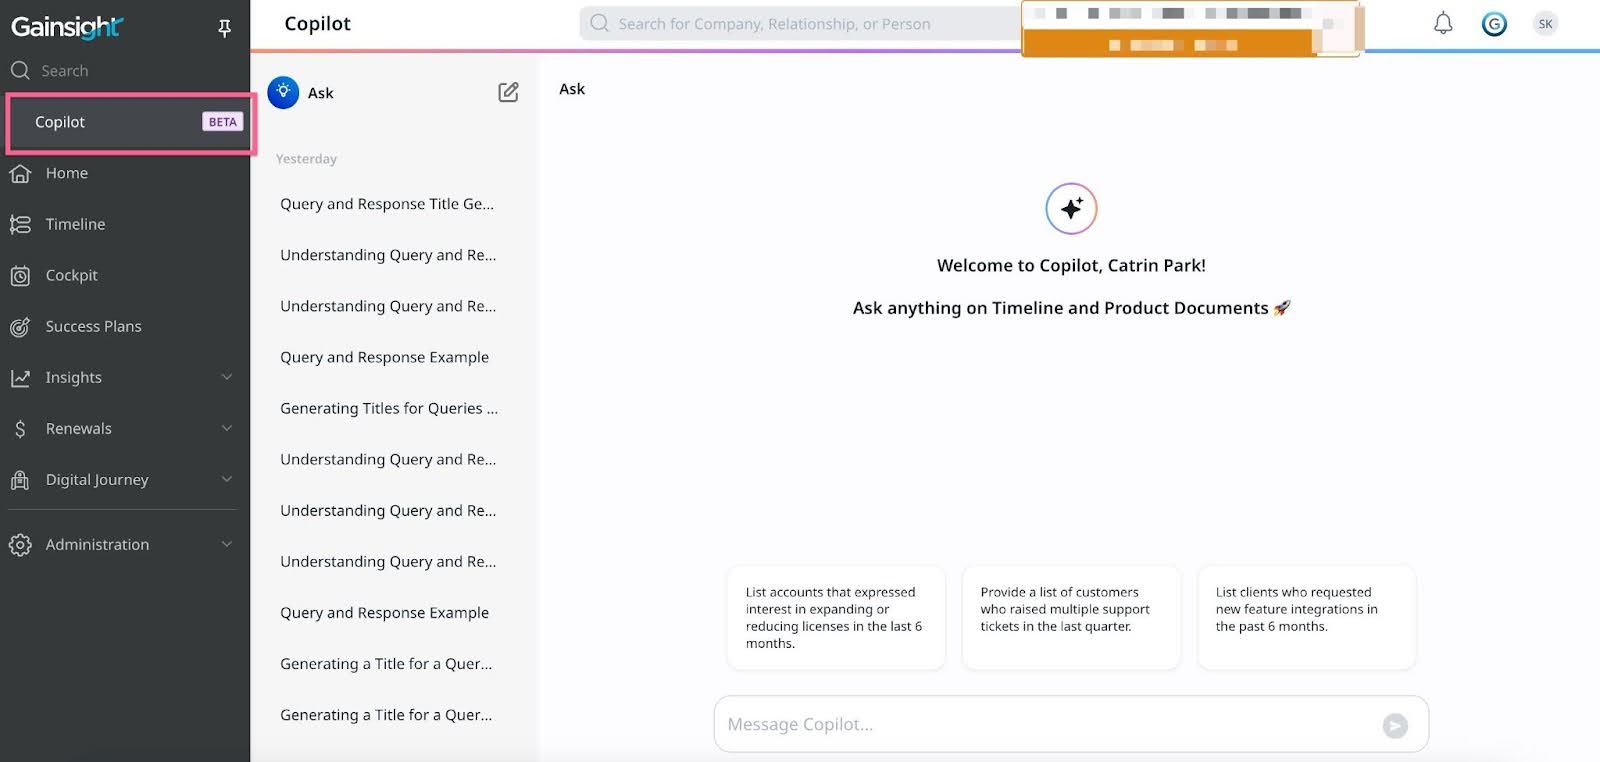
- Click on the chat window to start a new session.
- Utilize sample queries and pro-tips provided to initiate conversations.
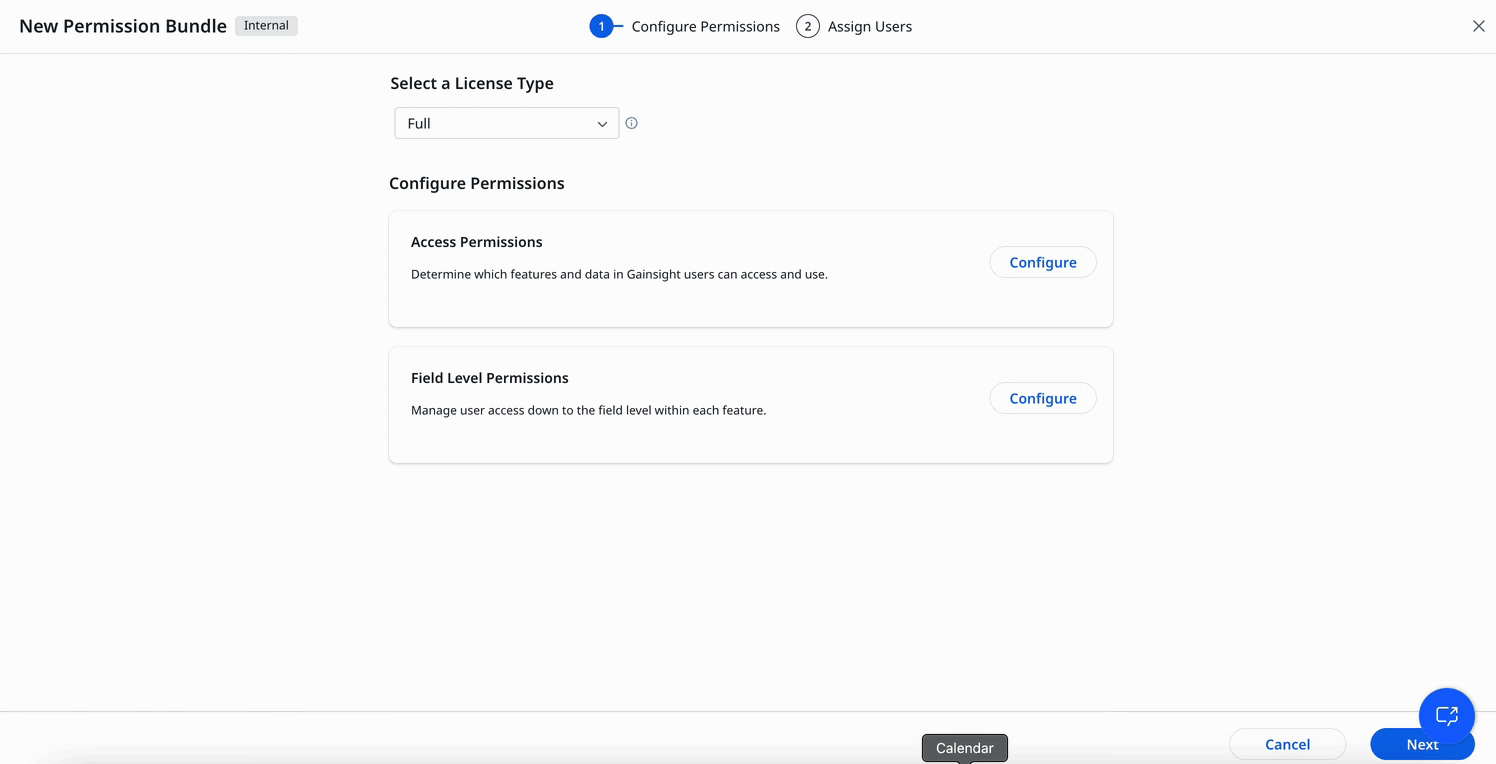
Configure Permission Bundles to Enable Copilot for Users
By default, Copilot is included in the default bundle for all license types, so any user with access to the default bundles will have access to Copilot. For users who don’t have access to the default bundles, admins need to add Copilot to specific bundles and assign them to those users. Additionally, admins can create a custom bundle with Copilot and assign it to specific users.
By performing the following steps, admins can effectively configure permission bundles to enable Copilot for users with different licenses.
By performing the following steps, admins can effectively configure permission bundles to enable Copilot for users with different licenses.
- Navigate to Administration > Permission Bundles.
- Click Configure Permission Bundle.

- In the Configure Permission page, click the edit icon to enter a name and description for the new bundle.
-
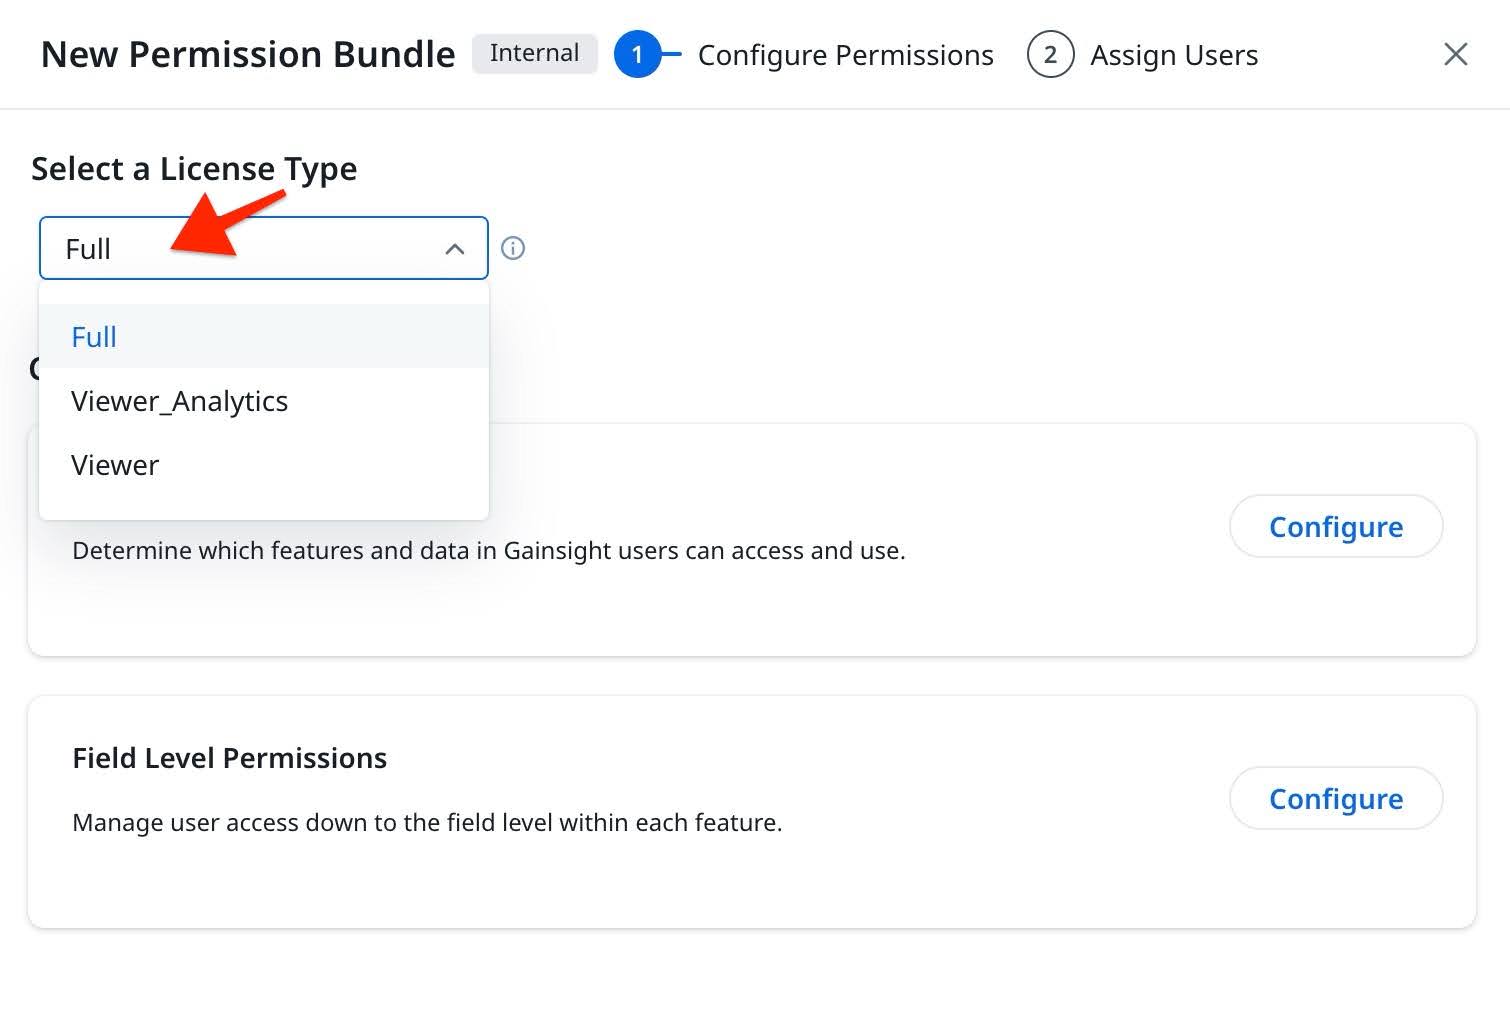
Choose the appropriate license type from the dropdown menu. Learn more about the type of licenses Gainsight offers, refer to the User License Management article.
- Click Configure next to Access Permissions.
- Expand Navigation Permissions, select the Copilot checkbox.

- Click Save to confirm the access permissions.
- Click Configure next to Field level Permissions to manage user access down to the field level.
- Click Save to confirm the field-level permissions.
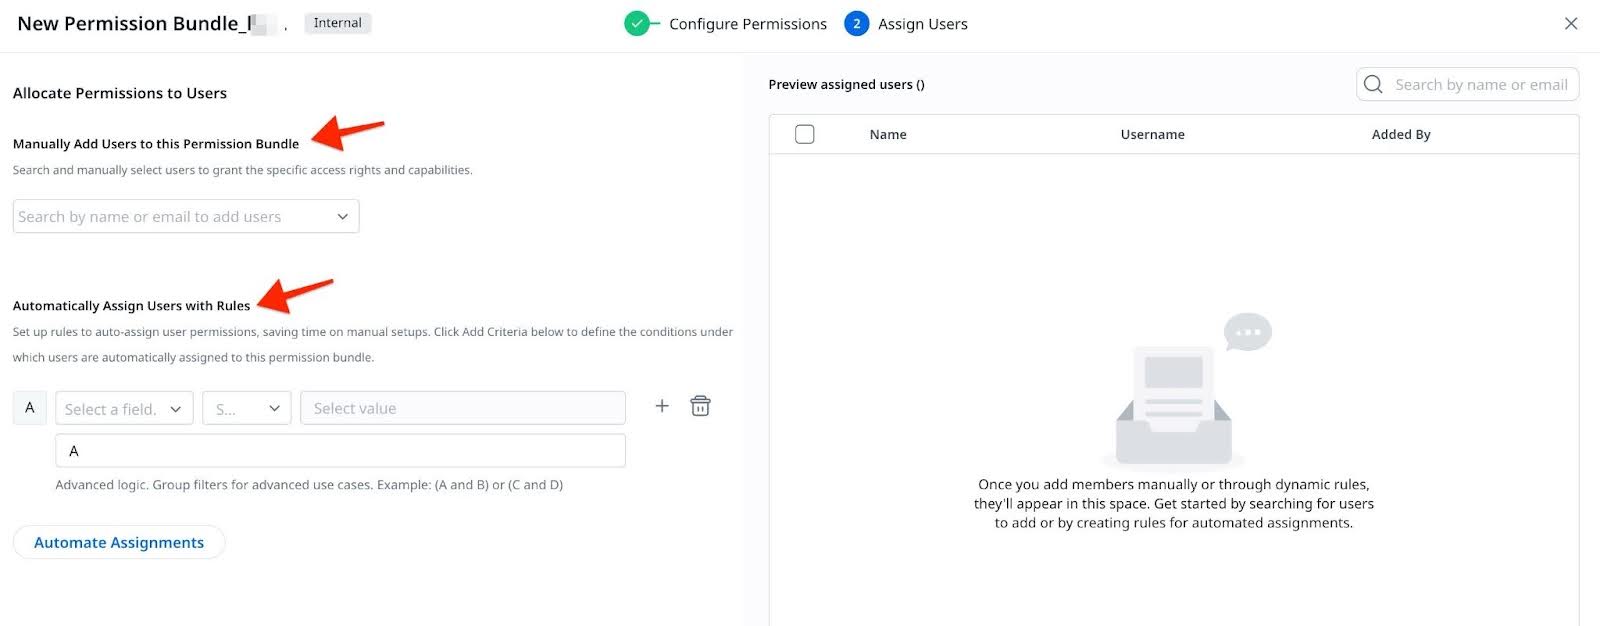
- Click Next to proceed to the Assign Users step.
- Select the users that should have this permission bundle.
Note: Admins can manually select users or set up rules to auto-assign user permissions to grant the specific access rights and capabilities.
-
Click Save to create and activate the permission bundle.
Different Sections in Copilot
The Copilot interface has several sections marked with numbers.

Here's an explanation of each section:
- Let’s chat: This is the text input area where users can type their queries or requests to interact with the Copilot. It serves as the starting point for any conversation or command.
- Send Button: The send button, typically represented by an arrow or paper plane icon, is used to submit the typed message to the Copilot. Clicking this button sends the query for processing and generates a response.
Note: The Stop button appears when a query is being processed by the Copilot. When clicked, the Stop button immediately halts the ongoing query processing. This is useful if the user realizes they need to modify the query, add additional information, or if the query is taking longer than expected.

- Copilot Response Area: This section displays the Copilot’s responses to the user’s queries. It provides detailed answers based on the input received. The response area helps users quickly see the information or assistance provided by the Copilot.
- Timeline Entries: This section shows relevant Timeline entries related to the query. Users can interact with these entries, possibly clicking on them for more details or to navigate to the original Timeline posts.
- Feedback Section: This area allows users to provide feedback on the Copilot’s response. Options like Not Accurate, Incomplete Info, Not Relevant, and Other are available. Users can also provide a detailed description to elaborate on their feedback. Submitting feedback helps improve the AI’s performance.
- Recent Queries: This section displays recent queries made by the user. It allows quick access to previous interactions with the Copilot, enabling users to revisit and review past responses without re-entering the queries.
- Previous Queries: This area shows queries from the previous week, organized chronologically. It provides a history of interactions, helping users track past inquiries and responses over a longer period.
- New Chat Icon: The New Chat icon typically allows users to start a new chat.
- Retry: The Retry option appears only when an unexpected error occurs while using the Copilot feature. This option allows users to attempt the action again without having to navigate away from the current page or restart their chat. This helps to minimize disruption and provides a seamless way to recover from temporary issues.

These sections collectively enhance the user experience by organizing interactions, providing context-based responses, and facilitating feedback to refine the AI’s capabilities.
Copilot Best Practices
To harness the full potential of Copilot and ensure a seamless, productive experience, it’s crucial to follow certain best practices. This section delves into the technical nuances behind these best practices, providing a comprehensive understanding of how to effectively interact with Copilot. By offering clear context, leveraging sample queries, using follow-up prompts effectively, and managing sessions efficiently, users can enhance the accuracy and relevance of the AI's responses. These practices not only improve user experience but also maximize the AI’s capabilities, leading to more insightful and actionable outcomes.
- Provide Clear Context: Always specify the full name of Company or User while writing the query. The Copilot's Natural Language Processing (NLP) engine parses user input to determine the context. Clear context helps the engine to direct the query appropriately.
- Examples:
- Global Query: Show me the overall customer feedback for the last quarter.
- Specific Company Query: What was the customer sentiment for Company X in the last month?
- Examples:
- Follow-Up Effectively: For optimal performance, queries should ideally involve only one service. While multiple services can be utilized, breaking down the query into sequential, single-service queries is recommended In case a query requires multiple services asked in steps one at a time as follow up questions . Follow-up questions help to dig deeper into the initial query results, providing more detailed insights.
- Example:
- Initial Query: What were the main issues raised by Company X in the last quarter?
- Follow-Up Prompt: Can you provide more details on the issue related to product delivery?
- Example:
- Understand the subtle differences between each service. Copilot may sometimes select an incorrect service for borderline queries. For example:
- Query: "What are CTAs?" This might be directed to the Brainstorming Assist instead of the Product Documentation Assist.
- Queries such as "summarize my last three meetings" will apply a user filter.
- User specific queries are not fully supported in Timeline Assist. Example: How many meetings has xxx attended?
Note: Users can view and manage their session history, including renaming sessions, deleting them, or resuming previous sessions.