Set Up Gainsight CS MCP Server Integration
This article helps admins set up and configure the Gainsight CS Model Context Protocol (MCP) server so that users can connect Gainsight CS data to external LLM tools such as ChatGPT, Claude, and Microsoft 365 Copilot.
Overview
The Gainsight CS MCP server is an integration that connects Gainsight CS directly to large language models (LLMs) such as ChatGPT, Claude, and Microsoft 365 Copilot. Once connected, users can query Companies, CTAs, Success Plans, and Timeline Activities, and perform write actions such as creating CTAs and Success Plans, all through natural-language prompts in their preferred LLM tool.
The MCP server acts as a general-purpose API connector. The LLM calls the exposed Gainsight tools based on user prompts, which means prompt quality directly affects the accuracy and usefulness of responses.
All three integrations require user-level OAuth 2.1 authentication with Proof Key for Code Exchange (PKCE) enabled in Gainsight CS. The setup process varies slightly depending on the LLM tool, with each tool requiring a different connector configuration on its side.
For more information, refer to the OAuth for Gainsight APIs article.
Prerequisites
Ensure that you meet the following requirements before you begin
Common Requirements
The following requirements apply regardless of which LLM tool you are connecting:
- Gainsight Admin access: You must have admin-level permissions in Gainsight CS to create OAuth apps and configure authentication settings.
- PKCE enabled in Gainsight: The OAuth application in Gainsight CS must have PKCE (Proof Key for Code Exchange) enabled. This is required for all three LLM integrations.
- Client ID and Client Secret: You must have the Client ID and Client Secret generated from the OAuth app configuration in Gainsight.
- Gainsight CS tenant base URL: Your instance URL is required during setup. For example:
https://your-org.gainsightcloud.com - LLM tool with MCP support: Your LLM tool must support MCP integrations.
ChatGPT
- ChatGPT Admin access: A ChatGPT admin must have the ability to create apps in ChatGPT.
- Developer Mode enabled: Developer Mode must be turned on in ChatGPT settings for the Create App option to appear.
Claude
- Claude Admin access: An admin must have permissions to add custom connectors in Claude settings.
- Claude Callback URLs: The following two Callback URLs must be added to the Gainsight OAuth application:
https://claude.ai/api/mcp/auth_callbackandhttps://claude.com/api/mcp/auth_callback
Microsoft Copilot
- Microsoft Copilot Studio access: You must have permissions to create or edit agents in Microsoft Copilot Studio.
- An existing Copilot agent: The MCP tool is added to an agent within Copilot Studio.
What Can MCP Read and Write?
The MCP server supports a set of actions that allow your LLM to read and write Gainsight data. The following tables list currently supported actions.
Data Retrieval
The following table lists the data retrieval capabilities that the MCP server currently supports.
|
Capability |
Status |
|---|---|
|
Detailed Account Summary |
Supported |
| Query Company and Relationship |
Supported |
|
Fetch CTAs for a company |
Supported |
| Read Tasks in CTA | Supported |
|
Fetch Success Plans |
Supported |
|
Read Timeline activities |
Supported |
|
Scorecards ( read only) |
Supported |
|
Cross-account analysis |
Supported |
| Reports(that users can see in UI) | Supported |
| Query Portfolio Data(GS Home filters) | Supported |
| End User Contact Search | Supported |
Write Actions
The following table lists the write action capabilities that the MCP server currently supports.
|
Capability |
Status |
|---|---|
|
Create CTAs |
Supported |
|
Update CTAs |
Supported |
| Create Tasks in CTAs | Supported |
|
Create Success Plans |
Supported |
|
Update Success Plans |
Supported |
|
Create Timeline Activities |
Supported |
| Update Timeline Activites | Supported |
|
Delete records |
Not Supported |
|
Update company fields |
Not Supported |
|
Admin-level configuration |
Not Supported |
| Scorecards | Not Supported |
Create and update Timeline is possible at Company, Success Plan, CTA and Relationship level. Not at Scorecard level.
Configure OAuth with PKCE in Gainsight
All three LLM integrations require an OAuth application with Proof Key for Code Exchange (PKCE) enabled in Gainsight CS. Complete this section before you set up the MCP connection in any LLM tool.
To configure OAuth with PKCE in Gainsight CS:
- Navigate to Administration > User Management and click the Authentication tab.
- Click OAuth Applications.
- Locate an existing OAuth app or create a new one.
For more information on how to create an OAuth app, refer to the OAuth for Gainsight APIs article.

- Click the three-dots vertical menu and select View/Edit. A slide-out panel appears.

- Turn on the Enable PKCE (Proof Key for Code Exchange) toggle. The PKCE option is now active for the OAuth application.
- In the Callback URLs, add a temporary callback URL. For example:
https://gainsight.com/oauth/callback - (Optional) Select the Enforce Allowed IP Ranges checkbox to restrict API access to selected IP addresses.
- Click Add Application. The OAuth application settings are saved.
When the application is successfully saved, Client ID and Client Secret are created for this application.
Gainsight recommends to copy and save the Client ID and the Client Secret as these are required further in the configuration.

Set Up the MCP Server Connection in ChatGPT
This setup requires coordination between the Gainsight admin and ChatGPT admin. Ensure that you have completed the OAuth with PKCE configuration above before proceeding with following sections:
Create the MCP App in ChatGPT
After you enable PKCE, ensure the Client ID and Client Secret are copied, as these are required for the next steps.
- In ChatGPT, navigate to Settings > Apps.
- Turn on the Developer mode toggle. The Create app option is now available.

- Click Create app. The New App window appears.
- Enter the following details to create the app:
- In the Name text field, enter the name of the app.
- (Optional) In the Description text field, describe the app.
- In the MCP Server URL field, enter the URL instance followed by
/v1/ds-mcp/mcp. For example:https://your-domain.gainsightcloud.com/v1/ds-mcp/mcp - From the Authentication dropdown, select OAuth.

- Select Advanced settings. The OAuth advanced settings dialog appears.

- In the OAuth Client ID field, paste the Client ID copied from the Gainsight CS application.
- In the OAuth Client Secret field, paste the Client Secret copied from the Gainsight CS application.
- Copy and save the Callback URL as this is required further in the configuration.
- Select the I understand and want to continue checkbox.
- Click Create. The new app is created and appears in your Apps list.
Complete the Connection
The Callback URL from the app settings is required to complete the connection in Gainsight CS User Management.
- Navigate to Administration > User Management > Authentication tab.
- Click OAuth Applications.
- Locate an existing OAuth app.
- Click the three-vertical dots menu.
- Click View/Edit. The application slide-out panel appears.
- Replace the temporary callback URL with the Callback URL copied from ChatGPT’s OAuth advanced settings section
- Click Save to complete the connection.
Connect and Authenticate
After the Gainsight admin and ChatGPT admin complete the respective setup, each end user can connect to the new app.
To connect and authenticate as an end user:
- Navigate to ChatGPT > Apps.
- Select the newly created app. For example, in this case, GSMCP.

- Click Connect. The Gainsight Login dialog appears.

- Click Continue to GSMCP to authenticate the connection.

After successful authentication, the MCP connection appears as active in ChatGPT.

Set Up the MCP Server Connection in Claude
Claude requires the same OAuth with PKCE configuration in Gainsight CS as ChatGPT. Ensure that you have completed the OAuth with PKCE configuration and added the two Claude Callback URLs to the OAuth application before proceeding with the following configuration steps:
Callback URLs
https://claude.ai/api/mcp/auth_callbackhttps://claude.com/api/mcp/auth_callback
You must add both Callback URLs to the same OAuth application in Gainsight CS.
Create the Custom Connector in Claude
After you add the Callback URLs and copy the Client ID and Client Secret from the Gainsight CS instance, you can create a custom connector in Claude.
To create a custom connector in Claude:
- Navigate to Customize > Connectors.
- Click Add custom connector. The Add custom connector dialog box appears.

- Enter the following details
- Name: Enter a name for the MCP Server.
- Server URL: Enter the URL instance followed by /v1/ds-mcp/mcp. For example:
https://your-domain.gainsightcloud.com/v1/ds-mcp/mcp
- Expand Advanced settings:
- In the OAuth Client ID field, paste the Client ID copied from the Gainsight CS application.
- In the OAuth Client Secret field, paste the Client Secret copied from the Gainsight CS application.
- Click Add. The custom connector is created and appears on the Connectors page.

Connect and Authenticate
After the Gainsight admin and Claude admin complete their respective setup, each end user can connect to the new app.
To connect and authenticate:
- Navigate to Settings > Connectors. The Connectors page appears.
- Click Connect. Claude redirects you to the Gainsight login page.

- Log in with your Gainsight credentials. After authentication, Claude confirms the connection.
Set Up the MCP Server Connection in Microsoft Copilot Studio
Copilot requires the same OAuth with PKCE configuration in Gainsight CS as ChatGPT. Ensure that you have completed the OAuth with PKCE configuration before proceeding with the following configuration steps:
Create an MCP Tool in Copilot
In Copilot, you can create an MCP tool for an agent. To do this:
- Navigate to Copilot Studio.
- Select an existing Copilot agent and click Tools. The Tool page appears.

- Click + Add a tool.
- Select MCP. The Model Context Protocol window appears.

- Enter the following details below:
- Server name: A display name for the MCP app.
- Server description: A brief description of what the app does
- Server URL: The endpoint URL for the server. For example:
https://<<TENANT_BASE_URL>>/v1/ds-mcp/mcp
- For the Authentication, select the OAuth 2.0 radio button.
- For the Type, select the Manual radio button.
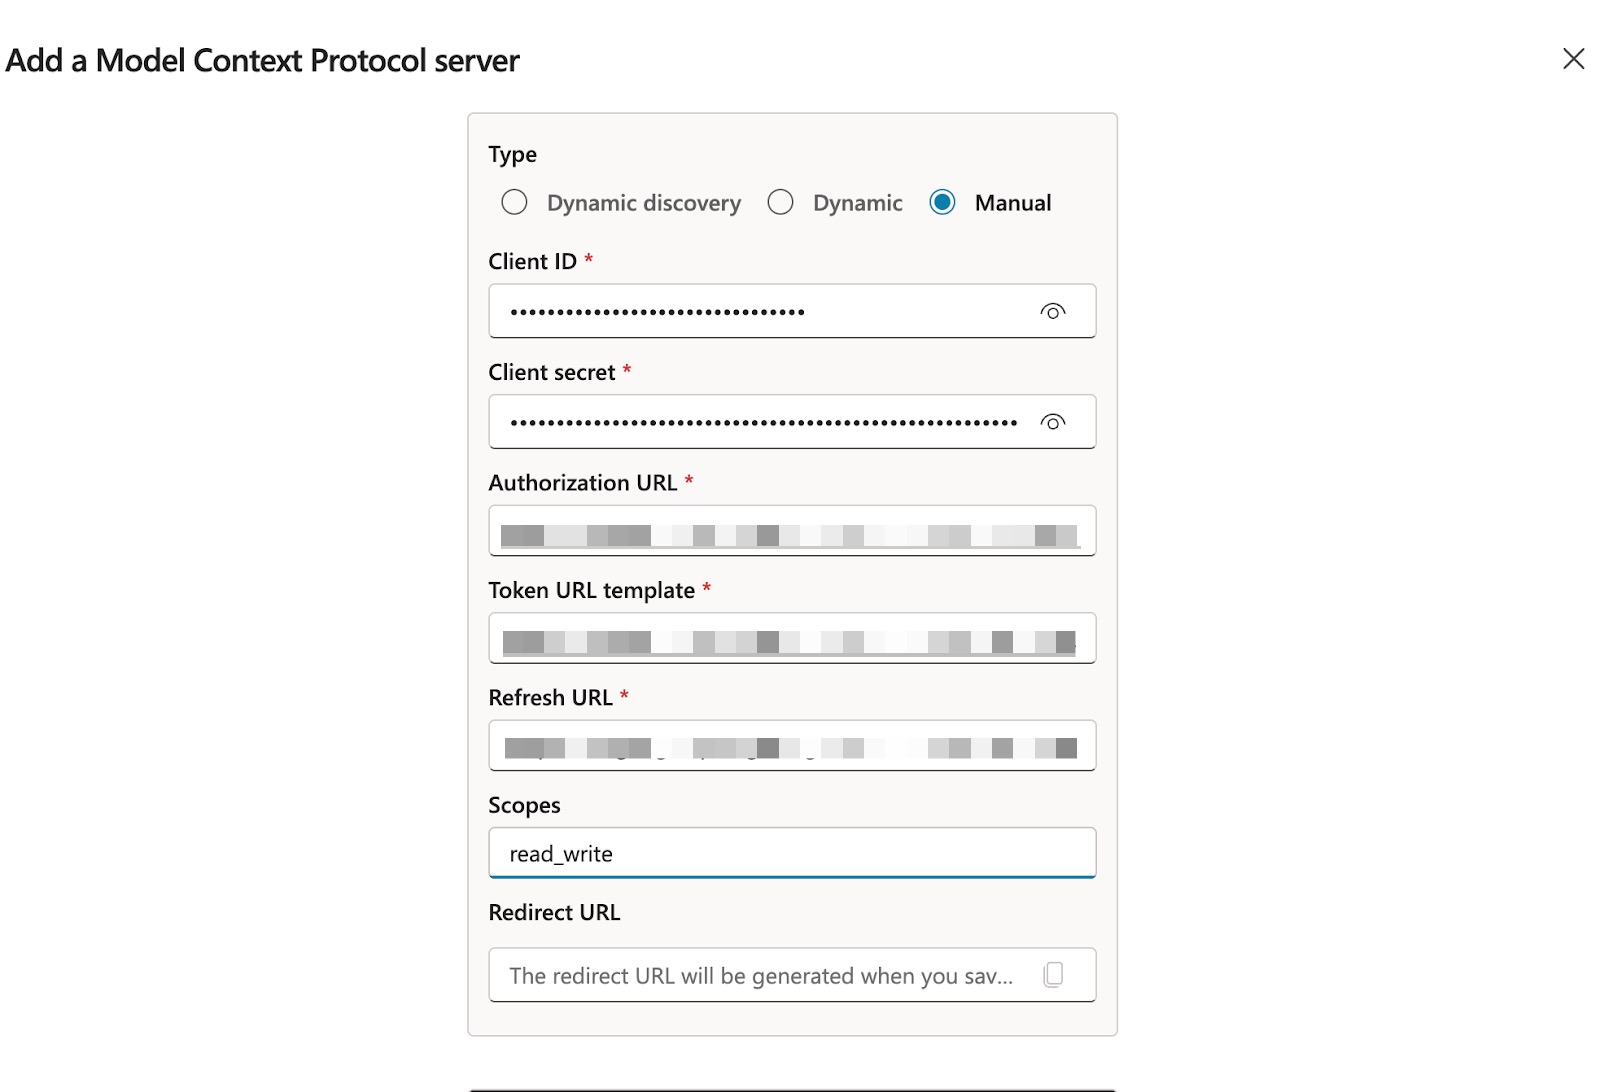
- In the OAuth Client ID field, paste the Client ID copied from the Gainsight CS application.
- In the OAuth Client Secret field, paste the Client Secret copied from the Gainsight CS application.
- In the Authorization URL text field, enter Gainsight’s authorization URL. For example,
https://<<TENANT_BASE_URL>>/v1/authorize - In the Token URL text field, enter the Gainsight CS token endpoint. For example,
https://<<TENANT_BASE_URL>>/v1/users/oauth/access/token - In the Refresh URL text field, enter the token refresh endpoint. Use the same URL as the Token URL.
- In the Scopes text field, enter the permission scopes for the MCP connection.
- Click Save.
When you complete the configuration, Copilot MCP generates a Redirect URL. Gainsight recommends copying and saving this URL.
Add Callback URL in Gainsight CS
The MCP server requires user-level OAuth authentication in Gainsight CS. To configure the OAuth application:
- Navigate to Administration > User Management and click the Authentication tab.
- Click OAuth Applications.
- Locate an existing OAuth app or create a new one. For more information on how to create an OAuth app, refer to the OAuth for Gainsight APIs article.
- Click the three-dots vertical menu and select View/Edit. A slide-out panel appears.

- Paste the Redirect URL copied from Copilot’s Model Context Protocol configuration in the above section.
- Click Add Application. The OAuth application is now created.