Archived Configure Success Plans
Overview
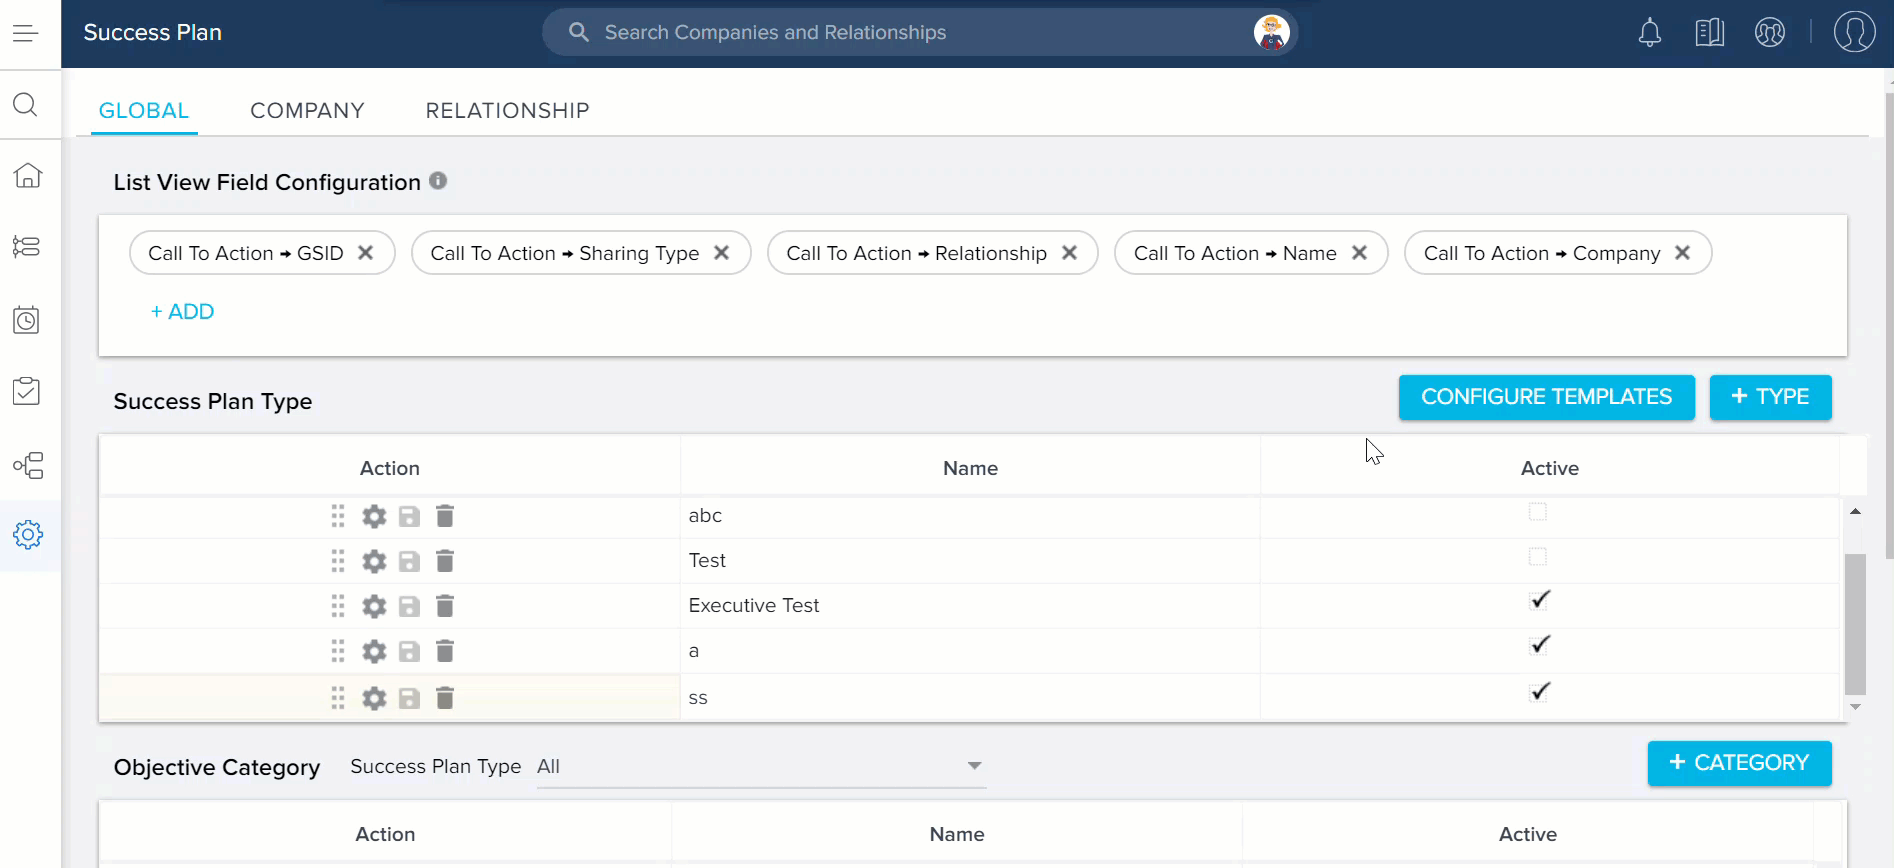
Admins can configure Success Plans at three levels:
- GLOBAL: You can select the GLOBAL tab if you want to apply configurations for both Companies and Relationships. You can configure the Global Success Plans Types and Categories at the Global level only. You can also configure the Success Plans sharing and security settings at Global level.
- COMPANY: You can select the COMPANY tab if you want to apply configurations to use with Companies. Global Success Plan types and categories are also available at the Company level but cannot be edited or deleted.
- RELATIONSHIP: You can select the RELATIONSHIP tab if you want to apply configurations for Relationships. You should select Relationship type to associate the Success Plan configurations. Global configuration options are also available at the Relationship level but cannot be edited or deleted.
Depending on these Success Plan configurations, end users can see the types and categories specific to the Company or Relationship type in Rules engine and while creating or editing Success Plans from C360/R360.
Admins can configure Success Plan Templates and Categories specific to the Success Plan type and for ‘All’ types. Depending on the configuration, each Success Plan type can have a different set of Success Plan Templates and Categories.
To enable the Success Plans feature, Admins must do the following steps:
Common Success Plan Configuration Options
Admins can see the following Success Plan Type options in the configuration page:
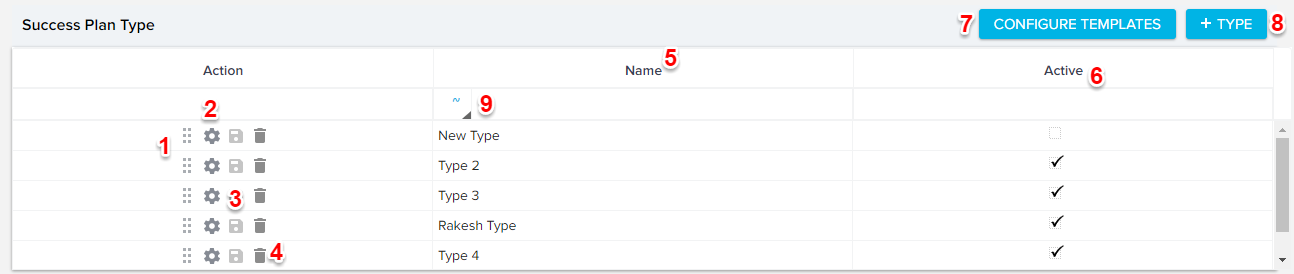
- Drag: This option is available in Success Plan type at Global, Company, and Relationship levels. At the Company and Relationship levels, Admins can reorder the Success Plan.
- Configure: This option is available in Success Plan type at Global, Company, and Relationship levels. Admins can use this option to configure the Success Plans.
- Save: After editing, click the Save icon to save changes.
- Delete: Click the trash icon to delete a Success Plan. You cannot delete items that are currently in use.
- Name: This displays the name of the Success Plan.
- Active: This option is available in all the Success Plan elements section at the Global, Account, and Relationship levels. When you select the Active checkbox at the Global level, the specific Success Plan element appears at the Company and Relationship levels.
- CONFIGURE TEMPLATES: You can configure or delete the Success Plan template using this option.
- +TYPE: Use this option to add and configure a new Success Plan type.
- Search: You can search a value for the Dropdown List type fields.
Note: Search Operation is allowed only on the String fields.
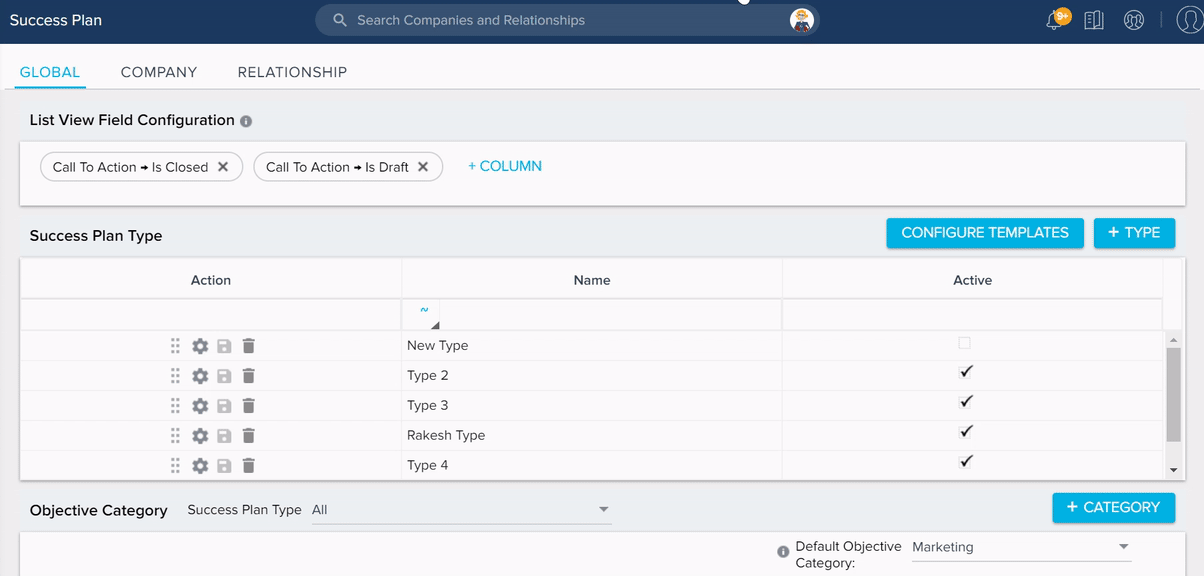
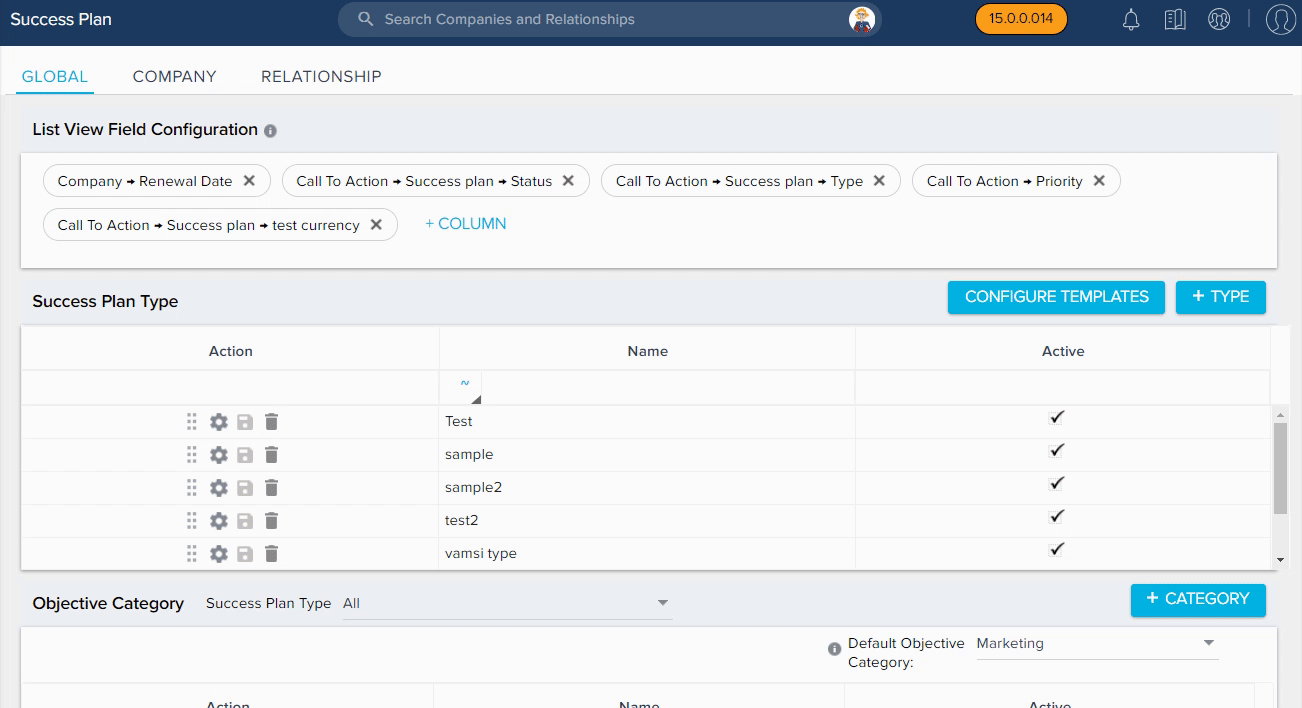
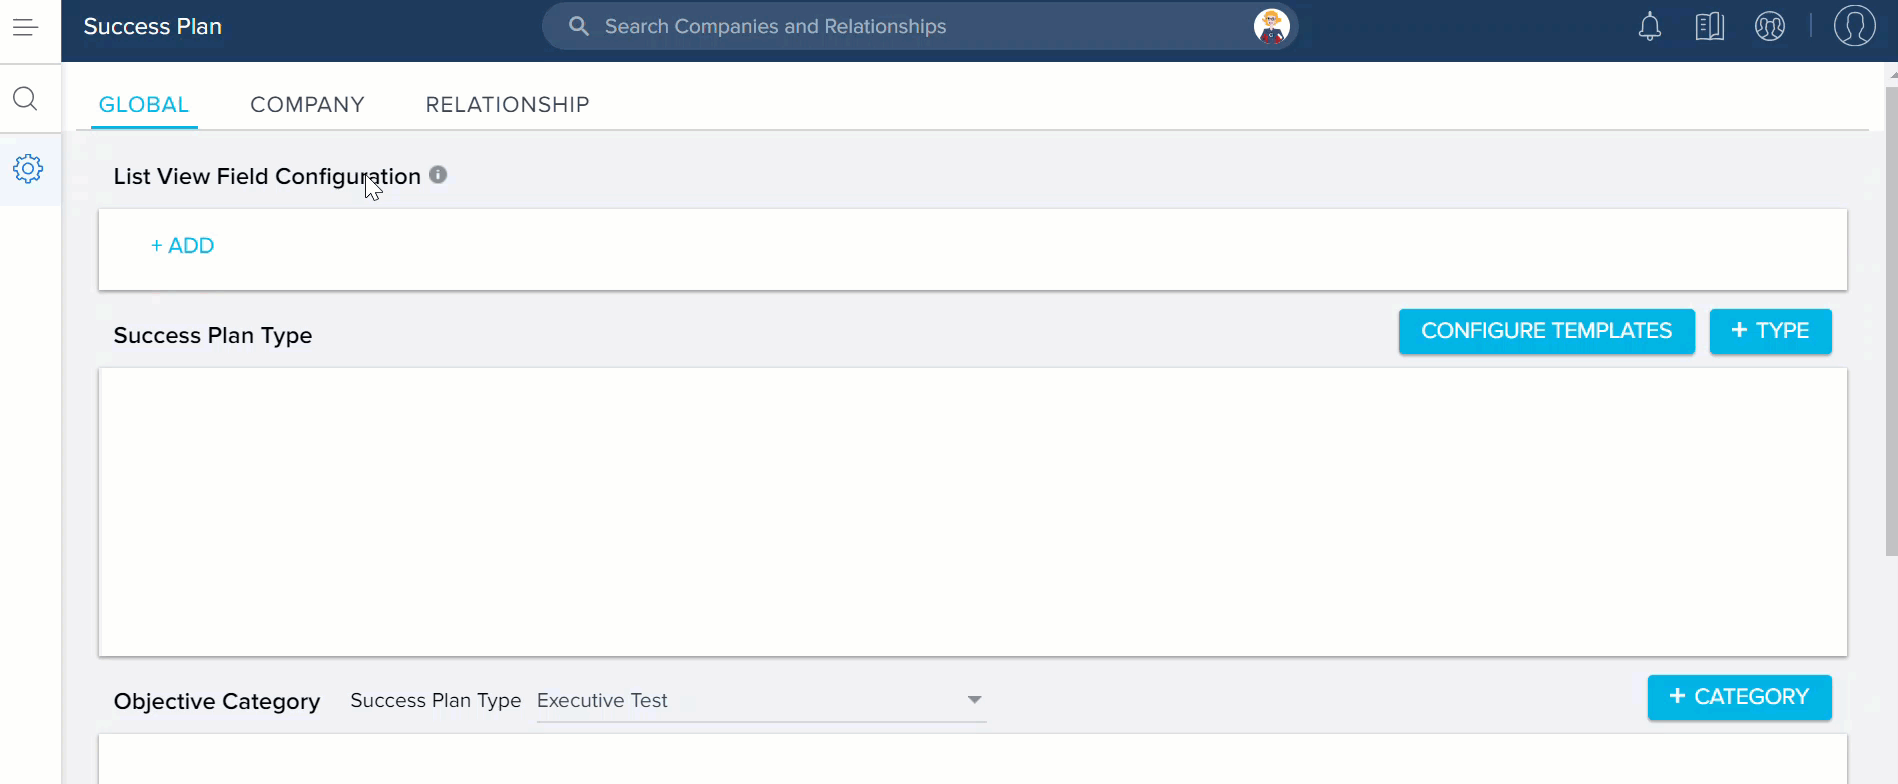
Configure List View Field
This section is available at the Global level only and determines which list view fields are visible in the Success Plans. A maximum of six fields can be added in this section.
To configure the list view columns:
- Click the X button to remove a default list view field.
- Click the +COLUMN button to add a field.
- Select the list view fields. (maximum 6 fields)

Configure Success Plan Types
To configure the Success Plan types:
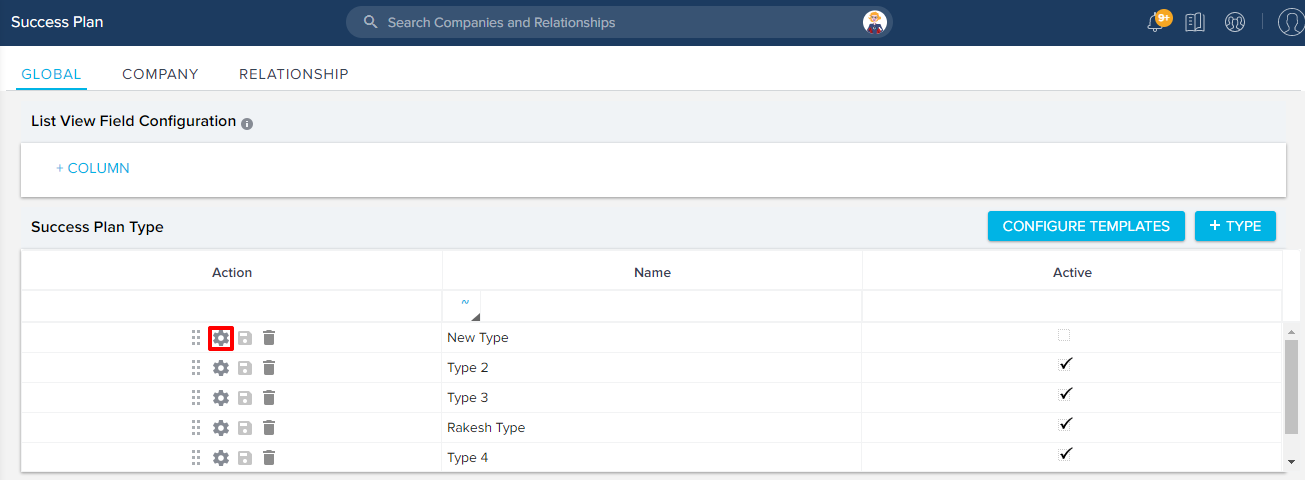
- Navigate to Administration > Success Plan. For every Success Plan type, you can configure the Plan Info layout. Similarly, for every Success Plan type, you can create one or multiple templates.
![Conf SP [2].png](https://support.gainsight.com/@api/deki/files/13726/Conf_SP_%255B2%255D.png?revision=1)
- Select GLOBAL or COMPANY or RELATIONSHIP tab, to create Success Plan Type for the respective entity. If you want to create type for Relationships, you should select a Relationship Type to associate the Success Plan configuration.
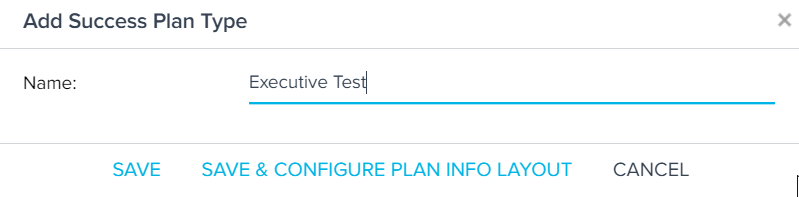
- Click + TYPE in the Success Plan Type section, to create new Success Plan types. Add Success Plan Type dialog appears.
Note: Plan types cannot be deleted if they are in use within a Success Plan. - Enter the desired Name in the Add Success Plan Type window, then click SAVE to create a new Success Plan type.
Note: The maximum character limit allowed while creating and updating the Success Plan Type is 40. - Click SAVE & CONFIGURE PLAN INFO LAYOUT to continue configuring the Success Plan info layout.
Deactivate Success Plan Types
It is possible to deprecate or make existing Success Plan Types inactive. This helps eliminate Success Plan Types clutter from the Admin and end user’s views.
Admins can make the Success Plan Types Inactive by unchecking the Active option from the Success Plan Type section in the Success Plan page. You can deactivate a Success Plan Type, even if it is used in the existing Success Plans.
A Success Plan Type cannot be made inactive if it is used in a Rule. If you try marking inactive, you will see “Picklist is used in the <<Rule Names>> warning message.
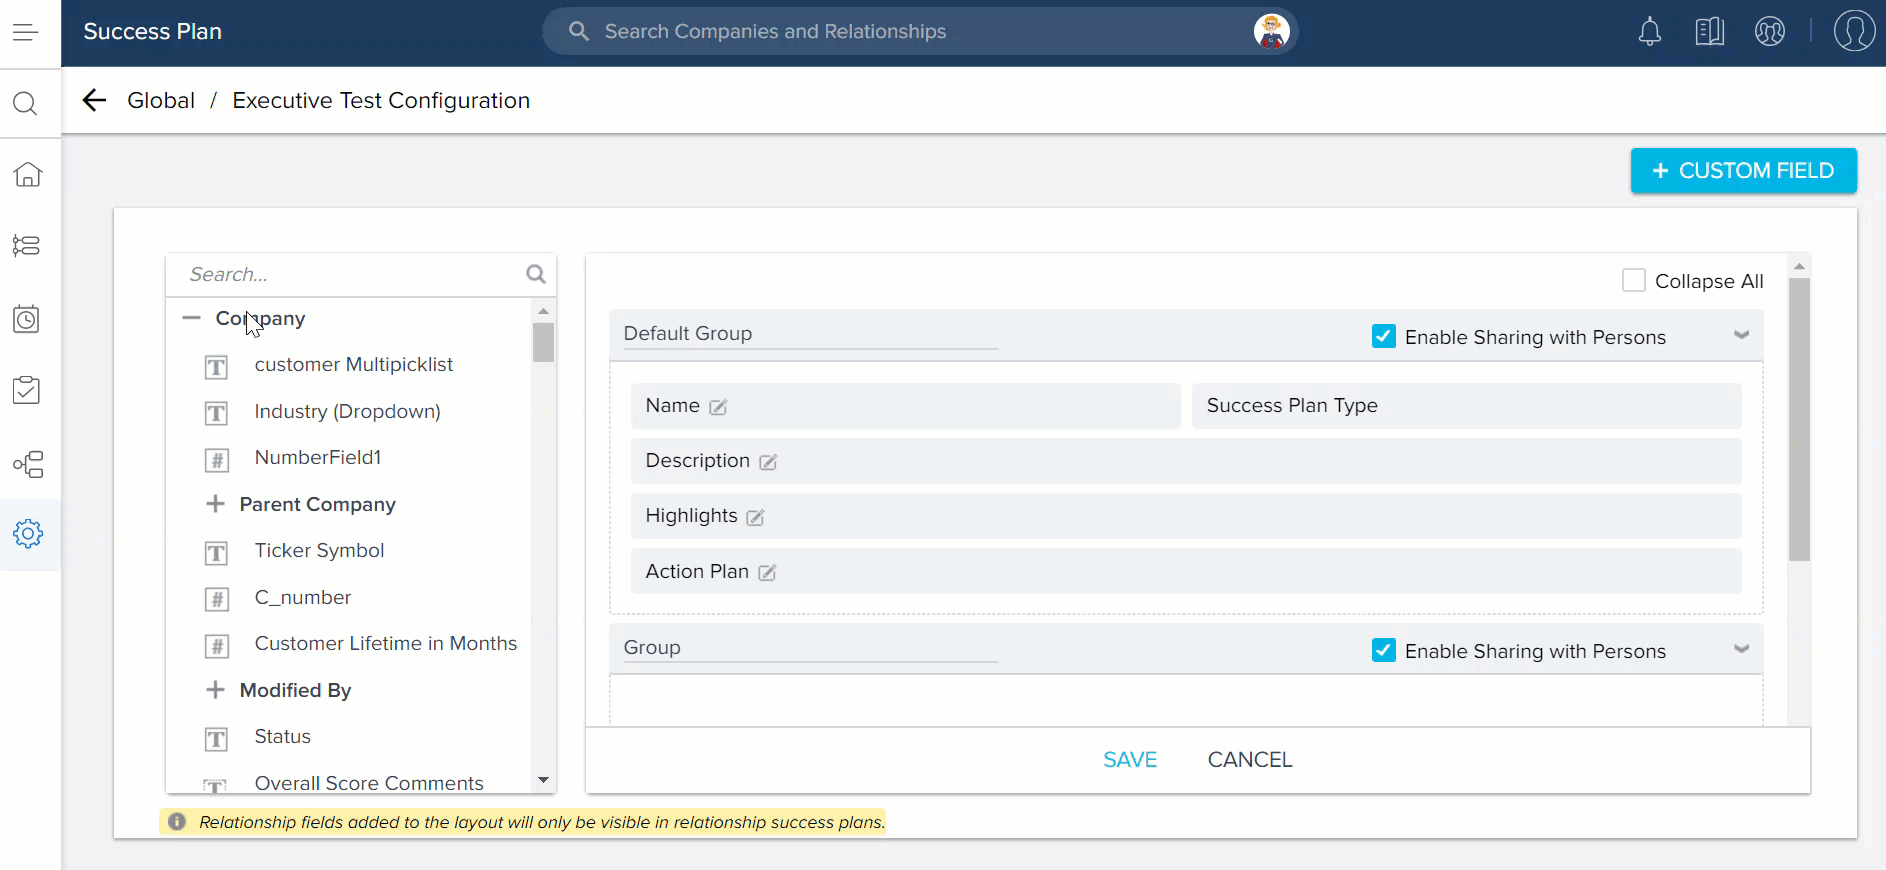
Configure the Success Plan Layout
To configure the Success Plan Layout:
Note: By default, some Success Plans fields are available.
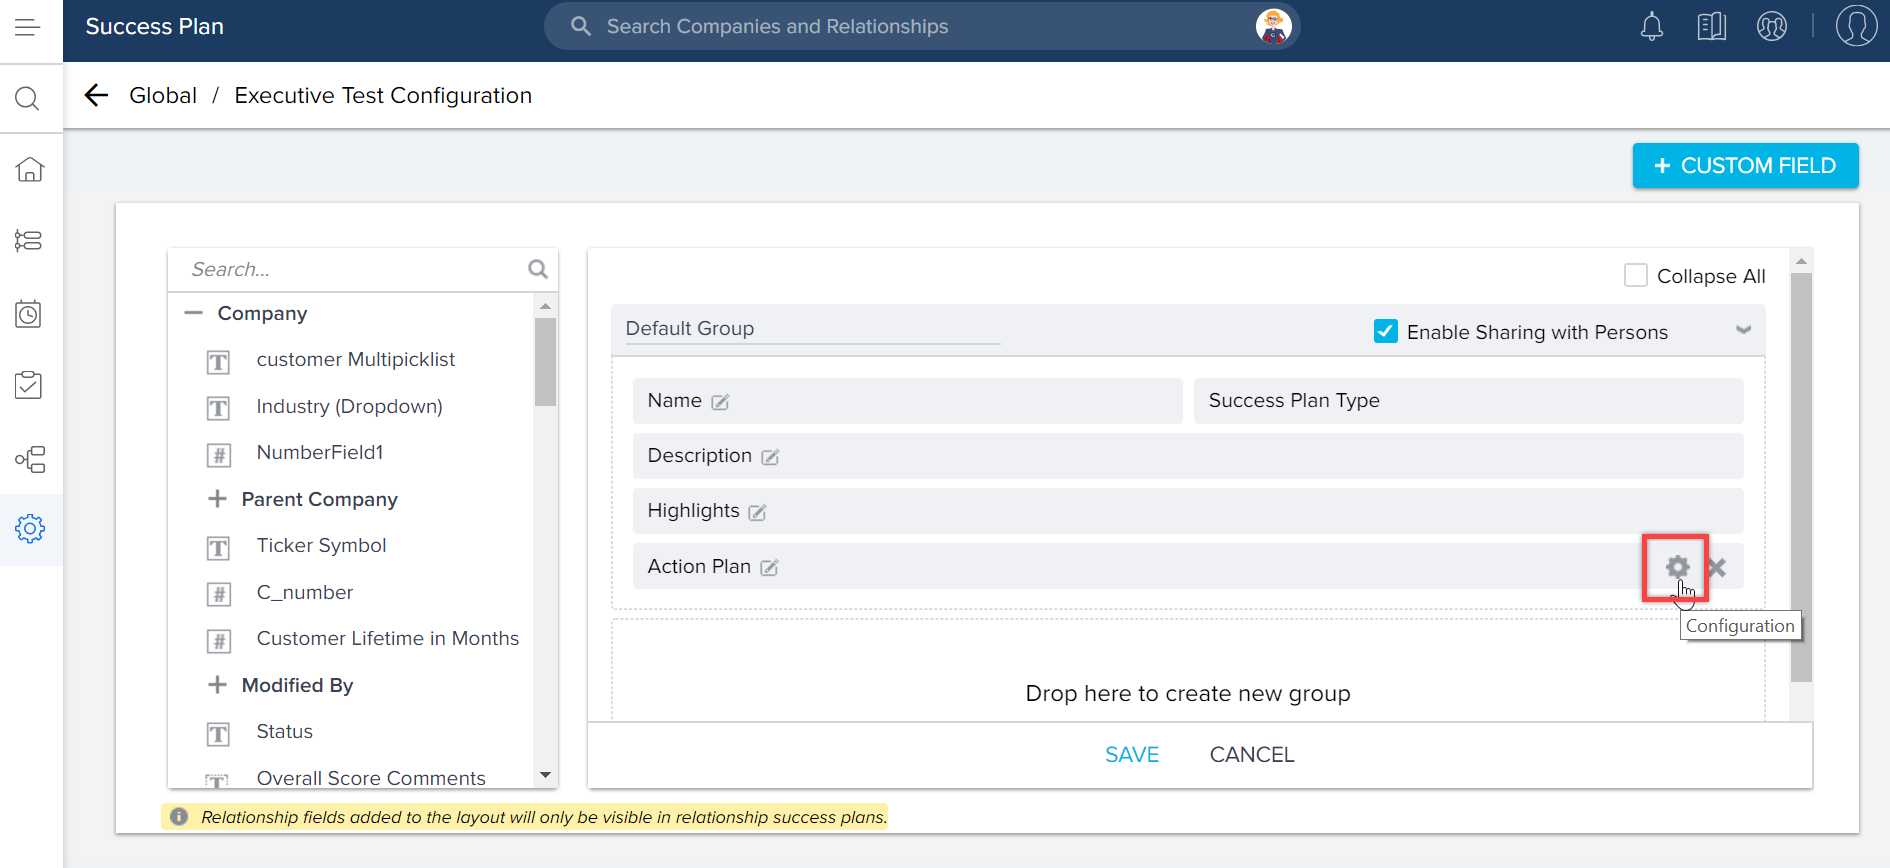
- Click SAVE & CONFIGURE PLAN INFO LAYOUT in the Add Success Plan Type dialog while creating a Success Plan type or click the Gear icon in the existing Success Plan. Success Plan Layout configuration page appears.
- Drag a field from the left pane and drop to the Default Group or create a new Group. You can select fields from the Gainsight objects, Success Plan, Company, and Relationship.
- Select any Group name to edit the name of a Group.
- Select Enable Sharing with Persons checkbox to enable sharing any Group with Persons in Success Plan sharing.
- Select the Collapse All checkbox to collapse all of the Groups on the right pane.
- Click the Gear icon of any field on the right pane. Field Configuration dialog appears. CSMs.
Note: All the editable fields from CTA or Success Plan are displayed in the Rules Engine while creating a Success Plan or CTA.
- Perform the following in the Field Configuration dialog:
- Display Label: Edit display label of the field that should be displayed while creating or editing Objectives in the C360 > Success Plan section.
- Editable: Select the checkbox to mark the field as editable for the CSMs.
- Click SAVE to save the field configuration.
Notes:
- Modified field labels appear in the Success Plan on the C360 page, but when you build reports, the fields are available with their original field names.
- Relationship fields added to the layout will only be visible to the Success Plans associated to Relationships.
- Click the X icon to remove any field from a Group.
- (Optional) Click +CUSTOM Field to create a new field as per your requirement. These fields are stored in the Success Plan object and are available for reporting in the Reports Builder. For more information on how to create new fields, refer to the Add Custom Fields in an Object article.
- Click SAVE at the bottom of the Success Plan Info Field Configuration page to save the layout configuration.
Configure Search for lookup fields
To configure search criteria for the lookup fields:
- Create a custom lookup field. For more information, refer to the Add Custom Fields in an Object article.
- Drag and drop this field into a Group as displayed in the following image:
- Click the Gear icon. A Configuration window is displayed for the relevant field.
- Click +ADD to add the Search Fields from the lookup object as required.
Notes:
- Search criteria is displayed for only fields having lookup to another object.
- Maximum of only 4 fields can be added in the Search criteria.
- Click SAVE to save the field configuration.
Create New Objective Categories
You can add multiple Objective Categories in the Success Plan configuration at the Global, Company, or Relationship level. Gainsight offers some out-of-the-box categories, including Research, Marketing, Business Development, Revenue, Relationship, Partner, Customer Success, and Other in the Success Plan configurations for the Global, Company, or Relationship pages. You can add unlimited categories. Categories are particularly useful for Success Plan reporting.
To create a custom Objective Category:
- Navigate to the Objective Category section.
- Click + CATEGORY to create a new custom category. Add Objective Category dialog appears.
- Specify the following details:
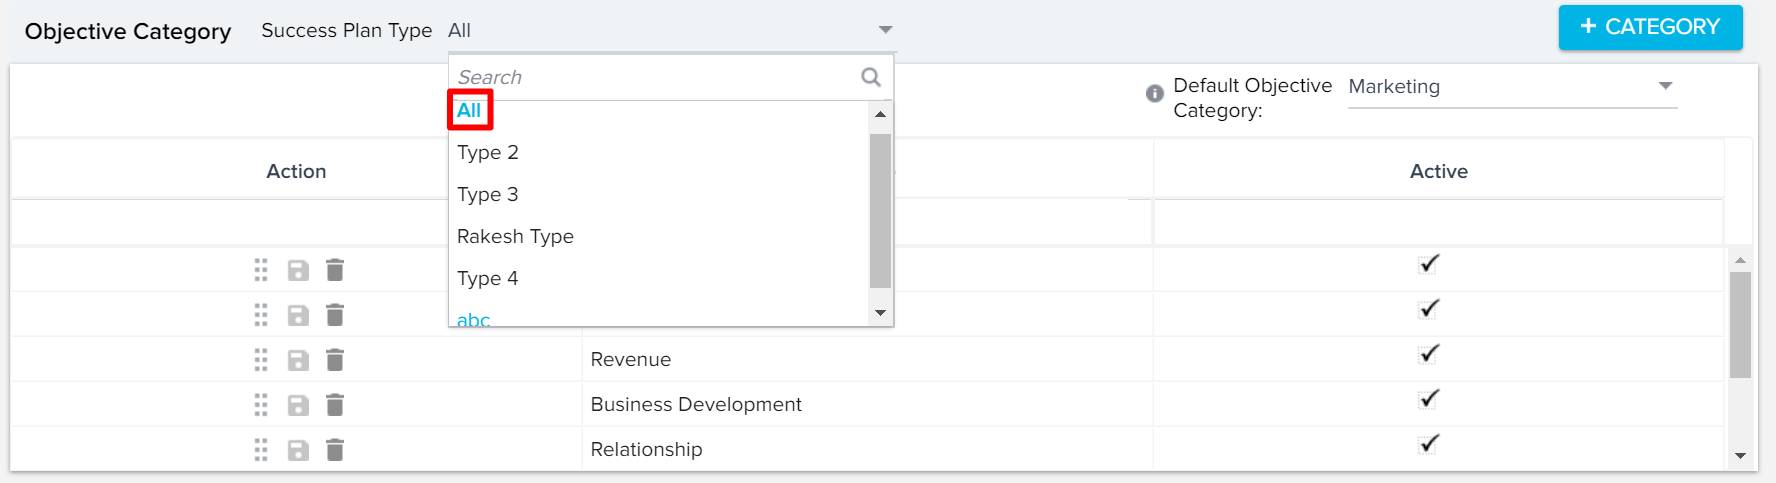
- Select either ‘All’ or a specific Success Plan type. The new Success Plan category will be mapped to the selected Success Plan type.
- Name: Enter new Success Plan Category name. This category name appears to the end-users while adding or editing a Success Plan in the C360/R360 page.
Note: The maximum character limit allowed while creating and updating the Success Plan Objective Category is 40.
- Click SAVE.
Notes:
- Default Objective Category: From the dropdown list, select an Objective Category, if you want to set it as default. Once a default category is selected, Objectives created from 360 page fall under this category.
- A category cannot be deleted once it is in use within a Success Plan.
- You can have different objective categories for different success plan types, and you can also use categories that are applicable to ‘All’ Success Plan Types.
Deactivate Success Plan Objective Categories
It is possible to deprecate or make existing Success Plan Objective Categories inactive. This helps eliminate Success Plan Objective Categories clutter from the Admin and end user’s views.
Admins can make the Success Plan Objective Categories Inactive by unchecking the Active option from the Objective Category section in the Success Plan page.
However, they cannot be made inactive if the objective category is used in any of the Success Plan Templates.
The Success Plan Objective Category is also not allowed to be made inactive, if it is selected as a Default Objective Category in the dropdown option.
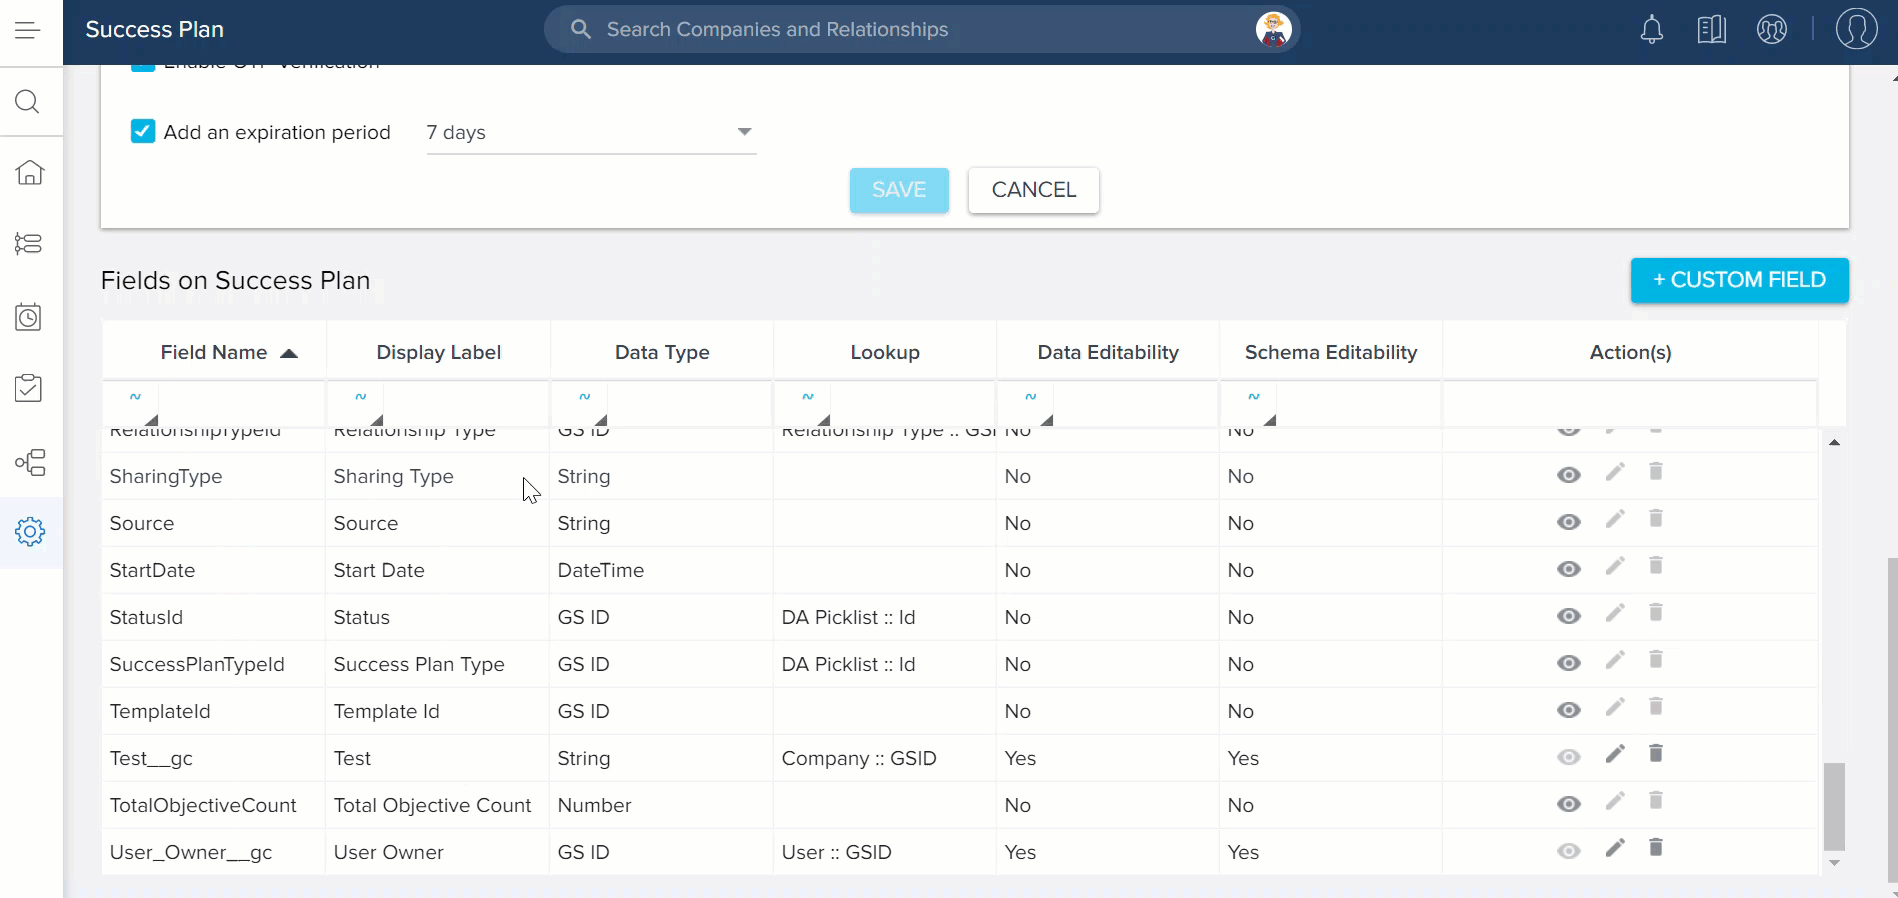
Create Custom Fields on Success Plan Object
Admins can directly create custom fields on Success Plan object from the Fields on Success Plan section. This section also displays the existing fields used in the Success Plan Object, in a tabular format.
Note: You can only create Custom Fields and view Fields on Success Plan section only on the GLOBAL tab of the Succes Plan page.
To create custom fields:
- Click + CUSTOM FIELD.
- Enter the following details in the Create Custom Field screen:
- Display Name: The easily understandable display name.
- Field Name: The system defined field name with a suffix of __gc.
- Data type: The data type of the field being created.
- Required: By setting this constraint, the field is not allowed to ingest a null value record while importing data. You can select this option only when you are adding a custom field into an object that does not have any existing data.
- Hide in reporting: If you select this, the field is hidden in the Reporting functionality.
- Calculated Field: Enabling Calculated field checkbox allows you to instantly create a formula field on CTA, Task and Success Plan objects, based on your business requirements. For detailed instructions on how to create Formula Fields, refer Create Formula Fields in CTA, Task and Success Plan Objects article.
- Default Value: Set a default value that you would like to insert in the field when the source field is NULL or Empty.
- Gainsight Mapping: Map the field being created with a Gainsight object, if required.
- Object lookup list: Select the object to which lookup is required from the current field.
- Field lookup list: Once you select an object, its corresponding fields are displayed in this drop down list. Select the field to which lookup is required from the current field.
- Description: (Optional) A description for the object being created.
- Click SAVE & NEW to add a custom field to the Success Plan object and create another field or click SAVE; then a custom field is created and added to the Success Plan object.
Admins can review, modify, and delete the existing fields used in the Success Plan Object by using these options:
- View field: To view the information of the existing fields.
- Edit field: To update the existing fields information.
Note: Admins cannot update the Field name and Data type fields for the existing fields. - Delete field: To delete the existing fields used in Success Plan Object.
Note: Admins cannot delete the fields that are already used in any layouts, reports, or rules. - You can create and edit Custom Fields on Call To Action/Success Plan/Task objects only from the CTA/Success Plan/Task admin pages respectively. You cannot create/edit the these fields from Data Management page.
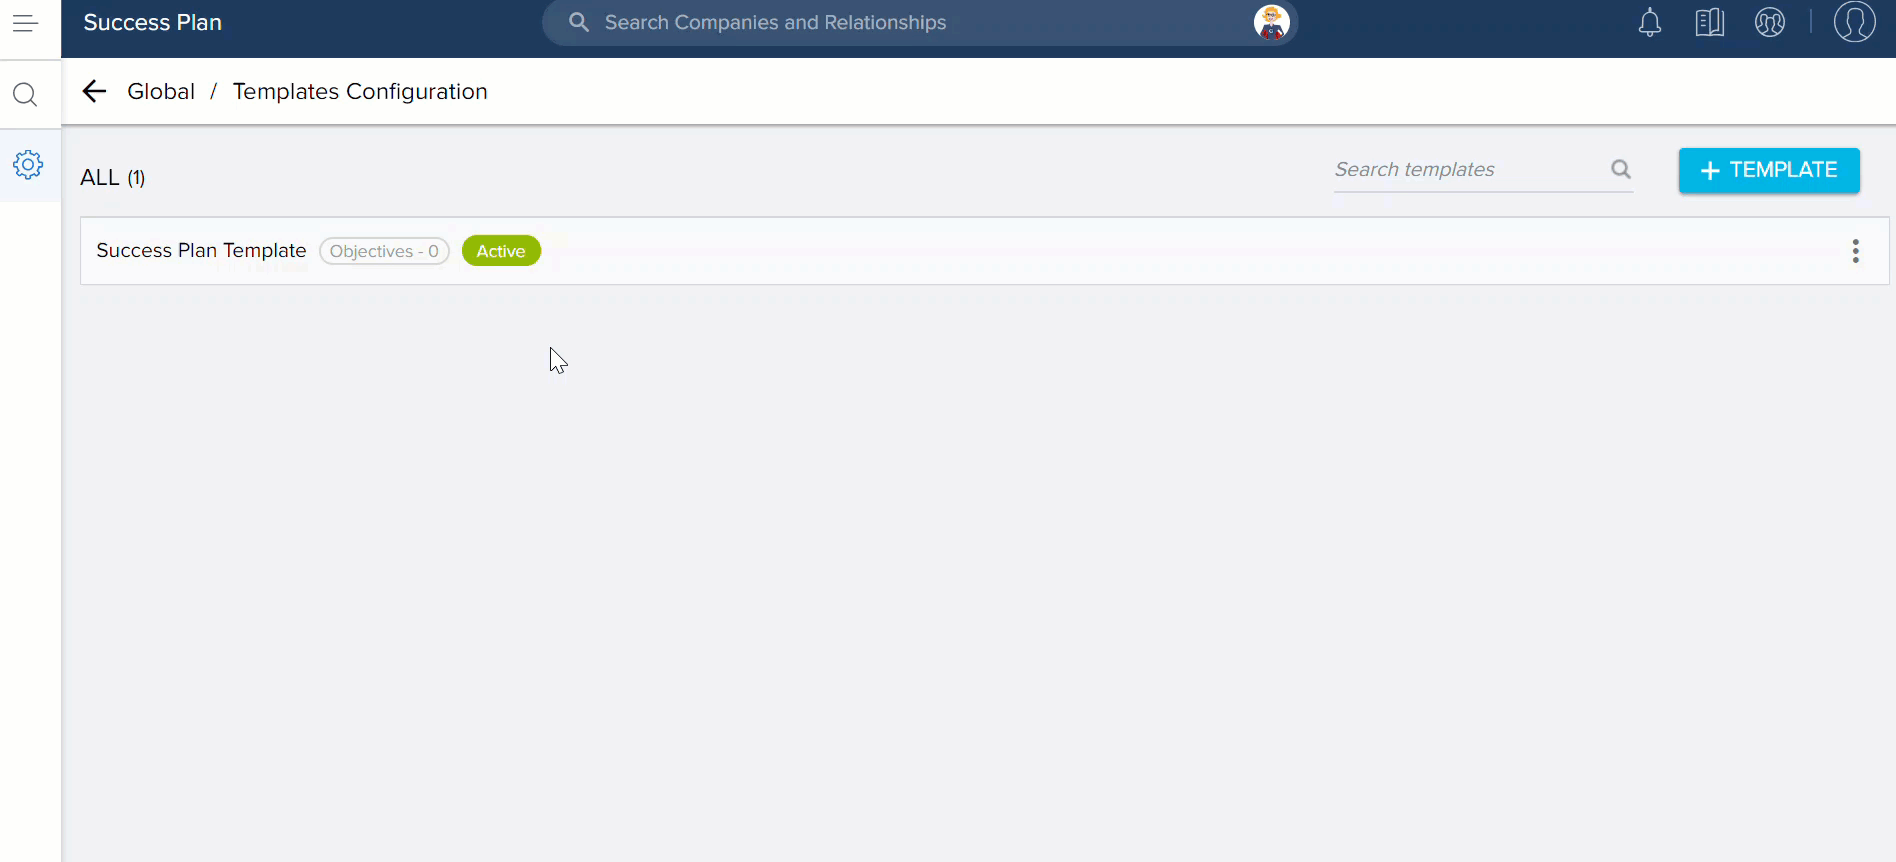
Create Success Plan Templates
To Create a Success Plan Template:
- Navigate to the Success Plan Type section in the respective pages from Global, Company, or Relationship.
- Click CONFIGURE TEMPLATES. The Templates Configuration page appears. You can see all of the templates arranged for ALL or each success plan type defined in the Success Plan configuration page. You can see Global Templates at Company or Relationship level also.
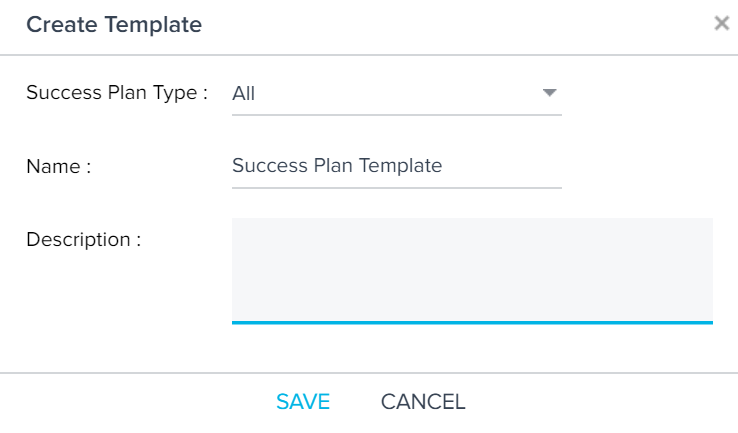
- Click +TEMPLATE. Create Template dialog appears.
- Specify or select the following details in the Create Template window:
- Success Plan Type: Select the appropriate success plan type as either ‘All’ or specific success plan type.
- Name: The name of the success plan template.
- (Optional) Description: Enter description in the dialog.
- Click SAVE.
- Click three vertical dots on a Template Configuration screen and select one of the following options:
- Add Objective: To add an objective to the template selected. You can add Objectives to the Templates that are created at the respective level only. For more information, refer to Add an Objective to the Template.
- Edit Template: To edit an existing template. You can edit Template that are created at the respective level only. You can edit details that are entered in Step 4.
- Delete Template: To delete the template. You can delete Template that are created at the respective level only.
- Mark Active/Mark Inactive: To mark a template as Active or Inactive. Templates that are marked as Inactive at the Global level cannot be consumed for success plans at Company or Relationship level.
Add an Objective to the Template
To add an objective to the template:
- Click three vertical dots on a Template Configuration screen and select Add Objective. The Add Objective screen appears.
- Specify the name of the Objective in the Name field.
- Specify the Due Date for an Objective in the Due Date field.
- Select the Objective category for the Success Plan in the Category dropdown menu.
Note: By default, the Type field is always Objective as this Success Plan is a CTA type Objective. - Select the Status and Priority for the Success Plan in the Status and Priority dropdown menu options respectively.
Note: The options available in the Status and Priority dropdown menus are configured in the CTA configuration for Objective CTA type. For more information, refer to the Federated Customer Management article. - Click SAVE.
Deactivate Success Plan Templates
It is possible to deprecate or make existing Success Plan Templates inactive. This helps eliminate Success Plan Templates clutter from the Admin and end user’s views.
Admins can make the Success Plan Templates Inactive by clicking the three dots and selecting the Mark Inactive option of SP templates. To deactivate a CTA Reason, navigate to the Administration > Success Plan > +CONFIGURE TEMPLATES page.
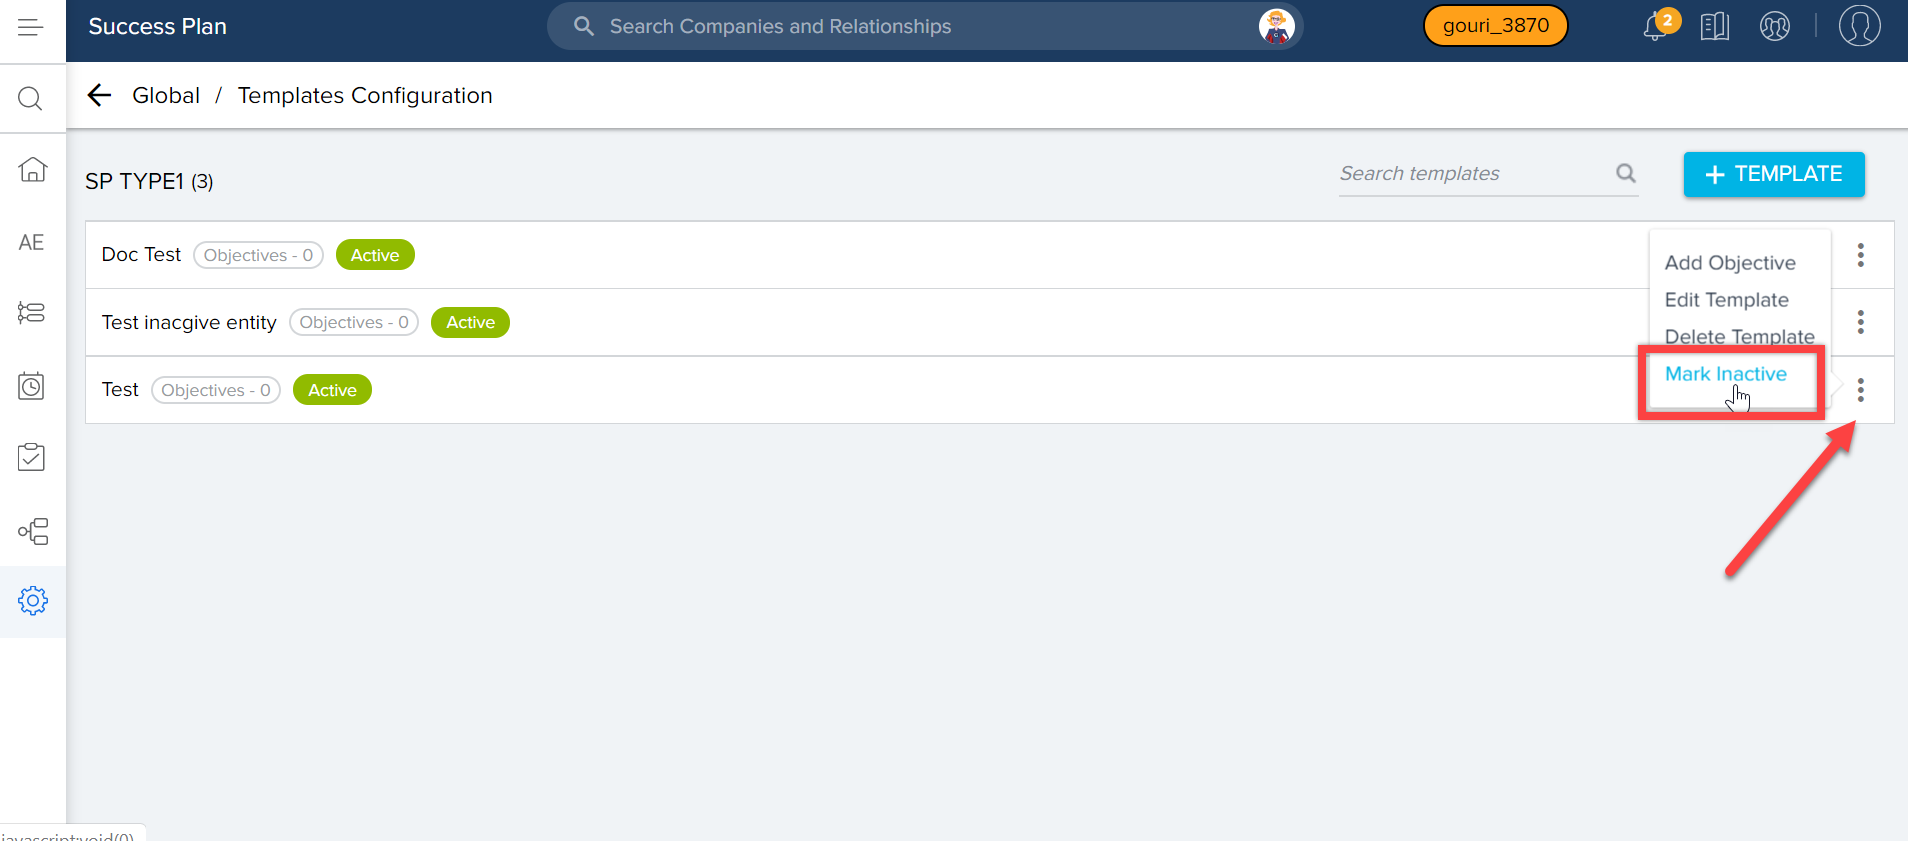
But, once a template is marked Inactive, it is not displayed for selection while applying a template to the new Success Plan.
However, a template cannot be made inactive, if it is used in a Rule. If you try marking inactive, you will see “This template is being used in the <<Rule Names>> warning message.
If a Success Plan template is created at the Global level, it can be deactivated at the GLOBAL level only and not at the COMPANY/RELATIONSHIP level. The inactive SP templates are not displayed at the COMPANY/RELATIONSHIP level once they are deactivated at GLOBAL level.
Configure Dependency in Templates/ Playbooks
CSMs can add dependency between the Objectives/tasks of Templates/Playbooks.
Success Plan Templates
In Success Plan Templates, CSMs can configure:
- Start Date of the Objective to be dependent on any of the following two dates:
- Assign date (date when the Template is applied to Success Plan)
- Due Date of the previous Objective
- Due Date of the Objective to be dependent on any of the following two dates:
- Assign date (date when the Template is applied to Success Plan
- Start date of the same Objective
Playbooks
In Playbooks, CSMs can configure:
- Start Date of the task to be dependent on any of the following three dates:
- Assign date (date when the playbook is applied to Objective)
- Due Date of previous task in the same Objective
- Start date of parent Objective
- Due Date of the task to be dependent on any of the following two dates:
- Start date of parent Objective
- Start date of the task
To add dependency between the Objectives in the Template:
- Navigate to Administration > Success Plan.
- Click CONFIGURE TEMPLATES.
- Click on the required Success Plan Template to expand it.
- Click the three dots menu of the dependent Objective and select Edit Objective.
- In Start Date, select Objective Due Date.
- In Select an Option, select the independent Objective.
- Click Save.
Add Success Plan section to the C360/R360 page
To add Success Plan section to C360/R360 section:
- For C360:
- Navigate to Administration > C360 Layouts.
- Click the edit icon on the desired layout from either Global Sections or Company Layouts.
- Drag the Success Plan section from the left pane and drop on the right pane.

- For R360:
- Navigate to Administration > Relationship > Types.
- Click the edit icon on the specific Relationship type.
- Navigate to the LAYOUTS tab.
- Click the edit icon on the specific Layout.
- Drag the Success Plan section from the left pane and drop on the right pane.

CSMs can now see the Success Plans section in the specific company’s C360 page for which a respective Section is applied.
Configure Custom Status for Success Plan
Configure custom statuses for Success Plan from the admin page. These standard or custom statuses are displayed in the Global Success Plans or C360 > Success Plan page.
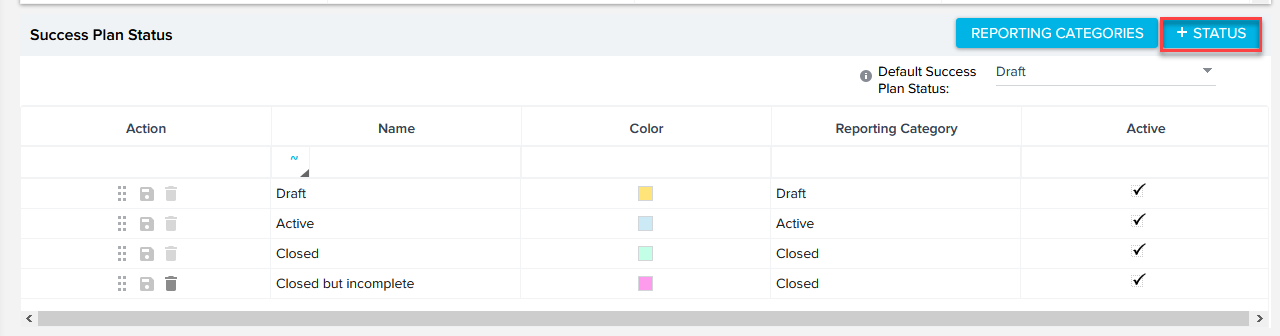
To create custom status of Success Plan:
- Navigate to Administration > Success Plan.
- Click +STATUS. This opens the Add Success Plan Status pop-up window.
- Enter a unique name for the Success plan.
- Click the color icon and select the preferred color.
- In the Category dropdown list, select the any of the following standard statuses:
- Draft
- Active
- Closed
Note: Category is a means to choose how a custom status behaves. Any custom status will have to behave as one of three standard status (Draft, Active, Closed).
For example, a "Closed but incomplete" custom status marked under the "closed" category will behave like a "closed" status. ie. A Success Plan with "closed but incomplete" status will show up under the Completed Plans view in the Global Success Plan or C360 page.
- Click Save.