OBSOLETE - Success Plan Admin
This article explains to admins how to configure a re-designed Success Plan.
Overview
The re-designed Success Plan is a powerful project management tool for CSMs. Admins can establish uniform goal-setting processes by creating standardized success plan types, attributes, and templates. The new Success Plan features keep track of client goals, share updates, and automatically start actions at crucial times for smooth operations. The redesign improves the admins experience by simplifying the configuration process and ensures Success Plans meet user needs. It includes a Gantt chart for visual task management, understanding dependencies, and tracking deadlines.
Key Benefits of re-designed Success Plan
-
Enhanced Control and Flexibility: The redesign enhances admins control and flexibility, enabling them to customize success plans more effectively. This customization ensures that the success plan meets the specific needs and goals of the organization ensuring a better alignment with business objectives.
-
Gantt Chart Visualization: With Gantt Chart, the redesign provides a clear overview of tasks, dependencies, and due dates, enhancing project management and planning.
-
Customizable Success Plan Types: The ability to manage and configure distinct Success Plan Types increases customization and adaptability. This helps admins tailor business objectives and customer needs.
-
Streamlined Updates Across Success Plan Types: The redesign simplifies the process for admins to update dropdown values, templates, and detail views across multiple Success Plan Types. This streamlining of the configuration process ensures consistent data representation and reduces the effort required to manage various aspects of success plans.
-
Standardized Default Behaviour: The default behavior across all Success Plan types enhances usability and reduces confusion. Standardization of default behaviors means that users can expect the same interactions and responses across the system, leading to a more intuitive and predictable experience.
-
Advanced Detailed Layout Customization: The redesign improves the organization and presentation of information, facilitating better clarity and easier access to key details.
Tabs for Success Plan
To access Success Plan, navigate to Administration > Success Plan. The Success Plan page appears.
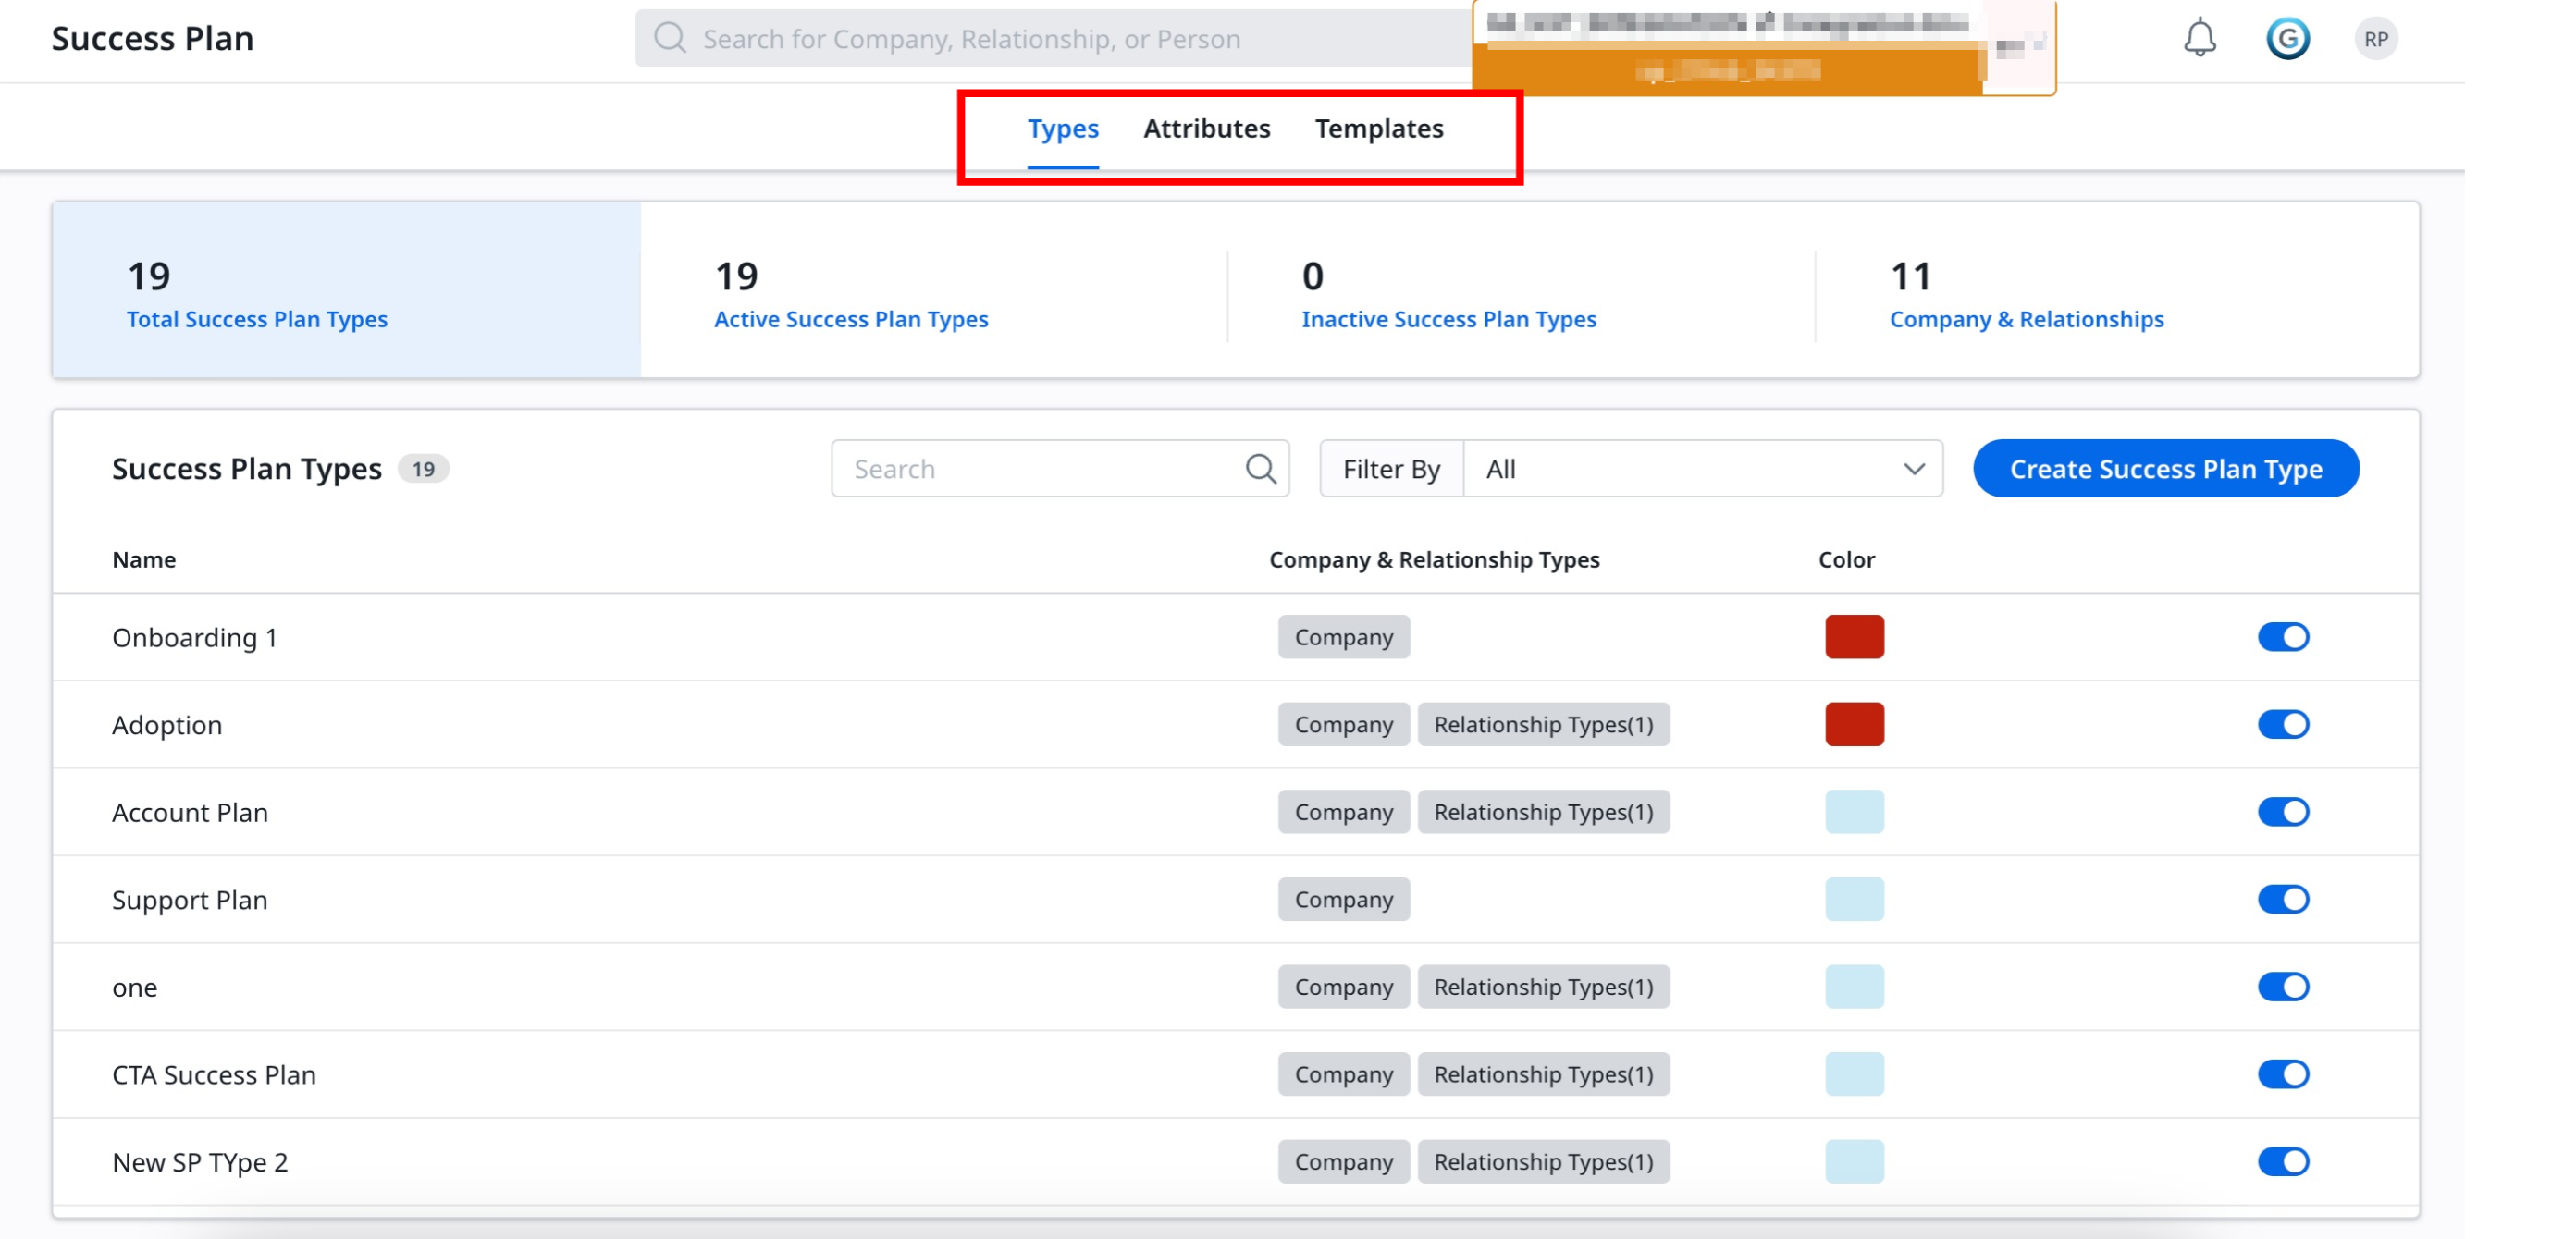
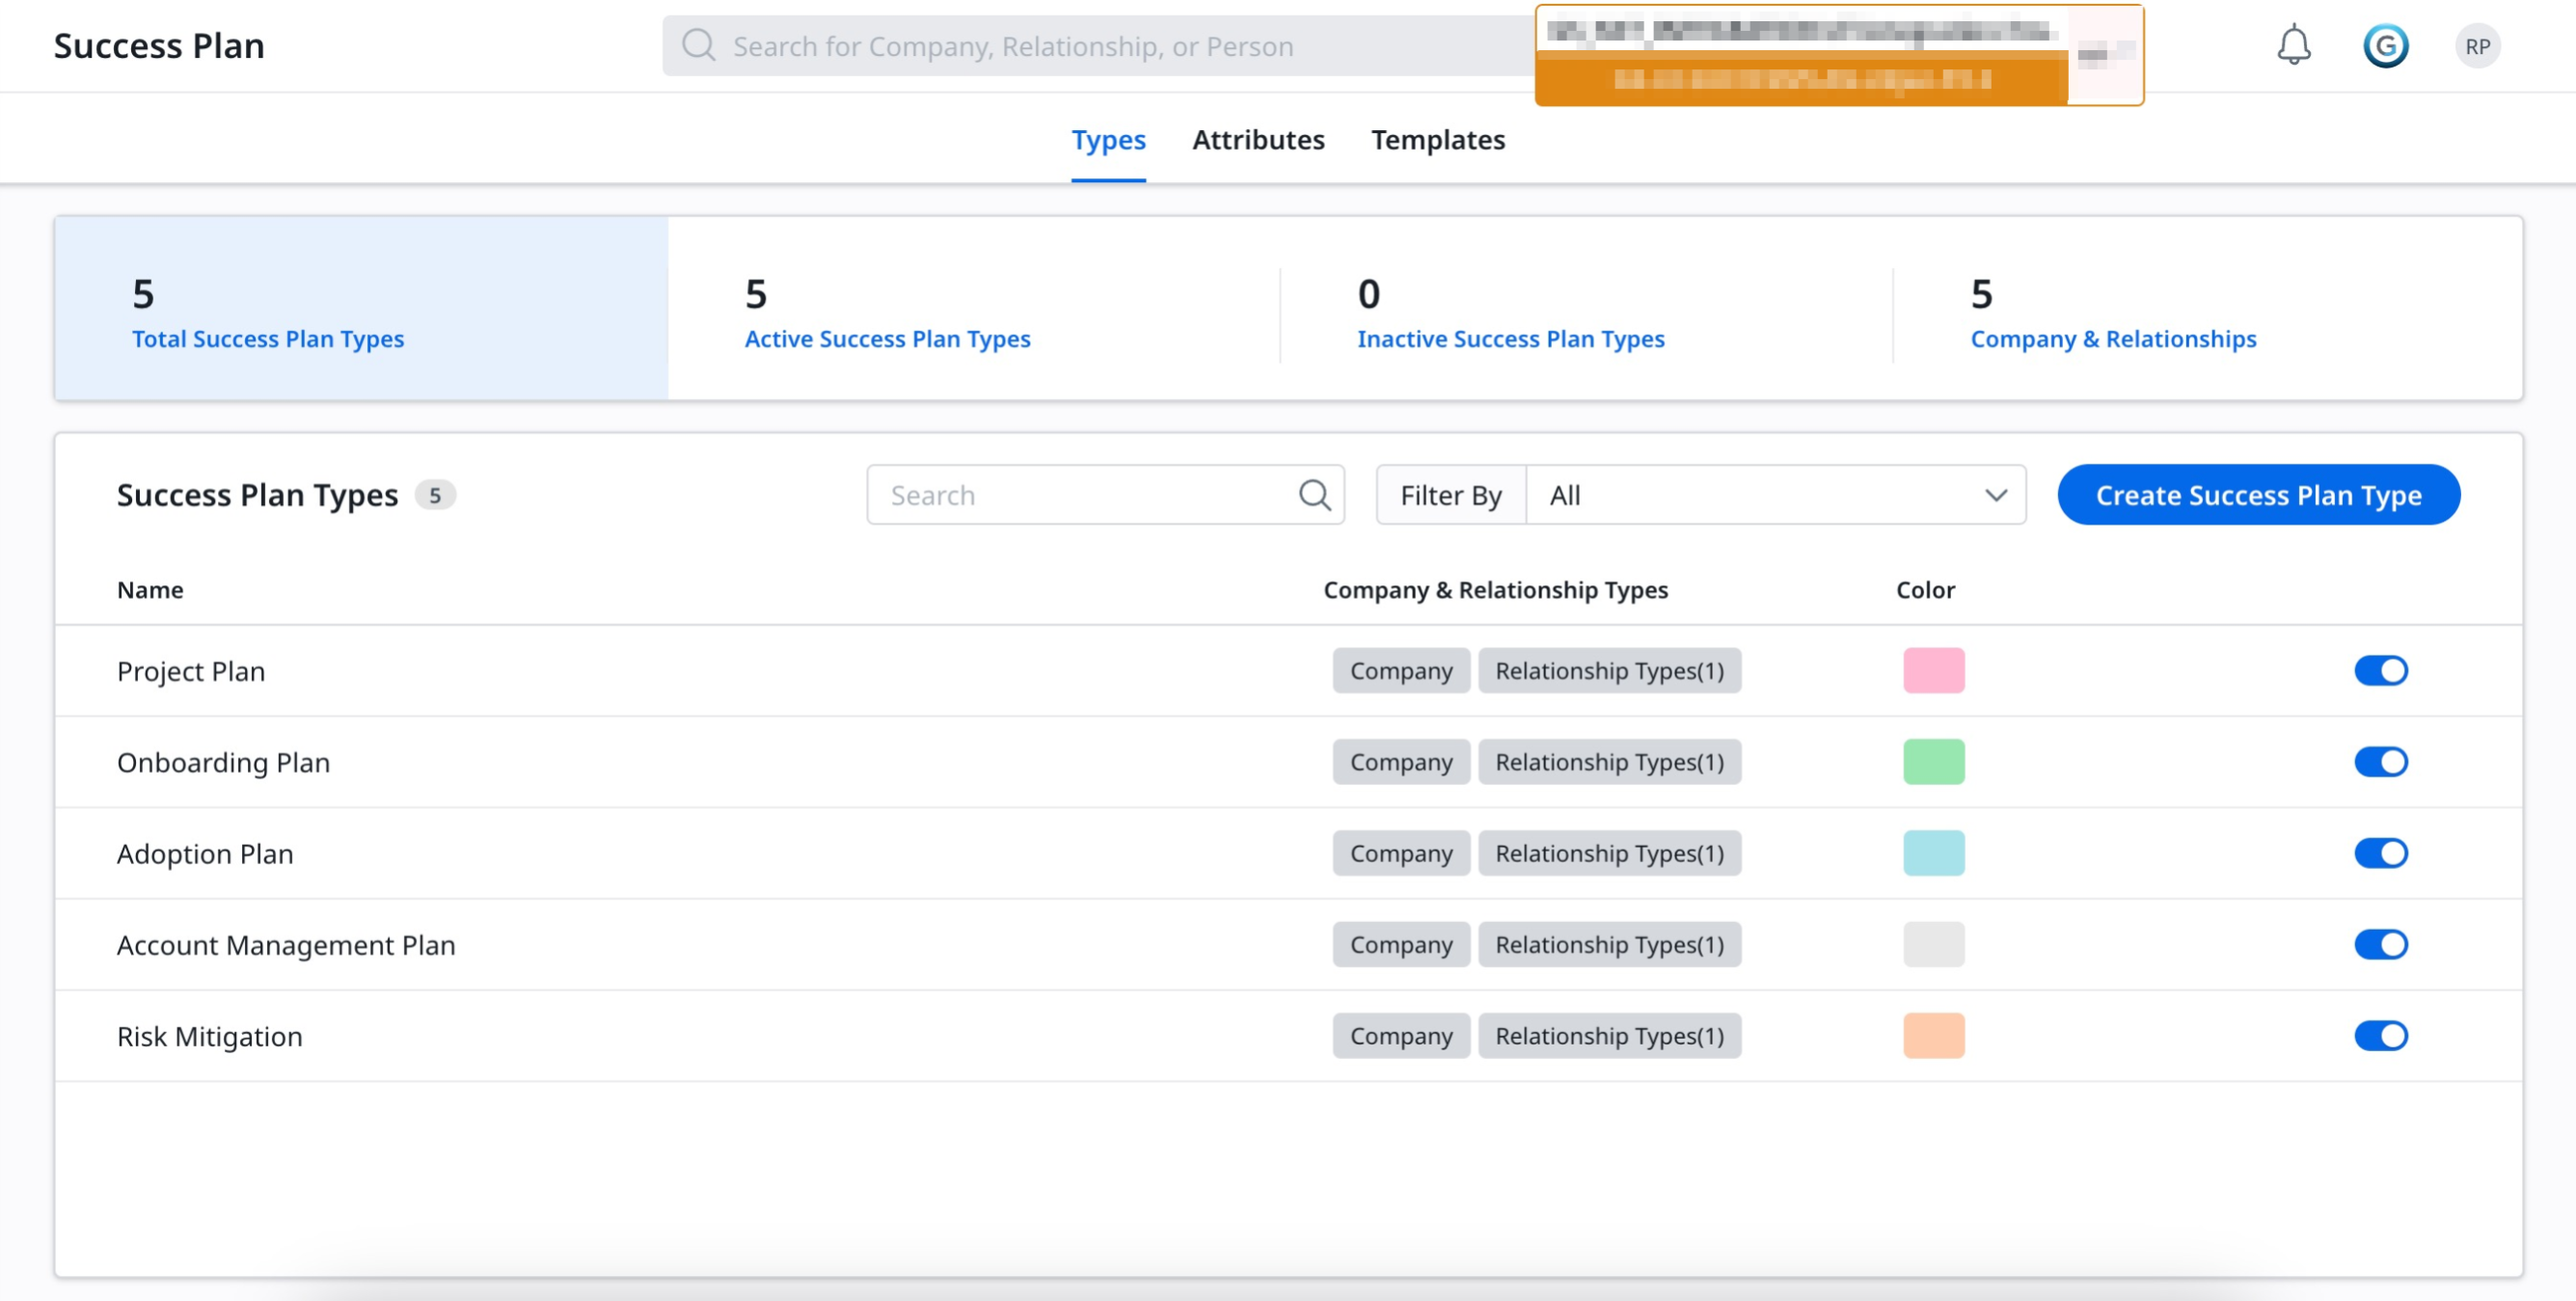
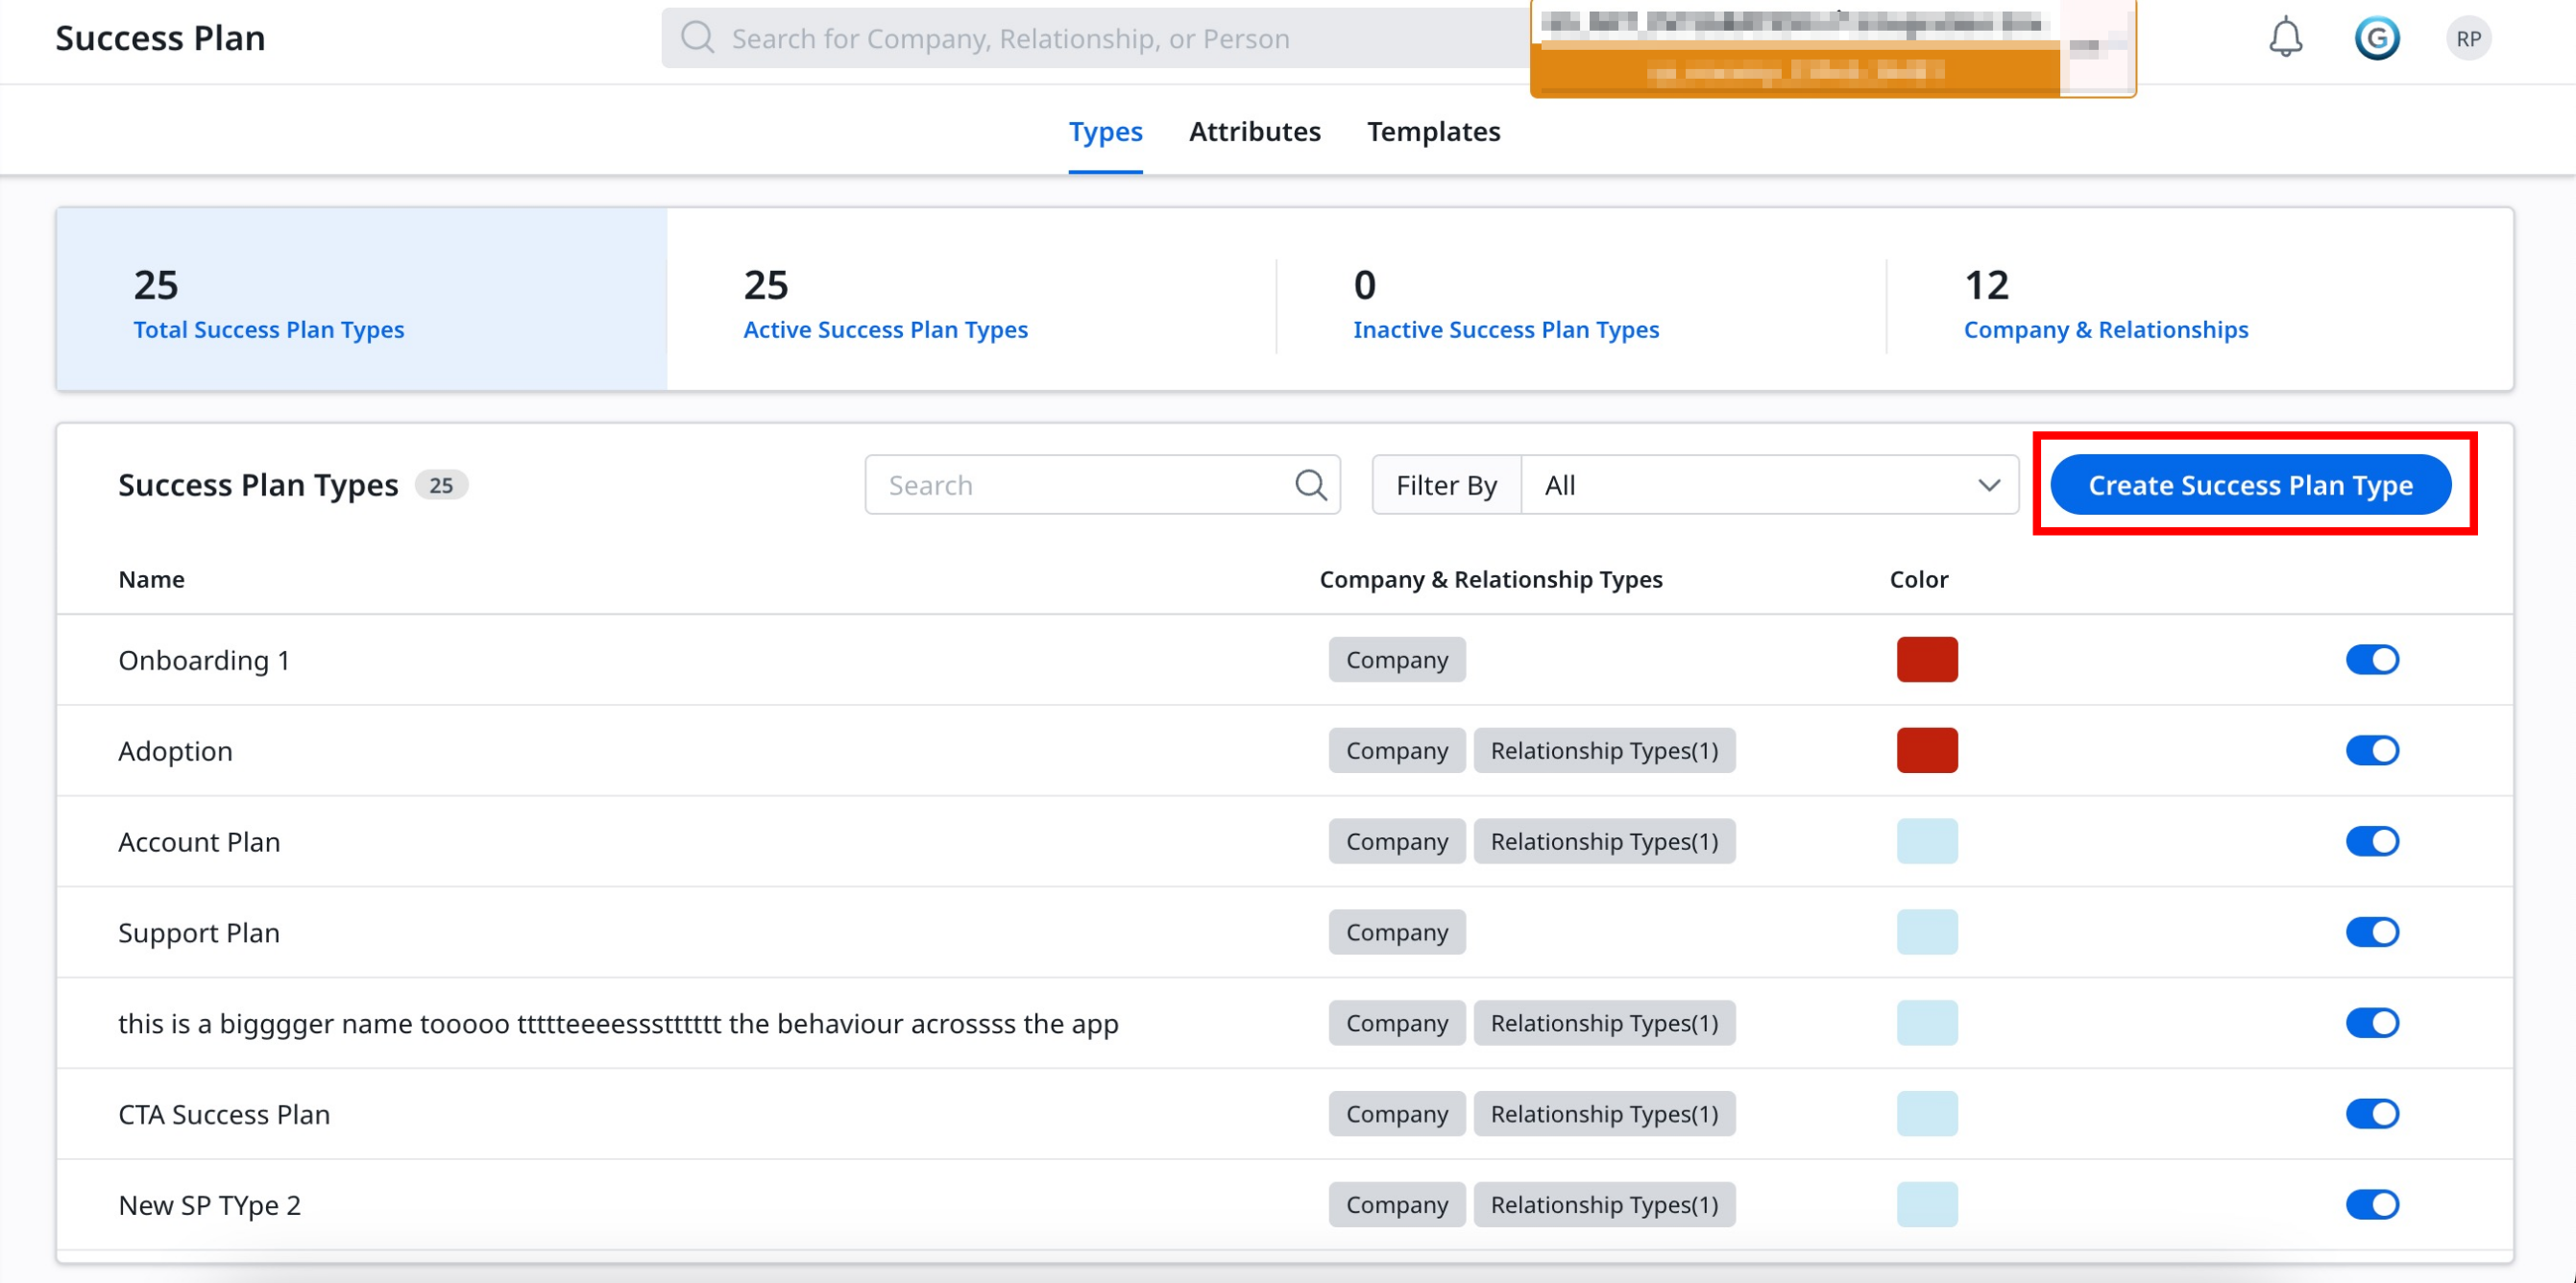
Success Plan has three tabs for configuration:
Create a Success Plan Type
The Success Plan Type allows you to create customized plans that track the progress of customer goals and objectives. You can create individual plans that can monitor progress across various products, departments, or locations. This functionality is important for developing strategies tailored to the specific needs of different customer segments or individual customers. Additionally, you can effectively support CSMs in capturing the key goals of their customers through CTAs and related tasks.
The redesigned Success Plan Types tab offers a simplified layout, significantly improving the visibility:
-
Summary Ribbon Filter: It lists out the total number of Success Plans that are categorized into:
-
Total Success Plan Types: Shows total Success Plan Types assigned to the tenant.
-
Active Success Plan Types: Shows only active Success Plan Types.
-
Inactive Success Plan Types: Shows only inactive success Plan Types.
-
Company & Relationship: Shows and filters the number of Success Plan Types applicable to Company and Relationship Types.
-
-
Success Plan Types: Shows the total number of Success Plan Types.
-
Filter By: Allows you to filter Success Plan based on the Company or Relationship Type filters.
-
Create a Success Plan Type: For the creation of a new type of Success Plan.
-
Name: The Name column lists the name of the various Success Plan Types.
-
Company & Relationship Types: Display the Success Plan Type built for which entity.
-
Color: The color blocks next to each Success Plan Type are likely visual indicators that help users quickly identify different plan types.
-
Toggle: Turn on or off toggle to activate or deactivate the Success Plan Type.
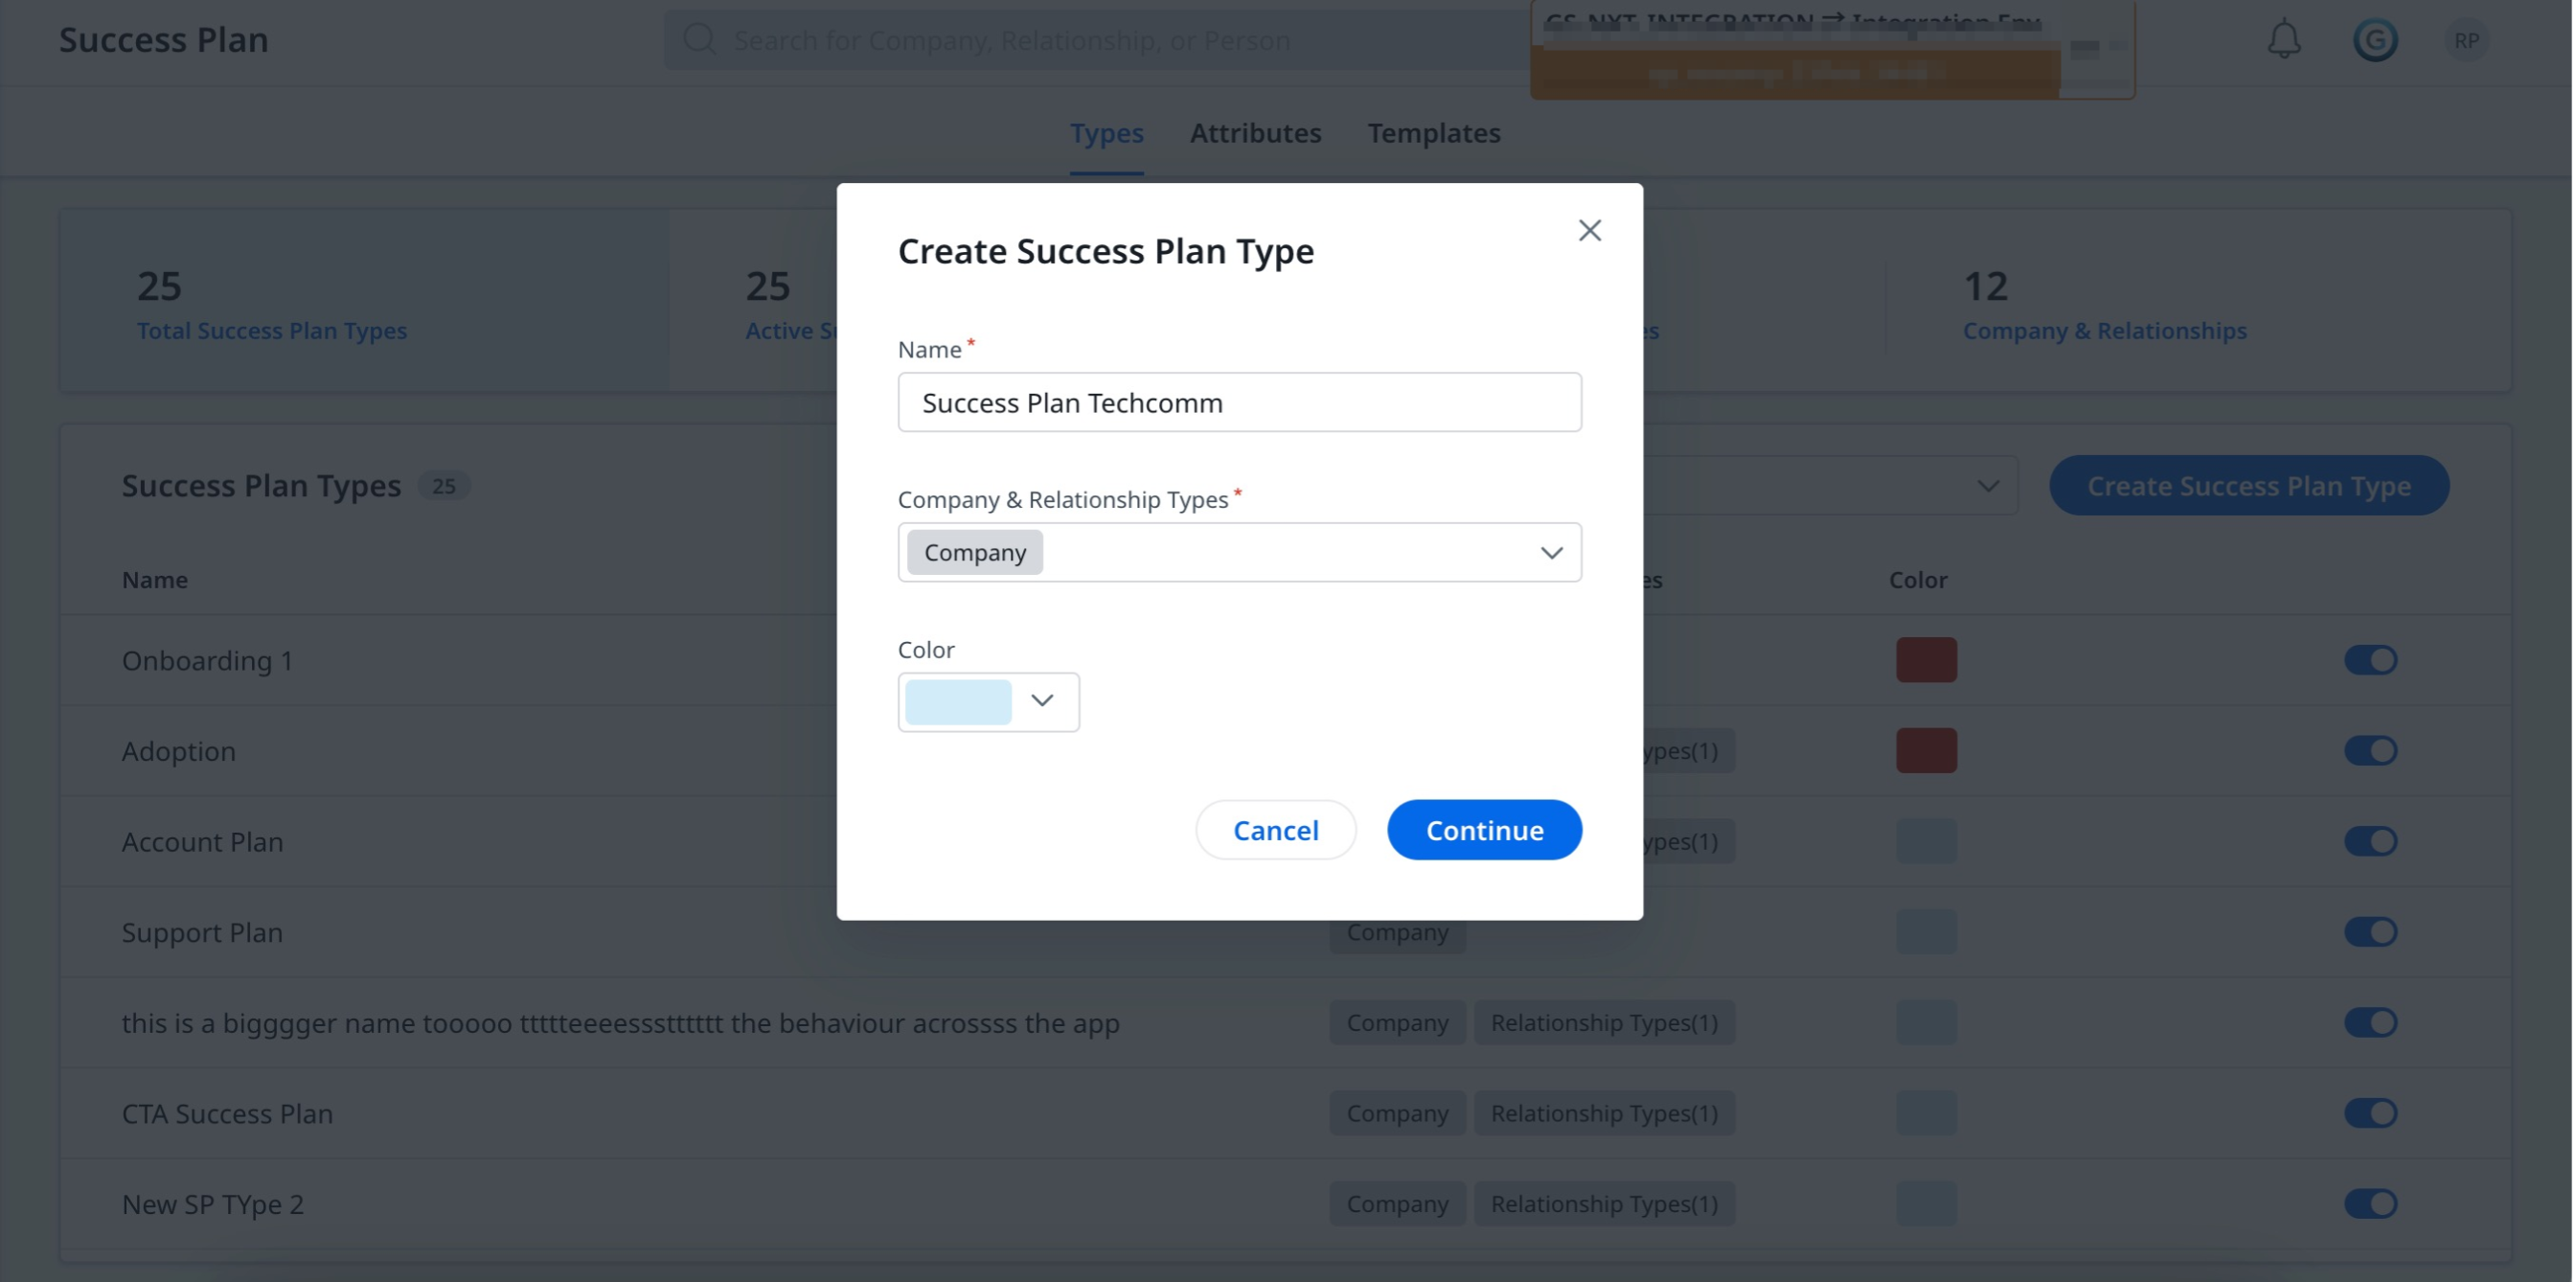
To create a Success Plan Type:
-
Navigate to Administration > Success Plans. The Success Plan page appears.
-
Click Create Success Plan Type. A Create Success Plan Type dialog box appears.
-
Provide the following details:
- Name: Enter the name for the Success Plan Type.
- Company & Relationship Type: Select either Company, Relationship types, or both from the dropdown menu.
- Color: Select the required color from the dropdown. Click Ok.
-
Click Continue. The Success Plan Layout Configuration page appears with the given name.
Manage Success Plan Types
Once the Success Plan is created, you need to manage and customize it effectively to track and support the customer goals and objectives. Effectively managing success plans helps CSMs to work efficiently and effectively. You can set up attributes, create templates, configure layouts, and assign tasks.
Set Up Attributes
The Success plan attributes within an admin configuration include different attributes and categories that you can adjust to tailor how success plans are created, managed, and tracked. These attributes help in tailoring the success plans to meet the specific needs and goals of individual customers or customer segments.
The following attributes can be configured in Success Plans:
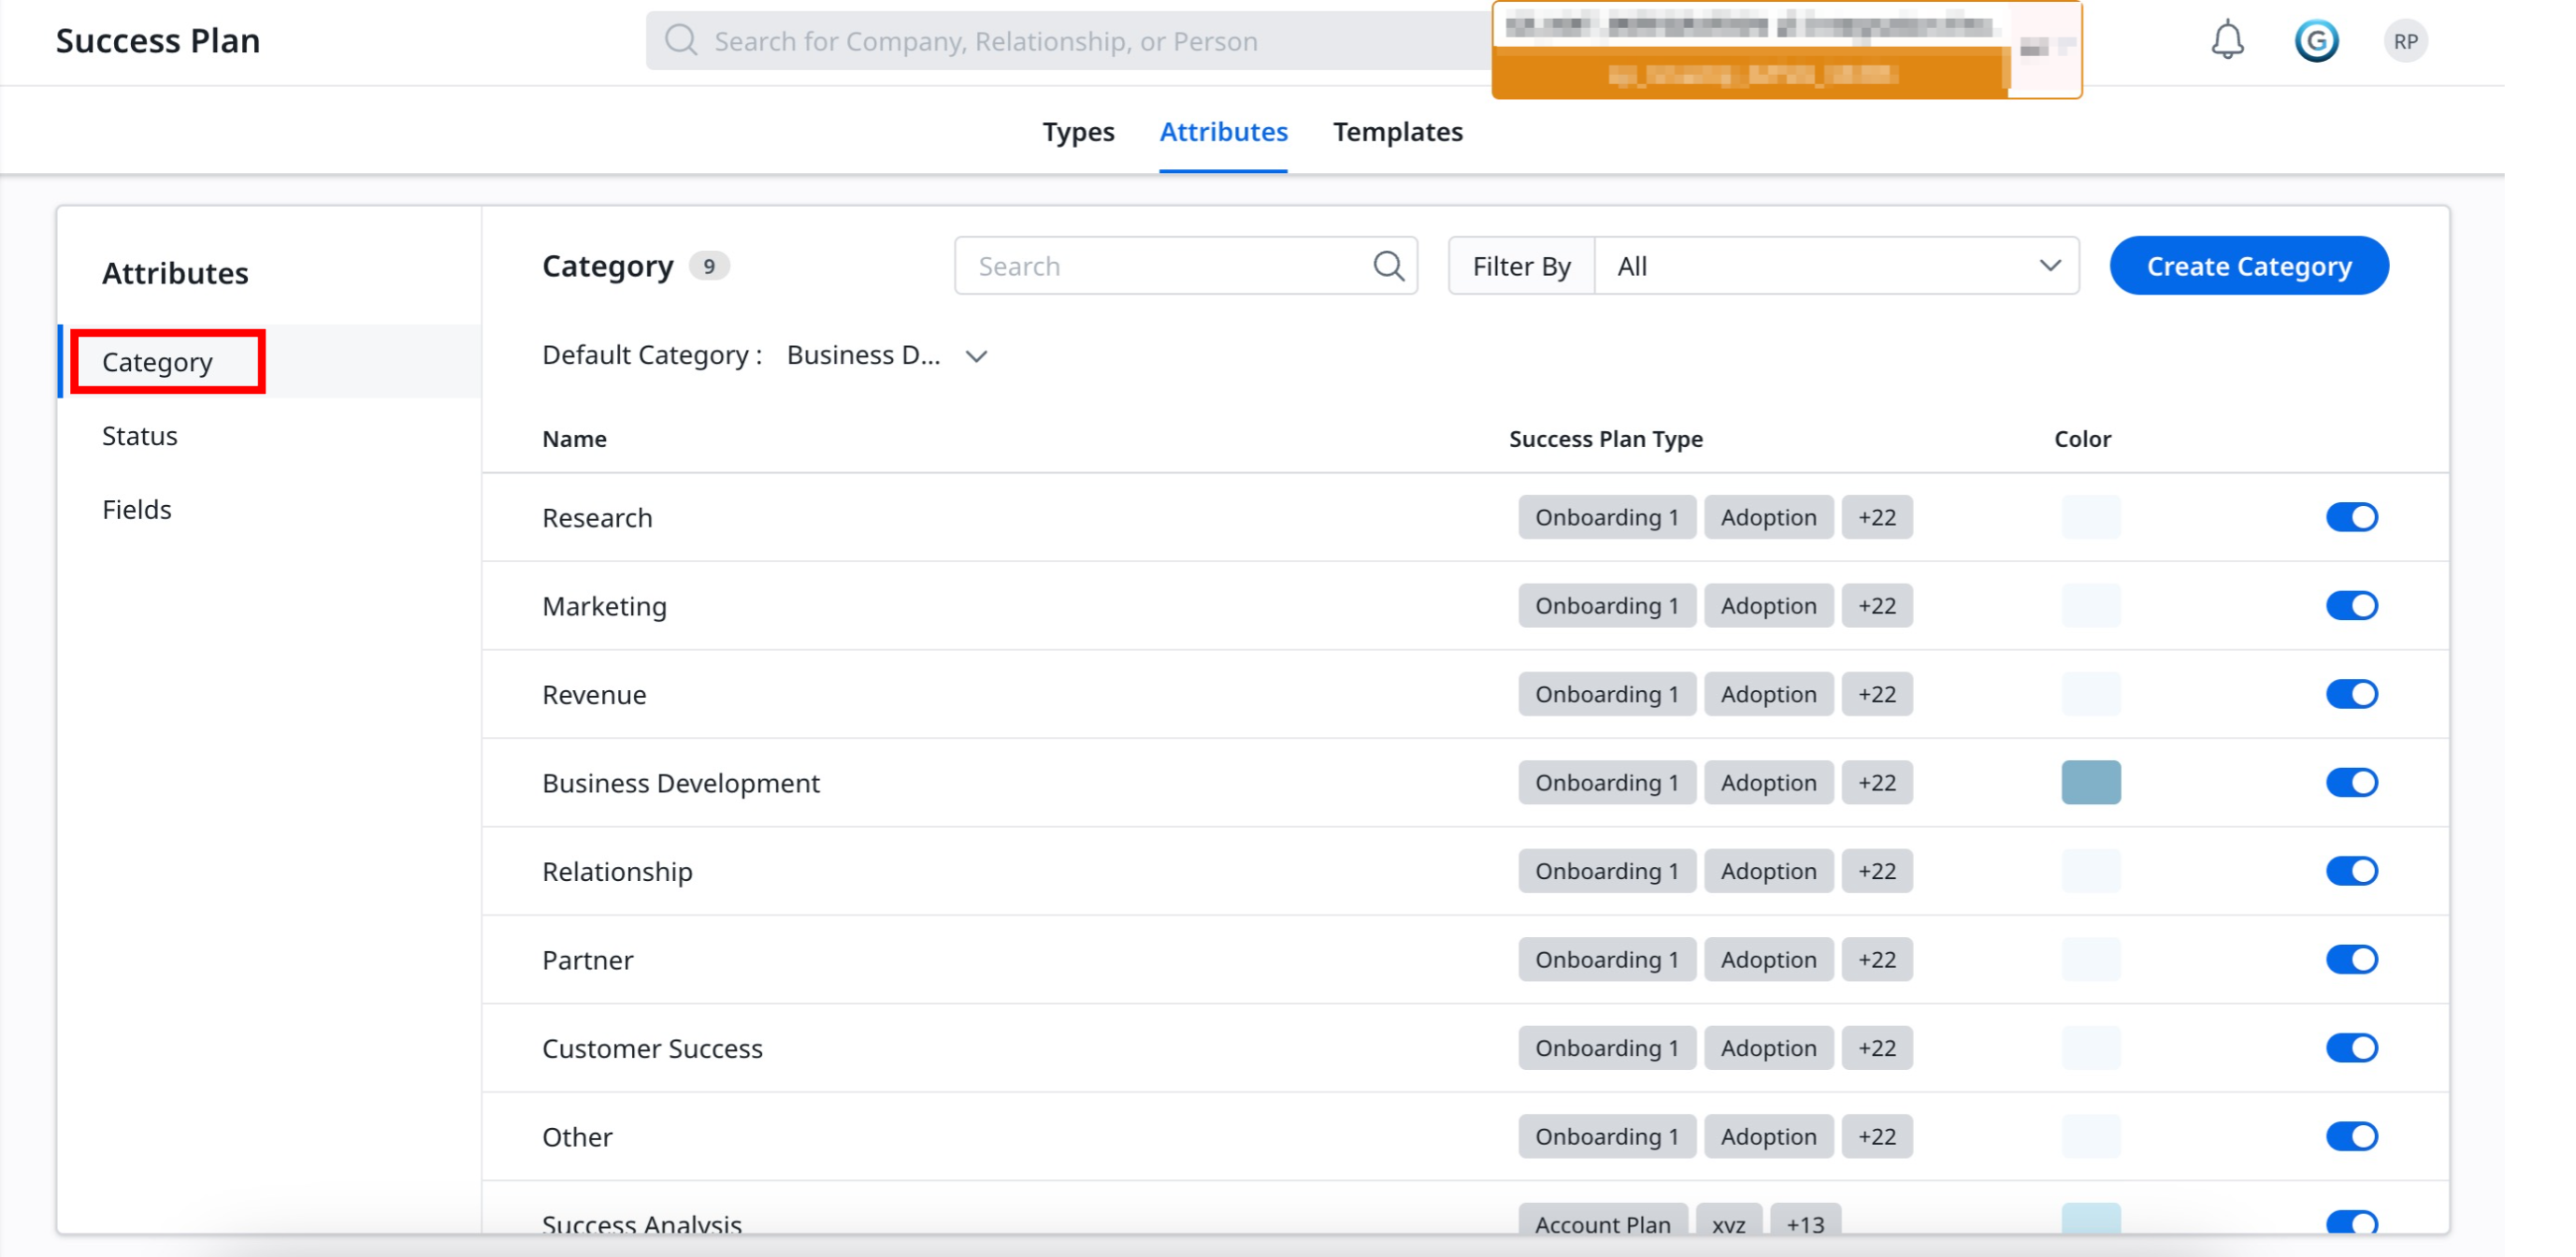
Category
The Category attribute in the Success Plan is used to categorize and organize success plans. This attribute segments plans based on various criteria for streamlined management and analysis.
To create a category for success plan:
- From the Attributes tab, click Category.
-
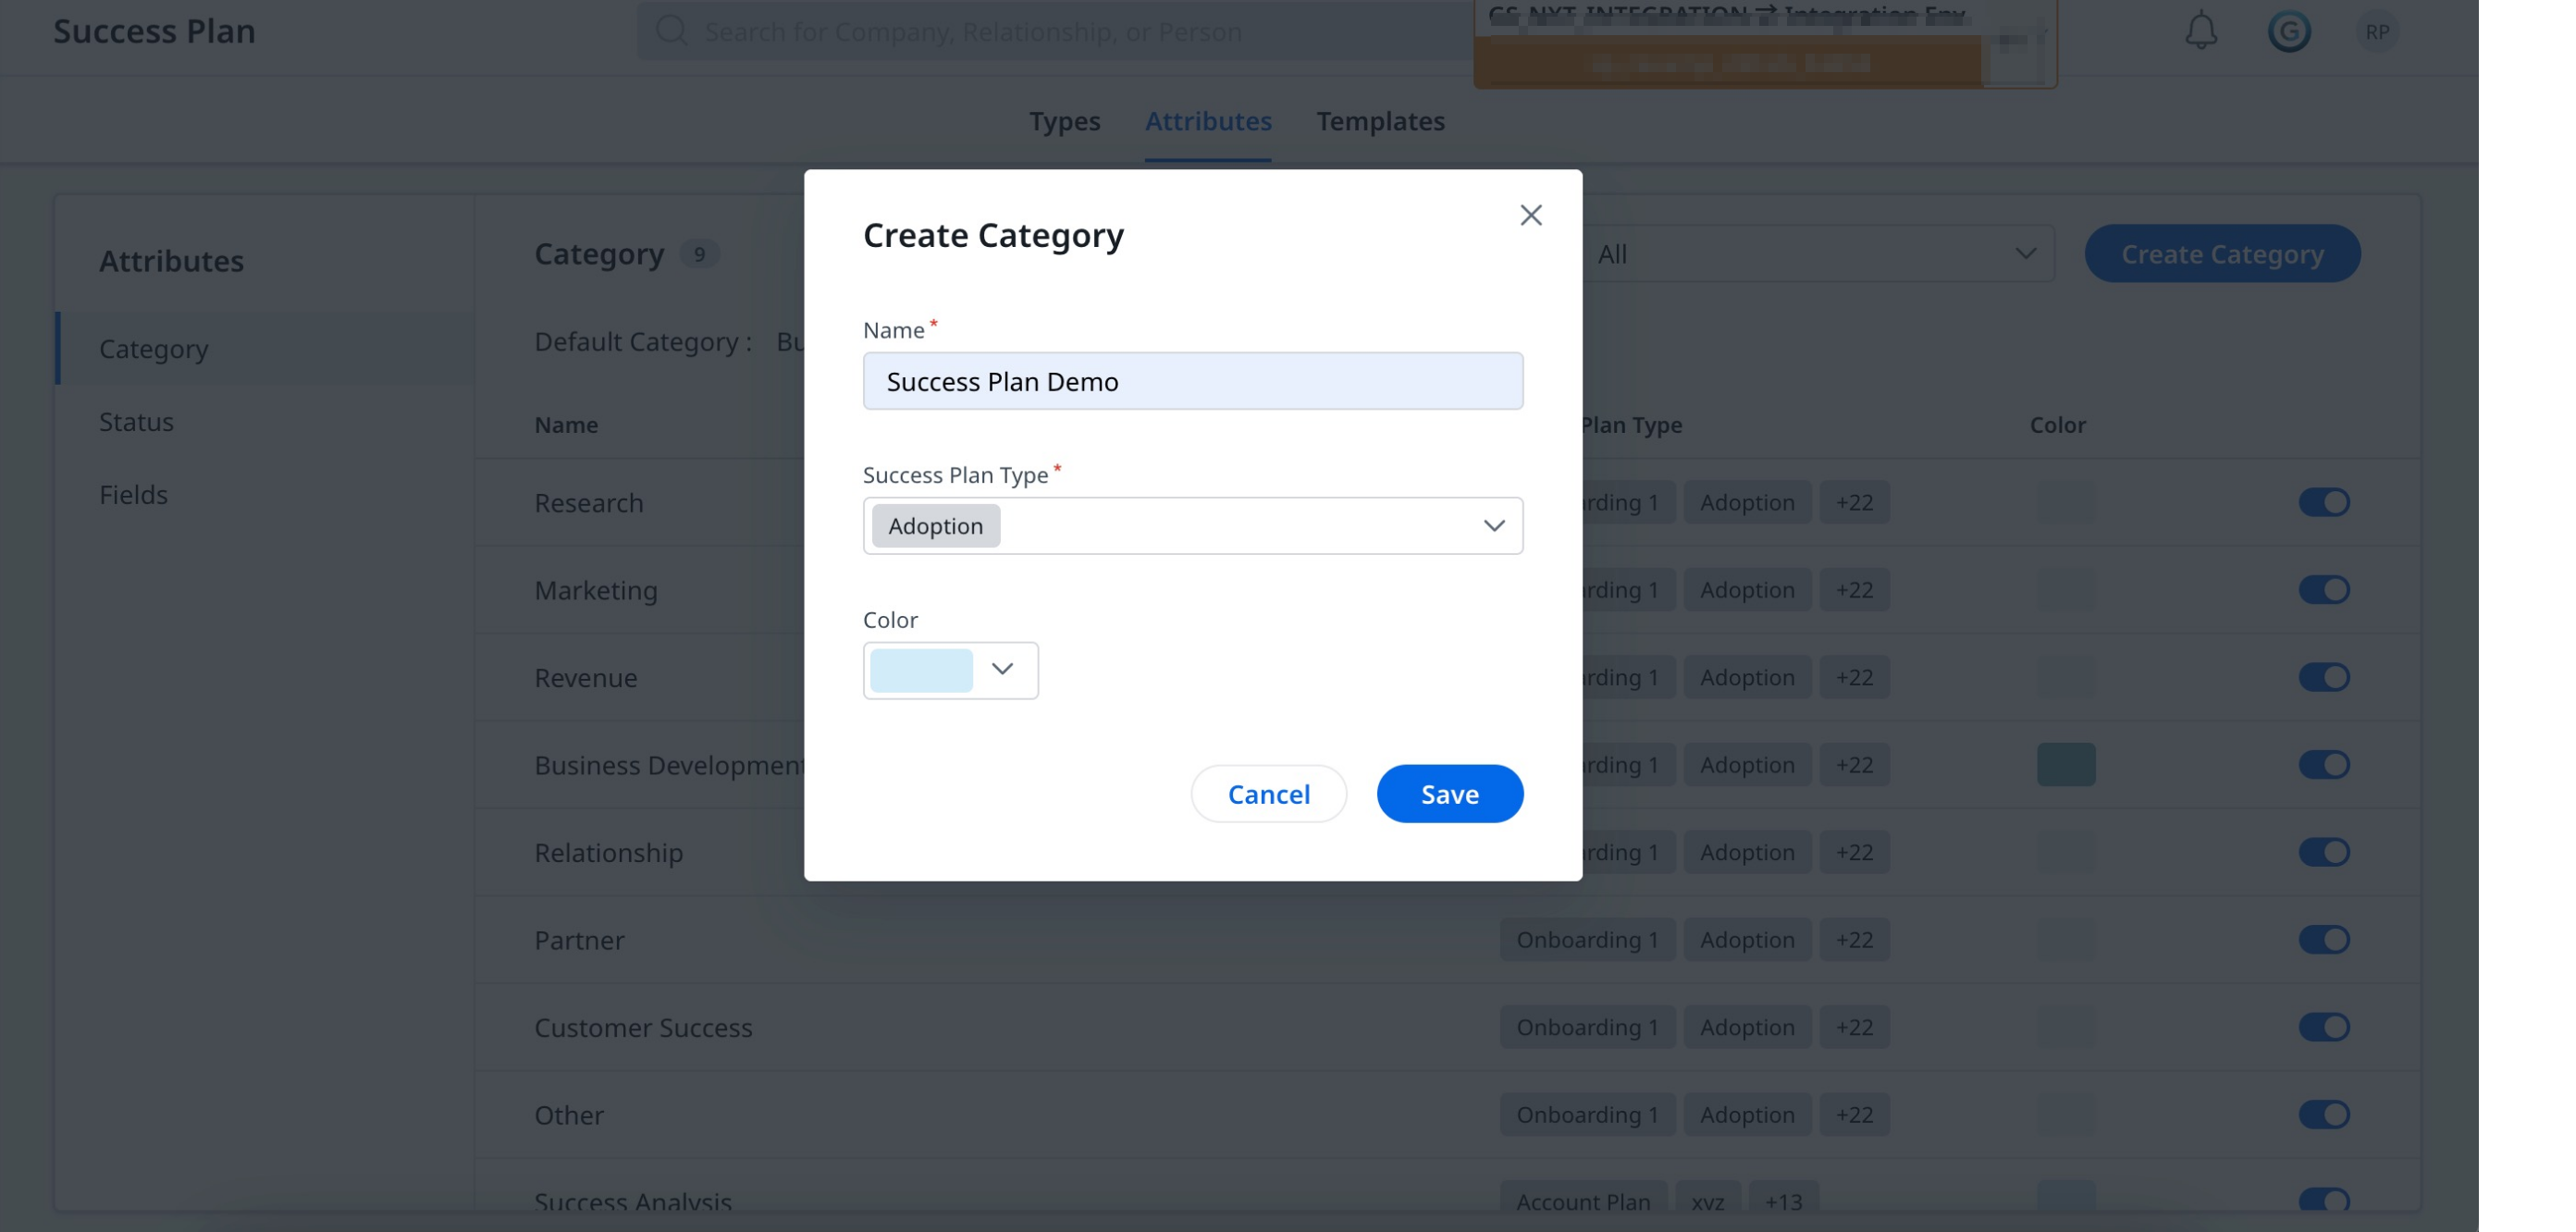
Click Create Category. A Create Category dialog box appears.
-
Enter the category name in the Name field.
-
From the Success Plan Type dropdown, select the required success plan type.
-
From a Color dropdown, select the required color. Click Ok.
-
Click Save. A new Category is created and appears in the Category list page.
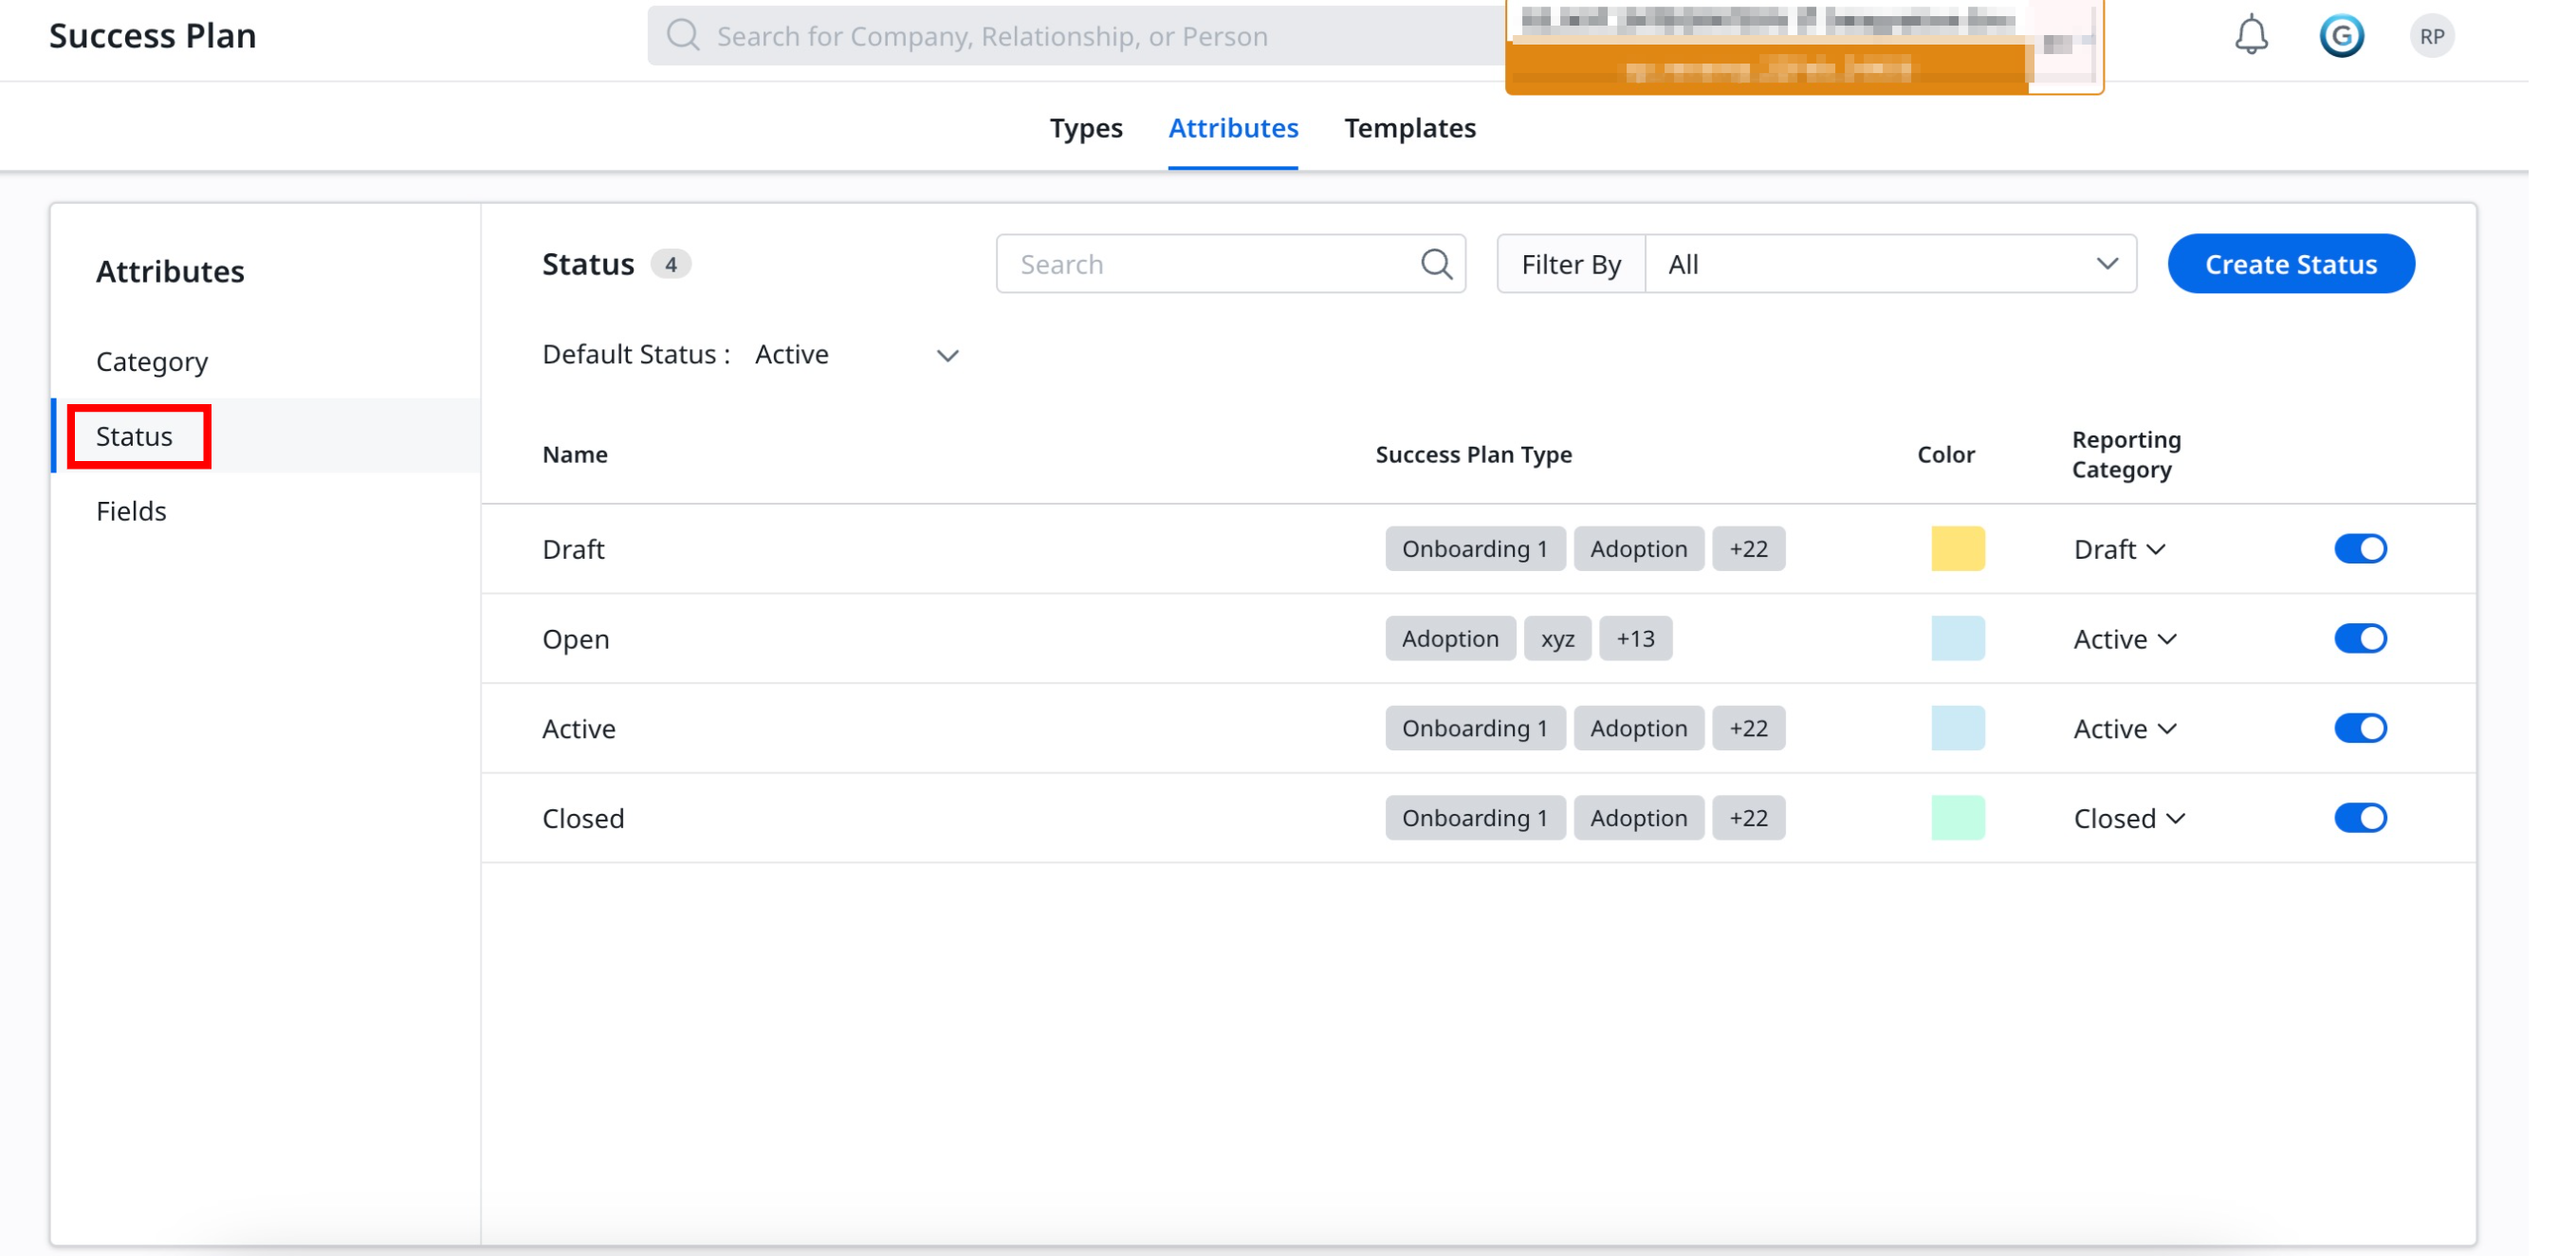
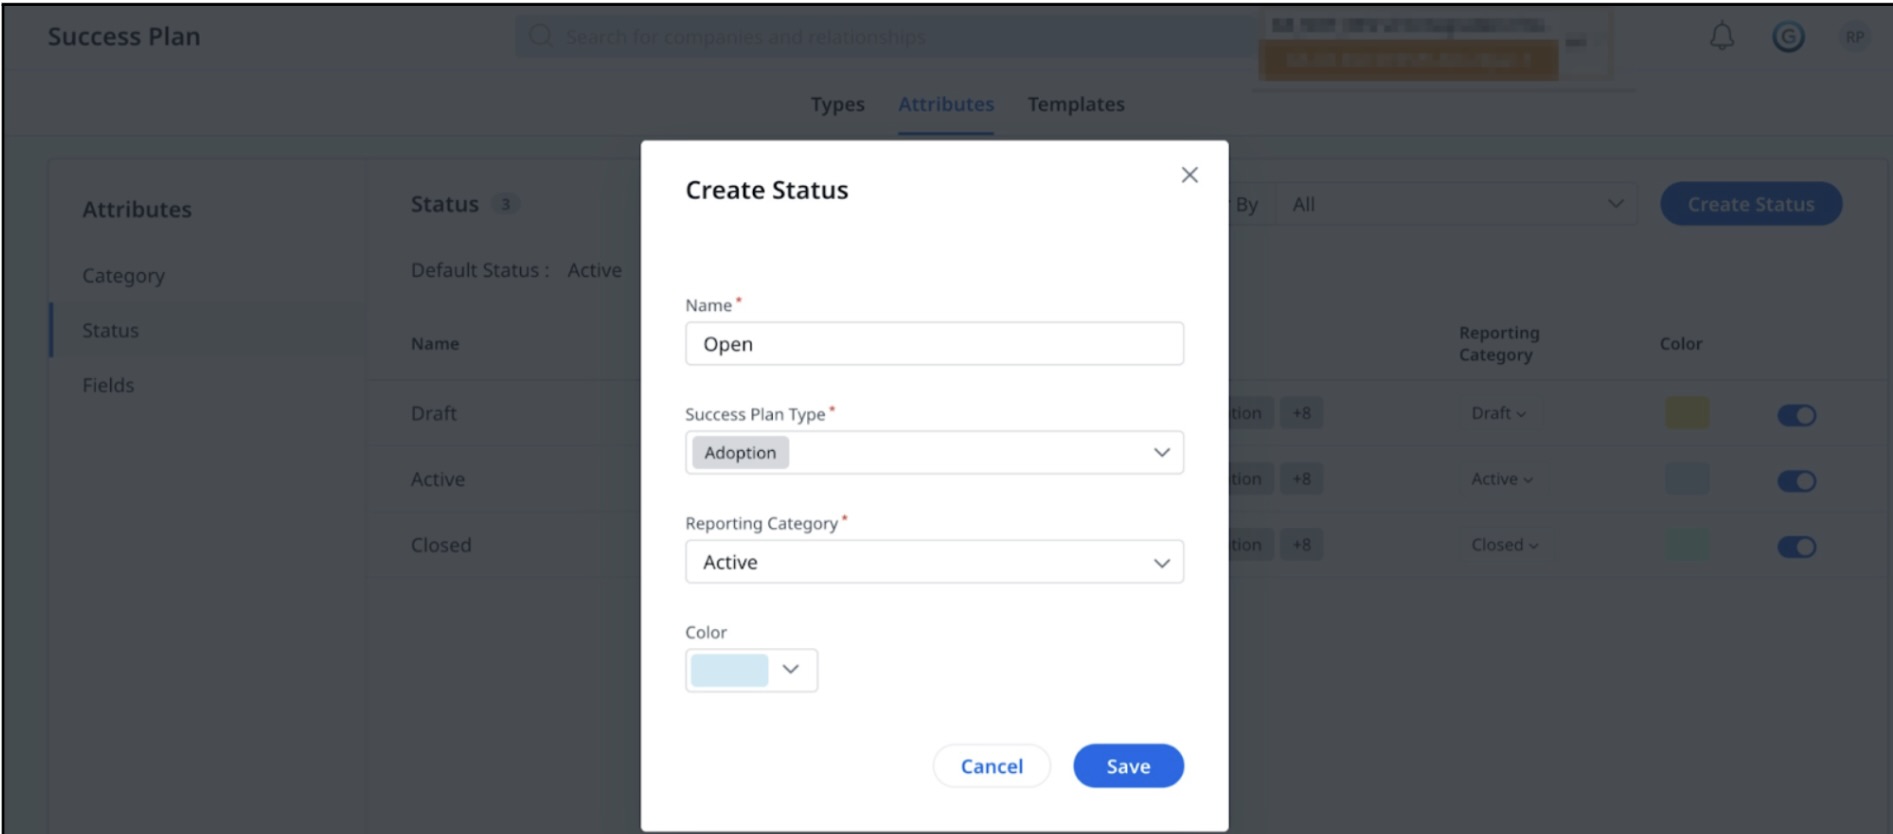
Status
The Status attribute in a Success Plan helps to track the overall state of a success plan at any given time. This attribute is crucial for effectively managing and monitoring the progress of success plans.
To add a new status:
- From the Attributes tab, click Status.
-
Click Create Status. A Create Status dialog box appears.
-
Enter the status name in the Name field.
-
From the Success Plan Type dropdown, select the required success plan type.
-
From the Reporting Category dropdown, select the category.
-
From a Color dropdown, select the required color. Click Ok.
-
Click Save. A new Status is created and appears on the Status list view.
 Fields
Fields are custom attributes that you can create on the Success Plan Objects. These fields are integral to the functionality of the success plan and provide essential information about each success plan.
Create Custom Field
You can directly create custom fields on the Success Plan object from the Fields on the Attributes page. This section also displays the existing fields used in the Success Plan Object, in a tabular format.
To add a custom field:
- From the Attributes tab, click Fields.
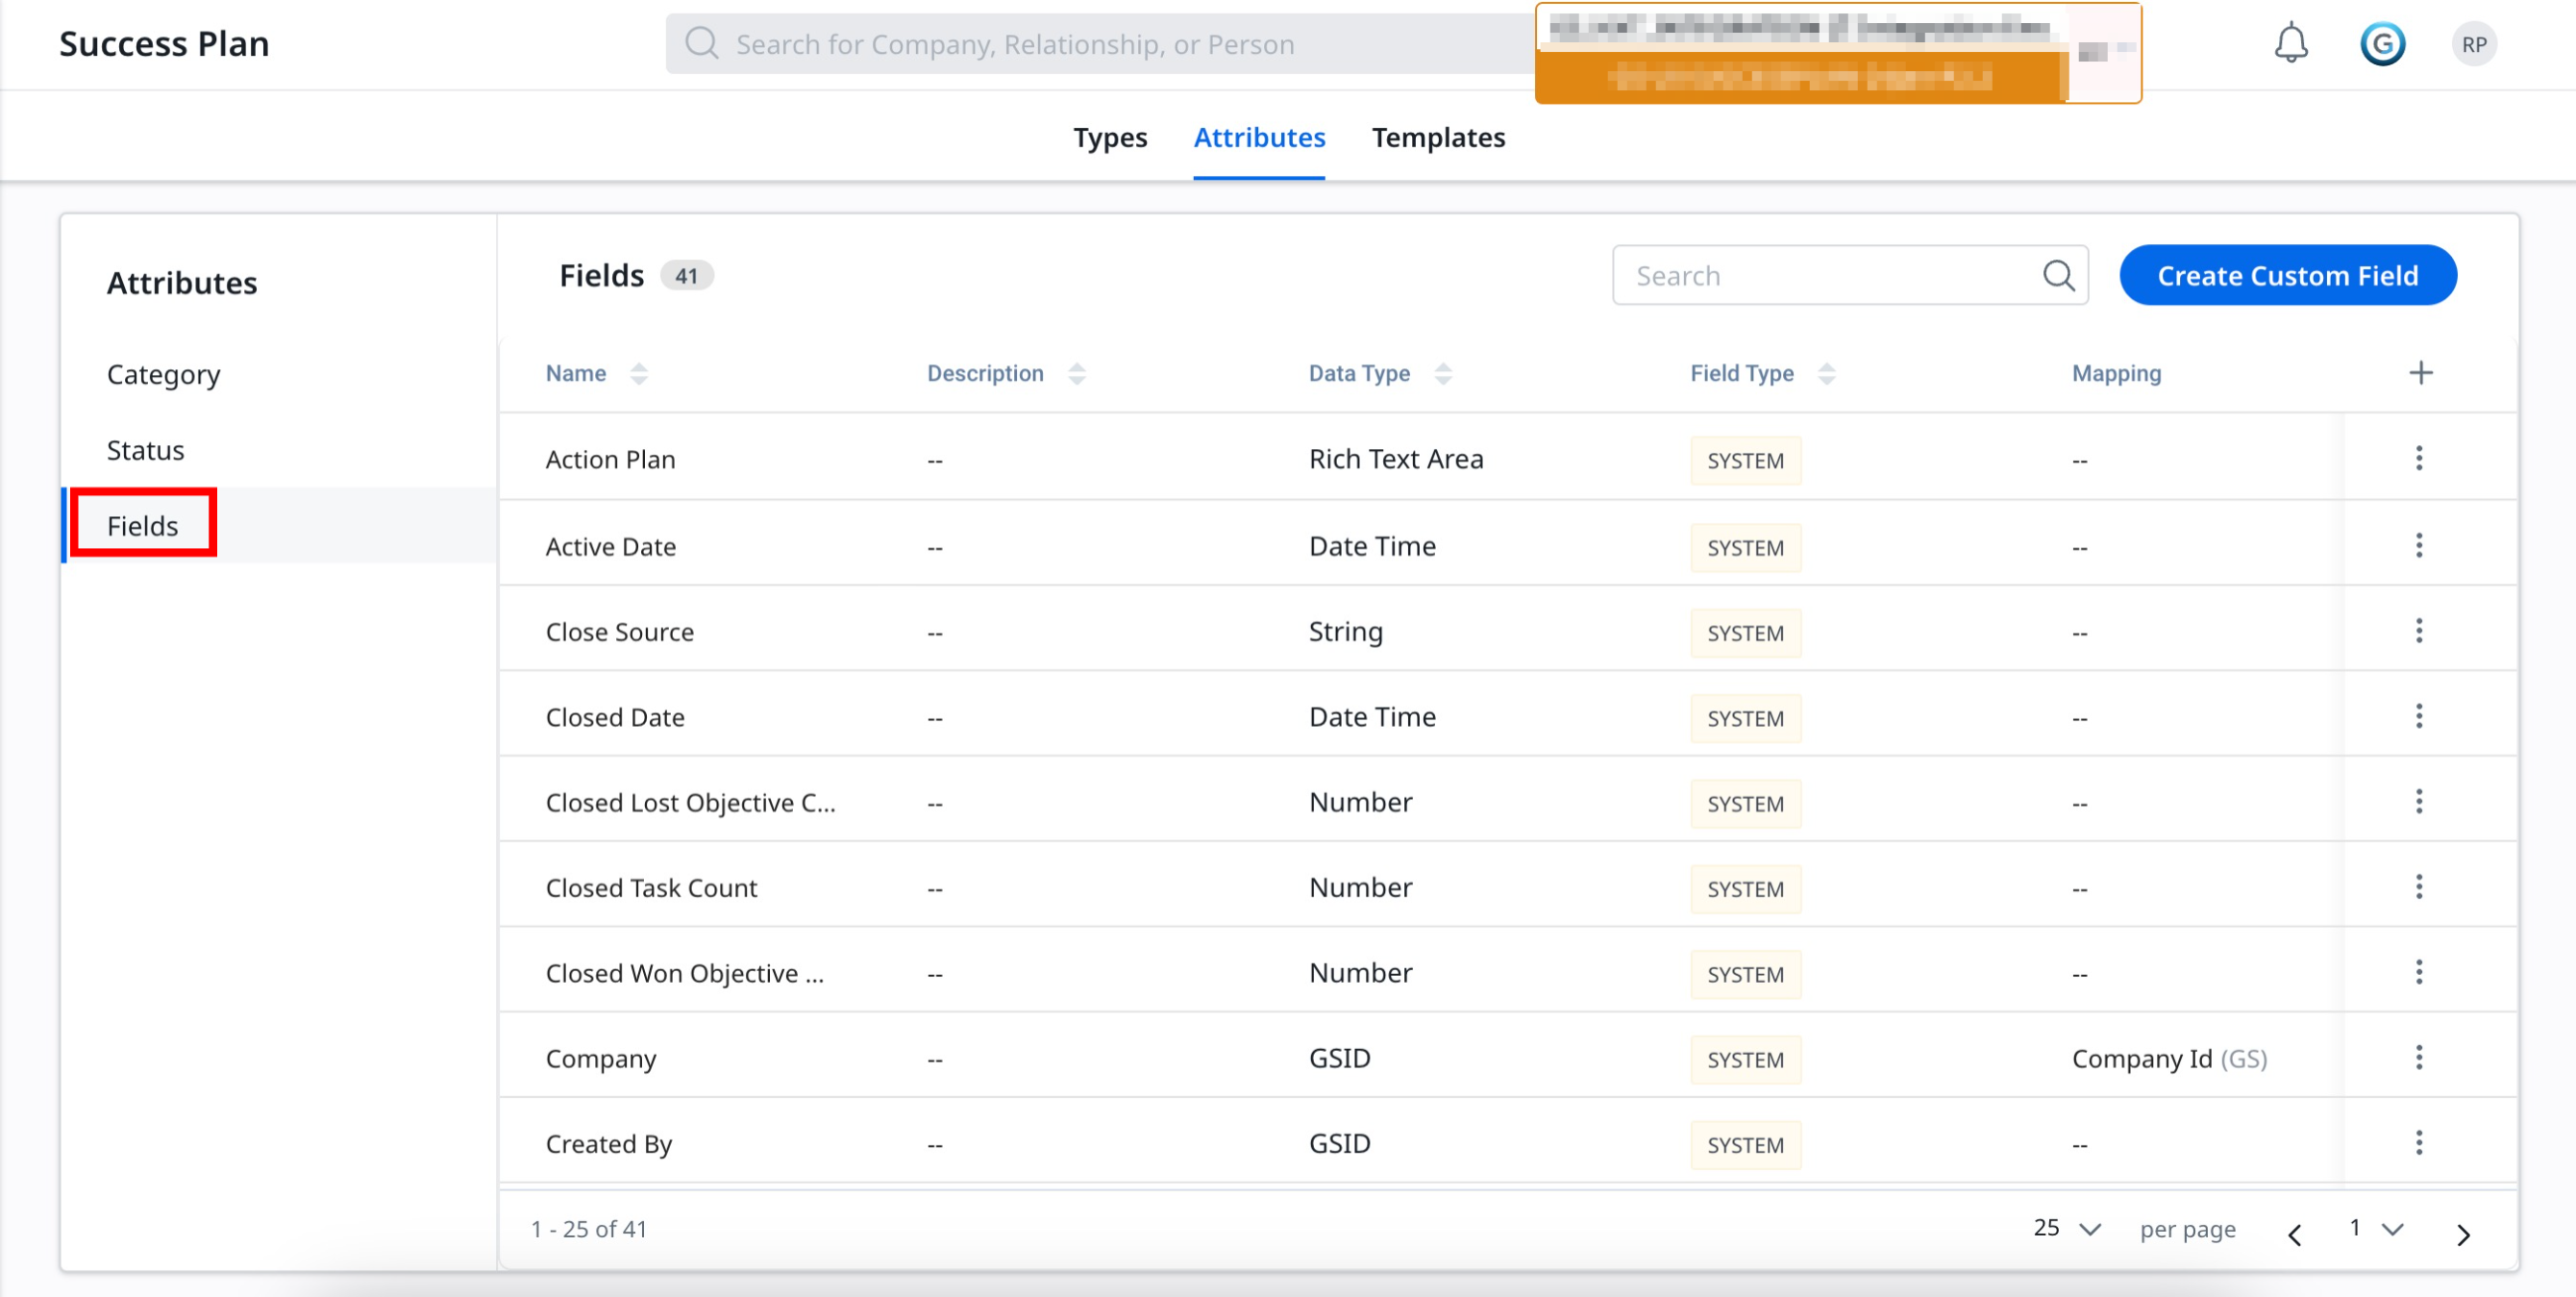
-
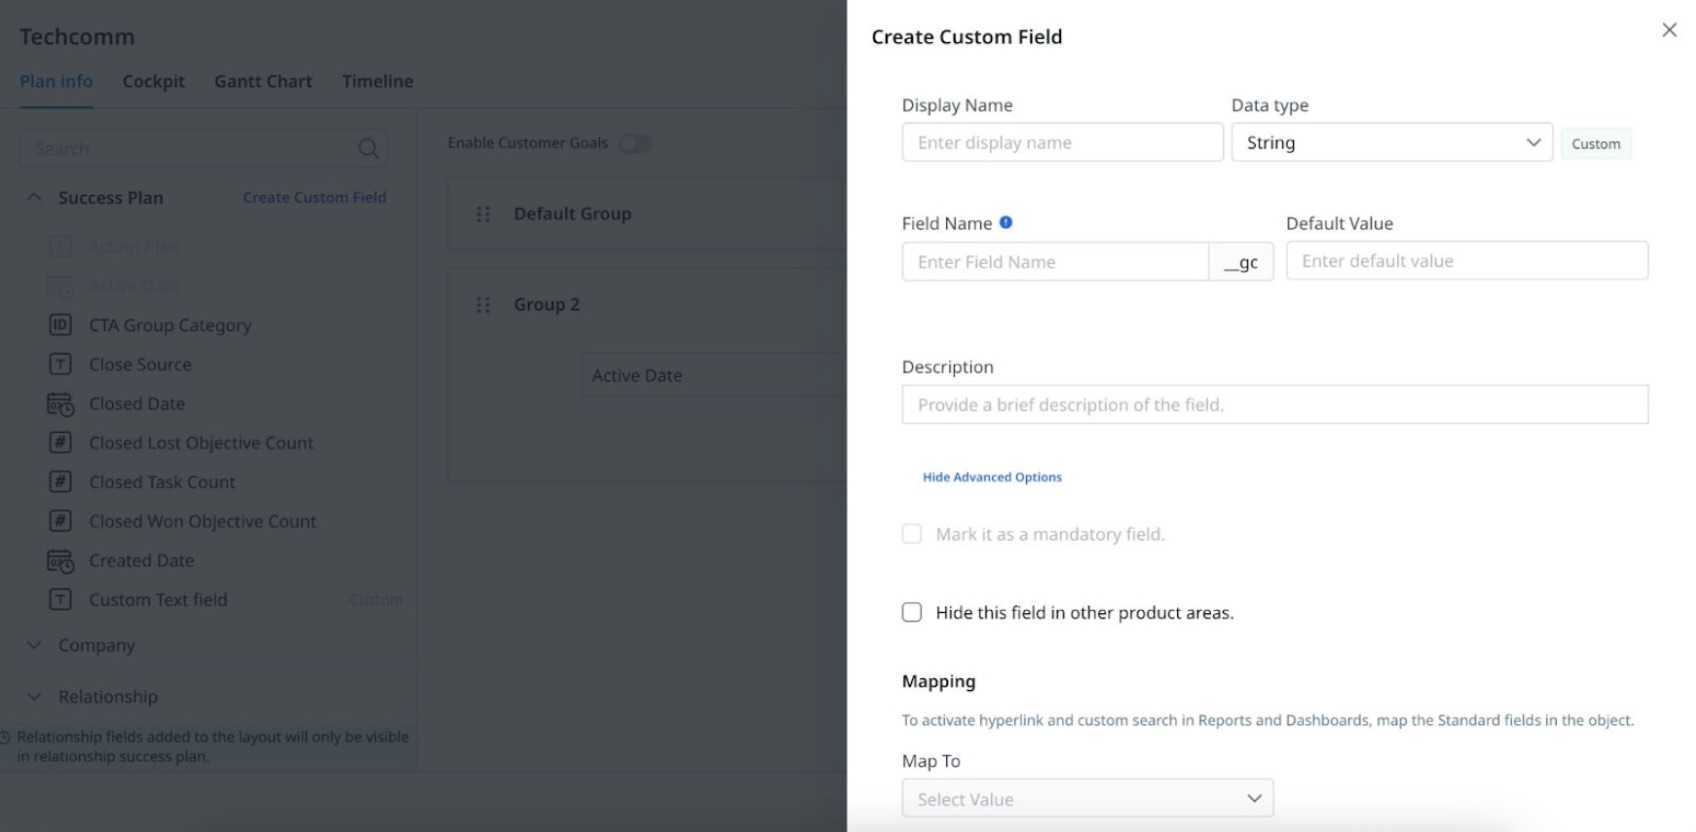
Click Create Custom Field. A Create Custom Field slideout panel appears.
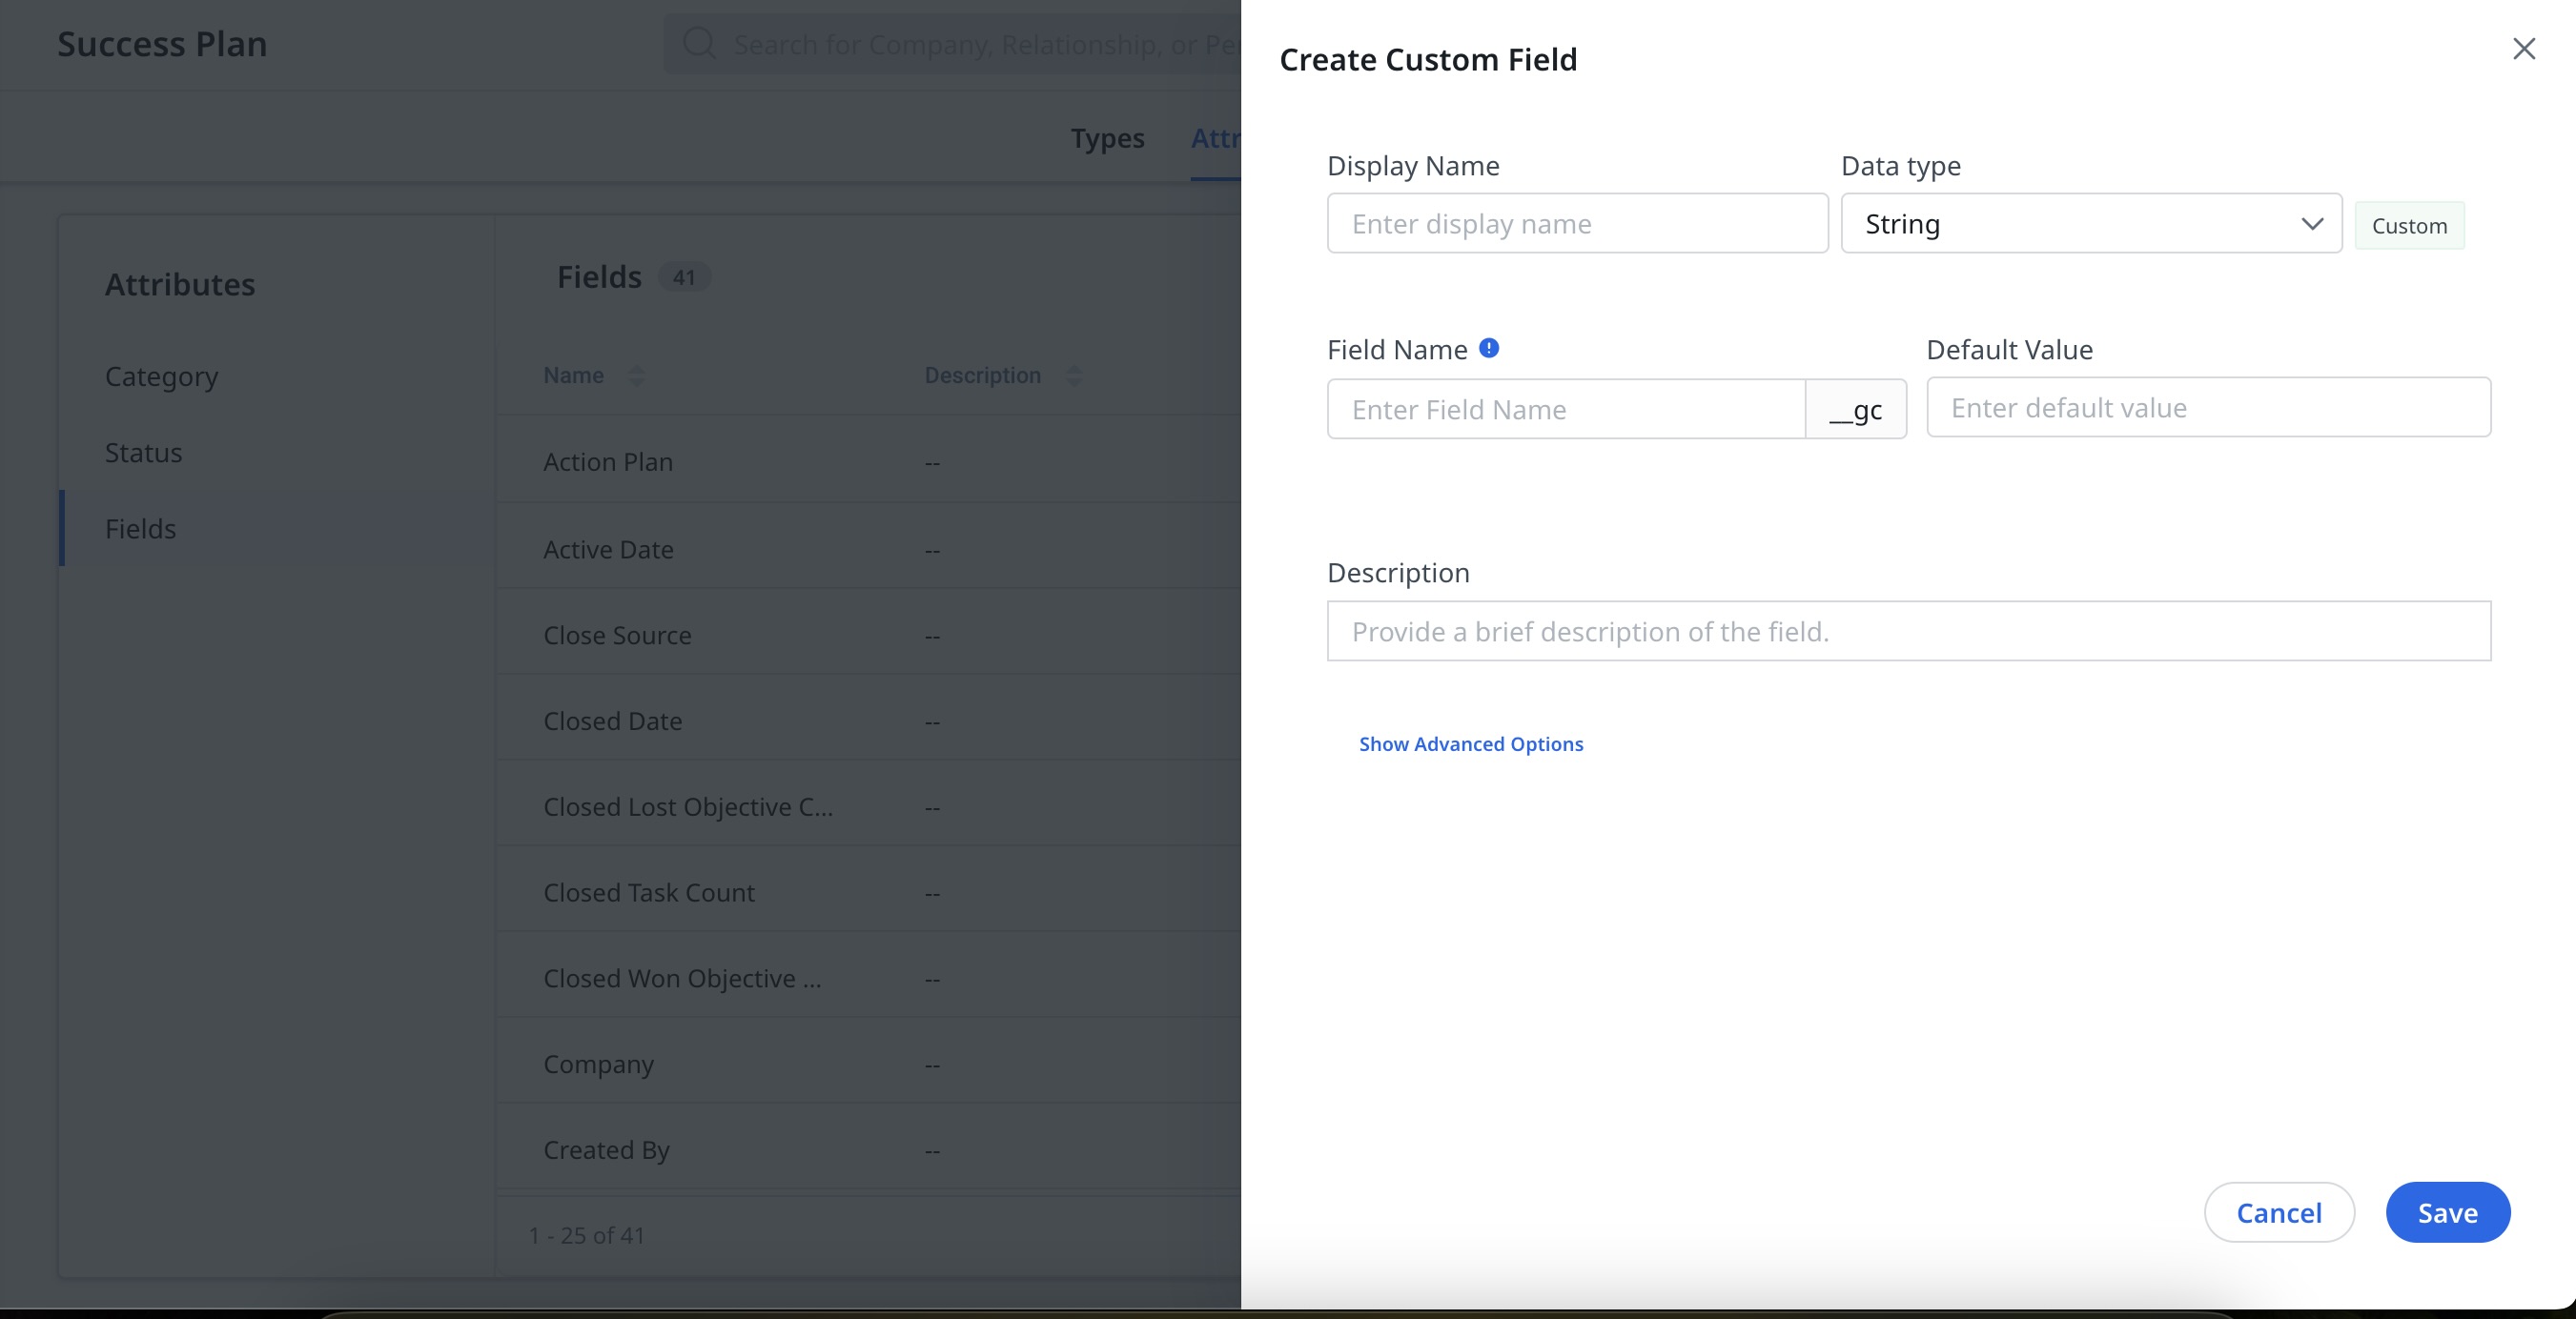
- Provide the required details in the respective field:
- Display Name: Enter the display name.
- Date Type: Select the date type from the dropdown menu.
- Field Name: Enter the field name.
- Default Value: Enter the default value.
- Description: Enter a description of the field.
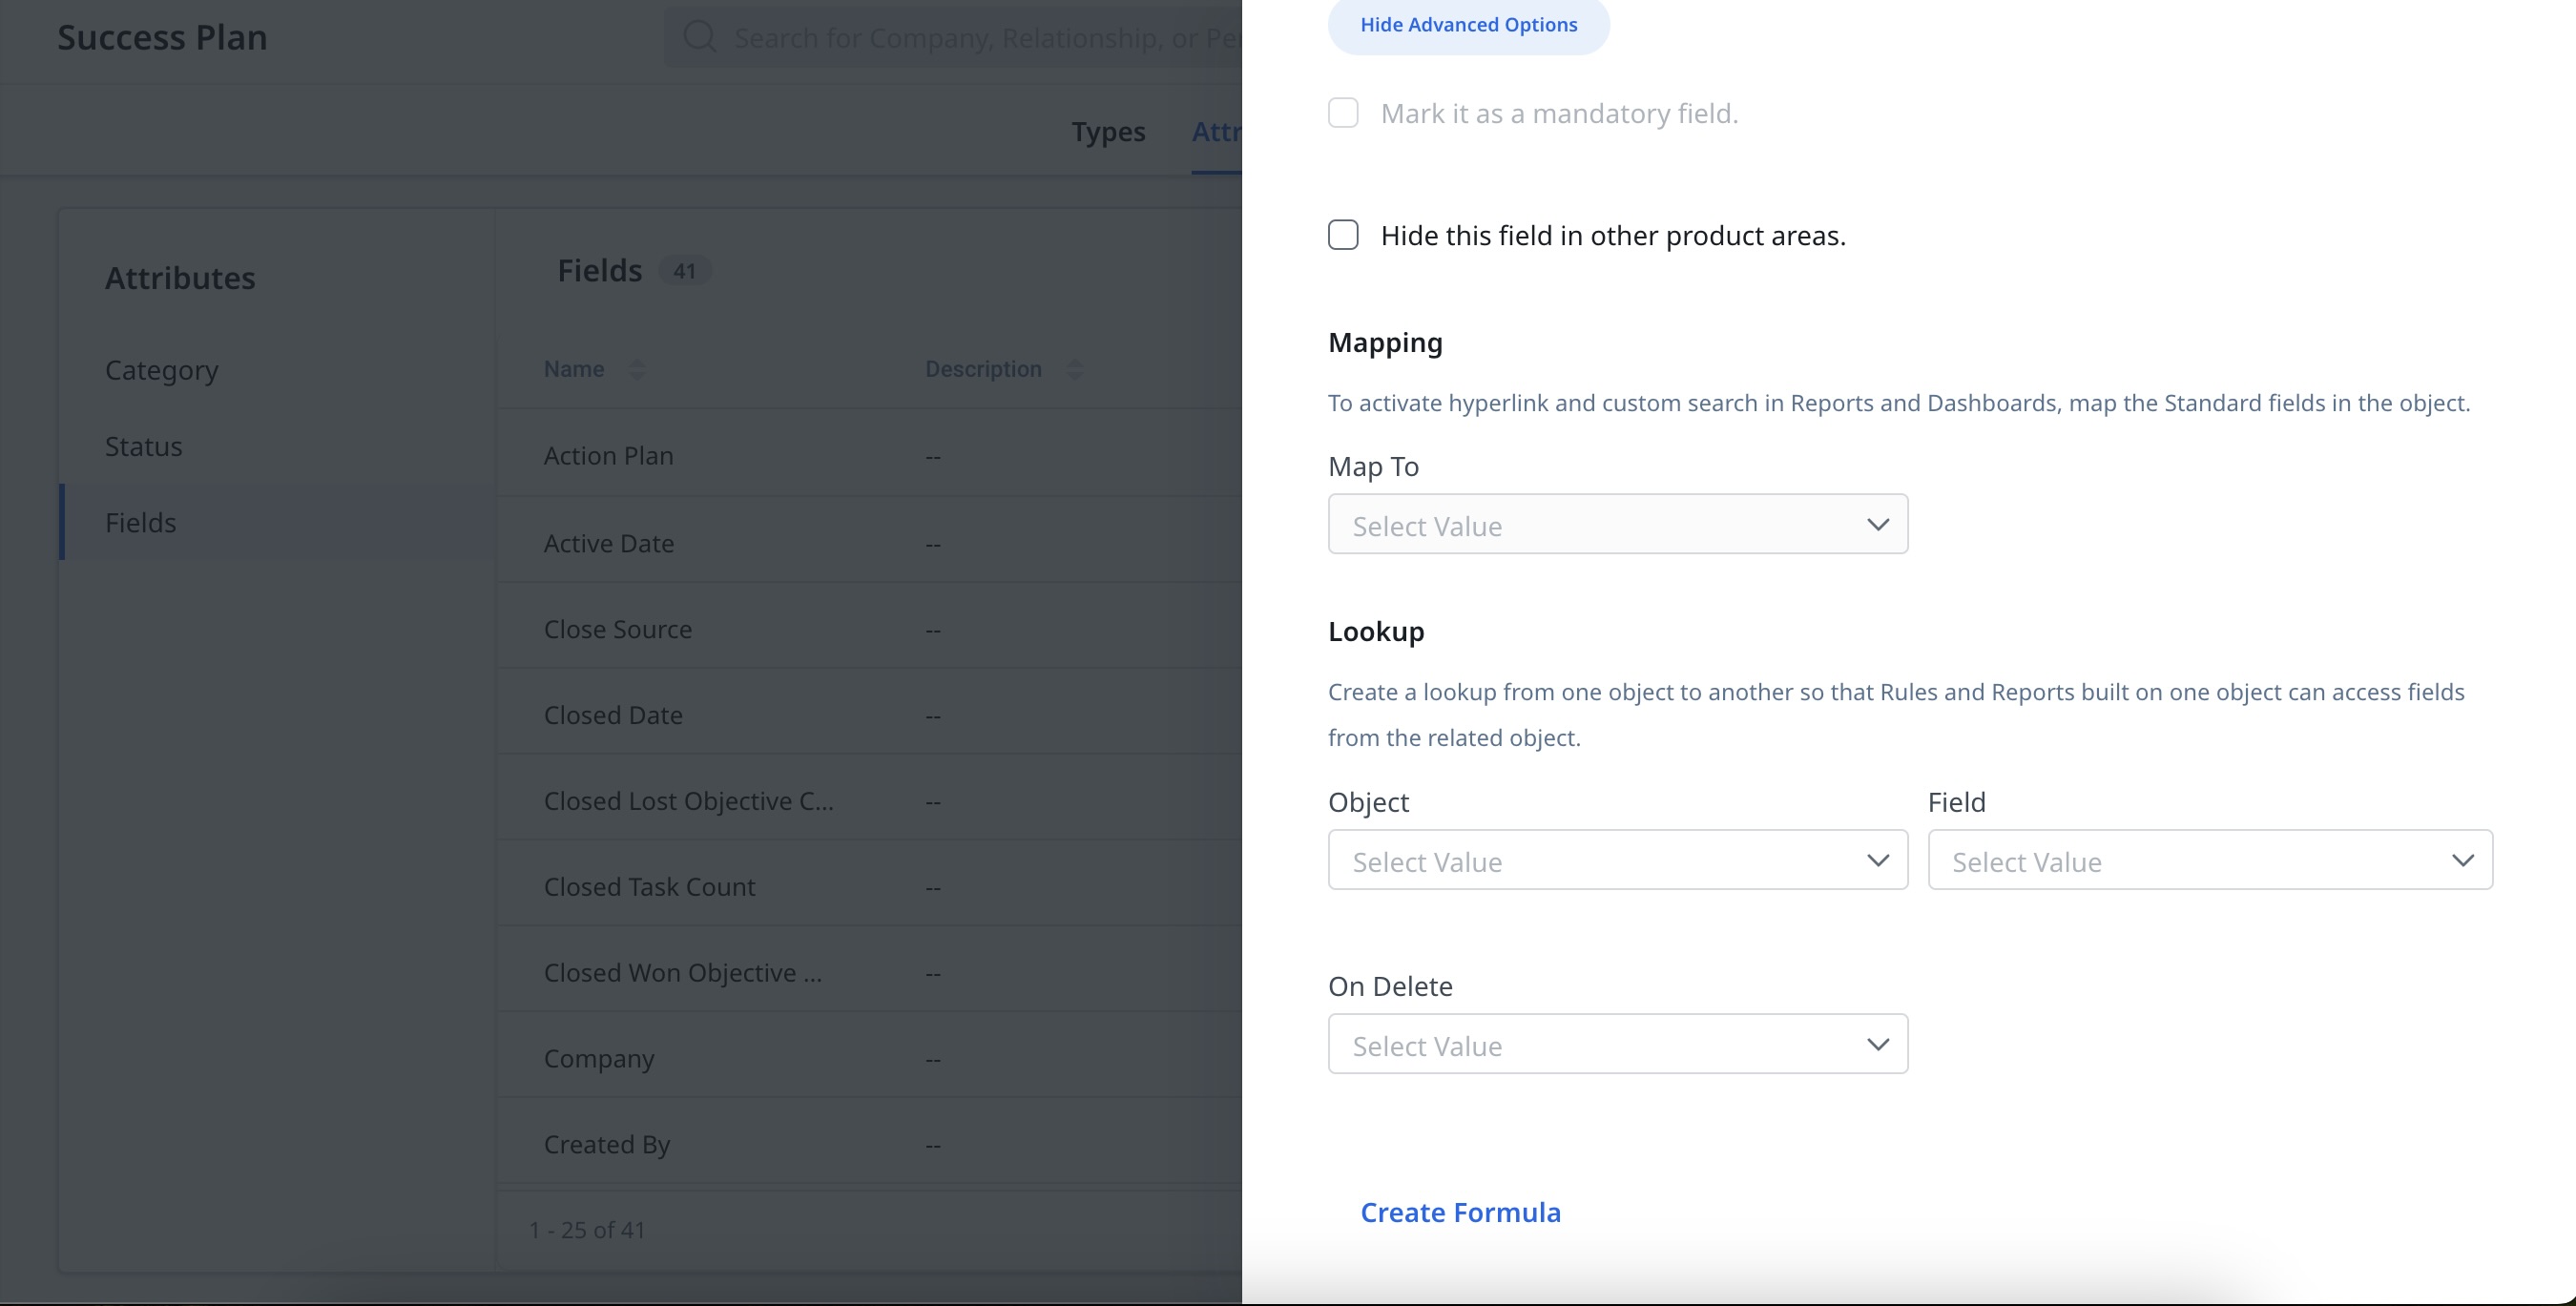
- Click Show Advanced Options. The advanced fields appear.
Note: Select or clear the Hide this field in other product areas check box. By default Mark it as a mandatory field is disabled. -
For the field mapping, select a value from the following drop-down menus:
- Map To: Select a standard field.
- Object: Select the object.
- Field: Select the field.
- On Delete: Select deletion of the field.
-
(Optional) To create a formula field, click Create Formula. Add the formula in the provided text box and click Apply.
-
Click Save. The custom field is created.
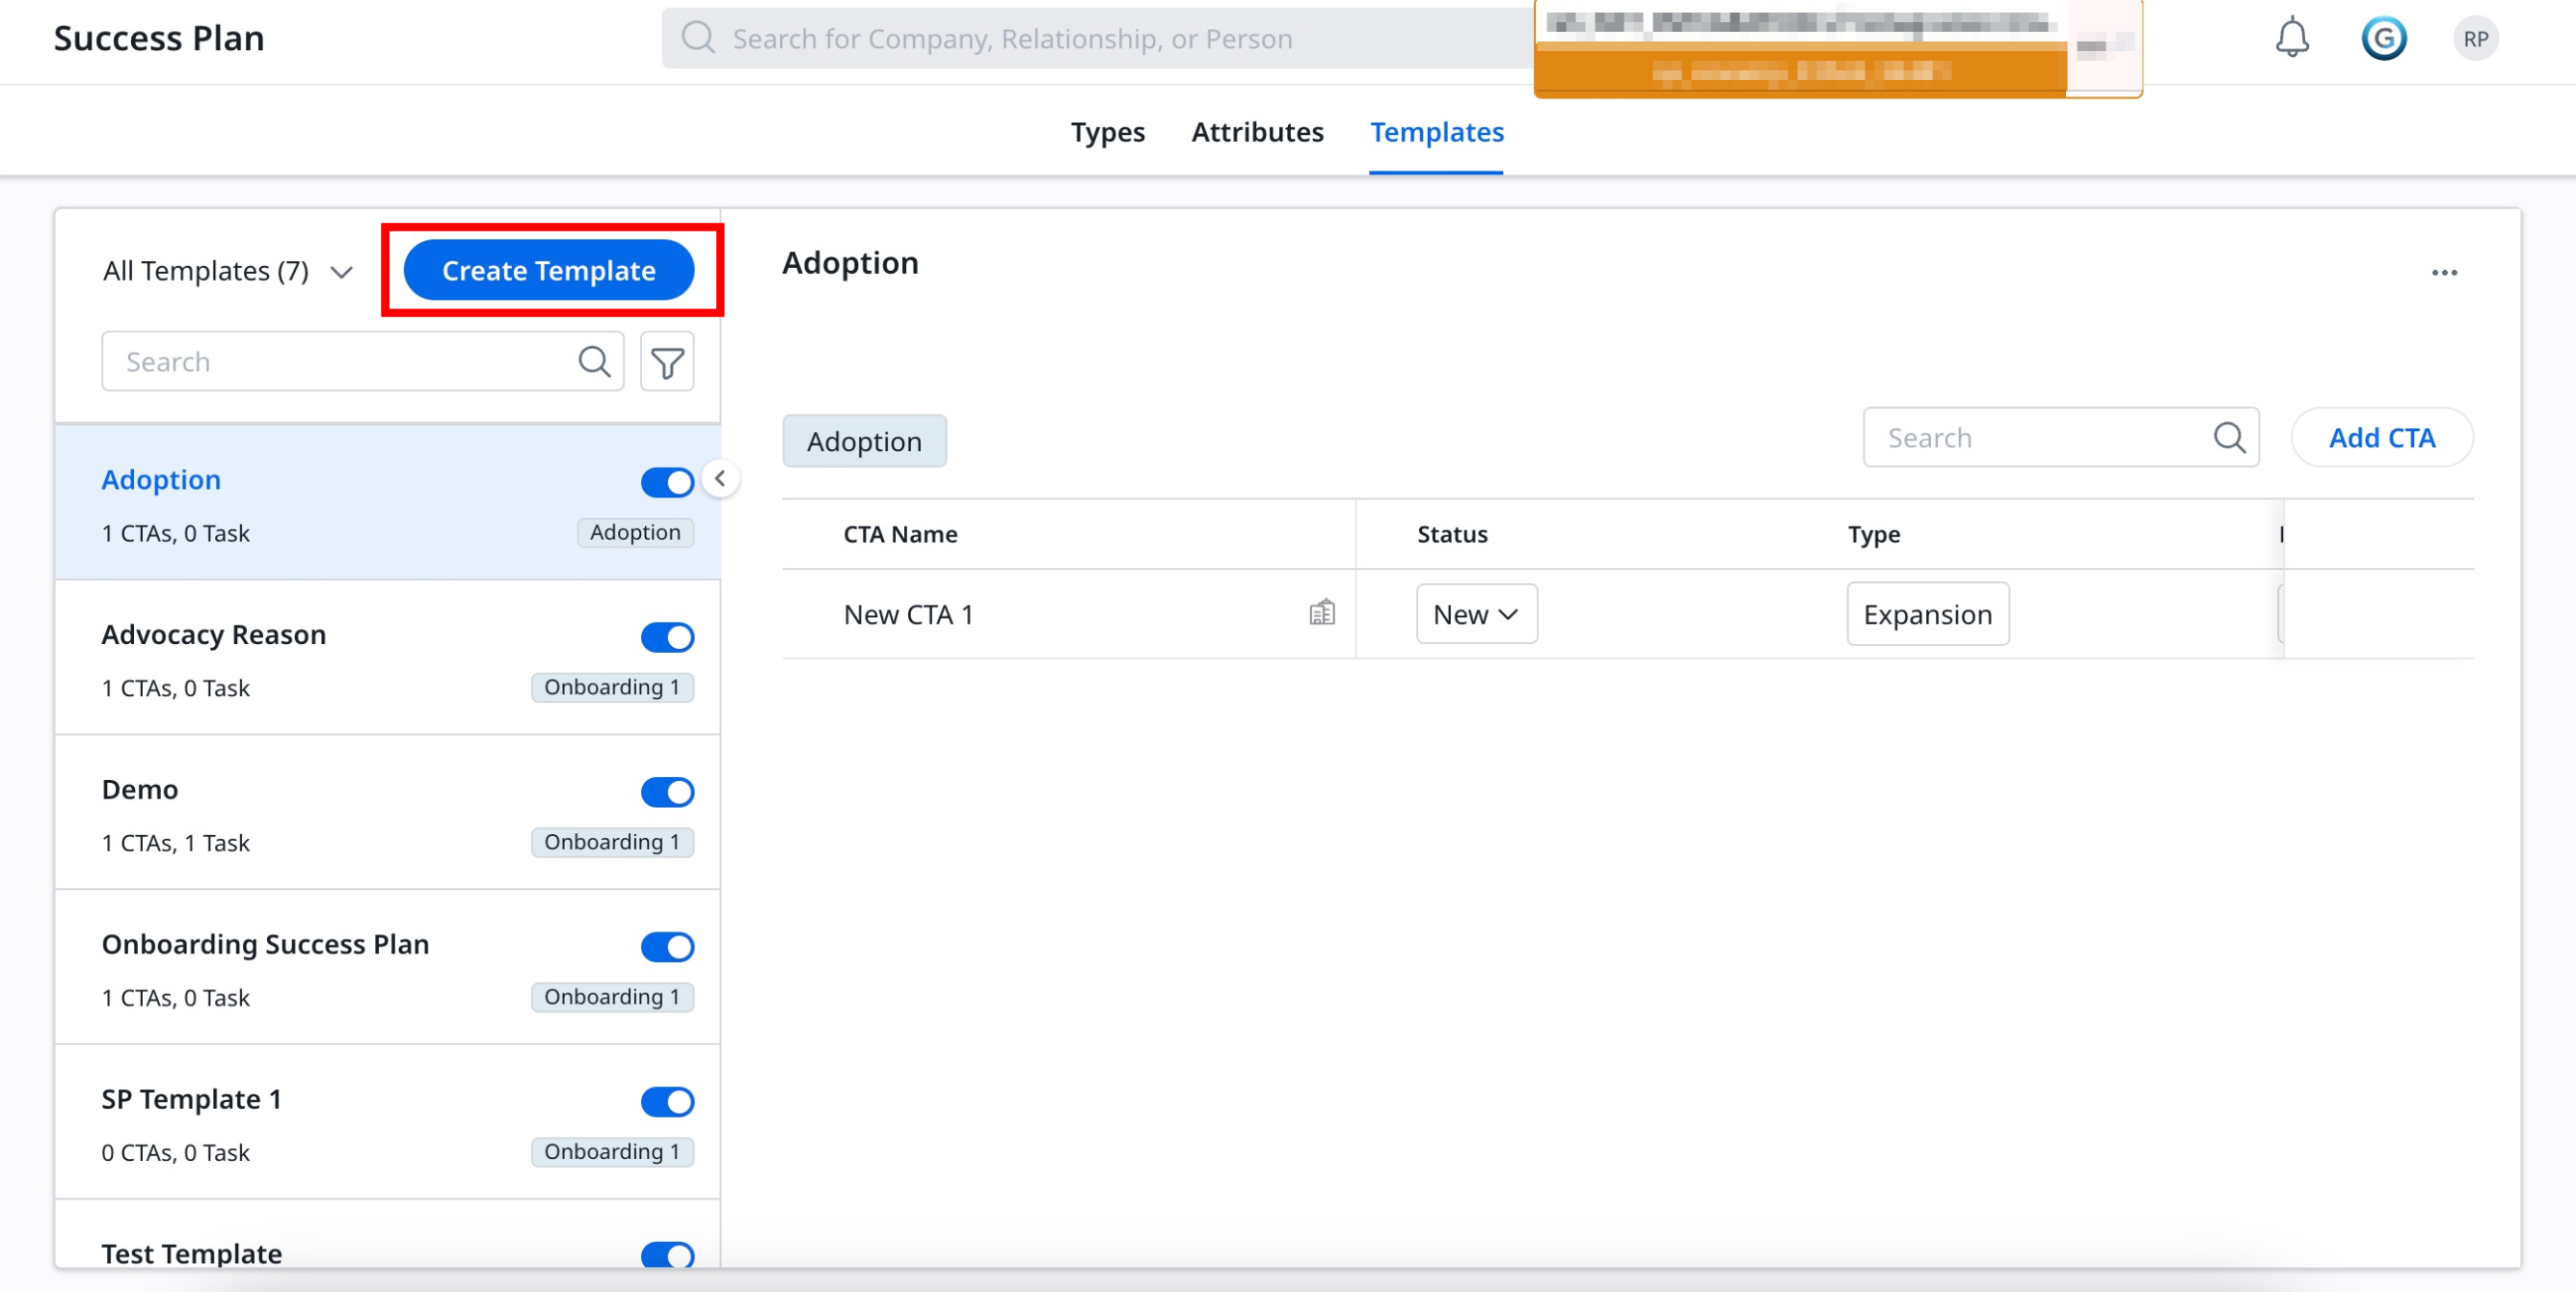
 Create Success Plan Templates
The Success Plan Template helps customer success teams improve customer relationships through goal-oriented strategies. This template guides customer success teams in developing more meaningful and productive relationships with clients.
It is designed to improve customer experience and business growth. By customizing the success plan template, CSMs can strengthen their relationship with customers, thus contributing to the overall success of the business growth.
The redesigned Success Plan Template tab offers a simplified layout, significantly improving the visibility:

-
All Templates: Filter the templates by using All Templates dropdown to view all, Active, or Inactive templates.
-
Filters: Filter the templates by selecting the available success plan types.
-
Toggle: Turn on or off the toggle adjacent to each template to activate or deactivate the templates.
-
Three horizontal dots menu: Provides Edit and Delete options. You can modify the selected template or remove an existing template from the list.
-
Search: Search the required CTAs within the template.
-
Add CTA: Add multiple CTAs to the template.
-
Three horizontal dots menu: Click to access the following options:
-
Details: To view the details of the CTA.
-
Map Playbook: To map the playbook with the given CTA.
-
Delete: To delete an existing CTA.
-
Turn on Enable External Sharing toggle to enable the CTA for external sharing.
The Success Plan template tab offers the following capabilities:
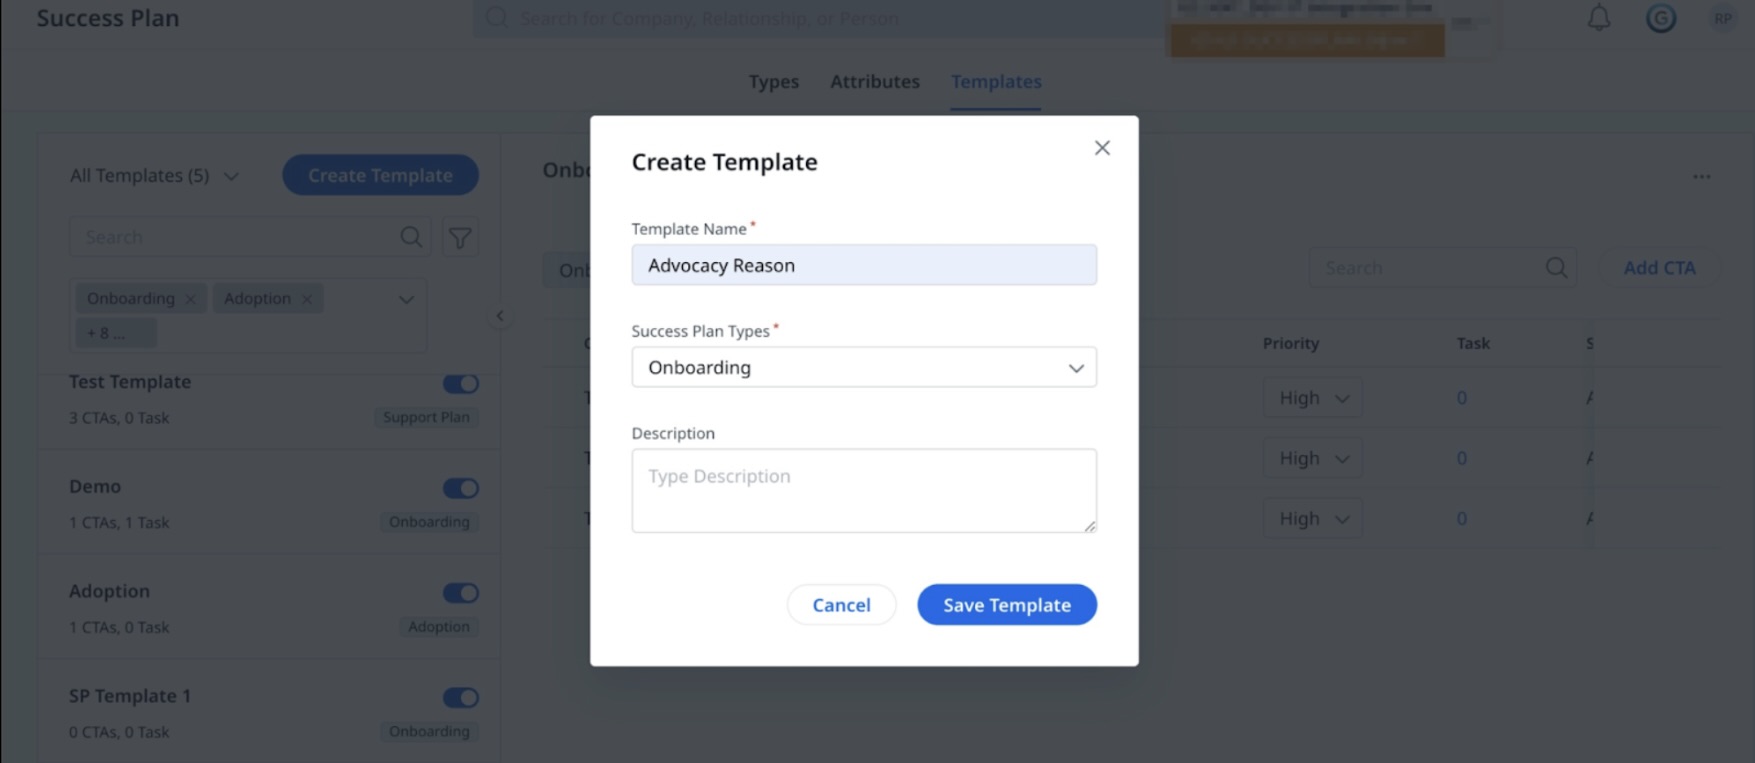
Create a Template
To Create a Template:
-
From the Template tab, click Create Template. A Create Template dialog box appears.
-
Enter the template name in the Template Name field.
-
From the Success Plan Type dropdown, select the required type.
-
Add a description in the Description box if required.
-
Click Save Template. A new template is created and displayed on the template list page.
Manage Templates
Once you create a template, you can manage templates to streamline processes and enhance CSMs goals and strategies. Effective template management ensures CSMs align with business needs and customer expectations.
Add CTA
To add CTA:
-
From the Templates Tab, Click Add CTA. A Create CTA slide-out panel appears.
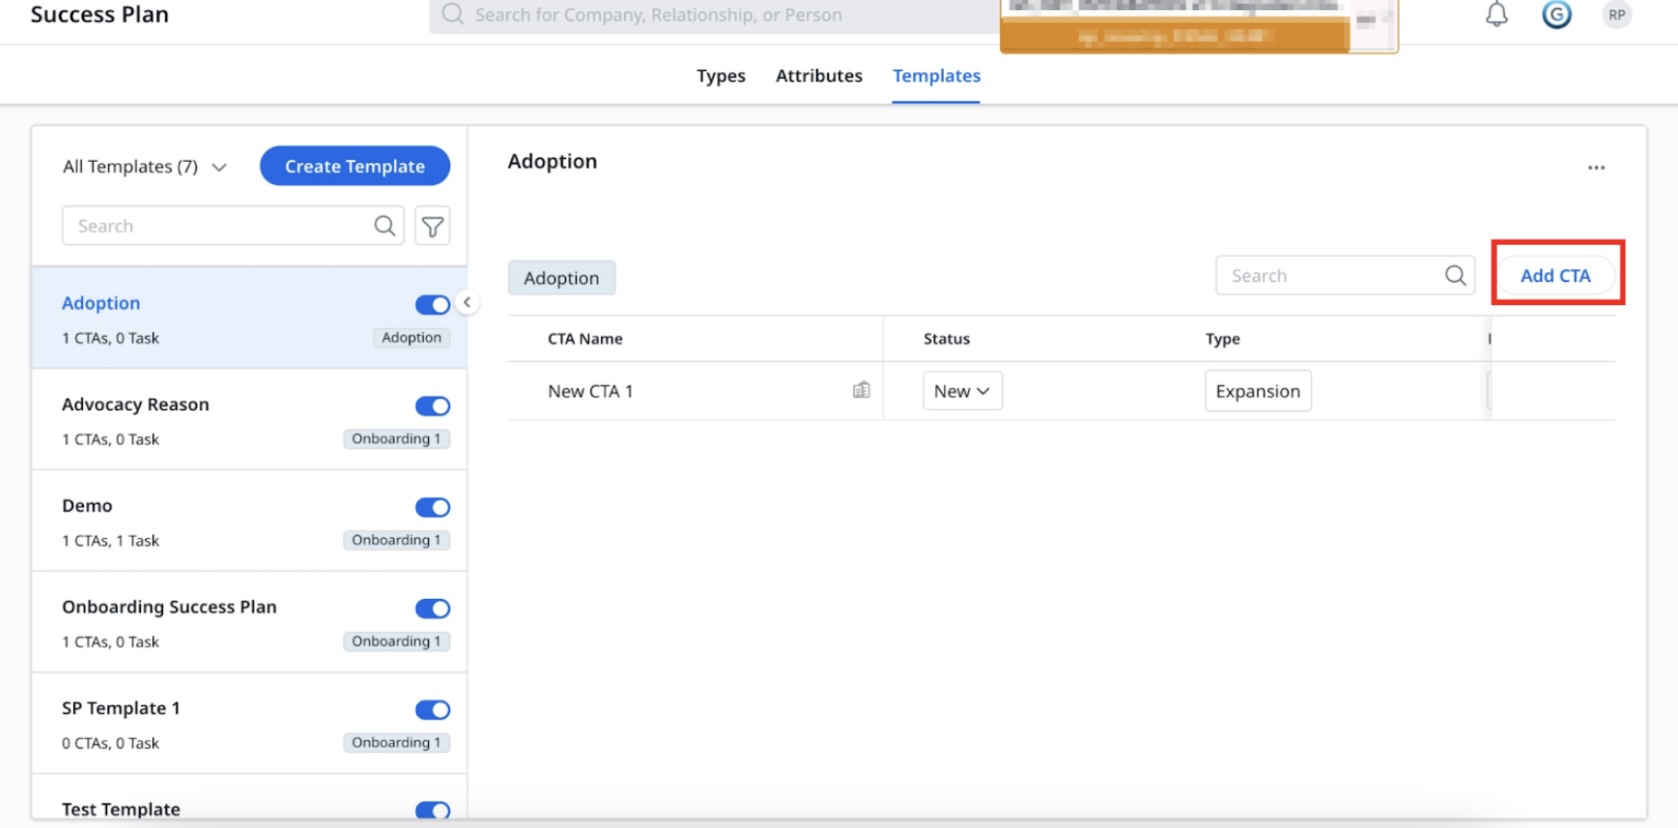
-
Provide the required details in the respective fields:
- Name: Enter the CTA name.
- Start Date: Select the start date of template validity from the dropdown.
- Due Date: Select the due date from the dropdown.
- Skip weekends: Select the value to skip days.
- Owner: Enter the owner name in the search box and select from the auto-populated options.
- Type: Select the CTA type from the dropdown.
- Status: Enter the CTA status.
- Priority: Enter the CTA priority.
- Reason: Enter the CTA reason.
-
Add comments in the Comments box if required.
-
Click Save. The newly created CTA is added to the template CTAs list.

Configure Success Plan Layouts
Once the Success Plan is created, you can configure a layout with the Plan Info and Cockpit feature. This configuration helps in streamlining and monitoring success plans, aiming to meet the customer needs. It allows better planning, execution, and monitoring of the steps necessary to achieve the desired outcomes. Moreover, it ensures that everyone involved remains up-to-date with the information, thus improving communication and collaboration.
Plan Info
The Plan Info tab lists all fields related to the Success Plan, Company, Relationships, and any custom fields. This tab contains the following functionality:
Add Group
You can add multiple groups while creating a success Plan Type, in addition to a default group. You can also add and maintain multiple groups.
To add a group:
-
Click Add Group. Group 2 is added to the layout configuration.
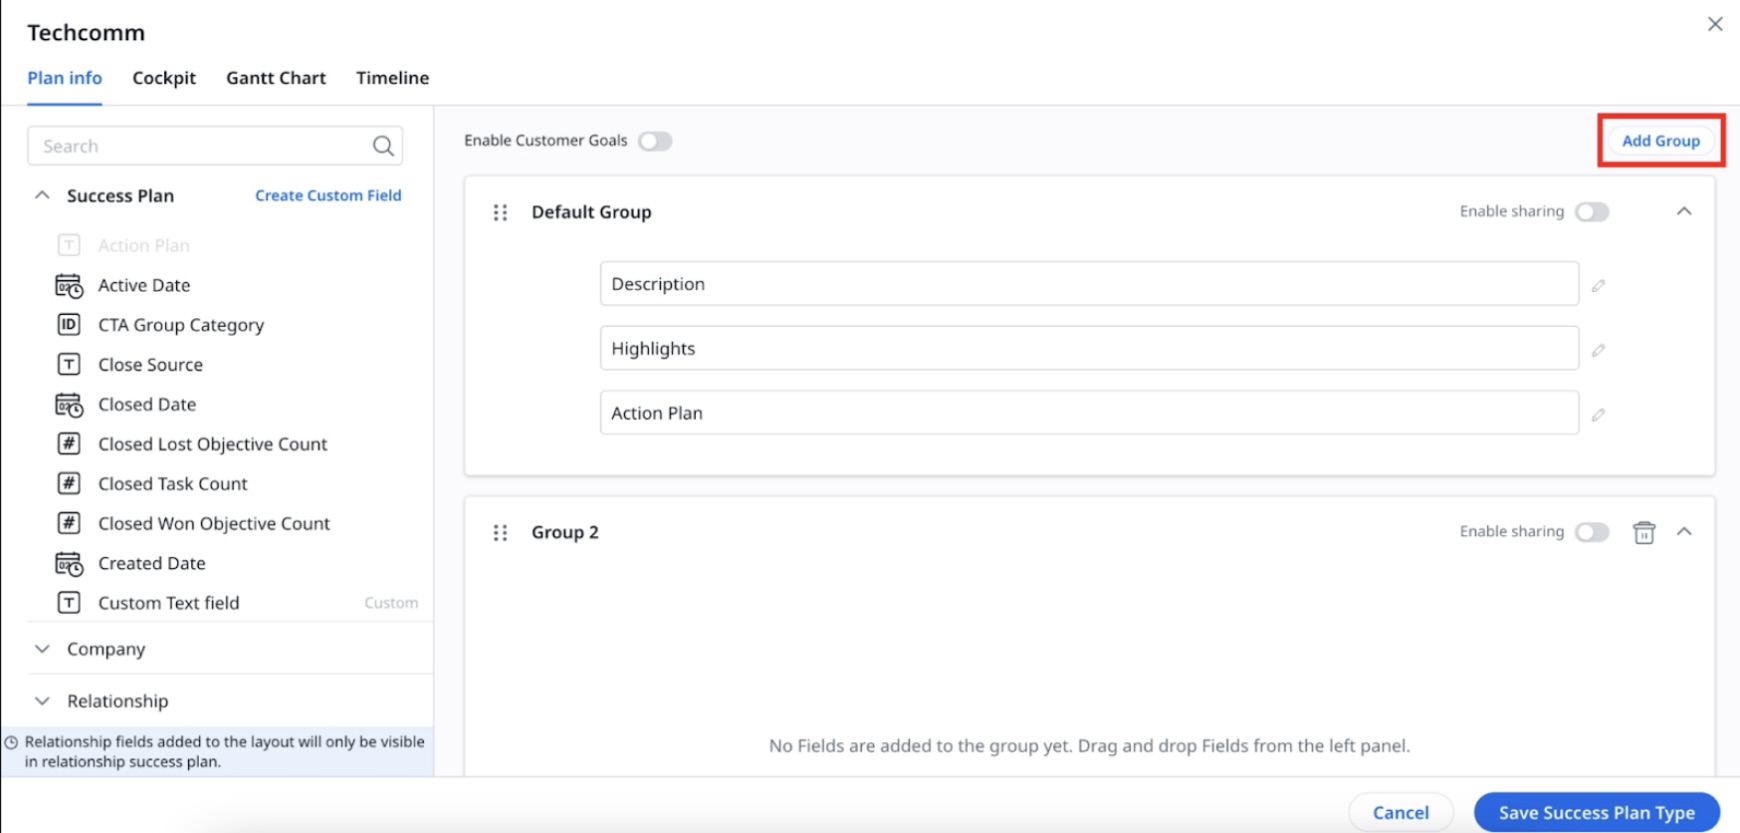
-
From the left pane, Drag and drop the required fields into Group 2.
-
(Optional) Hover on the selected fields and click the Settings icon to change the field.
-
(Optional) Click the X icon to delete the field.
-
(Optional) Turn on Enable Sharing toggle to permit the sharing of the group. By default, the toggle is turned off.
-
(Optional) Click the delete icon to delete the entire group.
Create Custom Field
You can create custom fields as per their requirements for the success plan object apart from the given fields.

To create a Custom Field:
- Click Create Custom Field. The Create Custom Field slide-out panel appears.
-
Provide the required details in the respective field:
- Display Name: Enter the display name.
- Date Type: Select the date type from the dropdown.
- Field Name: Enter the field name.
- Default Value: Enter the default value.
- Description: Enter a description of the field.
- Click Show Advanced Options. The advanced fields appear.
Note: Select or clear the Hide this field in other product areas check box. By default Mark it as a mandatory field is disabled. - For the field mapping, select a value from the following dropdown menus:
- Map To: Select a standard field.
- Object: Select the object.
- Field: Select the field.
- On Delete: Select deletion of the field.
- To create a formula field, click Create Formula. Add the formula in the provided text box and click Apply.
- Click Save. The custom field is created.
Integration with other Product Areas
Cockpit
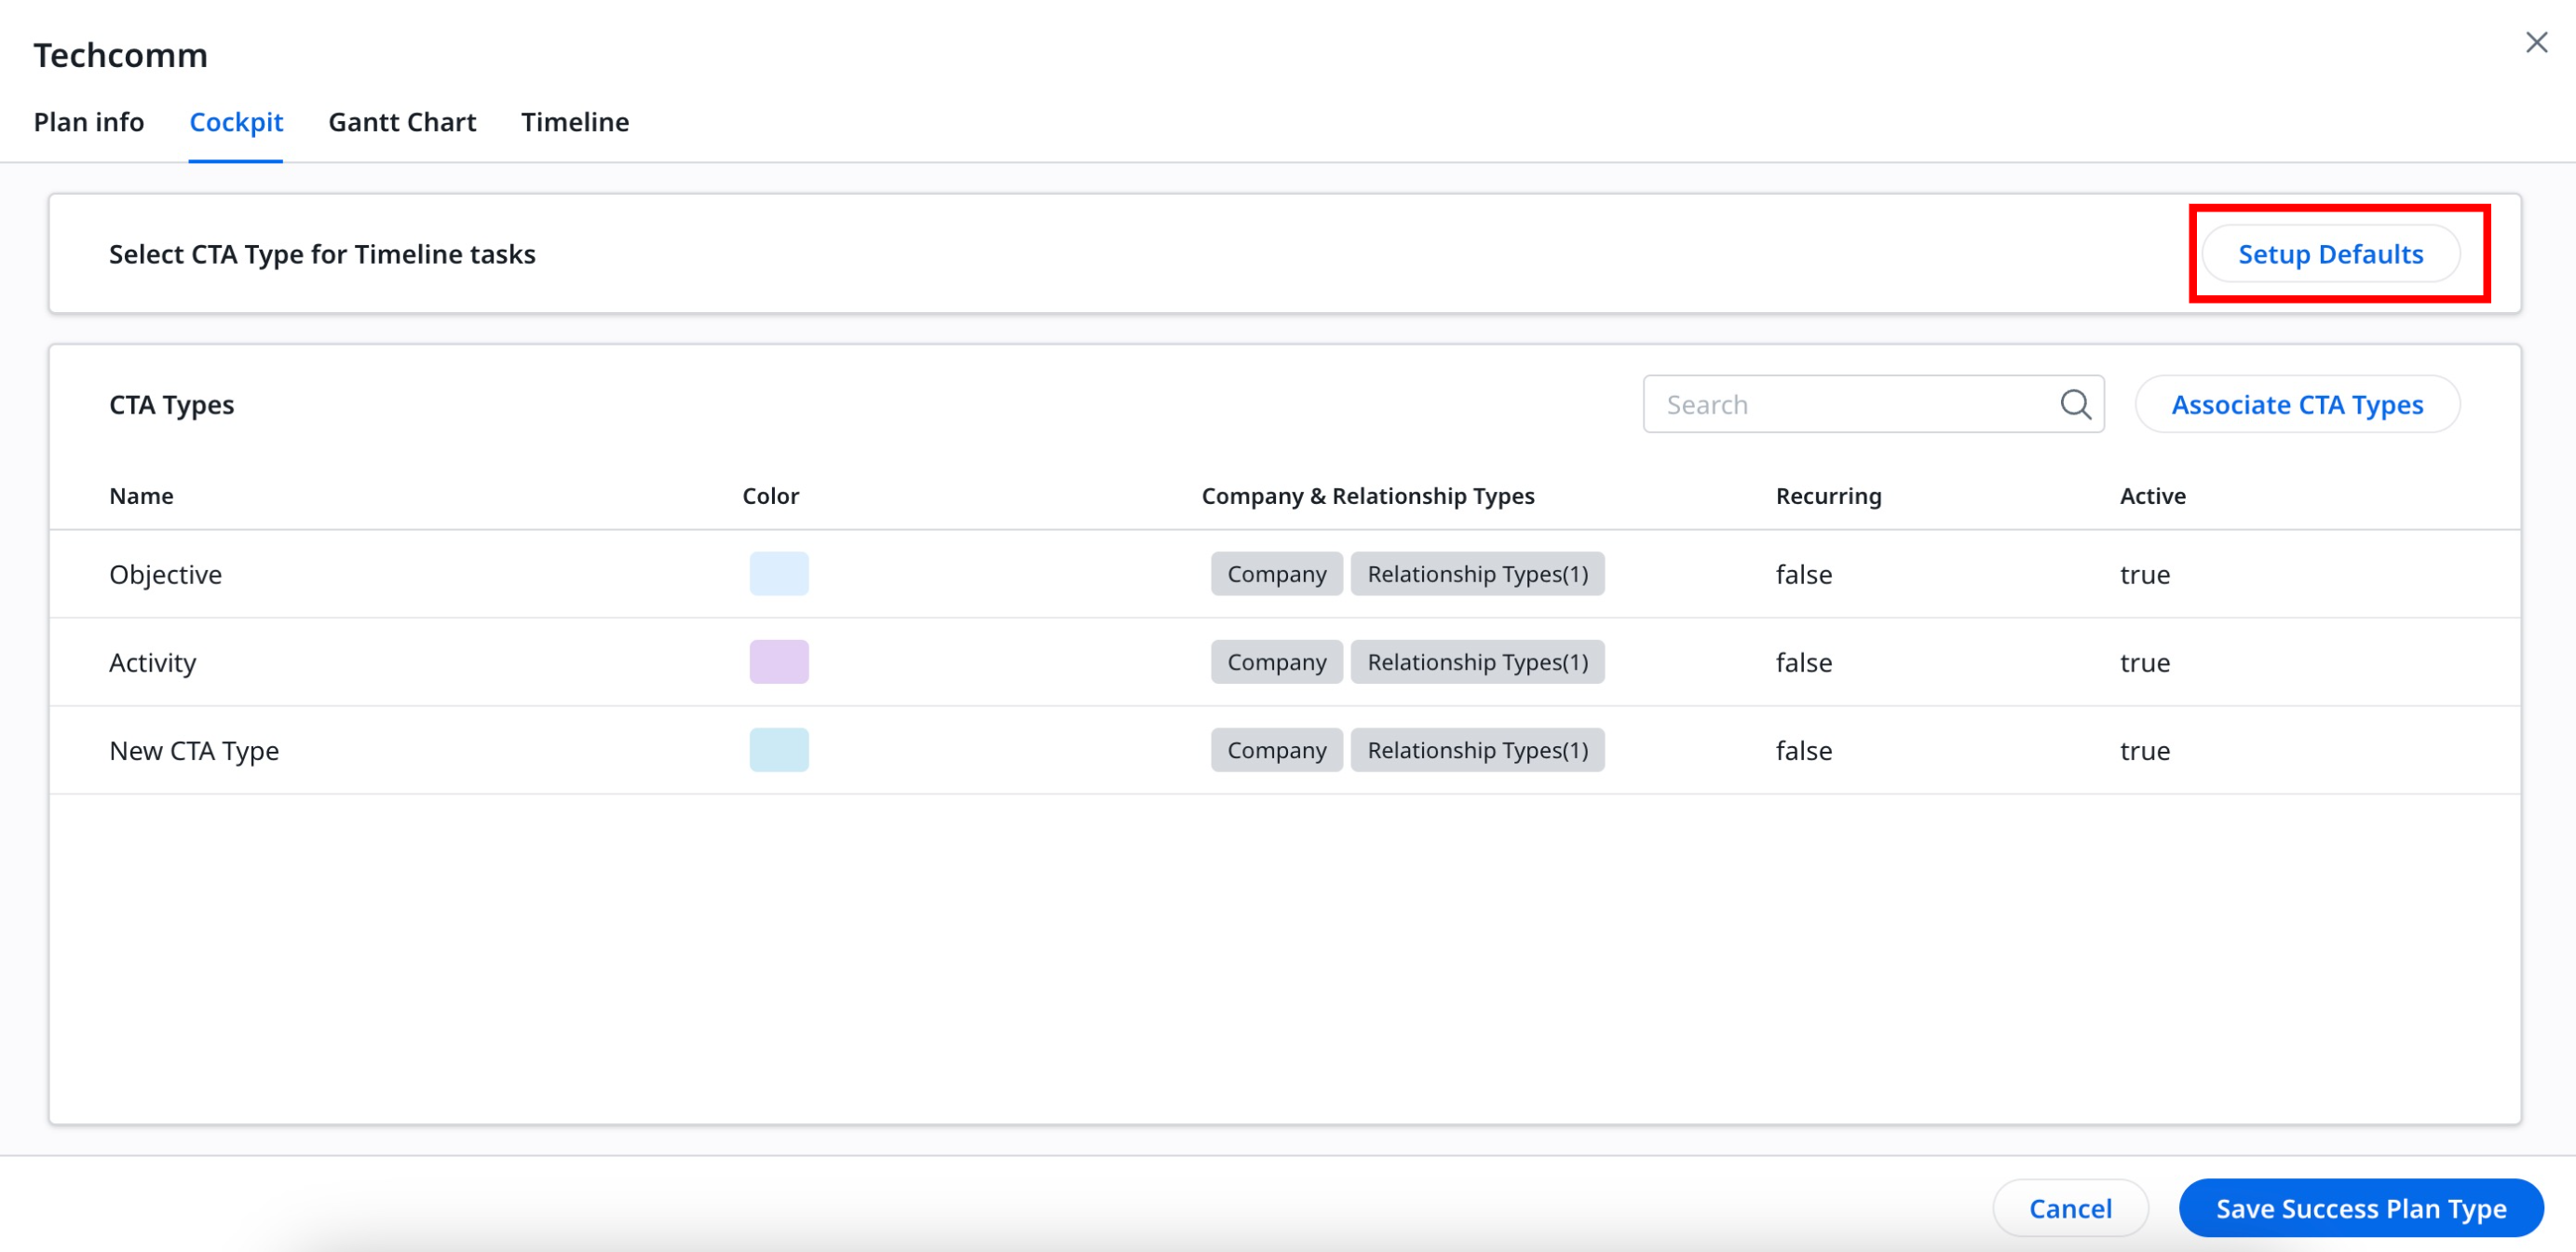
Cockpit plays an important role in ensuring that CSMs have a structured and efficient approach to achieving customer success objectives. In the Success plan, the cockpit displays CTAs and the tasks linked to them.
Admins play a key role in configuring, managing, and improving these CTAs to align with CSMs goals. Admins provide the tool to CSMs to track progress and take the right actions. You can monitor the progress of each task associated with the cockpit CTAs by creating reports that provide real-time insights into the status of CTAs and their impact on customer goals. Also, you can define the CTA types that can be added to a Success Plan type in this configuration.
This tab contains the following functionality:
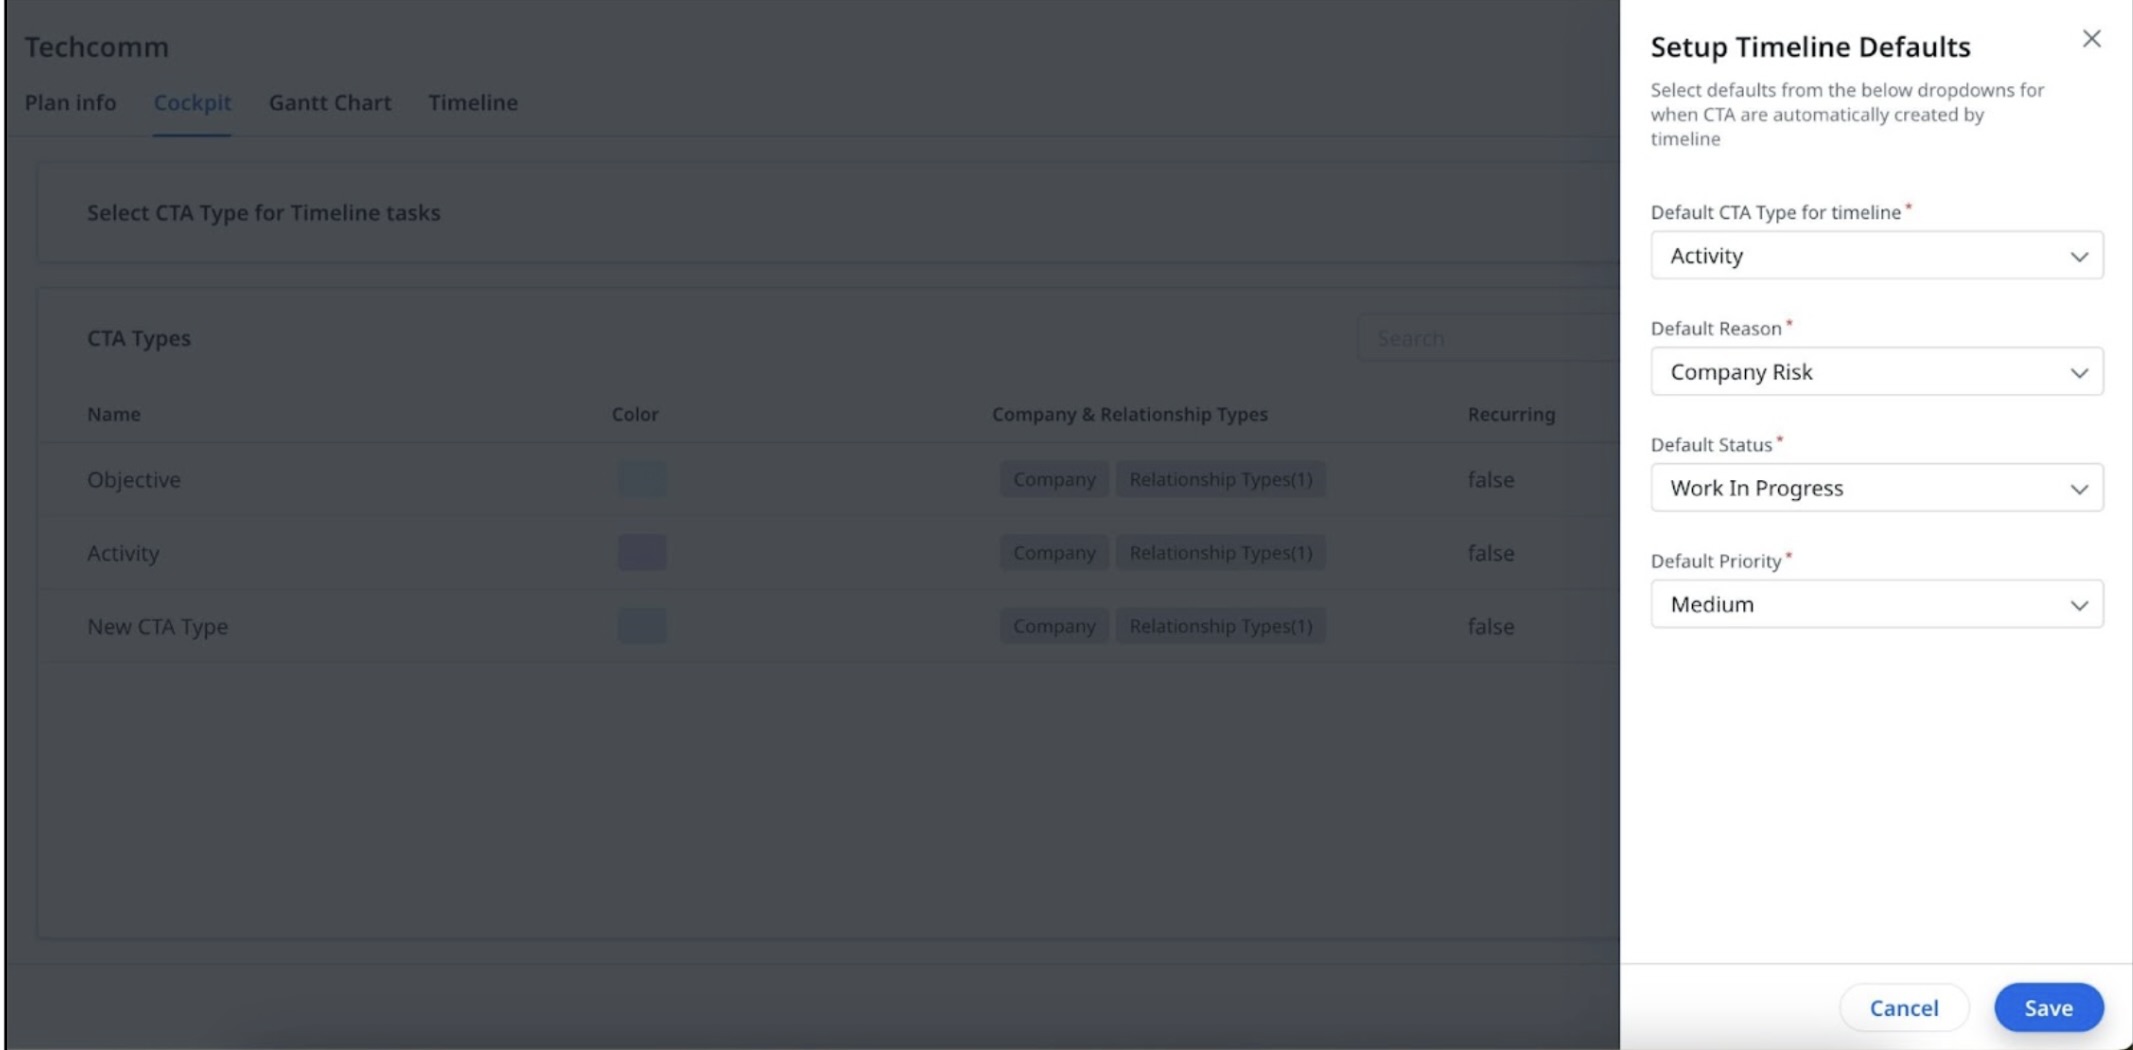
Set up Defaults
Timeline defaults are used when creating a Task from the Success Plan Timeline. Also, when a CSMs adds a new task to a Success Plan timeline entry, the system automatically selects the type for the CTAs based on these defaults.
By default, the CTA type is set to Objective. This automated selection streamlines the task creation process, ensuring consistency and efficiency in managing Success Plans.
You can setup the default CTA Type to be used while configuring a success plan.
To setup default CTA Setting :
-
Click Setup Default. The Setup Timeline Defaults slide-out panel appears.
-
From the Default CTA type for the timeline dropdown, select the CTA type.
-
From the Default Reason dropdown, select the reason.
-
From the Default Status dropdown, select the status.
-
From the Default Priority dropdown, select the priority.
-
Click Save. The above information gets saved as the default setup for CTA in Timeline.
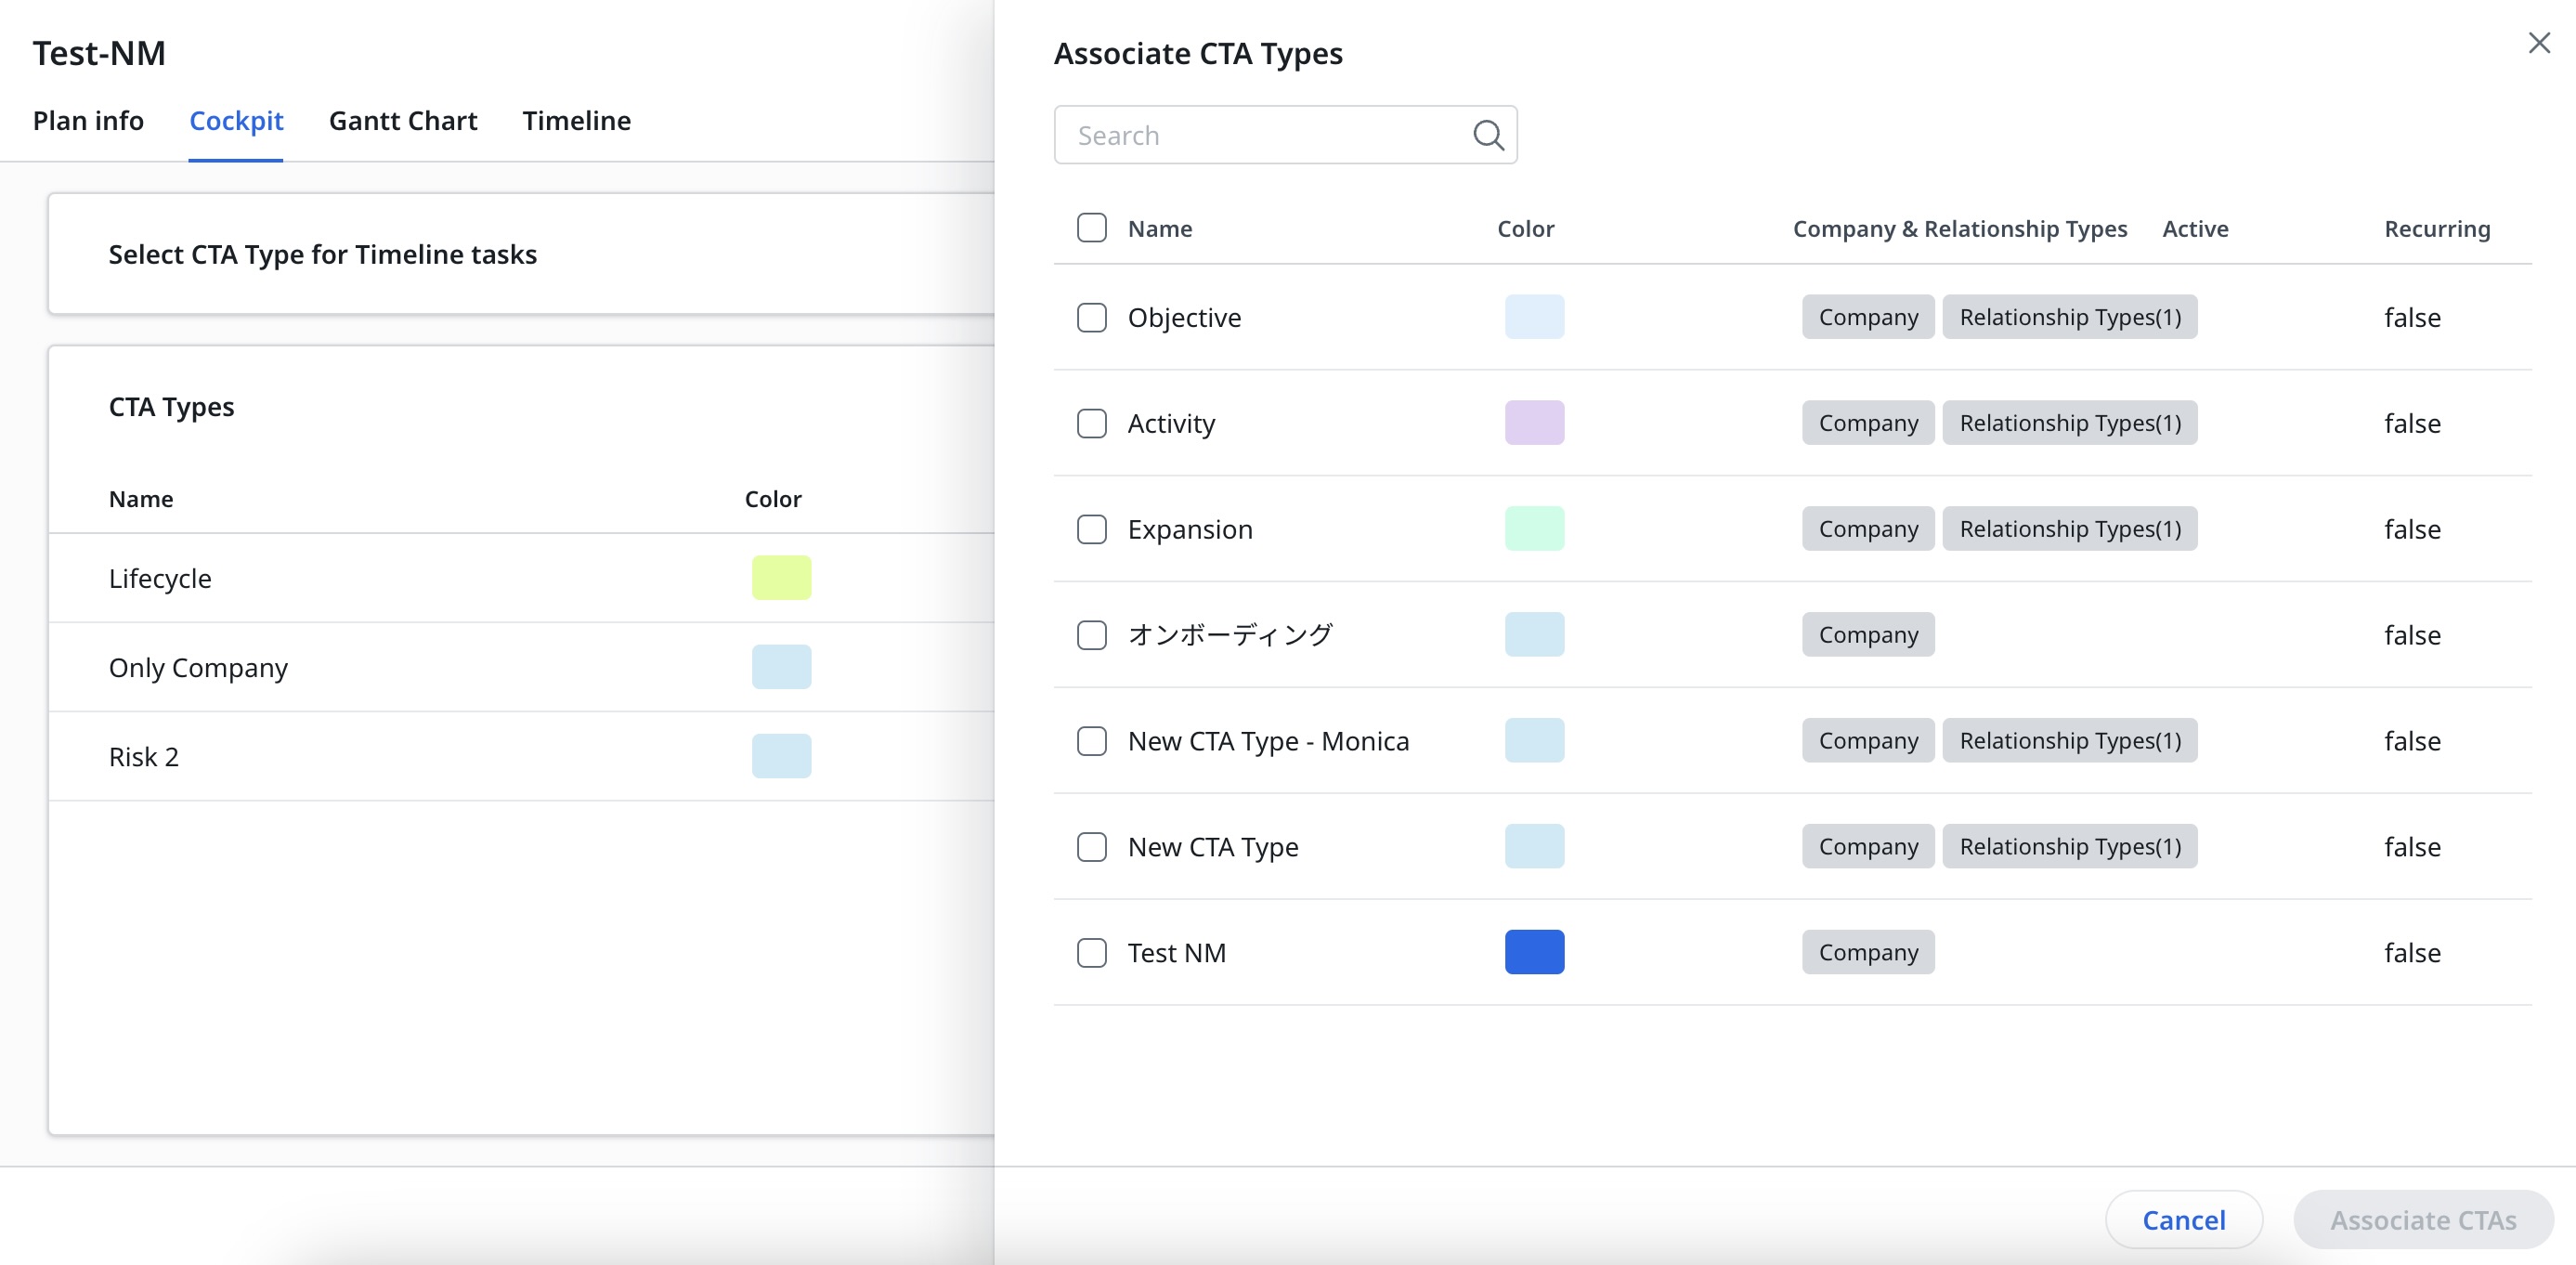
 Associate CTA Types
Associate CTA Types allow CSMs to add the associated CTA Types to the Success Plan.
To associate CTA Types with the Success Plan Type:
-
From the Cockpit tab, click Associate CTA Types. The Associate CTA Types slide-out panel appears.
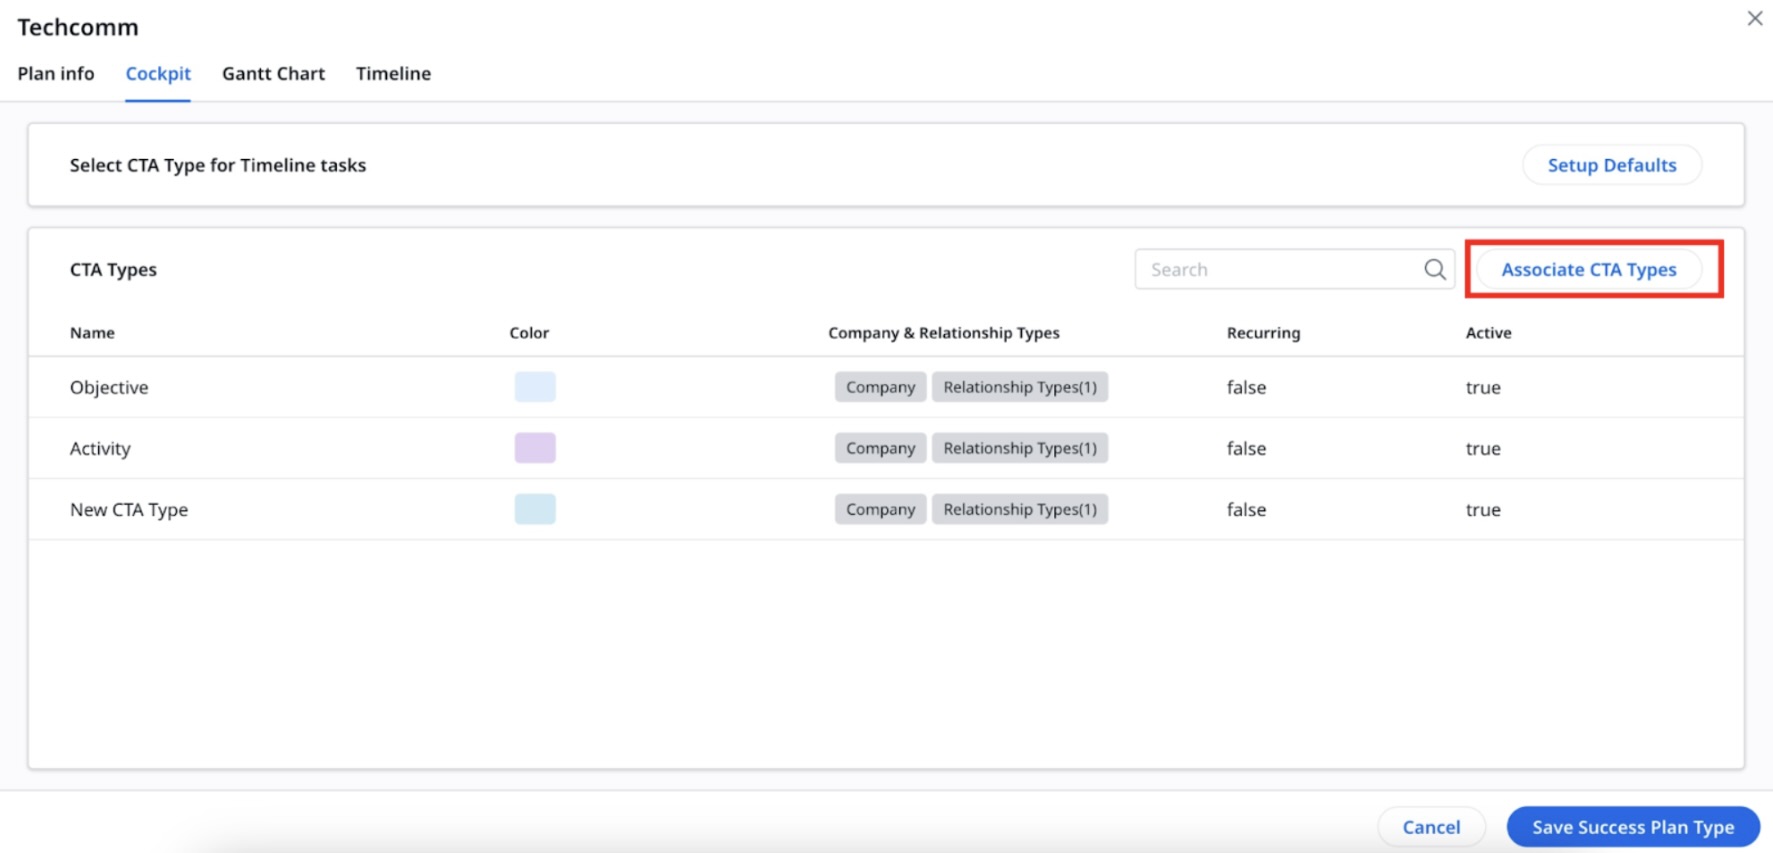
-
Select the CTA Types from the list.
-
Click Associate CTAs. The selected CTA types are listed on the Associate CTA Types page.
-
Click Save Success Plan Type. A new success plan type is created and displayed in the Success Plan list view.
 Timeline
Timeline is an essential functionality within the success plan, designed to empower you with the ability to efficiently log, track, and manage customer interactions effectively. It helps in recording various customer-related activities and insights, which are crucial for analyzing and enhancing customer relationships. You have access to a comprehensive view of all activities related to the success plan through the Timeline tab, allowing easy monitoring and management of customer engagement.
Furthermore, integrating the Timeline with the Gantt Chart provides you with a detailed view of the project timeline and progress. This integration helps in recording various customer-related activities and insights, thereby streamlining workflow and enhancing project management efficiency.
Advanced Feature
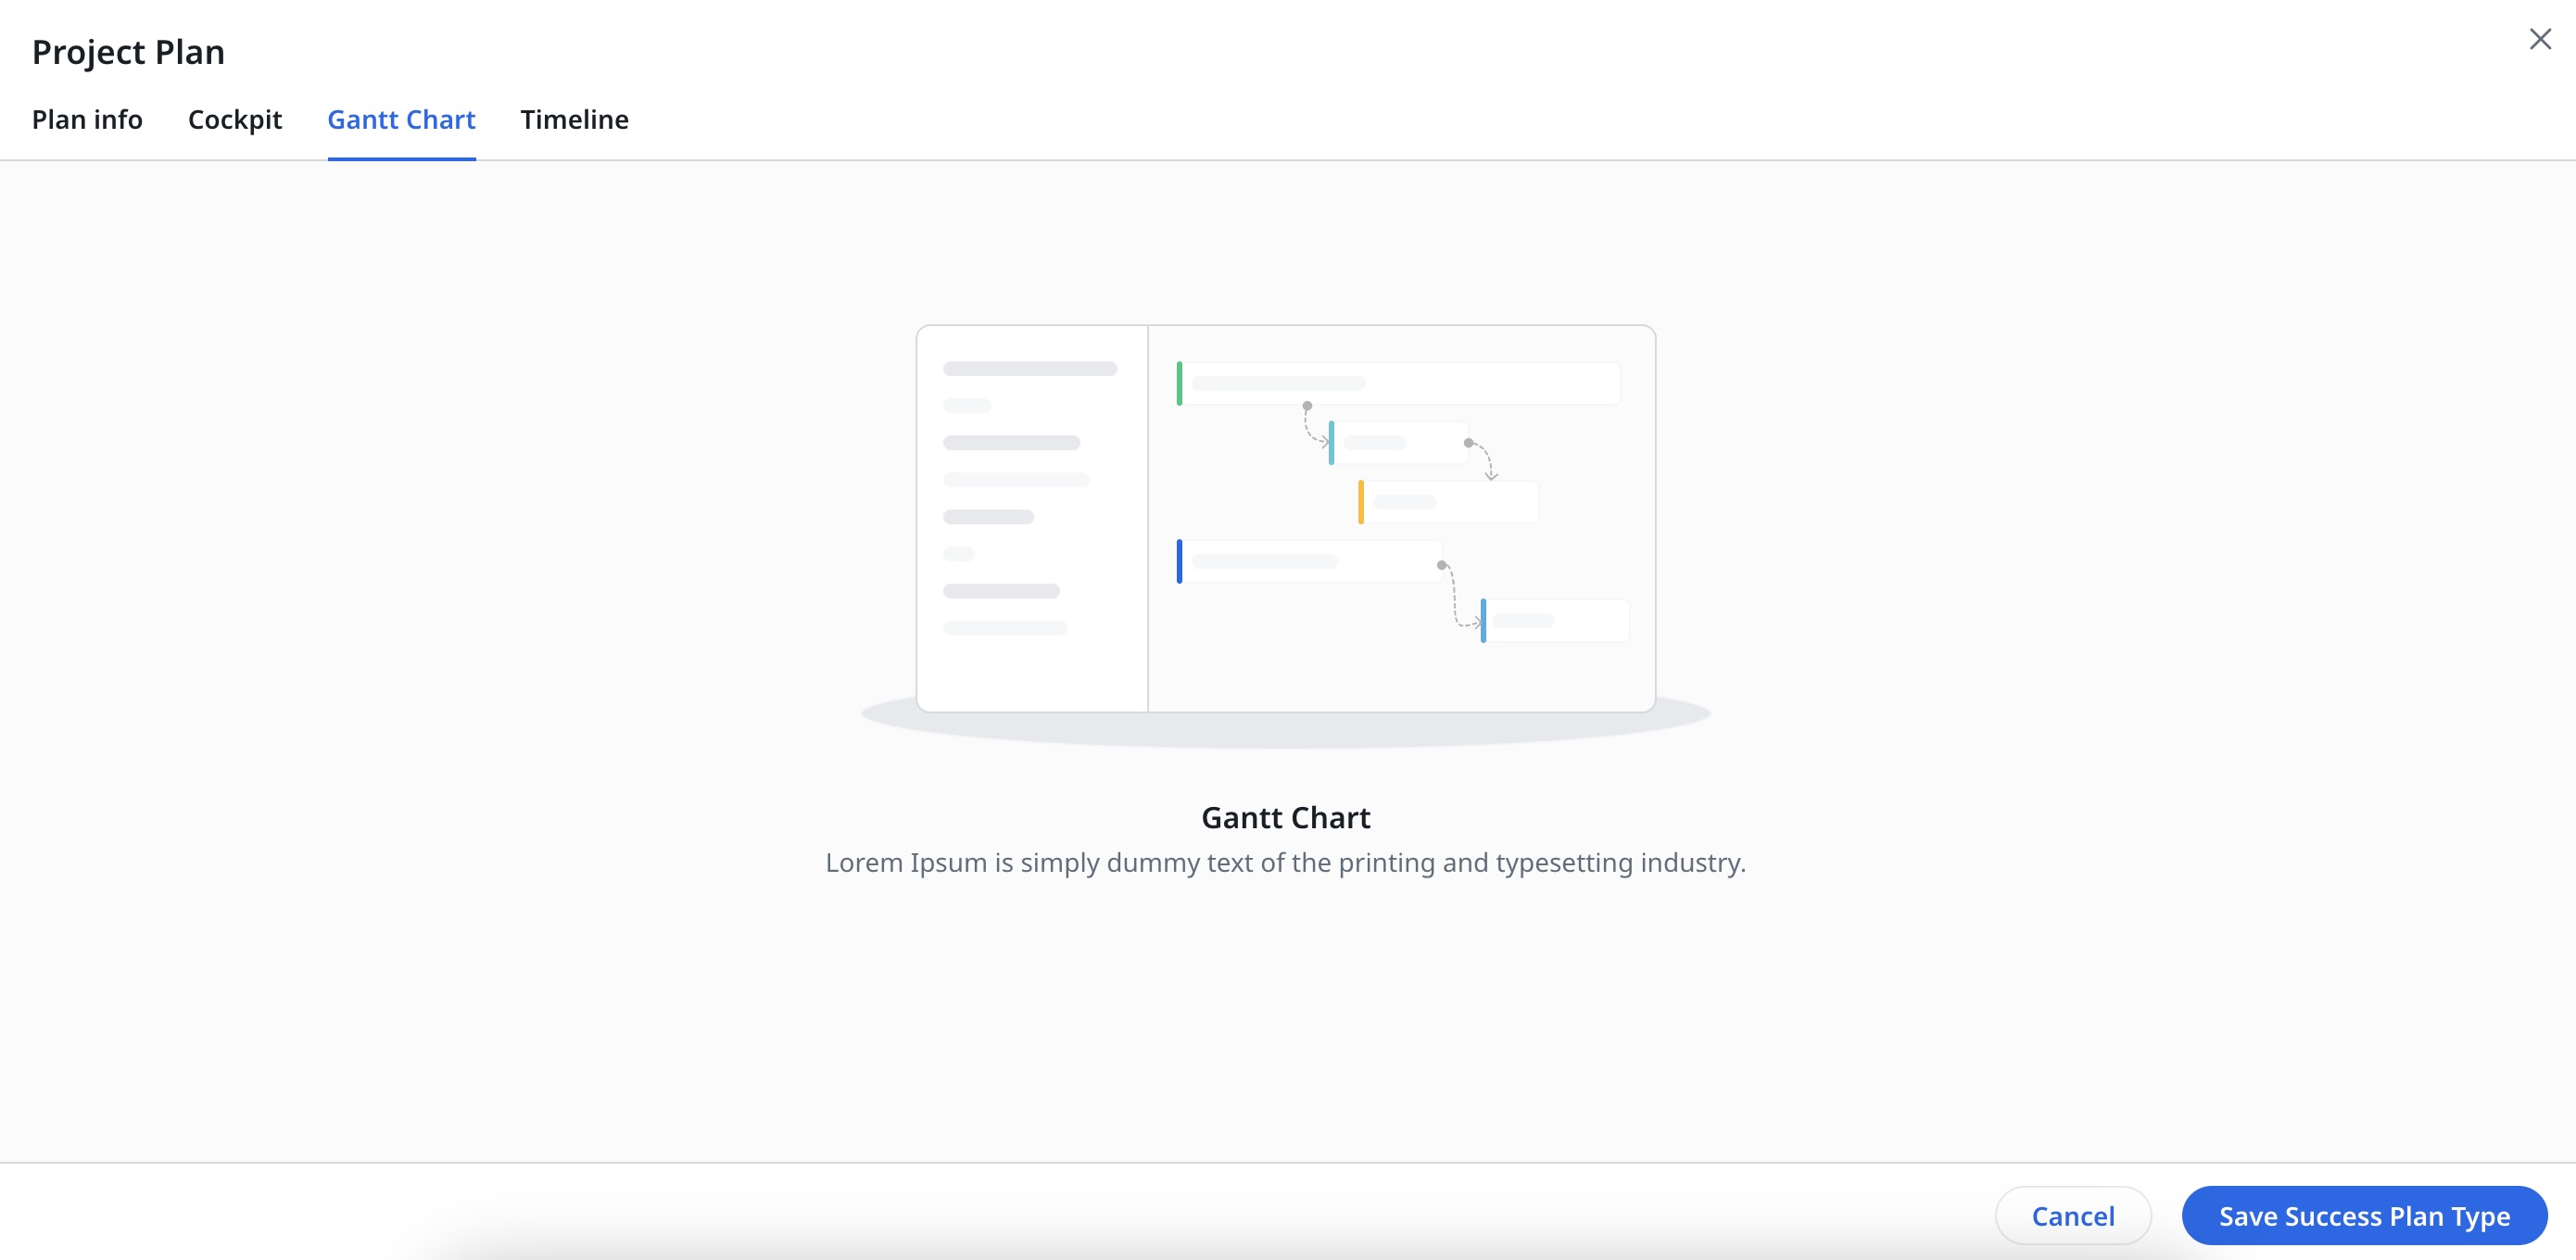
Gantt Chart Visualization
The Gantt Chart is an important tool within the success plan. You can preview the Gantt Chart which is used by CSMs for visualizing and managing customer success plans. It is integral to Gainsight’s larger Success Plans framework, which assists in capturing, monitoring, and sharing customer goals and can be tailored for various customer scenarios. The Gantt Chart is crucial for effective planning and provides a clear visual representation of the progress in customer success initiatives.