Cockpit Overview
Overview
The redesigned Cockpit, powered by the Gainsight Horizon Experience significantly improves the admins' experience by providing simple access to all the existing Call to Action (CTAs) created. The new Cockpit features address the critical pain point of navigating through a cluttered and complex interface. With the redesigned Cockpit, admins gain a comprehensive and clear view of the CTA repository, ensuring that managing tasks is quicker and more efficient.
The focus of this redesign is to make navigation easier, simplify the completion of admins tasks, and enhance the look and functionality of the interface. These improvements are designed to make the Cockpit admins interface more user-friendly and efficient. This streamlined approach enhances the ability to keep track of and prioritize actions and boosts workflow efficiency ultimately leading to improved customer engagement and satisfaction.
Key Benefits of re-designed Cockpit
- Streamlined Administrative Functions: The redesign offers a unified admin experience with consolidated functions for streamlined navigation and introduces a simplified task approach. This streamlining reduces the time and effort required for management, thereby enhancing productivity.
- Customizable Alerts and Actions: The redesign allows admins to tailor alerts and actions to meet specific business requirements, offering flexibility and relevance.
- Simplified Access to CTAs: With the redesign, admins gain simplified access to all created CTAs, providing a comprehensive overview of the CTA repository. This enhancement allows for quick navigation and efficient management of tasks, promoting a smoother workflow.
- Improved CTA Creation Workflow: In the redesigned Cockpit, the process for creating CTAs has been made more intuitive and less time-consuming. This optimization helps in faster deployment of CTAs, enhancing responsiveness to customer needs.
- Collaborative Views in CTA Listings: This redesign provides collaborative views within the CTA listing page and promotes shared access among team members. This enhancement allows for a more cohesive team effort in managing CTAs.
- Updated Visual Experience: Redesign brings a color scheme and detailed ordering in layouts to contribute to a more organized and visually appealing interface. This visual enhancement makes the platform more user-friendly and aids in easier data location and understanding.
- Extended Field Level Customization: With the redesign admins can now add custom fields, offering extensive flexibility to capture unique data.
Tabs for Cockpit
To access Cockpit, navigate to Administration > Cockpit. The Cockpit Configuration page appears.
Cockpit has four tabs for configuration and a General setting page.
Configure the Call To Action Section
Cockpit list page provides a comprehensive overview and control of customer engagement activities, ensuring efficient and effective management of customer relationships and success initiatives.
CTAs manage and track activities such as Low Survey Scores, Upsell Opportunities, Possible Customer Churn, Customer Engagement, and so on.
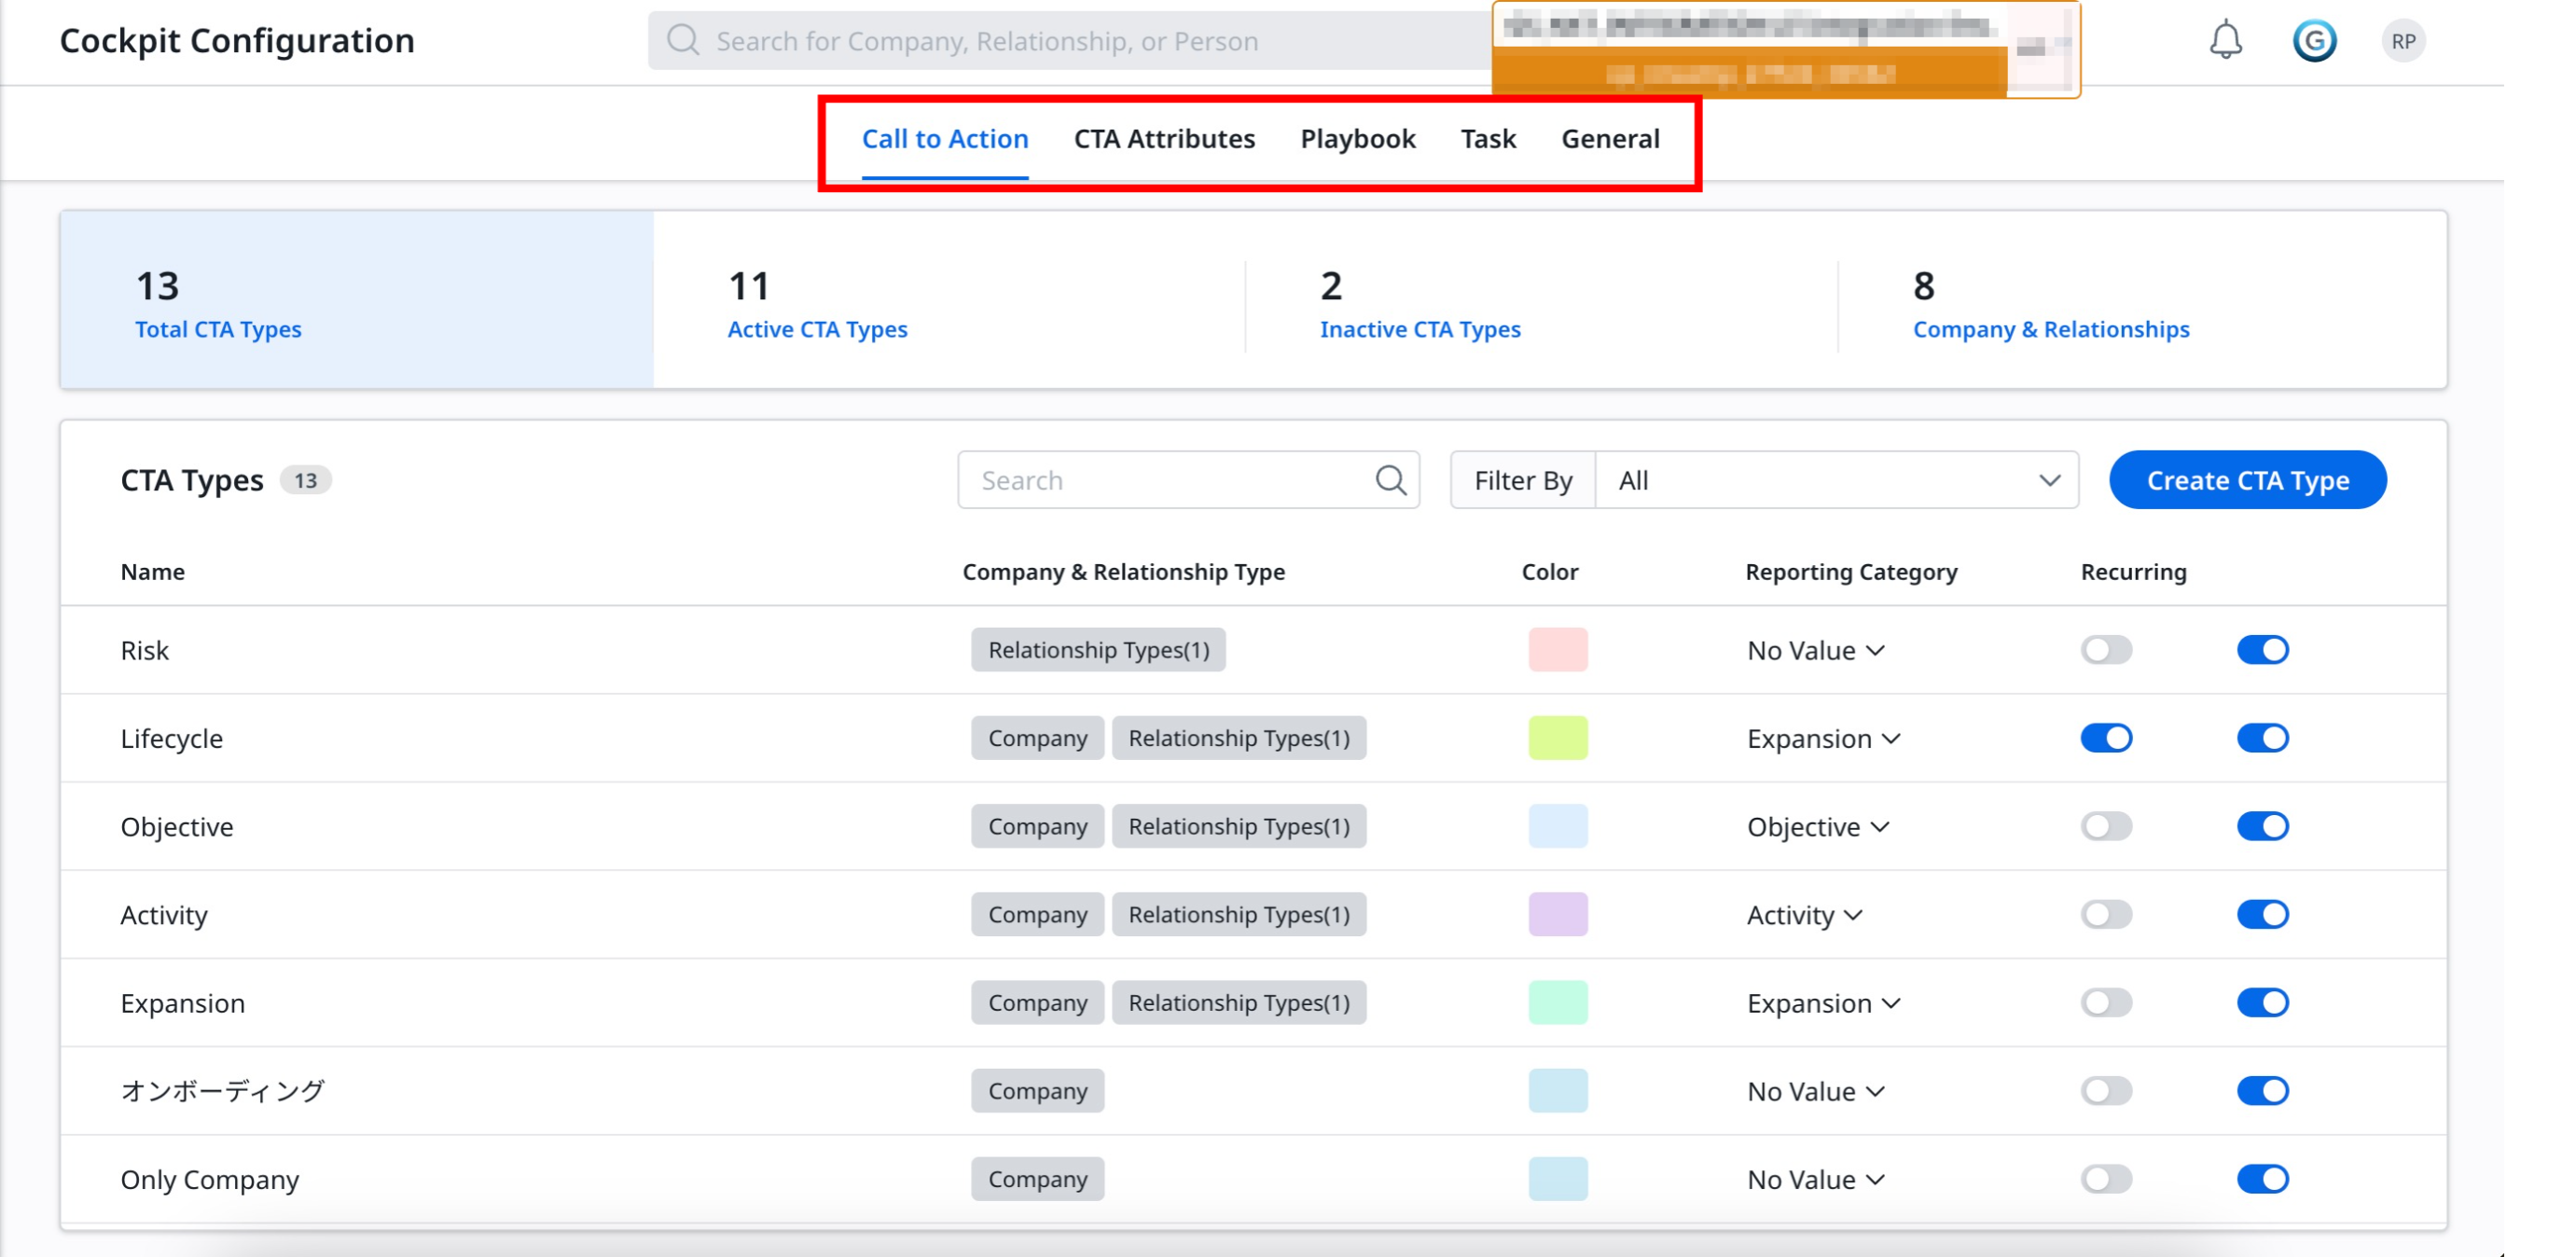
The redesigned Cockpit Call to Action tab offers a simplified layout, significantly improving the visibility:
-
Summary Ribbon: It lists out the total number of CTAs that are categorized into:
- Total CTA Types: Shows total CTA types assigned to the tenant.
- Active CTA Types: Shows only active CTAs.
- Inactive CTA Types: Shows only inactive CTAs.
- Company & Relationship: Shows the CTAs type that is associated with all the entities and the auto-assign toggle is true.
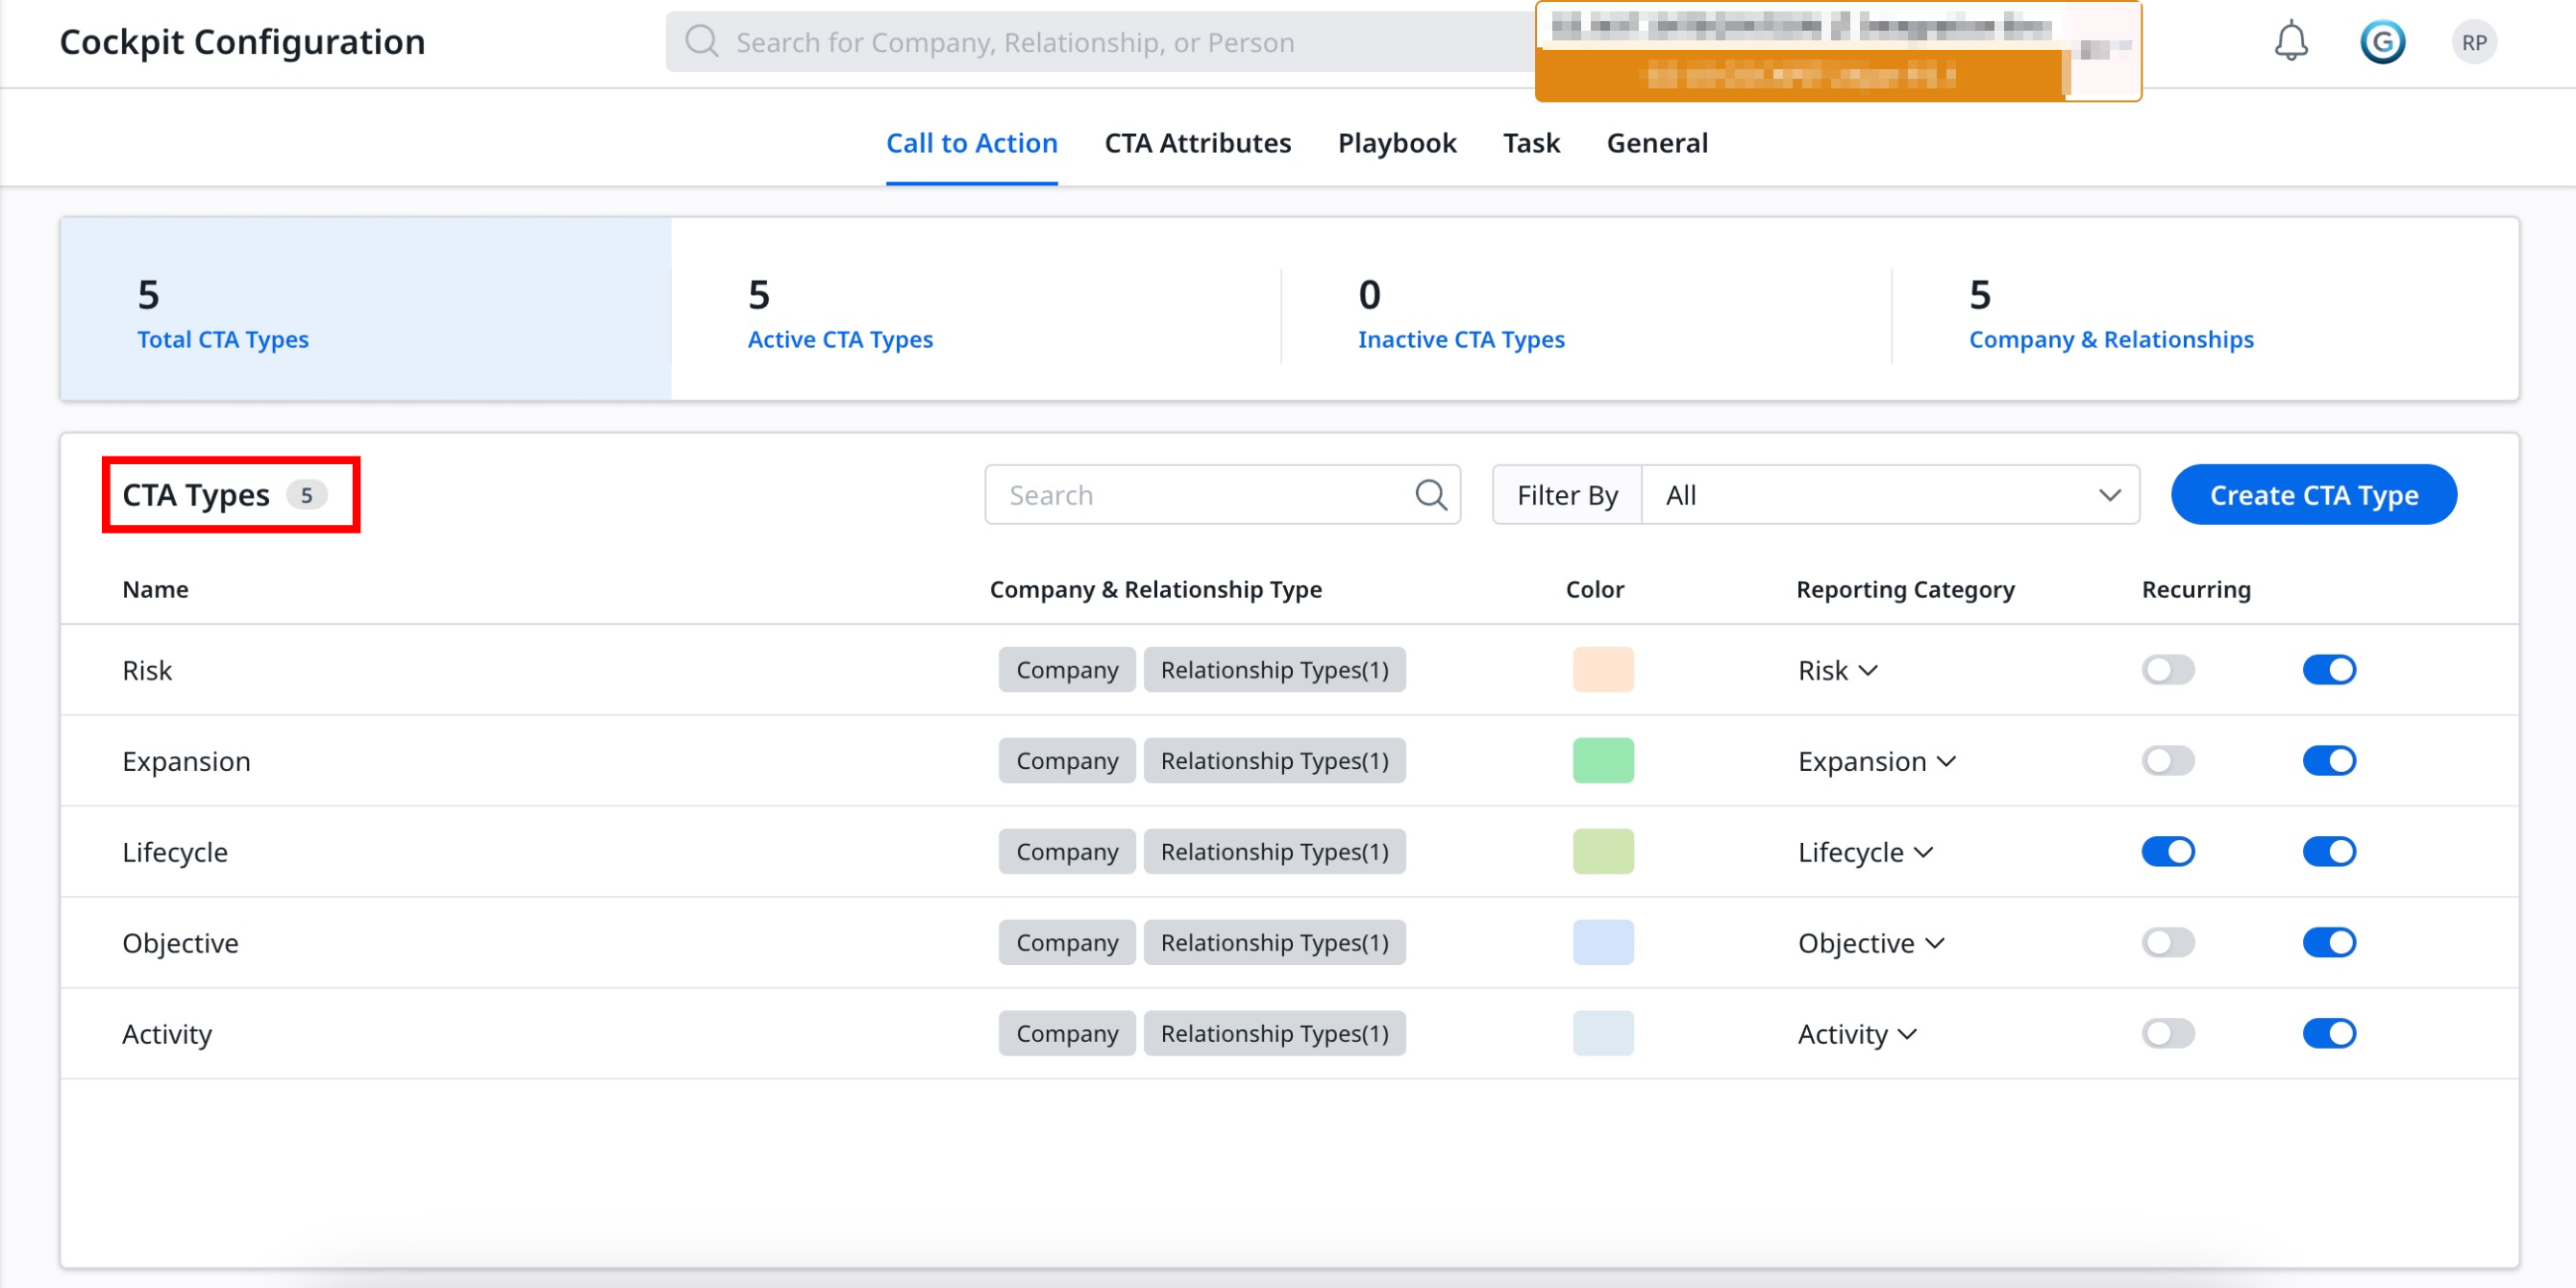
- CTA Types: Shows the total number of CTAs.
- Filter By: Allows you to filter CTAs based on the Company or Relationship Type filters.
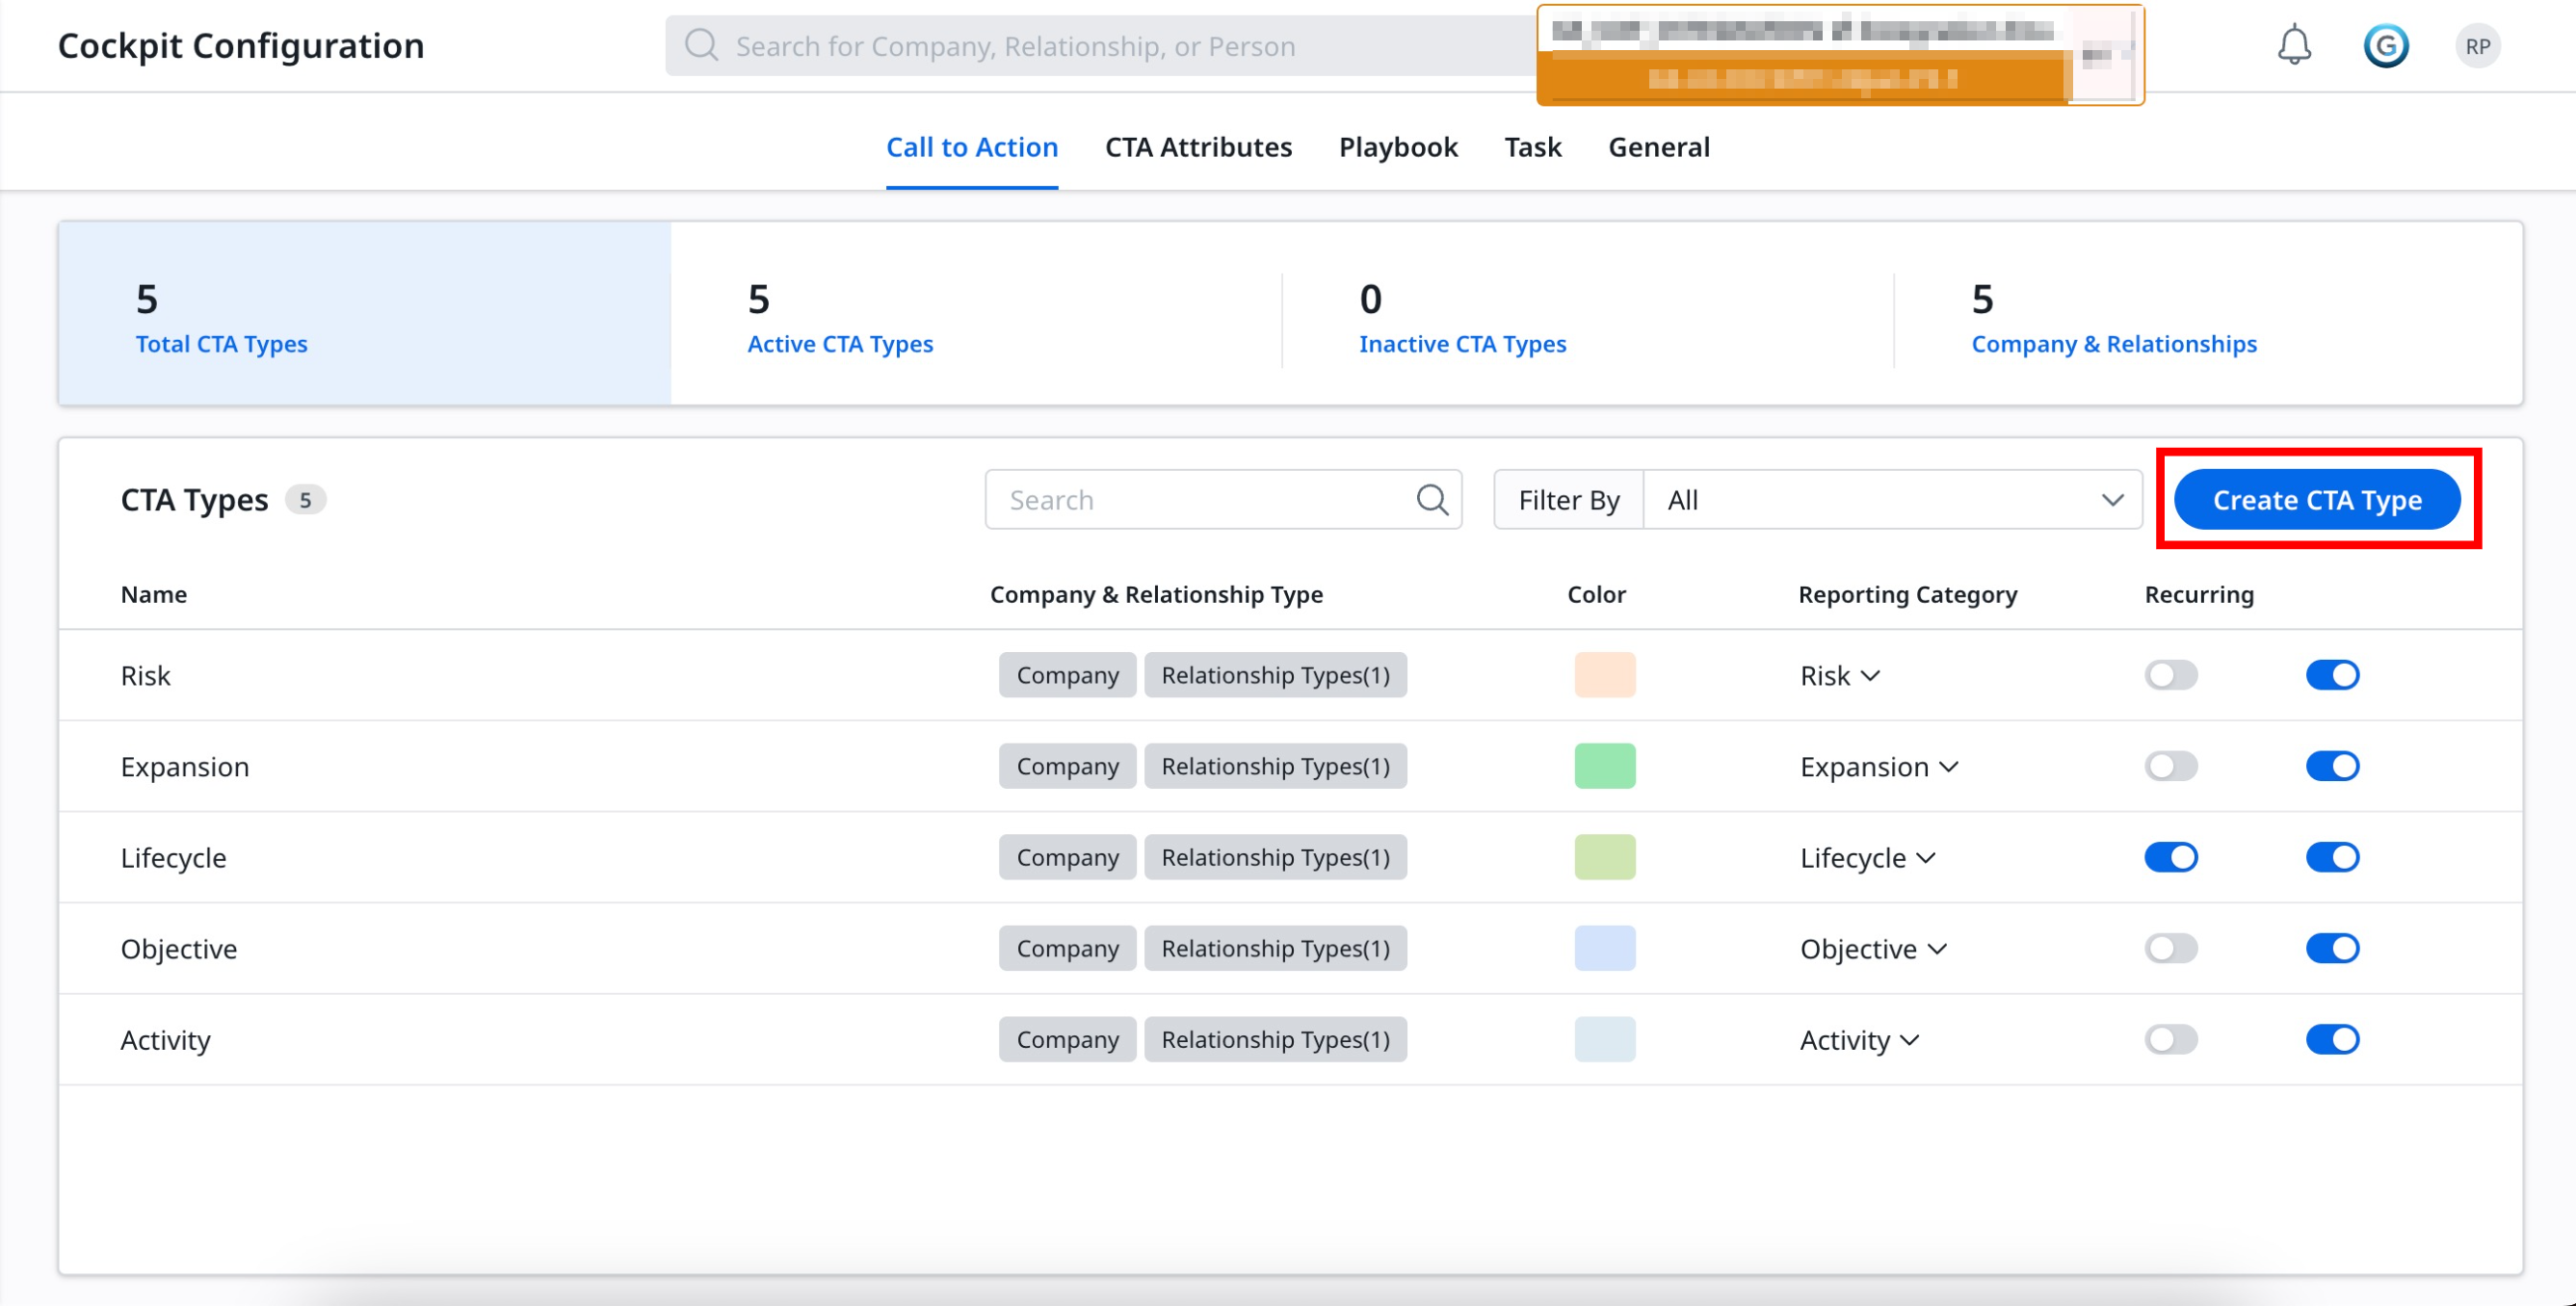
- Create CTA types: Allows you to create new CTA types.
- Name: The Name column lists the names of the various CTAs.
- Color: Shows the color designated to the CTA.
- Reporting Category: Shows CTAs based on the Reporting Category for which they have been created.
- Recurring: Allows you to mark the CTA as a recurring event.
Create CTA Types
Gainsight provides five out-of-the-box CTA types.
- Risk: Represents negative trends with customers. Examples include loss of exec. sponsor, low NPS® score, low number of licenses in use, and so on.
- Lifecycle: Lifecycle-based and typically scheduled events. Examples include training events, EBR/QBR, and renewal meetings.
- Expansion: Represents positive trends with customers. Examples include high NPS® score, high page views, or product usage.
- Objective: Objective is default CTAs to manage the Success Plans task.
- Activity: Tied to 360 Timeline Activities. Activity is generally the default CTA type for CTAs created from Timeline. Admins can also create CTAs of this type from the Cockpit page.
Note: In addition to the out-of-the-box CTA types available in Gainsight, you can also create custom CTA types.
To create a CTA Type:
- Navigate to Administration > Cockpit > Call to Action. The Call to Action list page appears.
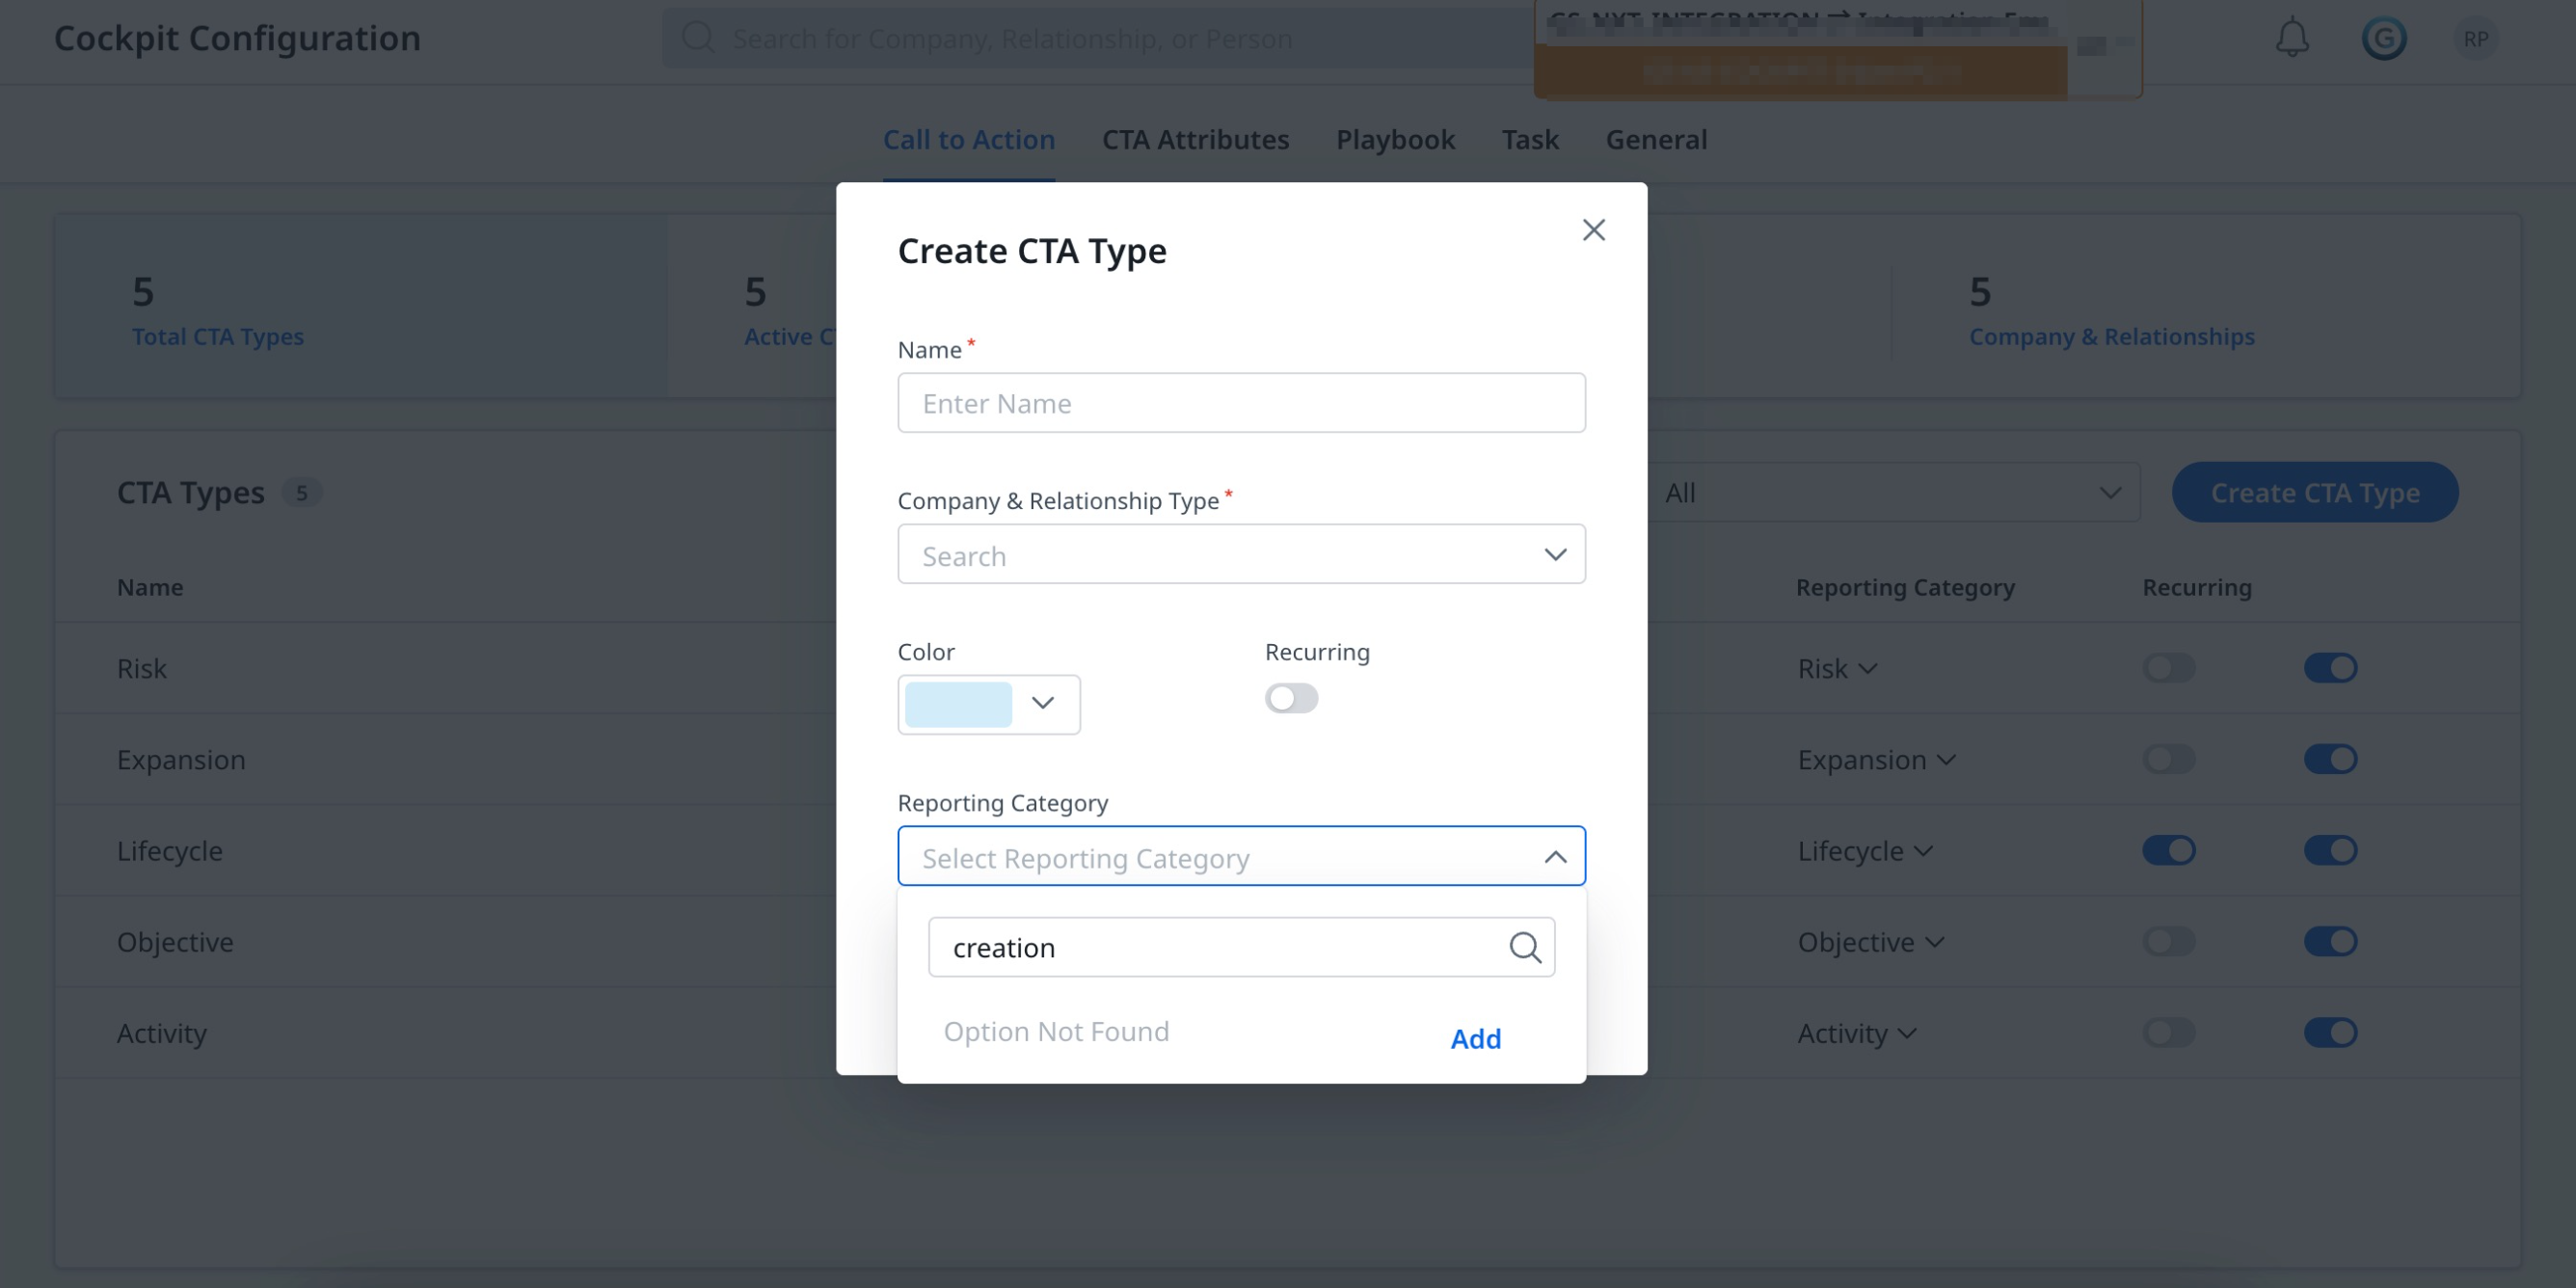
- Click Create CTA Type. A Create CTA Type dialog box appears.
- Enter the CTA name in the Name field.
- From the Company & Relationship dropdown, select either Company or Relationship or both.
- From the Color dropdown, select the color for CTA. Click Ok.
- (Optional) Turn on Recurring toggle to mark the CTA as a recurring event.
- From the Reporting Category dropdown, select a reporting category for the CTA, or you can add a new reporting category name. Enter the name and click Add.
- Click Continue. The CTA Type created by you appears on the CTA Layout Configuration page.
Manage CTAs
Once the CTA is created, you need to manage and customize it effectively to track and support the customer goals and objectives. Effectively management of CTA helps CSMs to perform their tasks more smoothly and with better results. You can set up attributes, configure playbooks, Create tasks, and add layouts.
Set Up CTA Attributes
CTA Attributes are designed to enhance and personalize CTAs for improved customer engagement. These attributes offer customizing CTAs, ensuring that each action is strategically aligned to meet specific business goals and user needs.
You can select from default attributes or create custom ones, providing a flexible and effective way to manage CTAs in various stages, priorities, and conditions. This customization ensures that CTAs are relevant, timely, and effective in driving desired outcomes. Also, you can set the default as none for Reason, Priority, and Snooze. This ensures that every CTA attribute from Reason, Priority, and Snooze has a defined status to improve tracking and management.
The CTA Attributes contain the following different attributes:
- Create Reason
- Create Status
- Create Priority
- Create Snooze Reason
- Create Views
- Create Fields on Call to Action
Create Reason
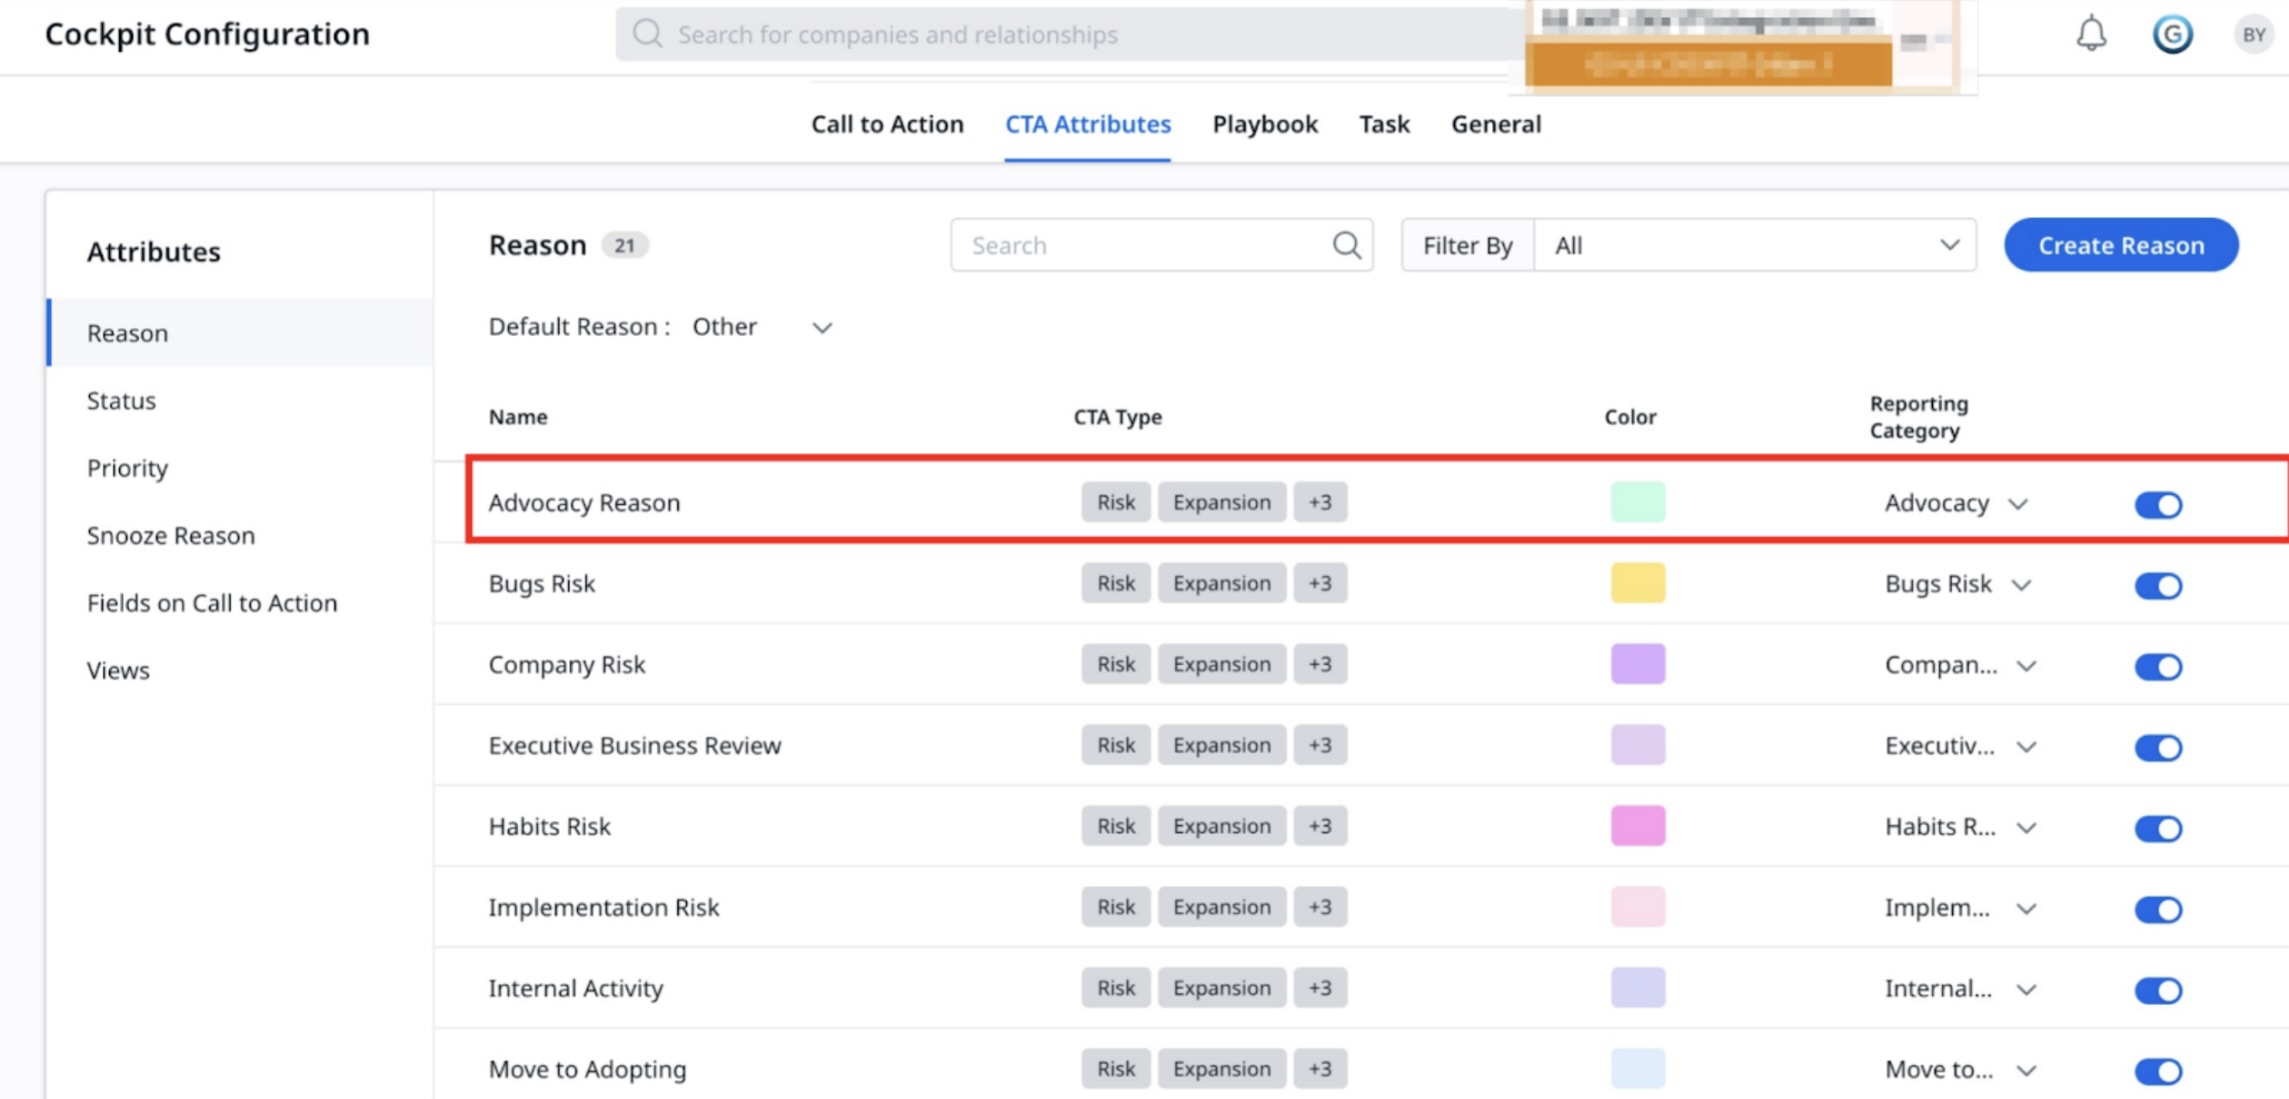
The Reason attribute provides information on the intent and purpose of the CTAs. Gainsight provides 19 default reason attributes.
You can create customized reason attributes, in addition to the default option available.
To create a CTA reason attribute:
- From the CTA Attributes page, select Reason from the Attribute list.
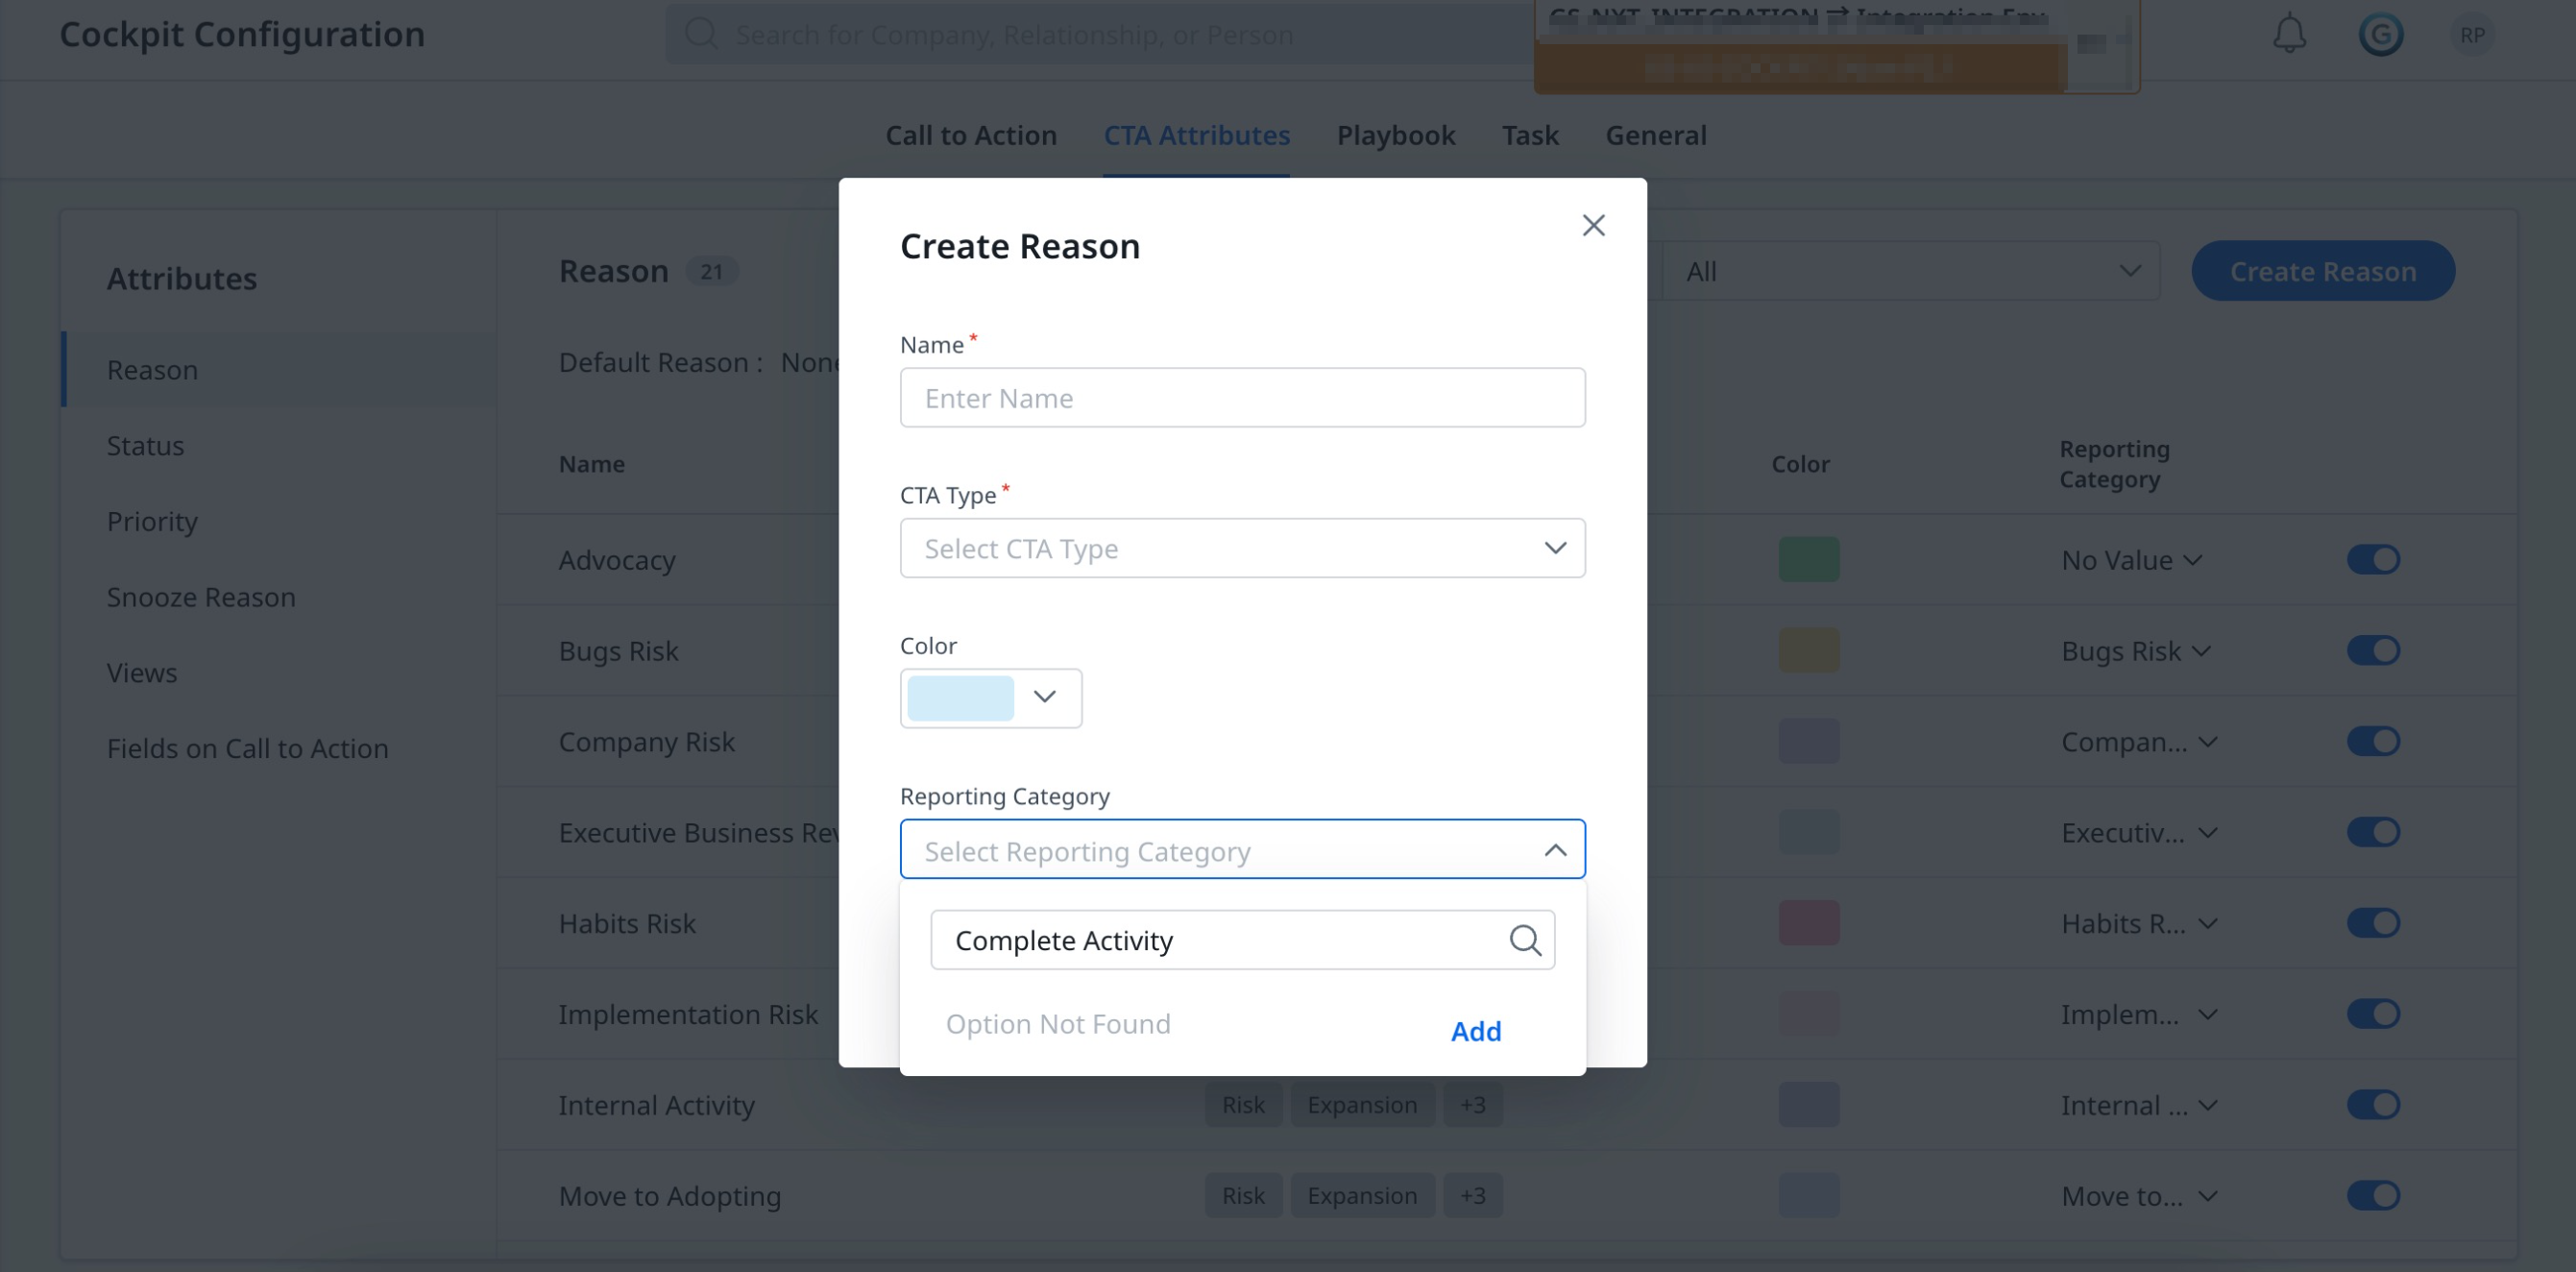
- Click Create Reason. A Create Reason dialog box appears.
-
Provide the following details:
- Enter the name for the reason attribute in the Name field.
- From the CTA Type dropdown, select the CTA type.
- From the Color dropdown, select the required color. Click Ok.
- From the Reporting Category dropdown, select the category from the list, or you can add a new reporting category name. Enter the name in the Search field. Click Add.
- Click Save. A new CTA Reason is created and appears on the Reason list page.
- (Optional) You can edit the name of the reporting category from the listing screen. Click the required category, and click edit icon to edit the name. Click Save Reporting Category to apply the changes.
Create Status
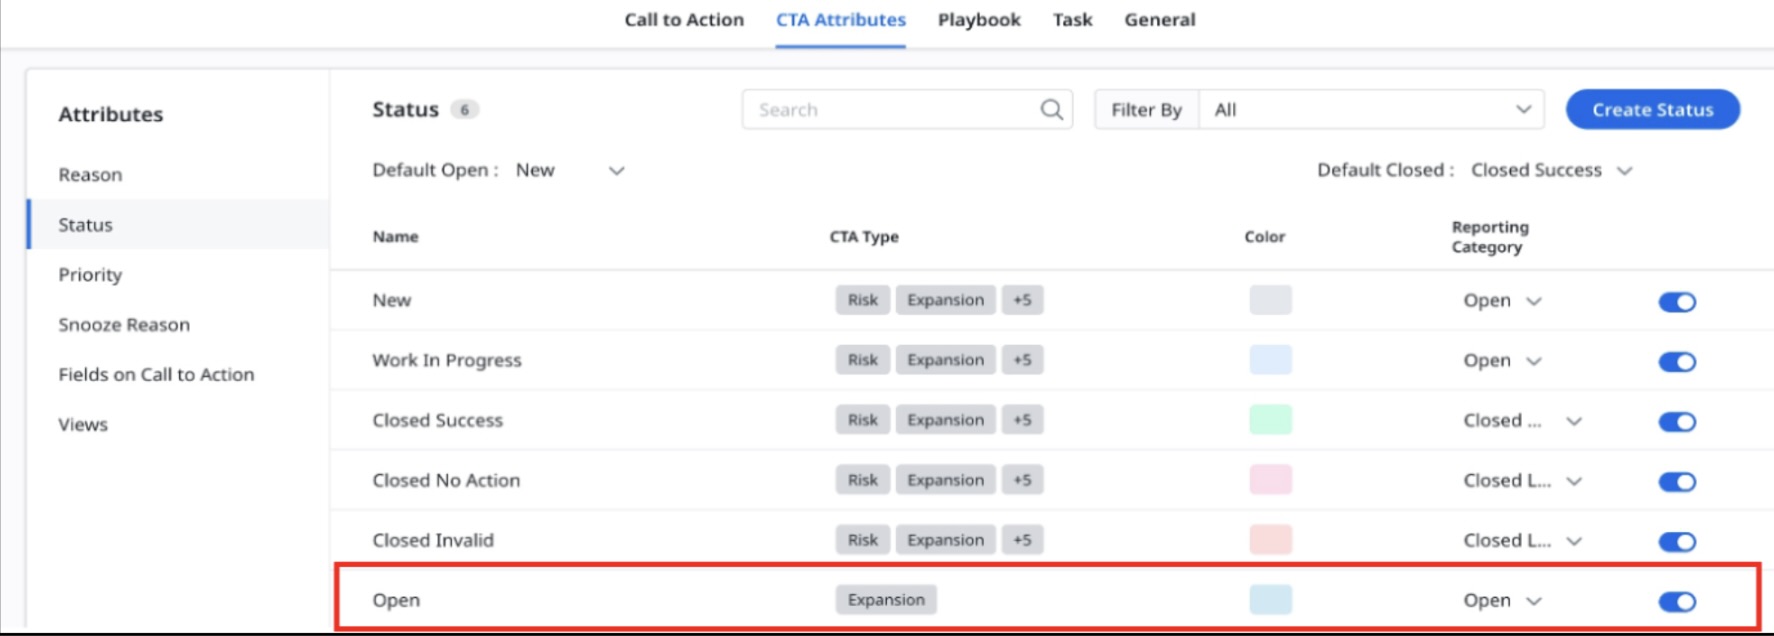
Status in CTA attributes represents the current stage or condition of that CTA. This provides admins with a clear and quick overview of a CTA, whether it is making progress or resolution.
The default status is distributed under two subcategories:
-
Default Open
- New
- Work in Progress
-
Default Close
- Closed Success
- Closed No Action
- Closed Invalid
You can create customized status attributes, in addition to the default option available. Default is mandatory for Status.
To create a CTA Status attribute:
- From the CTA Attributes page, select Status from the Attributes list.
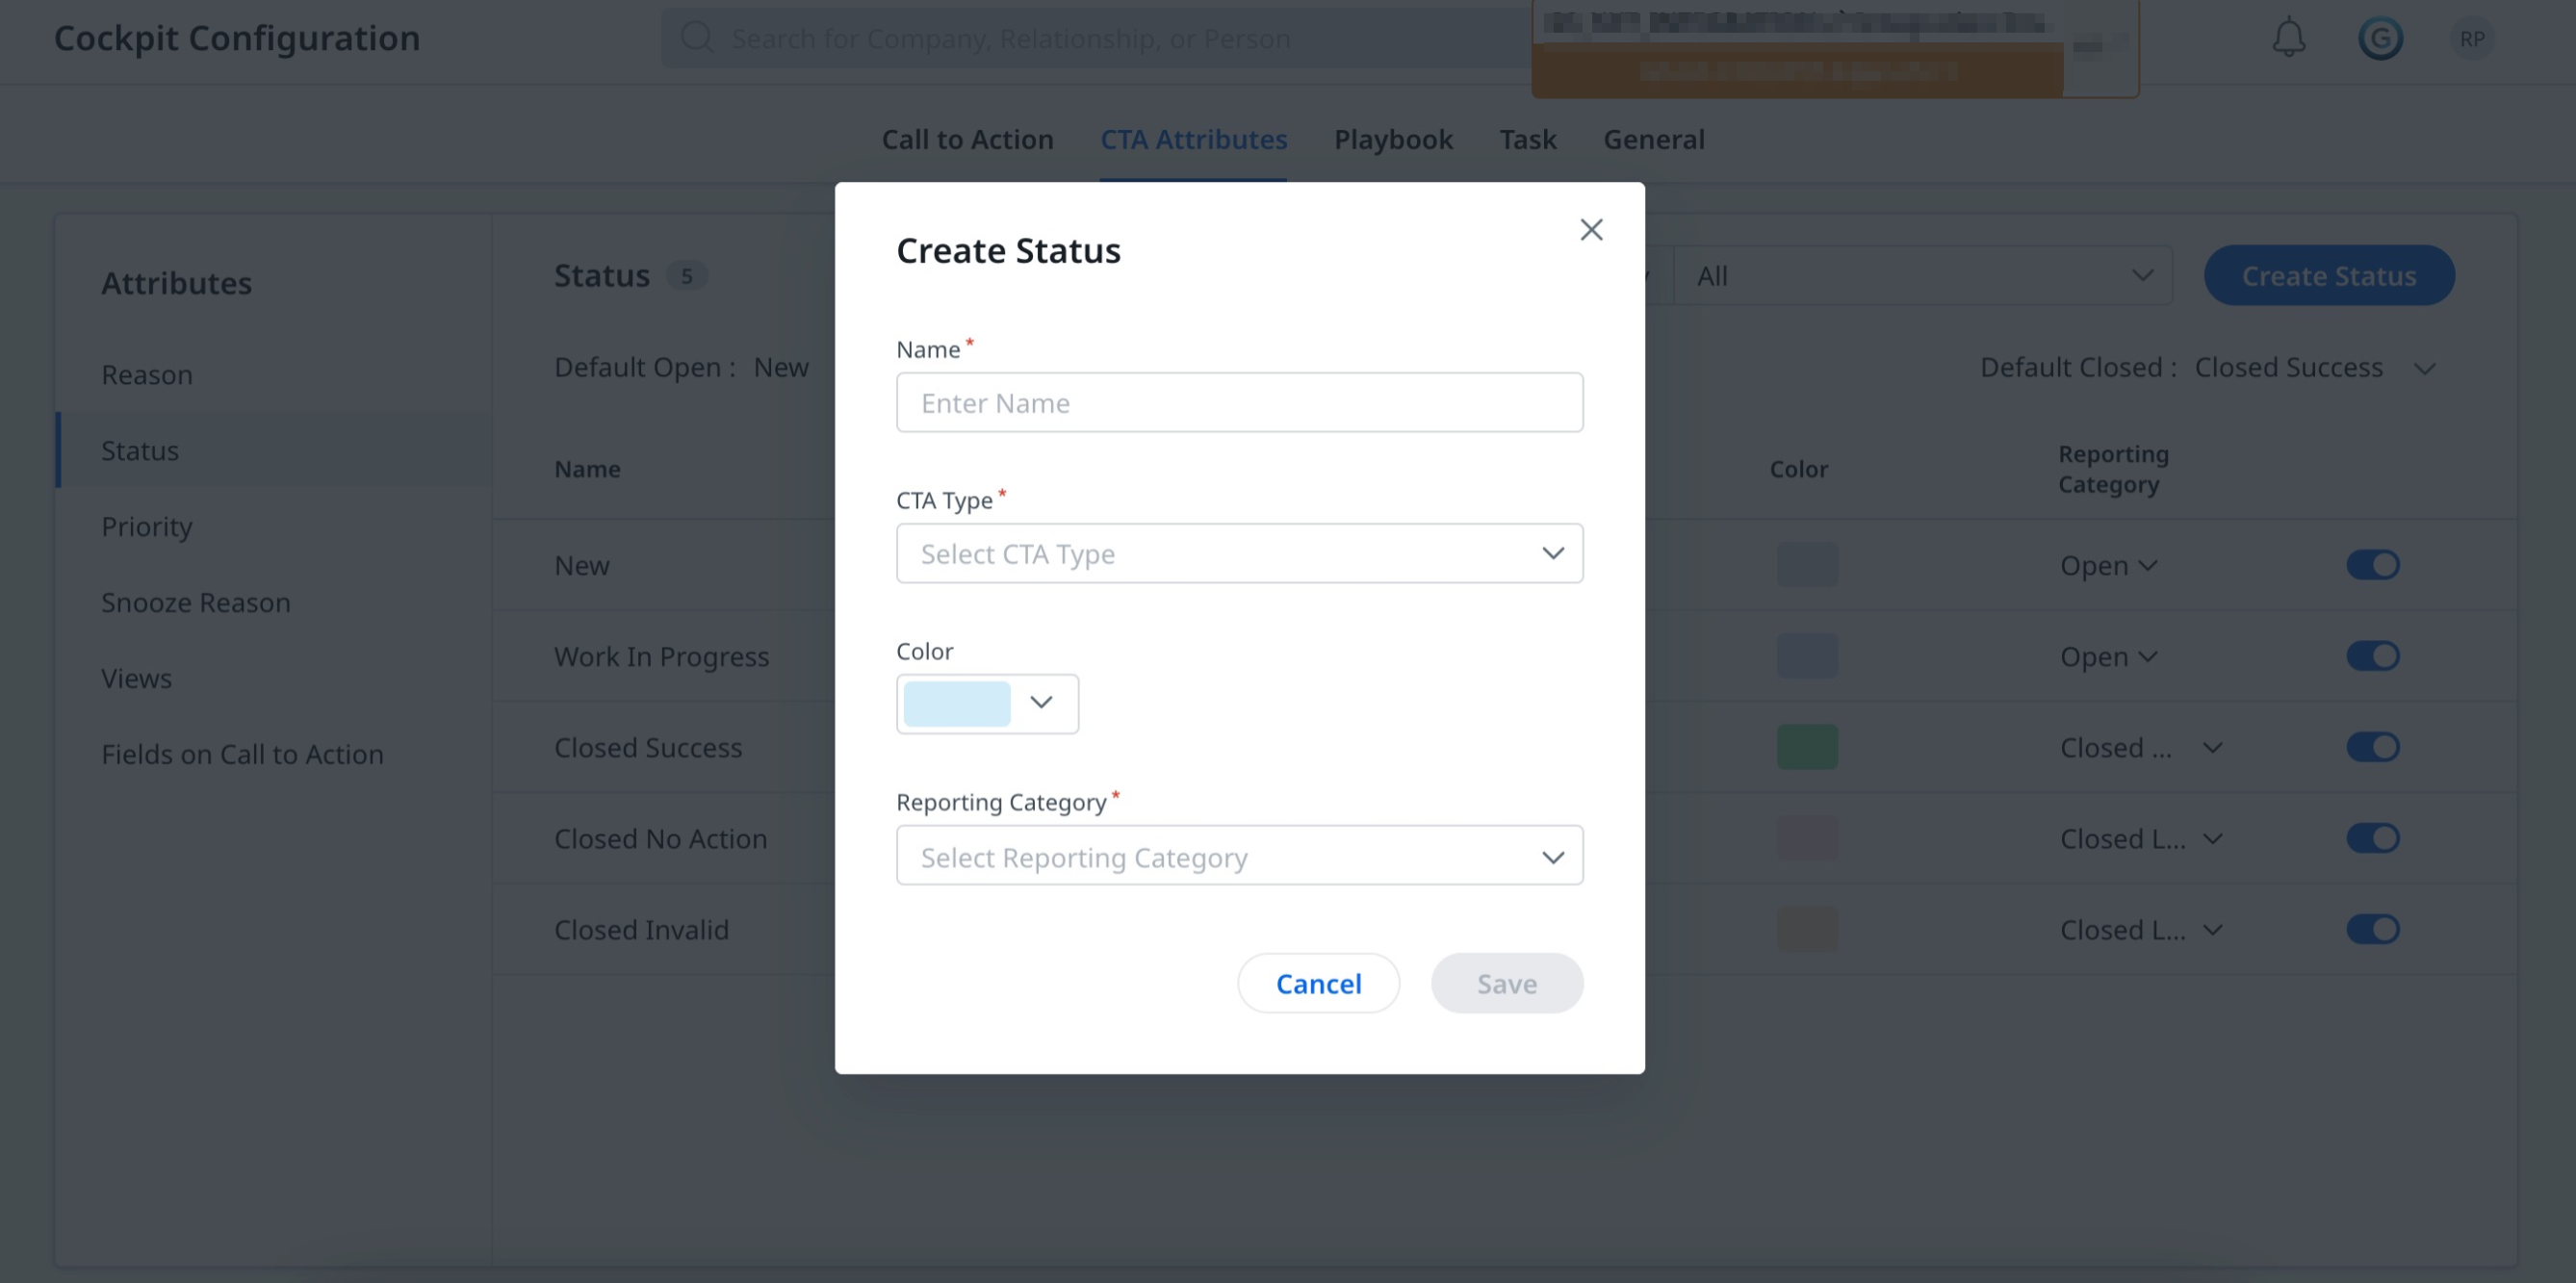
- Click Create Status. A Create Status dialog box appears.
-
Provide the following details:
- Enter the name for the status attribute In the Name field.
- From the CTA Type dropdown, select the CTA type.
- From the Color dropdown, select the required color. Click Ok.
- From the Reporting Category dropdown, select the category from the list.
Note: Admins cannot add, edit, or delete a CTA status reporting category. - Click Save. A new CTA Status is created and appears on the Status list page.
Create Priority
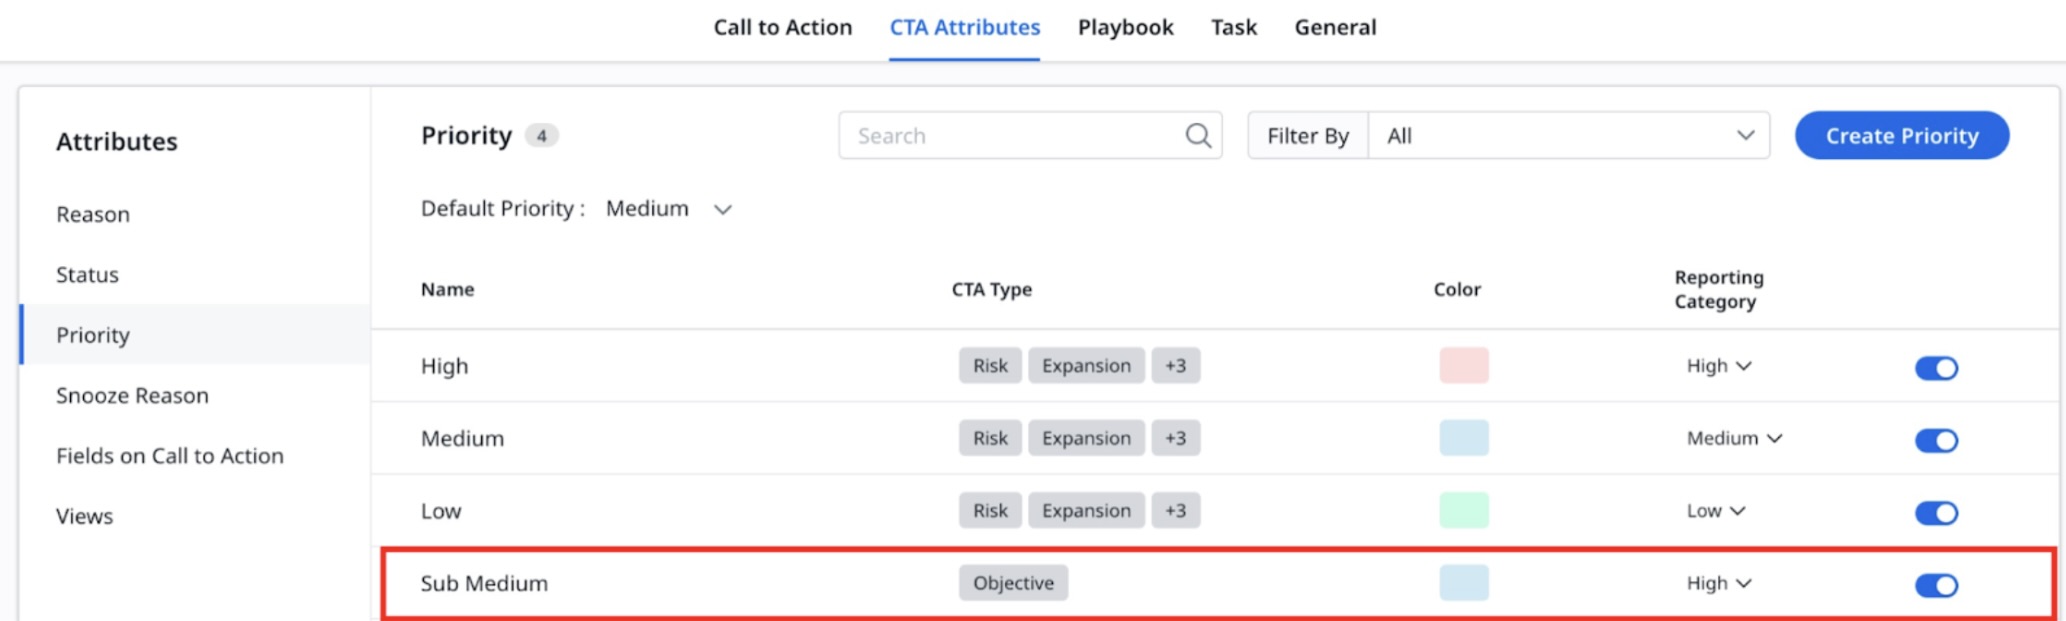
Priority in a CTA refers to the level of urgency or importance assigned to that CTA. This attribute helps CSMs and other team members to quickly identify which tasks or action items need immediate attention and which can be scheduled for a later time. Gainsight provides three default priorities.
You can create customized priority attributes, in addition to the default option available.
To create a CTA Priority attribute:
- From the CTA Attributes page, select Priority from the Attributes list.
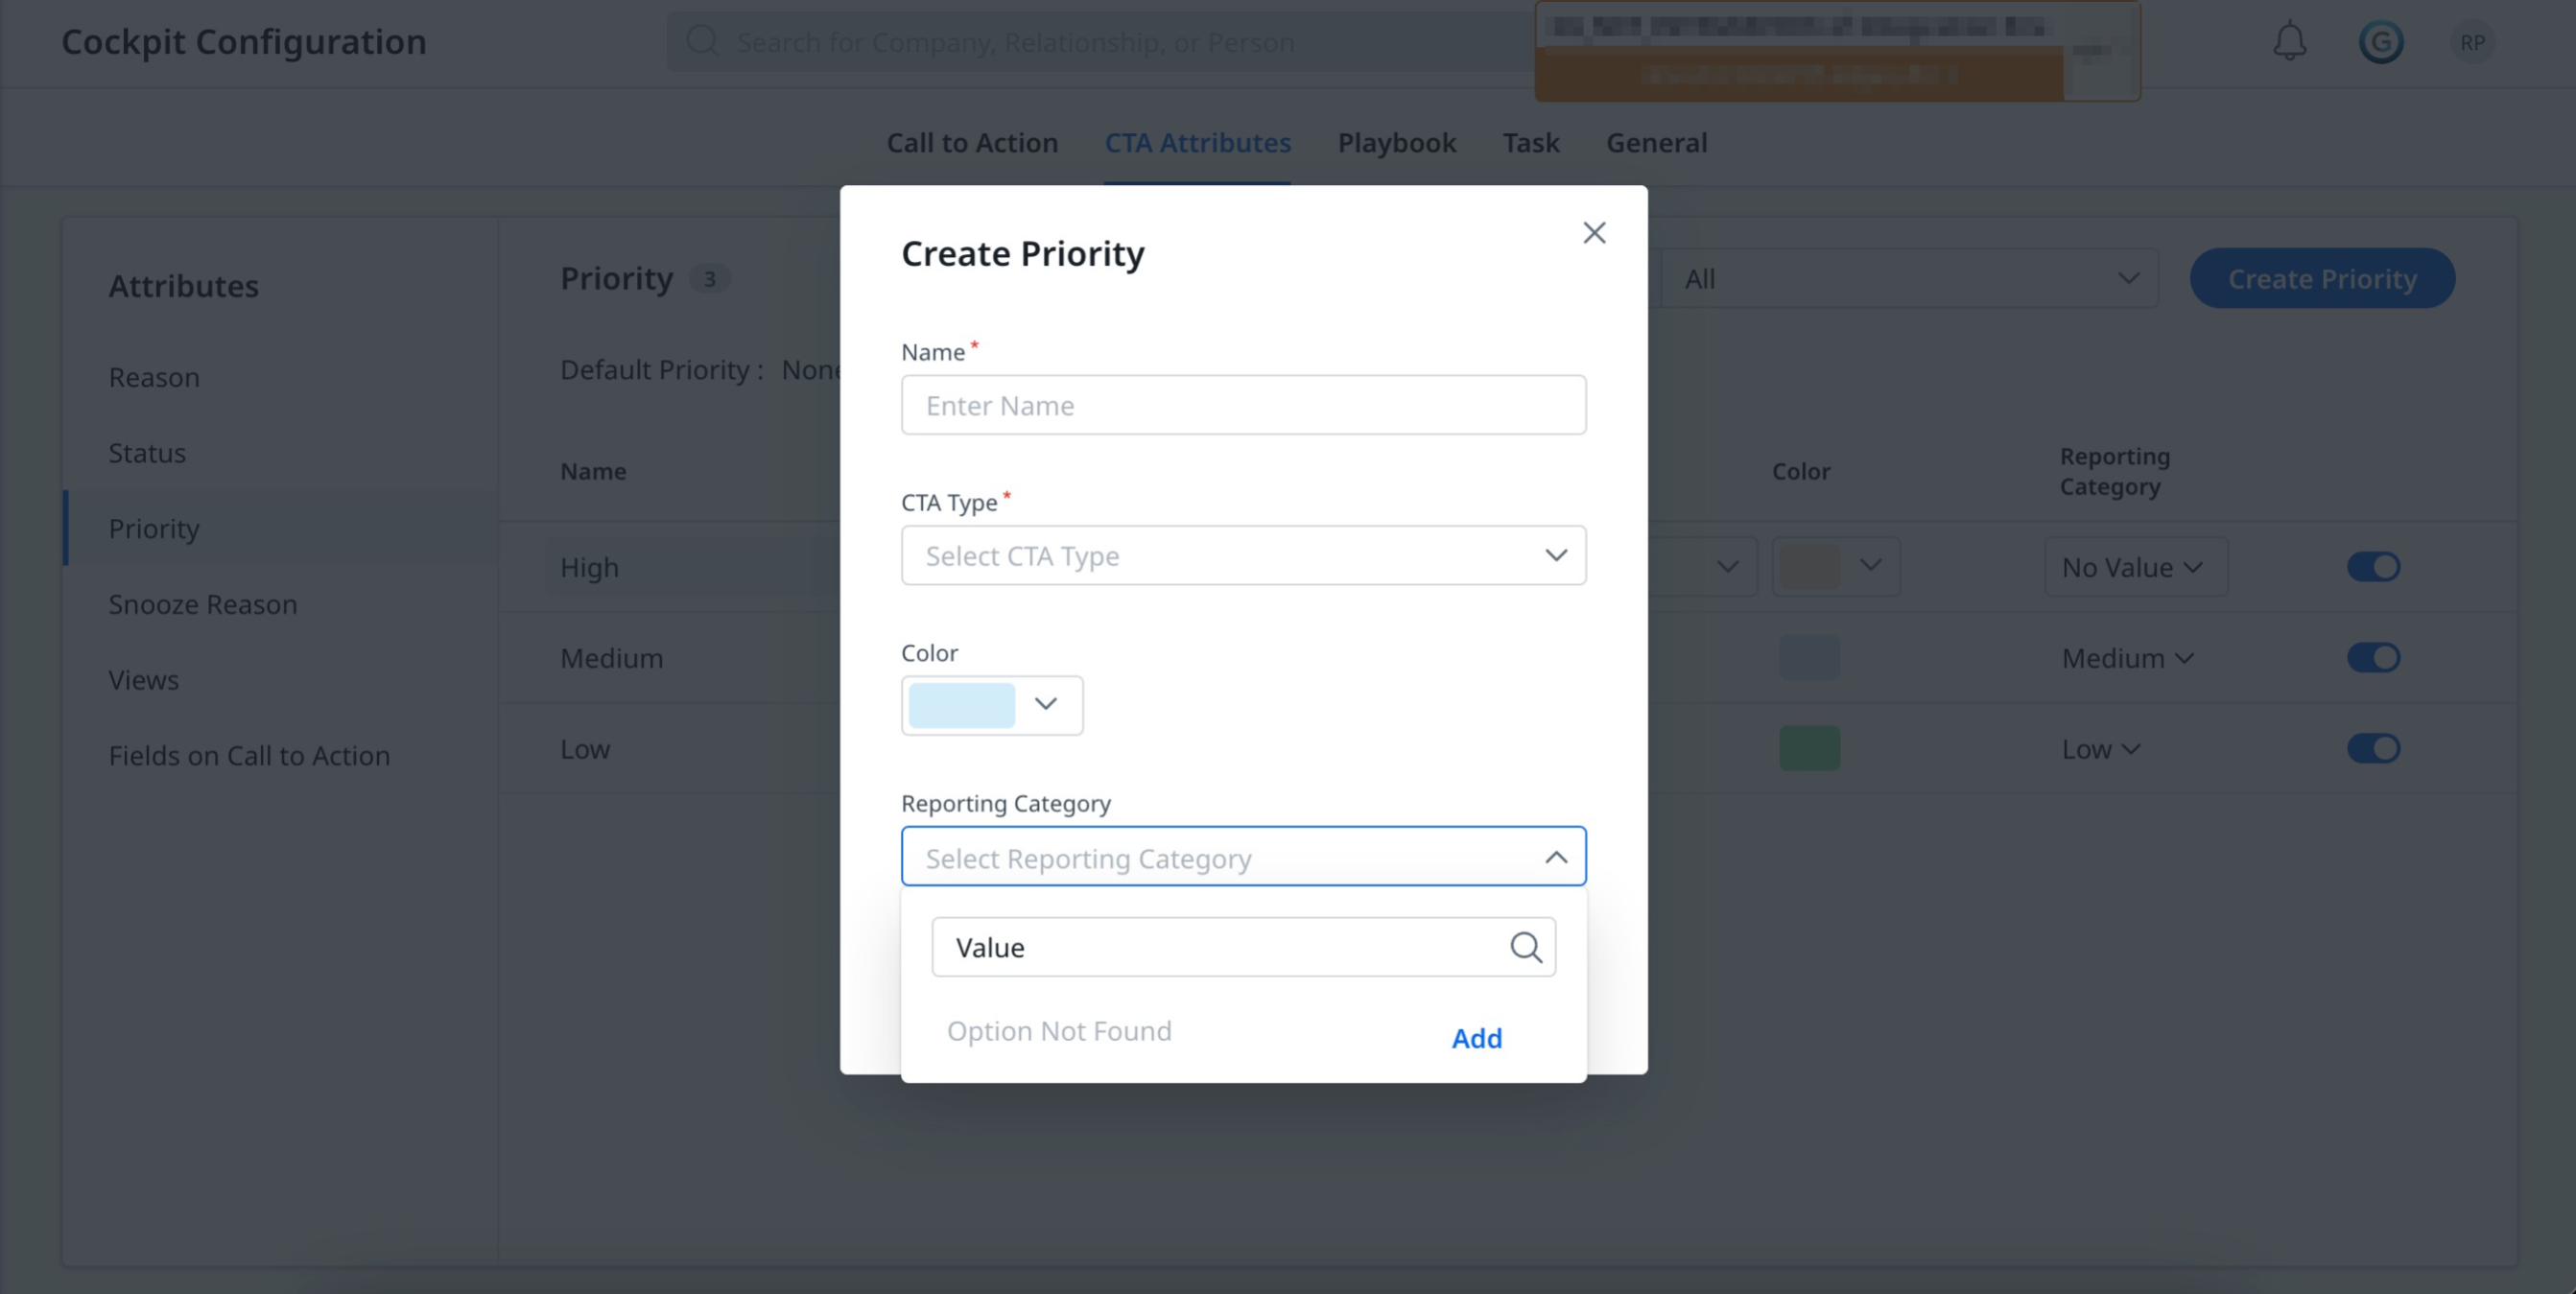
- Click Create Priority. A Create Priority dialog box appears.
-
Provide the following details:
- Enter the name for the priority attribute In the Name field.
- From the CTA Type dropdown, select the CTA type.
- From the Color dropdown, select the required color. Click Ok.
- From the Reporting Category dropdown, select the category from the list, or you can add a new reporting category name. Enter the name and click Add.
- Click Save. A new CTA Priority is created and appears on the Priority list page.
- (Optional) You can edit the name of the reporting category from the listing screen. Click the required category, and click edit icon to edit the name. Click Save Reporting Category to apply the changes.
Create Snooze Reason
Snooze Reason in a CTA refers to the justification provided when a CTA is temporarily deferred or put on hold. The snooze function allows admins to temporarily remove the CTA from their active list without marking it as completed or deleting it. Gainsight provides three default snooze reasons.
You can create customized snooze reason attributes, in addition to the default option available.
To create a new Snooze Reason attribute:
- From the CTA Attributes page, select Snooze Reason from the Attributes list.
- Click Create Snooze Reason. A Create Snooze Reason dialog box appears.
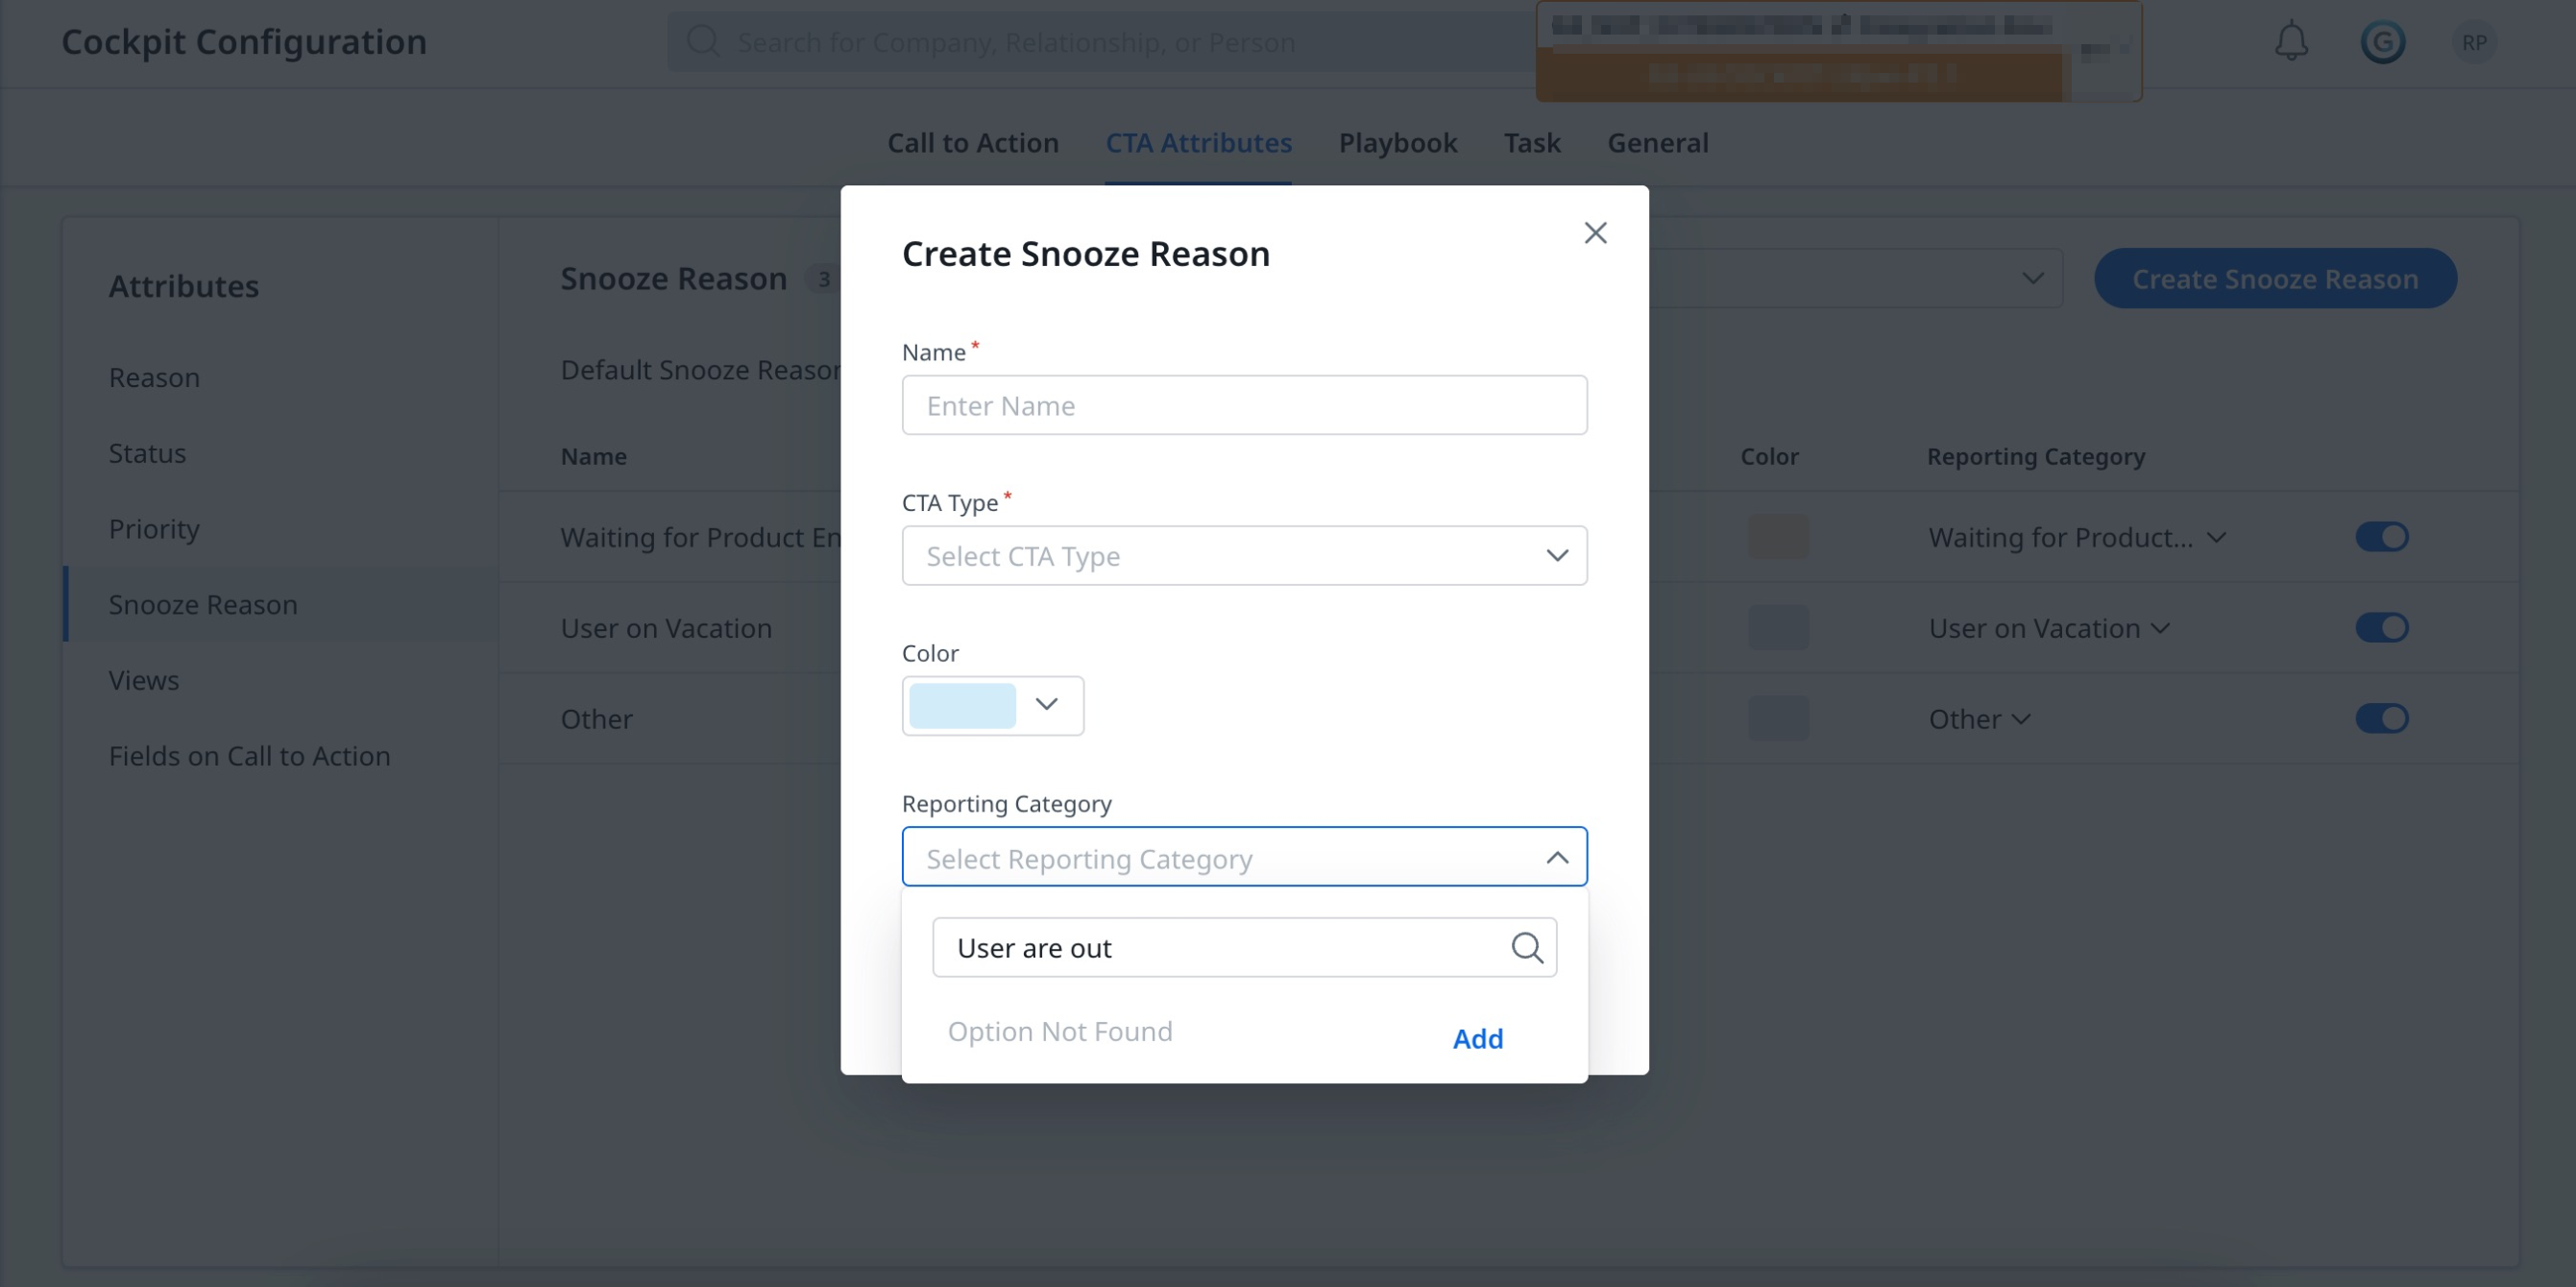
-
Provide the following details:
- Enter the name for the snooze reason in the Name field.
- From the CTA Type dropdown, select the CTA type.
- From the Color dropdown, select the required color. Click Ok.
- From the Reporting Category dropdown, select the category from the list, or you can add a new reporting category name. Enter the name and click Add.
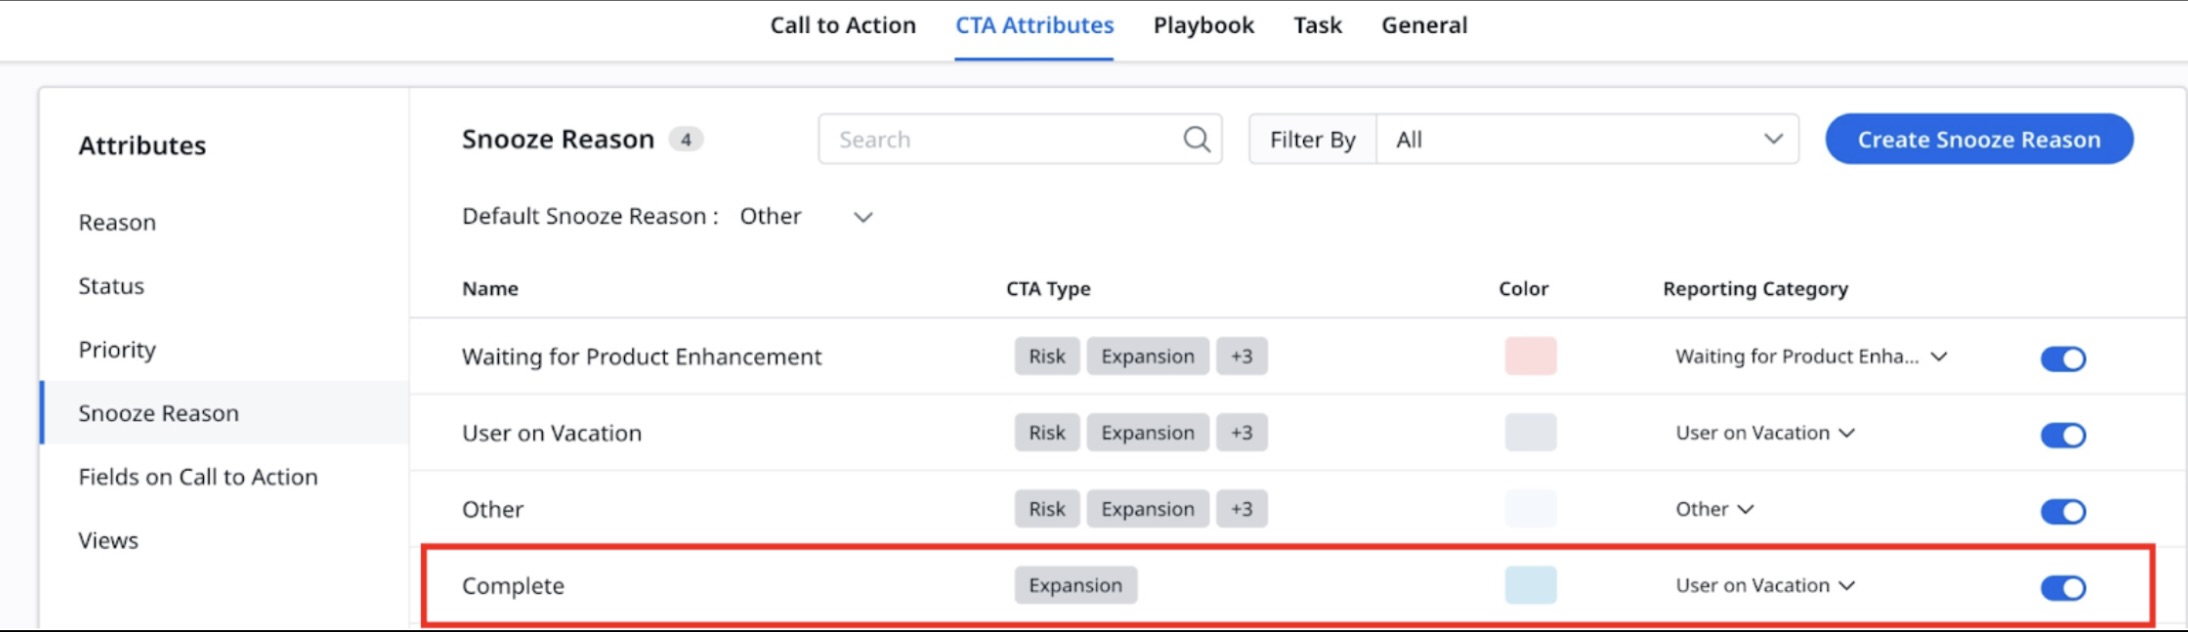
- Click Save. A new Snooze Reason attribute is created and appears on the Snooze Reason list page.
- (Optional) You can edit the name of the reporting category from the listing screen. Click the required category, and click edit icon to edit the name. Click Save Reporting Category to apply the changes.
Create Views
Cockpit Views provide the primary workspace for CSM teams to manage their CTAs and Tasks. Admins can use either default views for viewing specific CTAs or create customized views to select a preferred set of CTAs. Gainsight provides four default views.
You can create customized view attributes, in addition to the default option available based on the view type, and permissions, and by applying filters to them.
To create a view:
- From the CTA Attributes page, select View from the Attributes list.
- Click Create View. A Create New View page appears.
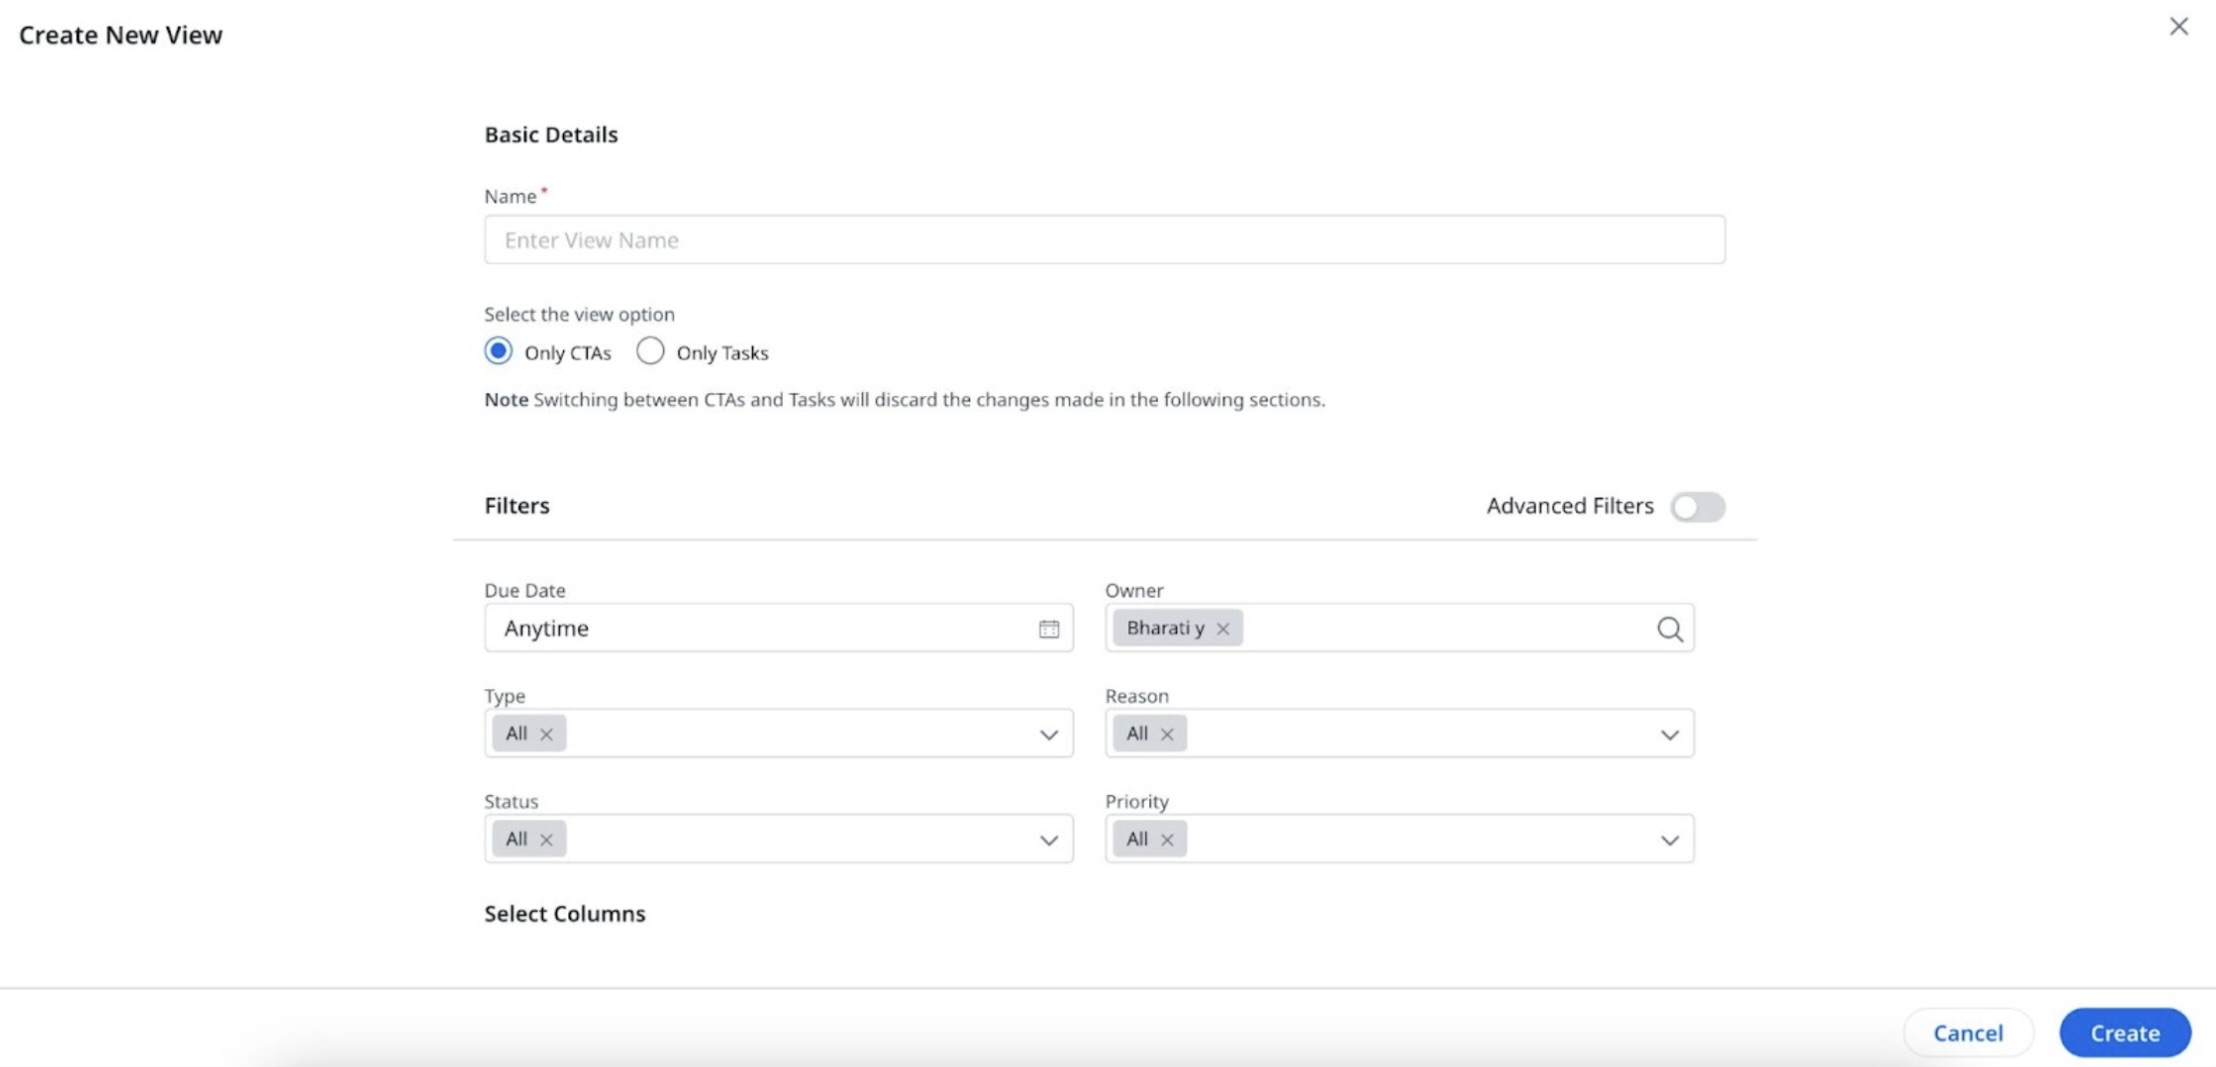
- Enter the view name in the Name field.
- Select the required view option, either Only CTAs or Only Tasks.
- In the Filters section, provide the following details:
- From the Due Date dropdown, select the date.
- Search and select the owner name in the Owner field.
- From the Type dropdown, select the CTA Type.
- From the Reason dropdown, select the reason.
- From the Status dropdown, select the status.
- From the Priority dropdown, select the priority.
- Turn on the Advance Filters toggle to add more filters. Click Add Filter and select the field, operator, and value from the Field, Operator, and Value dropdown.
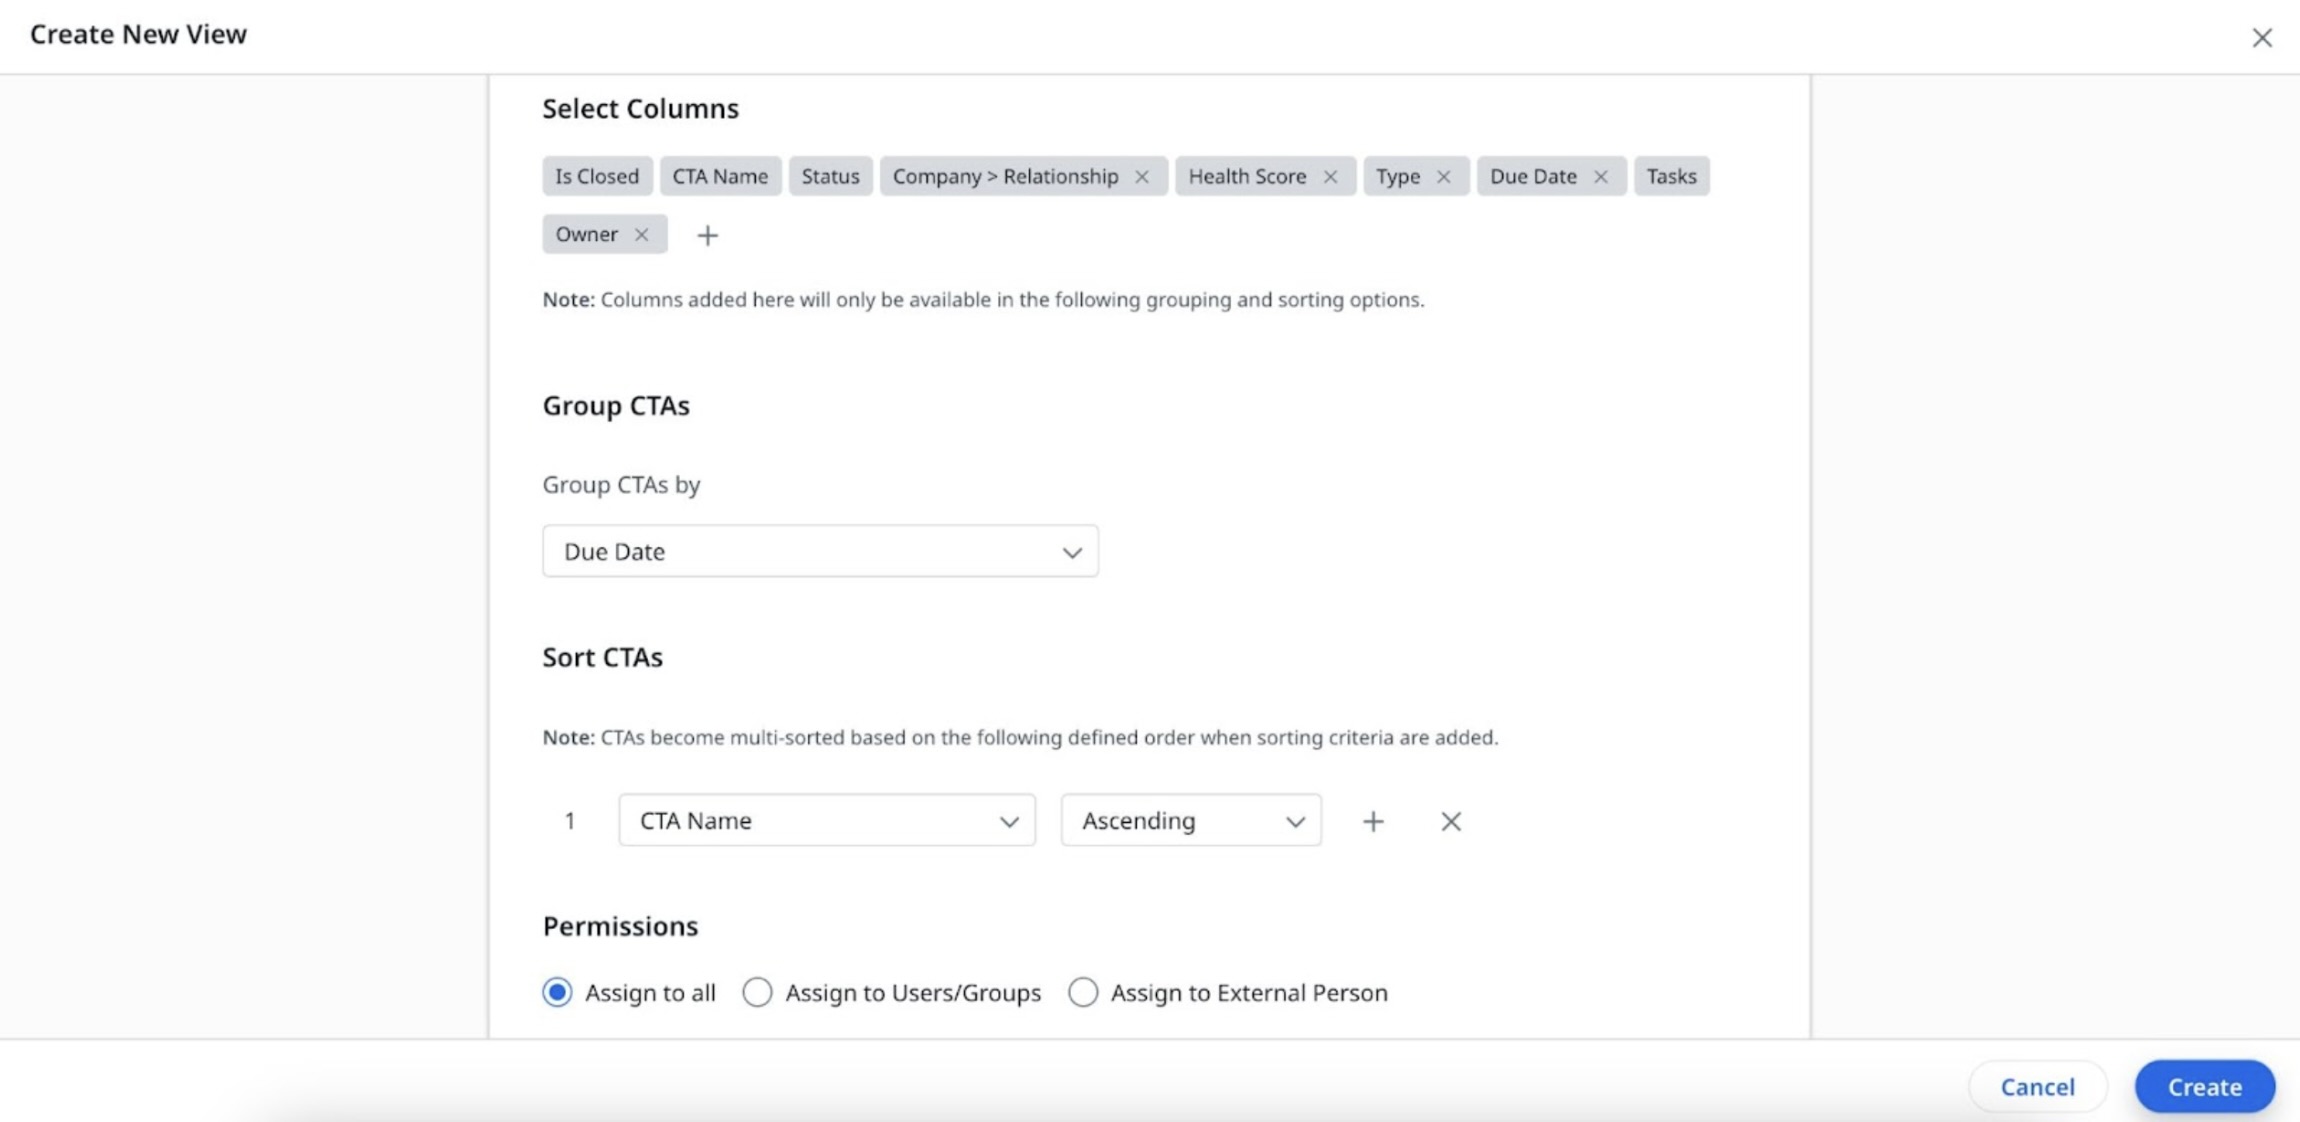
- From the Select Columns section, click the + icon to add more columns.
- From the Group CTAs by dropdown, select the required parameters.
- Sort CTAs with the dropdown available in the Sort CTAs section.
- From the Permission section, select the required permission option.
- Click Create. A new View is created and added to the Views list page.
 Create Custom Fields for Call to Action
The fields on Call to Action are a combination of pre-defined and custom-created, including both editable and non-editable fields. These fields are integral to the functionality of Cockpit and provide essential information about each CTA.
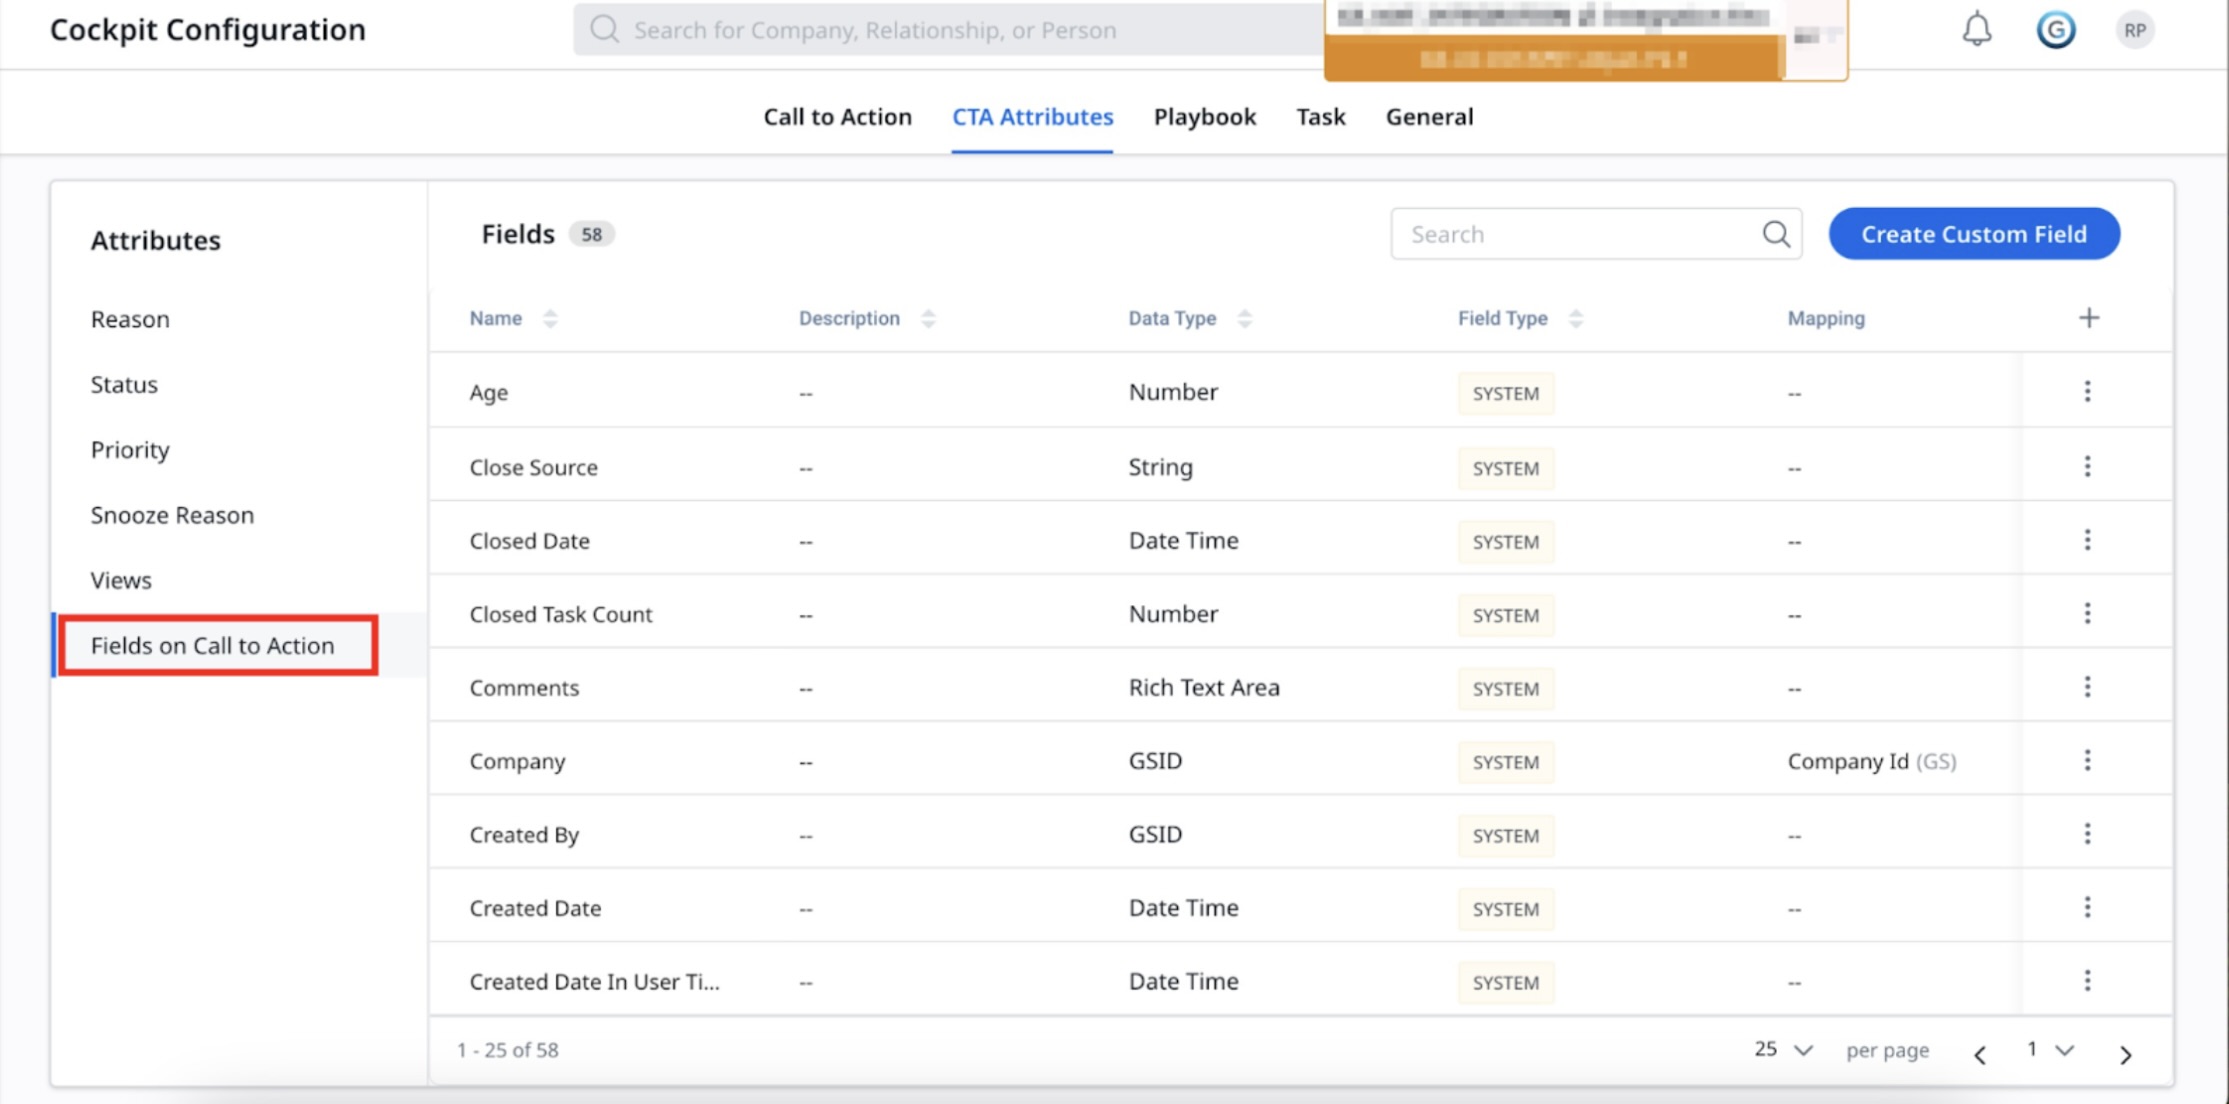
You can create customized field attributes, in addition to the default option available.
To create a custom Field:
- From the CTA Attributes page, select Fields on Call to Action from the Attributes list.
- Click Create Custom Field. A Create Custom Field slide-out panel appears.
-
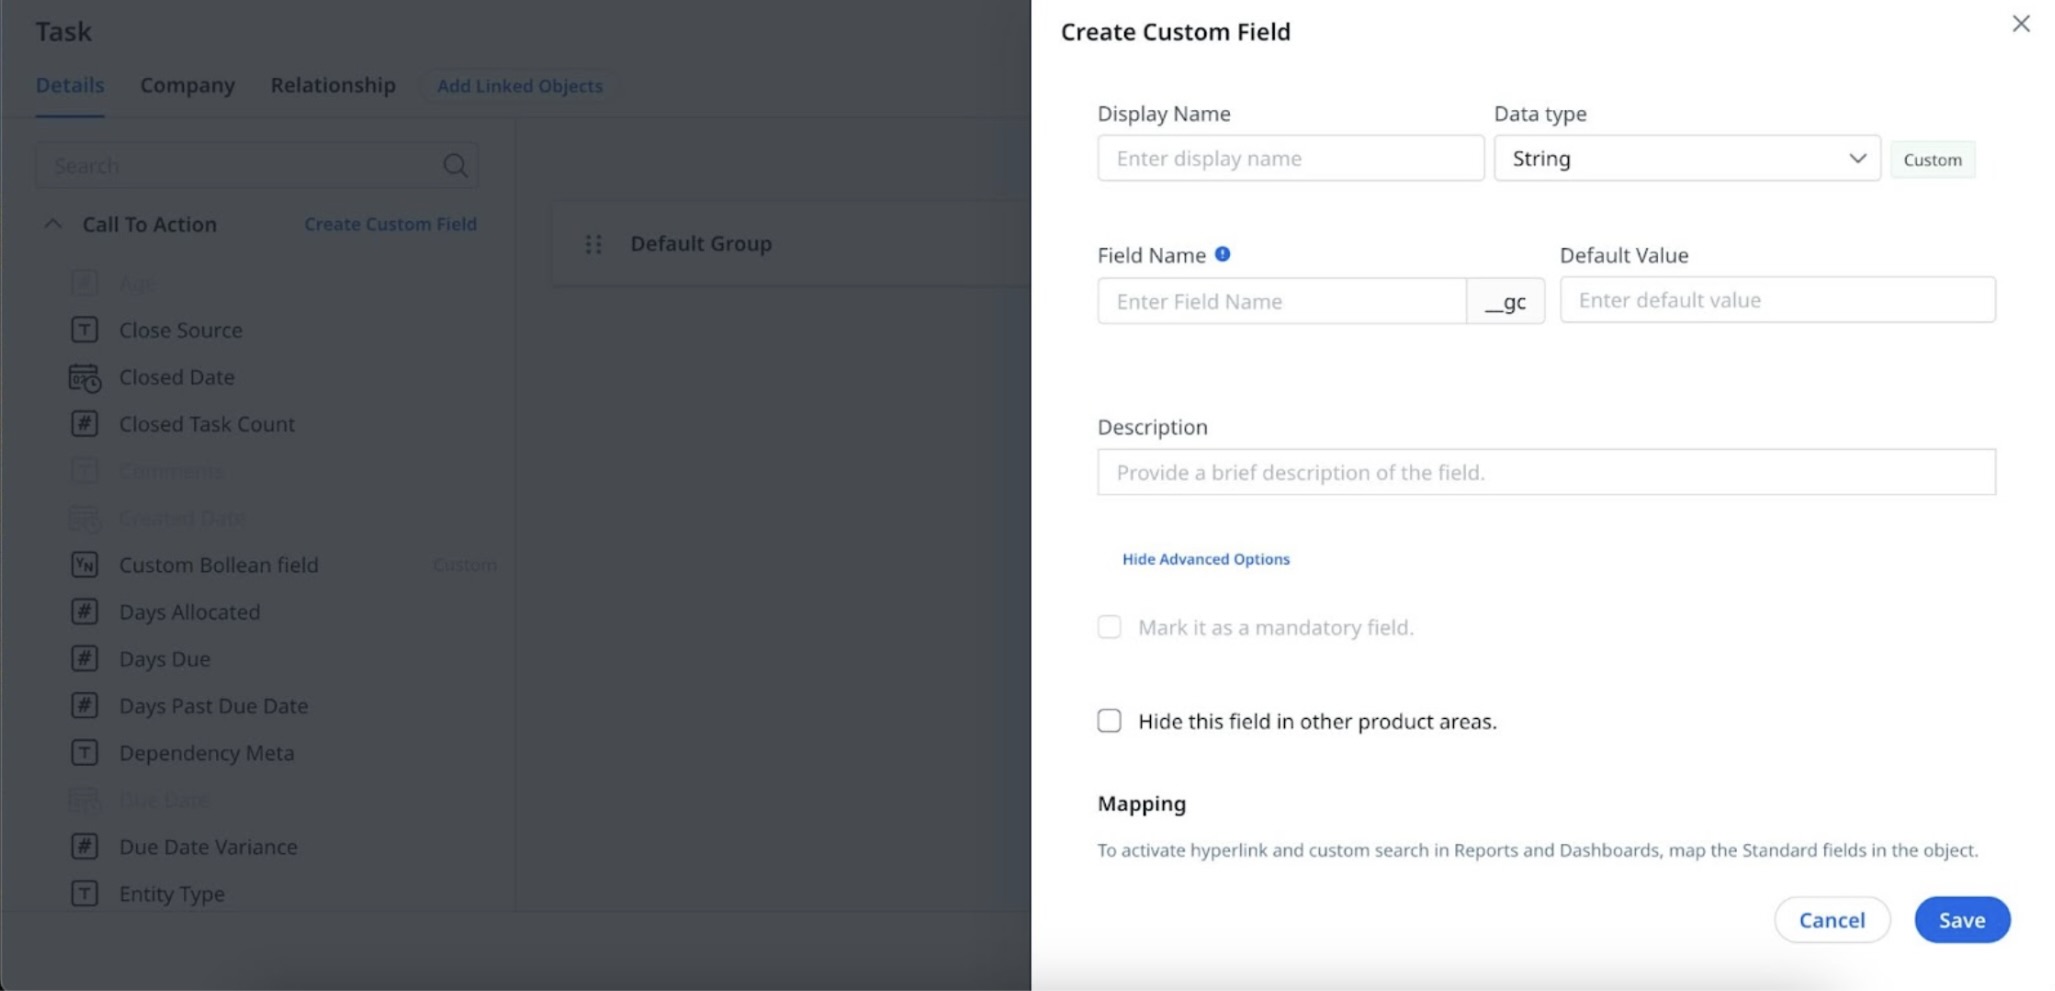
Provide the following details in the respective fields:
- Enter the name in the Display Name field.
- From the Data type dropdown, select the required data type.
- Enter the name in the Field Name field.
- Enter the value in the Default Value field.
- Enter a description in the Description field.
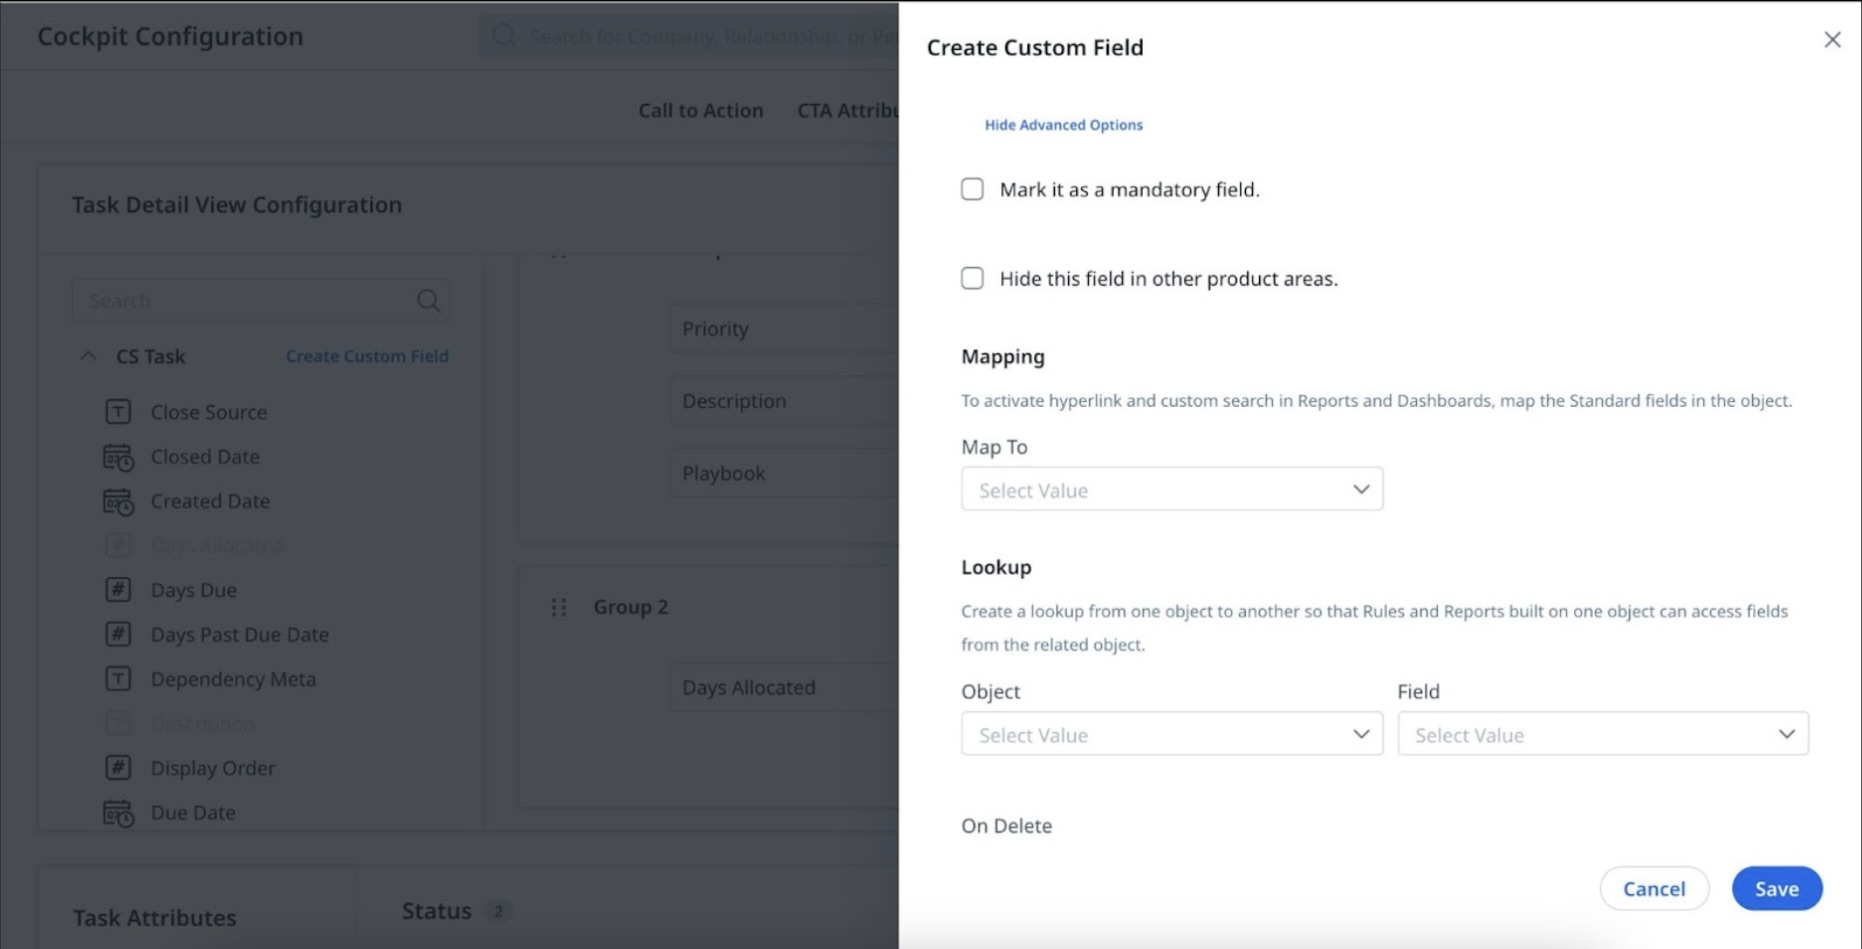
- Click Show Advanced Options. The advanced fields appear.
Note: select or clear the Hide this field in other product areas check box. By default Mark it as a mandatory field is disabled. - For the field mapping, select a value from the following dropdown options:
- Map To: Select a standard field.
- Object: Select the object.
- Field: Select the field.
- On Delete: Select deletion of the field.
- (Optional) To create a formula field, click Create Formula. Add the formula in the provided text box and click Apply.
- Click Save. The custom field is created.
Configure CTA Types Layouts
Once the CTA Type is created, perform the following steps to create a layout.
 Add Details
The Details tab lists all the standard CTA fields along with the custom fields. This tab contains the following functionality:

Create Custom Field
Admins can create custom fields as per their requirements apart from the given fields in the CTA object.
To create a Custom Field:
- Click Create Custom Field. The Create Custom Field slide-out panel appears.
- Provide the required details in the respective field:
- Display Name: Enter the display name.
- Date Type: Select the date type from the dropdown.
- Field Name: Enter the field name.
- Default Value: Enter the default value.
- Description: Enter a description of the field.
- Click Show Advanced Options. The advanced fields appear.
Note: Select or clear the Hide this field in other product areas check box. By default Mark it as a mandatory field is disabled. - For the field mapping, select a value from the following dropdown menus:
- Map To: Select a standard field.
- Object: Select the object.
- Field: Select the field.
- On Delete: Select deletion of the field.
- (Optional) To create a formula field, click Create Formula. Write the formula in the provided text box and click Apply.
- Click Save. The custom field is created and appears with a Custom tag.
Use Default Group
A default group in the layout configuration is available out-of-the-box. This group contains a set of standard fields.
To edit in the Default Group:
- Click the edit icon that appears adjacent to the Owner field. The Owner slide-out panel appears with the configuration path.
- Enter the display name in the Display Name field.
- Select or clear the Editable checkbox to control field editability.
- Select or clear the Mandatory to close checkbox to enforce users to provide value while closing a CTA.
- Turn on Enable Sharing toggle to allow the Default Group to be shared with other CTAs.
Note:
- The default group cannot be deleted.
- The fields eligible for editing are represented by an edit icon.
- The name of the Default Group name is editable.
Add Group
You can add multiple groups while creating a CTA, in addition to a default group.
To add a group:
- Click Add Group. Group 2 is added to the layout configuration.
- From the left pane, drag and drop the required fields into Group 2.
- (Optional) Hover on the selected fields and click the Settings icon to change the field.
- (Optional) Click the X icon to delete the field.
- (Optional) Turn on Enable Sharing toggle to permit the sharing of the group.
- (Optional) Click the delete icon to delete the entire group.
Note:
- The added groups can be renamed.
- The display sequence of added groups can be changed using the drag and drop method.
Add Company Details
You can configure the company fields required for the CTA from this tab. It has the following capabilities :
IMPORTANT:
- The Create Custom Field Is not available for the Company Tab.
- The Company fields added to the layout are visible only in the Company CTAs.
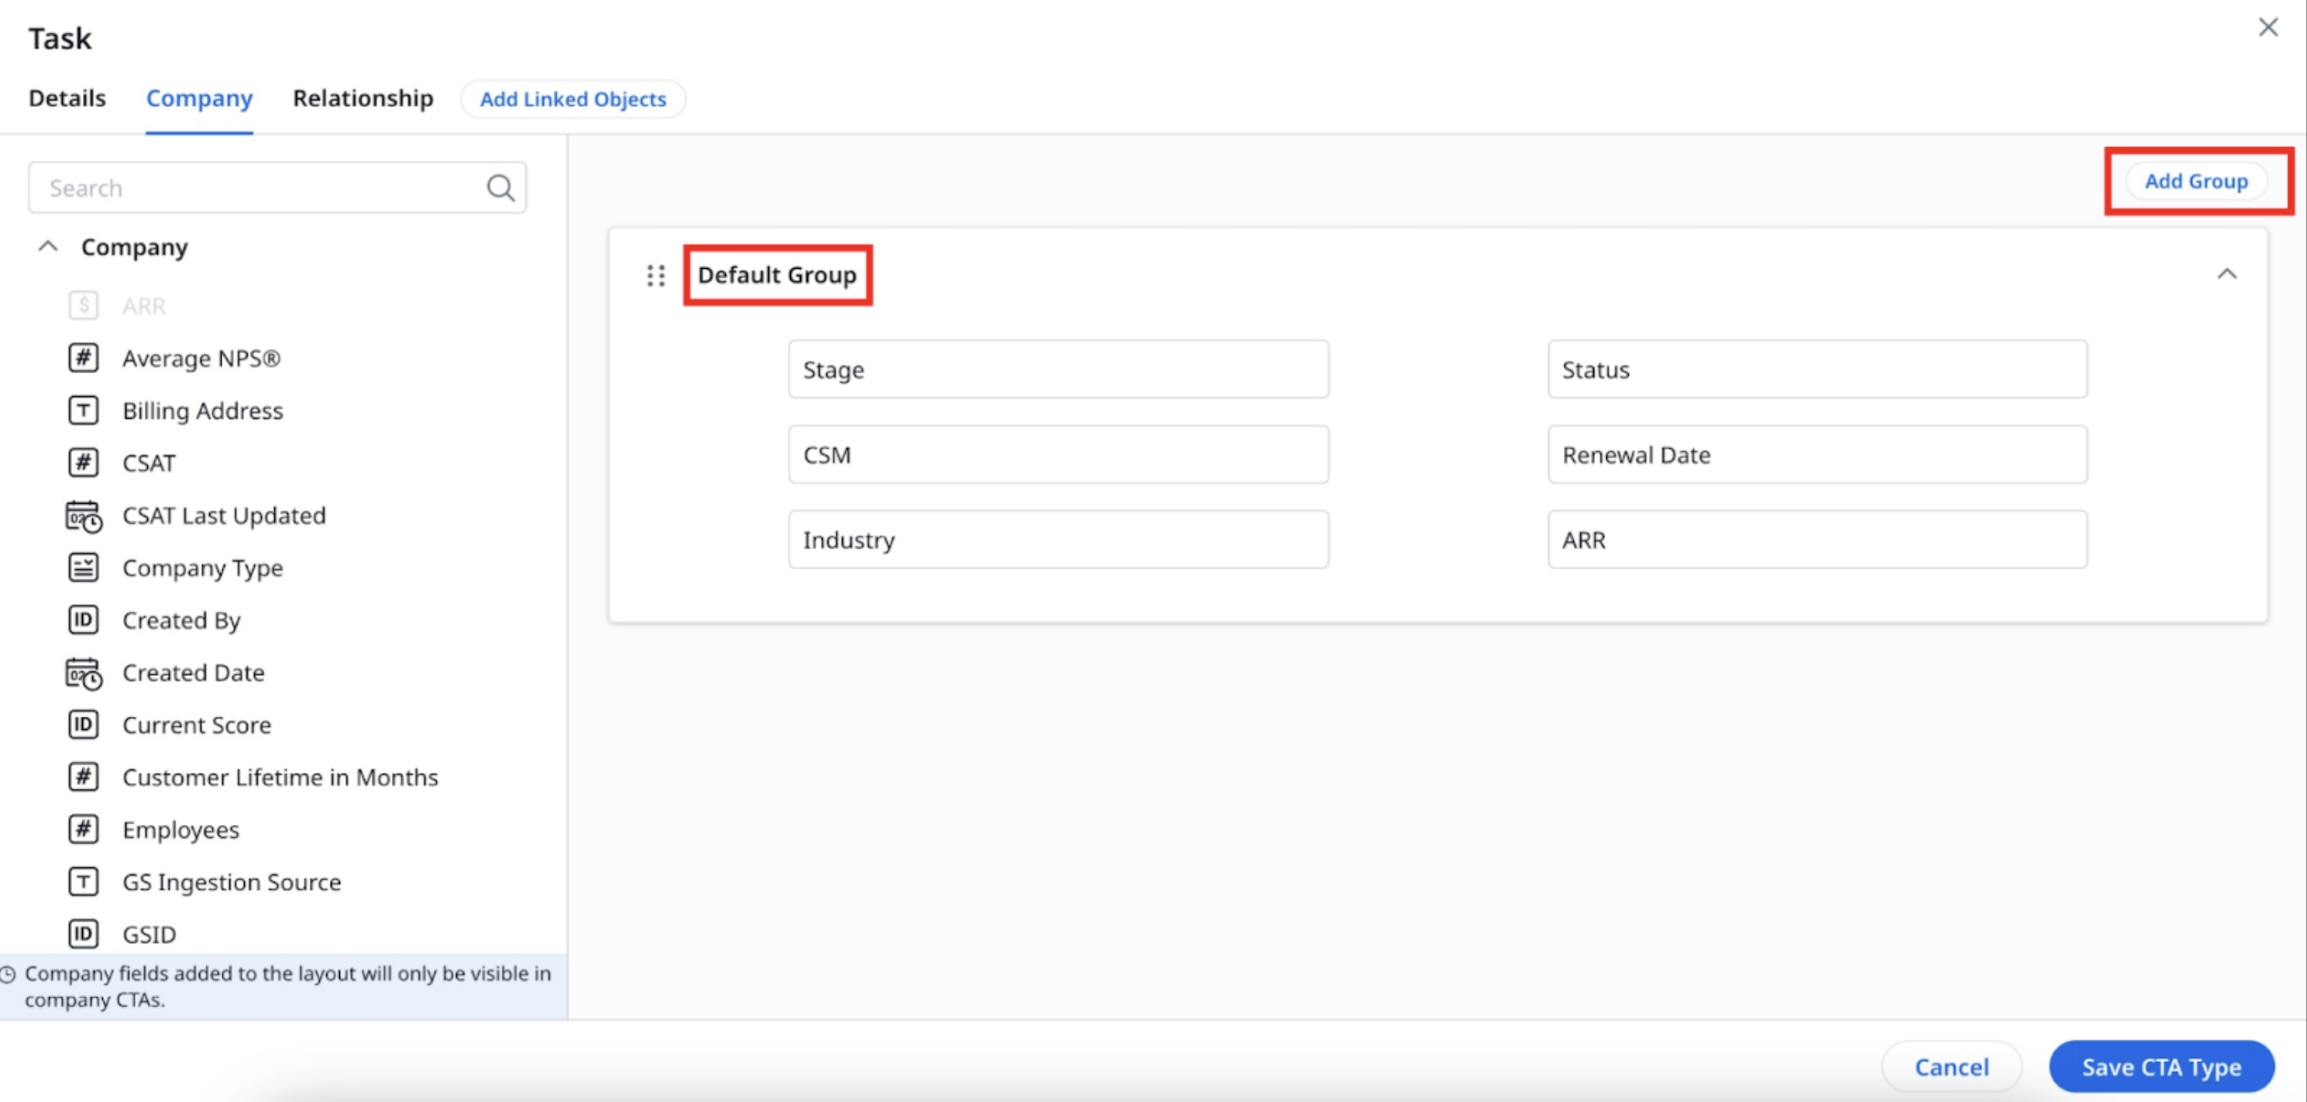
Use Default Group
Admins get a default group in the layout configuration with a few standard fields.
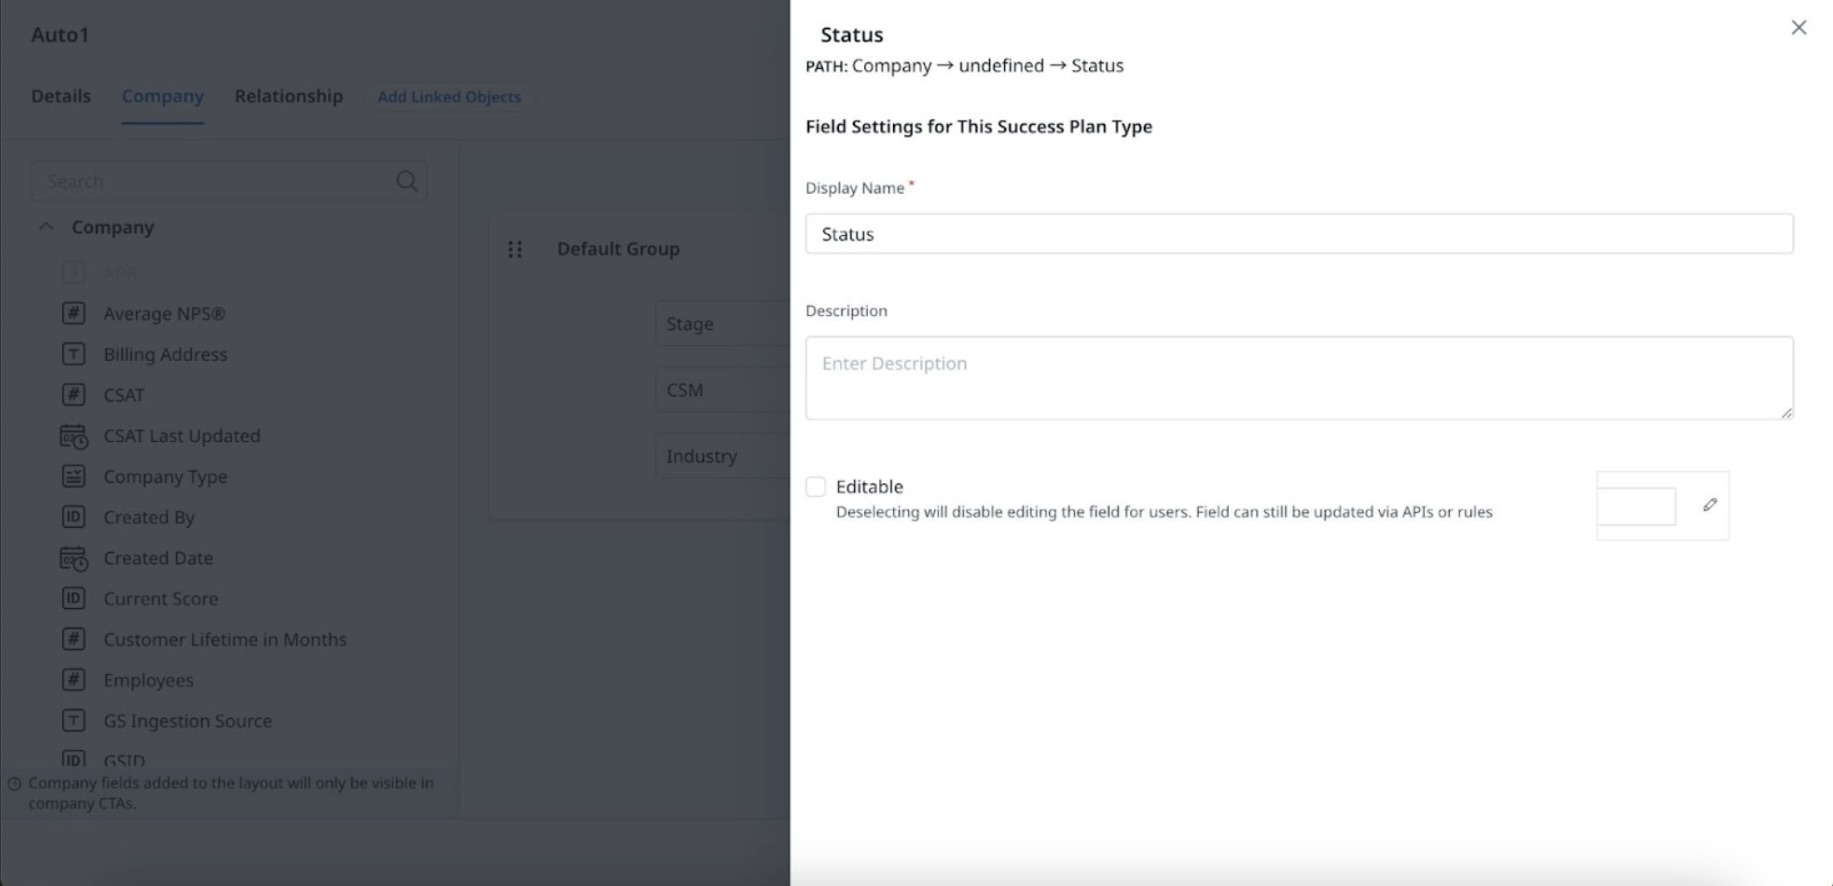
To edit in the default group or configure in the default group:
- Click the edit icon that appears adjacent to the Stage field. The Stage slide-out panel appears with the configuration path.
- Enter the display name in the Display Name field.
- Enter the description in the Description field.
- Select or clear the Editable checkbox to control field editability.
- Select or clear the Mandatory to close checkbox to encourage users to provide value while closing a CTA.
Note: The Default group cannot be deleted but you can edit the default group name.
Add Group
You can add multiple groups while creating a CTA, in addition to a default group.
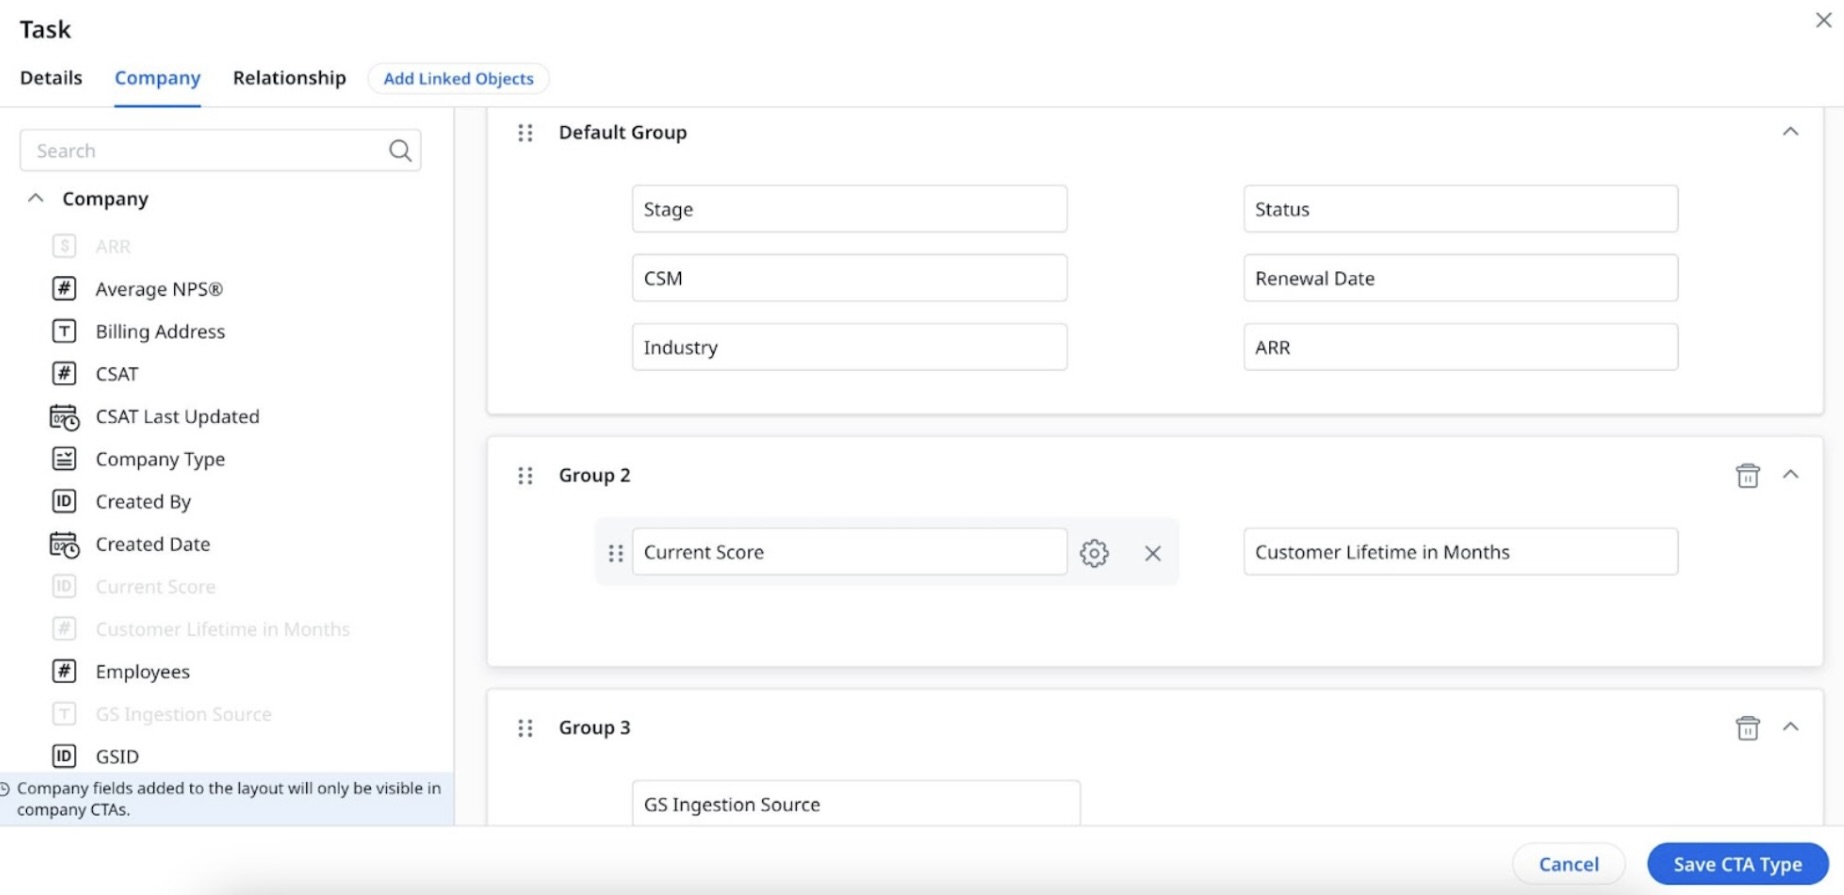
To add a group:
- Click Add Group. Group 2 is added to the layout configuration.
- From the left pane, drag and drop the required fields into Group 2.
- (Optional) Hover on the selected fields and click the Settings icon to change the field.
- (Optional) Click the X icon to delete the field.
- (Optional) Click the delete icon to delete the entire group.
 Note: The added groups can be renamed and also you can change the sequence of its display by drag and drop method.
Add Relationship Details
The Relationship tab contains all the Relationship Types fields for the CTA. it consists of the following functionality:
Important:
- The Create Custom Field is not available for the Relationship Tab.
- The Relationship fields added to the layout are visible only in the Relationship CTAs.
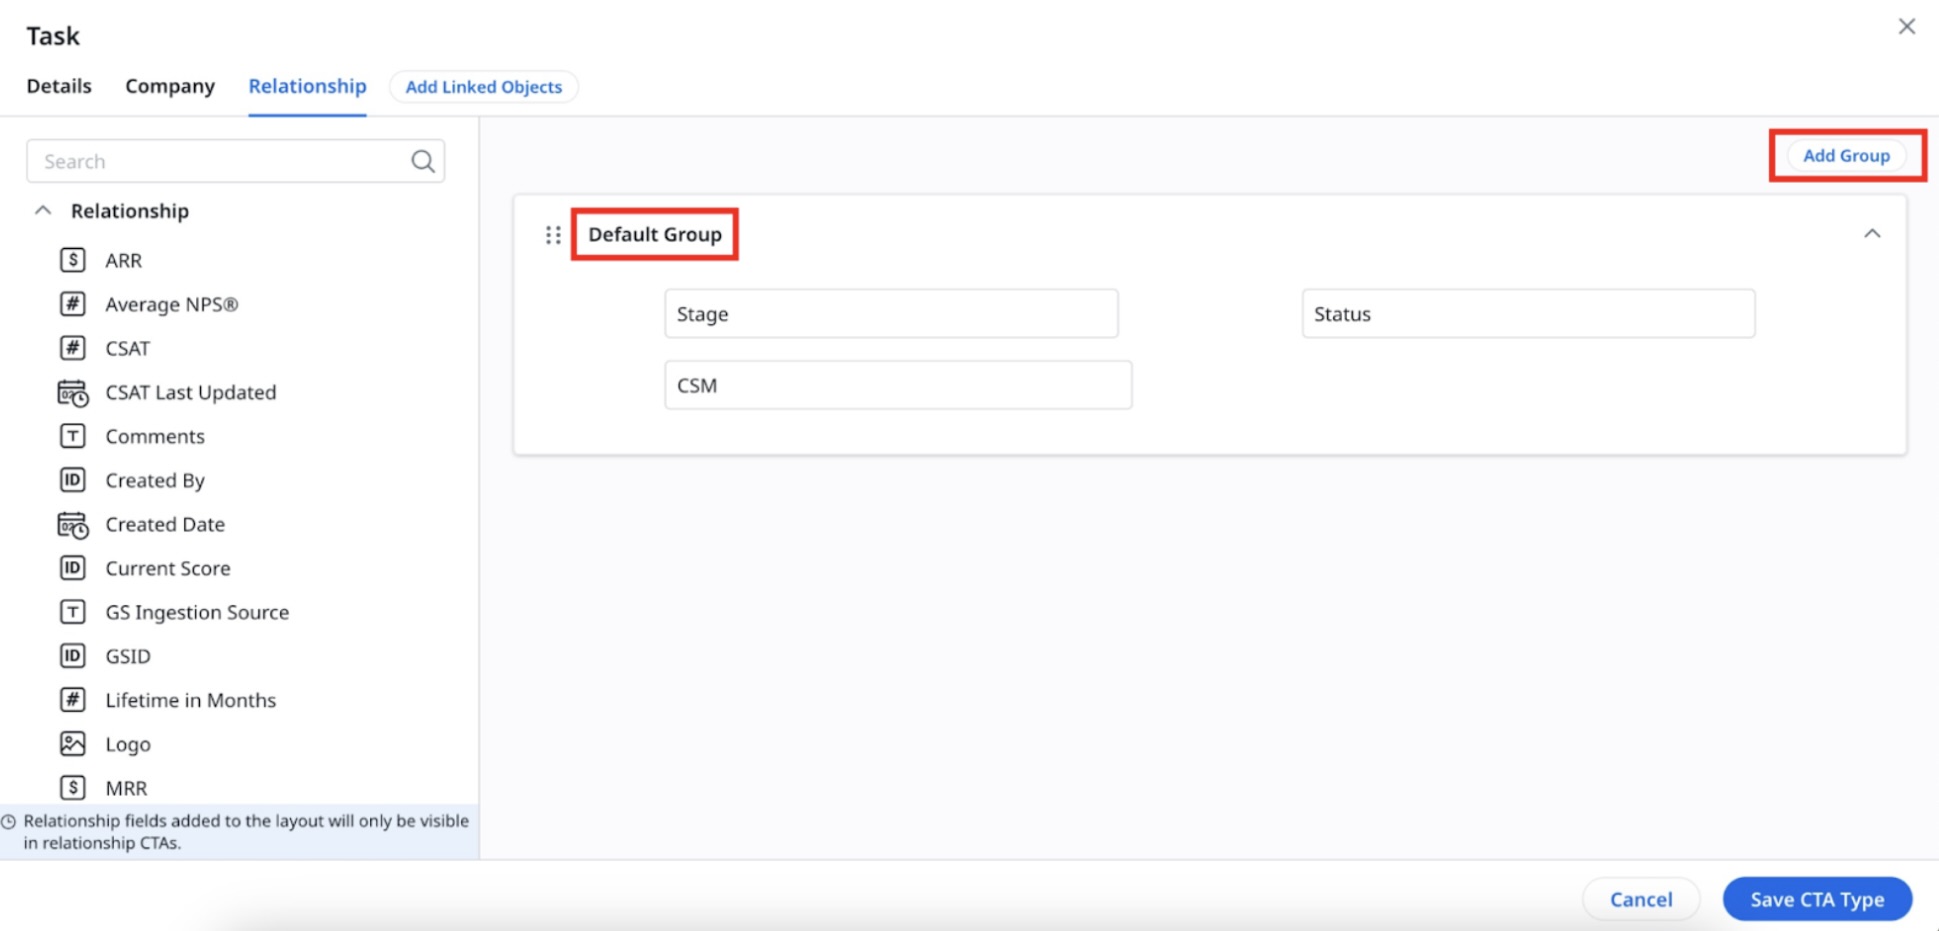
Use Default Group
You get a default group in the layout configuration with a few standard fields.
To edit in the default group or configure in the default group:
- Click the edit icon that appears adjacent to the Stage field. The Stage slide-out panel appears with the configuration path.
- Enter the display name in the Display Name field.
- Select or clear the Editable checkbox to control field editability.
- Select or clear the Mandatory to close checkbox to enforce users to provide value while closing a CTA.
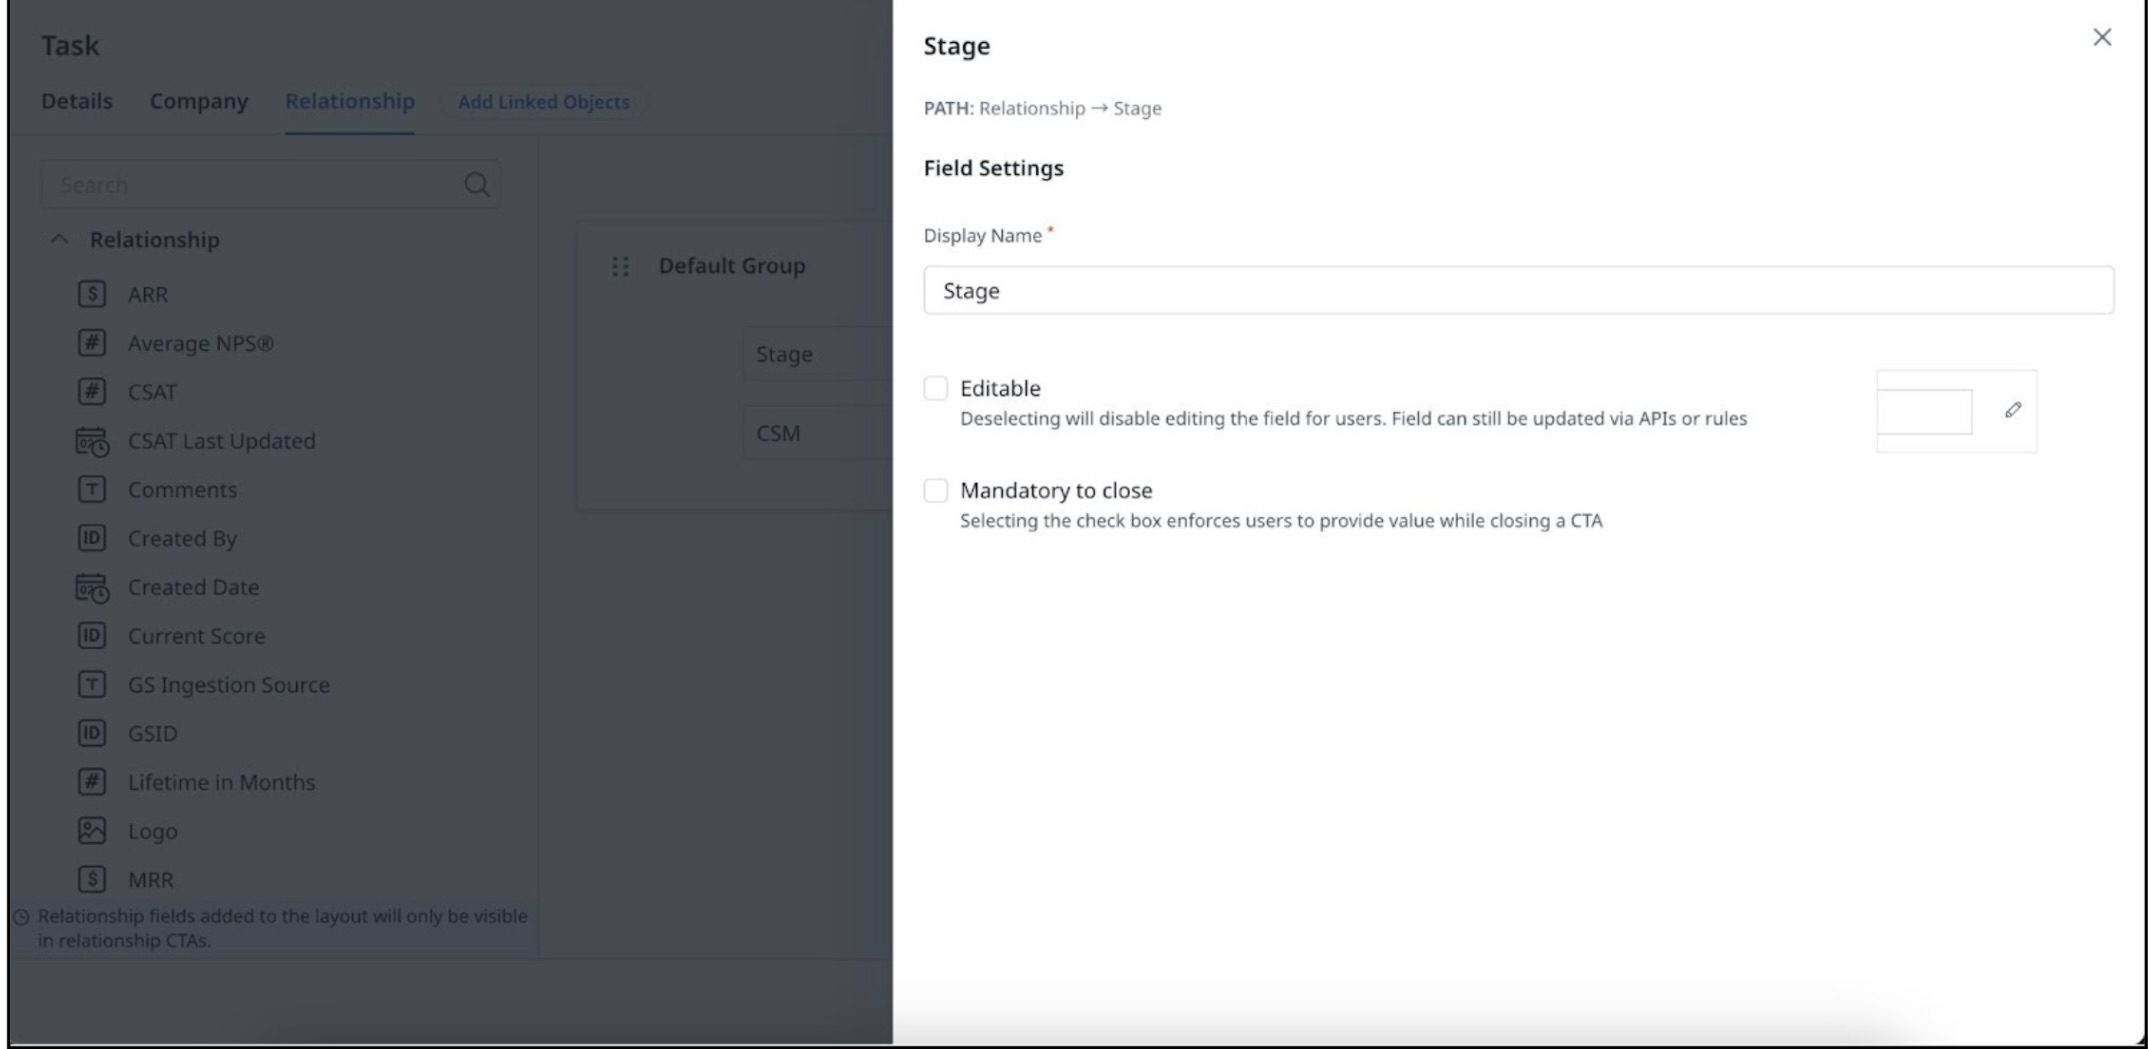
Note: The Default group cannot be deleted but you can edit the name of the default group.
Add Group
You can add multiple groups while creating a CTA, in addition to a default group.
To add a group:
- Click Add Group. Group 2 is added to the layout configuration.
- From the left pane, drag and drop the required fields into Group 2.
- (Optional) Hover on the selected fields and click the Settings icon to change the field.
- (Optional) Click the X icon to delete the field.
- (Optional) Click the delete icon to delete the entire group.
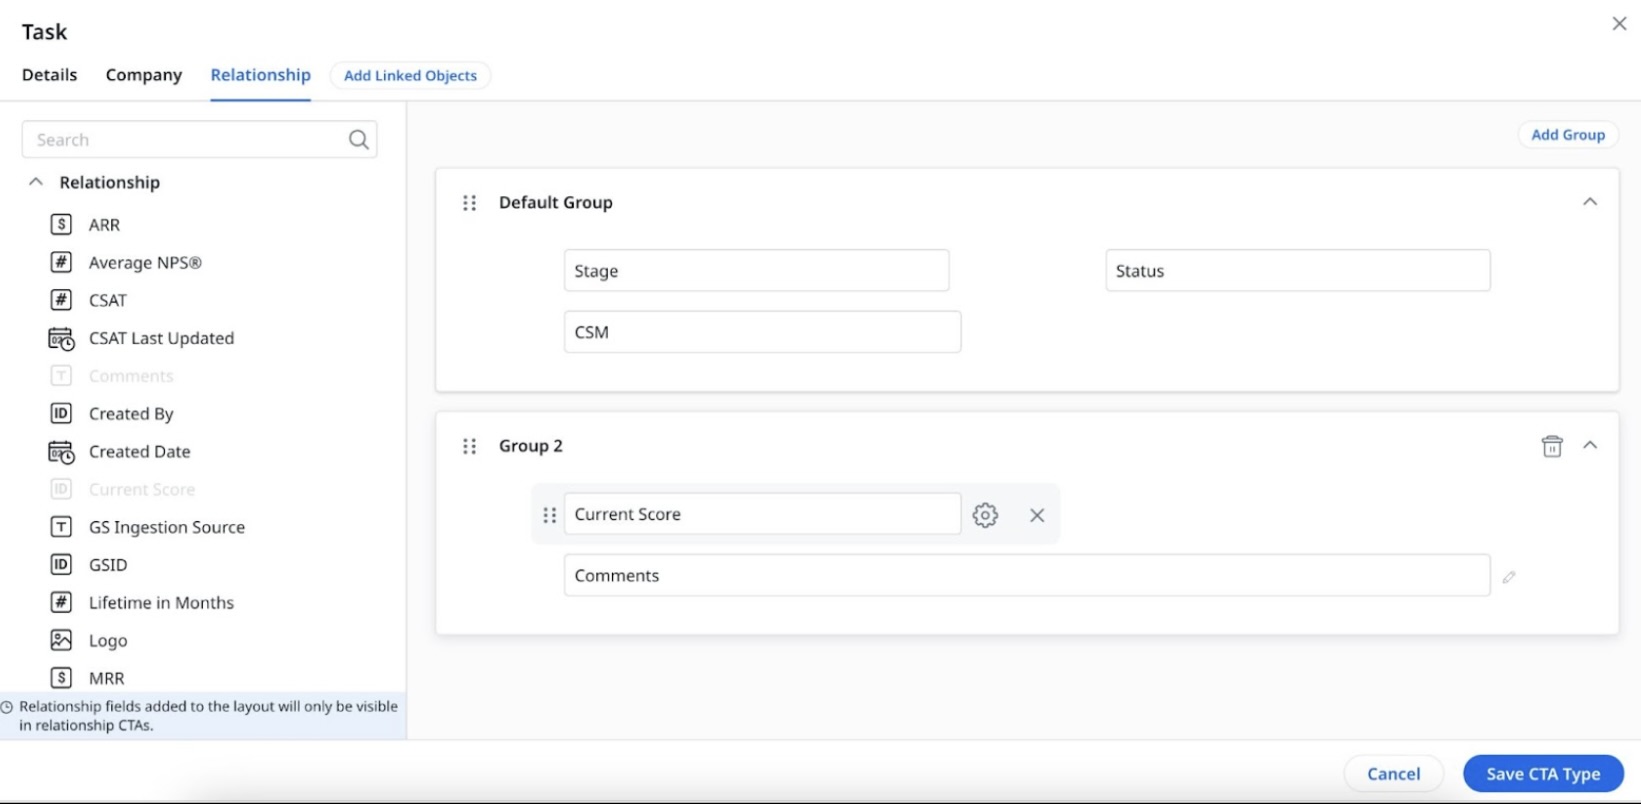
Note: The added groups can be renamed and also you can change the sequence of its display by drag and drop method.
Add Linked Objects
Admins can configure to add objects that should be linked to a CTA for each CTA type from the Linked Objects tab.
To link objects to the CTA:
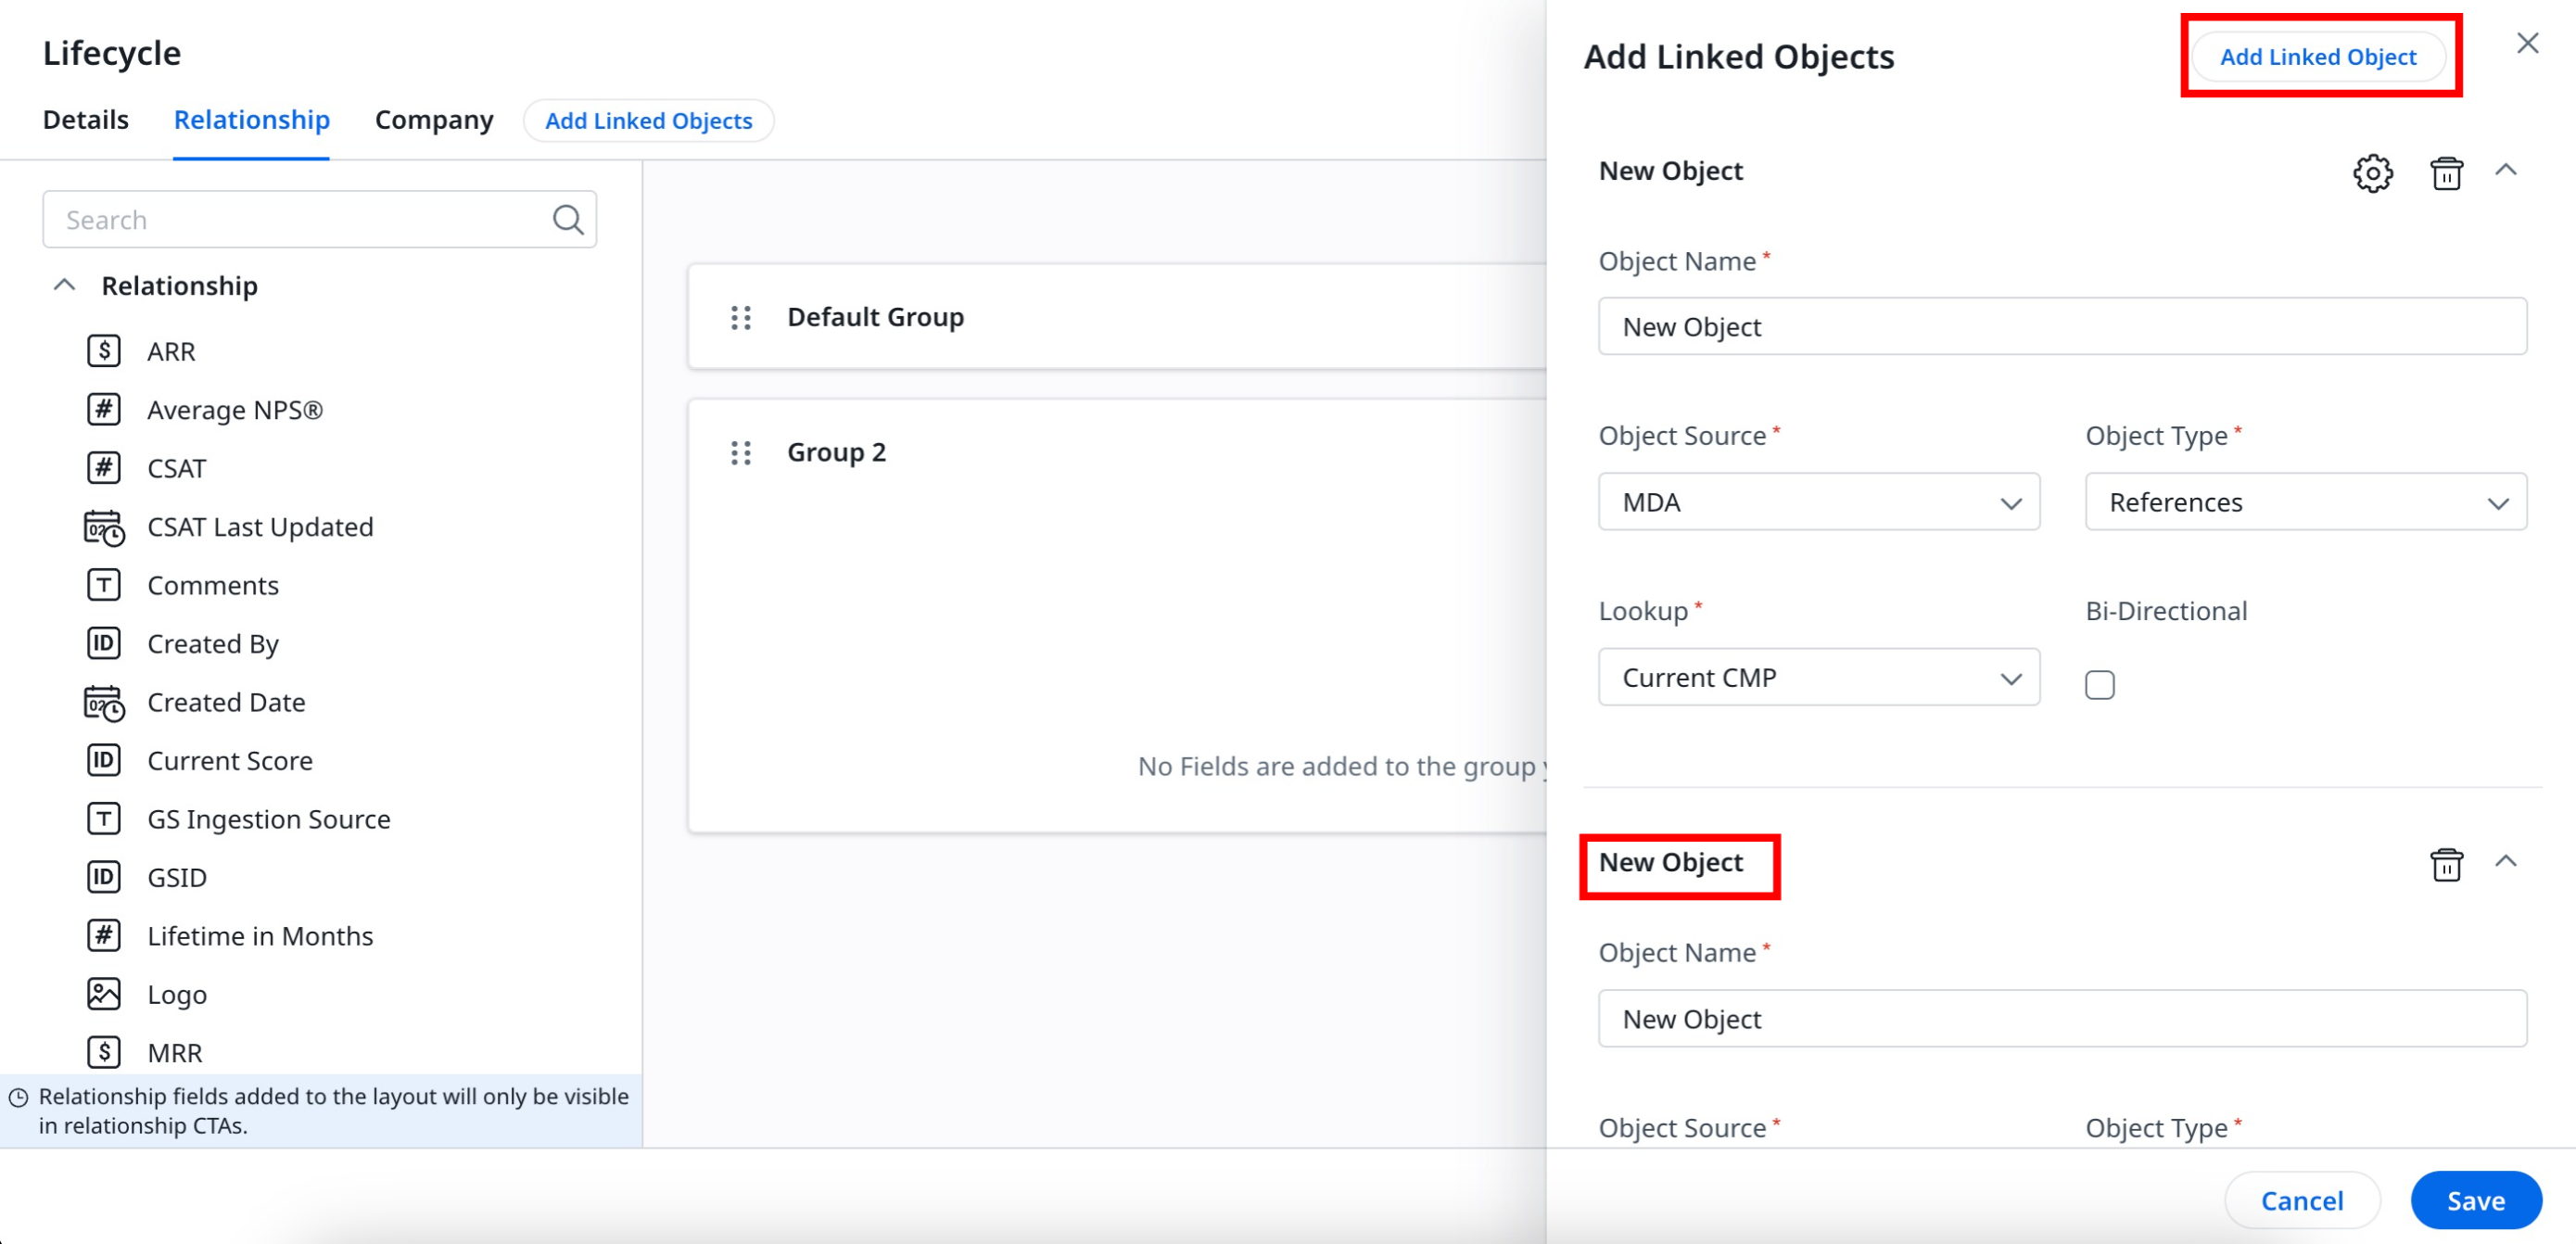
- Click Add Linked Objects. The Add Linked Objects slide-out panel appears.
- Enter the object name in the Object Name field.
- From the Object Source dropdown, select the object source.
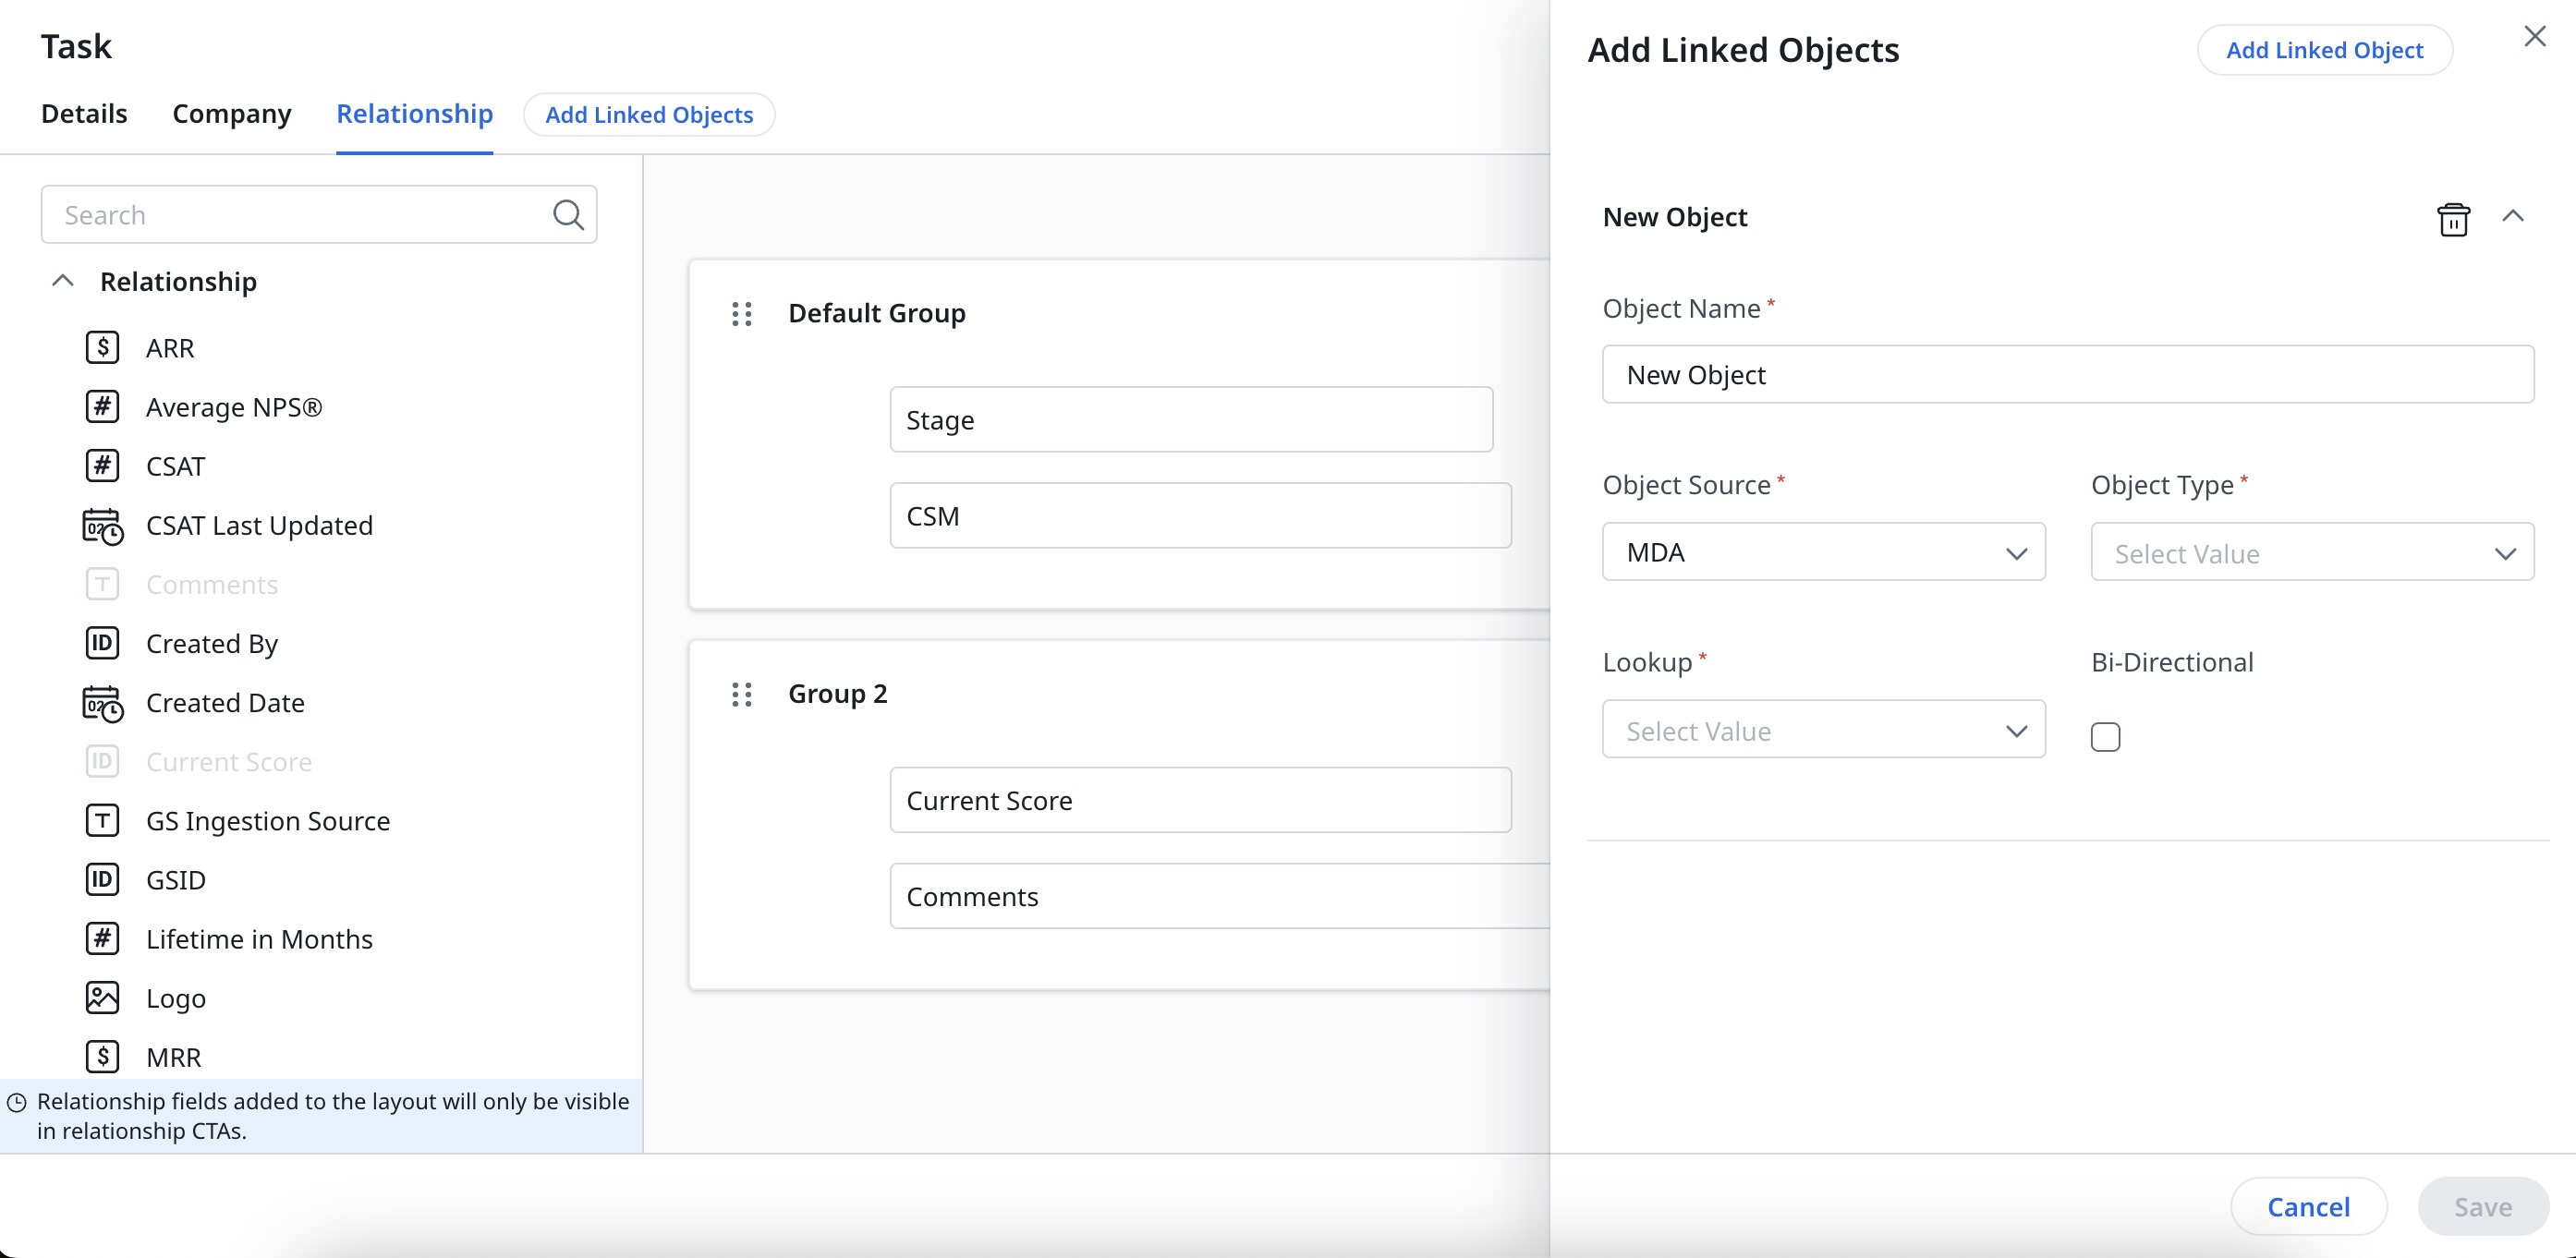
-
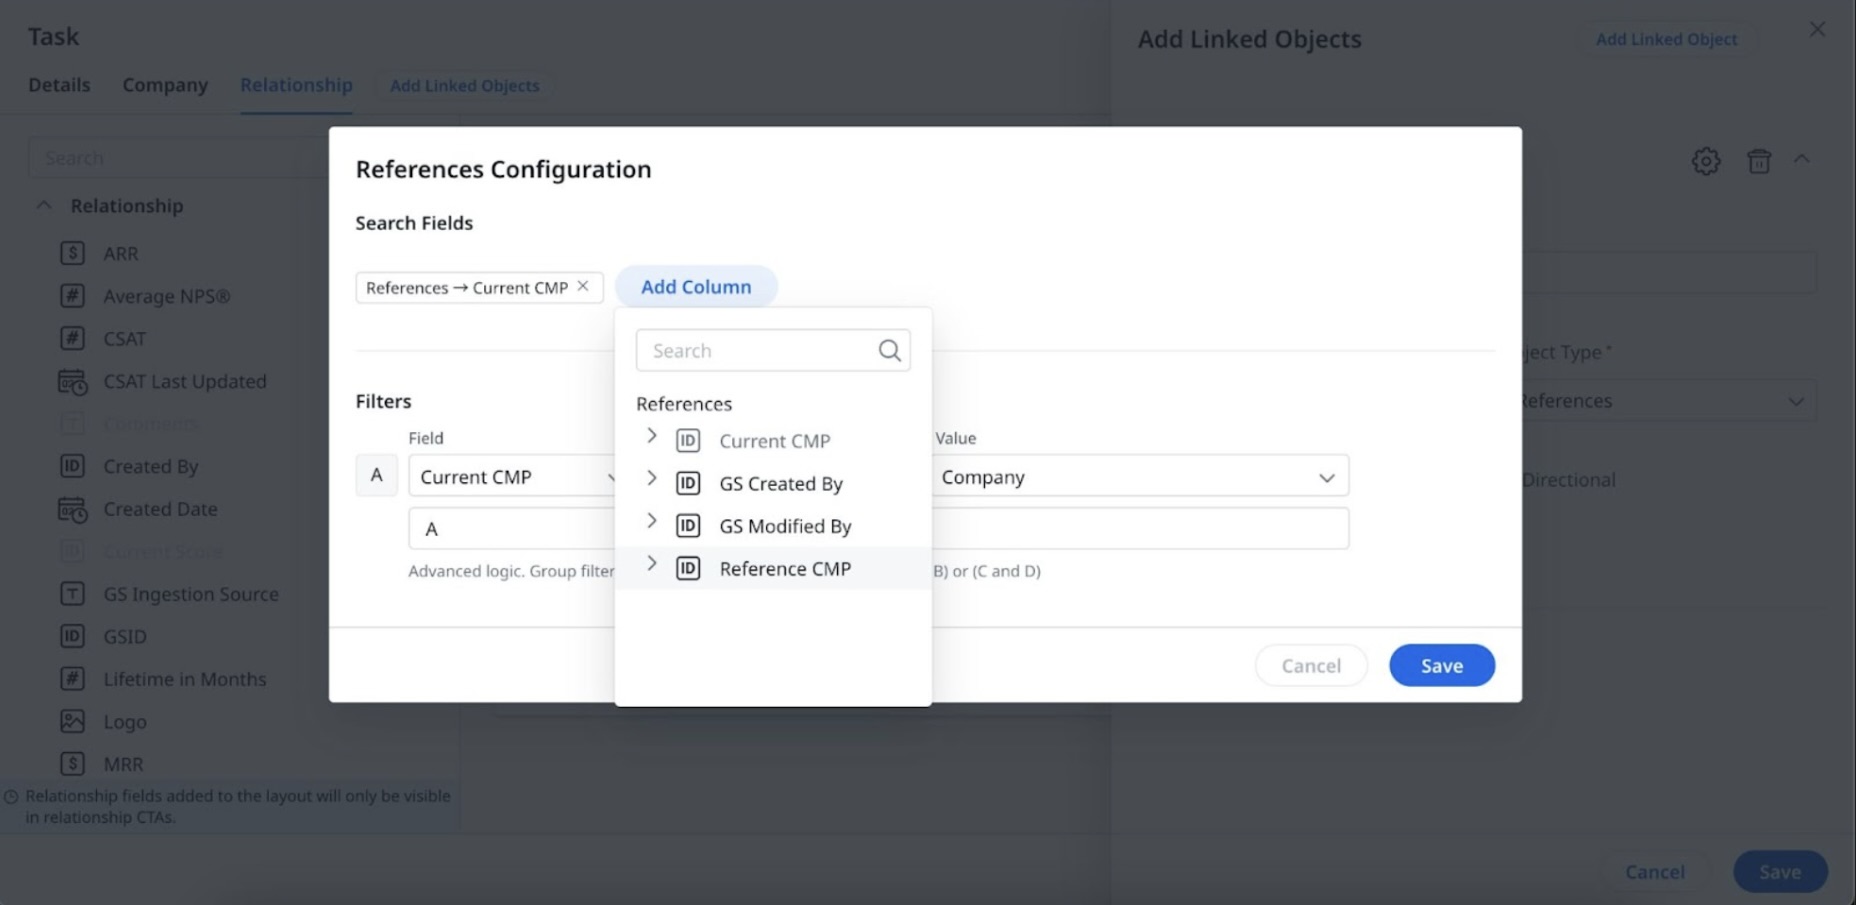
From the Object Type dropdown, select the type. The selected object type configuration window appears.
- Click Add Column and select the fields from the list.
- Click + icon to add group filters for advanced use cases.
- Click Save.
- From the Lookup dropdown, select the object.
- Select or clear the Bi-Directional check box to create a field on the linked object to hold reference on the linked record back to the CTA.
- Click Save CTA Type. The CTA type is saved successfully and appears on the CTA Types list view page.
- (Optional) Click Add Linked Object it will help you to create a new object with the above-mentioned fields and you can view this as a tab on the layout page.
Configure Playbook
Each CTA that appears in Cockpit has a prescribed playbook of best practice tasks that can help guide the CSM through the right steps. Playbooks help disseminate and standardize best practices across the organization.
Playbooks are a collection of pre-defined tasks with relative dates. Playbooks help level the playing field for your whole CSM team and get everyone on the same page. They help ensure best practices are followed across the board. Additionally, playbooks provide a system for reviewing and revising the practices based on lessons learned and evolving needs. Playbooks can be used to standardize the process a user follows when a call to action is triggered, or when an event occurs. Playbooks can be used to effectively answer questions such as:
- How should I handle a poor NPS® score from a customer?
- How do I address a decline in usage activity from a customer instance?
- What do I need to do to prepare for a Quarterly Business Review with a customer?
The redesigned Playbook tab offers a simplified layout, significantly improving the visibility:
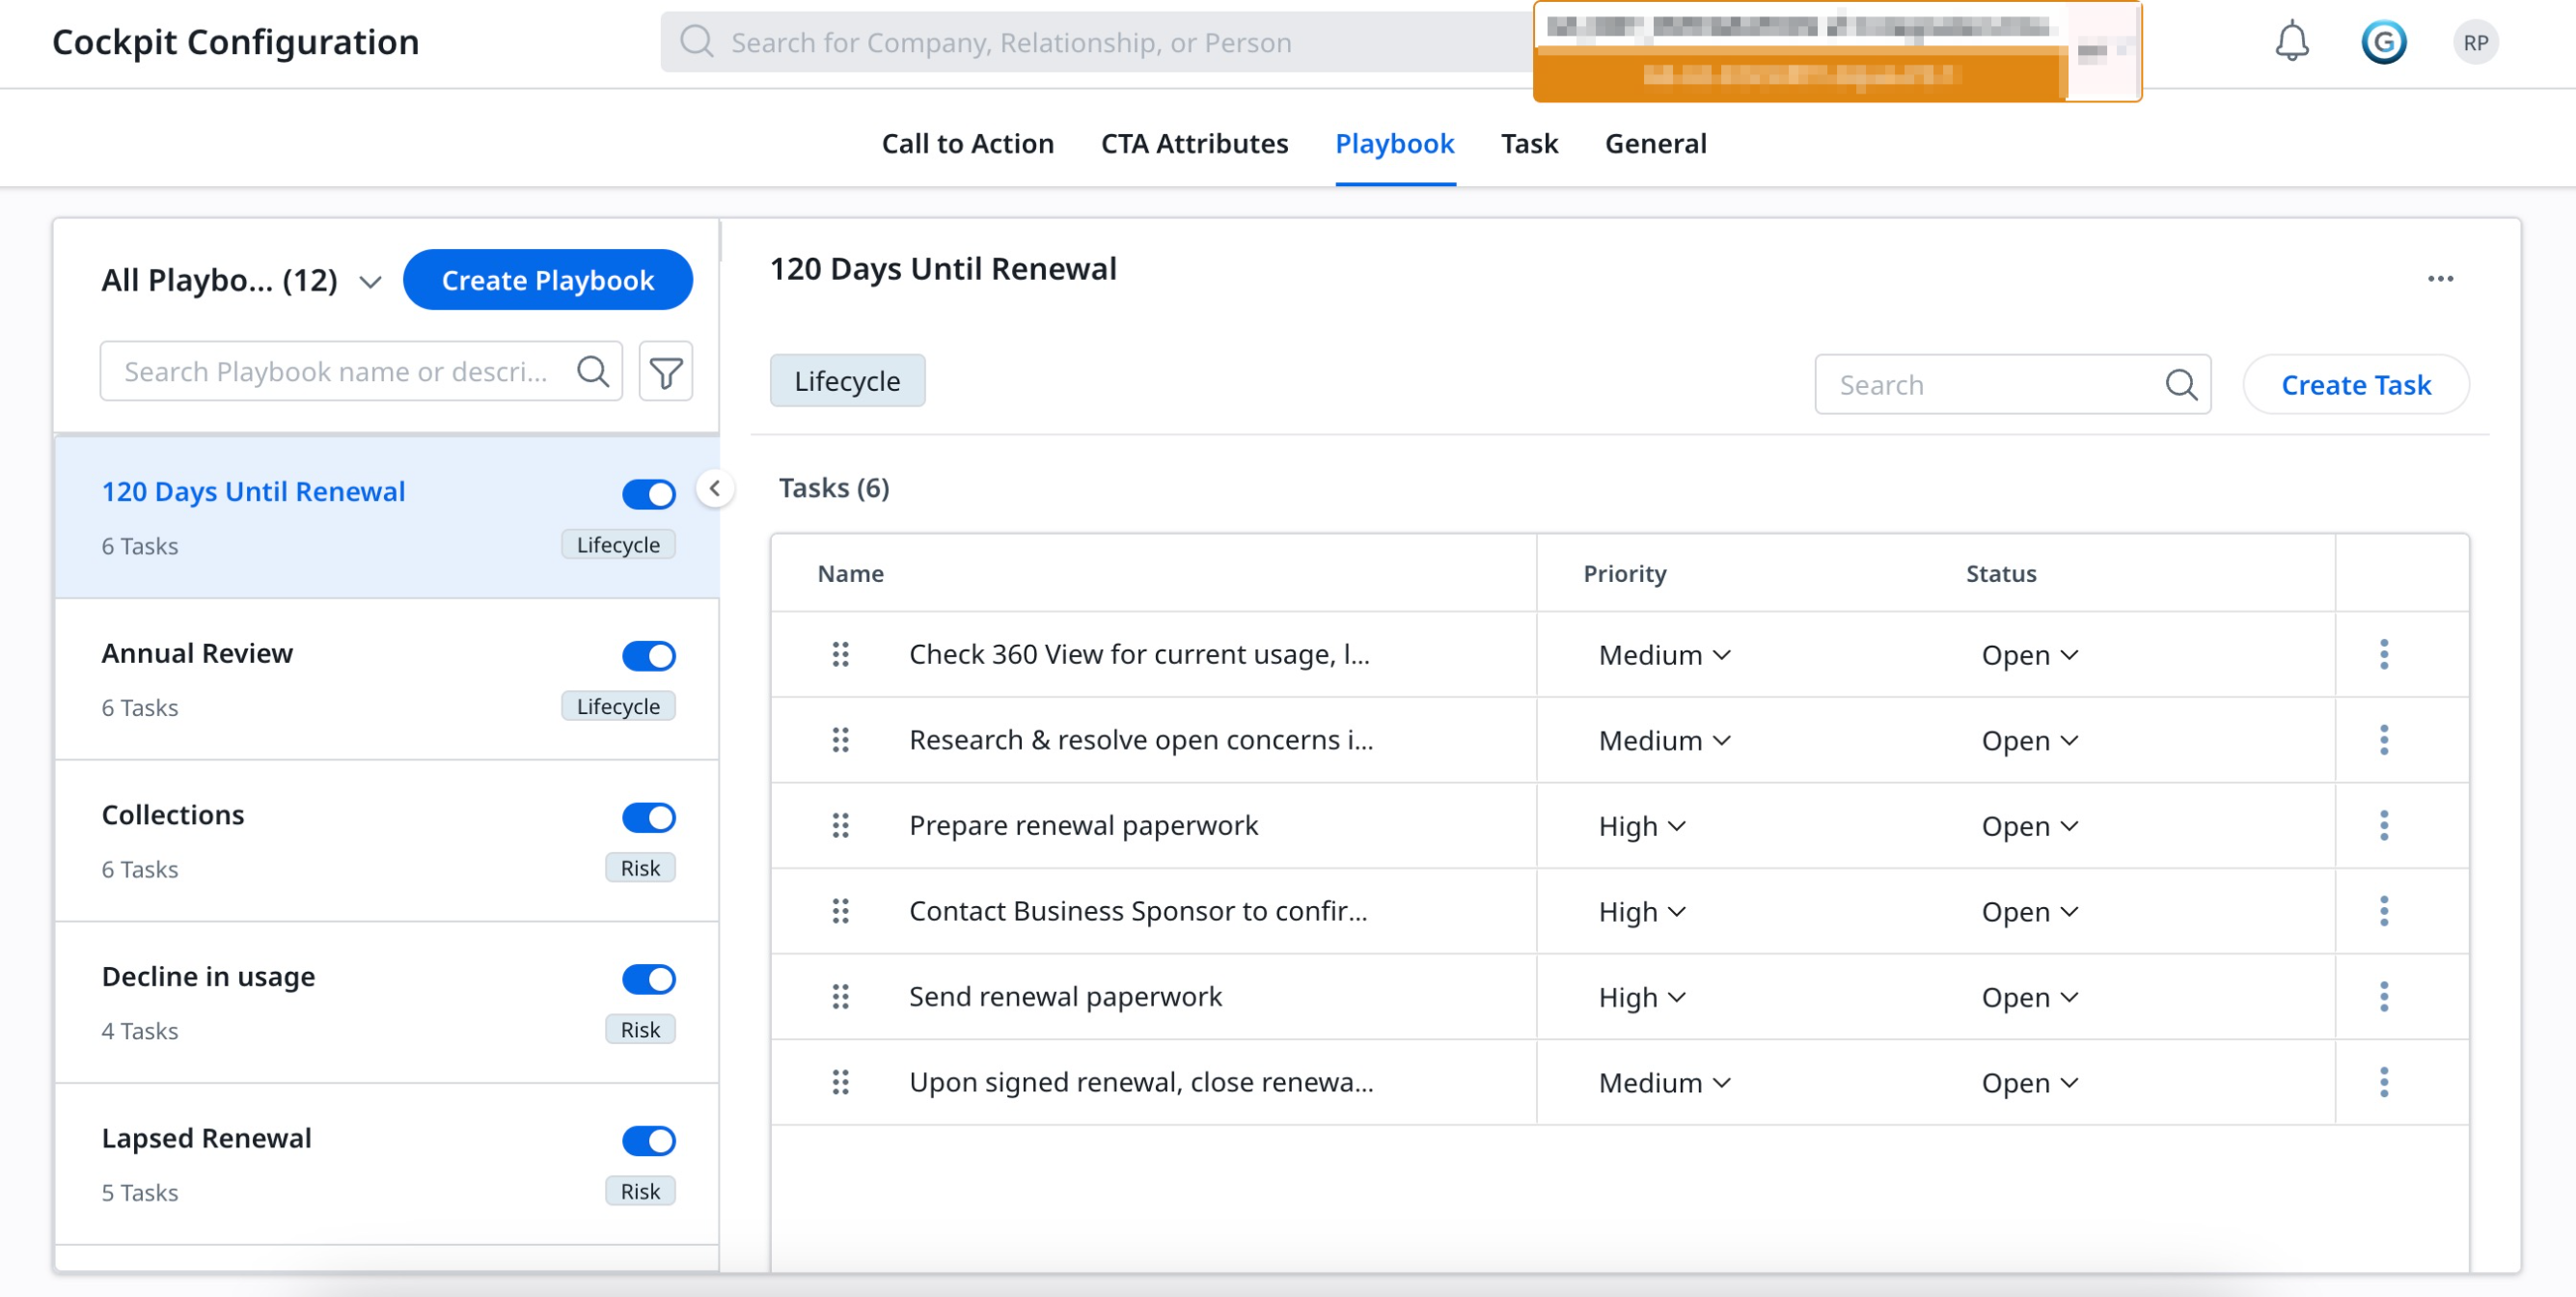
- All Playbooks: Display a list of all available playbooks.
- Create Playbook: A button for creating a new playbook.
- Filter: Allows you to filter any playbook configured to the selected CTA.
- Three horizontal dots menu: Provide options such as Edit, Mark Inactive, Clone, and Delete. You can modify the created task as required.
- Create Task: A button for adding a new task to the selected playbook.
- Tasks: Shows a complete list of tasks associated with the selected playbook.
- Name: Lists the names of created tasks.
- Priority: Indicates the importance or urgency of the task.
- Status: Shows the current status of the task.
- Three vertical dot menu: Provides Edit and Delete options. You can modify the selected task or remove an existing task from the list.
Create Playbook
To create a Playbook:
- Navigate to Administration > Cockpit > Call to Action. The Call to Action list page appears.
- Click the Playbook tab. The Playbook List page appears.
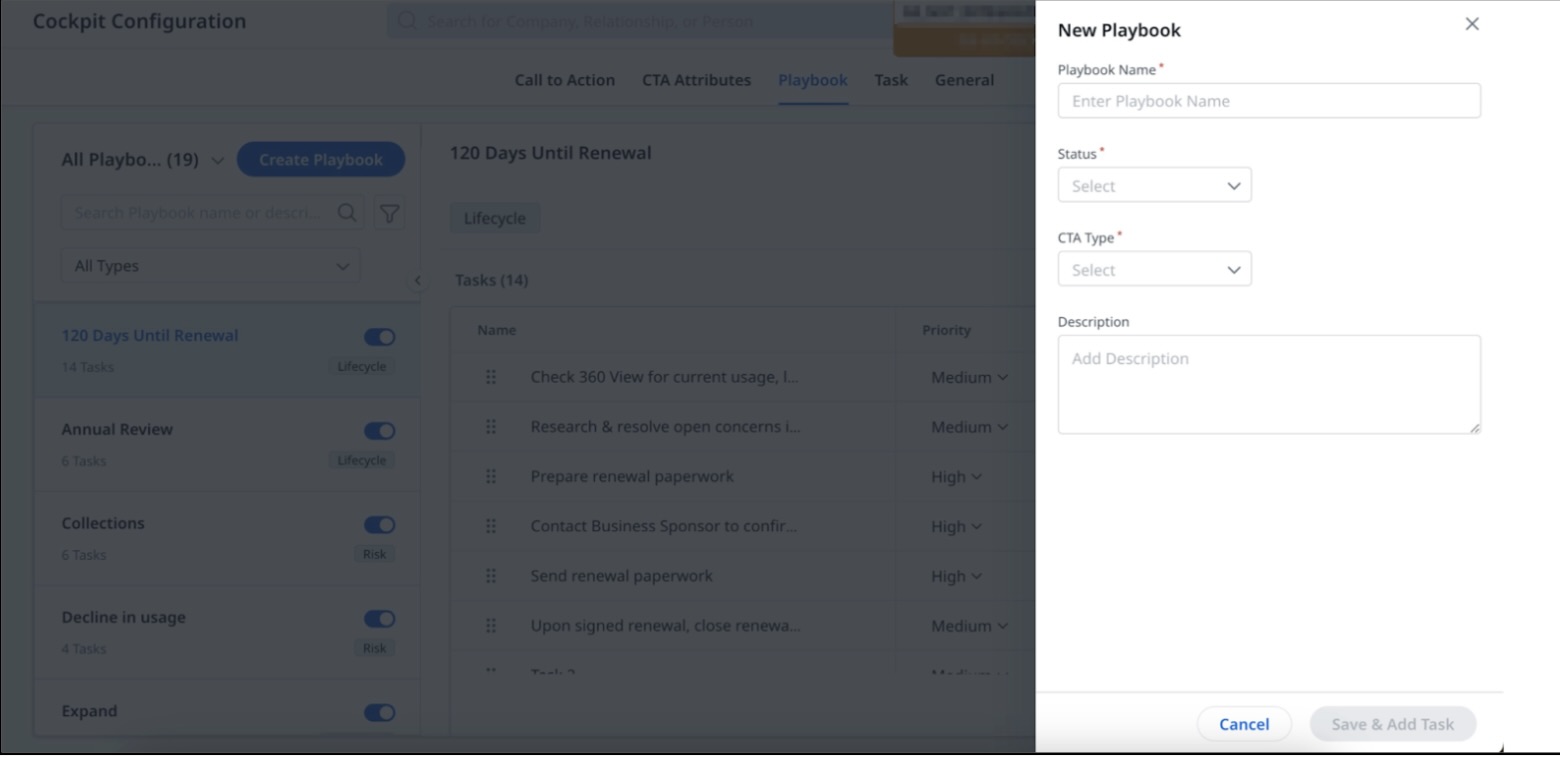
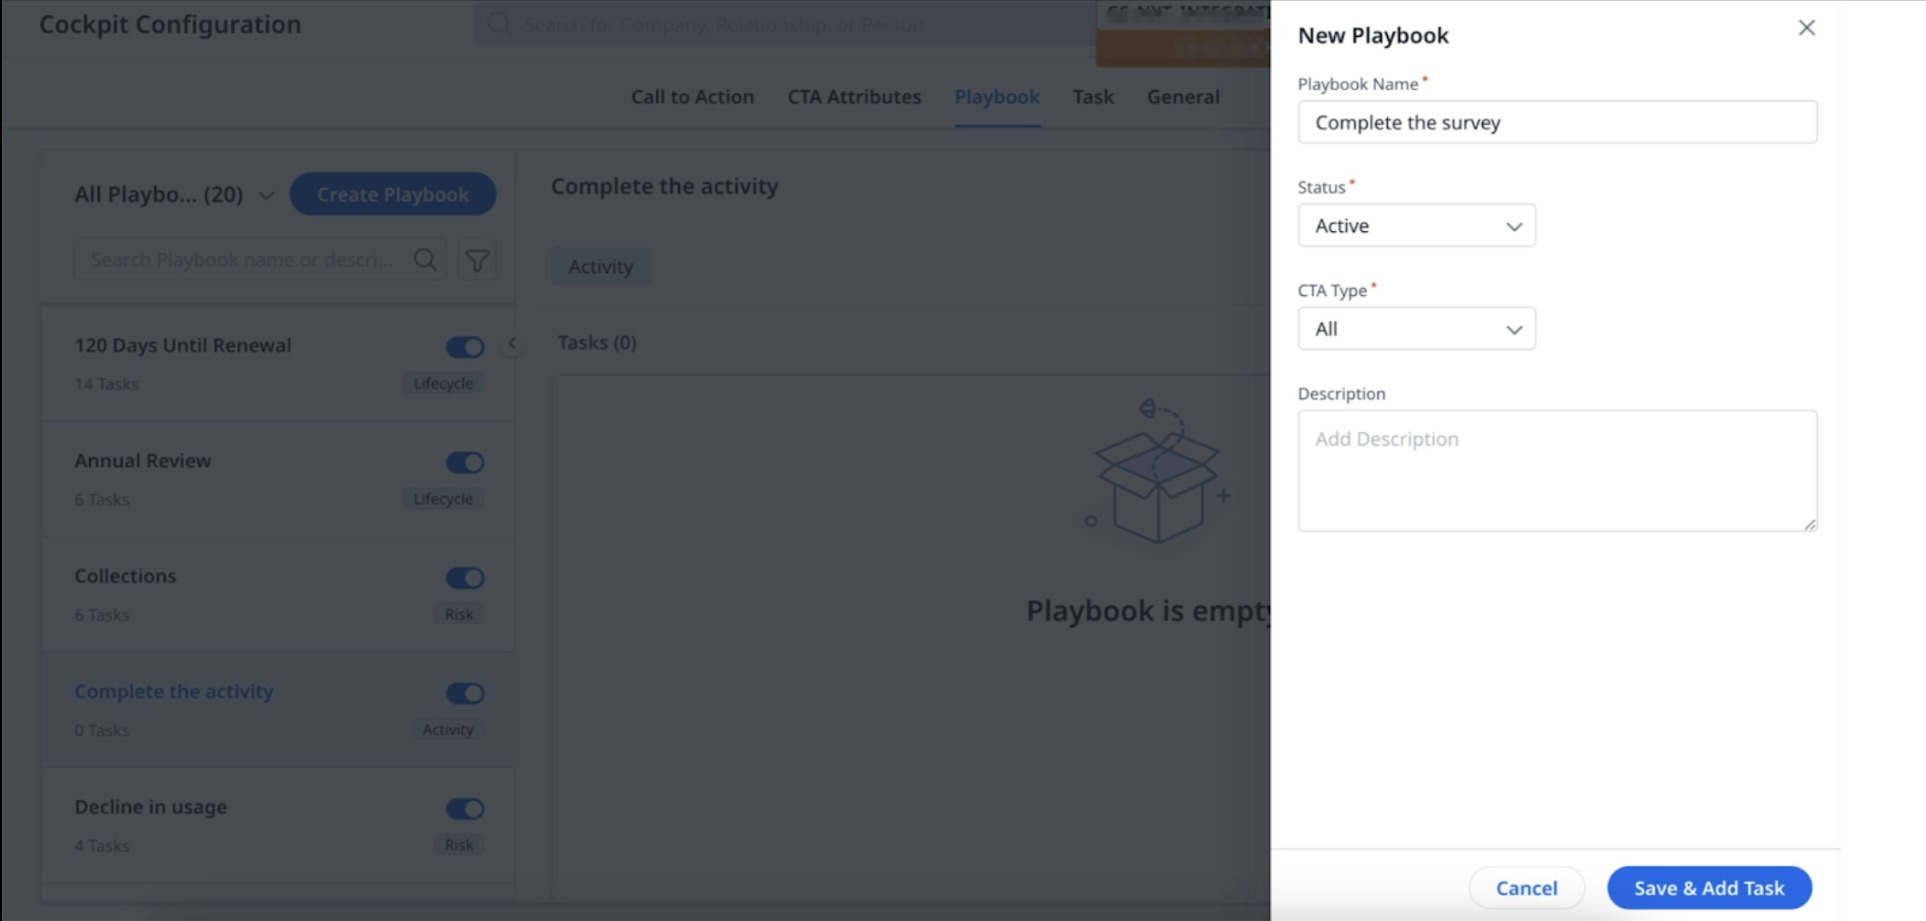
- Click Create Playbook. The New Playbook slide-out panel appears.
-
Provide the following details:
- Playbook Name: Enter a name for the playbook.
- Status: From the dropdown, Select the options Active or Inactive.
- CTA Type: From the dropdown, Select the desired CTA Type.
- Description: Enter the description in the field, if required.
-
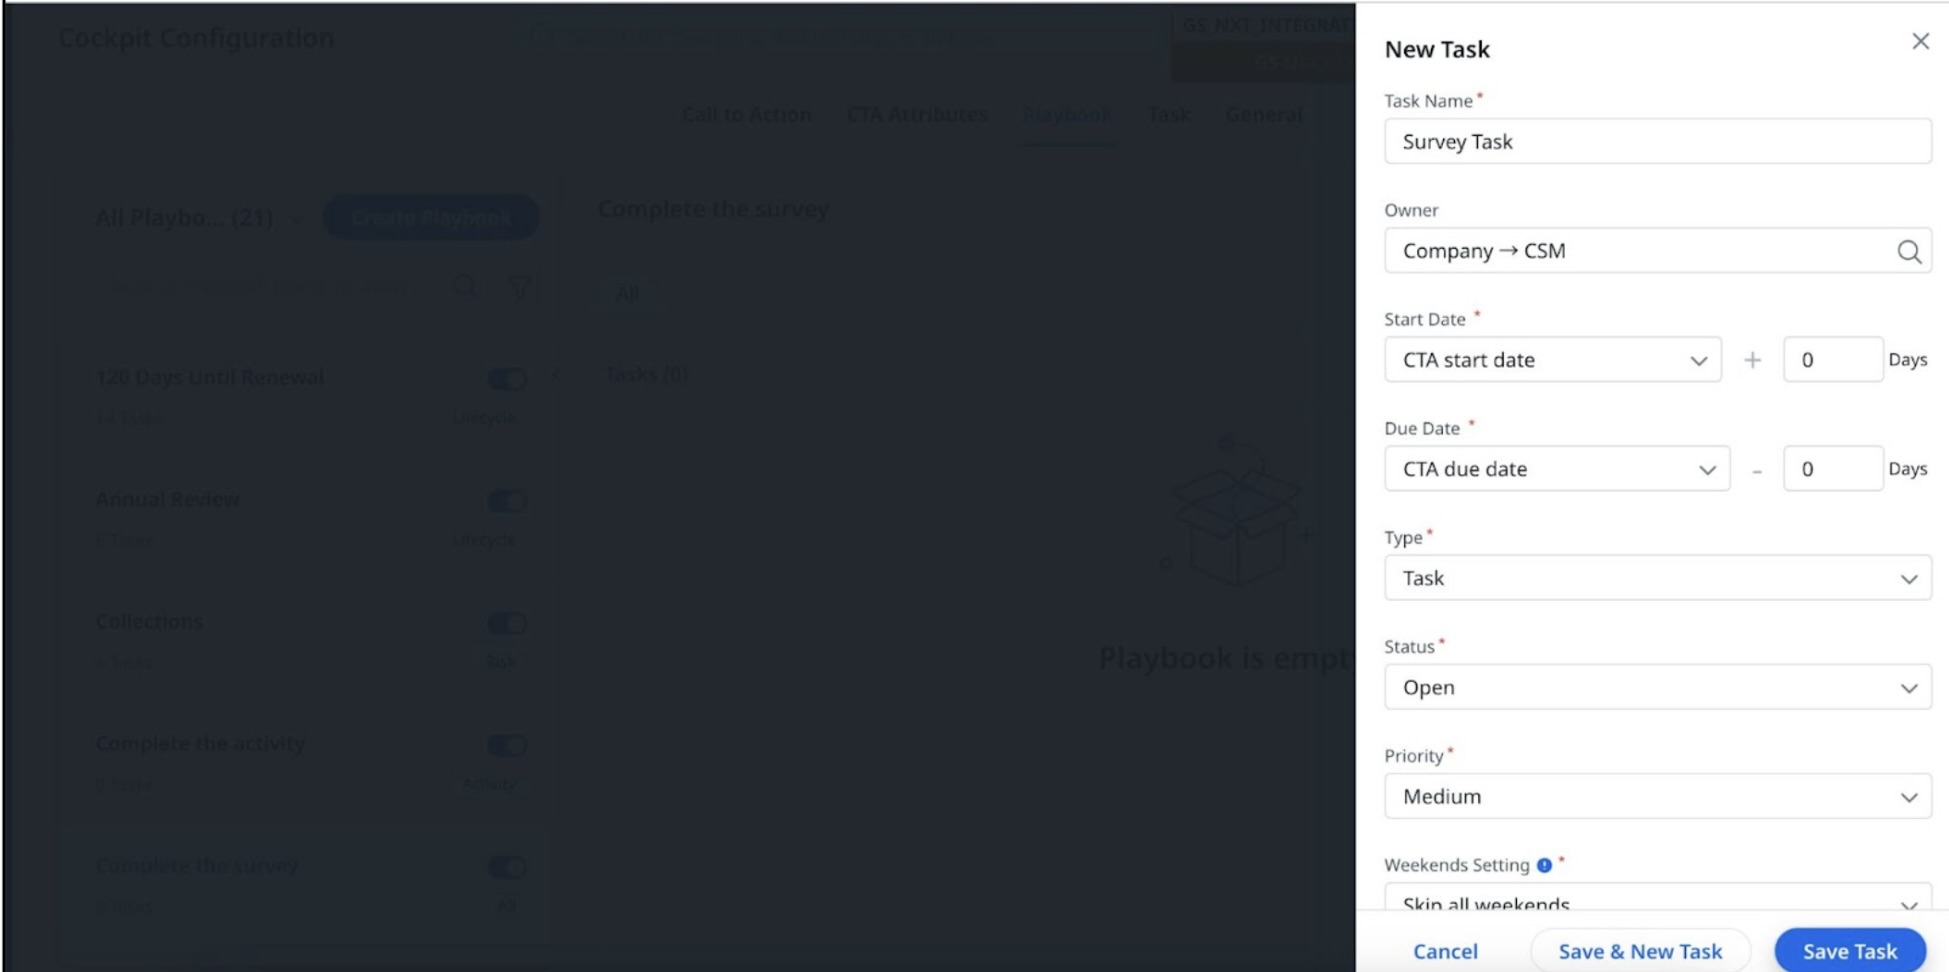
Click Save & Add Task. A playbook is created successfully and the New Task slide-out panel appears.
-
Provide the following details:
- Task Name: Enter a name for the task.
- Owner: Enter the name of the Task owner and select one from the available values.
- Start Date: From the dropdown, select the start date for the task and enter a numeric value in the Days field..
Note: The start date can be the CTA assign date, CTA start date, or the previous task due date. - Due Date: From the dropdown, Select the due date by which the task has to be completed and enter a numeric in the Days field.
Note: The due date can be the CTA assign date, CTA due date, CTA start date, None, Task close date, or Task due date. - Type: From the dropdown, select either Task or Email.
- Status: From the dropdown, select the status of the task created.
- Priority: From the dropdown, select the priority of the task created.
- Weekend Setting: From the dropdown, select an appropriate option from:
- Skip all weekends: If selected, this will skip all weekends, if any, while calculating the due date. For example, if a task’s assigned date is 8th Nov 2018 (Thu) and the due date is set as Assign Date + 10 Days, the task’s due date after skipping 2 weekends will be 22nd Nov 2018 (Thu).
- Skip weekend if due on a weekend: If selected, while calculating the due date, this will skip weekends if the due date falls on weekends. For example, if a task’s assigned date is 8th Nov 2018 and the due date is set as Assign Date + 10 Days, the task’s due date after skipping 18th (Sun) and 19th (Mon) will be 20th Nov 2018 (Tue).
- Do not skip weekend: If selected, while calculating the due date, this will not skip weekends even if the due date falls on weekends. For example, if a task’s assigned date is 8th Nov 2018 (Thu) and the due date is set as Assign Date + 10 Days, the task’s due date will be 18th Nov 2018 (Sun).
- Description: Enter the description of the task, if required.
7. Click Save Task. The Task is saved in the Playbook.
8. (Optional) Click Save & New Task to add more Tasks to the Playbook.
Note:
- Tasks should serve as helpful reminders for CSMs for activities they might forget to complete or to ensure adherence to specific business processes. If any task doesn't meet at least one of these criteria, do not add it to the Playbook.
- If two tasks are likely to be completed at the same time, add them as one task.
Configure Task
Tasks are the specific actions that must be completed to close a CTA. Typically, closing a CTA involves completing multiple tasks in a sequential order. The Tasks can be added to a CTA manually or applied as a Playbook.
As an admin, you are responsible for configuring the fields and layout of tasks. They can create Custom Fields for Tasks, allowing for greater detail and visibility in reporting.
You can configure Tasks in the following two steps: :
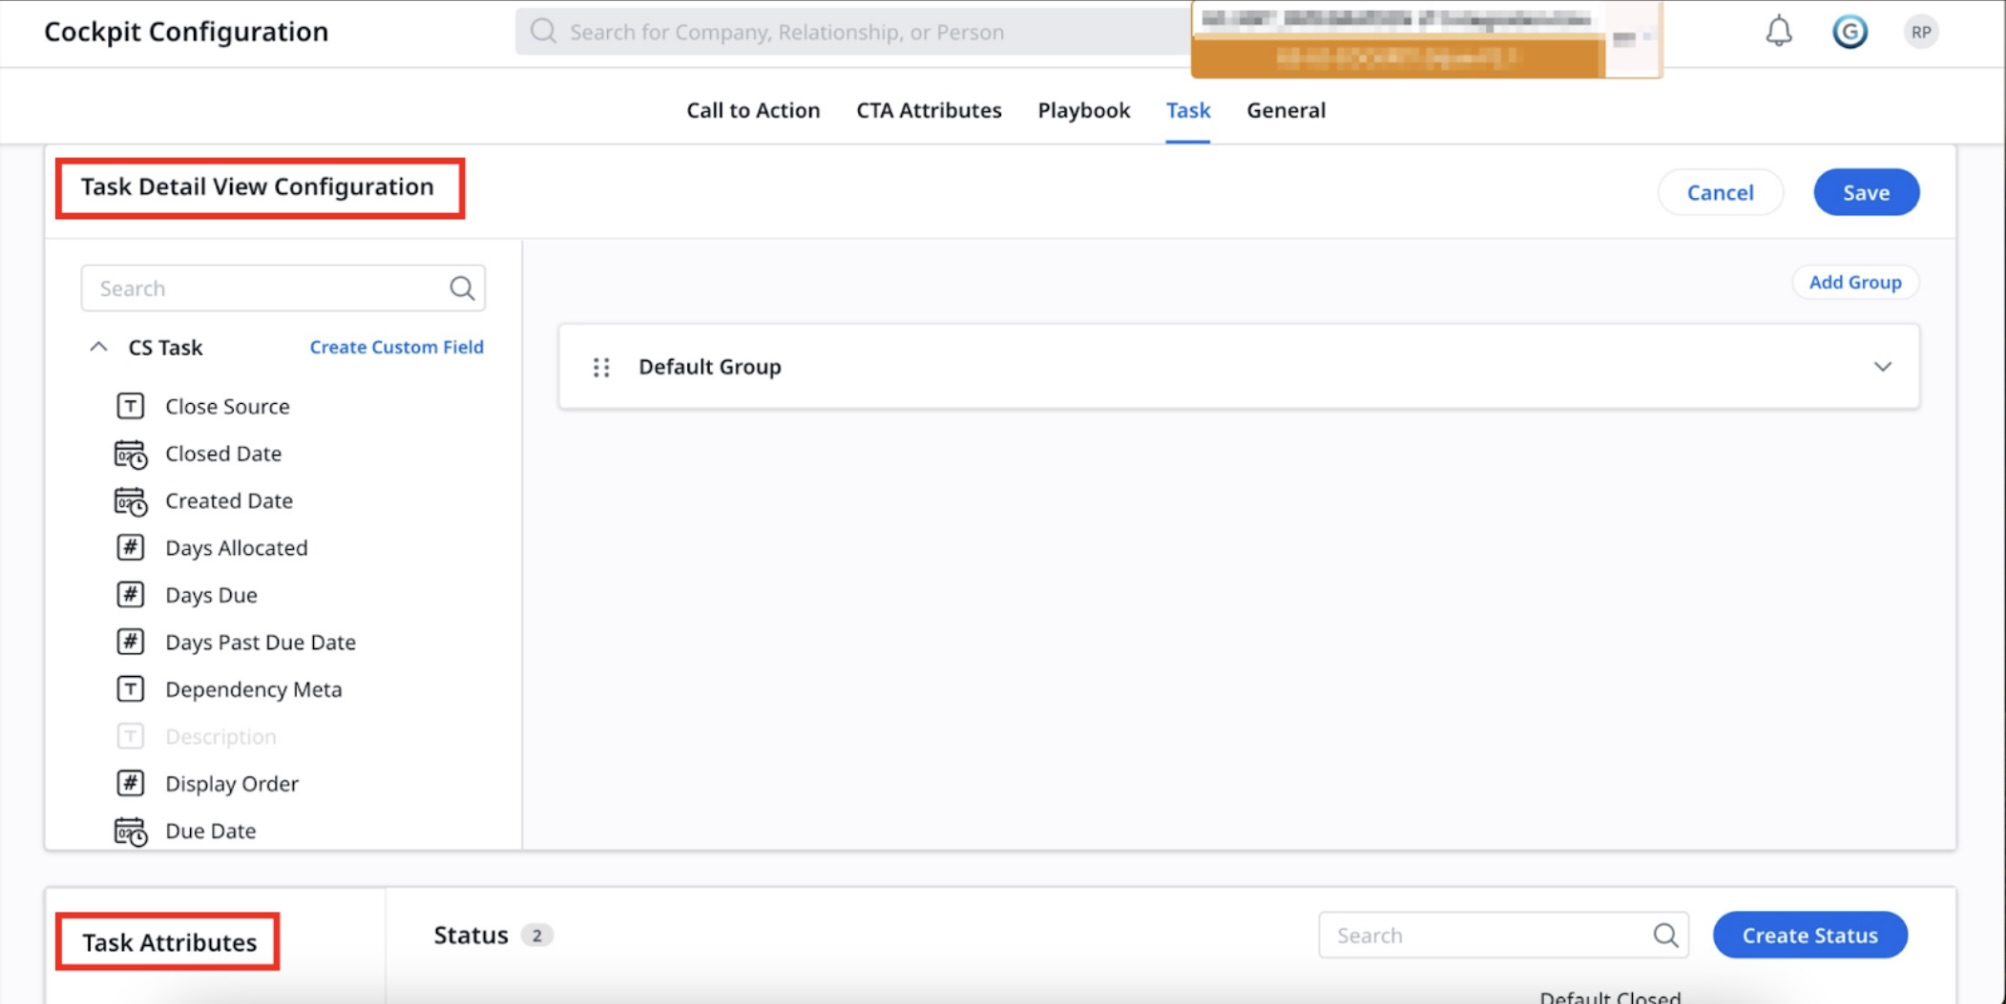
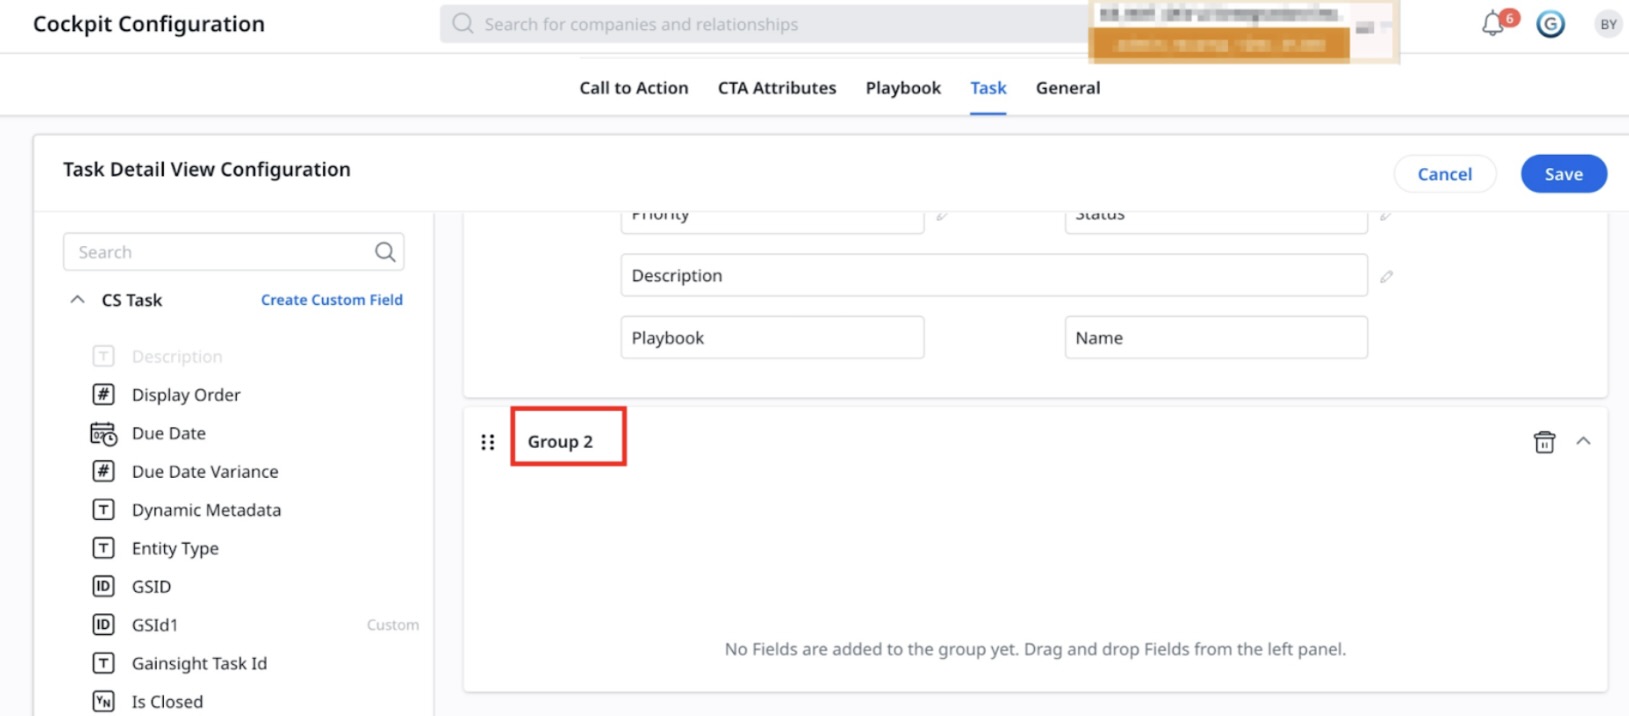
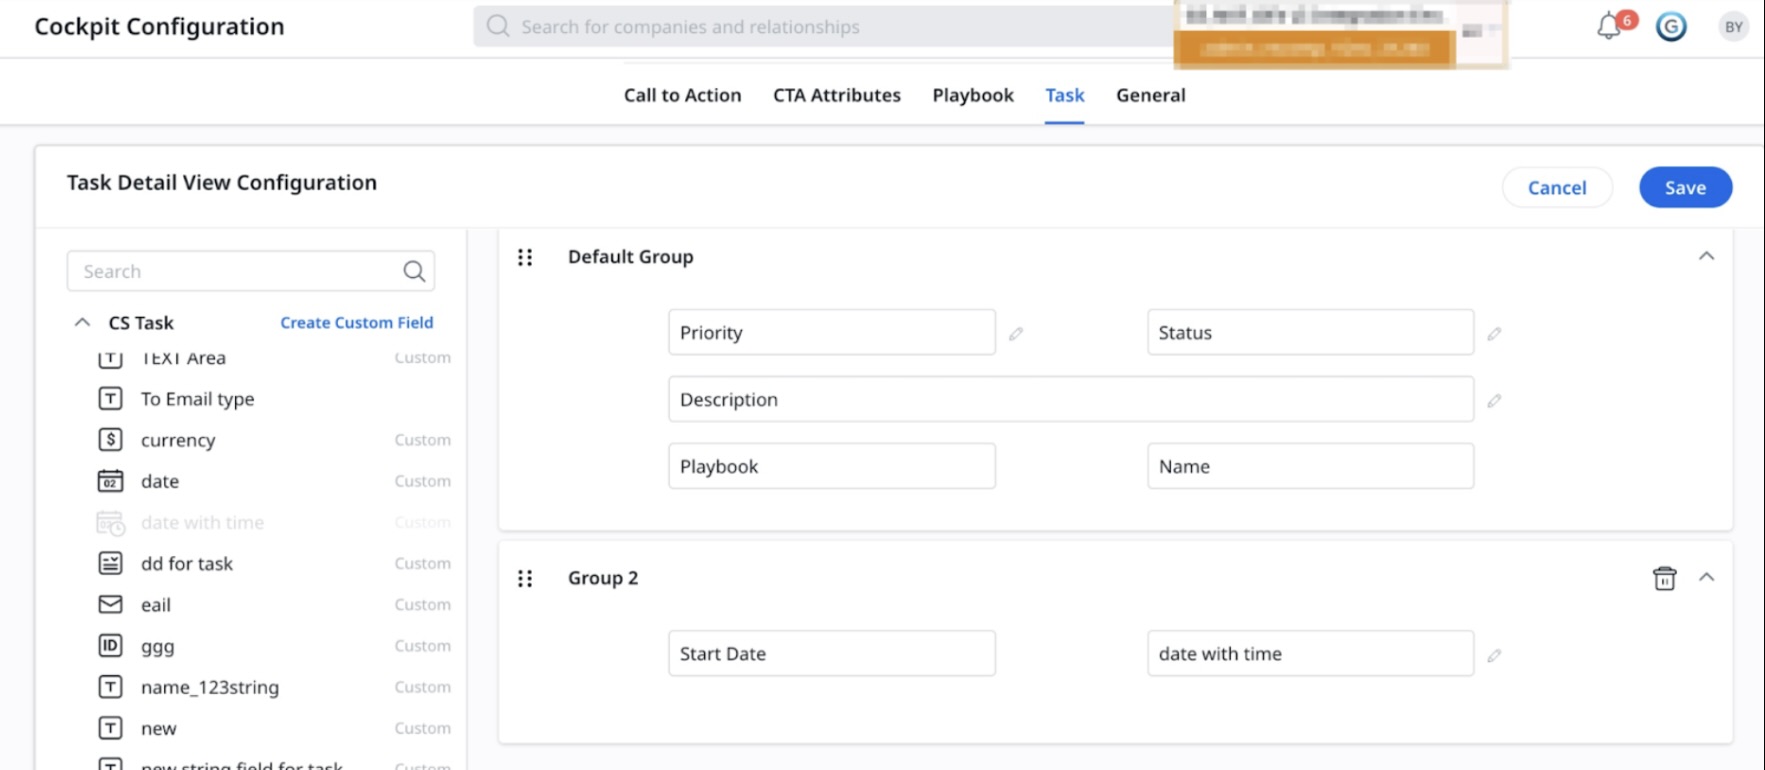
Configure Task Detail View
You can configure the fields that are visible to CSMs in the Task detail view. Also, you can create a Group and add the required fields to the group.
Perform the following actions to configure a task detail view:
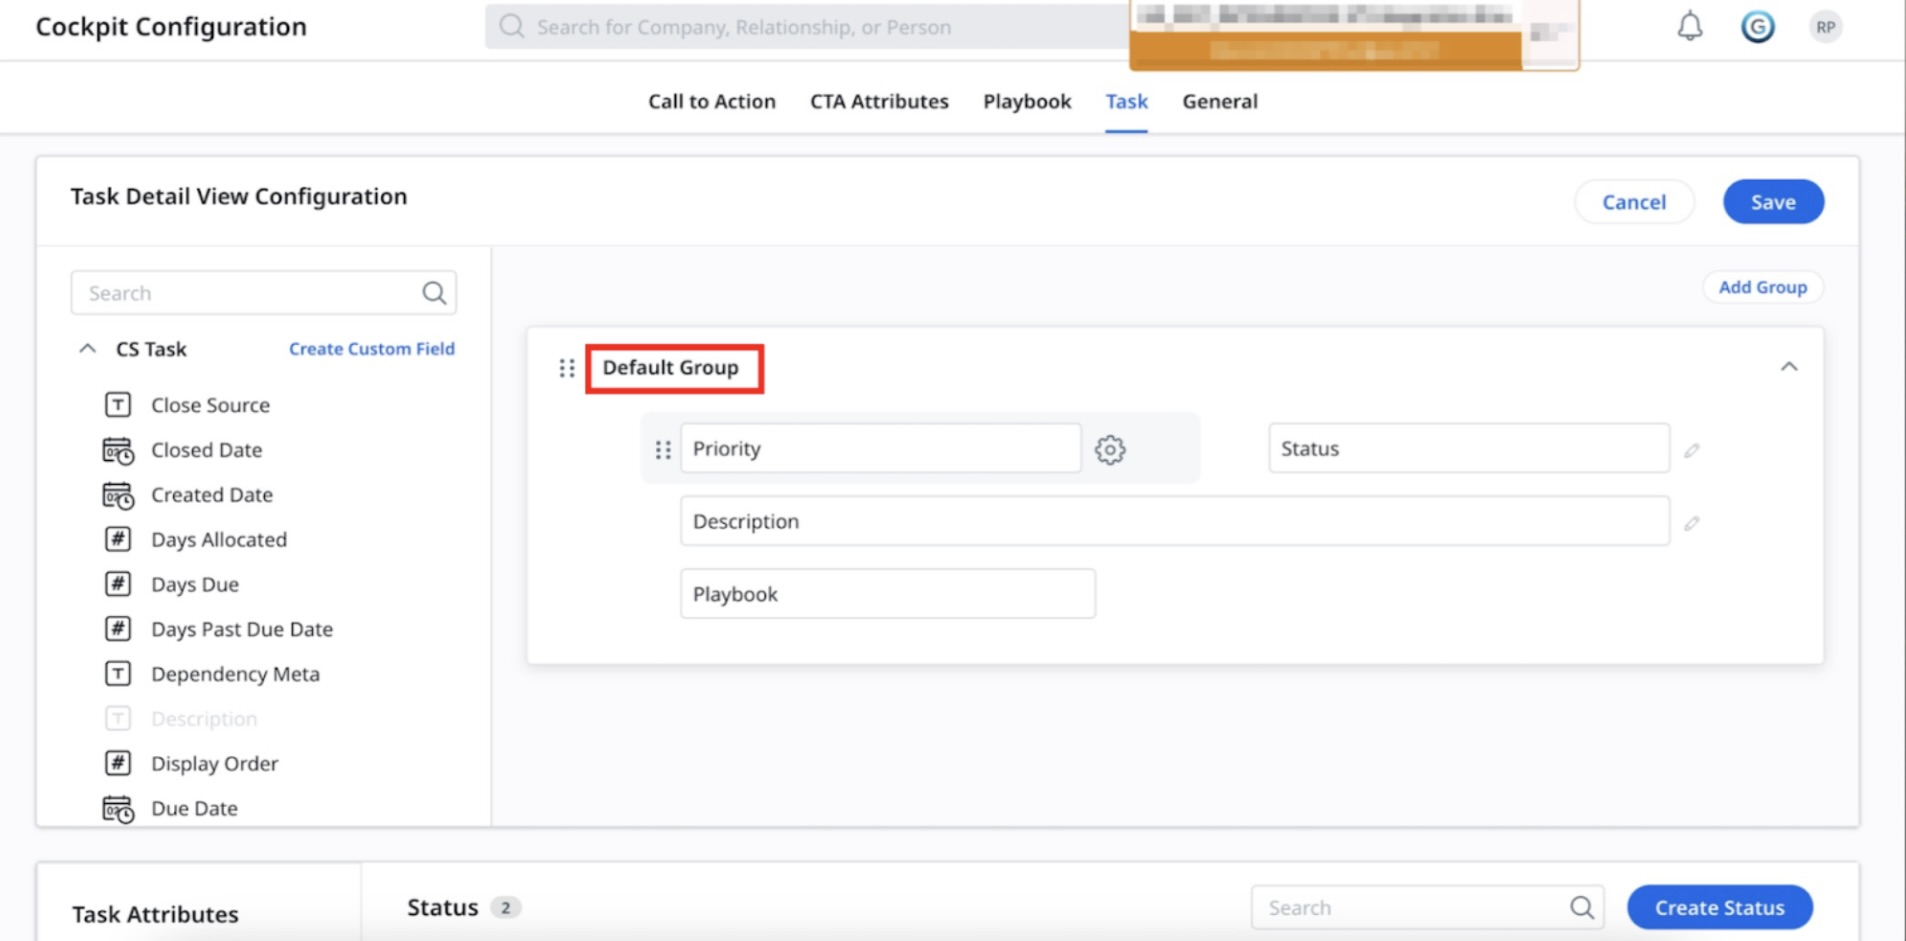
Use Default Group
You can structure the task layout to prioritize important information. By giving a default group, you can start with a predefined set of fields that are commonly used. This group contains a set of standard fields.
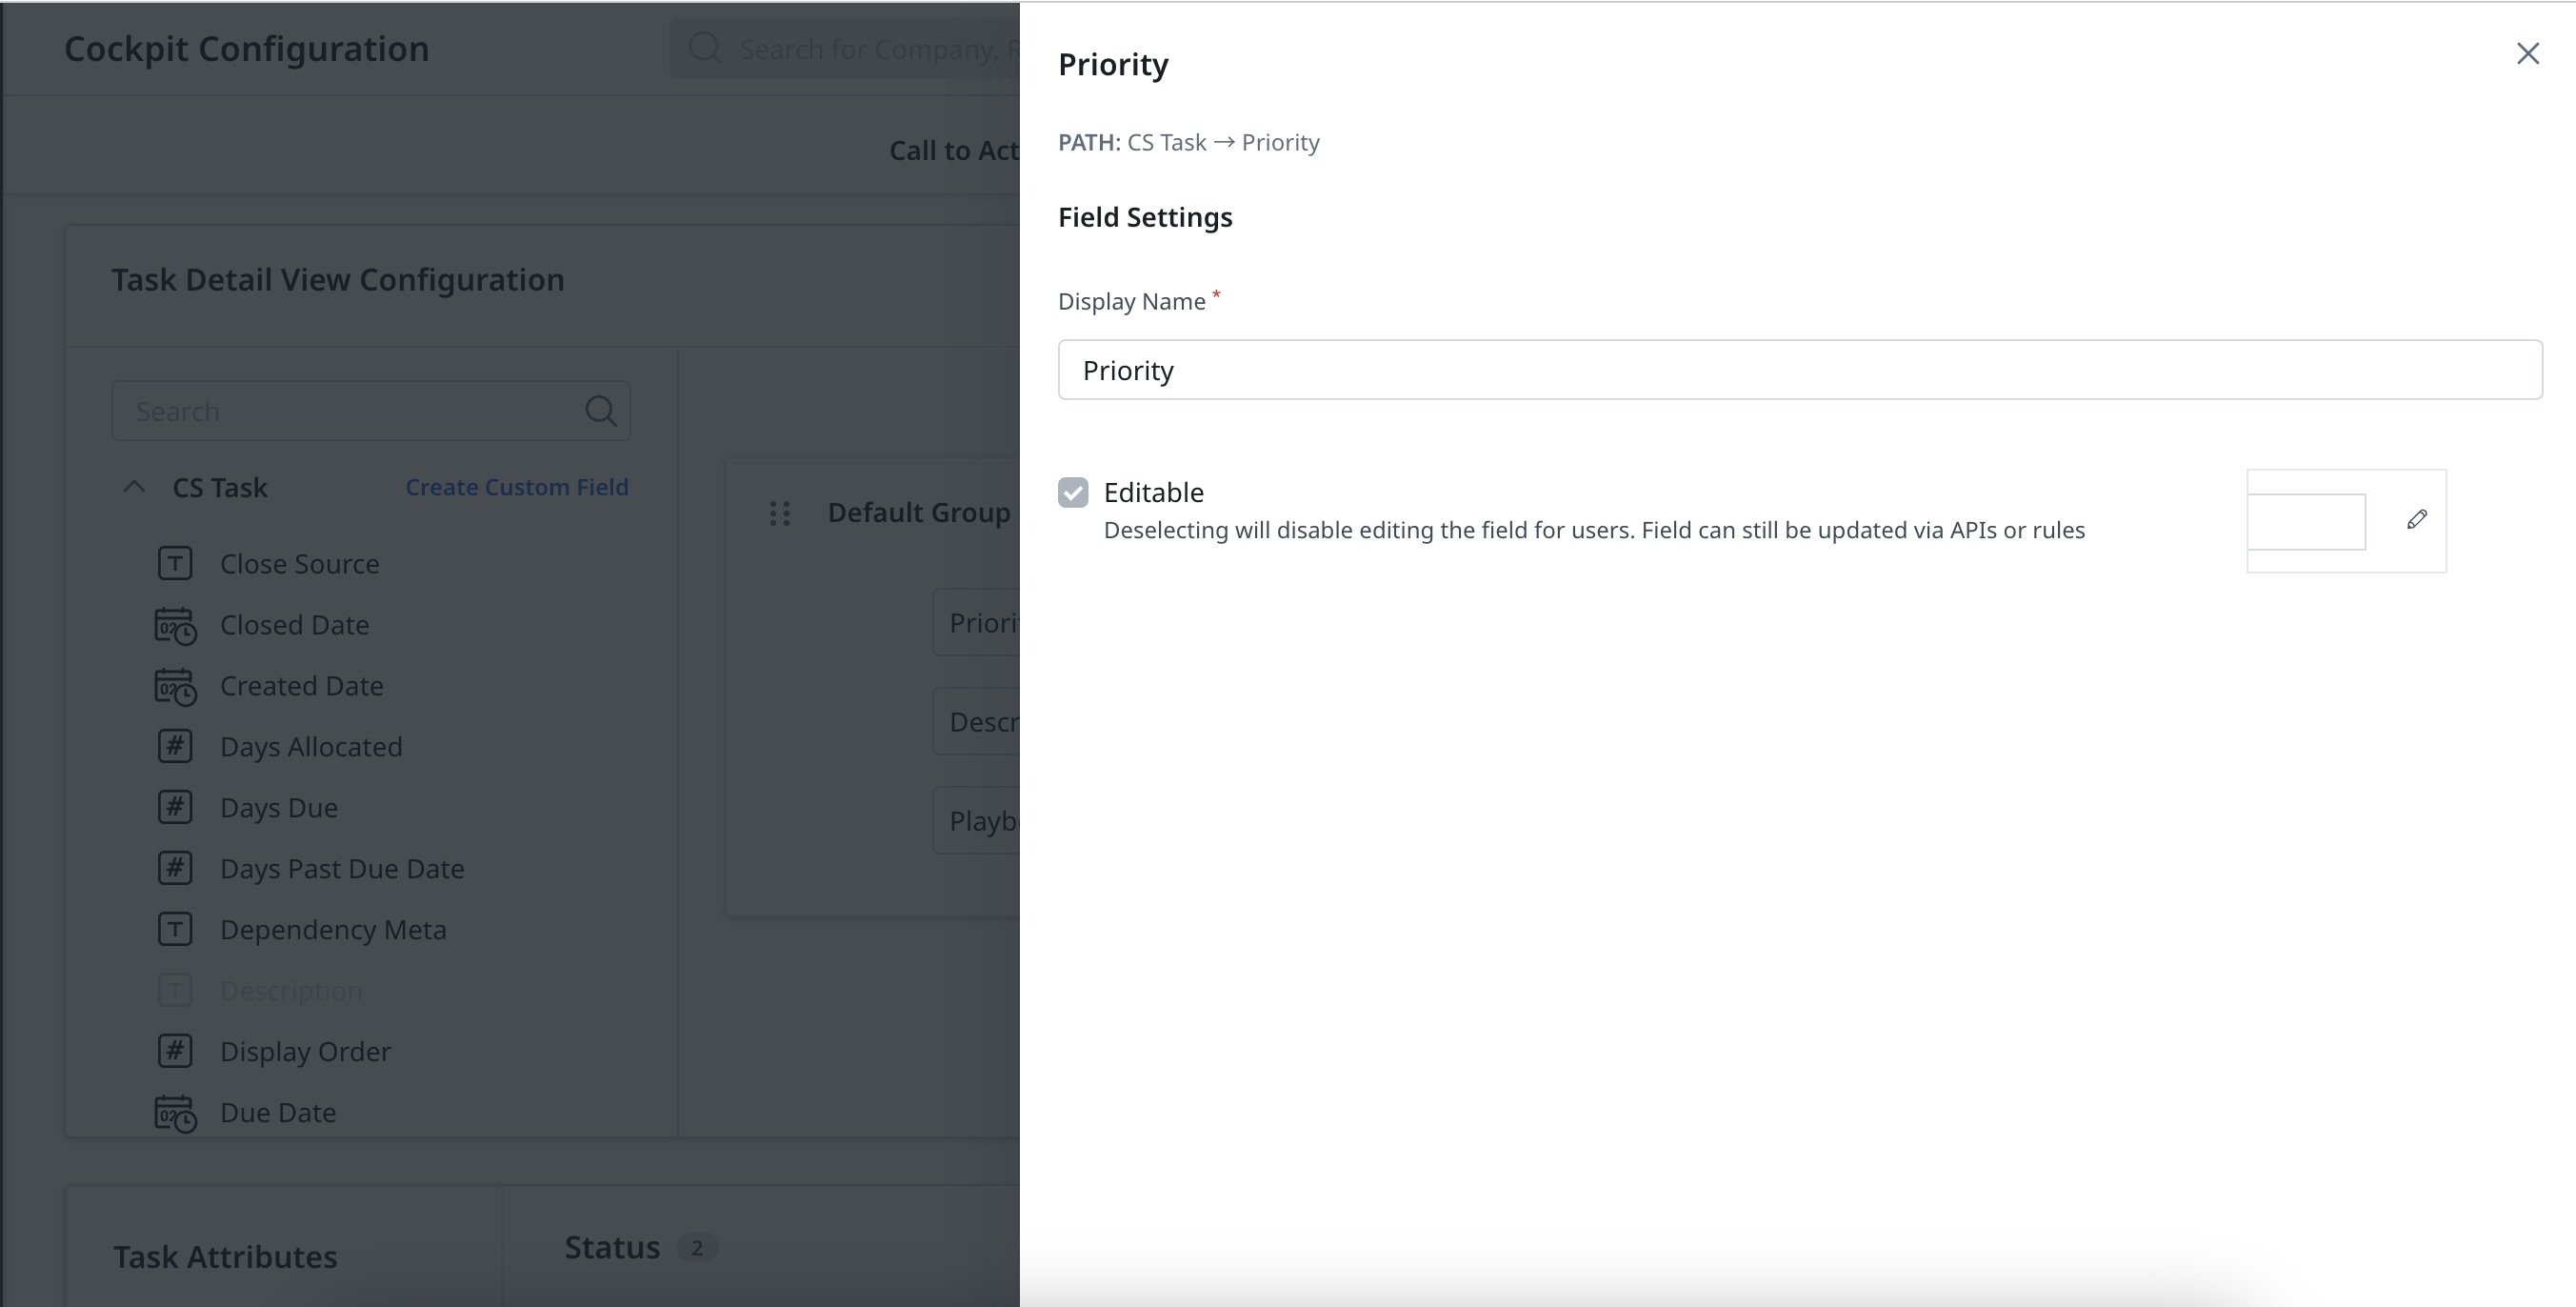
To edit in the Default Group:
- Click the edit icon that appears adjacent to the Priority field. The Priority slide-out panel appears with the configuration path.
- Enter the display name in the Display Name field.
- Select or clear the Editable checkbox to control field editability.
Note:
- The default group cannot be deleted.
- The fields eligible for editing are represented by an edit icon.
- The name of the Default Group name is editable.
Add Group
You can add a custom group to provide CSMs with custom fields in the Task detail view, in addition to the default group. Also, you can also add and maintain multiple groups.
To add a group:
- Click Add Group. Group 2 is added to the layout configuration.
- From the CS Task menu, drag-and-drop the required fields into Group 2.
- (Optional) Hover on the selected fields and click the Settings icon to change the field.
- (Optional) Click the X icon to delete the field.
- Click Save.
Note:
- You can rename the added groups.
- You can change the group display sequence using drag-and-drop.
Create Custom Field
You can create custom fields as per requirements apart from the fields available in the CS Task object.
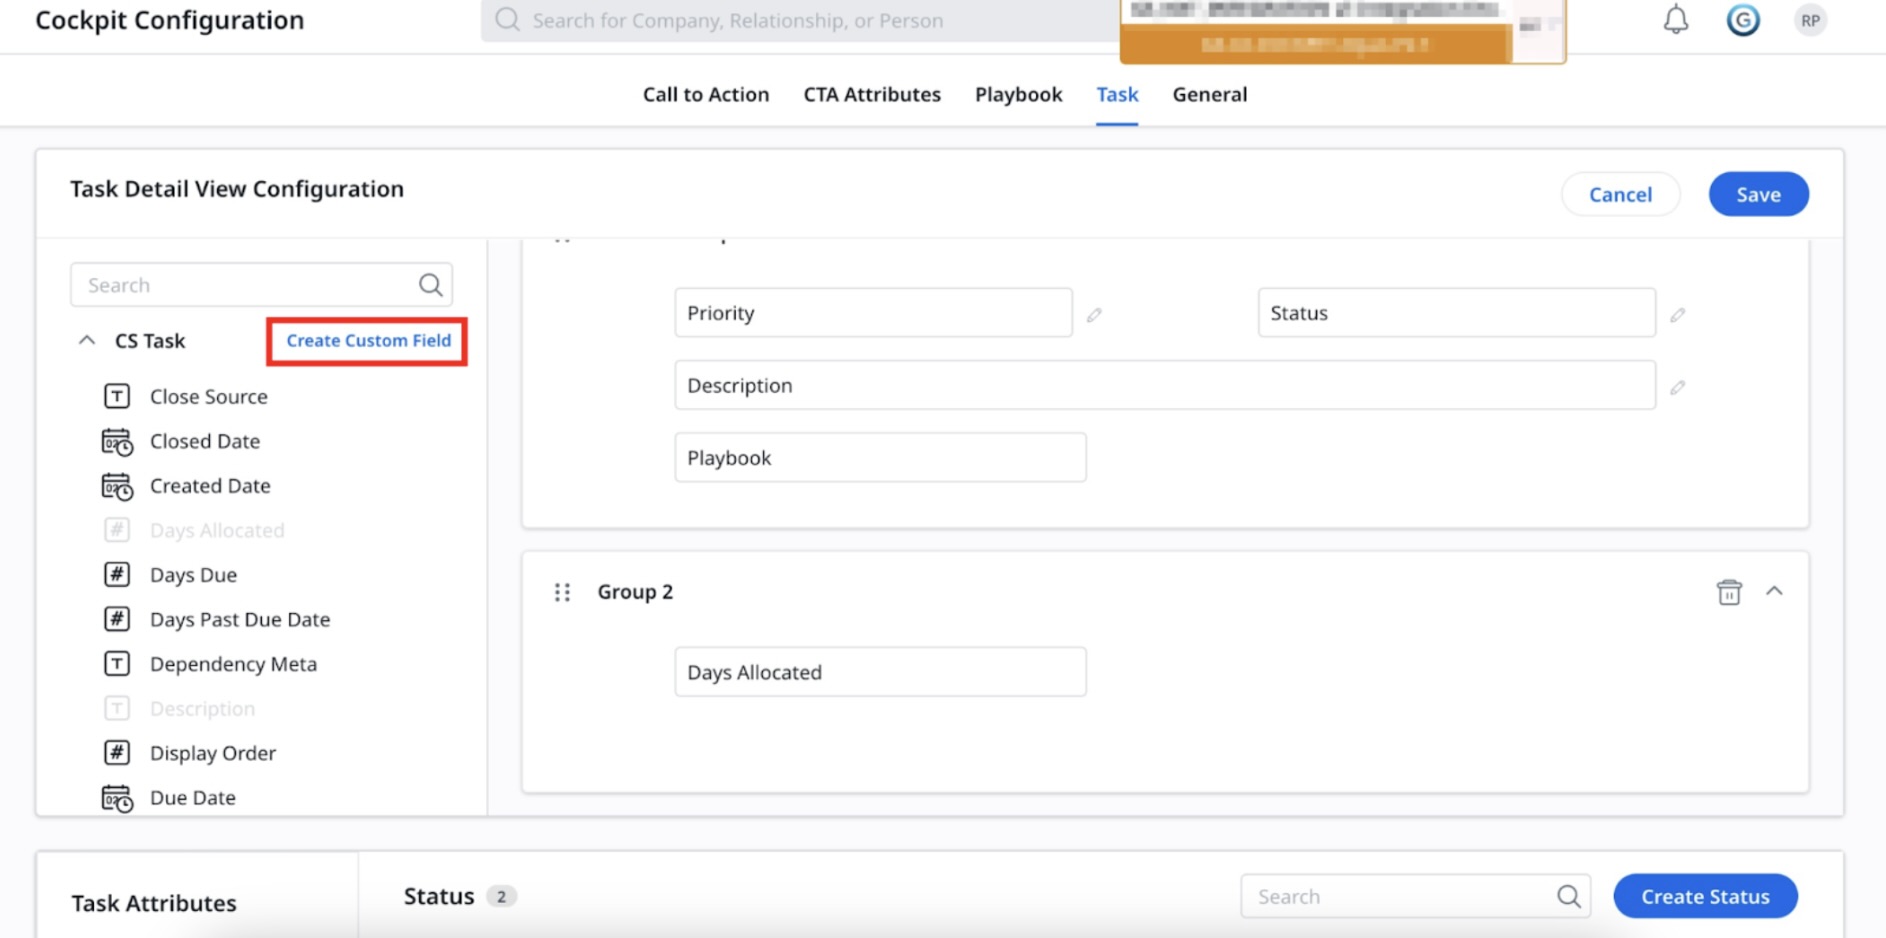
To create a Custom Field:
-
Click Create Custom Field. The Create Custom Field slide-out panel appears.
-
Provide the required details in the respective field:
- Display Name: Enter the display name.
- Date Type: Select the date type from the dropdown.
- Field Name: Enter the field name.
- Default Value: Enter the default value.
- Description: Enter a description of the field.
- Click Show Advanced Options. The advanced fields appear.
Note: select or clear the Hide this field in other product areas check box. By default Mark it as a mandatory field is disabled. - For the field mapping, select a value from the following dropdown menus:
- Map To: Select a standard field.
- Object: Select the object.
- Field: Select the field.
- On Delete: Select deletion of the field.
- (Optional) ) To create a formula field, click Create Formula. Add the formula in the provided text box and click Apply.
- Click Save. The custom field is created.
Configure Task Attributes
You can add Attributes to the Task and configure the fields in it. Attributes comprise of the following fields:
Create Status
You can configure the status field for the tasks. The priorities you configure are available for the CSMs in the status Priority drop-down menu.
To create a status:
- Navigate to the Administration > Cockpit > Call to Action.
- Click the Task tab. The Task Detail View Configuration page appears.
- Under the Task Attributes section, select Status.
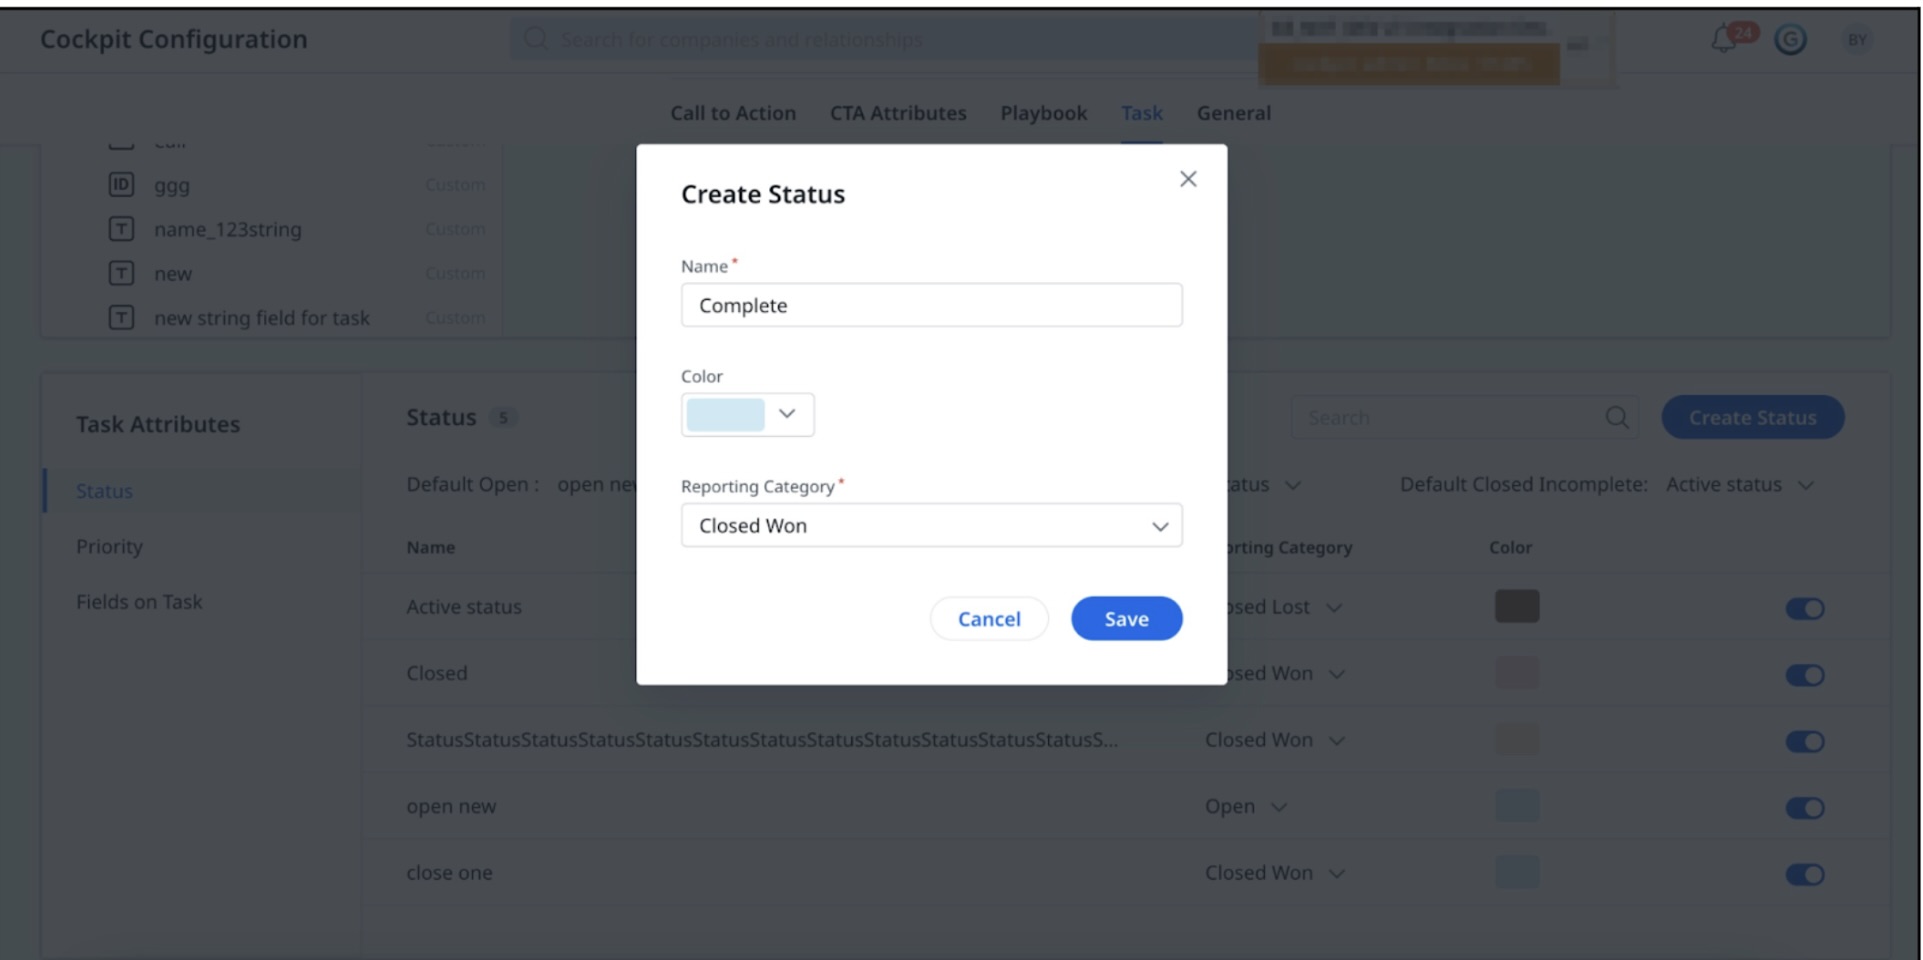
- Click Create Status. The Create Status dialog box appears.
- Provide the following details:
- Name: Enter the name of the status
- Color: Select the color as required. Click Ok.
- Reporting Category: From the Reporting Category drop-down list, select the category.
- Click Save. The status is created successfully.
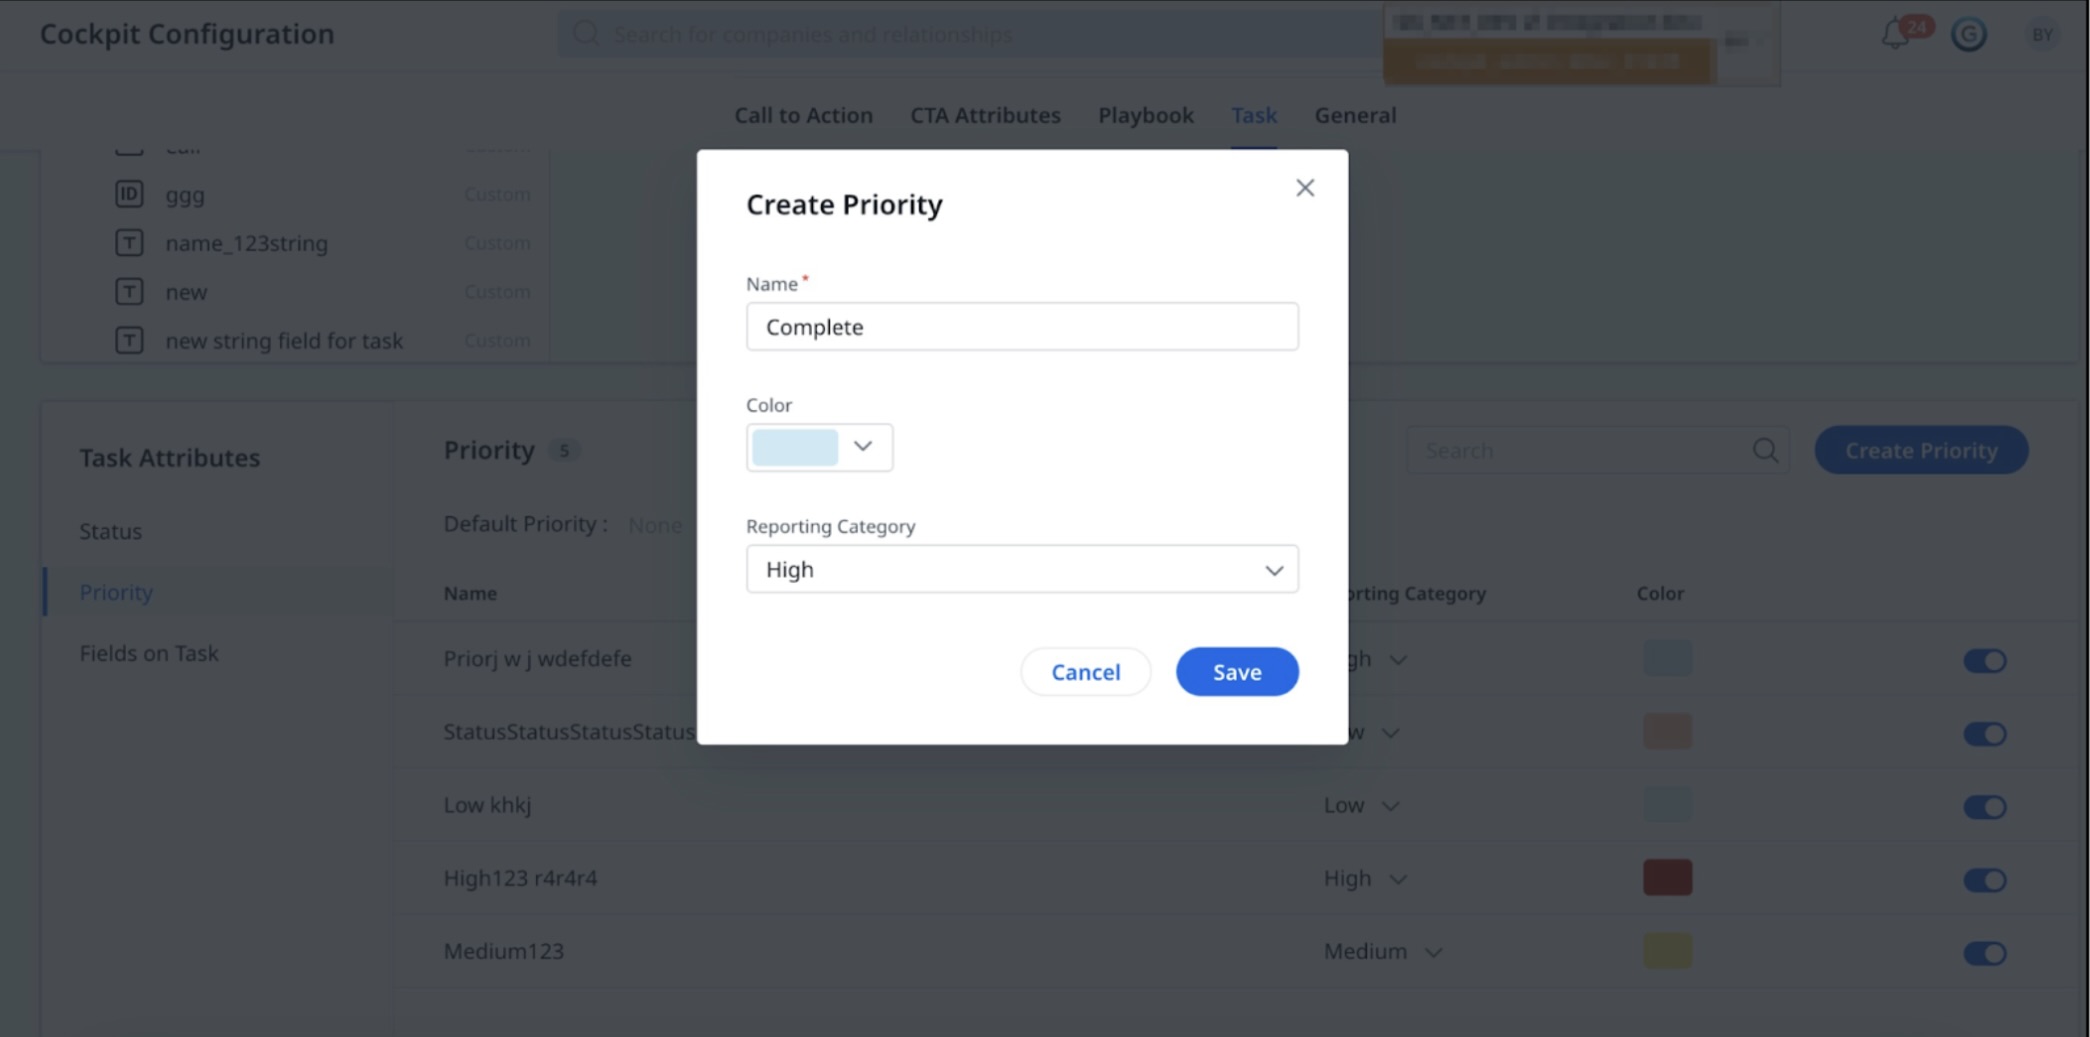
Create Priority
You can configure the Priority field for the tasks. The priorities you configure are available for the CSMs in the Task’s Priority drop-down menu.
To create a priority:
- Navigate to the Administration > Cockpit > Call to Action.
- Click the Task tab. The Task Detail View Configuration page appears.
- Under Task Attributes section, select Priority.
- Click Create Priority. The Create Priority dialog box appears.
- Provide the following details:
- Name: Enter the name of the status
- Color: Select the color as required. Click Ok.
- Reporting Category: From the Reporting Category drop-down list, select the category.
- Click Save. The priority is created successfully.
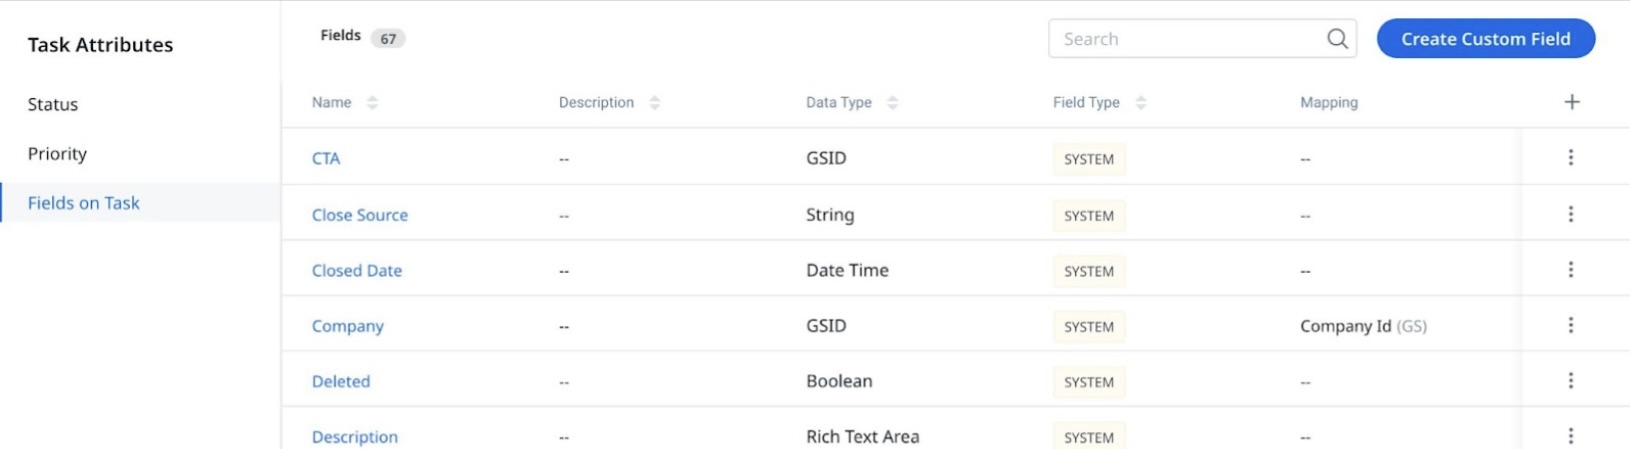
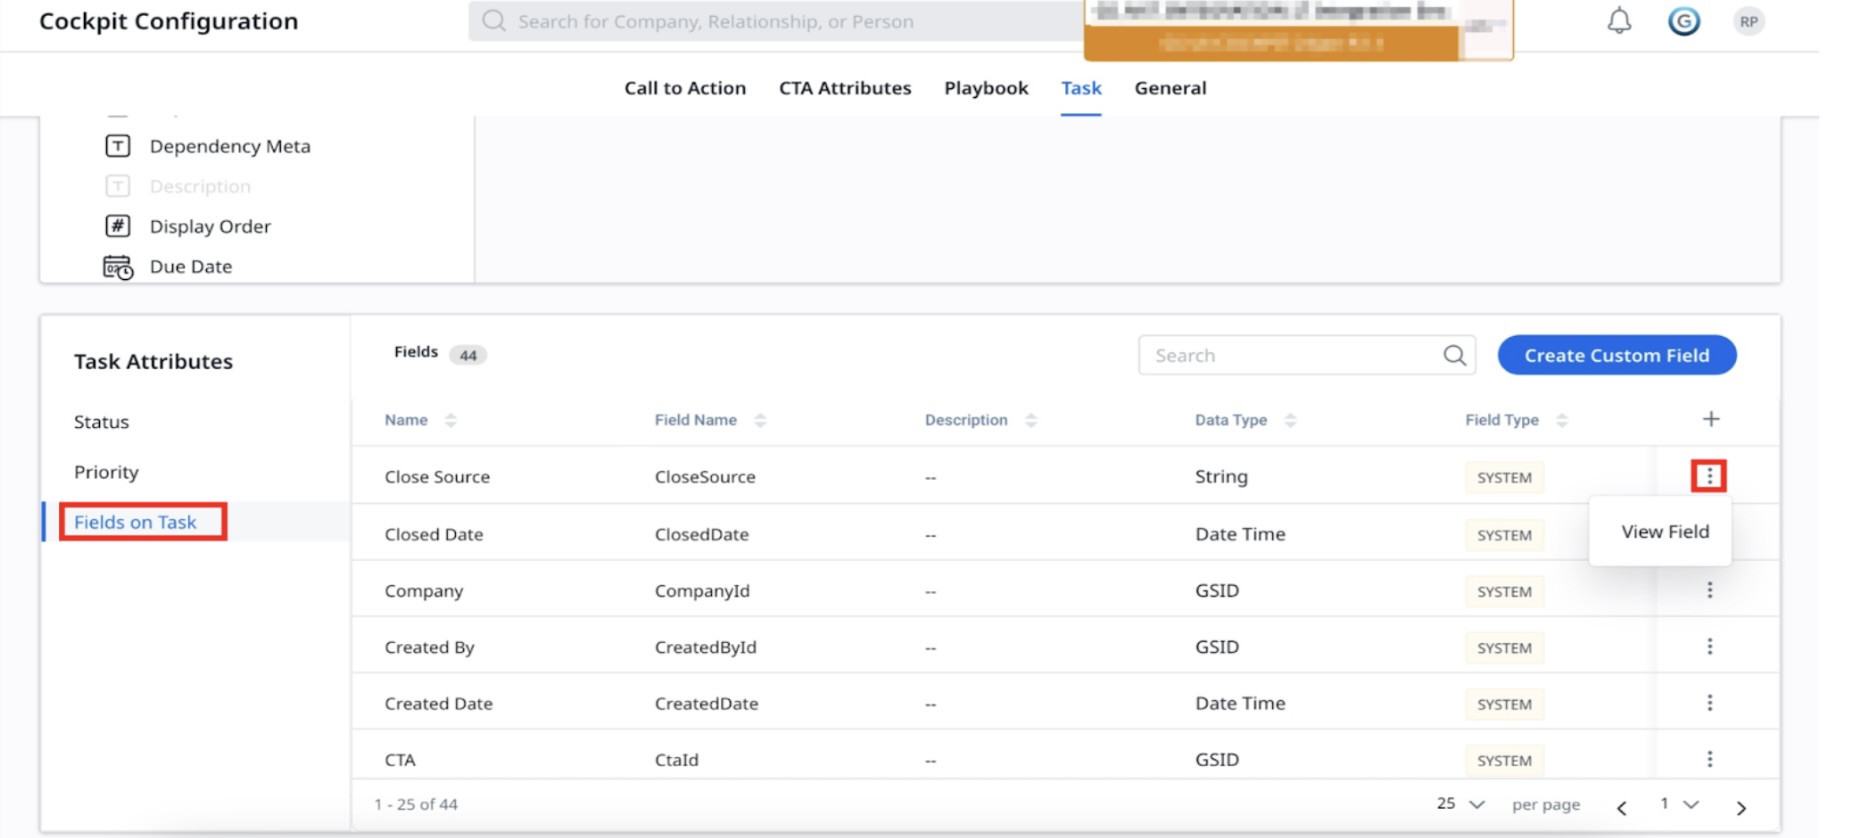
Create Custom Fields for Task
You can create custom fields in the Task object from the Fields on Task tab. This tab also displays the existing fields used in the Task object.
To create a custom field:
- Navigate to the Administration > Cockpit > Call to Action.
- Click the Task tab. The Task Detail View Configuration page appears.
- Under the Task Attributes section, select Fields on Task.
- Click Create Custom Field. The Create Custom Field slide-out panel appears.
- Provide the following details in the respective field:
- Enter the display name in the Display Name field.
- From the Data type dropdown, select the required data type.
- Select the field name from the auto-populated name in the Field Name field.
- Enter the value in the Default Value field.
- Enter a description in the Description field.
- Click Show Advanced Options. The advanced fields appear.
Note: select or clear the Hide this field in other product areas check box. By default Mark it as a mandatory field is disabled. - For the field mapping, select a value from the following dropdown menus:
- Map To: Select a standard field.
- Object: Select the object.
- Field: Select the field.
- On Delete: Select deletion of the field.
- (Optional) To create a formula field, click Create Formula. Add the formula in the provided text box and click Apply.
- Click Save. The custom field is created.
- (Optional) To view a standard field, click the three vertical dot menu on any standard field. Select View Field. The Update Custom Field slide-out panel appears. Update the details as required. Click Save.
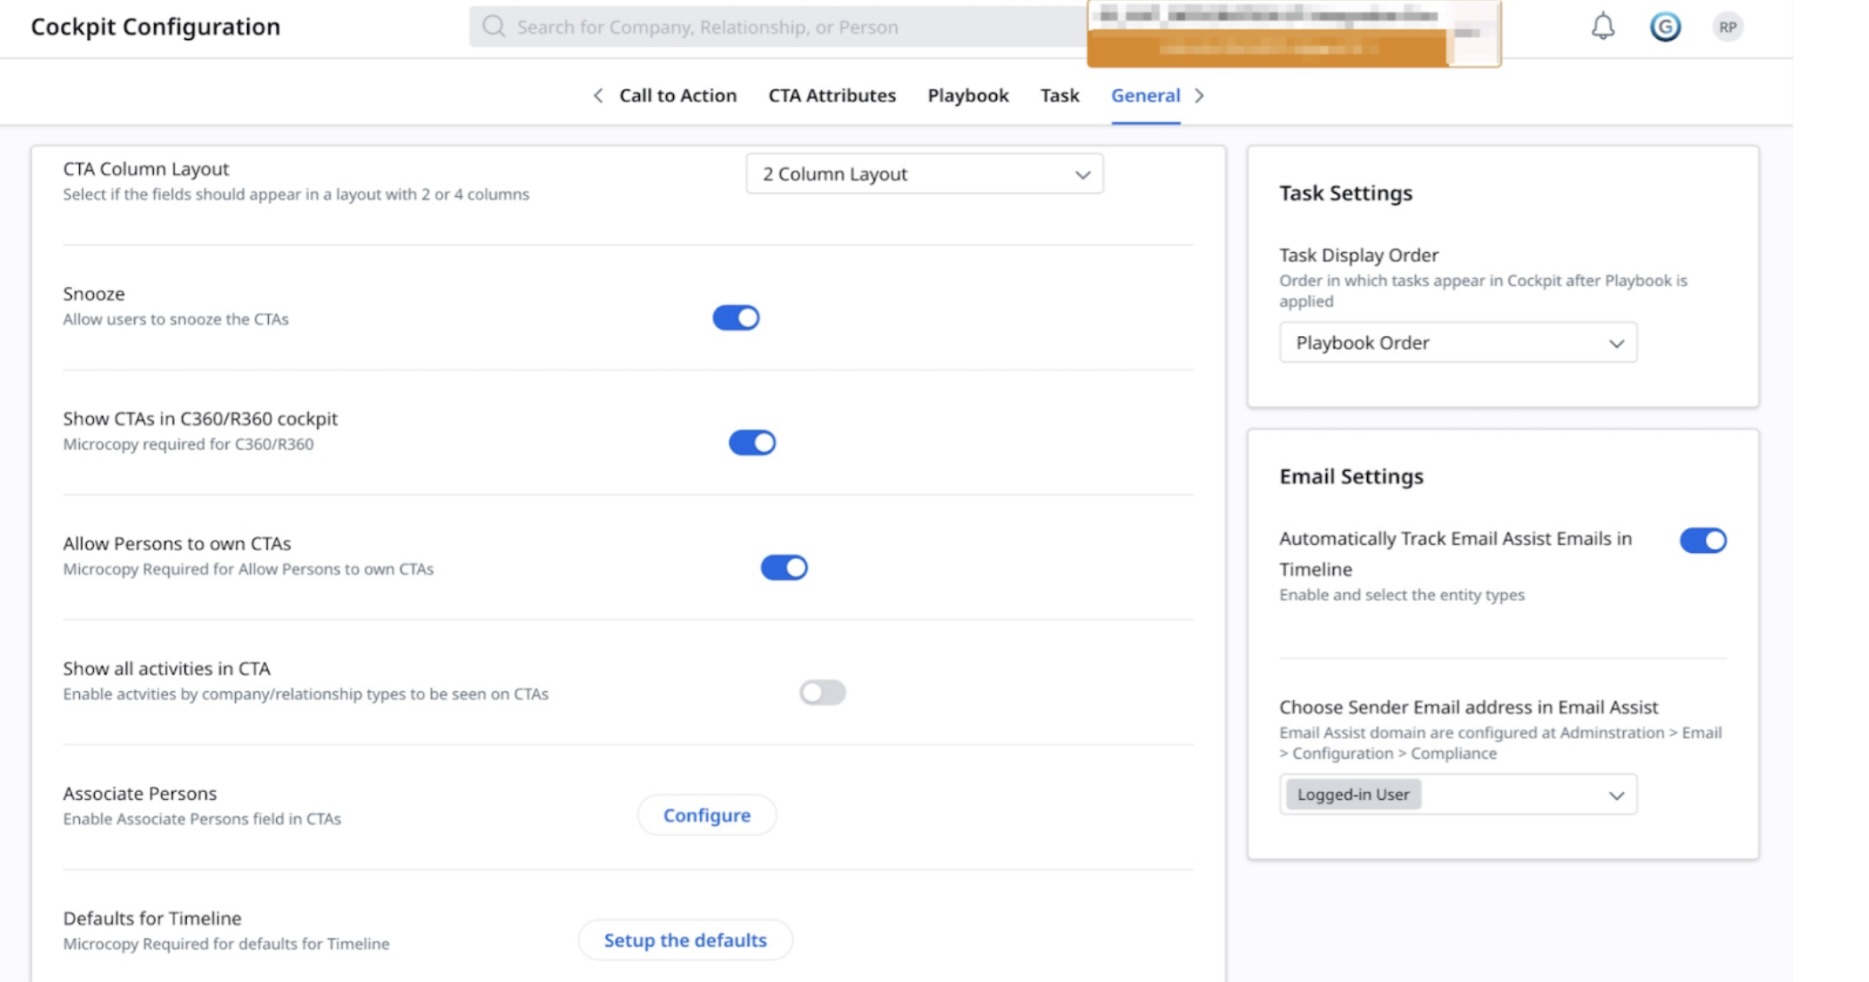
General Settings
The General tab is your central hub for configuration and allows you to personalize key features about Cockpit and CTAs for an optimized experience.
The general configuration is a setting section in which you can configure the following:
- CTA Column Layout
- Snooze
- Show CTAs in C360/R360 Cockpit
- Show all activities in CTA
- Allow Persons to own CTAs
- Associate Person
- Default for Timeline
- Task Settings
- Email Settings
| Configuration | Description | Additional Options |
|
CTA Column Layout |
This setting determines whether to display the CTAs in two column or four column layout. Admins can select from the column layout dropdown as per the requirement. | Column layout Configuration (2 or 4 columns). |
| Snooze | This setting allows admins to temporarily hide Call to Action (CTAs) for better workflow management. | NA |
|
Show CTAs in C360/R360 Cockpit |
This setting determines whether to display the CTAs in the comprehensive customer (C360) or relationship (R360) views within the Cockpit. | NA |
|
Show all activities in CTA |
This setting allows admins to ensure that all timeline activities by company or relationship types associated with a particular CTA are visible, providing a complete overview within each CTA. | NA |
|
Allow Persons to Own CTAs |
This setting allows admins to enable Company/Relationship person to be assigned as owners of specific CTAs, a vital feature for collaboration. | NA |
|
Associate Person |
This setting allows admins to set up search and filter criteria for which individuals are associated with CTAs, impacting how CTAs are delegated and managed. | In the Associated Persons Configuration slide-out panel, select the required checkbox and click save. |
| Default for Timeline | This setting allows admins to specify the default CTA Types that are created when a task is reated from a timeline activity. | In the Setup Timeline Default slide-out panel, select the required option from the drop-downs and click Save. |
| Task Settings | This setting allows admins to do the customization of how tasks are displayed in Cockpit after the playbook is applied to it. | Task Display order (Playbook order or Due date). |
| Email Settings | This setting allows admins to configure how email interactions are handled within CTAs and activities, which is crucial for communication management. | Choose the Sender Email address in Email Assist (Logged-in User and/or Email Assist Domain configuration). |