Application Settings
Gainsight NXT
This article explains the different configurations available in the Application Settings page.
Overview
After you log in to Gainsight for the first time, Gainsight recommends you to configure the following settings:
- General Details
- Fiscal Year
Note: The above Gainsight settings are applied at the tenant level.
Admins can navigate to the Administration > General > Application Settings page through the global navigation pane to apply the tenant level settings.
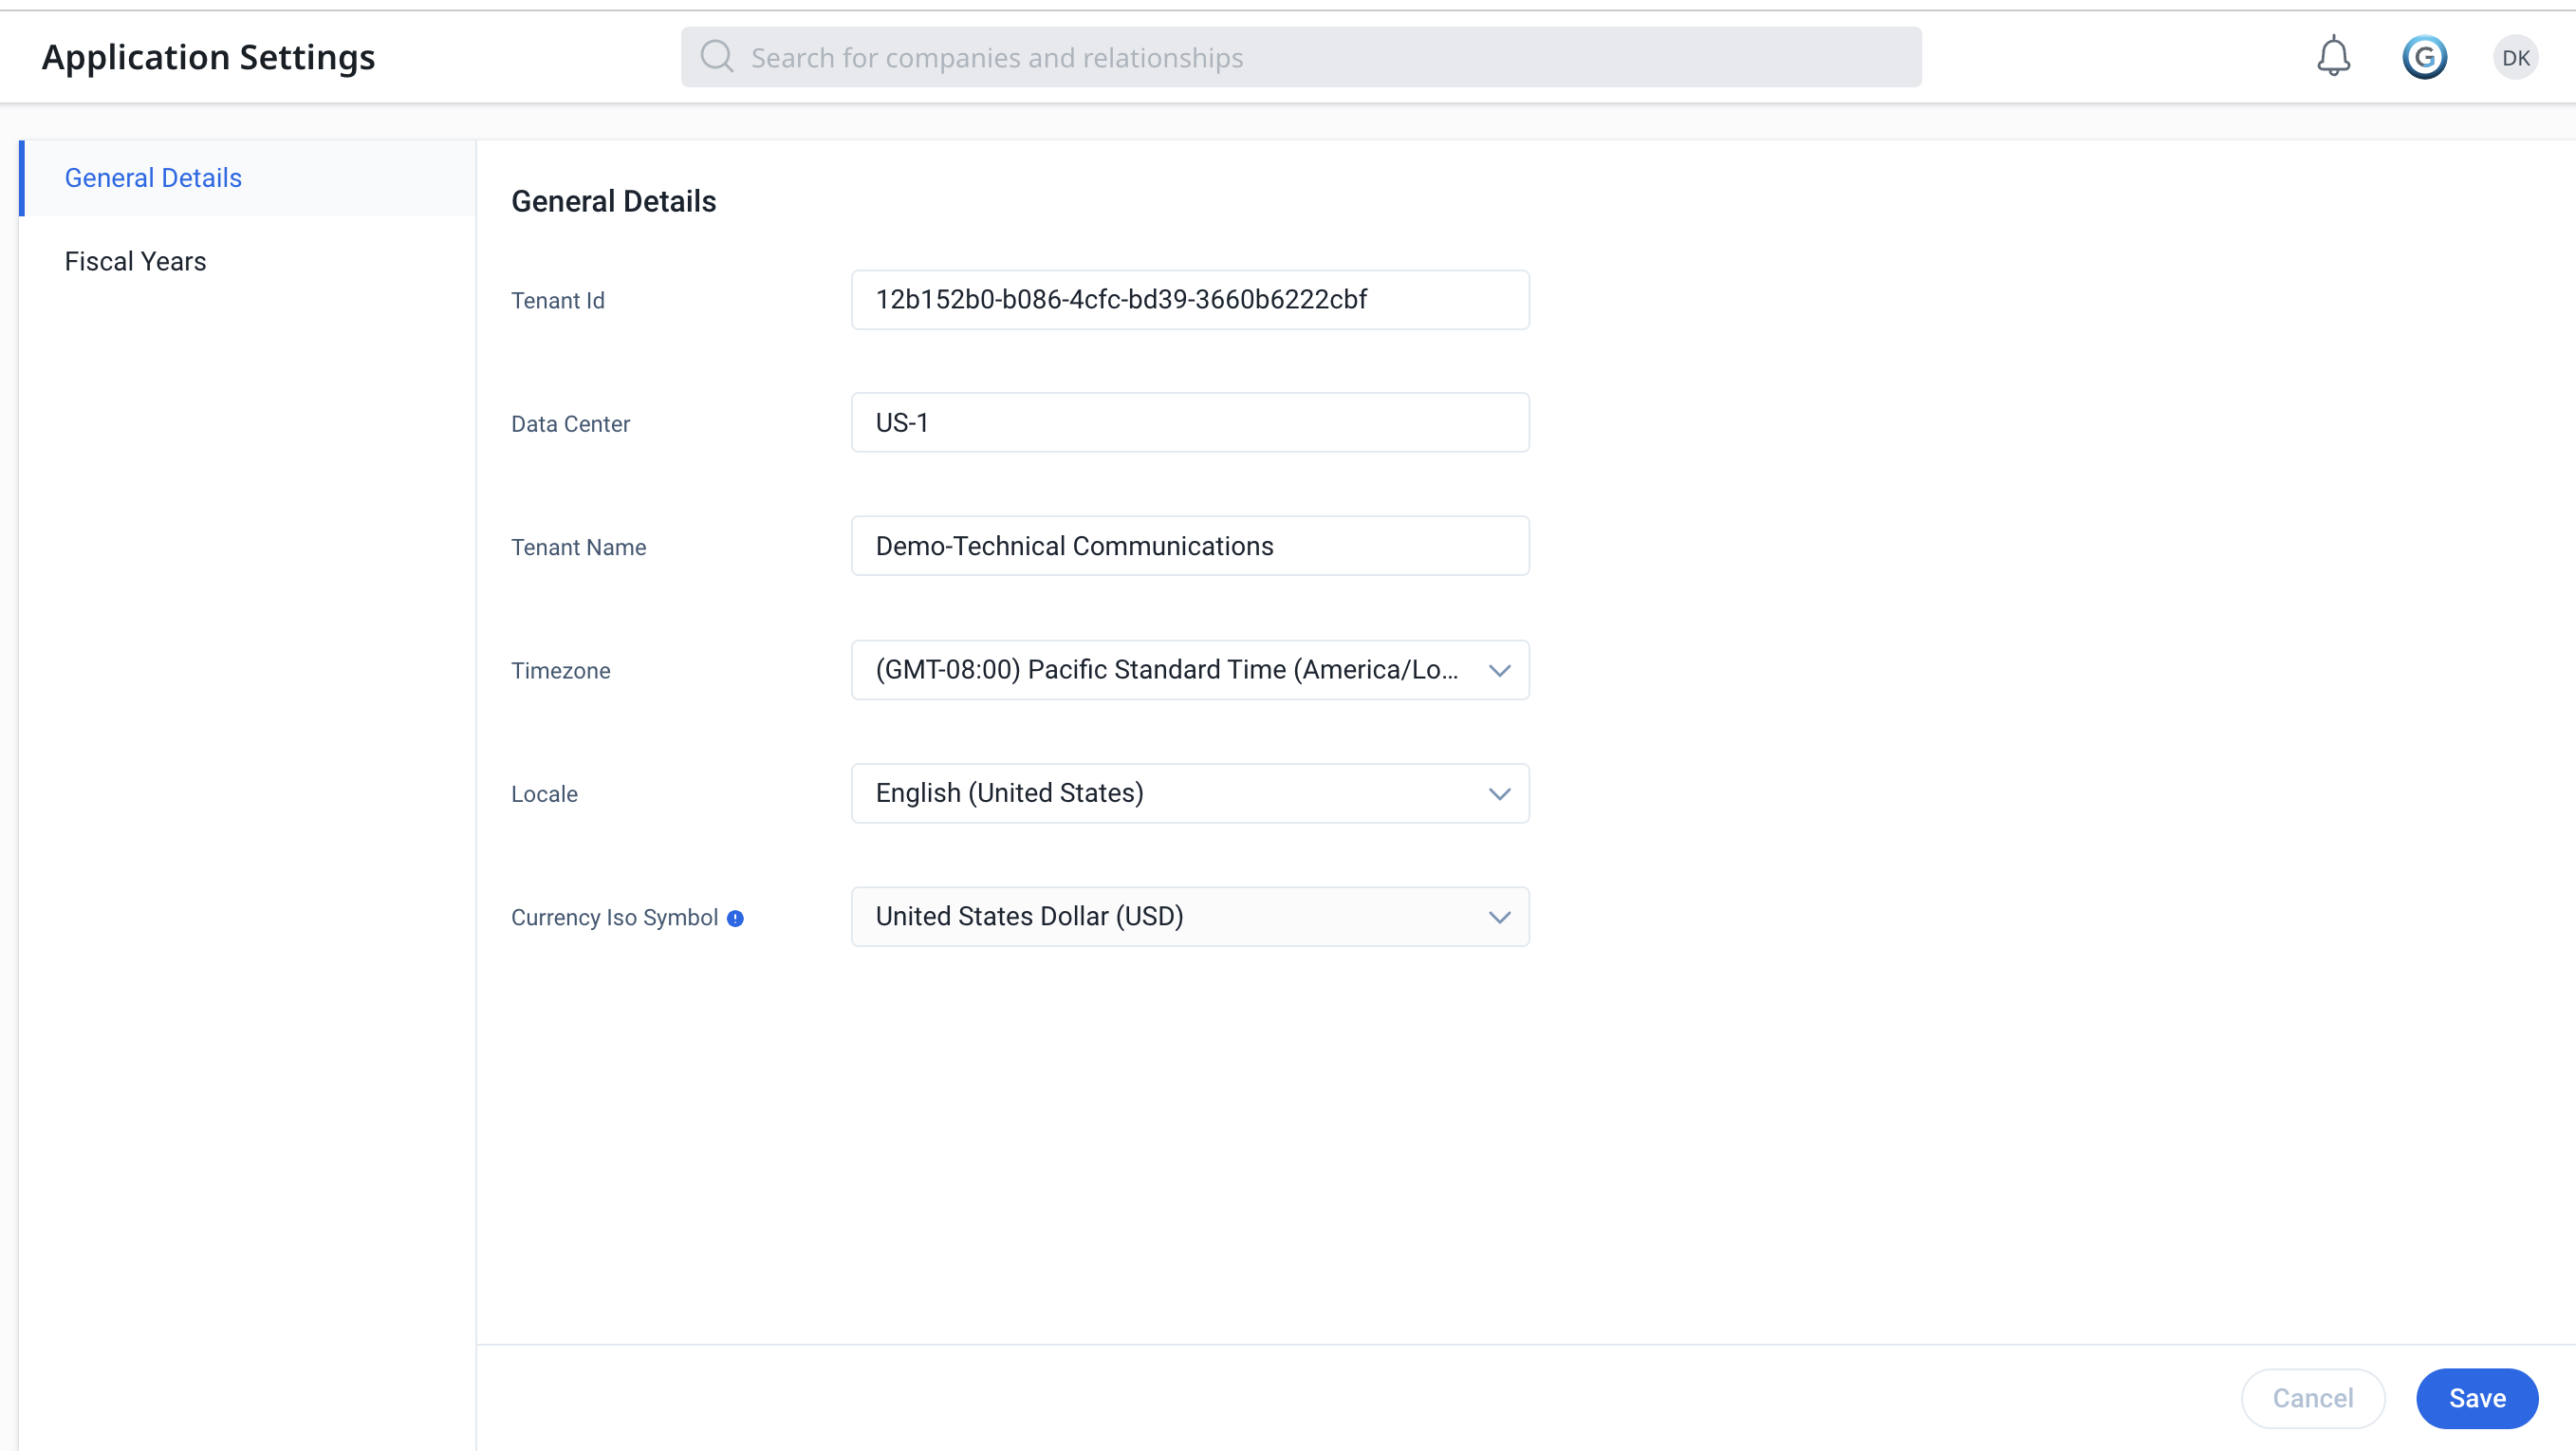
General Details
In the General Details tab, configure the following:
- Tenant ID: Displays the ID of the tenant.
- Data Center: Displays the current data center of tenant data.
- Tenant Name: Enter a unique tenant Name.
- Time Zone: (mandatory) Select a time zone from the list. All data interactions between Gainsight and MDA platform are recorded with a time in this timezone. History of inserting or updating records, rule execution details, etc. are stored using this timezone. Selecting this is mandatory before onboarding into Gainsight NXT.
| CAUTION: Do not change your timezone settings, after setting them up. It will result in serious data discrepancy issues. |
Note: Date and Datetime values displayed in a Report created on the Gainsight objects are based on the User Timezone setting. This setting can be applied in the user profile navigated from the top right of the global header. If this setting is not applied, Timezone selected in the Application Settings page is honored in the Reporting.
- Locale: Select a Locale from the list. Locale selection in this setting defines the Date and DateTime field formats across Gainsight applications as well as the format of Number and Currency fields on 360 pages. This setting is applicable when an Admin has not set a User Locale to any user from the User Management.
- Currency ISO Symbol: Select a currency symbol based on your business requirement.
Configure Fiscal Year
In Gainsight, you can configure fiscal year structures to suit the needs of your organization. You can select one of the following structures based on your requirements:
- Standard Fiscal Year: Gregorian Calendar fiscal years with customizable start month.
- Custom Fiscal Year: Customizable fiscal years where quarters and months can be split into custom fiscal periods. For example, the calendar can have four quarters, with 13 weeks per quarter in a 4-4-5 pattern or 13 periods per year.
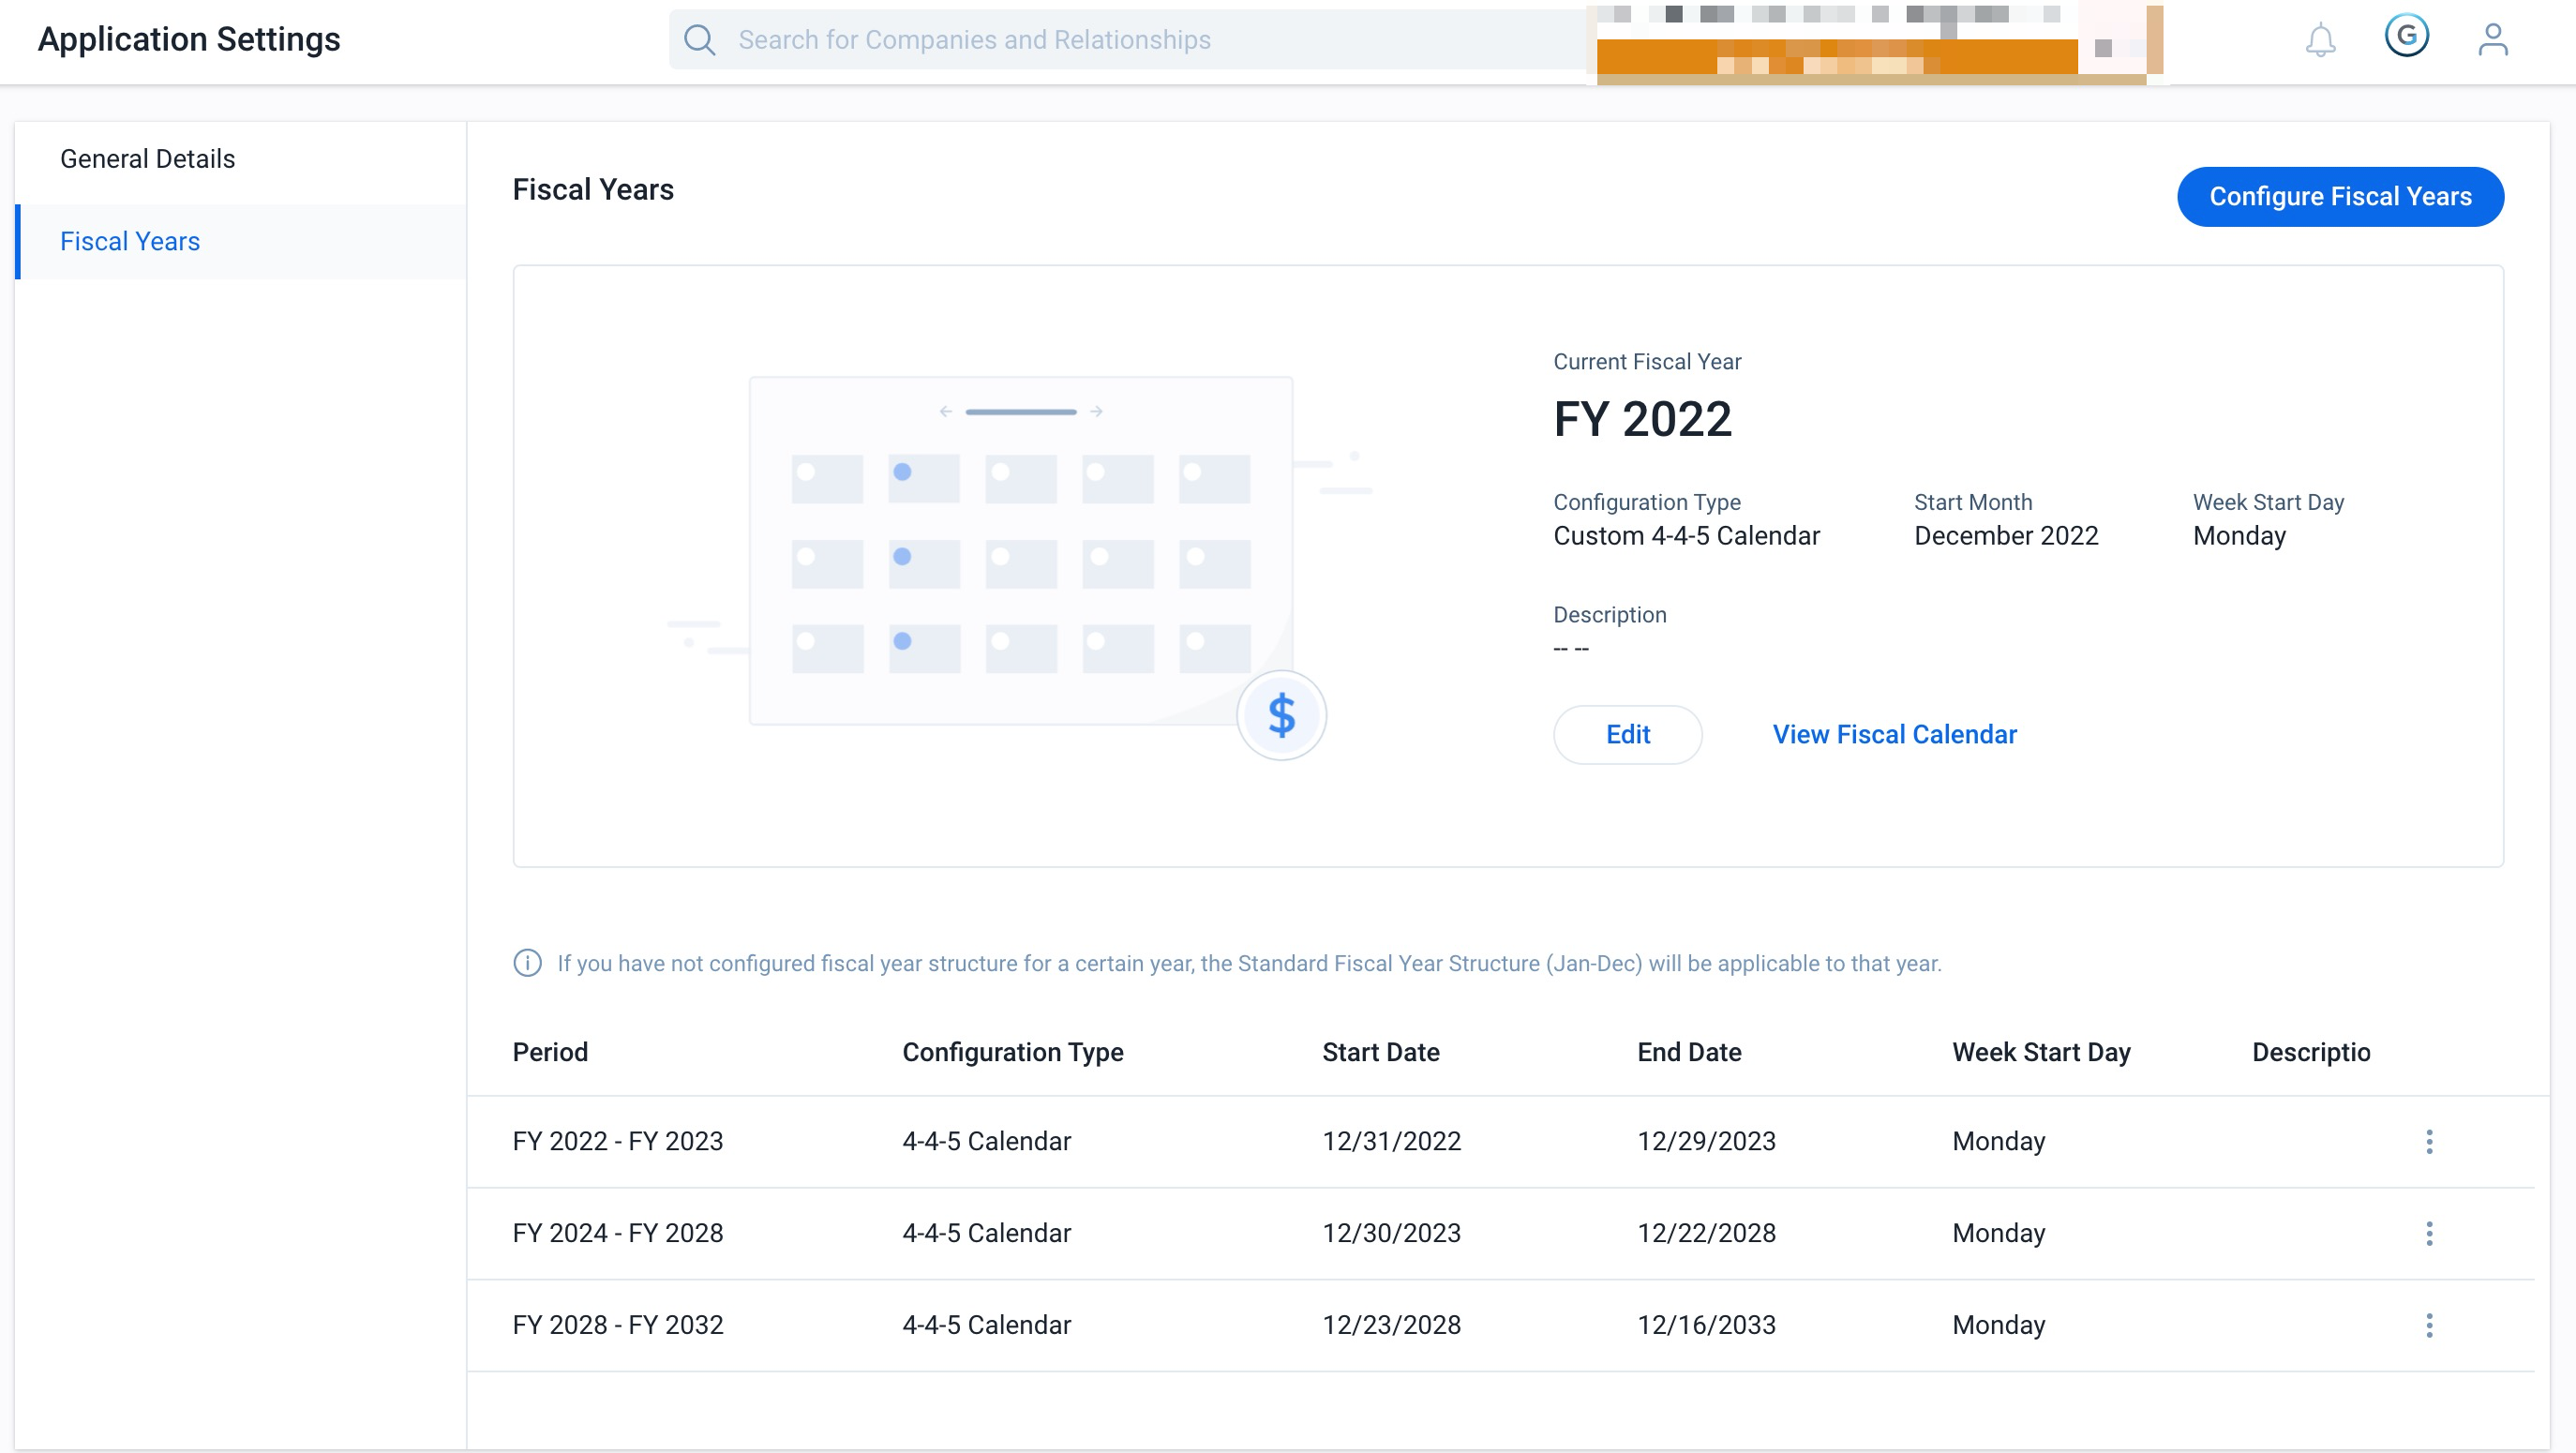
Standard Fiscal Year
If your company follows the Gregorian Calendar, you can select Standard Fiscal Year. The Standard Fiscal Year starts on the first day of any month you choose.
Admins can configure the following details in the Standard Fiscal Year:
- Start Month
- Week Start Day
- Fiscal Year Label
To configure a Standard Fiscal Year:
- Navigate to Administration > Application Settings > Fiscal Years.
- Click Edit. The Fiscal Year Configuration page appears.
- In the Setup tab, select the Fiscal Year Structure as Standard Fiscal Year.
- In the Details section, select the following details:
- From the Start Month dropdown, select the starting month for your company’s fiscal year.
- From the Week Start Day dropdown, select the first working day of the week.This applies to every week of the fiscal year.
- Select either Starting Year or Ending Year to display the label of fiscal year.
Note: Select the fiscal year label based on the following examples:
Let's consider your fiscal year starts in April 2022 and ends in March 2023:- If you base your fiscal year label on the starting year, your fiscal year format would be FY 2022 and the fiscal quarter format would be FQ1 2022, FQ2 2022 and so on
- If you base your fiscal year label on the ending year, your fiscal year format would be FY 2023 and the fiscal quarter format would be FQ1 2023, FQ2 2023 and so on.
- Click Save.
Custom Fiscal Year
Companies that work on custom fiscal periods often have challenges to present their reports or build their rules on financial data. To avoid complex workarounds and approximations, companies can leverage Custom Fiscal Period configuration to define a tailored fiscal year structure.
IMPORTANT: Once a custom fiscal year is configured, you cannot switch back to a standard fiscal year until all the custom fiiscal Year configurations are deleted.
Setup
To configure a Custom Fiscal Year:
- Navigate to Administration > Application Settings > Fiscal Years.
- Click Configure Custom FIscal Years. The Fiscal Year Configuration page appears.
- In the Setup tab, select the Fiscal Year Structure as Custom Fiscal Year.
- Select one of the following Templates for the custom fiscal year:
- 4 Quarters per Year, 13 Weeks per Quarter.
- 13 Periods per Year, 4 Weeks per Period.
For more information on Templates, refer to the Custom Fiscal Year Template article.
- From the Format dropdown, select the required format of calendar year. You can select the format based on the number of periods required in each quarter.
- In the Details section, select the following details:
- From the Start Month dropdown, select the starting month for your company’s fiscal year.
- From the Week Start Day dropdown, select the first working day of the week. This applies to every week of the fiscal year.
- Select either Starting Year or Ending Year to display the label of fiscal year.
Note: Select the fiscal year label based on the following examples:
Let's consider your fiscal year starts in April 2022 and ends in March 2023:- If you base your fiscal year label on the starting year, your fiscal year format would be FY 2022 and the fiscal quarter format would be FQ1 2022, FQ2 2022 and so on.
- If you base your fiscal year label on the ending year, your fiscal year format would be FY 2023 and the fiscal quarter format would be FQ1 2023, FQ2 2023 and so on.
- (Optional) In Generate this configuration for next field, enter the number of years you want this configuration to apply.
Note:- A minimum of one and maximum of 10 years can be entered in this field.
- The end date of a certain fiscal year must be continuous with the start date of the subsequent fiscal year.
- (Optional) Enter the Description if required.
- Click Preview. The Preview and Advance Customization page appears.
Note: When configuring the custom fiscal year, if there is a gap of days or overlap of days between the previous fiscal year and current fiscal year, an Error dialog box appears.
To rectify the error:
- Click Manual-adjust to close the gap for the number of days manually in the Setup tab.
- Click Auto-adjust to close the gap automatically and redirect to the Preview and Advance Customization tab.
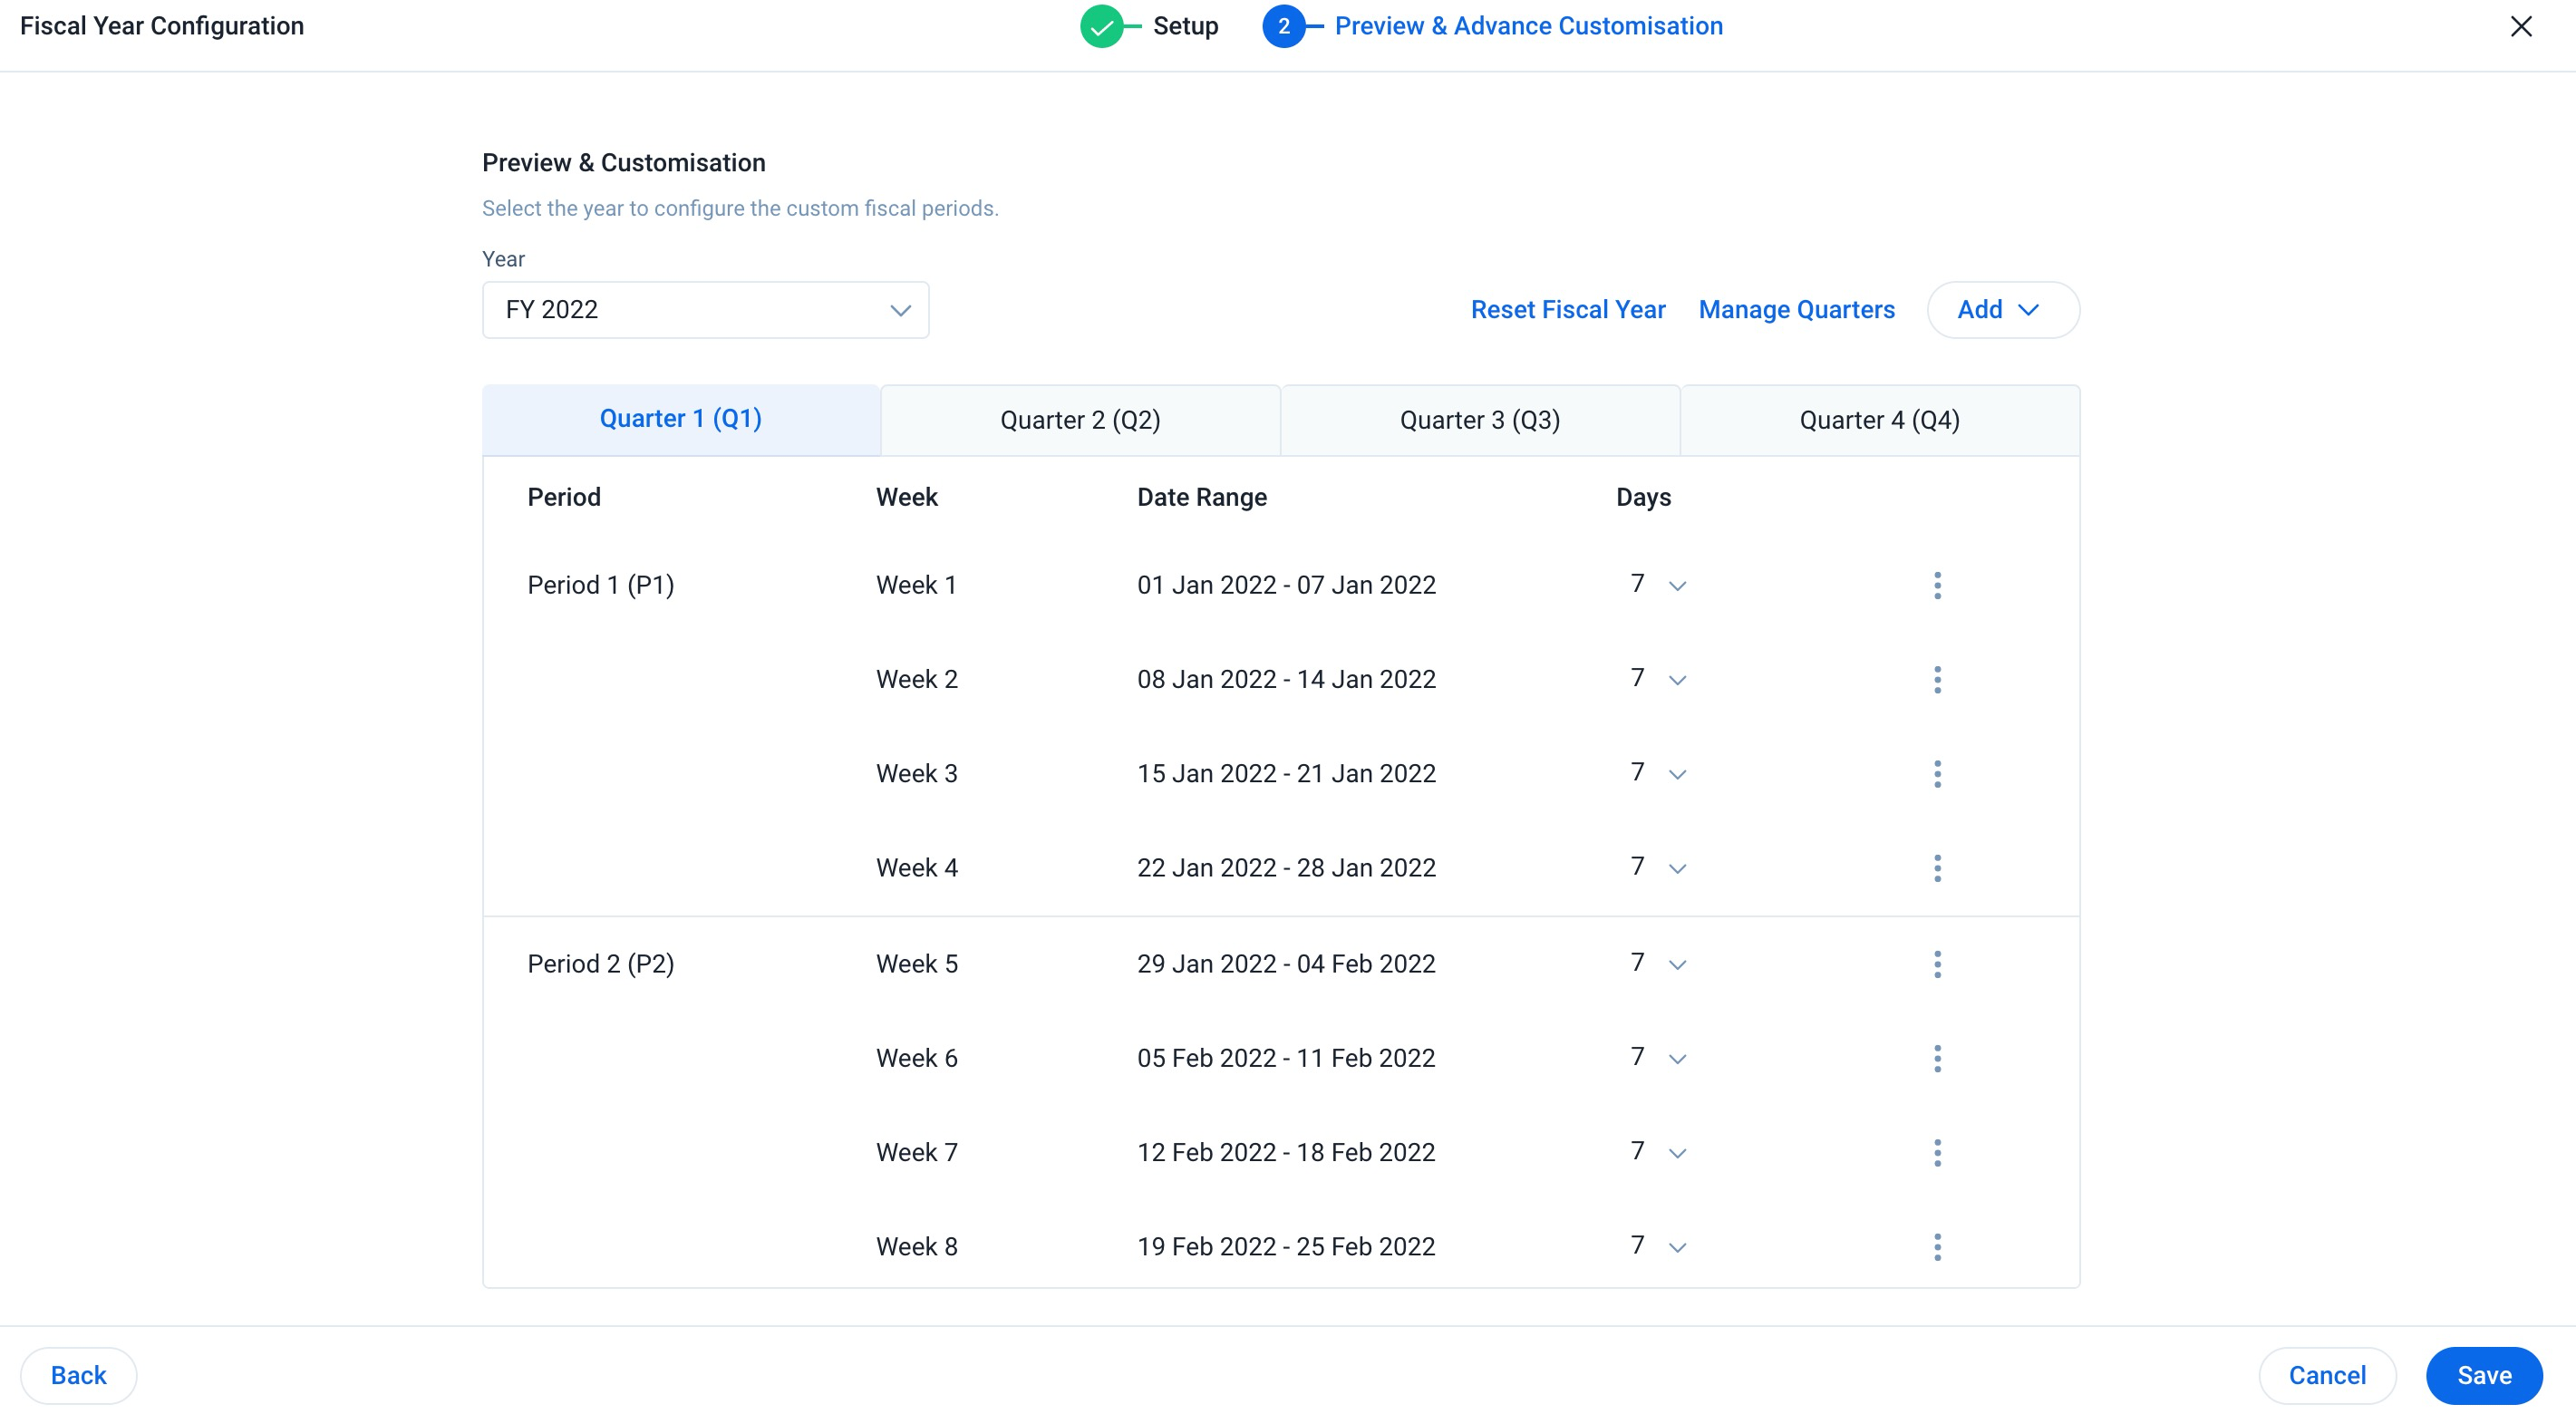
Preview and Advance Customization
The Preview and Advance Customization page displays a preview of the custom fiscal year structures configured in the previous section. It also enables you to perform following actions:
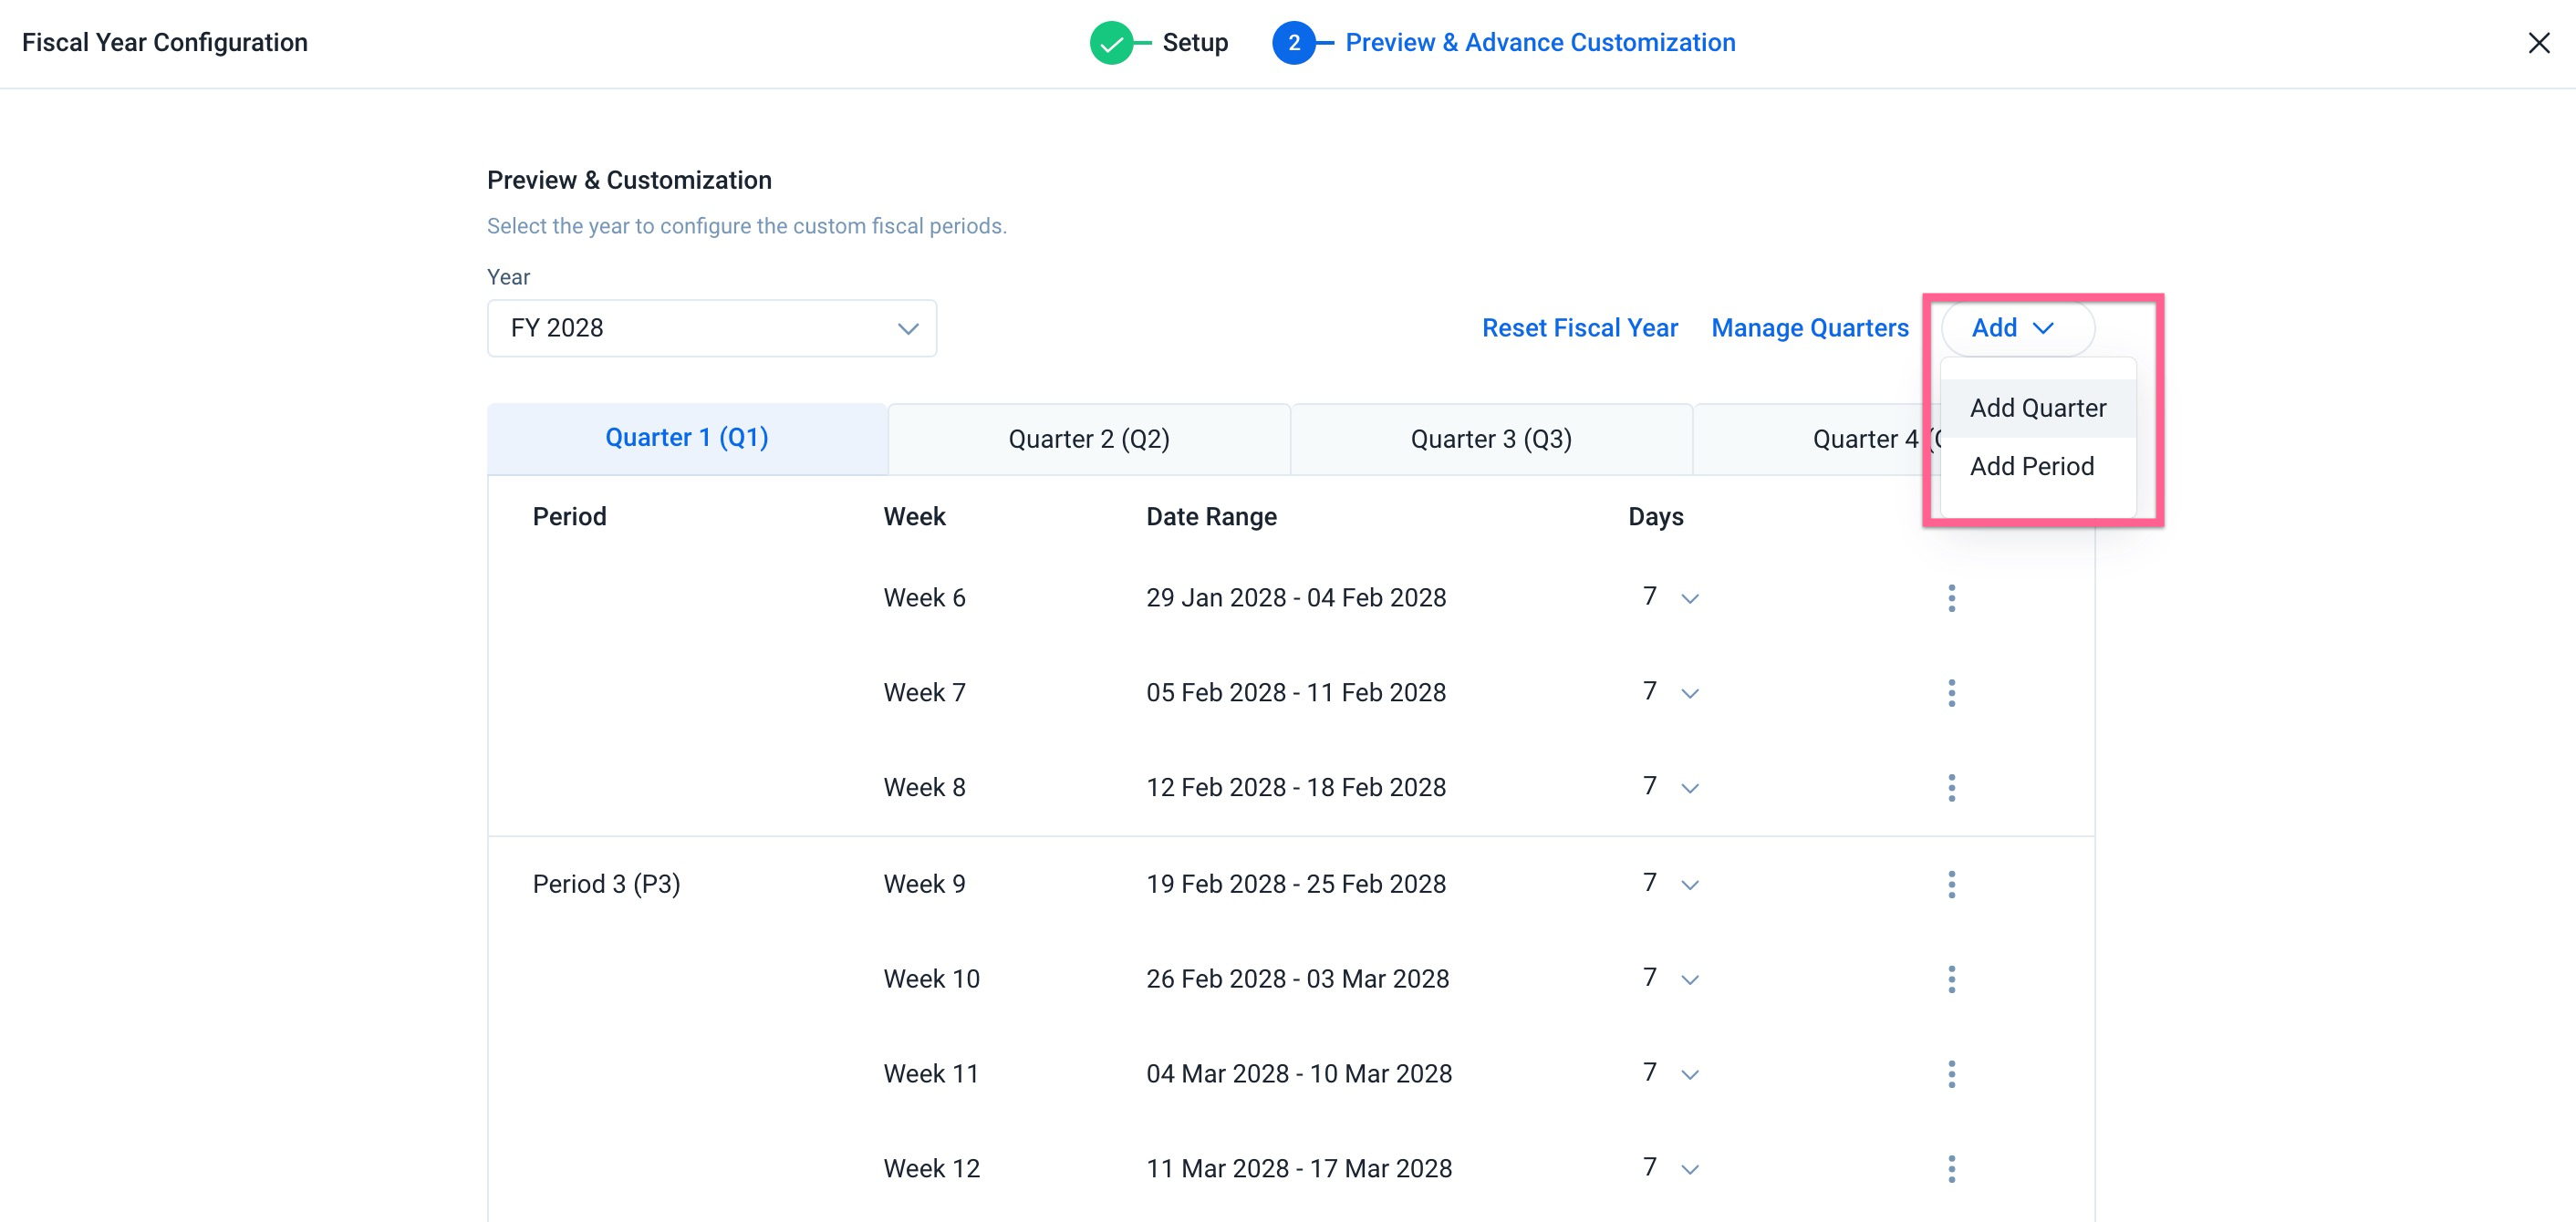
Add Quarters or Periods
Admins can add quarters or periods to a custom fiscal year.
To add a quarter or period to the custom fiscal year:
- From the Year dropdown, select the Custom Fiscal Year.
- Hover over Add.
- From the dropdown menu, select Add Quarter or Add Period.
Note: A maximum of 12 quarters can be added to a fiscal year. - Click Save. The Save Changes dialog box appears.
- Click Continue to save the changes.
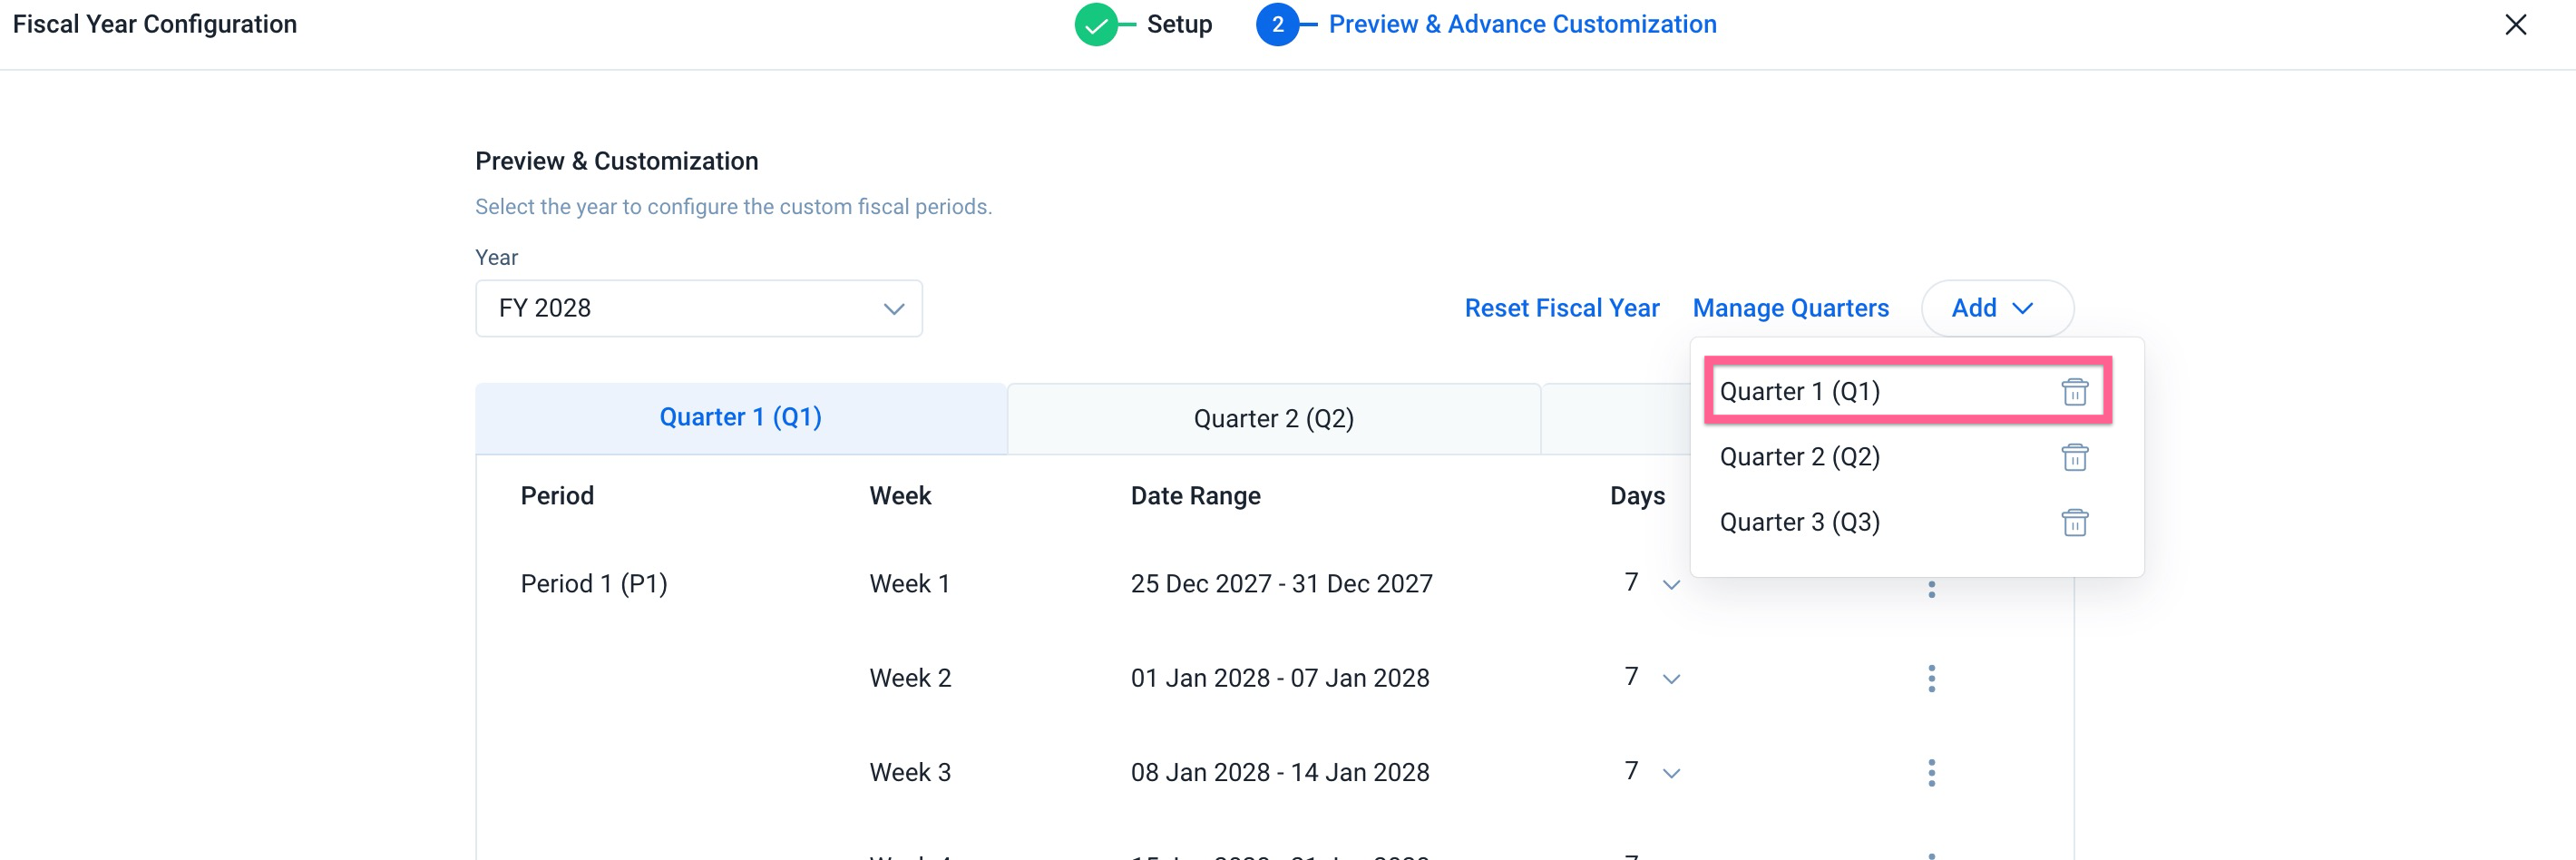
Manage Quarters
Admins can delete quarters from the custom fiscal year.
To delete quarters in a custom fiscal year:
- From the Year dropdown, select the Custom Fiscal Year.
- Click Manage Quarters.
- Click the Trash icon next to the quarter to be deleted.
Note: A minimum of one quarter must remain in the fiscal year. - Click Save. The Save Changes dialog box appears.
- Click Continue to save the changes.
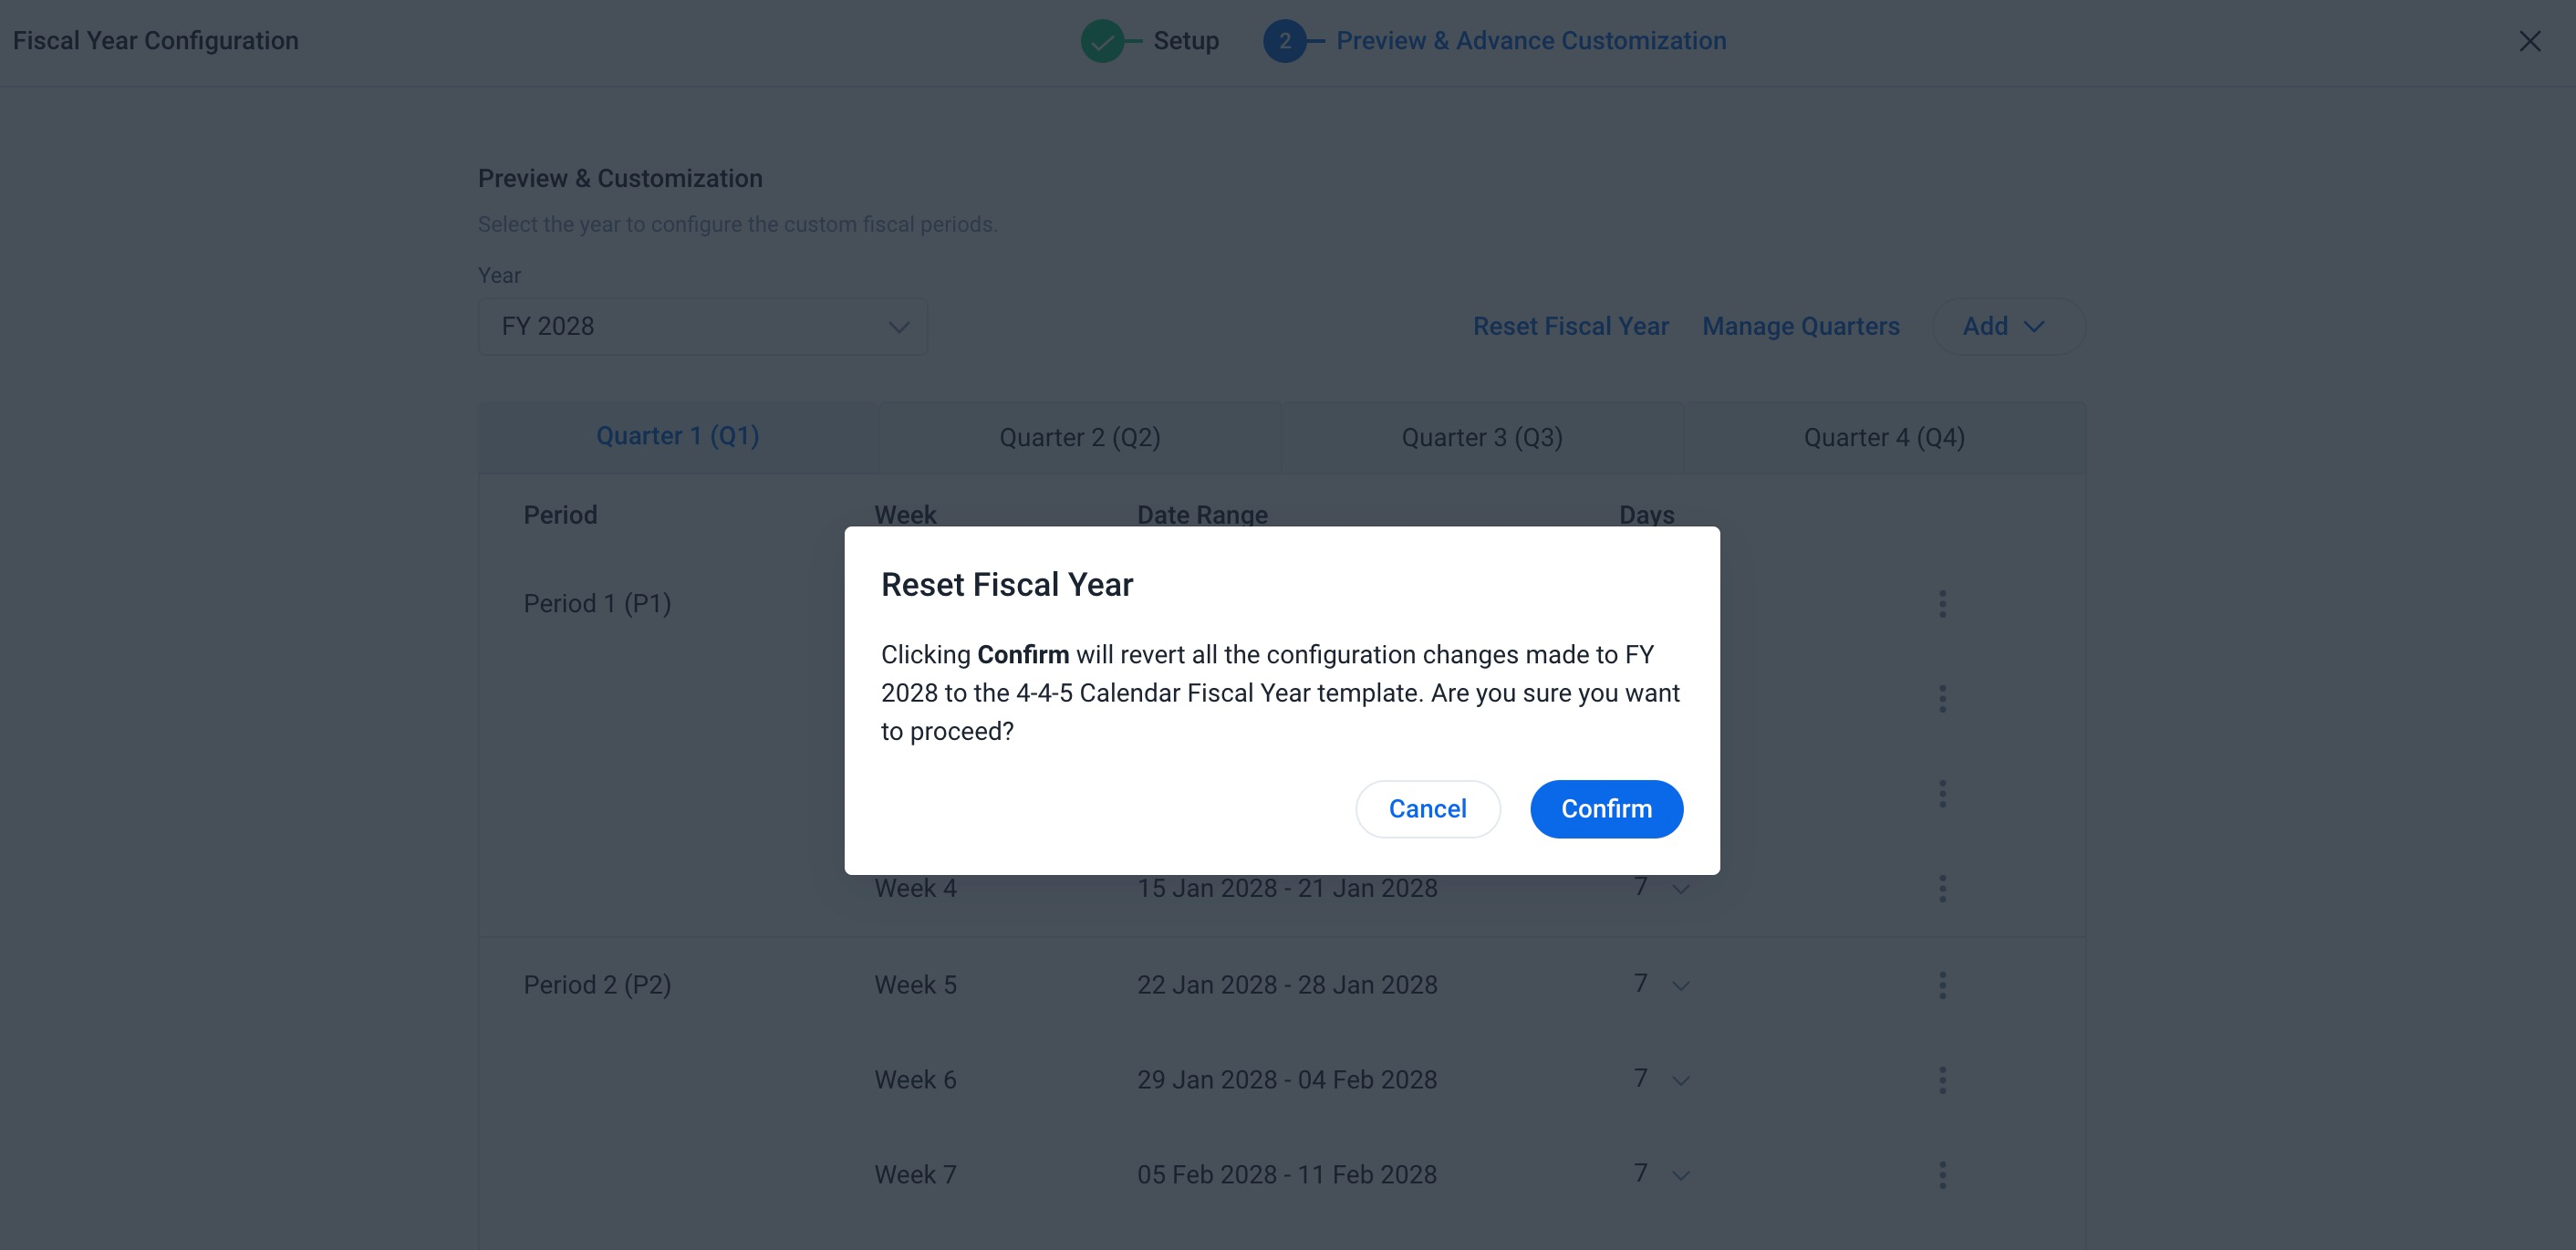
Reset Fiscal Year
Any modification done to a custom fiscal year can be reset to its original state.
To reset the custom fiscal year:
- From the Year dropdown, select the Custom Fiscal Year.
- Click Reset Fiscal Year. The Reset Fiscal Year dialog box appears.
- Click Confirm.
- Click Save. The Save Changes dialog box appears.
- Click Continue to save the changes.
Edit Quarters in a Custom Fiscal Year
To modify quarters in a custom fiscal year:
- From the Year dropdown, select the custom fiscal year. A table displaying all the quarters of the fiscal year appears.
- Select the quarter to modify. Each quarter displays the following information:
- Period: Number of periods in that quarter.
- Weeks: Number of weeks in each period.
- Date Range: Displays the date range for each week.
- Days: Number of days in each week.
Note: Only Periods, Weeks, and Days can be modified.
- From the Days dropdown, select the number of days to re-assign to that particular week.
- Click the three-vertical dots. Admin can perform following actions:
- Add Week
- Delete Week
- Delete Period
- Click Save. The Save Changes dialog box appears.
- Click Continue to save.