Configure Model and Emails for Programs
Gainsight NXT
Overview
This article explains Admins how to configure Model and Emails for Programs. Each Model has components that can be configured to create customized Programs. The components available within a model are largely determined by if the model is designed to send surveys or if it is designed to send other messages. For a brief summary of each model, refer to the Available Models for Programs article.
You can navigate to the list of Programs from Digital Journey > Programs on the left pane to configure a Program. Programs have Survey models and non-Survey models, configurations of which are explained in the sections below.
Navigation within a Model
Within the program model configuration page, you can scroll to zoom in and out of the model using the mouse. You can also click and drag the model, or use the arrow keys to pan across the screen.
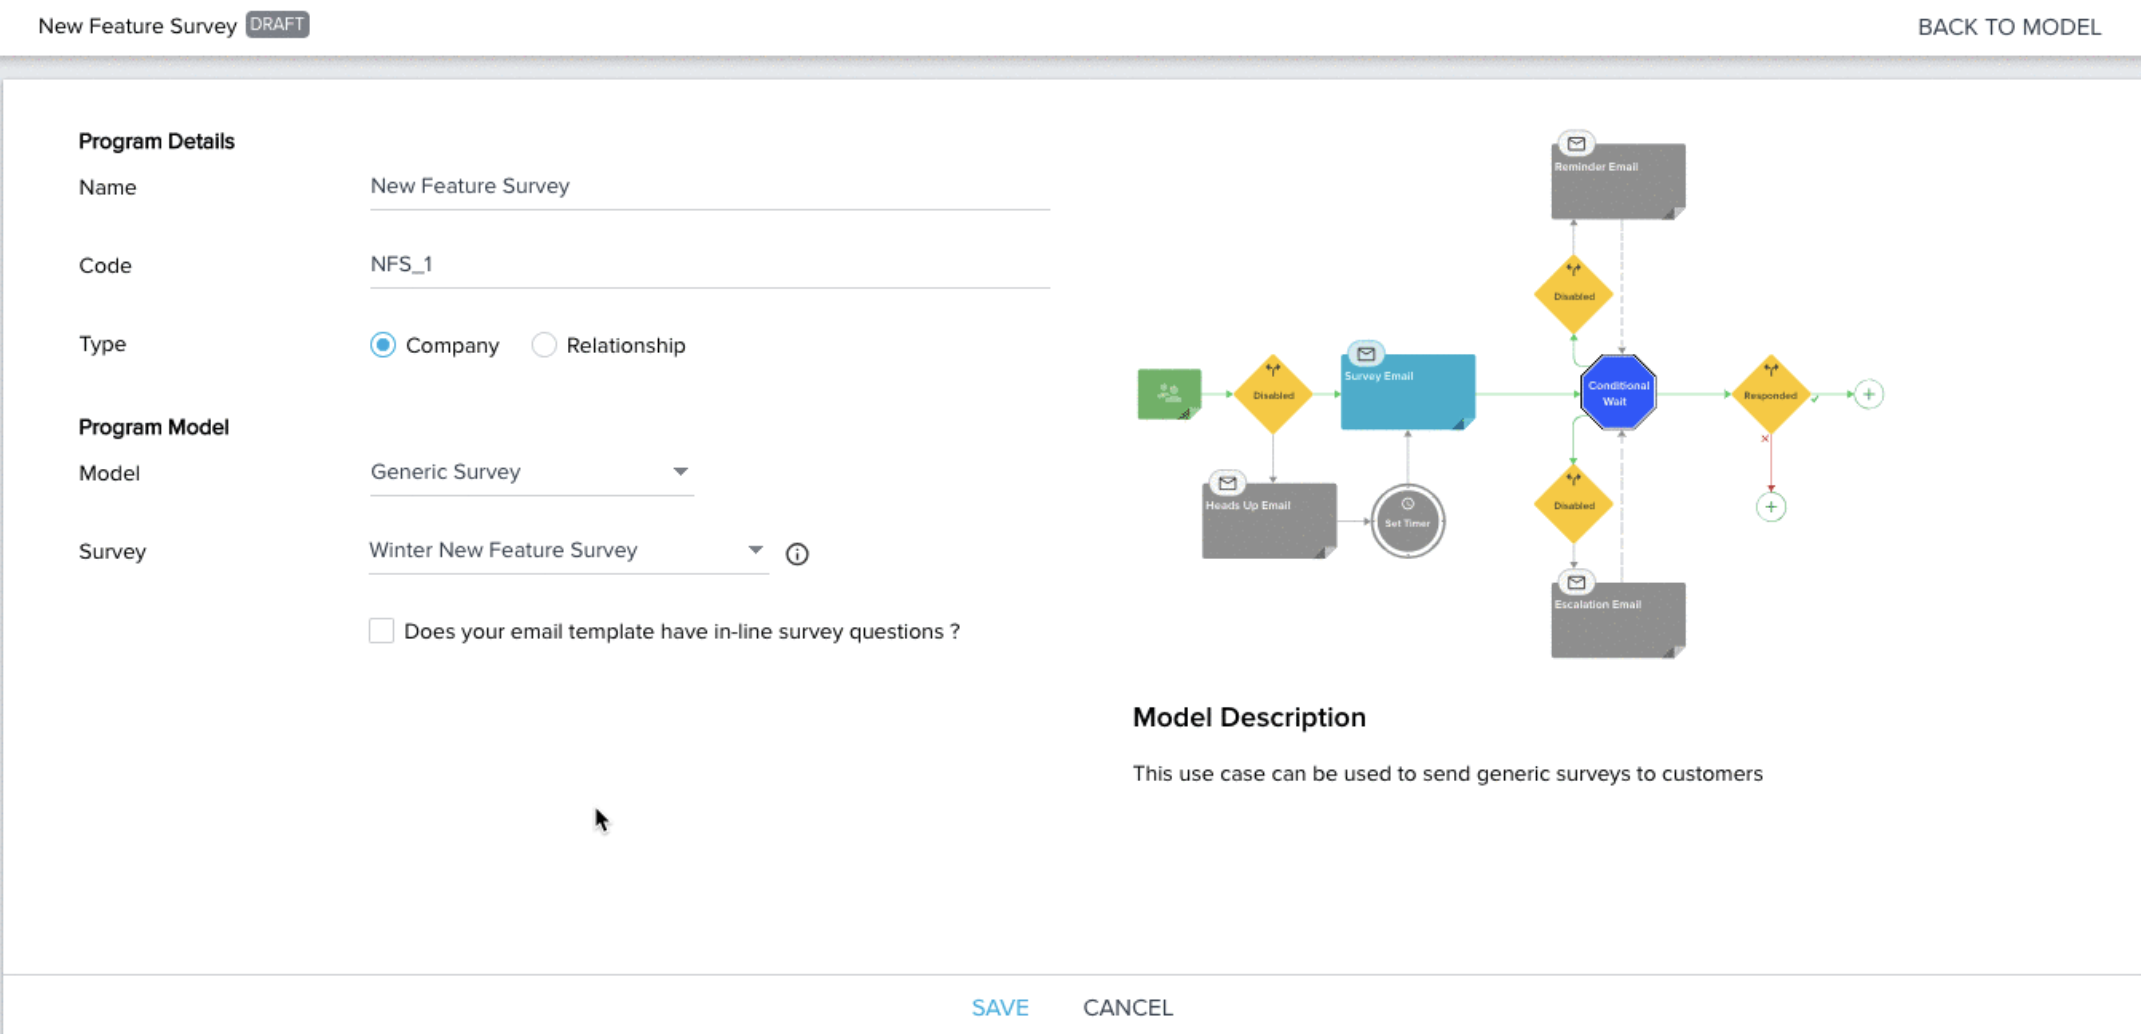
Survey Models
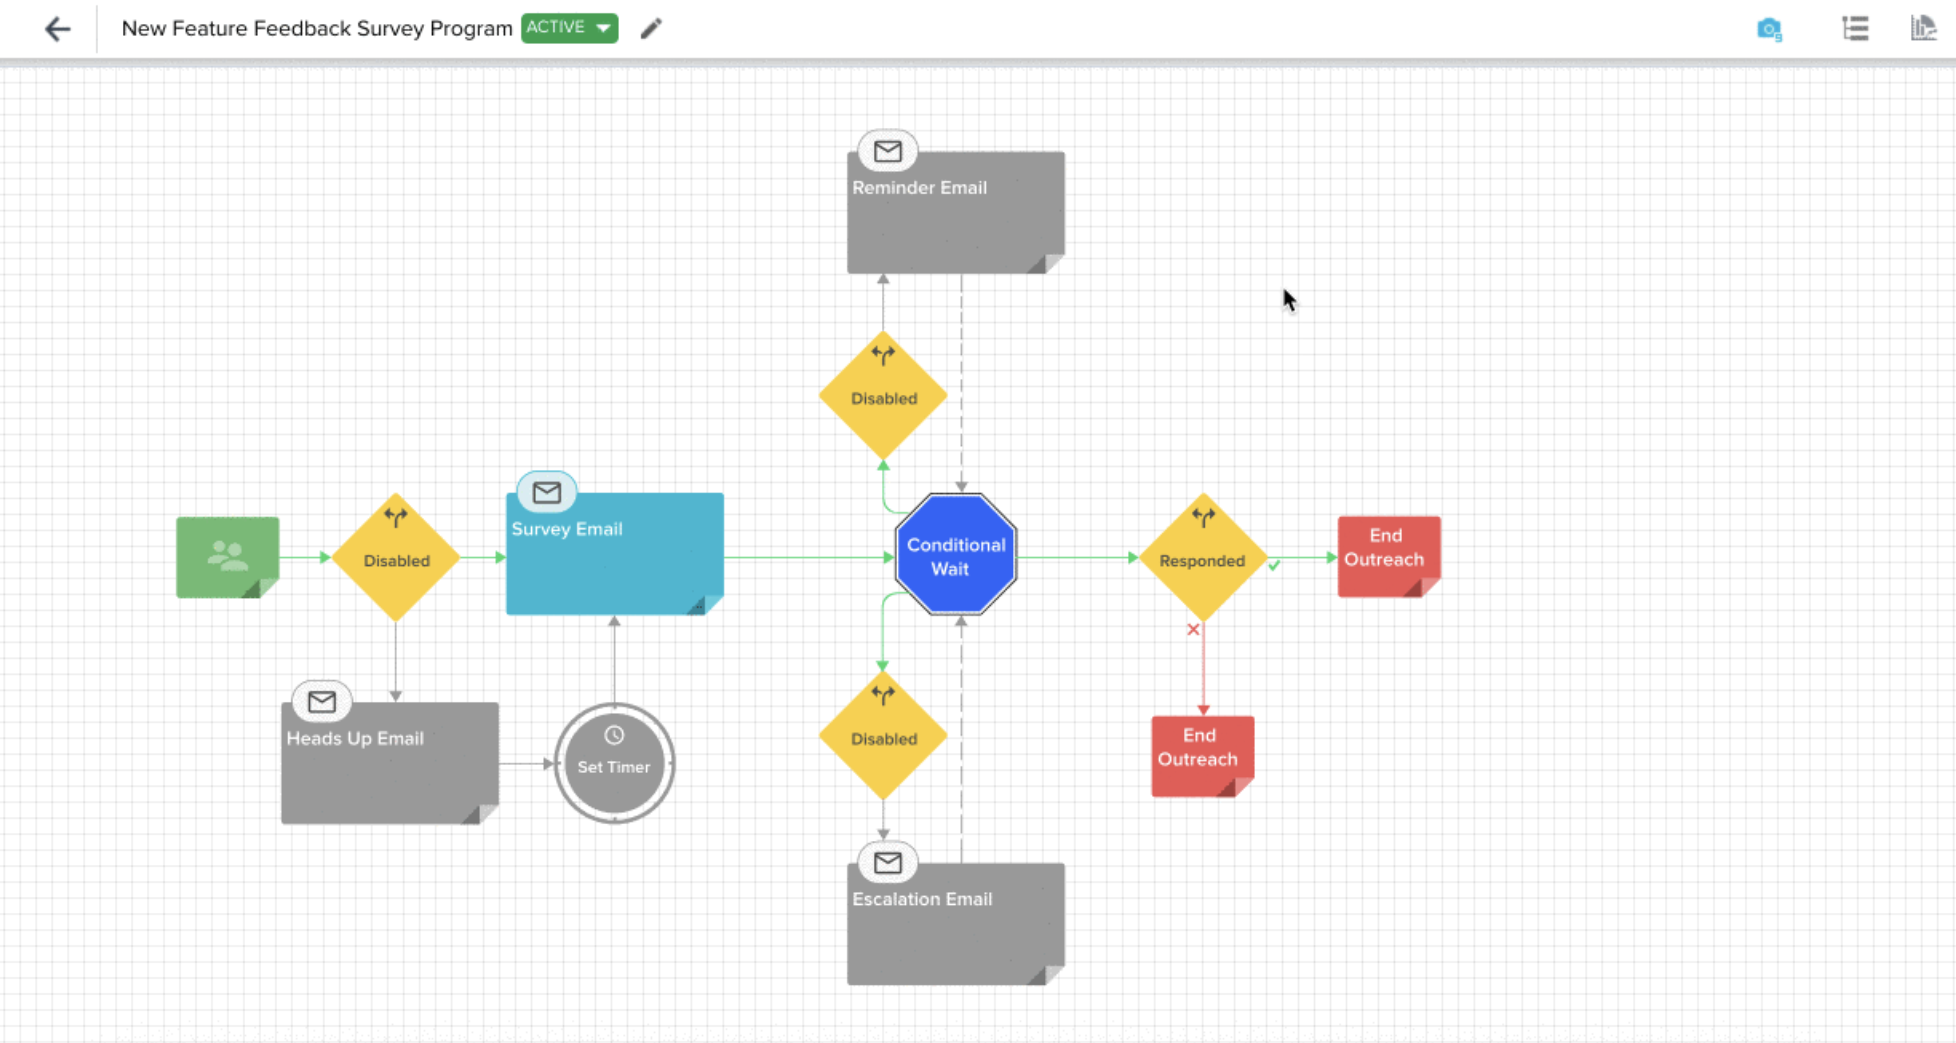
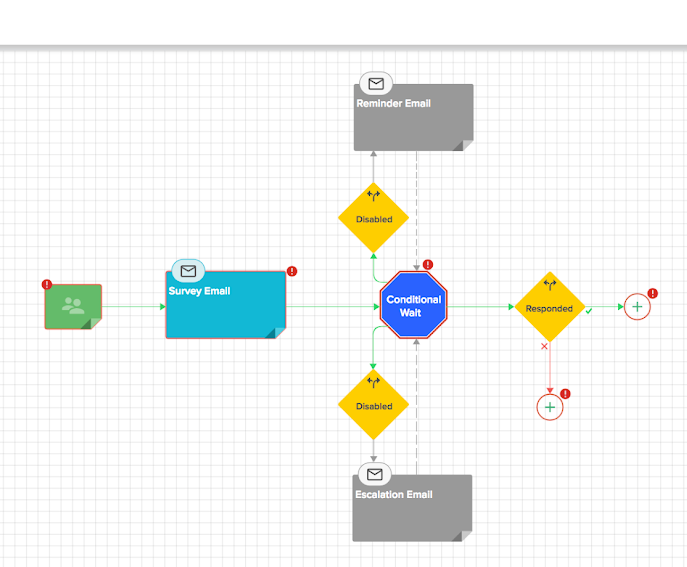
Survey models include the NPS® Survey, Customer Satisfaction Survey, and Generic Survey models. They each contain optional components that can be Enabled/Disabled, as well as a Conditional Wait option, that controls the amount of time that must pass before the next message in the email chain is sent based on set conditions. Some models also have a Set Timer section that controls the time interval before the next message is sent automatically. Each of these models has a Survey Settings page that controls which survey is sent as part of the Program.
Certain emails within a model, such as the “Head’s up” and “Thank you” emails within the NPS® model, can be enabled and disabled depending on the needs of the user. To enable or disable these components, take the following steps:
- Click the Yellow Diamond of the corresponding email step in the model.
- Select ON/OFF. Disabled emails are gray, and turn blue when enabled.
Conditional Wait
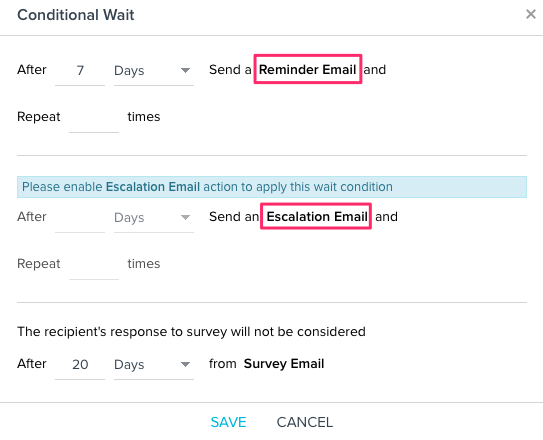
Conditional Wait is represented by a dark blue octagon. Clicking Conditional Wait allows a user to control how much time has to pass before a Reminder Email is sent to the recipient, or an Escalation Email is sent to the CSM, and how often these emails should be sent. You can also configure the expiry (number of days) of the recipient’s response from Survey Email. The amount of time can be configured in Days, Hours, or Minutes.
Limitation: There might be a delay of 15 to 30 minutes to complete the step after the Conditional Wait step, during peak hours, due to load on email infra.
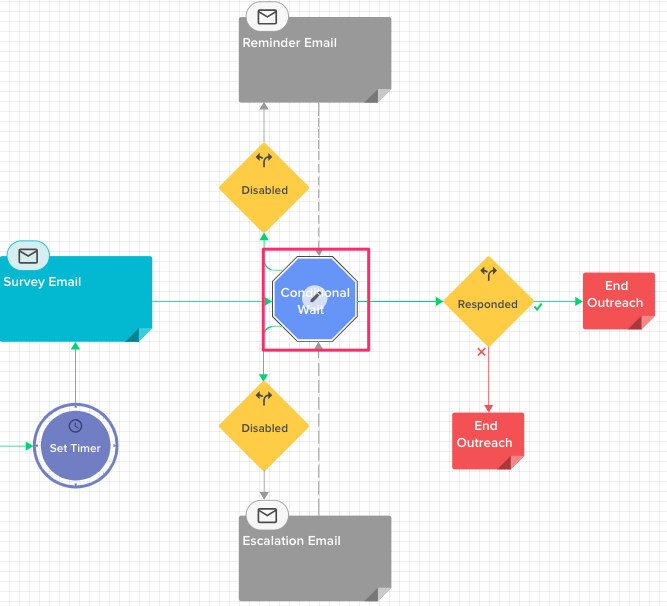
To configure the Conditional Wait for Survey model:
- Navigate to the required Program.
- Click the Conditional Wait octagon and then the edit icon. Conditional Wait dialog appears.
- Configure the following sections in the Conditional Wait:
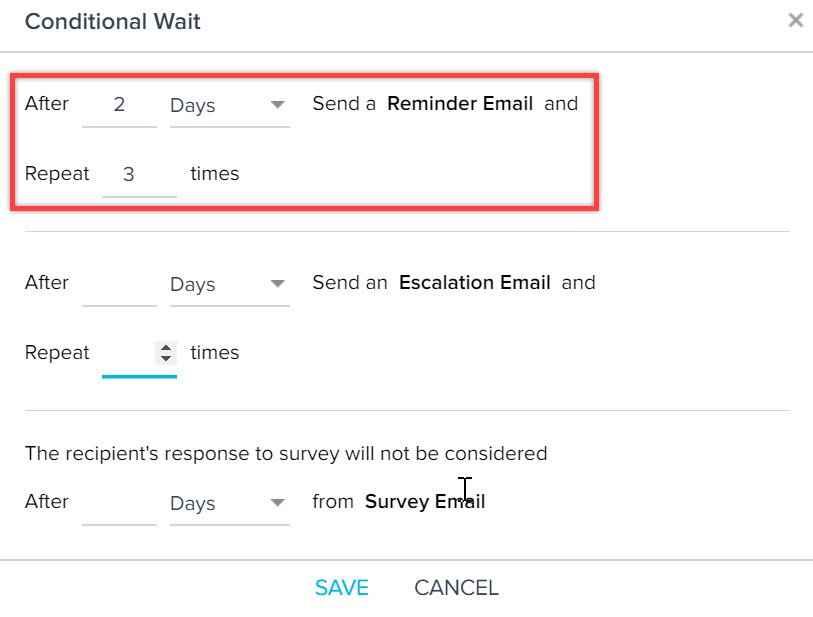
- Reminder Email: You should enable Reminder Email step in the Program to apply this wait condition. To learn more on how to enable this, refer the section Survey Models. In this wait condition, you can assign some time before sending a reminder email to the recipients to respond to the survey. You can assign number of days/hours/minutes as shown in the below image.
- Escalation Email: You should enable Escalation Email step in the Program to apply this wait condition. To learn more on how to enable this, refer the section Survey Models. In this wait condition, you can assign some time before sending an escalation email to the CSM to respond to the survey. You can assign number of days/hours/minutes as shown in the below image.
- Expiry from Survey Email: You can assign cut-off time to consider recipient’s survey response from Survey Email. This wait period is the total time you would like to wait for the user to respond to the Survey before ending his Program lifecycle. This marks the end of a participant’s life cycle. After the time expires, the participant no longer will receive reminders and their participation status will be completed.
- Repeat N times: Set this to 1, if you just want to send only one reminder to the contact, or adjust based on your requirements. For example, in the below use-case, if a user wants to send the reminder emails three times after every 2 days. Set the value in the Conditional Wait After and Repeat N times fields to 2 and 3 respectively.
Note: This step is applicable to the sections, Reminder Email and Escalation Email configurations.
IMPORTANT: The Reminder and Escalation emails are sent at the same time if they are configured to wait for the same number of days after the survey email is sent. Both Escalation and Reminder emails depend only on the time of the first Survey email.
- Click SAVE.
Note: If the first or second sections are assigned higher wait times than the third, the reminder/escalation emails do not go out.
Set Timer
Set Timer is represented by a blue circle. Clicking the Set Timer option allows a user to control the time interval before the next email in the campaign is sent automatically. This is usually configured between a Heads Up Email and a Survey Email. The Timer begins after the Heads up Email is sent.
Limitation: There might be a delay of 15 to 30 minutes to complete the step after Set Timer step, during peak hours, due to load on email infra.
To Set the Timer between the Email steps:
- Navigate to the required Program.
- Click the Set Timer circle and then the edit icon. A dialog appears to set the waiting period.
- Click SAVE. Set Timer circle will display the waiting period as Wait for N days.
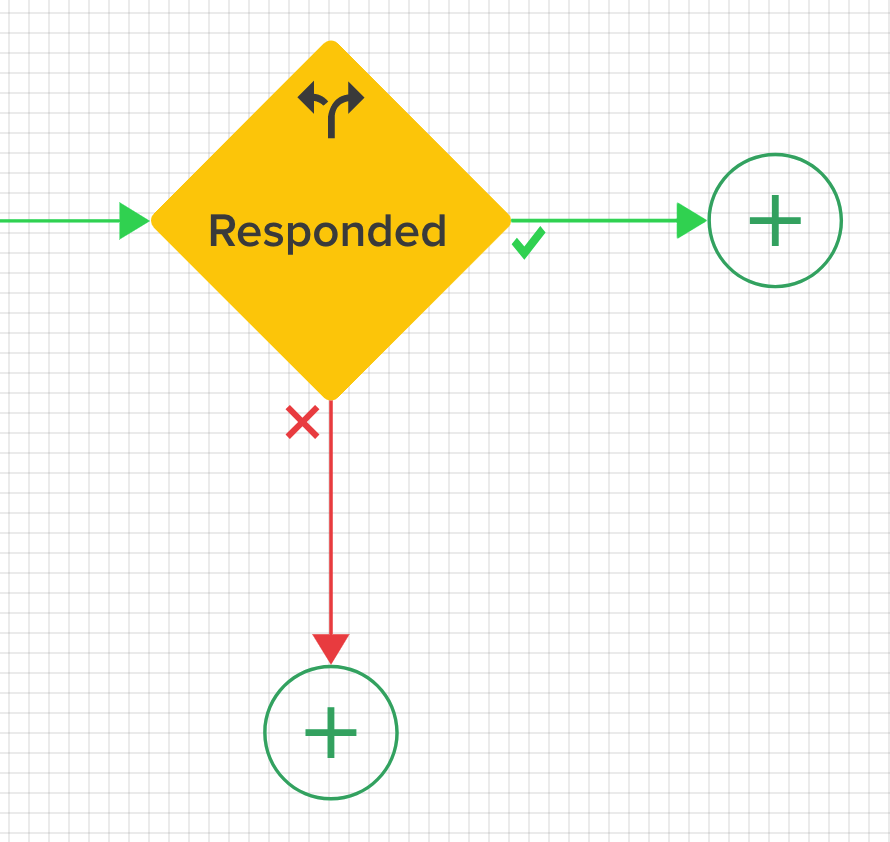
Responded Step
This step creates a branching path based on whether or not a participant has responded to the Program. If the participant responded to the Program, they will move to the next step on the right. If they do not respond, they will move to the next step down. It is available for all Survey models.
Responded Options
For participants that will respond to the Program, you can add the steps Conditional Wait, Wait Timer, Send Email, Create CTA, and End Outreach. A common use case for this feature is to send a thank you email with a delay timer. The following gives you more information on the Responded Options:
- Conditional Wait: This step is branching and offers additional steps depending on if a participant meets the configured conditions. The Conditional Wait step added here is configured differently than the default Conditional Wait step included in survey models. For more information on how to configure this step, refer to the Conditional Wait article.
Adding the Conditional Wait step after the Responded Step in a survey model gives you the option to include survey answers as conditions. With this option, you can control how participants move through the Program based on their answers. For example, you could choose to create a CTA based on an NPS® detractor response. For more information on how to configure this option, refer to the Conditional Wait article. - Wait Timer: You have the option to add either Send Email, Create CTA, or Conditional Wait steps immediately after the timer. Additional steps beyond that will vary depending on what is added. For more information on how to configure this step, refer to the Set Timer section.
- Send Email: You have the option to add either Conditional Wait, Wait Timer, or End Outreach step immediately after the email step. Additional steps beyond that will vary depending on what is added. For more information on how to configure Emails, refer to the Configure Emails section.
- Create CTA: These steps operate similarly to the ability to create and close CTAs using Rules Engine. For example, the Create CTA configuration requires Type, Status, Reason, Due Date, Priority, Default Owner, etc. For more information on configuring each step of the CTA, refer to the Creating and Closing CTAs from Rules Engine article. You have the option to add either Wait Timer, Conditional Wait, or End Outreach step after a Create CTA step. Additional steps beyond that will vary depending on what is added.
- End Outreach: Participants passing through the End Outreach step are moved to the completed stage. There is nothing to configure with this step.
Note: When a Survey response is deleted, relevant JO entries are deleted and the participants are dropped from the journey in order to ensure accurate Survey and Program Analytics statistics. It also removes participants from the participant grid view, participant activities, email logs, email events, and mapping of CTA to that participant. This not only affects the participants of an Active program, but also Paused programs.
Not Responded Options
For participants that will not respond to the Program, you can add the steps Send Email, Create CTA, and End Outreach. This option is designed for accounts that have not responded at all, where you sent reminder and escalation emails and have not received a response. Following are the Not Responded options:
- Send Email: You have the option to add an End Outreach step after Send Email. For more information on this step, refer to the Configure Emails section.
- Create CTA: These steps operate similarly to the ability to create and close CTAs using Rules Engine. For example, the Create CTA configuration requires Type, Status, Reason, Due Date, Priority, Default Owner, etc. For more information on configuring each step of the CTA, refer to Creating and Closing CTAs from Rules Engine article. You have the option to add an End Outreach step after the Create CTA step.
- End Outreach: Participants passing through the End Outreach step will be moved to the completed stage. There is nothing to configure with this step.
Email Chain Model
The Email Chain Model is designed to send a series of related email outreaches, such as messages related to the Onboarding Process. The model starts with a Participant component and an initial Email component. You can add additional components to create a program as per your business requirement. To configure an email chain model:
- Navigate to Administration > Programs. Programs List is displayed.
- Click +CREATE to create a Program of model, Email Chain. For more information on creating a new program with the Email Chain model, refer to the Program List View and Create New Program article.
- Click + to add a new action in the email chain model and configure as required.
Note: Wait Timer and Conditional Wait steps must be added between action steps such as Send Email or Create/Close CTA. - If you want to delete any step, hover over any step and then click the Delete icon. It is not possible to delete a step without first deleting the successive steps in the chain.
- If you want to edit configuration of any step, hover over any step and then click the edit icon. Configuration page of the respective step is displayed.
Note: Email templates containing surveys can not be used with this model.
Limitation: To view the program email model correctly in the browser, Admins must set the browser zoom settings to 100%.
Create or Close CTA
Admins have the ability to create or close multiple CTAs as part of the Program journey. You can add the Create CTA or Close CTA steps by clicking + after a Wait Timer or Conditional Wait step.

Create CTA Step
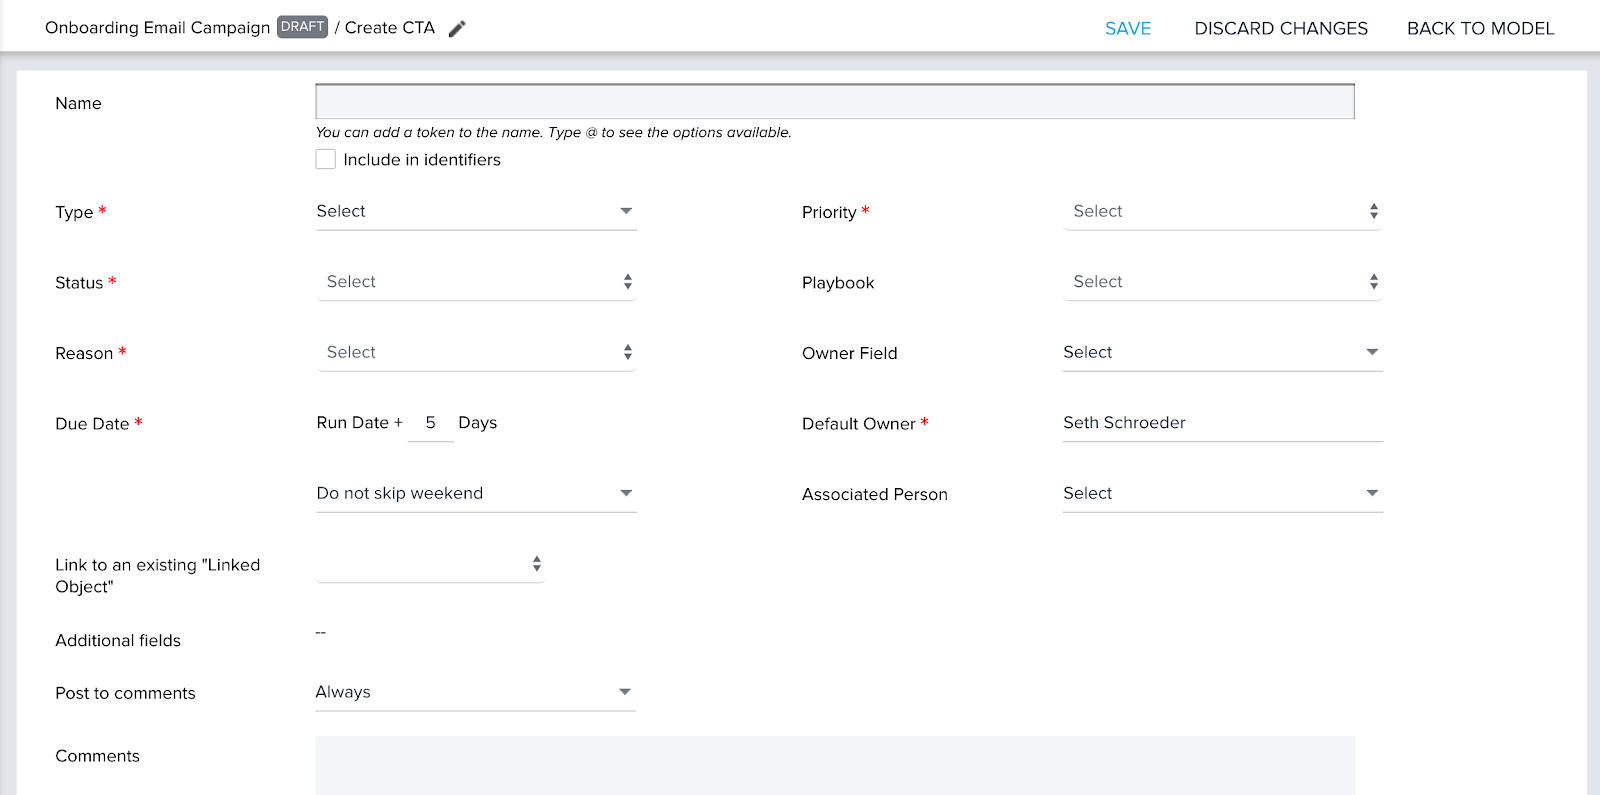
Create CTA step operate similar to the ability to create and close CTAs using Rules Engine. For example, the create CTA step requires Type, Status, Reason, Due Date, Priority, Default Owner, etc.
To configure the Create CTA step:
- Click + to add a new action in the email chain model and select Create CTA.
- Hover on the Create CTA step and click the edit icon. Create CTA configuration page appears.
- Enter the values required for the Create CTA configuration. This page is similar to the Rule configuration, Create CTA. For more information on this configuration, refer to the Creating and Closing CTAs from Rules Engine article.
Notes:
- Since Admins cannot add ID fields in the Journey Orchestrator Custom fields, only standard participant ID fields are allowed to map in the Owner Field while creating a CTA in Journey Orchestrator.
- Admins can also select the User Group to automate the CTAs distribution. When a program is run, the ownership is allocated to one of the CSMs from the assigned User Group. The CTAs are then distributed equally among the CSMs (using the Round Robin algorithm) that are part of the selected User Group, ensuring a fair allocation of tasks.
- Click SAVE.
While configuring the Create CTA step, Admins can add Survey Fields and Calculated Fields as tokens. For more information on using Survey Fields and Calculated Fields, refer to the Using Survey Fields in Programs and Using Calculated Fields in Programs article.
If CTA name is not included as an identifier and more than one open CTA are found for the same Company Id, Reason, and Type at Cockpit, then the participant with only one CTA will be associated randomly.
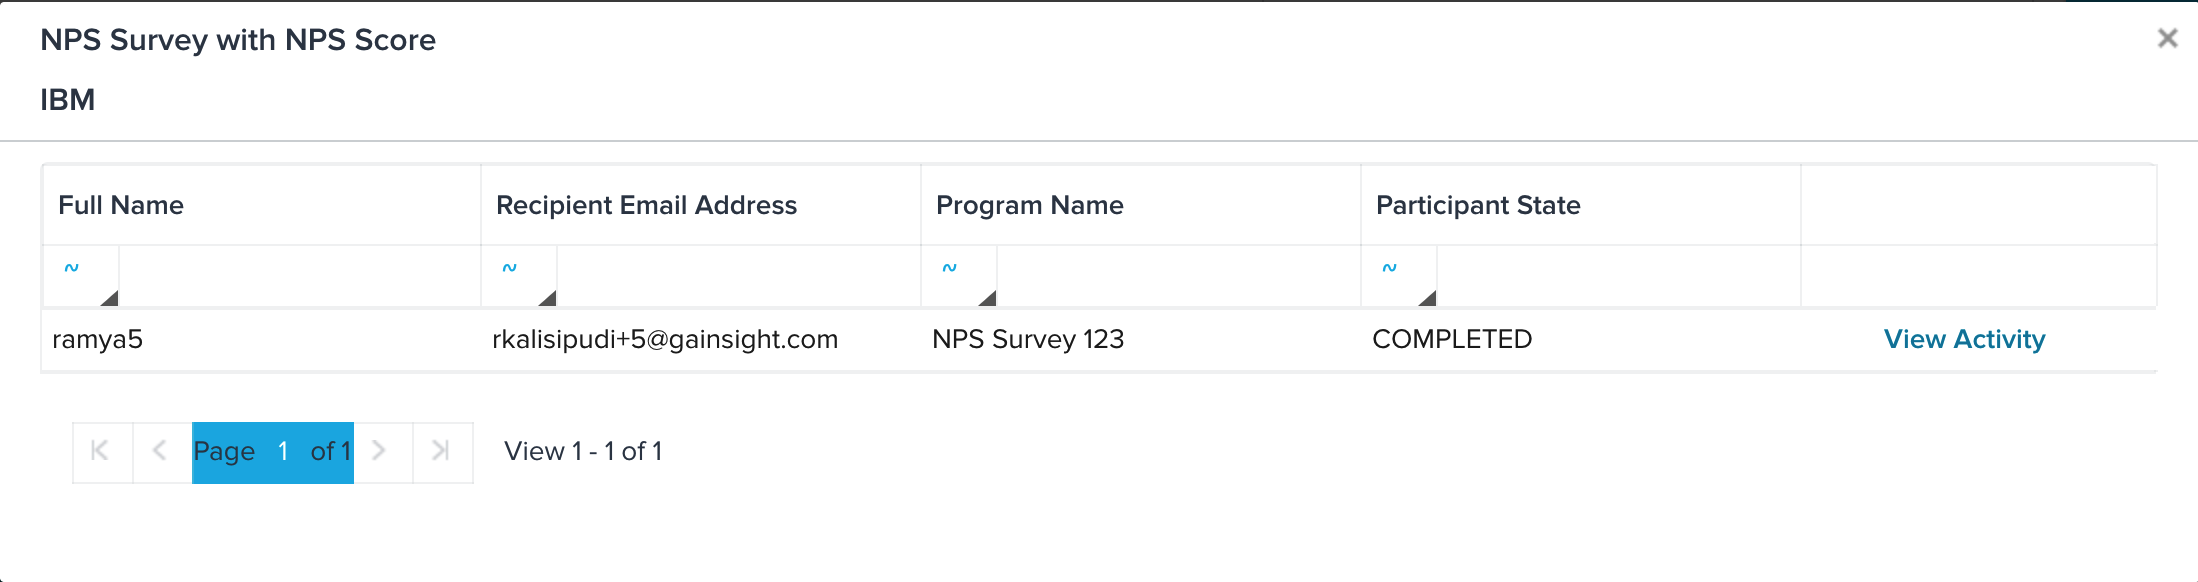
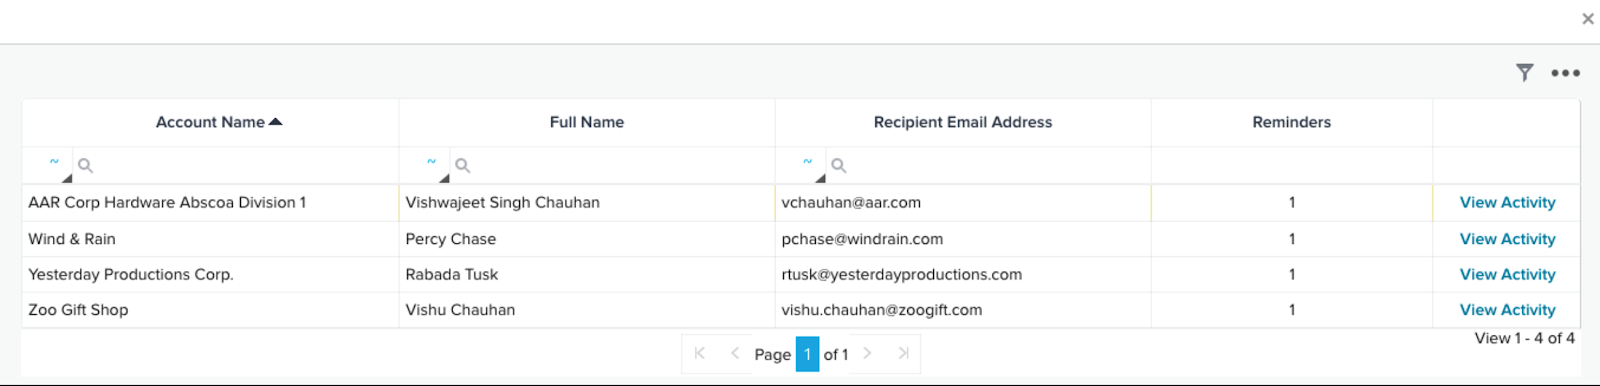
After a CTA is triggered from a Program, respective CSMs can see this CTA from the Cockpit list view page. The CTA can be identified with the name assigned in the Create CTA Step as shown above. CSMs can even filter CTAs triggered from the Programs by applying relevant filters. CSMs can access the participant’s journey from the respective CTA detail view by clicking the following link:
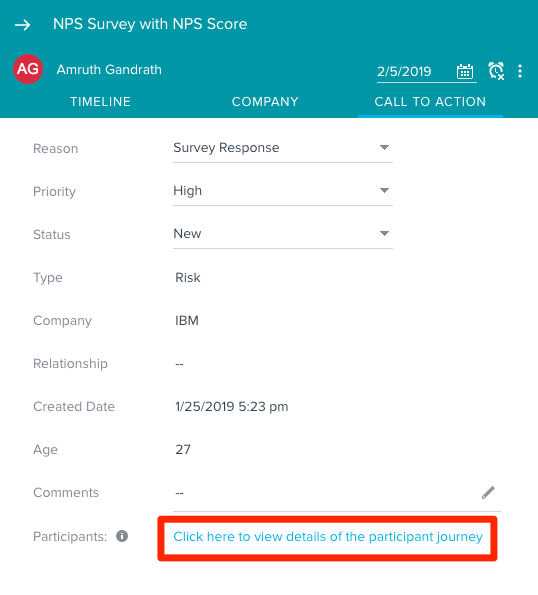
This displays a window with a list of all participants associated with the CTA. It is possible that participants from multiple Programs can be associated with one CTA. The list displays the Participant Name, Email Address, Program Name, and Participant State. CSMs can also click View Activity to see the participant’s activity in more detail. For more information on the Activity Feed, refer to the Program: Activity Feed article.
Close CTA Step
The Close CTA feature is designed to automate the closure of CTAs that were created in the program if certain conditions in the Program are met. Manual interaction with the CTA is only needed if those conditions are not met.
To configure the Close CTA step:
- Click + to add a new action in the email chain model and select Close CTA.
- Hover on the Close CTA step and click the edit icon. Close CTA configuration page appears.
- Enter the following information:
- CTA Step: Select any Create CTA step in the Program.
- Set CTA status to: Select a CTA status that should be applied after the CTA is closed.
- (Optional) Enter any comments that should be displayed in the closed CTA detail view.
-
Click SAVE.
You can correct or update the contents of CTA steps even after the program has been published. Any changes made will be applied to new participants and existing participants that have yet to pass through those steps.
Note: Program CTA actions will not work with dummy company accounts. The CTA steps are designed for customers only. Participants associated with dummy accounts will be dropped if they reach a CTA step.
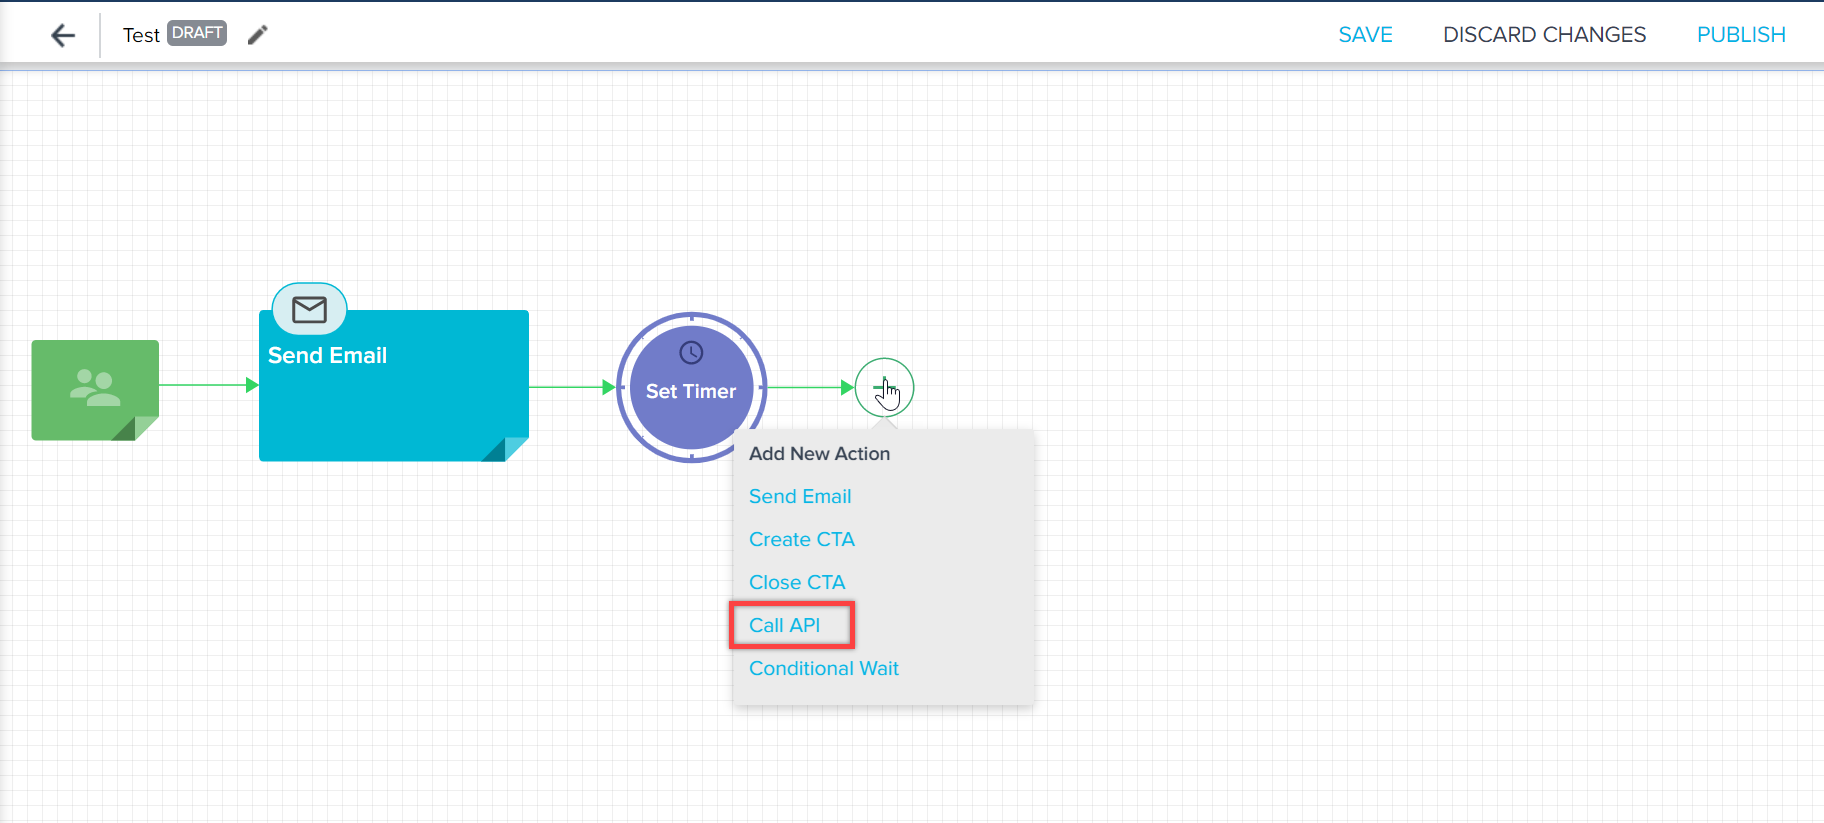
Call API
A new action type in Programs ‘Call API’ is used to integrate with the external callout framework and list all the connections used by the user. This action type is supported for all model types in Journey Orchestrator. Admins can select an external connector and its respective actions, and also select the participant fields and tokens to be populated for the dynamic token fields from external callout.
Admins can add the Call API step by clicking + after a Wait Timer or Conditional Wait step.
For more information on Call External API action type, refer to the Call API Action Type in Programs article.
Trigger PX Engagements
Gainsight integrates Journey Orchestrator (JO) with PX. You can trigger PX in-app engagements from Programs, take action based on the engagement events in Programs, and analyze and measure Program and Engagement effectiveness. This integration helps customers achieve a unified customer engagement strategy by leveraging the best of both JO and PX applications.
Note:
- Dialog, Slider, and Guide PX in-app engagements can be triggered in all Program model types.
- Survey PX in-app engagements cannot be triggered in the Email Chain program model.
By default, this feature is enabled for all the customers who have CS and PX subscriptions.
Business Use Cases
Following are some of the business use cases for the JO+PX integration feature:
- While On-boarding a new customer, Admins can send a ‘Welcome Email’ with a walkthrough of the CS application using PX engagement.
- After a new release, Admins can trigger a PX engagement, from Program, which consists of a release video to all users.
- CS admin wants to send an in-app NPS® survey and if not responded then wants to send an email reminder.
- Support team wants to send an in-app CSAT survey after the support ticket is closed.
Prerequisite
The following are the prerequisites to use this feature:
- Customers must have subscriptions for both the Gainsight Journey Orchestrator module in the CS application and also the Gainsight PX application.
- Configure the PX Connector in the Gainsight CS application. For more information, refer to the Gainsight PX Connector article.
For more information, refer to the Journey Orchestrator and PX Integration article.
Wait Timer
The Wait Timer step can be configured to wait a set amount of Days, Hours, or minutes before sending the next message. For more information on how to configure this step, refer to Set Timer.
Conditional Wait
The Conditional Wait is designed for a set condition to be met before sending the next message. These conditions include Event-Based Conditions, Calculated Field-Based Conditions, Event Field-Based Conditions, and Participant Field-Based Conditions.
For more information on Conditional Wait steps, refer to the Conditional Wait article.
Branching Options
Admins can configure the Email Chain model to progress non-linearly. The Conditional Wait feature can be configured to split the model into multiple pathways depending on whether the participant meets the conditions configured.
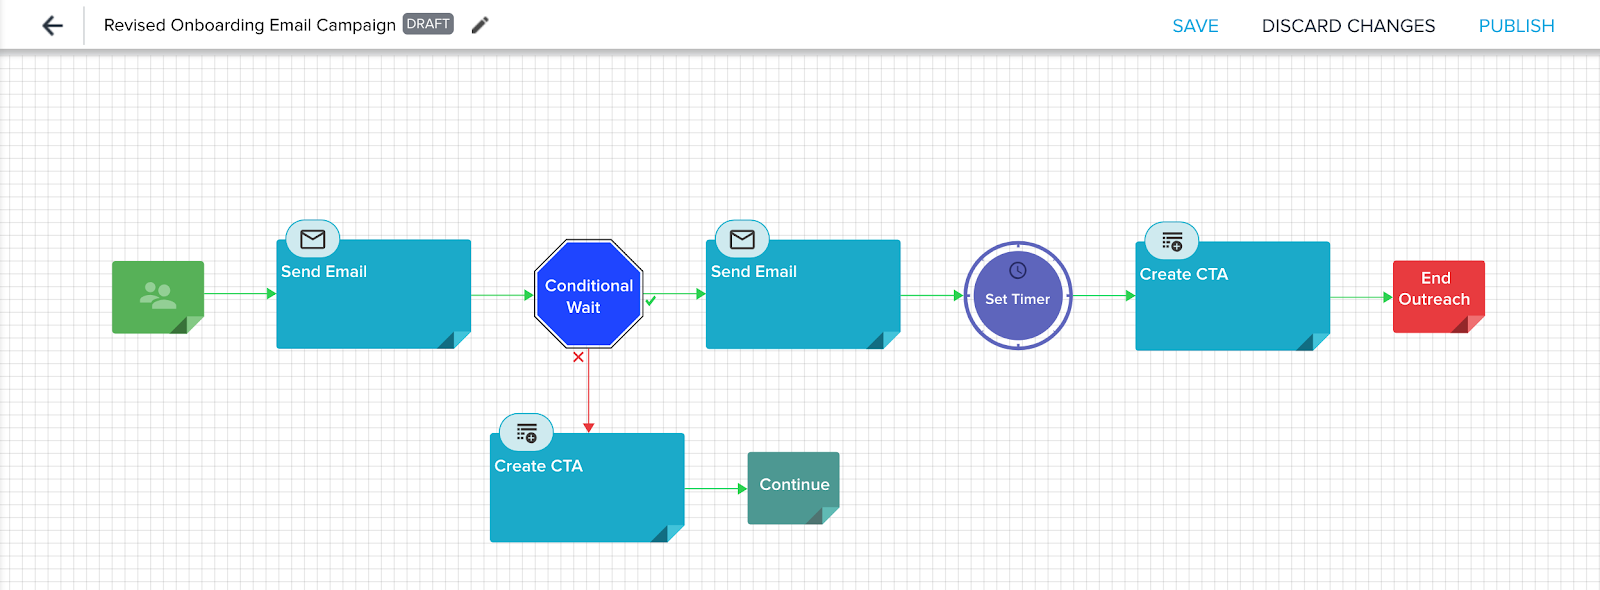
When Participants meet the conditions of the Conditional Wait, they will proceed to the model step directly to the right of the Conditional Wait step.
Participants who do not meet the conditions of the Conditional Wait will proceed to the step directly below the Conditional Wait step. The step below the Condition Wait can be configured with the following options:
- Send Email
- Create CTA
- Close CTA
- Continue
- End Outreach
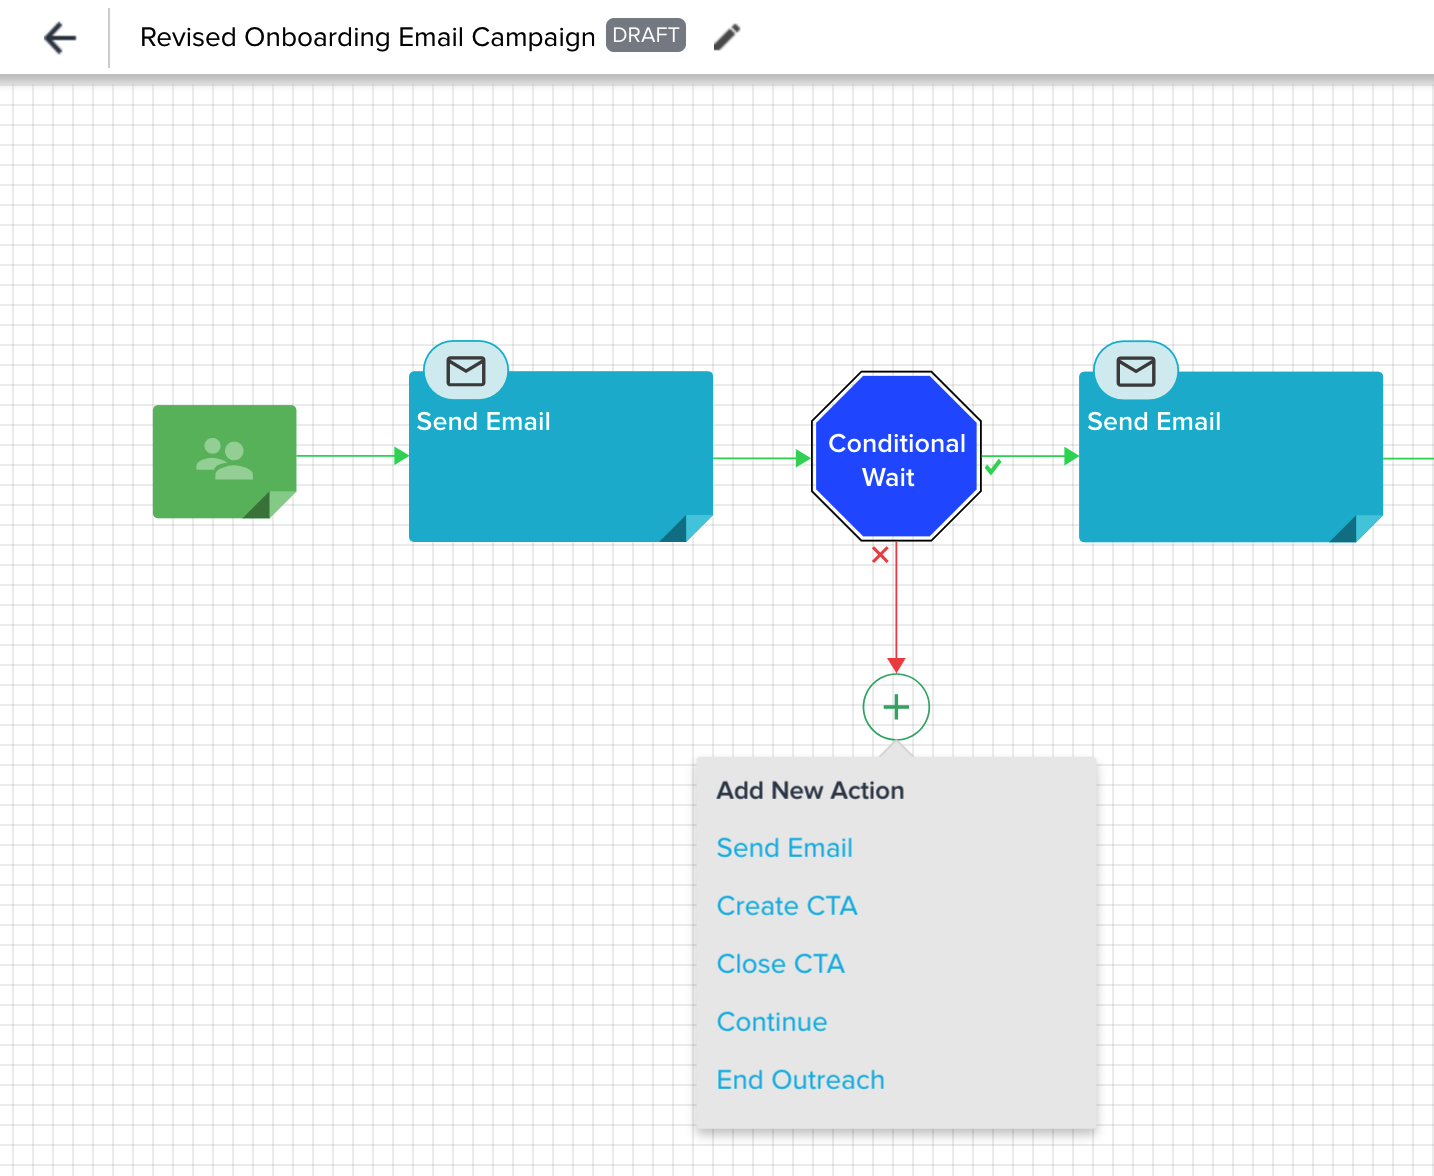
Selecting Send Email, Create CTA, or Close CTA for this branch of the Conditional Wait step provides Admins with the additional options for participants to Continue or End Outreach.
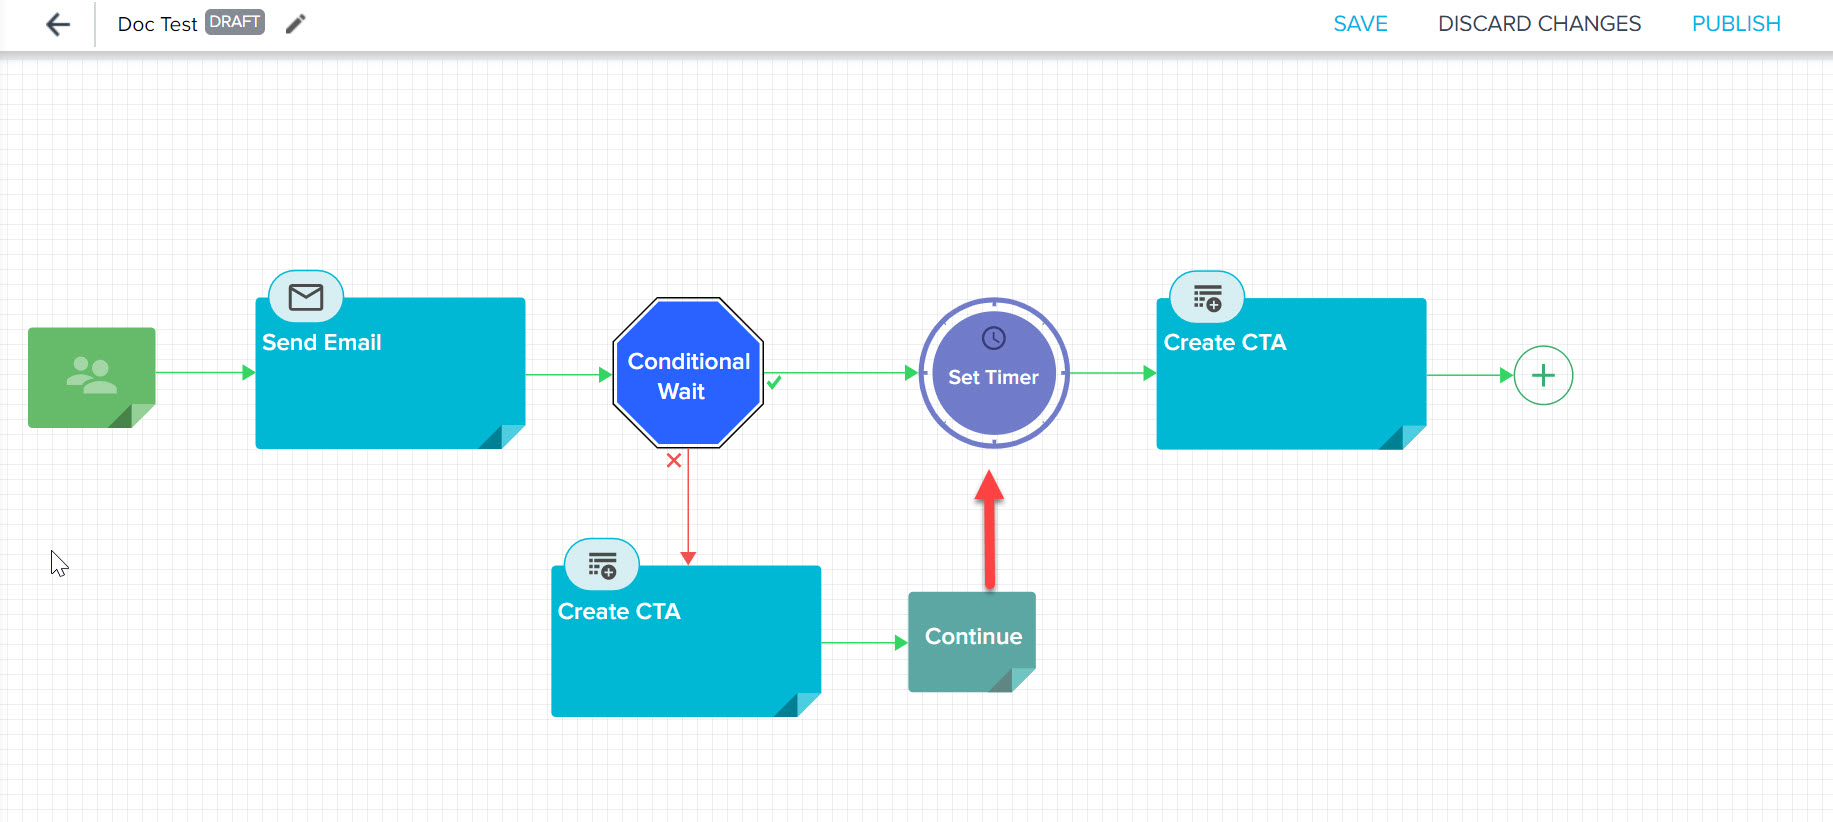
Participants passing through a Continue step moves to step two to the right of the Conditional Wait step. Participants cannot move to the step immediately after Conditional Wait, as they did not meet the conditions configured within the Conditional Wait step. This is designed to allow Participants to continue moving through the Program journey while skipping steps for which they did not meet the conditions. In the below use-case, a participant moving through a Continue step after the Close CTA step will then move to the second Conditional Wait step.

However, if the Wait Timer step is added after the Conditional Wait step, the Participants passing through a Continue step moves to Wait Timer step (immediate step to the right of the Conditional Wait step). It is an expected behavior of the Program functionality. In the below use-case, a participant moving through a Continue step after the Close CTA step will then move to the Set Timer step.
Note: Participants passing through the End Outreach step will be moved to completed.
Operational Emails
Email templates that are marked as operational can be included in the Email Chain model. No other models can be used for Operational Emails. For more information on Operational Emails, refer to the Operational Email Guidelines article. For more information on marking email templates as operational, refer to the Create Journey Orchestrator Email Templates article.
An Operational email can be included in any email step in the Email Chain Model. You can add a combination of operational and non-operational email steps.
Note: If a combination of Operational and Non-Operational Email templates are used in a program, the participants will be dropped from the program if they are in opt-out list even though an Operational Email template is used in it.
Users can add the cc list to the email by selecting the CC checkbox, which can only be enabled when sending Operational Emails in JO. Currently, only 3 email recipients can be added to the cc list.
Users can also track individual email events, such as open, click, and others, for ‘to’ and ‘cc’ emails in Email Logs and Program emails.
Note: Analytics report is only generated on ‘To’ emails and not yet supported on ‘CC’ emails.
If a CCed email participant responds to a Survey, the system considers this as an actual participant response and the journey moves ahead for that particular participant. If ‘Thank you Email’ is configured, it is sent to the actual (To) participant.
For a Program which has at least one operational email template, the following restrictions apply:
- No more than 5000 (or the limit configured per tenant) active participants can be within the Program. If 5000 participants have already been added, additional added participants will be dropped.
- No more than 5000 participants can be added to the Program per day.
Example: Consider that you have added 5000 participants to a Program on the first day when it is published, and then 1000 participants are either moved to completed or are dropped from the Program on the same day. You will not be able to add more participants until next day even though there are less than 5000 participants currently active.
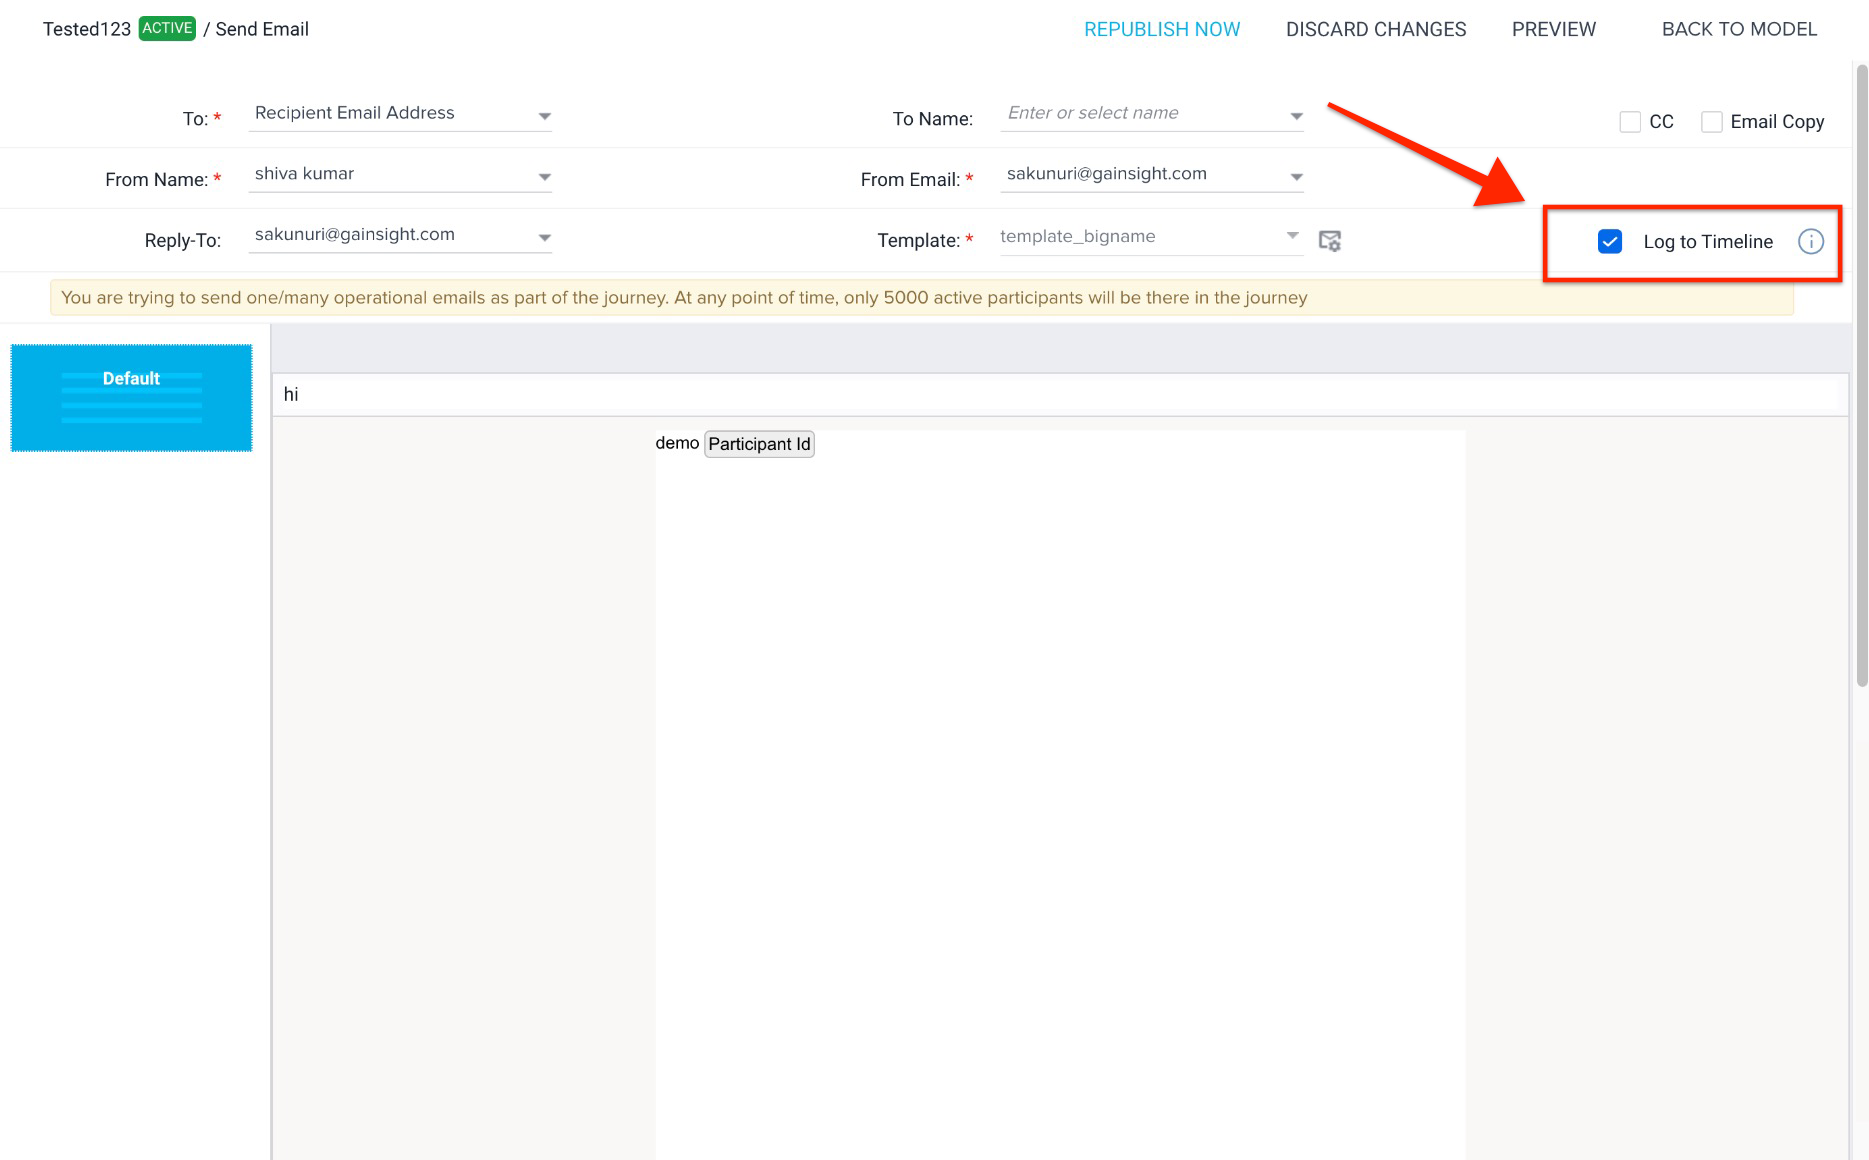
You can add an operational Email Template in the Email configuration step to configure operational emails. After an operational email template is added to the email configuration step of a Program, the following message is displayed informing that an operational template is selected:

Configure Emails
There are different types of Emails that can be configured in a program as listed below. An email type is available in a Program depending on the Program model that you have selected. Each Program model can contain multiple email template placeholders but not all of these emails are included in every model.
The available email types are:
- Survey Email: This email should contain the survey placeholder.
- Heads Up Email: This should be configured to let the customer know ahead of time that a survey email will be sent to participants in the near future. Sending a Heads Up Email has proven to increase a survey's response rate.
- Reminder Email: This email should be configured and sent to remind users who have not responded, or only partially responded/saved the survey, to complete the survey.
Note: if a Survey is configured to move someone to Partial Submitted before the Conditional Wait would send the reminder email, then the reminder email will NOT be sent to them. - Escalation Email: This email should be configured to send to the account's CSM, or another role managing the customer's account. The purpose of this email is to let the account owner know that the customer has not completed the survey, and to suggest next steps.
- Thank You Email: This email should be configured to express gratitude to customers that have responded to the survey.
- Send Email: These email steps are part of an Email Chain and should be configured to contain whatever information is needed in that stage of the chain.
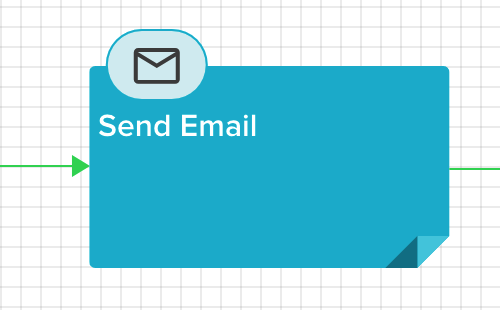
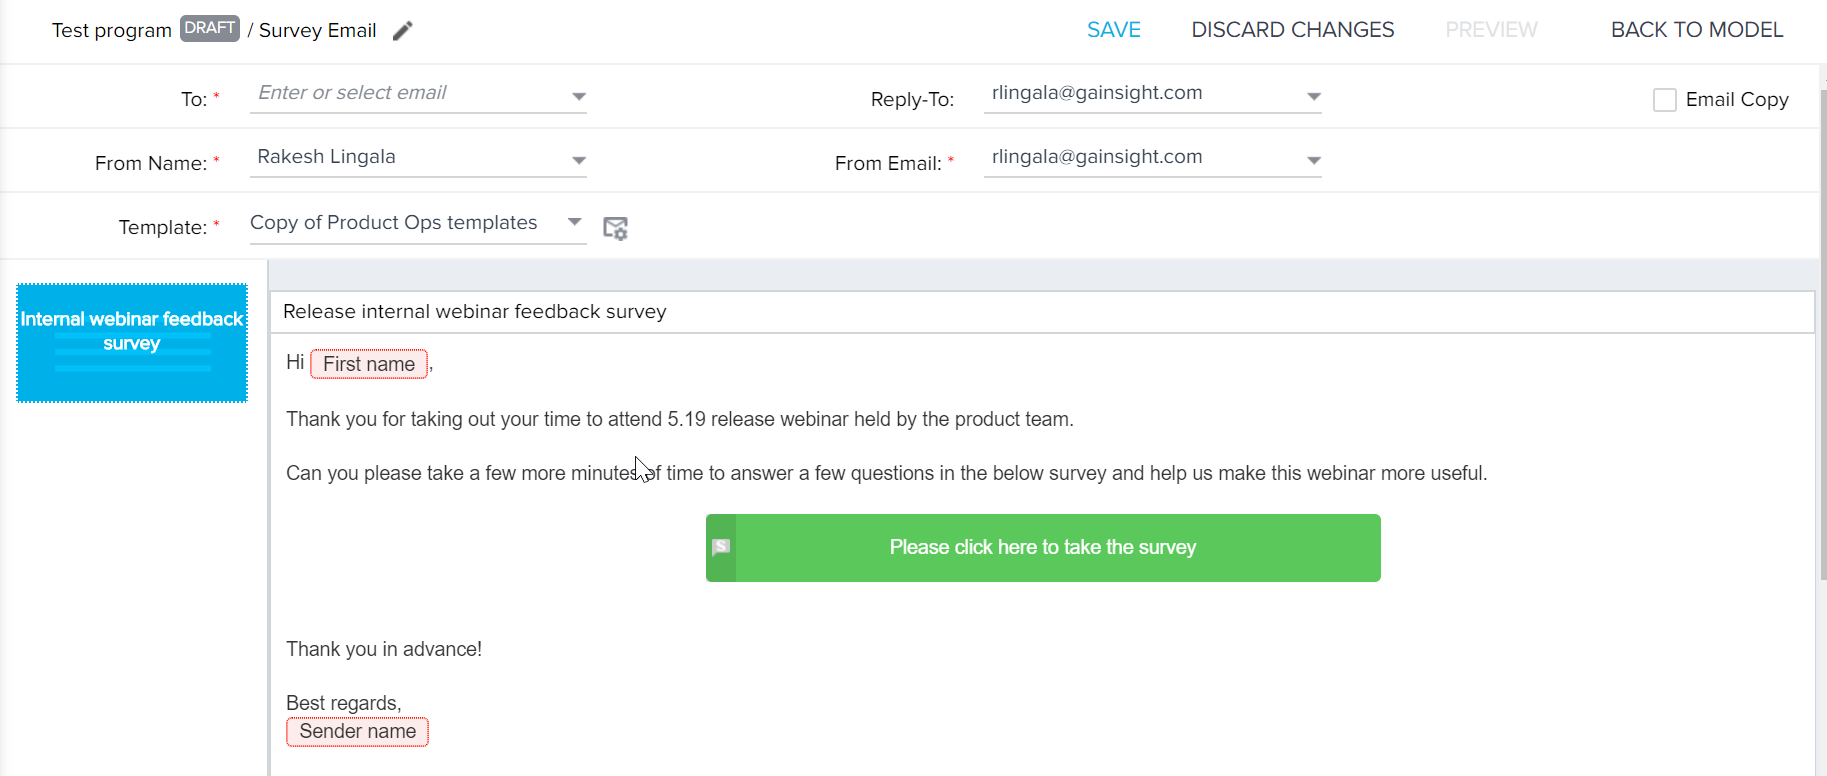
To configure each email within the model:
- Click the edit icon in the Send Email step in a Program. The email configuration screen is displayed.
- Configure the following:
- To: Address of the email. In this field, you can either enter email address or select Recipient Email Address.
- From Name: Designation of who sent the email. In this field, you can either enter name of the recipient or select First Name or Company Name from the dropdown.
- From Email: Email address of who sent the email. In this field, you can either enter email address or select Recipient Email Address.
- Reply-To: Address of the email. In this field, you can either enter an email address or select Recipient Email Address.
- Email Copy: Click EMAIL COPY to see the Email Copy to field. Enter an email address to send a copy of the email to.
- Template: of the email’s content. Program emails can use templates configured to attach reports either inline or CSV. For more information on creating email templates and sending emails with attached reports, refer to the Create Journey Orchestrator Email Templates article and Sharing Reports with Programs article. Multi-Version email templates are also supported for Programs. For more information on Multi-Version email Templates, refer to the Create and Send Multi-Version Emails article.
- Log to Timeline: If this checkbox is selected, the emails triggered from this program are logged as Activities in Timeline. All the emails sent from a program for a company/relationship on a particular day are logged as one Activity. The Activity Type is set to Automated Program by default. For more information refer to the Access Automated Program Activities article.
Custom email fields can be selected for the fields “To”, “Reply-to”, “From Email”, and “Email Copy”. For more information on custom email fields, refer to the Adding Participants to a Program article.
- Click one of the following options at the top-right of the email configuration page:
- Save: To save the email configurations
- Discard Changes: To revert the email configuration to its last saved version
- Back to Model: To navigate back to the model configuration page
- Preview: To preview the configured email. For more information on previewing emails as part of a Program, refer to the How to Test a Program article.
After a link to a survey is established within a Program, it can not be changed to a different survey within the email configuration page. Perform the following steps to change the survey before you publish the Program:
- Click the edit icon to a specific Program. The Program Details page appears.
- Select a new survey from the survey drop-down.
- Click SAVE.
After the email template is selected, users have the option to map any included tokens and to link to any selected surveys. Admins can use Survey Fields and Calculated Fields as tokenization options. For more information on using Survey Fields and Calculated Fields, refer to the Using Survey Fields in Programs article and Using Calculated Fields in Programs article.

Program Snapshot
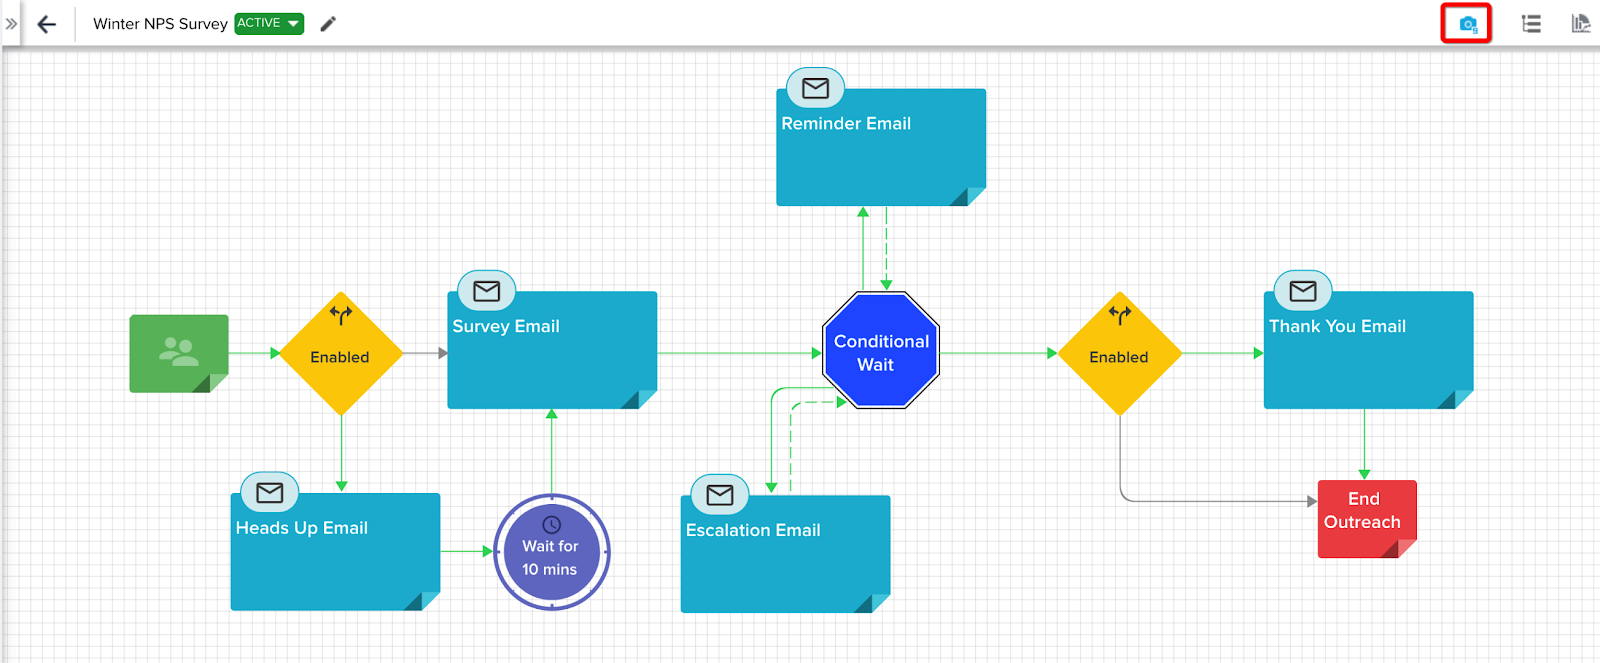
For all Program models, users can access the Snapshot mode to view the number of participants that are currently in each stage of a published Program. To access the Snapshot mode of a Program:
- Click the camera icon in the top-right of the Program model page to access the Snapshot. You can see the Snapshot mode for the model of the Program. You can see the number of participants that have passed or not passed through each step displayed next to it.
- Click the number of participants next to model step. This displays the list of participants that have passed or not passed through the step in the program.

View of the participants that have or not passed through a step is similar to the Participant Activity view in the Activity Feed.
The Program Snapshot view has an “in process” state to show when participants are between program steps. It is normal for Participants to spend time “in process” as background jobs related to the program take time to complete. The icon for “in process” participants will display between the Program’s steps in the Snapshot view. You can click the “in process” icon to view the list of Participants that are currently being processed at that point in the program journey.
![]()
- Click EXIT SNAPSHOT MODE to return to the model configuration page.
Notes:
- In Snapshot mode, Admins cannot configure the model steps.
- The Snapshot view does not fetch the participant list if the number of participants exceeds 99999.
Troubleshooting Configuration Errors
The model configuration page highlights the steps that have not been configured properly when the Admin clicks PUBLISH on the configuration page. This is available for all Program models.
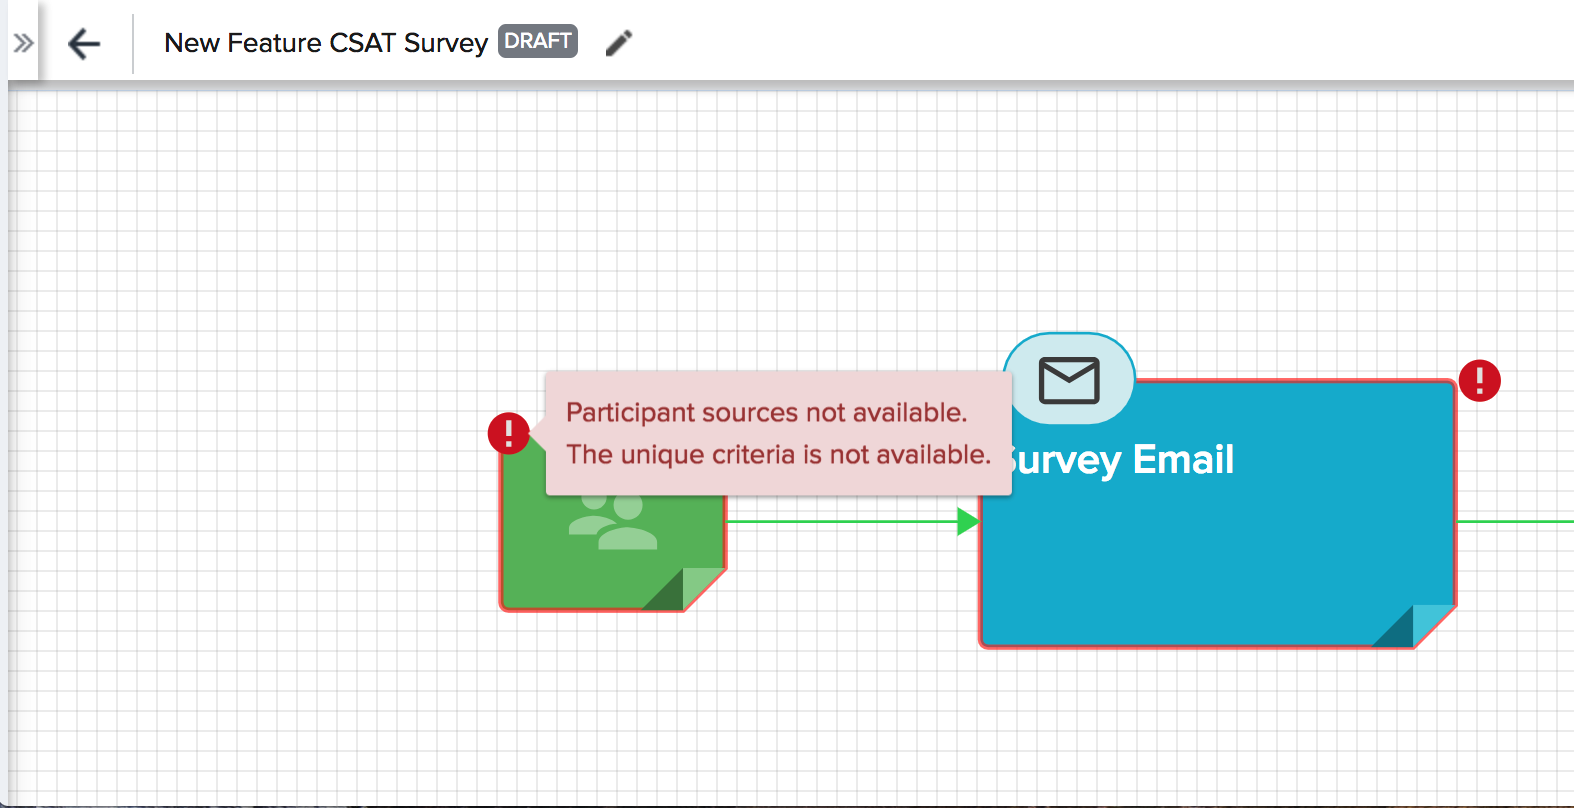
When you click PUBLISH on the configuration page, red highlights appear over any steps within the model that have not been configured properly and are preventing the Program from being published successfully. If this feature identifies one or more steps that have not been properly configured, the Program can not be published.
You can hover over the red exclamation icon at the top-right of any highlighted step to know more about the configuration issue.
The Program can be published successfully after you resolve all of the configuration issues successfully.
Publishing and Exiting the Model
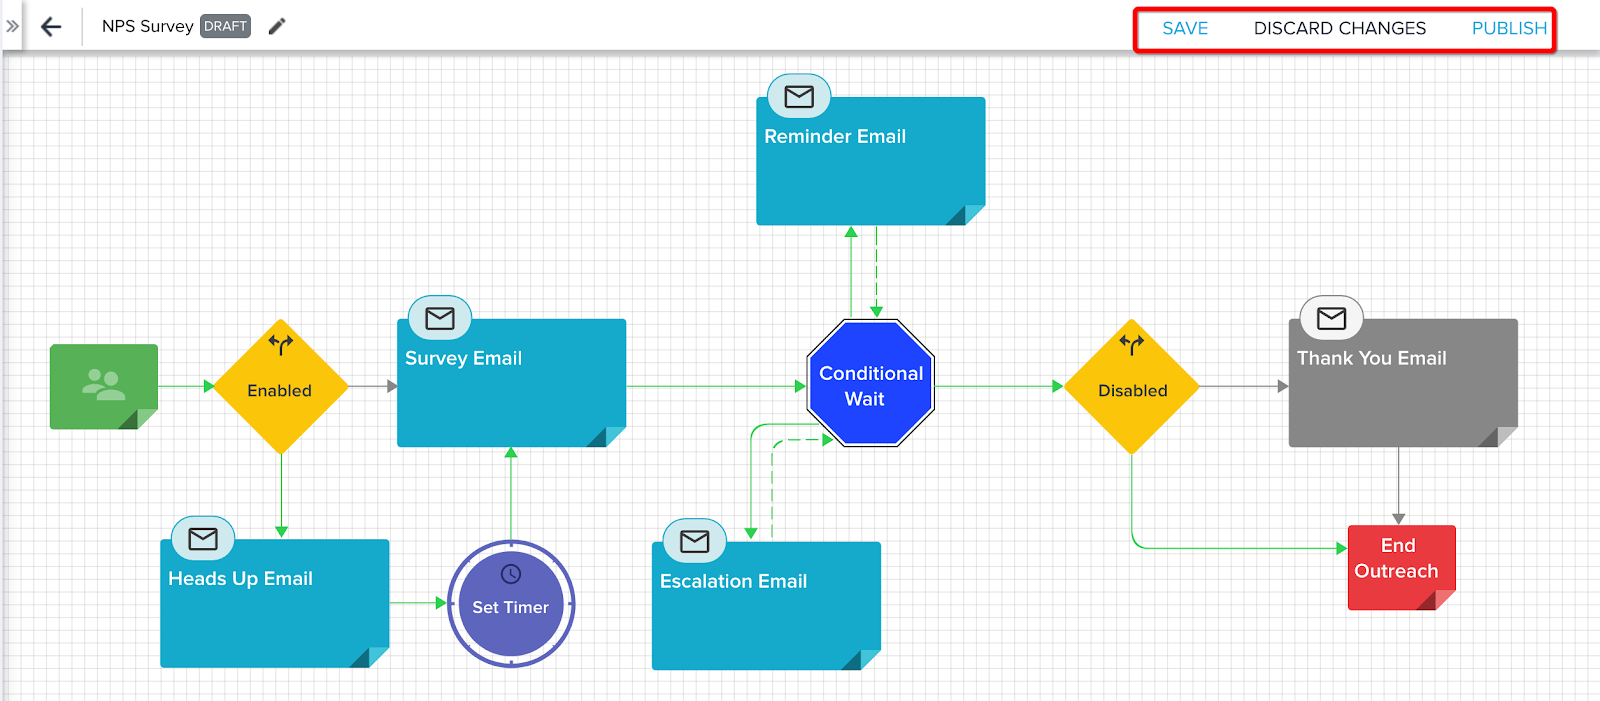
After configuring the Program, you can click one of the following three options before exiting the model:
- Save: This saves any changes to the model configuration.
- Discard Changes: This exits the model without saving any configuration changes.
- Publish: This publishes the Program and begins the process of sending messages to the participants. After clicking PUBLISH, a dialog appears to confirm publishing the program. You have two options to publish the Program now, or schedule to publish later as explained below.
Once the Program is Published and Active, you are limited in your ability to configure it further. You can make the following edits:
- Generate a query to pull in participants
- Modify the schedule for when the query runs
- Configure Uniqueness Criteria
- Remove Participants
- Modify Email Templates (edits will be reflected to participants, those are yet to move through the respective step)
- Modify any CTA steps (edits will be reflected to participants, those are yet to move through the respective step)
For more information on these available configurations, refer to the Adding Participants to a Program article.
Publish Now
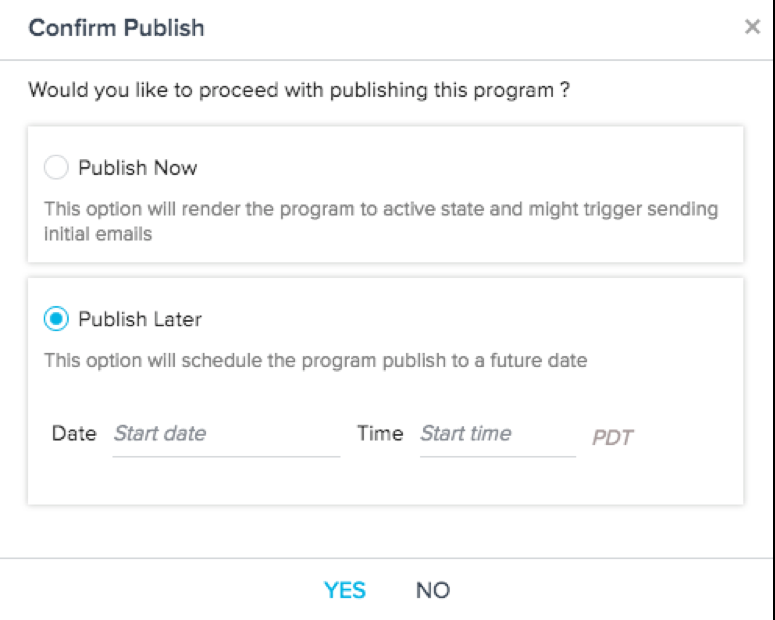
After Admins click PUBLISH, a dialog appears to confirm Publish Now or Publish Later.
You can select to publish the program now. This option renders the program to Active status, and possibly triggers sending any initial program emails.
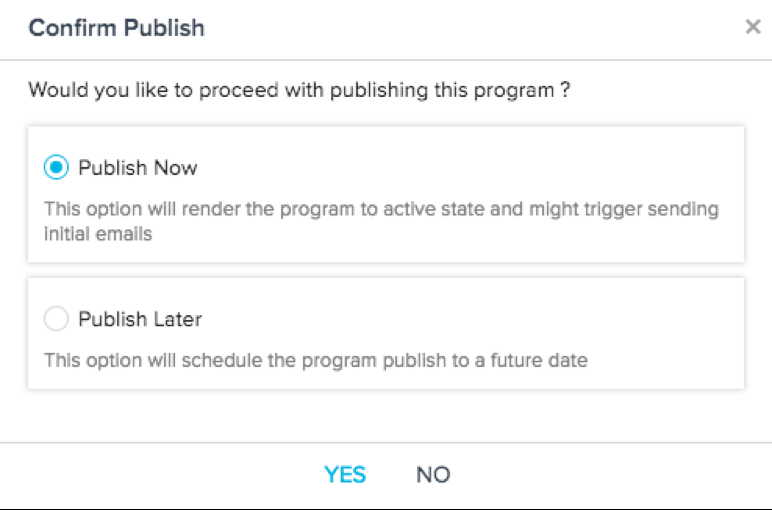
Publish Later
You can select this option to schedule publishing the program later. Selecting Publish Later gives you more control of when the Program should start sending messages and does not require you to manually complete publishing. After selecting this option, you can select the date and time to publish the program.
IMPORTANT: In order for a scheduled participant sync to occur, a program must either be active or have a scheduled publish date at the Program level. If you plan to publish programs on a delayed schedule, we recommend activating the program first from the program model screen and then schedule a date and time for the program to be published.
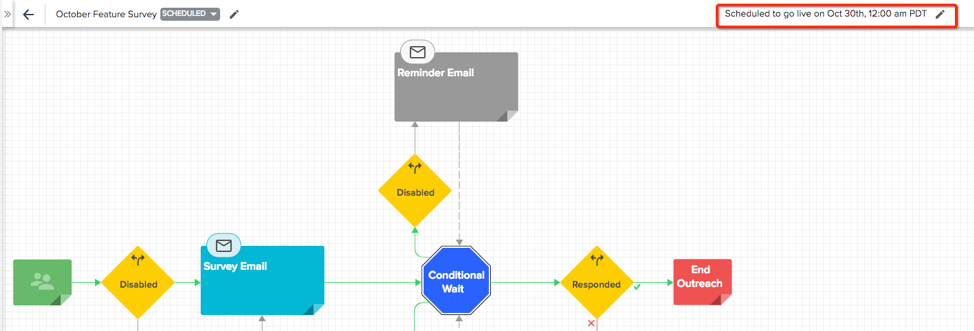
After selecting a date and time, you can click YES to complete scheduling the program. Programs that are scheduled to publish have the status SCHEDULED. At the scheduled date and time, the program will move to an Active status as part of the publishing process.
After a program is scheduled, a message is displayed on the top right of the Program model page identifying when the Program is scheduled to go live. You can click the edit icon to change the date and time of the publish schedule.
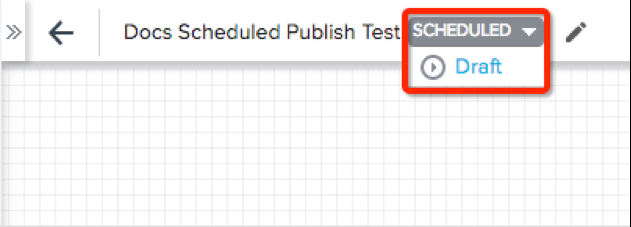
You can remove a program’s schedule. In the model configuration page, you can change the Program status from SCHEDULED to DRAFT as shown below. This removes schedule of the Program.
Automatic Validation of a Published Program
Gainsight runs a Validation process, in the backend, to validate all the configurations of a program, once the program is published. If there are any errors, it sends out an email notification to the user who published the program. Therefore, the status of the program is changed from ACTIVE to DRAFT and also the participant’s state is changed from NEW to REVIEW.
Note: Validation service is applicable only for Published programs.
An email notification is sent to the following users in different cases:
- For Manual Execution - Email notification is sent to Logged in user or the user who is publishing the program.
- For Scheduled Execution - Email notification is sent to the user who created the schedule.
This validation process is applicable to all program models. The following are the scenarios where validations are performed in the backend for a published Program:
- Survey/Report token validations.
- Versions exist or not.
- Configured email template exists or not.
- From and To email address exists or not.
- All the tokens in the email template mapped or not.
- Standard tokens exist in the participant mapping or not.
- The calculated fields exist in the JO configuration or not.
Note: Validation service is not supported for Call External API feature.
Options for Published Programs
After a Program is published, the model configuration view is changed to show new options as listed below:
- Back to Program List: Click here to navigate to the Program List View.
.png?revision=1)
- Program Status Drop-down: This drop-down displays the Program's current status. If the Program is published, status is displayed as Active. You can select to Pause or Stop the Program from here. For more information on the Program status, refer to Program List View and Create New Program.
After you change the status, a warning message is displayed, explaining how the change of status affects the Program. You can then select either YES or NO to confirm or cancel the change of status.
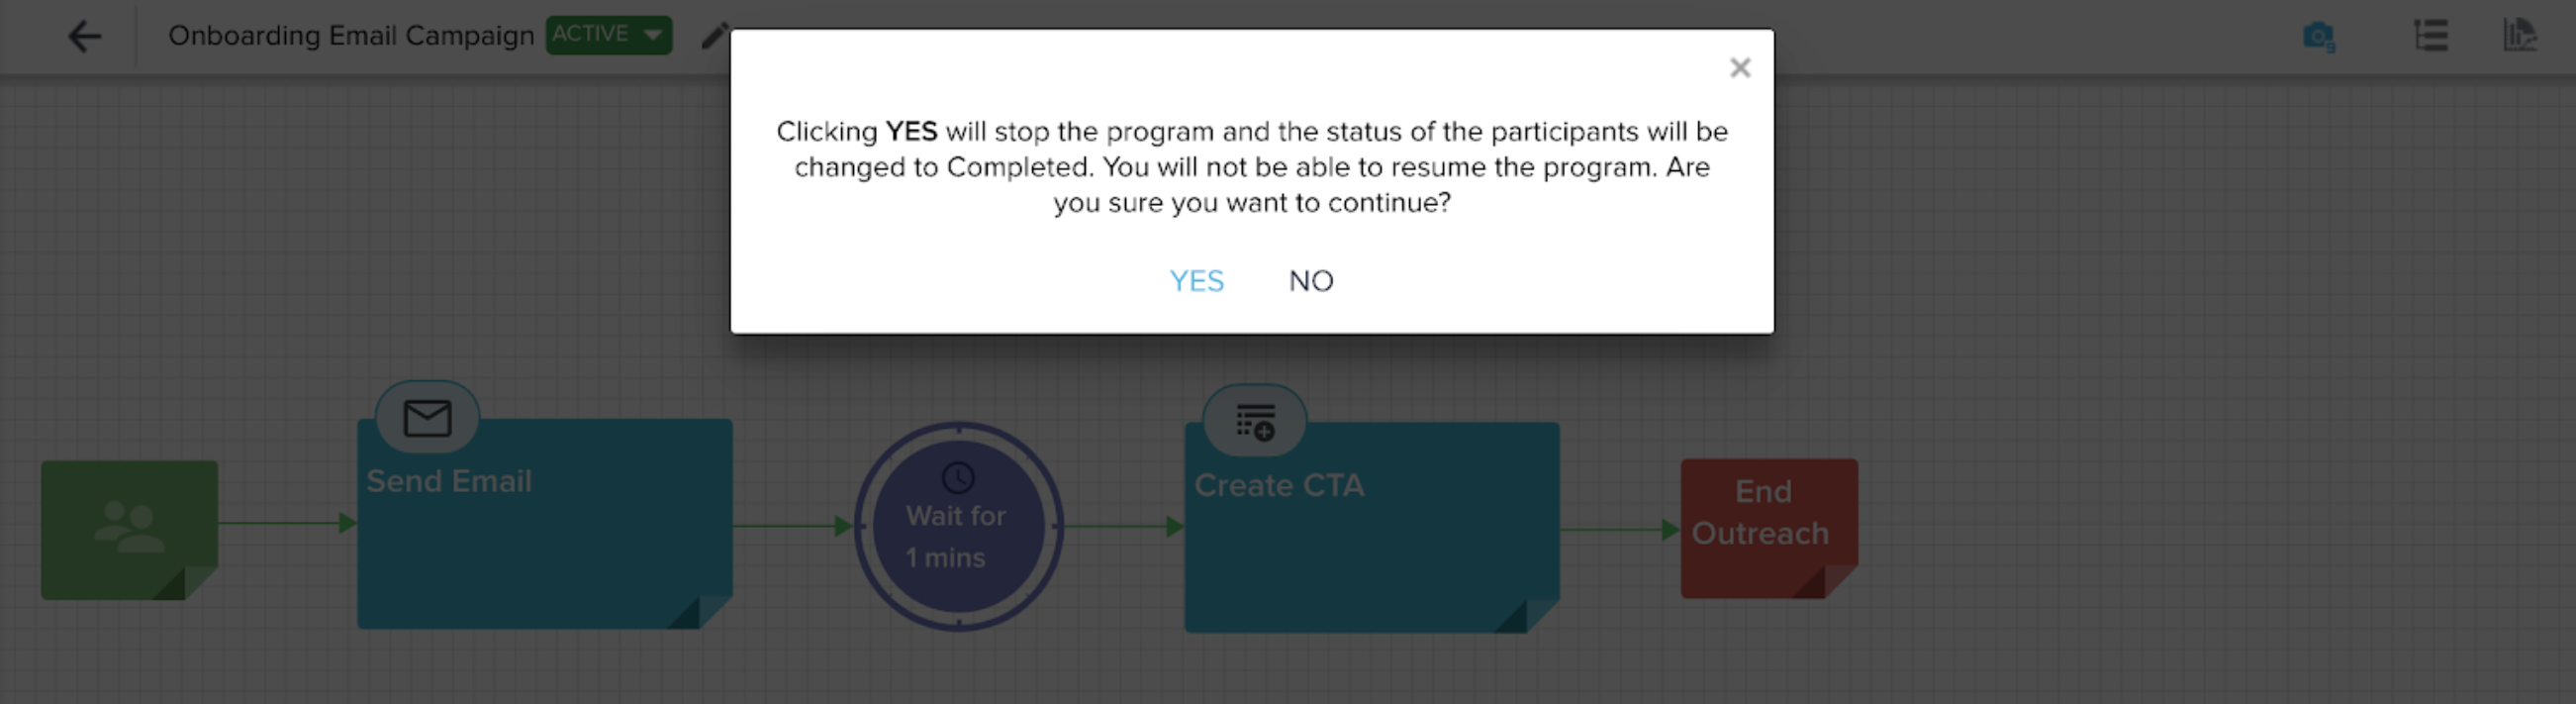
The text of the displayed message depends on the status selected:
- Changing status to Pause: The Actions/Activities that are in queue at the time when the Program is paused are executed normally, and the participants are paused only at the next Wait Timer/Conditional wait. Once the Program is resumed, all the timers will be adjusted to account for the paused duration. For example, assume that you have a step which says Wait for 3 days, but you have paused the program for a day and then resumed it. The wait step automatically recognizes the pause duration of 1 day, and now waits for 4 days instead of 3 to compensate for the pause duration.
Note: While the program is in a paused state, Gainsight captures all the events of participants' such as Email Clicks, Close Event, CTA Open/Close for a period of 60 days after the program is paused. If the program is resumed beyond this period, the data will not be preserved. You can resume the program with the updated statuses of all participants’ activities before the pause period. Moreover, you can also resume the program from it’s original state before pausing the program.
- Changing to Stop: "Clicking YES will stop the program and the status of the participants will be changed to Completed. You will not be able to resume the program. Are you sure you want to continue?"
Notes:
-
When the program is stopped, the participants with the status "New" and "Active" will only be changed to Knocked-Off. Rest of the participants' status will not be changed and remains same."
-
Stopped Programs do not allow adding new participants. You cannot setup any new configurations and the Program can not be started again. We recommend exercising caution when you change the Program status to Stop.
-
- Changing to Resume: "Clicking YES will make the program active and the participants will continue in the journey. Are you sure you want to continue?"
- Once the Program is resumed, all the timers will be offset to account for the paused duration.
- Changing to Draft (only available for Scheduled Programs): "Clicking YES will remove the schedule and make the program to the draft state. Are you sure you want to continue?"
- Edit Program Details: Click here to edit a Program's basic details, For more information on editing Sources after Publishing a Program, refer to the Add Participants to a Program article.
- Program Snapshot: Click here to navigate to the Program's Snapshot mode. For more information, refer to the Program Snapshot section.
- Participant Activity Feed: Click here to navigate to the Program's Participant Activity Feed. For more information, refer to the Participant Activity Feed article.
- Program Analytics: Click here to navigate to the individual Program's analytics. For more information, refer to the Reports for a Single Program article.
If you have questions or feedback about the feature explained in this article, please share them on community.gainsight.com.