Gainsight User Management
Gainsight NXT
This article explains admins about the options in the User Management page and how to add users in Gainsight through various channels.
Overview
Gainsight Admins manage users and their licenses from the Administration > Users and Permission > User Management page. You can also grant access to the Gainsight Sally application for the required users. Gainsight User is a standard object which stores users information in Gainsight’s Matrix Data Architecture (MDA). For more information on the Gainsight User Object, refer to the Gainsight User Object article.
You can add more user attributes in the Administration > Data Management page. For more information on how to add user attributes/fields in User Object, refer to the Add Custom Fields in an Object in the Basic Operations in Data Management article.
Training Resources: If you're new to Gainsight administration, we strongly encourage you to complete our free web-based training, and then sign-up for live instructor-led sessions. In the live sessions, you will have opportunities to hear about the best practices, tips and tricks for troubleshooting, and to complete practice exercises in a training org.
Add Users in Gainsight
Admins can add users to Gainsight manually, through CSV file, and through external systems.
Note: Currently, User APIs are not available to add users into Gainsight.
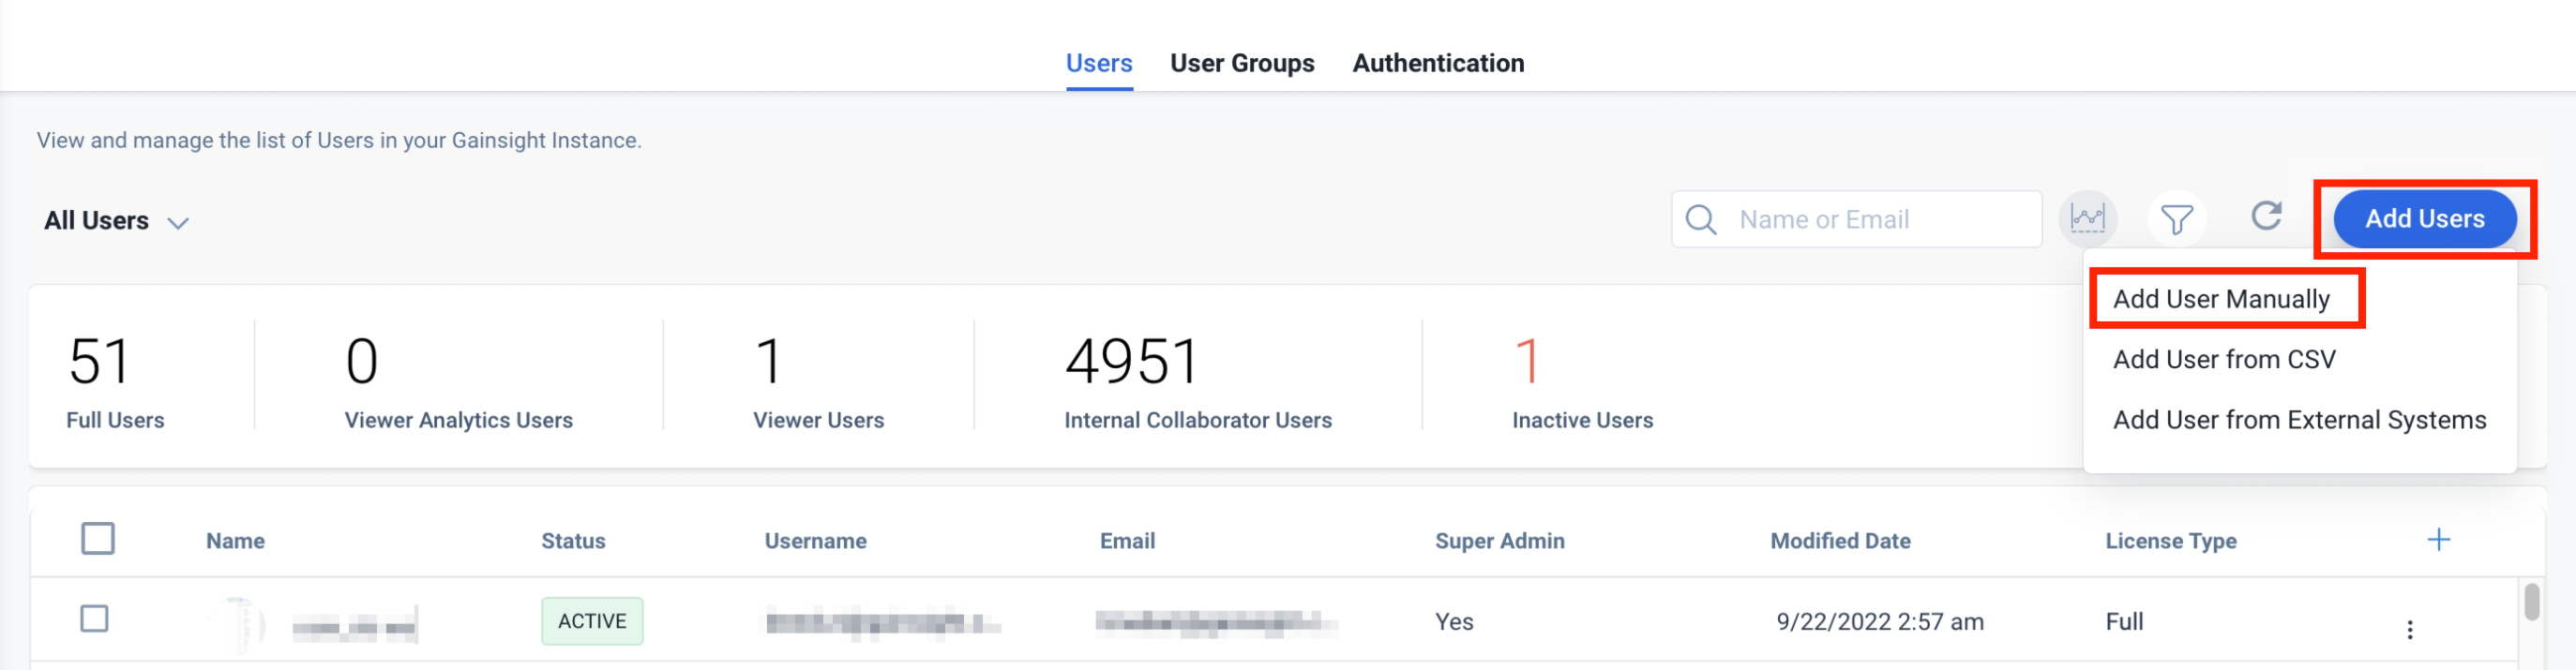
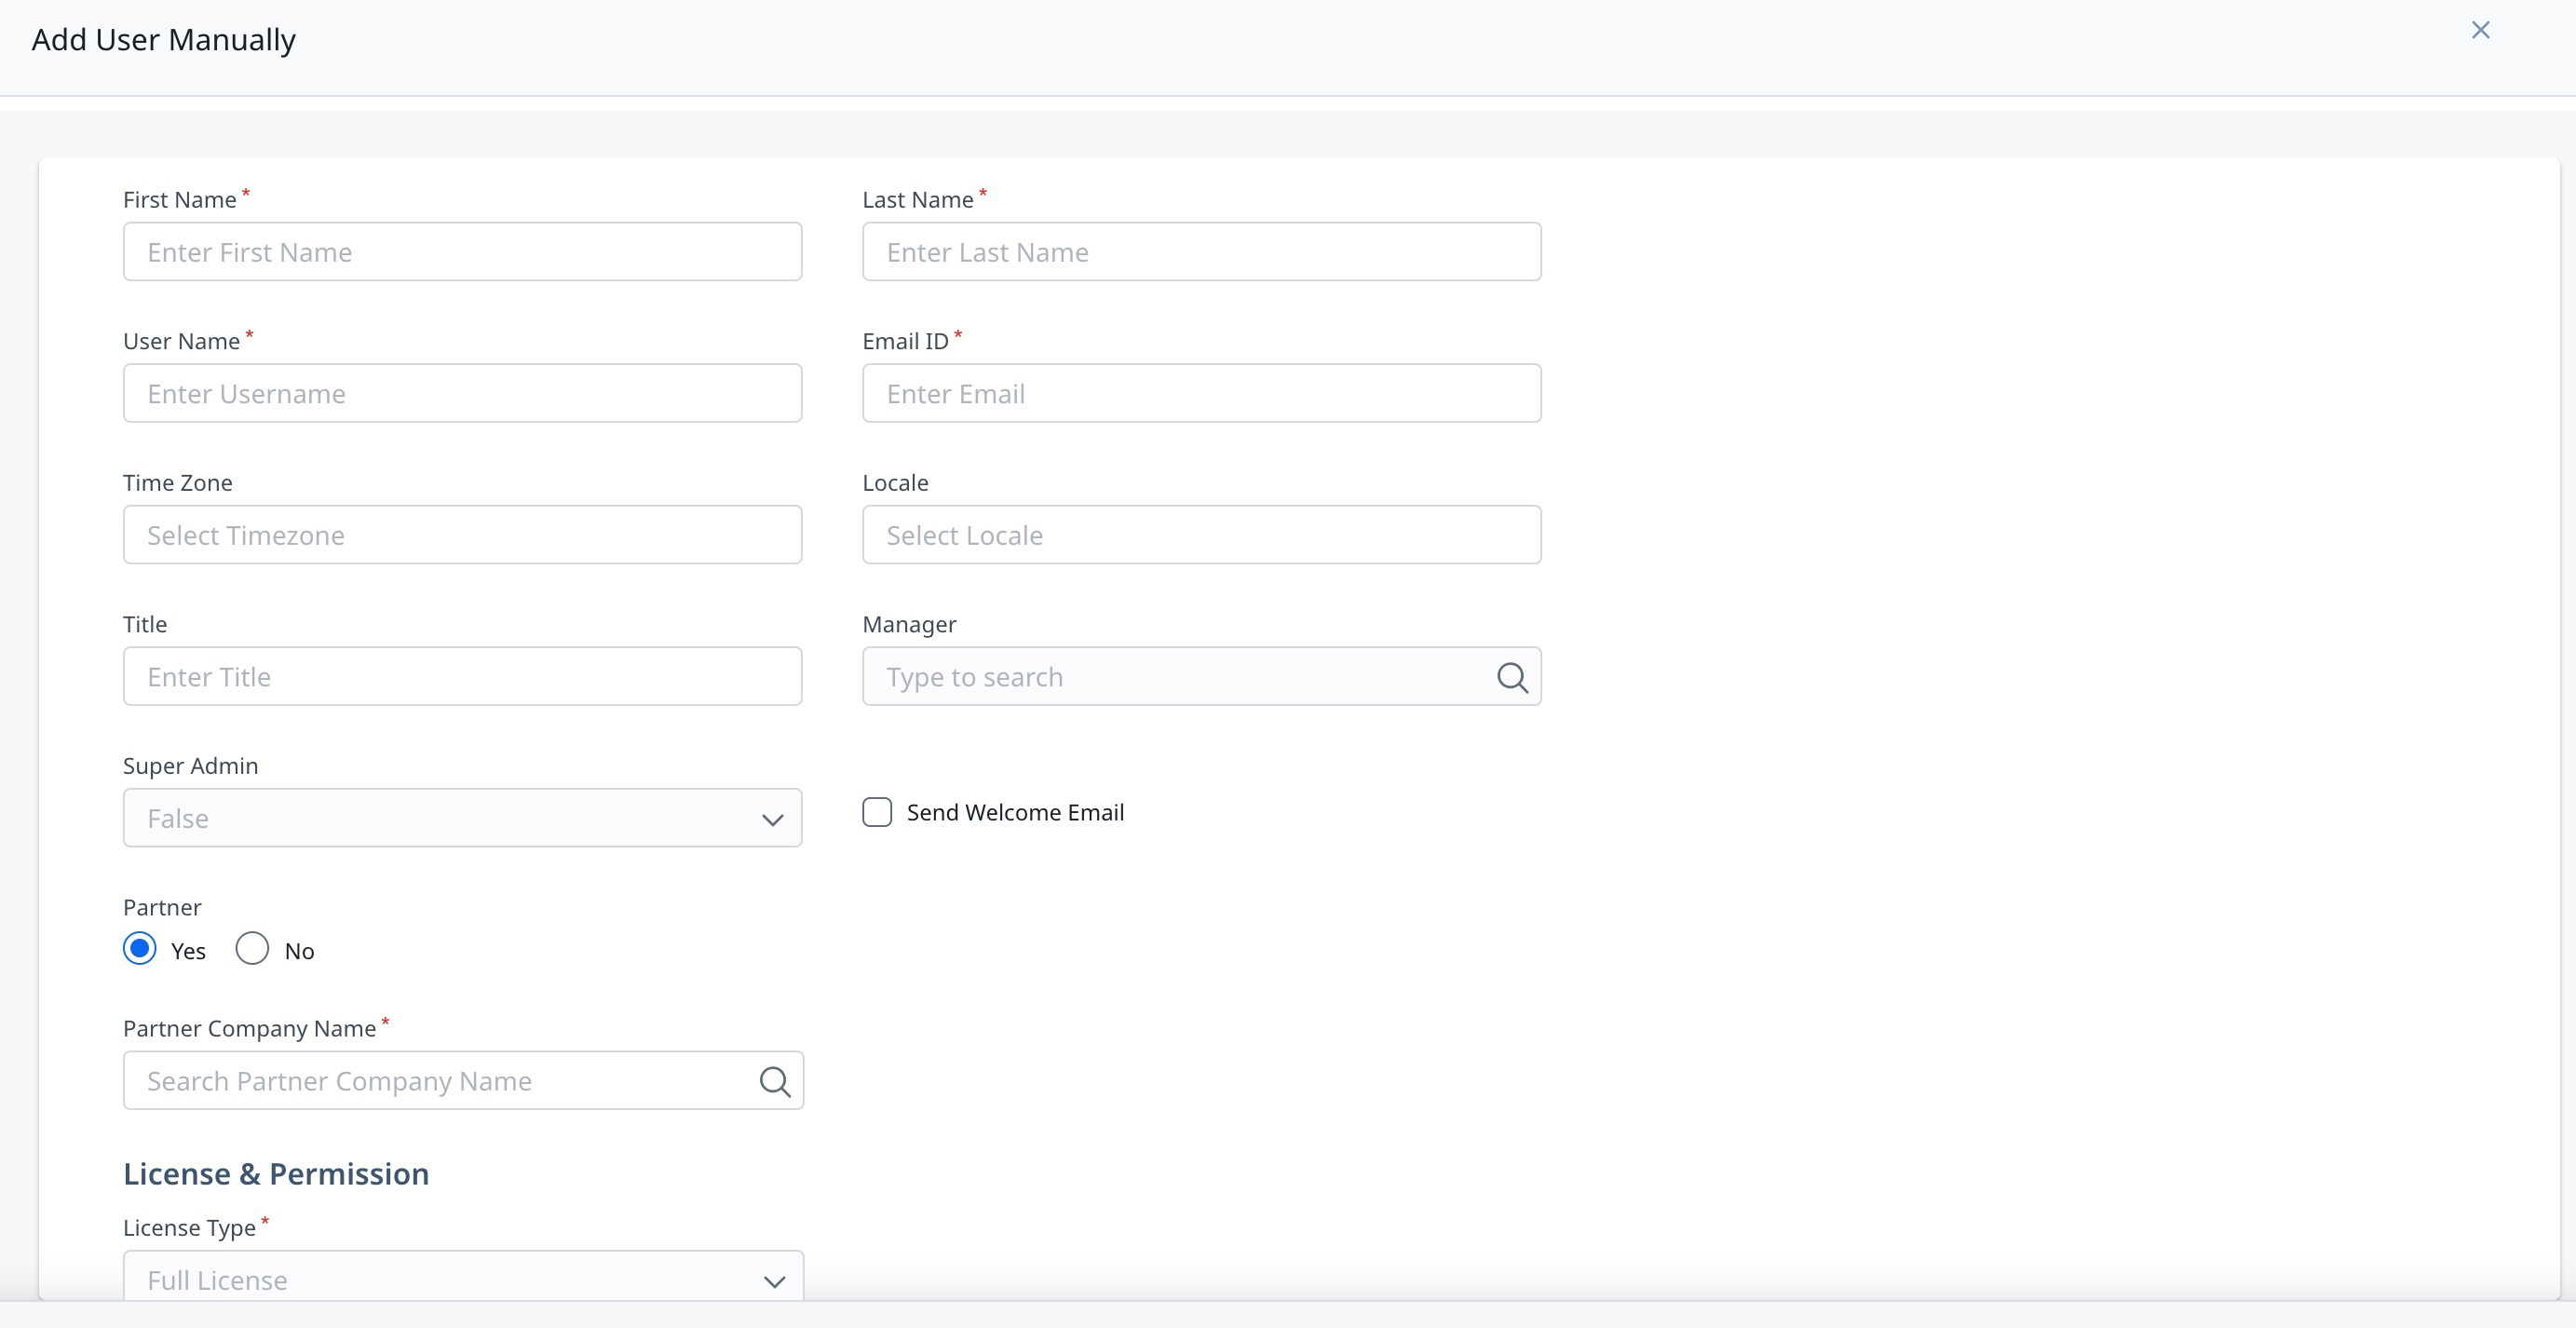
Add Users Manually
To add user into the Gainsight User object:
- Navigate to Administration > Users and Permission > User Management.
- Click Add Users and select Add User Manually.
- Enter the following information as explained in the following table:
Fields Mandatory Description First Name Yes First name of the user Last Name Yes Last name of the user User Name Yes Enter a unique User Name in the format of an email ID. For example, example@mail.com Email ID Yes Registered Email ID Time Zone No Users time zone Locale No Preferred Language
Note: If Admins do not configure a user's locale, data in the user's org will be formatted based on the tenant level locale setting by default. Admins can configure this setting under Application Settings. For more information, refer to the Application Settings article.Title No Preferred work title Manager No Reporting Manager Send Welcome Email No Sends a welcome email to the user. Super Admin No Select True or False License Type Yes License type of the user Custom Field's External ID No External ID of the Custom field - In the Super Admin section, select True or False from the drop-down list box.
- True: If this option is selected, then Full license is selected by default.
- False: If this option is selected, admins can select to assign any of the license types to the user.
Steps 5 to 8 are applicable, When the Super Admin is selected as ‘False’ and License as 'Full' license. For other license types, please proceed to step 9 as the Permission Bundles are selected by default.
Note: if Super Admin is ‘True’, then Full license is assigned by default and Permission Bundles are not required.
- Click Add Permission Bundles.
- In the Assign Permission Bundles dialog box, select the required Permission Bundles.
- Click Confirm.
- (Optional) Fill any Custom fields.
- Click Save.
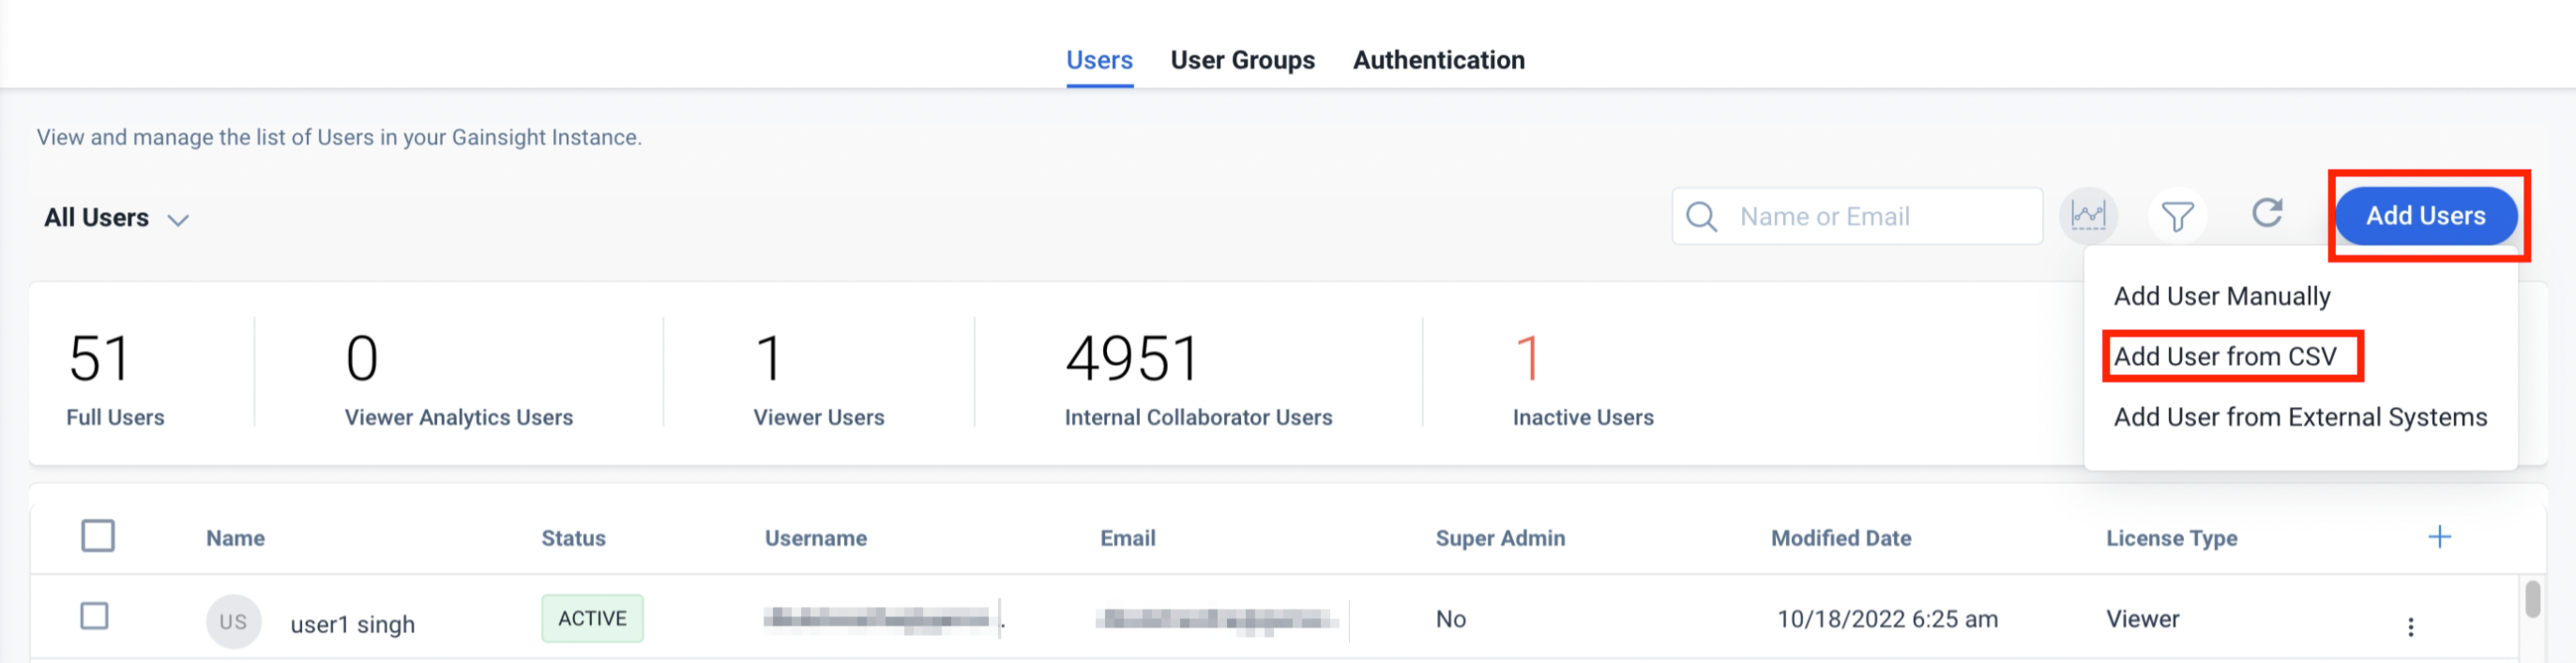
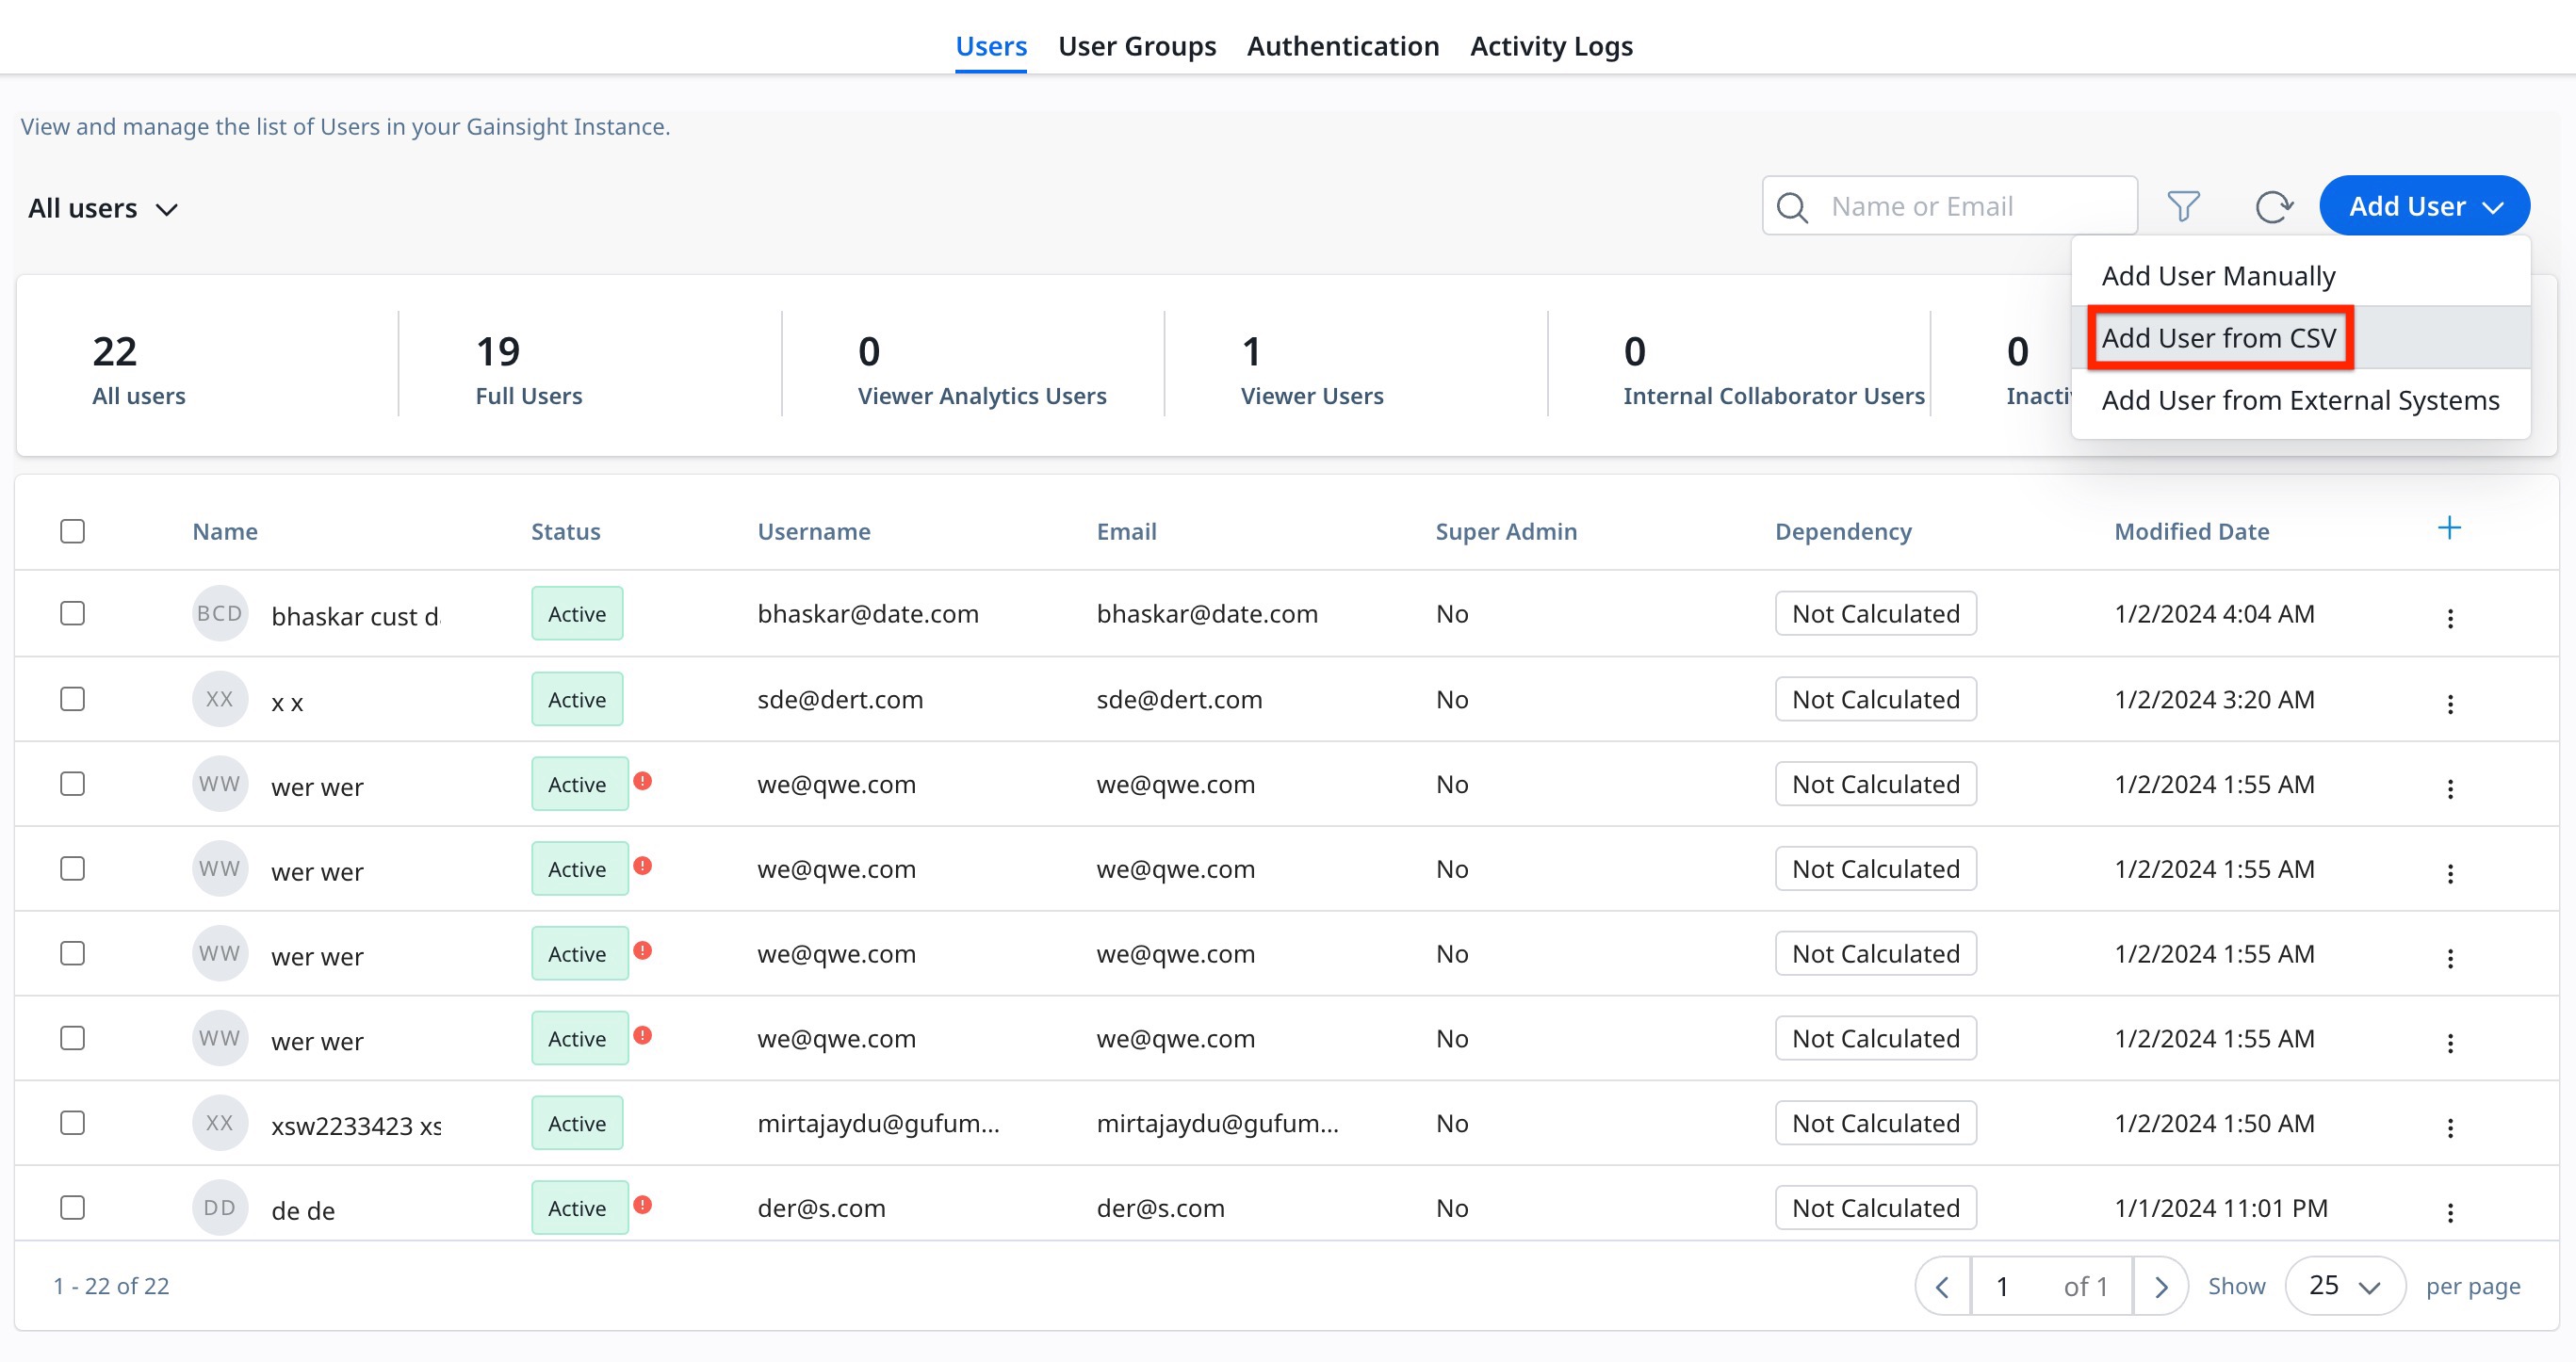
Add Users from CSV
While adding users through a CSV file, licenses are assigned to users in the Gainsight application based on the criteria mentioned in the License type field of CSV. For more information about the type of assigned license, based on values in the Super Admin and License Type fields in the CSV file, refer to the Assign License through CSV file section in User License Management article.
To add users from CSV:
- Navigate to Administration > Users and Permission > User Management.
- Click Add Users and select Add User from CSV.
- In the Upload CSV, drag and drop or click browse file to upload from your local machine.
Notes:
- The file format should be in .csv format. A sample document is also available to view the required fields.
- Admins can add all the fields available in the User object in the CSV file. The sample CSV file only contains the fields such as Username, First Name, Last Name, Email, Active and License Type.
- Username, First Name, Last Name and Email are mandatory fields for creation of Users and must be present in the CSV file being used for adding Users.
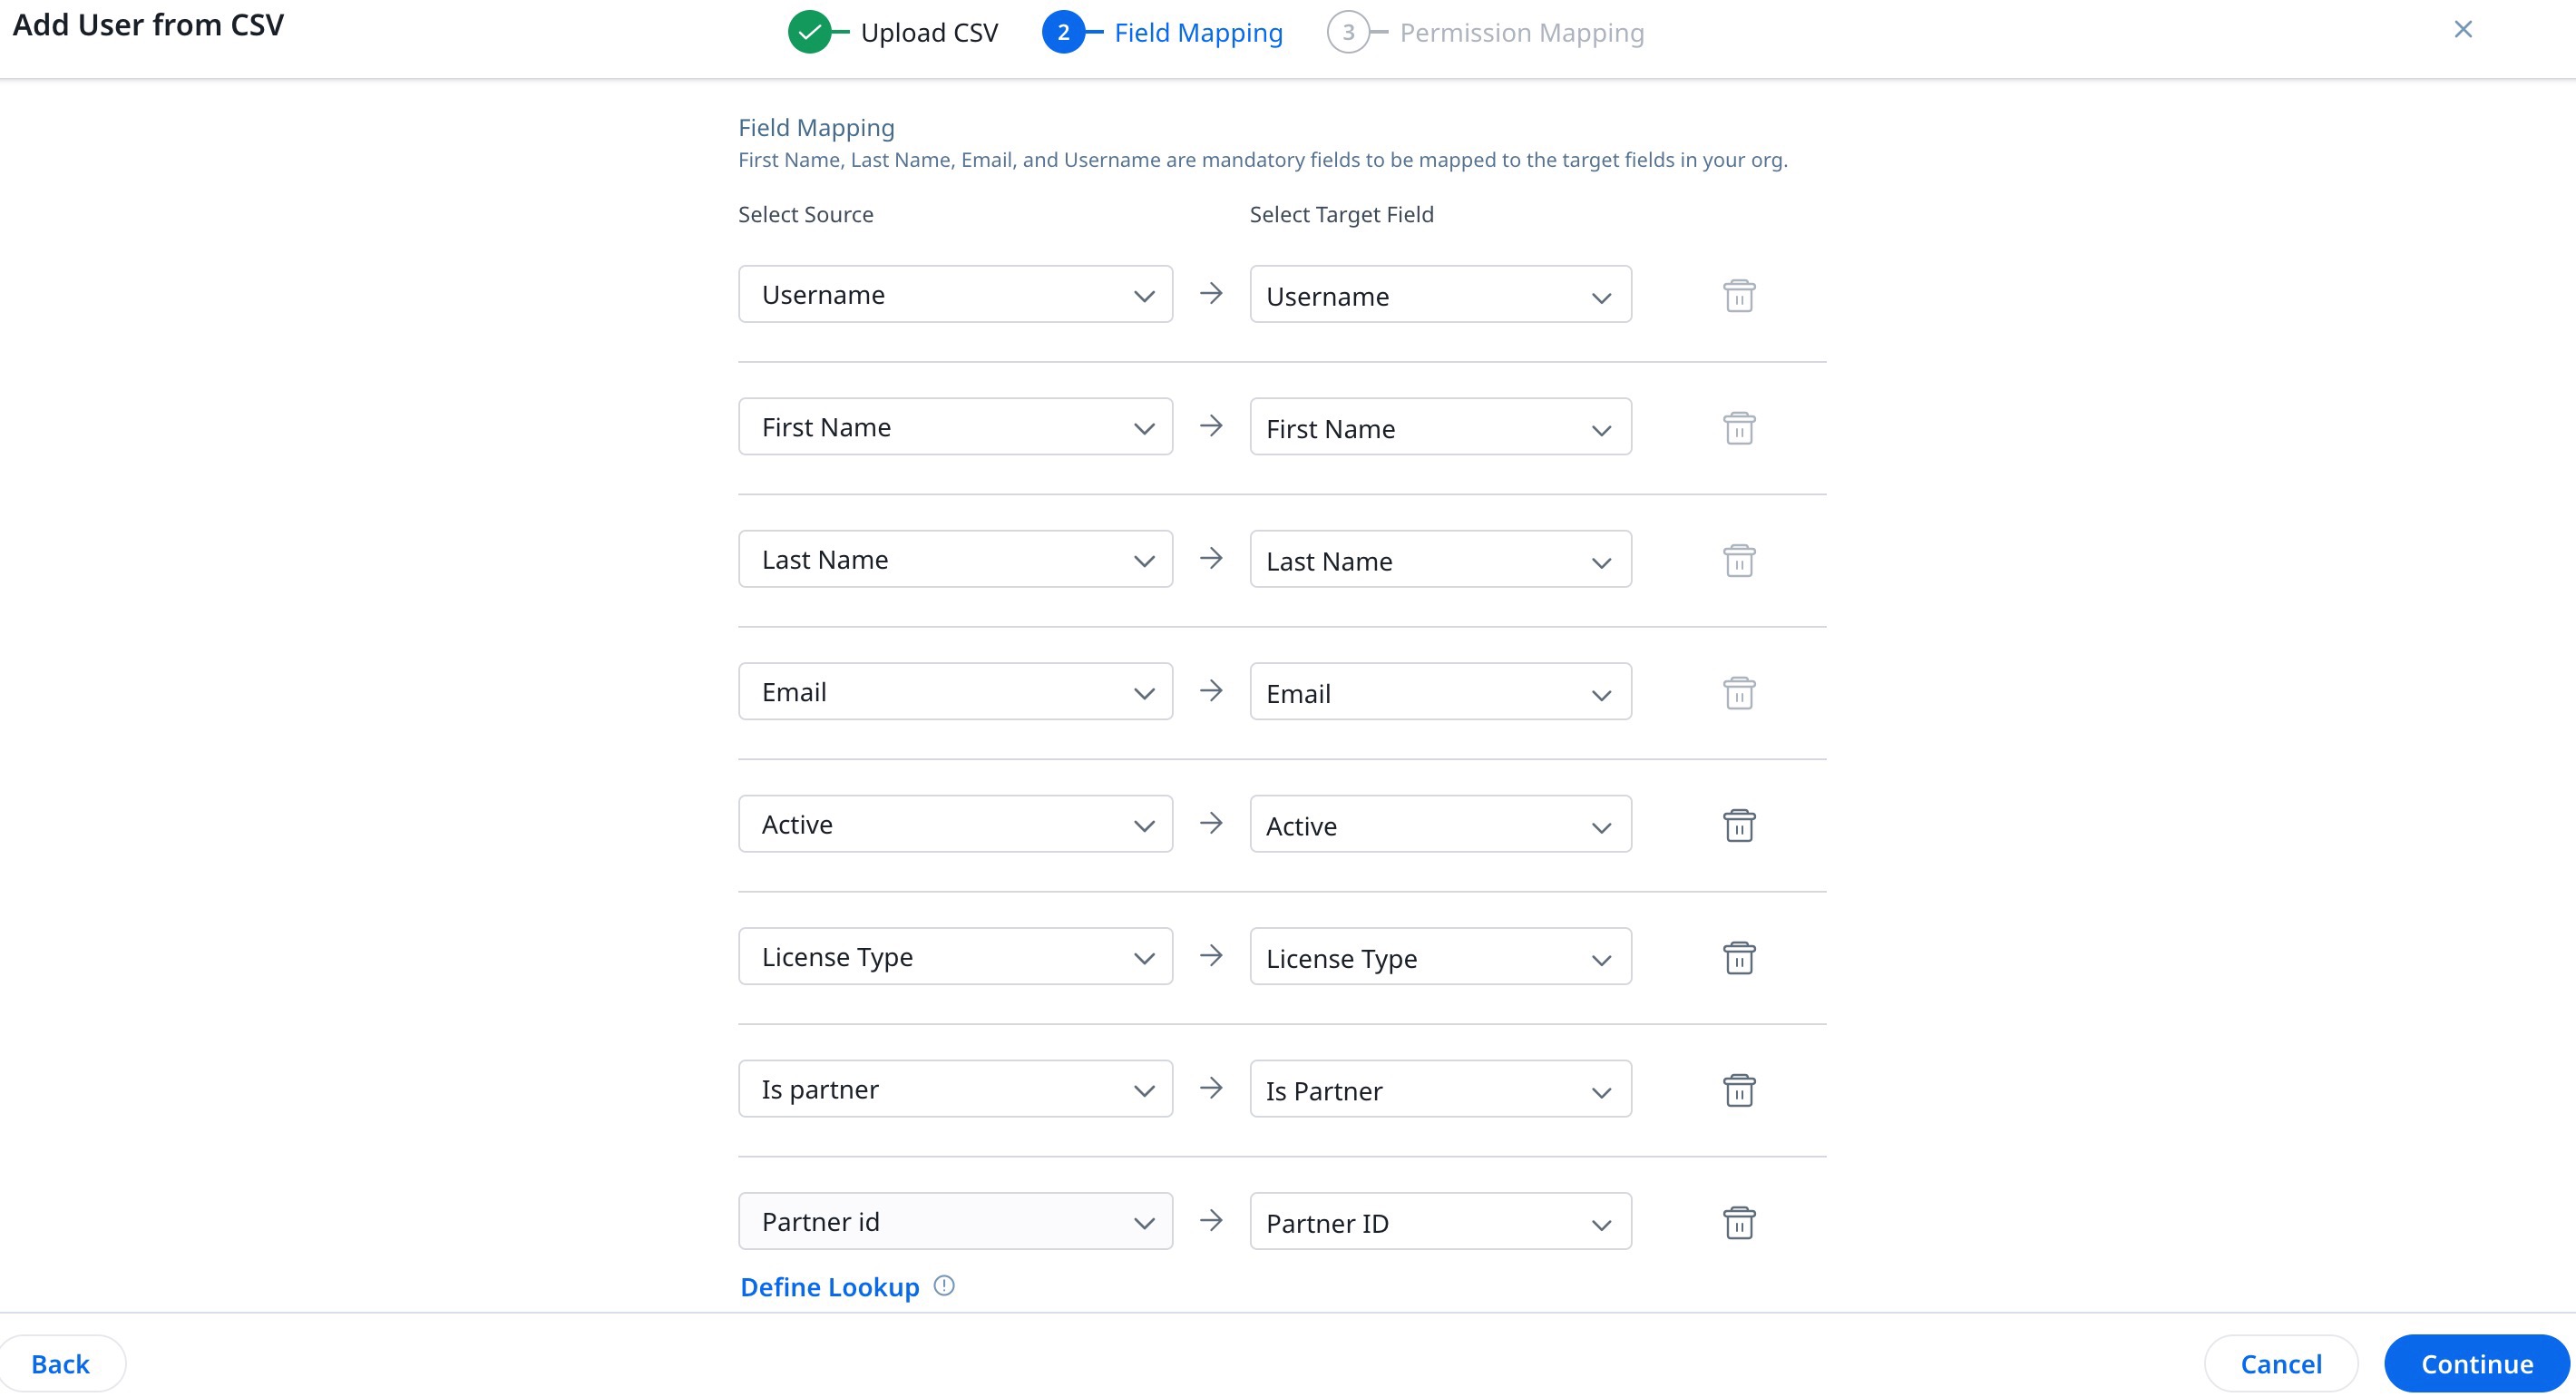
- Click Continue. The Field Mapping Page is displayed.
- In Field Mapping, all the standard Source and Target fields are mapped by default. Admins must map the target custom fields, if any.
- Click Continue.
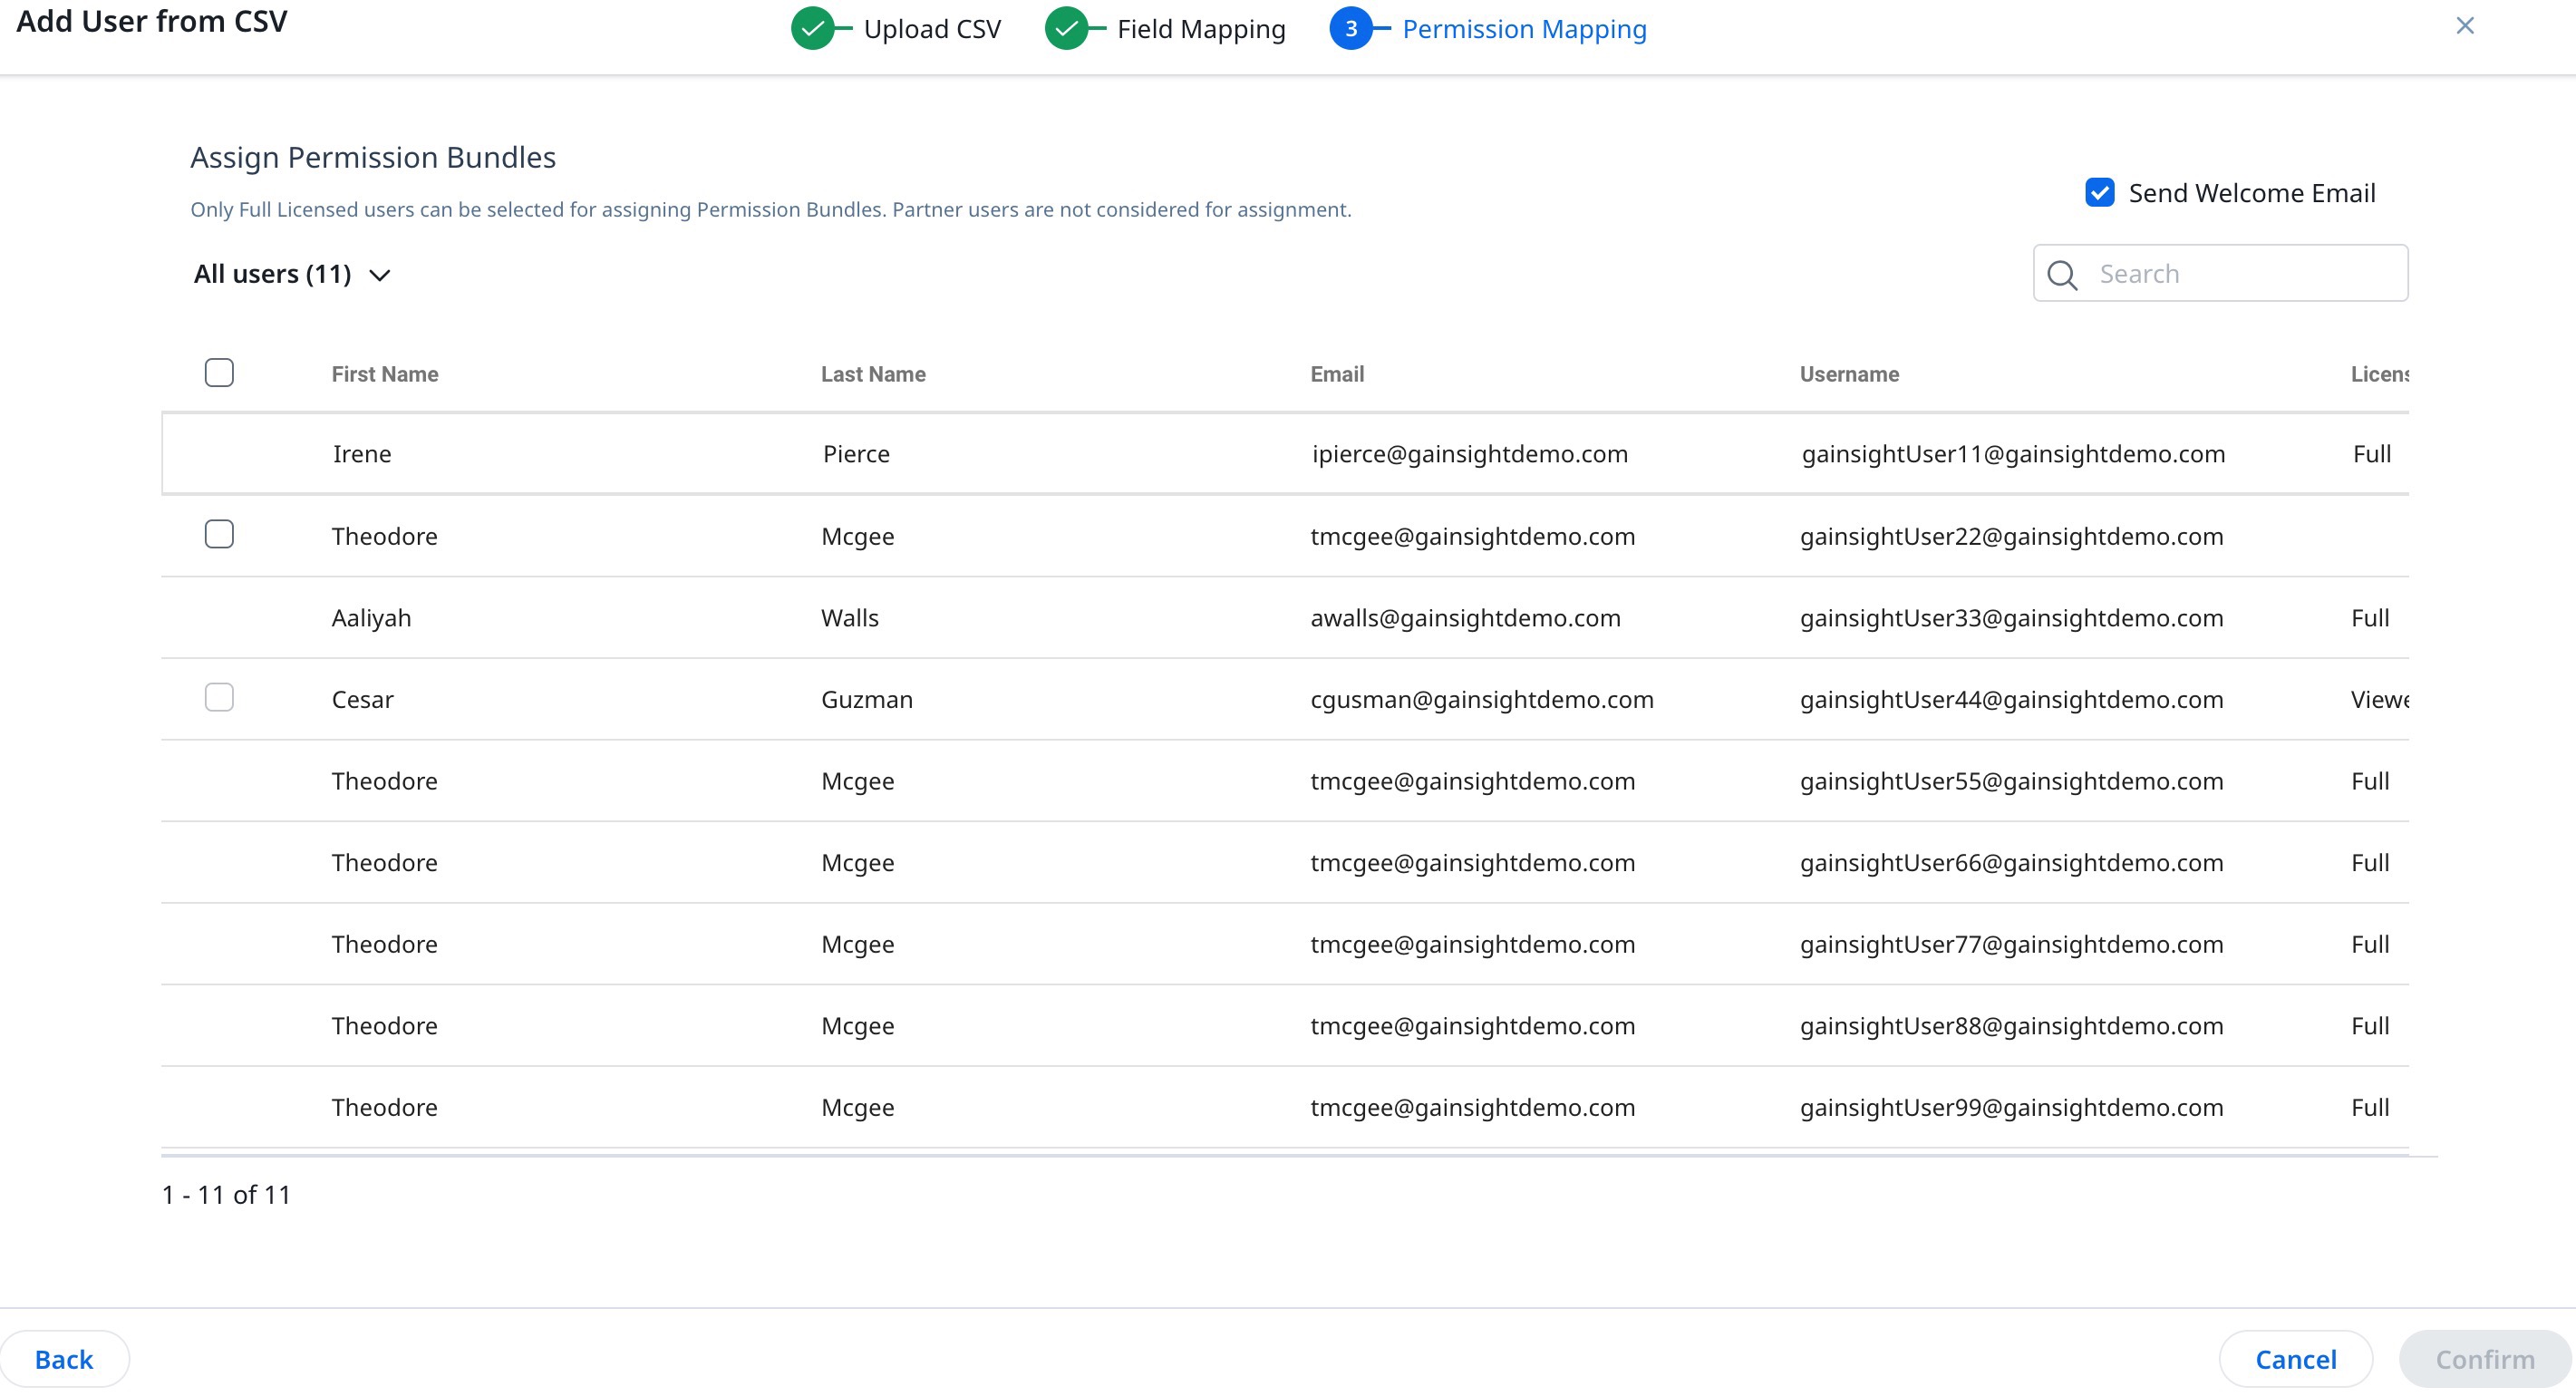
- In Permission Mapping, select the users to assign Permission Bundles.
- Select Send Welcome Email.
- Click Assign Permission Bundles.
- In Assign Permission Bundles, select the required Permission Bundles.
- Click Confirm.
- Click Confirm in the Permission Mapping. A confirmation dialog appears containing the status of the import of users.
For more information on assigning license types through a CSV file, refer to the User License Management article.
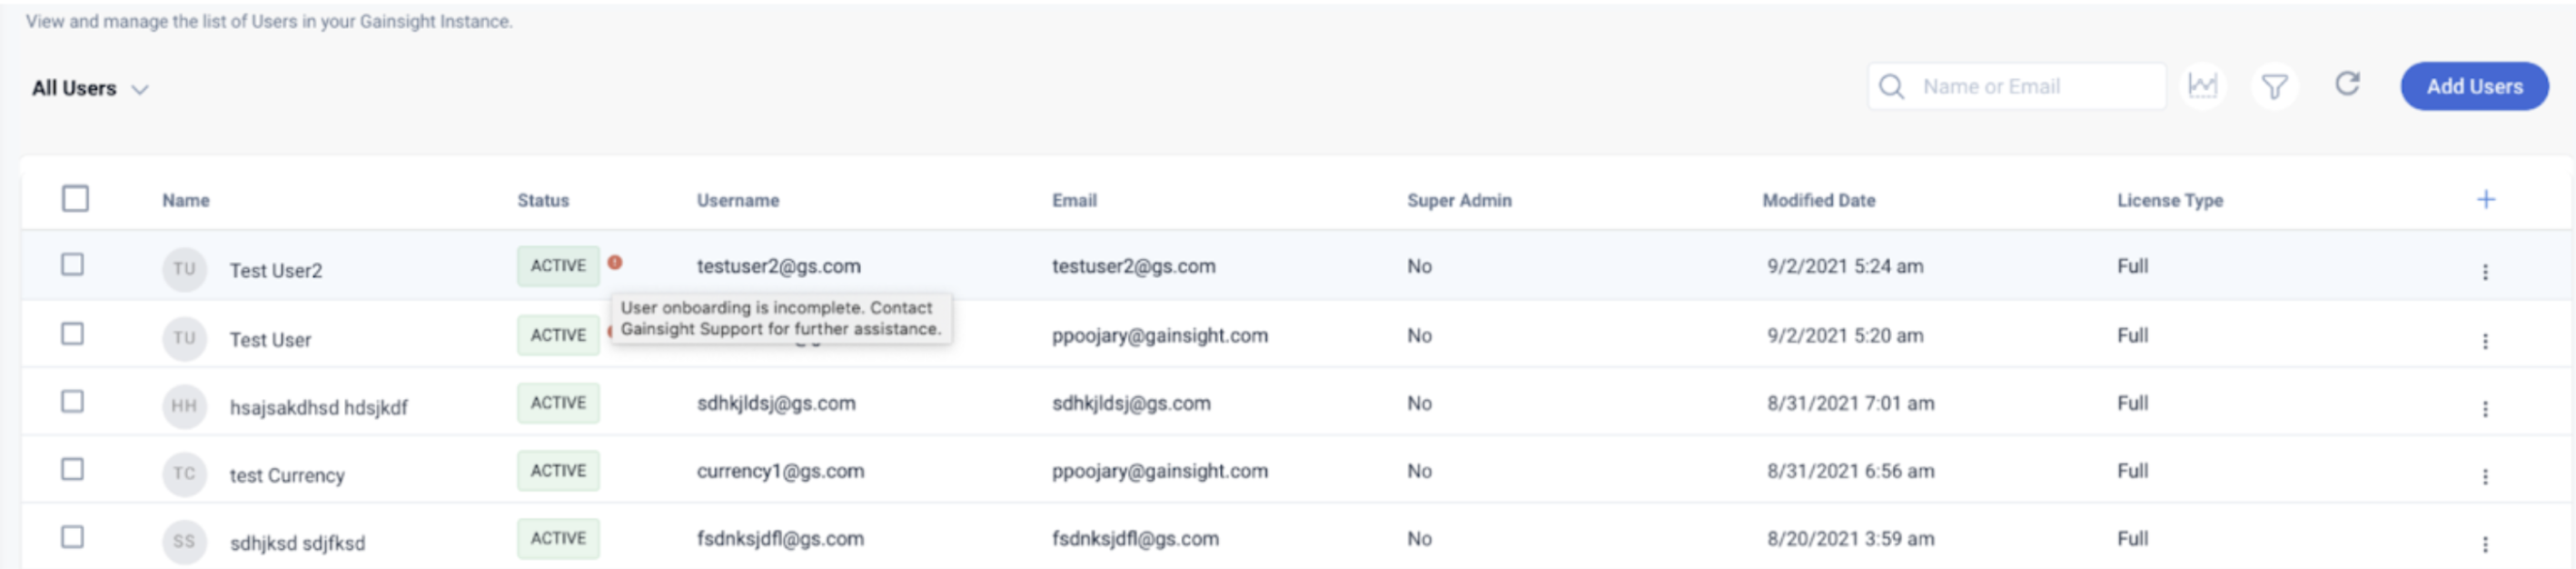
Note:
When a user does not complete the onboarding process, a warning icon is displayed that indicates either of the following errors:
-
No license is assigned to the user. This scenario happens during a bulk license change operation from Internal Collaborator or Inactive Users to a Paid license. Admins can re-assign the license to that user to complete the onboarding process.
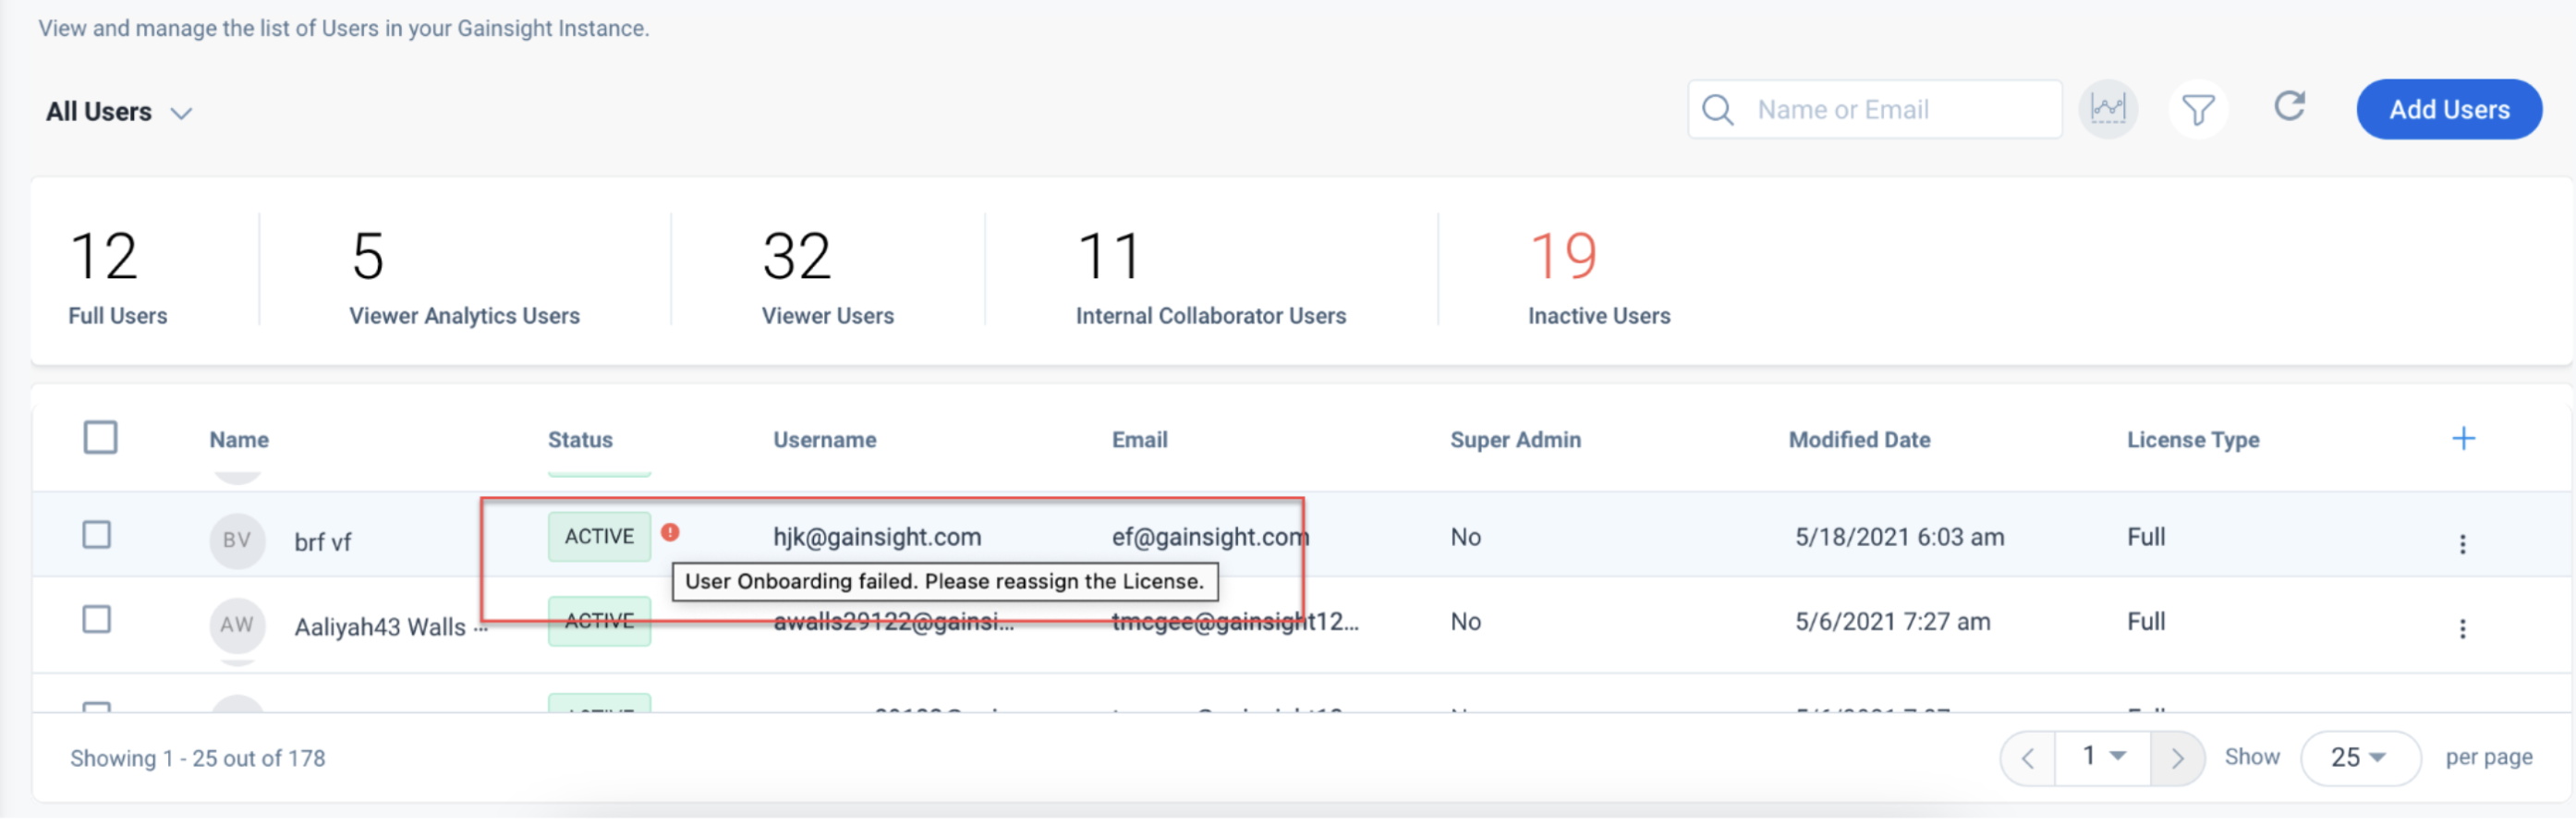
- When the username format is incorrect in the CSV file. Admins can change the username and reassign the license to complete the onboarding process.

-
When a user did not complete or did not start onboarding due to a technical error. Admins can contact Gainsight Support for further assistance.
Add User(s) from External Systems
Admins can add users from Salesforce, Slack, and Gong using this functionality in User Management page.
IMPORTANT:
- When users are pulled from the external systems, all active users are assigned an Internal Collaborator license. Inactive users pulled from all the External Systems (Salesforce, Dynamics, Zendesk, and Hubspot) are not assigned a license and are stored as inactive users in Gainsight.
- Inactive users from Slack are not synced into Gainsight.
- Currently, Gainsight supports adding users only from Salesforce and Slack.
To add users from external systems:
- Navigate to Administration > Users and Permission > User Management.
- Click Add Users and select Add User from External Systems.

- Select the type of connection from the Connection Type dropdown list.
- Select a connection in the Connection dropdown list. The users are automatically loaded in the right panel.
- (Optional) Click Load Users. This operation takes some time to load all users from the selected external system.
- Click Confirm. Confirmation dialog box is displayed.
- Click Done. The selected users are added to the avatar list.
Conflict
When you sync users from external systems, If more than one users are already added in Gainsight with the same email ID, Gainsight will display a Conflict button in the Status column. To resolve the conflict for the user, admins must select one of the existing users (with same email ID) in Gainsight whom they want to map the user.
To resolve conflict for the user:
- Click Conflict. Suggested User popup window is displayed.
- Select the existing user to map the user with the same email ID.
- Click Save.
Add Partner Users in Gainsight
Admins can add users to Gainsight manually, and through CSV file.
Add Users Manually
Admins can add partner users to Gainsight manually. To add a partner user to the Gainsight User object:
- Navigate to Administration > Users and Permission > User Management.
- Click Add Users and select Add User Manually.
- Enter the following information as explained in the following table:
Fields Mandatory Description First Name Yes First name of the user Last Name Yes Last name of the user User Name Yes Enter a unique User Name in the format of an email ID. For example, example@mail.com Email ID Yes Registered Email ID Time Zone No Users time zone Locale No Preferred Language
Note: If Admins do not configure a user's locale, data in the user's org will be formatted based on the tenant level locale setting by default. Admins can configure this setting under Application Settings. For more information, refer to the Application Settings article.Title No Preferred Work Title Send Welcome Email No Sends a welcome email to the user. Partner Yes Select Yes or No Partner Company Name Yes Search and add the partner company name Custom Field's External ID No External ID of the Custom field
If the user is selected as Partner, the below fields are set to default and are not editable.
Fields Description Manager Reporting Manager Super Admin Set to False License Type Set to Full License Permission Permission Bundle is assigned in Partner Permission Bundle. - (Optional) Fill any Custom fields.
- Click Save.
Notes:
- The License Type is set to default as Full License.
- The Permission Bundles can be assigned in Partner Management.
- The Partner Users cannot be added to the Company Teams.
- The Partner users cannot be added using user sync, and external systems.
- The Summary ribbon shows the count of Full License users, including the Partner users.
For more information on how to add Permission Bundles for Partner Users, refer to the Partner Permission Bundle article.
Add Users from CSV
While adding users through a CSV file, licenses are assigned to users in the Gainsight application based on the criteria mentioned in the License type field of CSV.
Note: Only Full License type can be assigned to Partner users.
To add users from CSV:
- Navigate to Administration > Users and Permission > User Management.
- Click Add Users and select Add User from CSV.
- In the Upload CSV, drag and drop or click browse file to upload from your local machine.
Notes:- The file format should be in .csv format. A sample document is also available to view the required fields.
- Admins can add all the fields available in the User object in the CSV file. The sample CSV file only contains fields such as Username, First Name, Last Name, Email, Active, and License Type.
- Username, First Name, Last Name and Email are mandatory fields for creating Users and must be present in the CSV file for adding Users.
- Click Continue. The Field Mapping Page is displayed.

- In Field Mapping, all the standard Source and Target fields are mapped by default. Admins must map the target custom fields, if any.
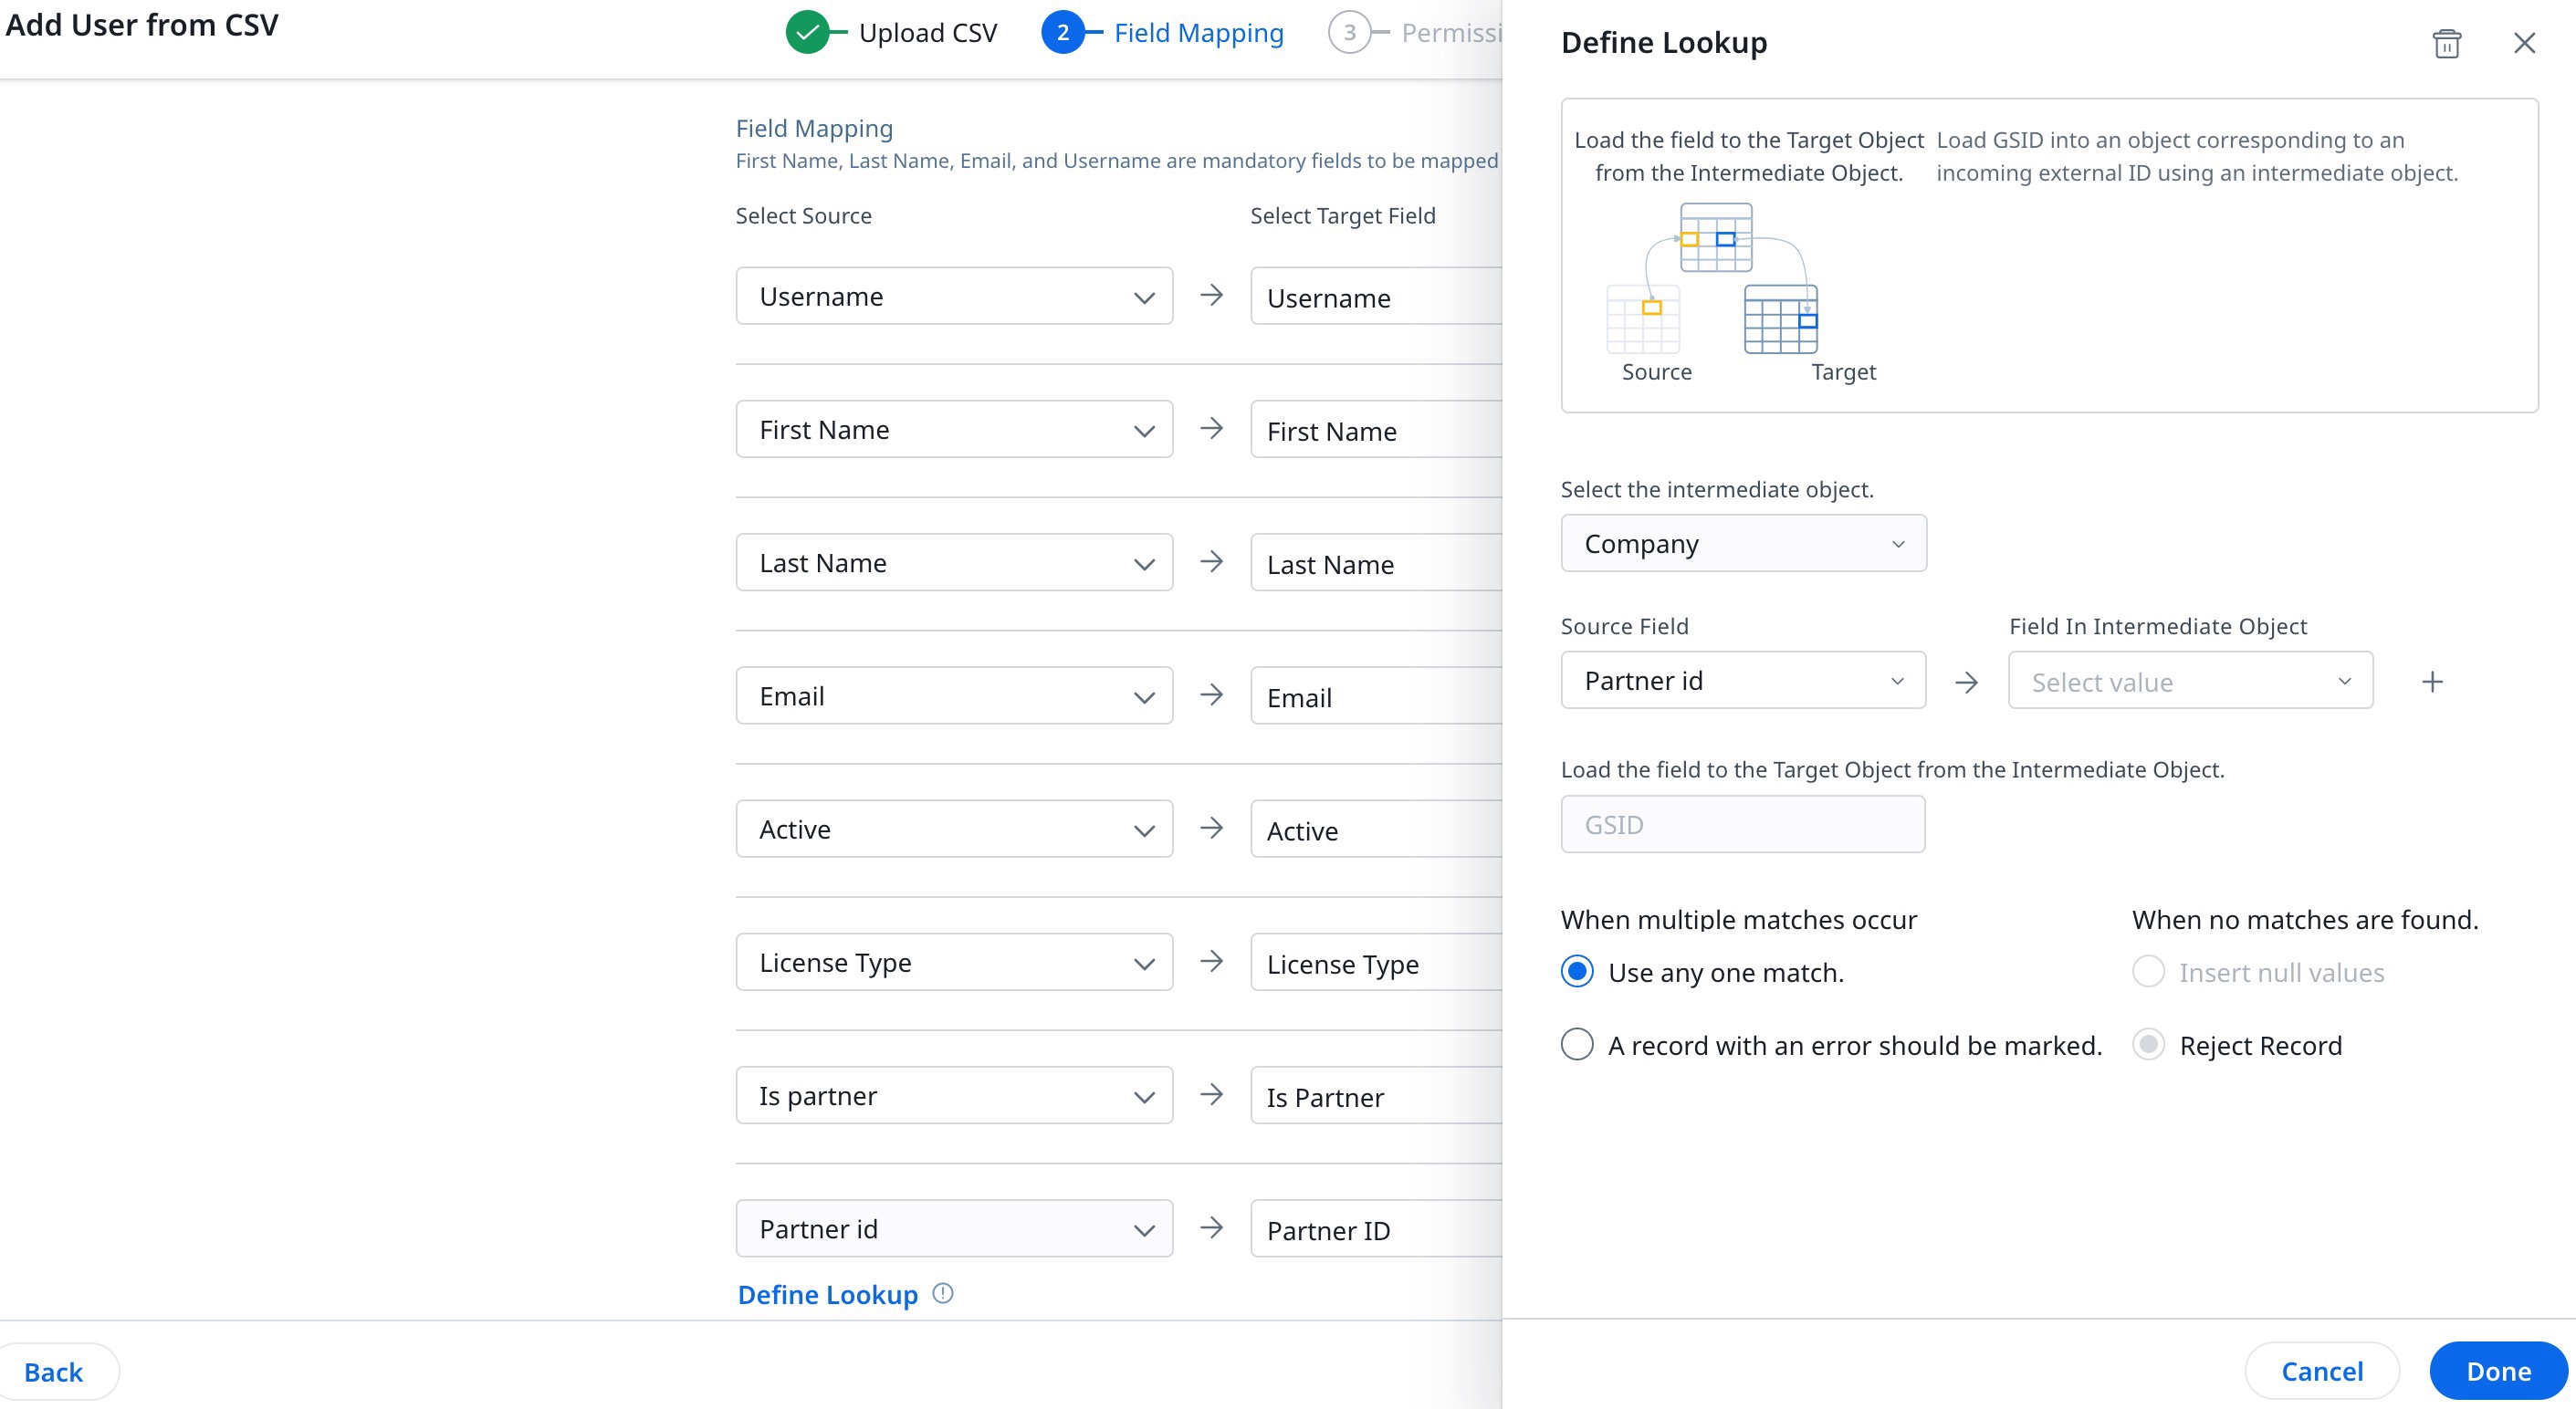
Note: If the Partner ID is not defined in the CSV file, then click Define Lookup to map the Partner IDs. For more information refer to the Define Lookup section in this article. - Click Continue.
- In Permission Mapping, select the users to assign Permission Bundles.
- Select Send Welcome Email.
- Click Confirm in the Permission Mapping. A confirmation dialog appears containing the status of the import of users.
Define Lookup
To map Partner IDs not defined in the CSV file:
- Click Define Lookup. The Define Lookup slide-out panel appears.
- Map the Source Field to the Field In Intermediate Object.
- Select either of the options for When multiple matches occur:
- Use any one match
- A record with an error should be marked
- Click Done.
- Click Confirm to proceed to Permission Mapping.
Notes:
- The License Type is set to default as Full License.
- The Permission Bundles can be assigned only in Partner Management.
- The Partner Users cannot be added to the Company Teams.
- The Partner users cannot be added using user sync, and external systems.
- The Summary ribbon shows the count of Full License users, including the Partner users.
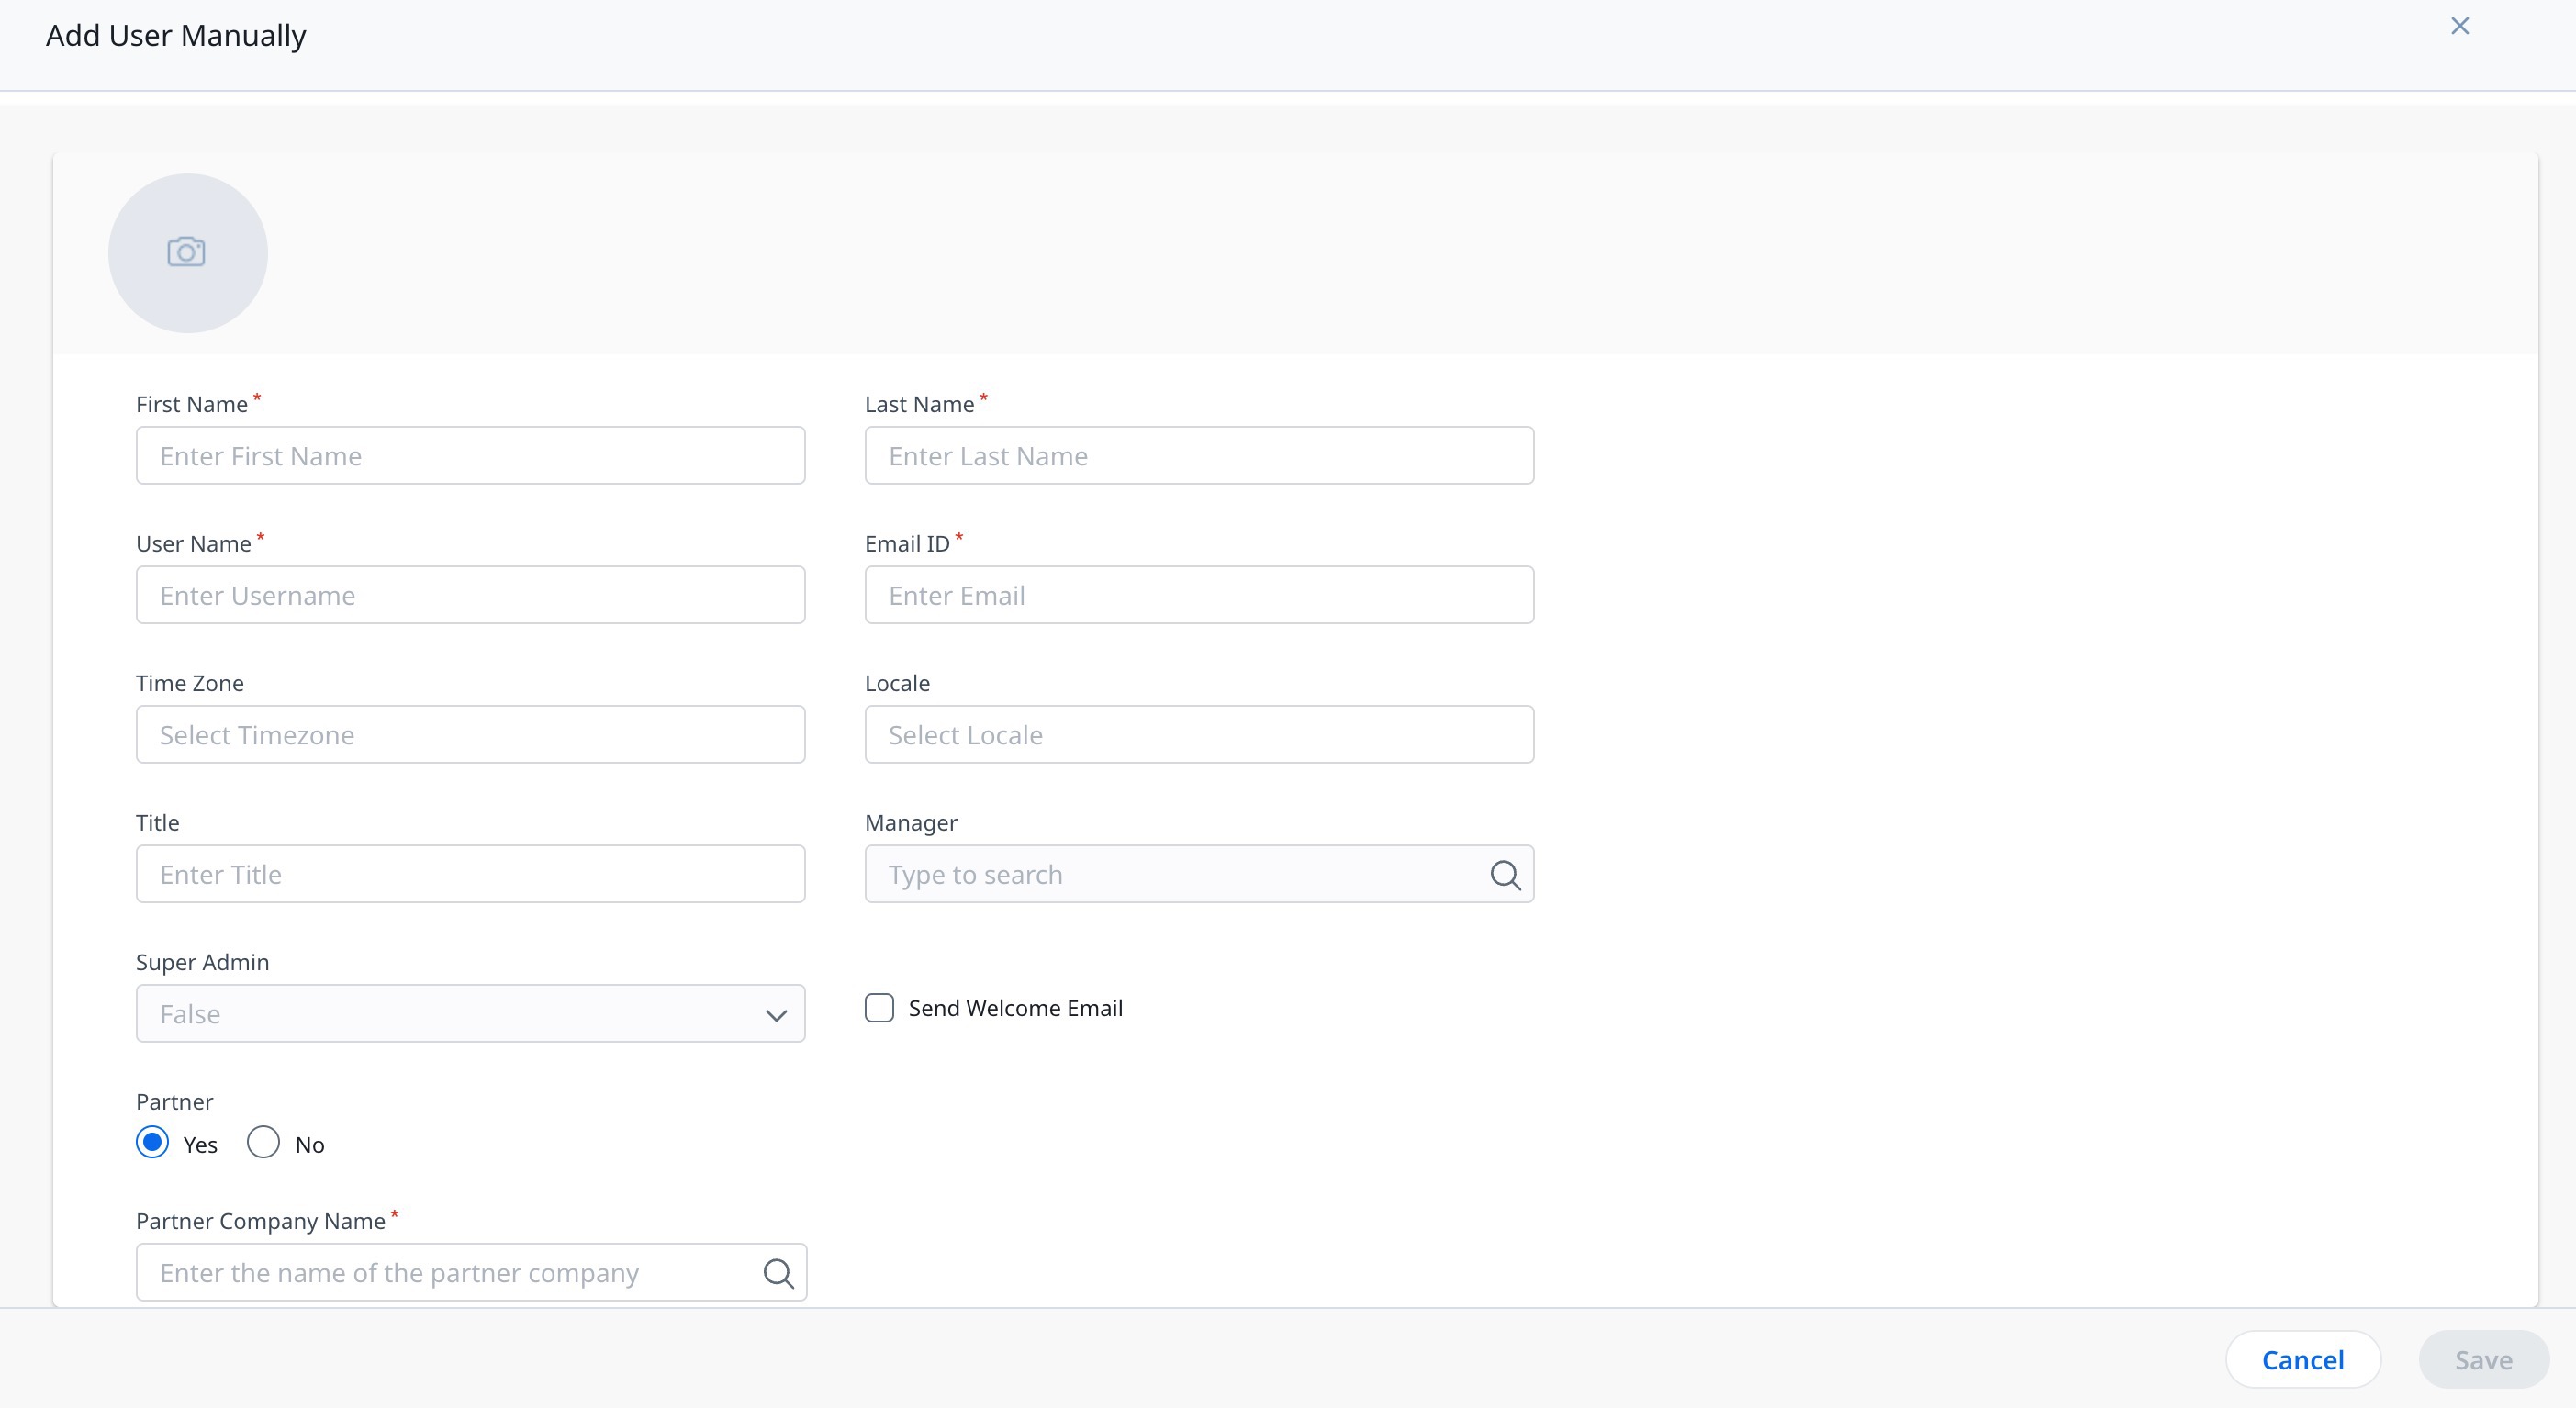
Add or Replace Profile Picture
To add or replace profile picture to a user:
- Navigate to the Administration > Users and Permissions > User Management.
- Click the three dots menu of the user and select Edit User.
- Hover over the profile pic and click Update Profile Picture.
- Drag and drop picture file or click BROWSE FILES to upload file from your machine.
Note: Image should be in the format, either PNG, JPG, or JPEG; image size should not exceed 5 MB. - Locate the portion of the image for display.
- (Optional) Enlarge the image using the scroll bar.
- Click Upload.
Edit User Details
You can either view or edit details of a user in the User detail view page. To edit a user details:
- Navigate to the Administration > Users and Permissions > User Management.
- Click the three dots menu of the user and select Edit User.
- In the User Detail page, update the user details as required.
- Click Update.
Note: Users can view the following additional information in the User Detail page:
- Connections: View different connections through which the current user is integrated with Gainsight NXT, for example: Connection 1 from type Slack, Connection A from type Salesforce, etc.
- Login History: View the following Login details of the current user to Gainsight NXT, by clicking View Login History:
- Source: Displays the name of the source application.
- Login Time: Displays the date and time of login.
- Status: Displays status (Success or Failure) of login attempt.
- Source IP: Displays the IP address of the source system.
- Login Type: Displays the authentication type used for login such as Username/Password (DB Login) or SAML Login, or Google Apps.
- Browser/OS: Displays the name of the browser and Operating System (OS)
Notes:
- Admins can create a report on User Login History to see the login platforms for Gainsight NXT (through Direct Gainsight login, Salesforce login, and Mobile) and login attempt status (success or failure) for each user. For more information on how to build reports on the Gainsight objects, refer to the How to Build Basic Reports article.
- For the first login, an entry is added to the user Login History page. A session timeout of 24 hours is set by default. If a user is idle for more than 24 hours, another entry is recorded. However, if the user remains active, with an activity every 6 hours, no additional entries are made, as the idle timer is refreshed with each activity.
- For the list of fields in the User Login History object and their descriptions, refer to the Gainsight Object Glossary article.
Options in the Users List
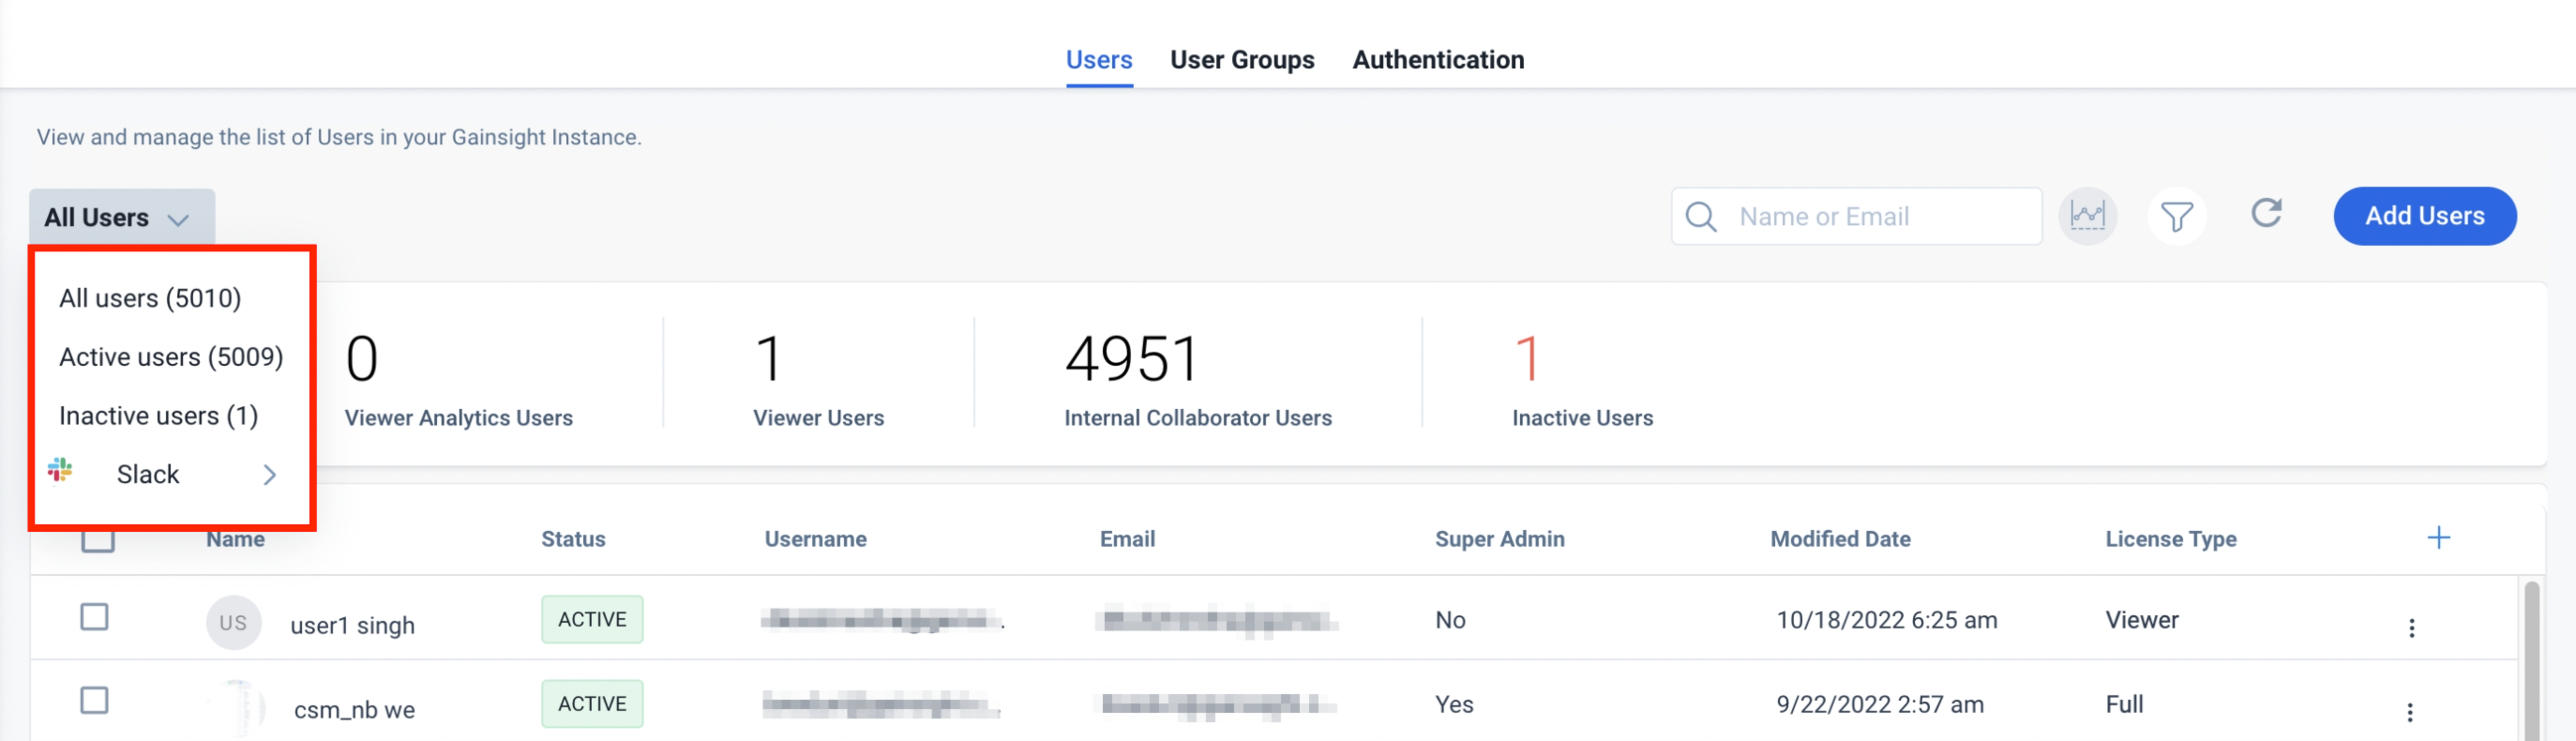
Admins can select to view a set of specific users by using All users dropdown menu. You can view the following types of users:
- All users
- Active users
- Inactive users
- Users specific to External Connection Type (Ex: Slack) > Connection. This filters and loads all of the users which are ingested from a specific Connection Type > Connection.
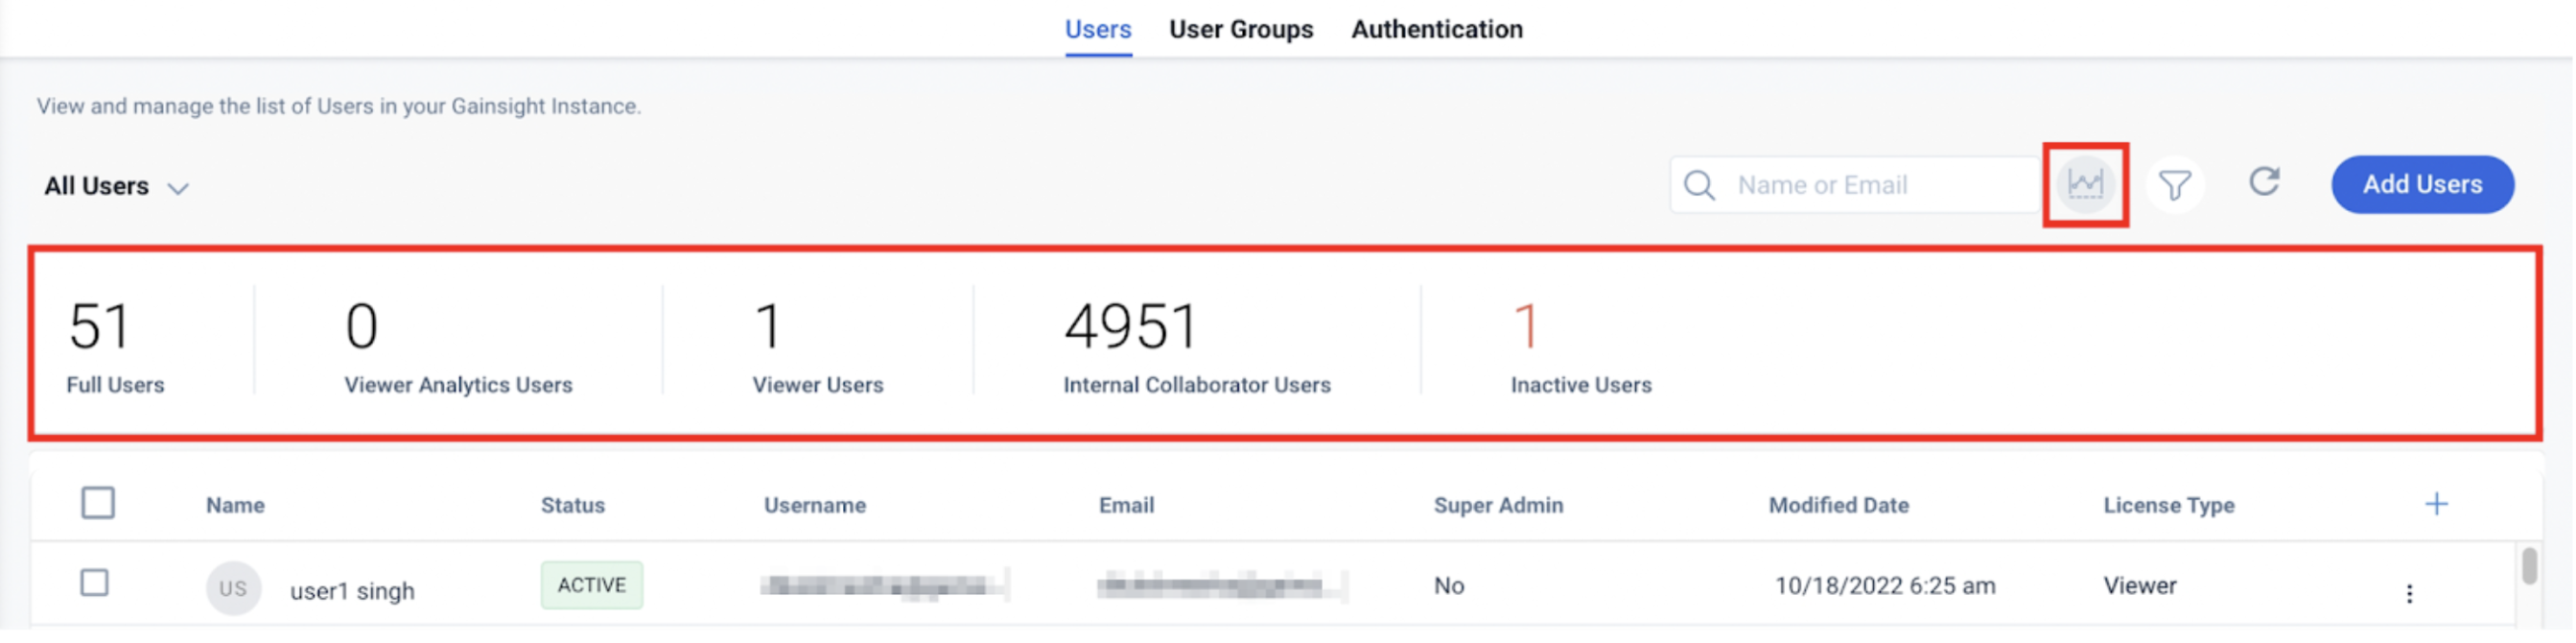
Stats Button
Stats button is enabled by default in the User Management Page. It displays the number of users for each license type (Full/Viewer/Internal Collaborator/Viewer Analytics) and number of inactive users in your org.
Note: Any users in the system with email containing ‘gainsight.com’ will not be counted as licensed users (Full/Viewer/Viewer Analytics).
Grant Sally Access for Microsoft Teams
Enable Sally access for users loaded from a specific MS Teams connection:
- Select MS Teams type and the required connection from the dropdown in the top left of the page.
- Select the required users.
- Click on the context menu and select Enable Sally Access.
Grant Sally Access for Slack
Enable Sally access for users loaded from a specific Slack connection:
- Select Slack type and the required connection from the dropdown in the top left of the page.
- Select the required users.
- Click on the context menu and select Enable Sally Access.
Context Menu of User
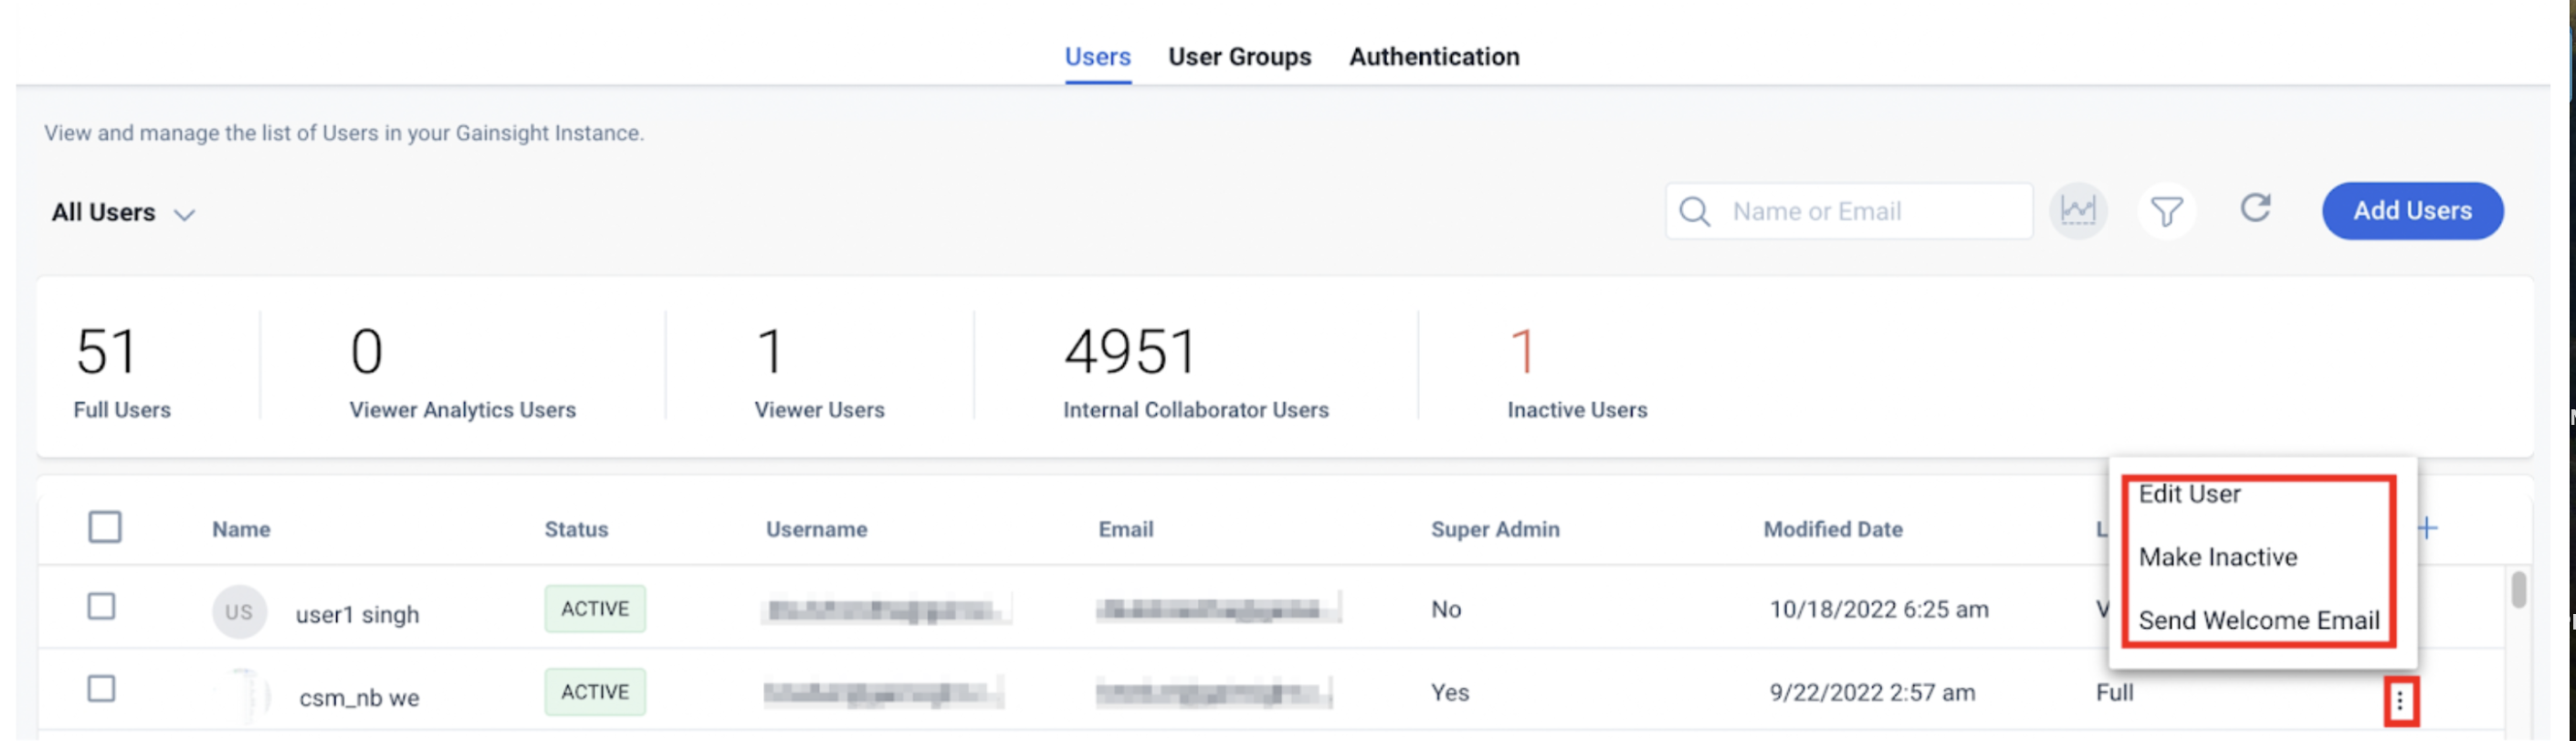
In the User Management page, click the three dots menu to perform the following actions:
| UI Functionality | Description |
|---|---|
| Edit User | Edit the user information. |
| Make Inactive |
Option to make the user inactive. Note: User status is available in the first column as either Active/Inactive. |
| Send Welcome Email | Send a welcome email to the user. |
Advance Filters
Filter option enables users to add Filters which appears below the stats section. For example, admins can filter the users based on their status (active/inactive) and/or license type.
To apply advanced filters:
- Click the Add filters icon in the User Management page.
- Click A to add more filters. Advanced Filter popup is displayed.
- Click + to add filter.
- In the Field, select an option from the user object. (For example, License Type)
Note: Click below Search and enter name of the field to find and select it.
- In the Operator dropdown list, select an operator. (For example, in)
- In the Value, select a value. (For example, Full)
- (Optional) Add or edit operators like AND and OR between the filters while applying the filters.
- Click APPLY. Applying filters will fetch the users list as per the added filter criteria.
Search Box
You can enter the value of a Name or Email in the search box. When searching a user using the Search box, the search is applied on all of the user records instead of just the filtered records. You can apply filters on the fetched user list using the Search box.

Select All Users
Admins can select multiple users at once in their tenant and perform setup operations. They can filter a set of user accounts and select all to upgrade their configurations. The Select All feature allows an admin to do the following actions for multiple users at the same time:
-
Send welcome emails
-
Activate or deactivate user accounts, and
-
Configure licenses and permissions.
Notes:
-
Admins can select up to 10,000 users to update the configurations and ensure flawless execution.
-
With the Select All feature, a progress bar is displayed if the process takes time based on the large number of operations. The percentage of completion displayed helps you understand the status of jobs.
To select all the users:
-
Select any users in the User Management page.
-
Click the Select All Users. All the users are selected.
- To deselect all the users at a time, click Clear Selection.
Send Welcome Email
You can now send Welcome Email for multiple users at once.
To send welcome email to users:
- Select the required users in the User Management page.
- Click Send Welcome Email. A confirmation dialog is displayed.
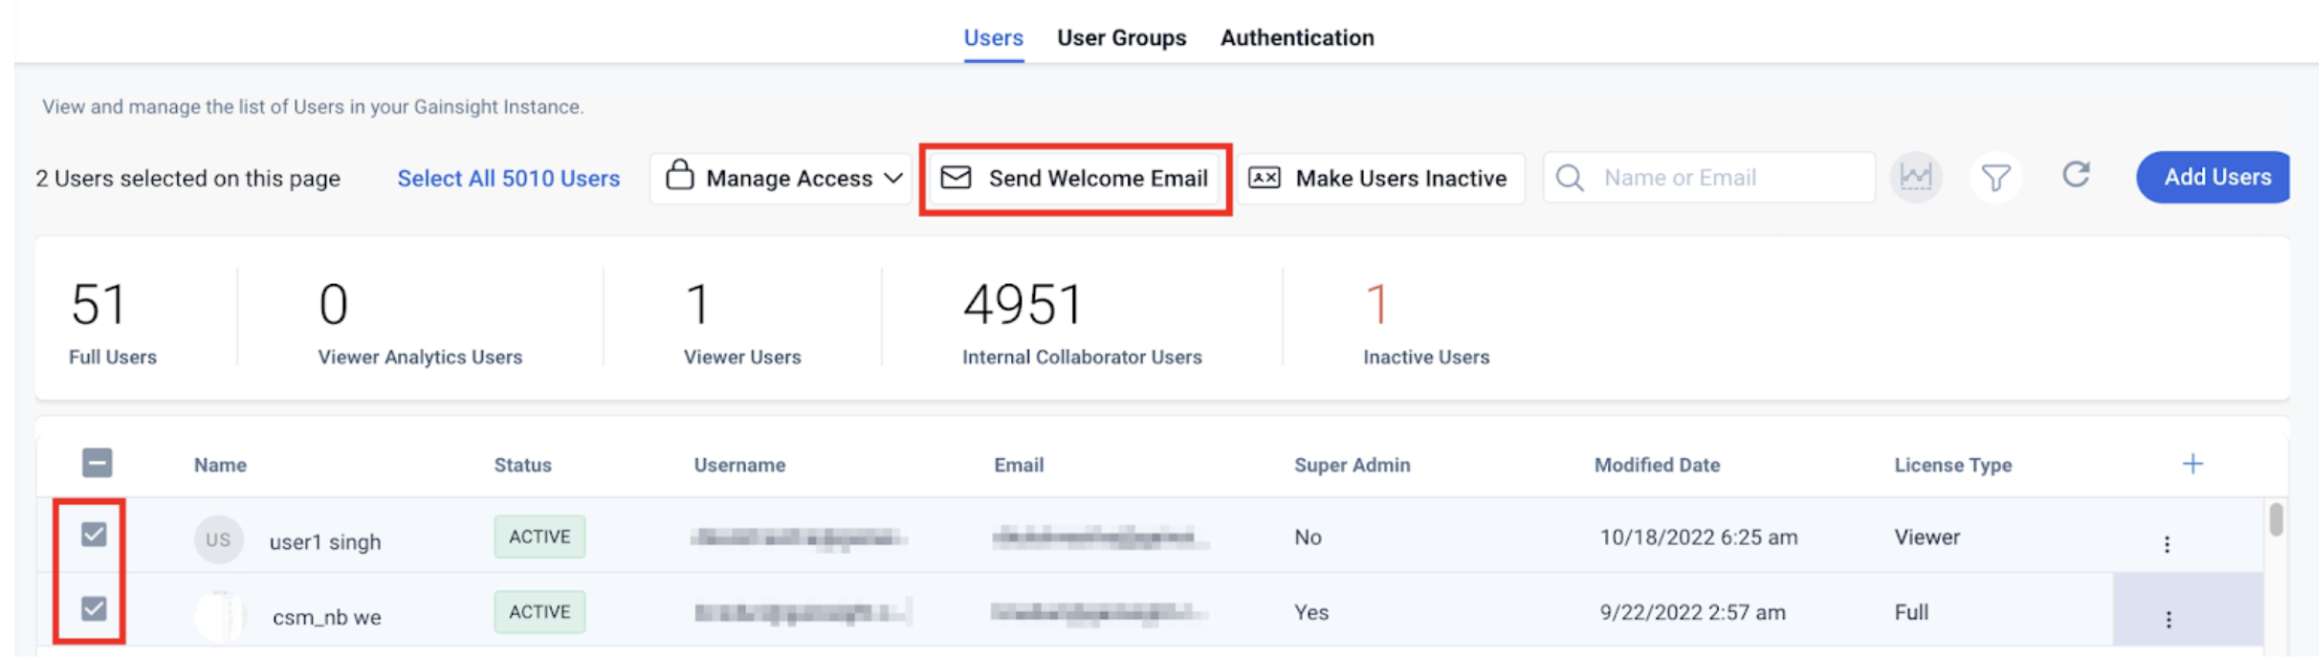
- Click Yes.
.png?revision=1)
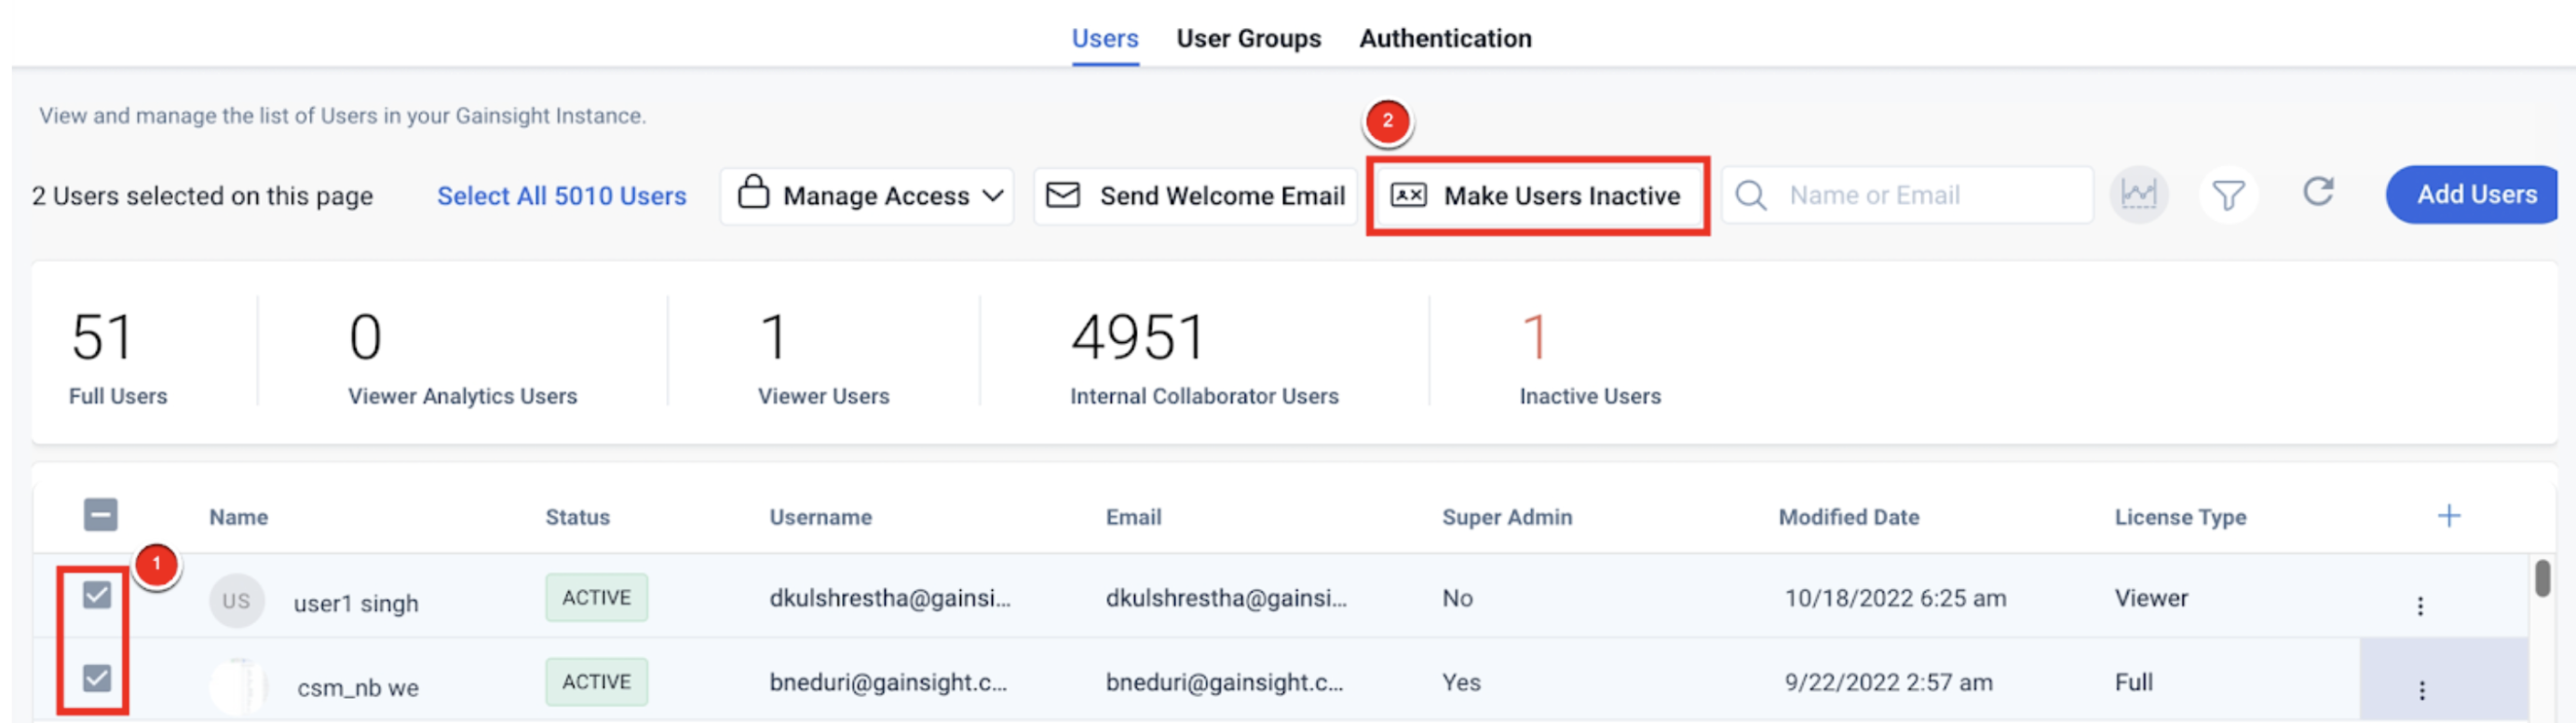
Make Users Inactive or Remove License
Admins can make users inactive to remove their assigned licenses from the User Management page. Once users are inactive, the assigned license type is removed. To make the users active again, admins must edit the user details and assign licenses to the users from the User Detail page.
Note: When an Inactive user or Internal Collaborator is changed to paid license (Full or Viewer), then an intermediate status called Pending is displayed in Status, before they are turned into paid license user.
To make a user inactive:
- Select the required users in the User Management page.
- Click Make Users Inactive. The selected users are inactive and their licenses are removed.
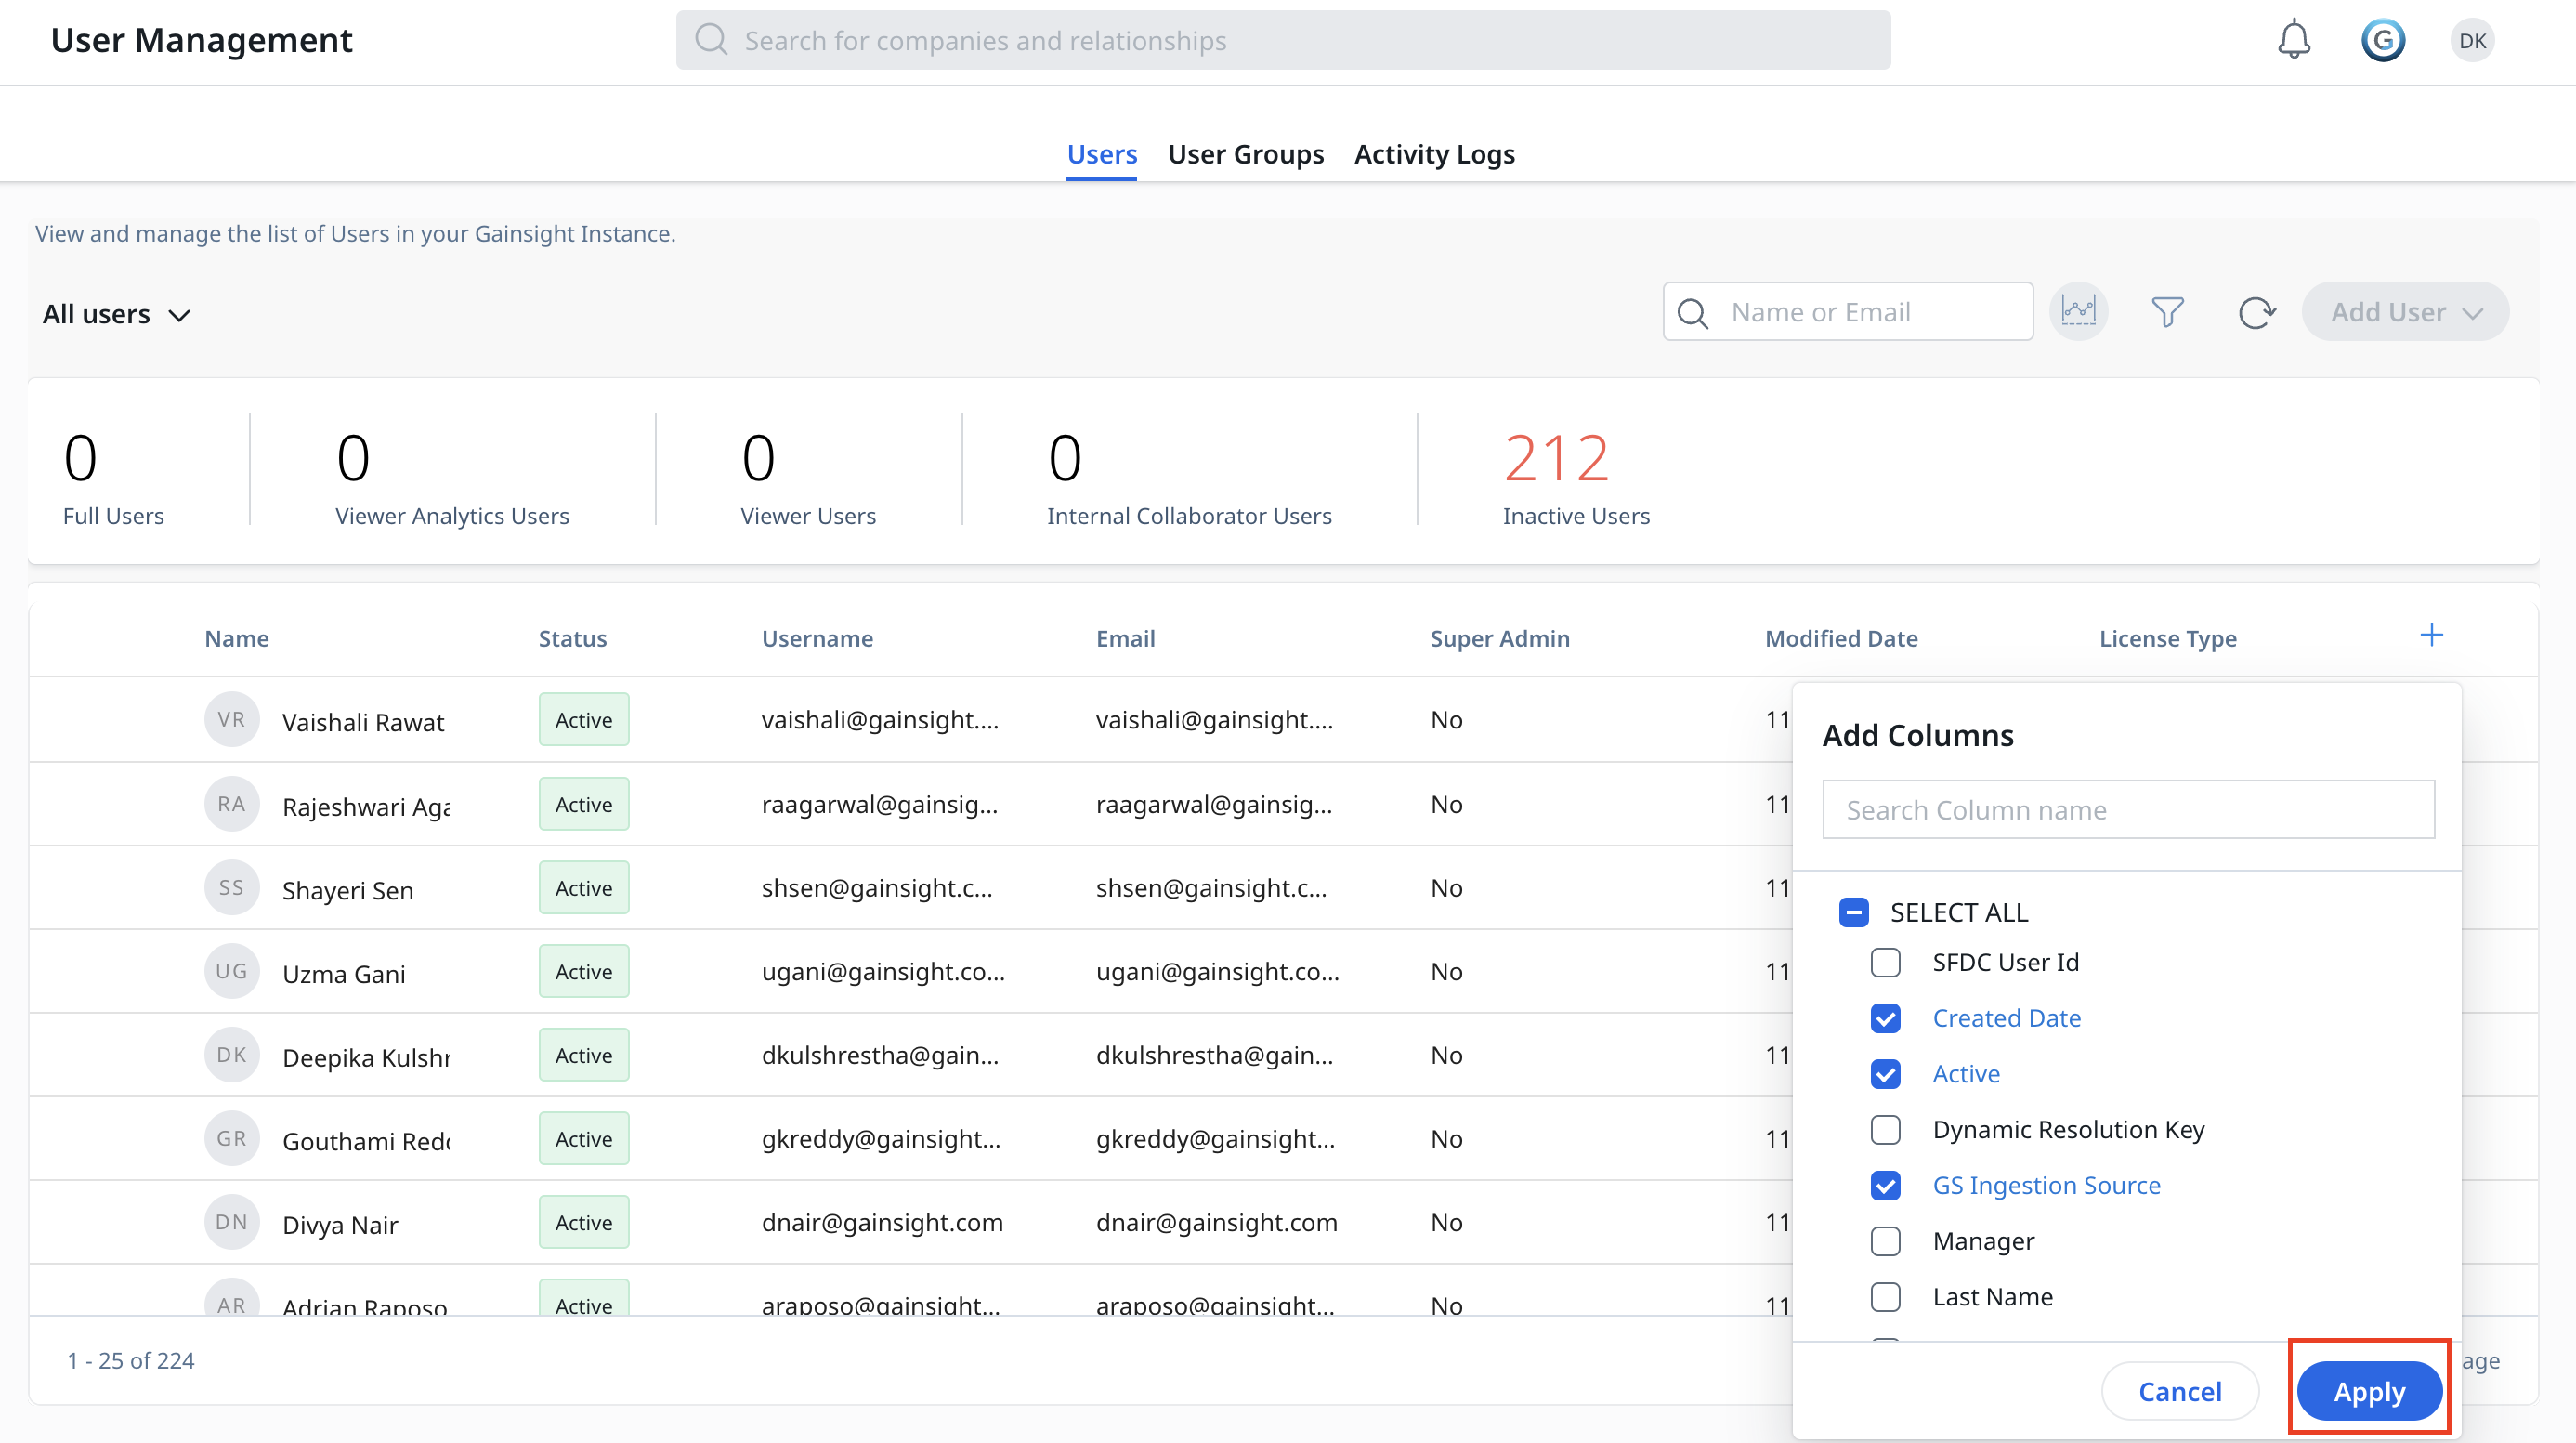
Add Fields/Columns
Admins can add columns or fields to view more user details in the User Management page.
To add columns or fields in the user list:
- Click + to display the Add Columns pop-up window.
- Select the desired filters.
- Click Apply.
Admin Settings for Login Preference to Gainsight NXT to see Notifications
Admins can set login preference to Gainsight NXT to see Gainsight Notifications received through an Email. This is applicable only to the Gainsight NXT customers connected through Salesforce Connector. Gainsight NXT can be accessed either through Direct Gainsight Login or Salesforce Login. Earlier, the access preference to Gainsight for Email Notifications was not stable and is well defined now. Below are the two types of login preferences for Email notifications:
-
Enable preferred Notification-NXT: When users click any hyperlink in the email notification, the system will redirect them to access Gainsight NXT through Direct Gainsight Login, where users need to enter their Gainsight login credentials to access the notification details inside the Gainsight application.
- Enable preferred Notification-SFDC: When users click any hyperlink in the email notification, the system will redirect them to access Gainsight NXT through Salesforce Login, where users need to enter their Salesforce login credentials to access the notification details inside the Gainsight application.
Gainsight email notifications notify users that a new CTA was assigned to them, they were mentioned in an Activity, a Success Plan was assigned to them, they received Survey Responses, etc.
Also, users can set their preference to access Gainsight NXT for email notifications from the My Settings > Notifications > Channel Subscriptions page.
Note: If a user is synced via Salesforce connector (and had a SFDC avatar) then the default configuration for notifications is set to Salesforce. If a user is added via any other way then configuration for notifications is set to NXT.
To set the login preference to Gainsight NXT to see Gainsight notifications received through Email:
- Navigate to Administration > User Management.
- Select Salesforce from the Users dropdown menu and select the required Salesforce Connection.
- Select the required users. You can see that the Context menu is enabled.
- Select one of the following options from the Context menu:
- Enable preferred Notification-NXT
- Enable preferred Notification-SFDC
- Click Yes to confirm the notification preference.

User Settings for Preferred Notification
To set the login preference to Gainsight NXT to see Gainsight notifications received through Email:
- Navigate to My Profile > My Settings > Notifications > Channel Subscriptions.
-
Select either Gainsight NXT or Salesforce in the ‘Allow me to view my notifications on’ field.
-
Click SAVE.
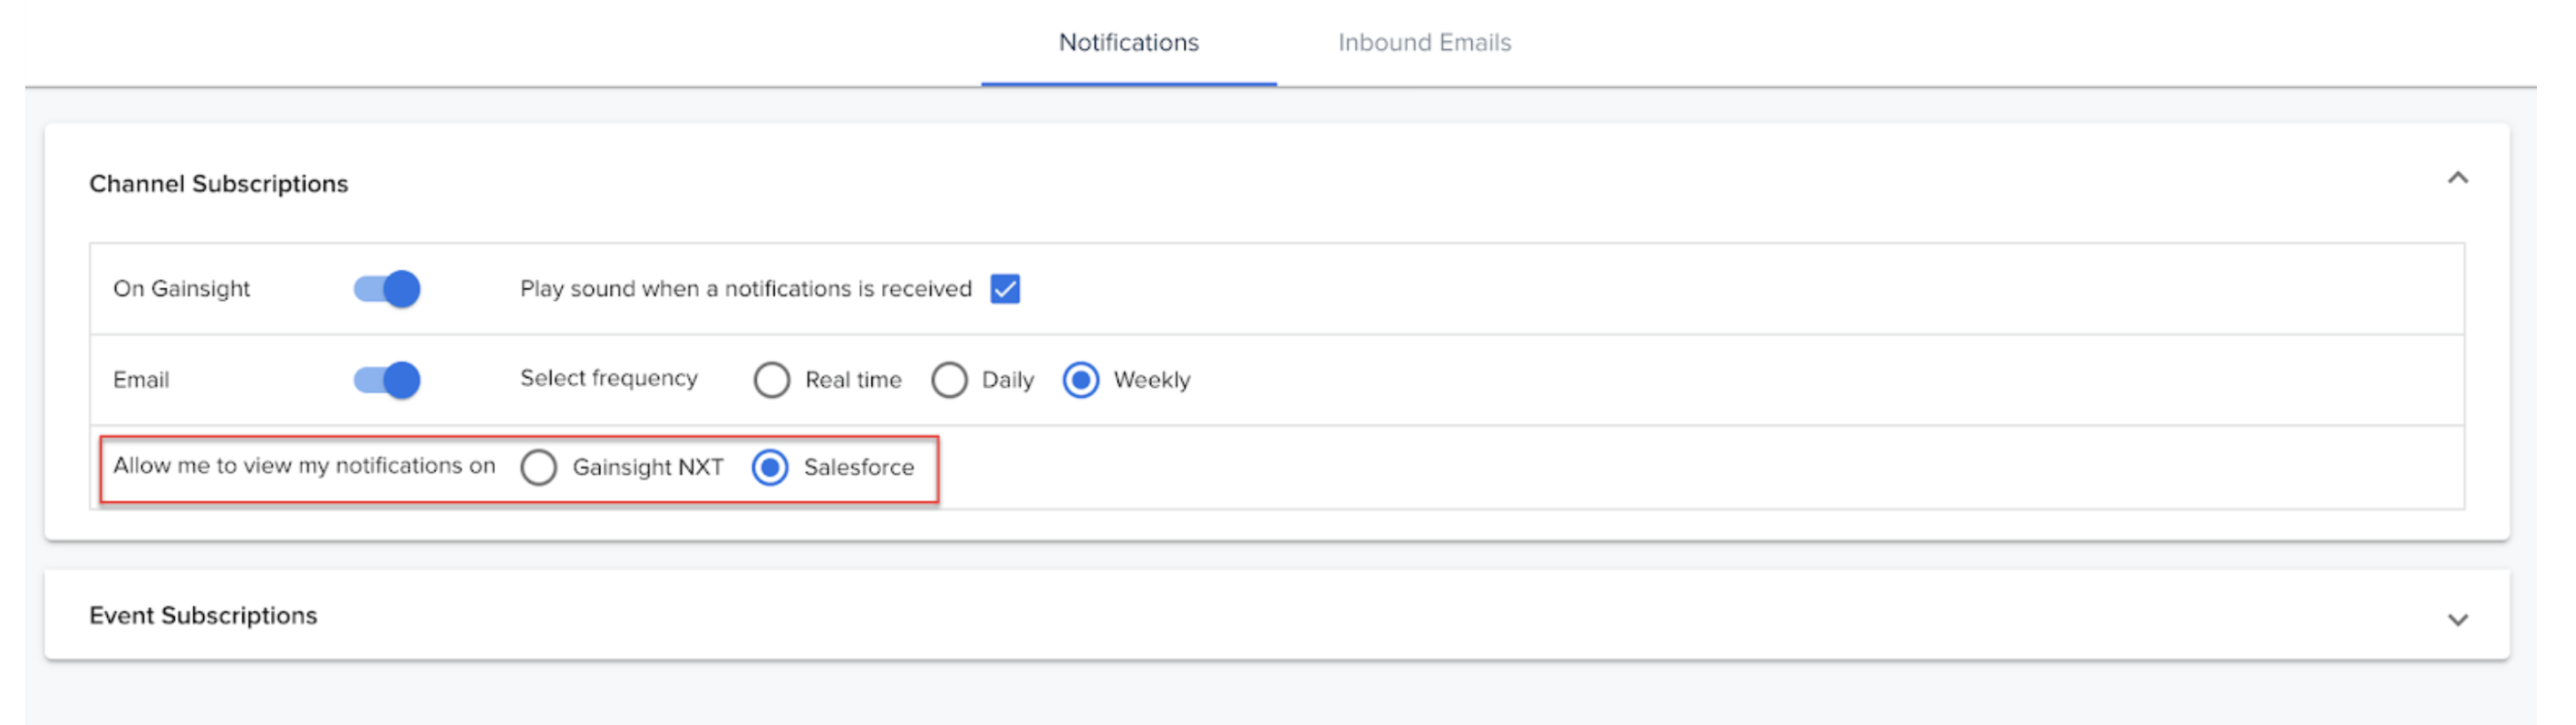
The user setting is visible only in the Gainsight NXT application accessed through Salesforce Login. This option is not visible in Gainsight NXT accessed through Direct Gainsight Login, considering the user Notification preference is NXT.
For more information on the User Notification settings, refer to the Setup User Notifications article.
User License Management
Admins can view and assign user license type in the User Management and User Detail pages of Gainsight application. You can filter the users based on license type, assign license to users in bulk and create reports of the licensed users in a company. For more information, refer to the User License Management and FAQs articles.
Additional Resources
For more information about user management, refer to the following articles: