Release Notes Version 5.10 November 2017: Incremental Improvements 2
![]() : This symbol indicates that an enhancement originated as a customer suggestion on the Gainsight Community.
: This symbol indicates that an enhancement originated as a customer suggestion on the Gainsight Community.
Activity Timeline
- Dropdown (Picklist) and Date Time fields can be added as custom fields to an activity layout.
Note: Gainsight does not support restricted or multi-select SFDC picklist fields and such fields are not shown in Field Mappings on the Activity sync page.- Navigate to Administration > Activities > General Settings.
- In the Activity Type section, edit an activity type. The Edit Activity Type dialog appears.
- In the Configure Layout section, click + FIELD.
- In the Field type list, select Date Time and provide a label name.
- In the Field type list, select Dropdown and provide a label name.
- Type a category name and select from the list of available suggestions. The dropdown categories are loaded from Administration > Data Management > Dropdown Lists page. You can also create a custom dropdown category and display in the Activity Layout. For more information, see Dropdown List and Multiselect Dropdown List.
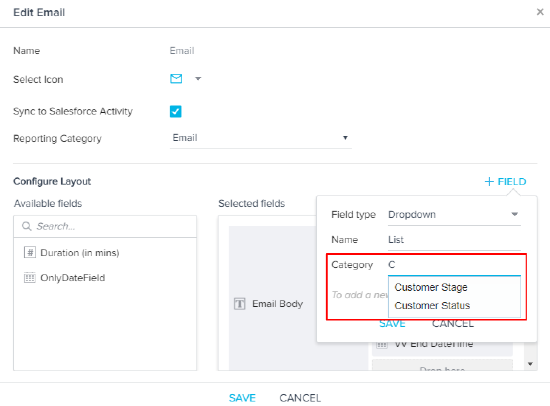
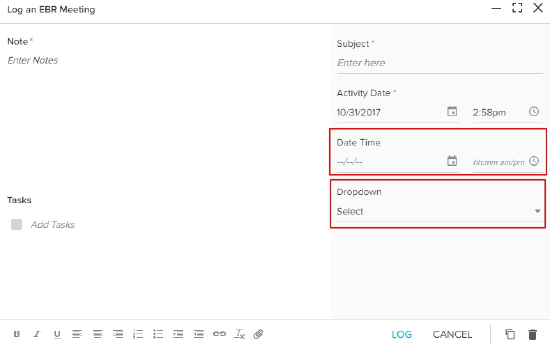
- Click Save. The custom Date Time and Dropdown fields will be added to the activity type. You can see these custom fields while logging an activity. The following activity form shows custom Date Time and Dropdown fields.
- Activities in Timeline can now be synced with Salesforce Events: Admins can either select sync to Salesforce Tasks or Salesforce Events for all activity types in the Administration > Activity Sync page.
- Navigate to Administration > Activities > Activity Sync.
- In the General Settings section, select Salesforce Events. Switching from tasks to events will start syncing the activities to events right away.
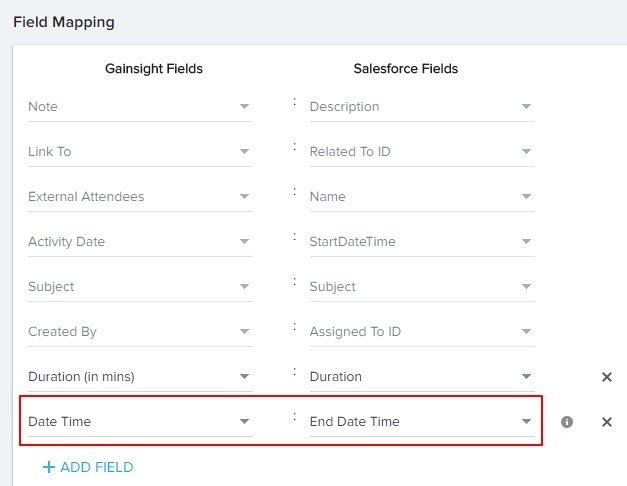
Note: If an activity that was previously synced to Salesforce Events is updated, then that activity will now be synced to Salesforce Tasks. But the frequency of the tasks getting synced will remain same as a minimum of 4 hours and maximum of 24 hours. - While syncing to Salesforce Events, it’s mandatory to map the Date Time field to the End Date-Time field under Salesforce Fields.
- Initiate an immediate manual sync of Timeline Activities: A new option for Admins to initiate an immediate manual sync from Administration > Activity Sync page is provided. Clicking this option will trigger a sync job immediately for all activities to either Salesforce Tasks or Events, per your configuration. Once you click the Start Manual Sync option, the sync progress message appears.
- Ability to report on Activity Timeline notes: Using Report Builder, you can now create a report on the notes created in the Timeline. You can use the Activity Timeline object as the source and add Notes as the Show field to generate the report.

Scorecard 2.0
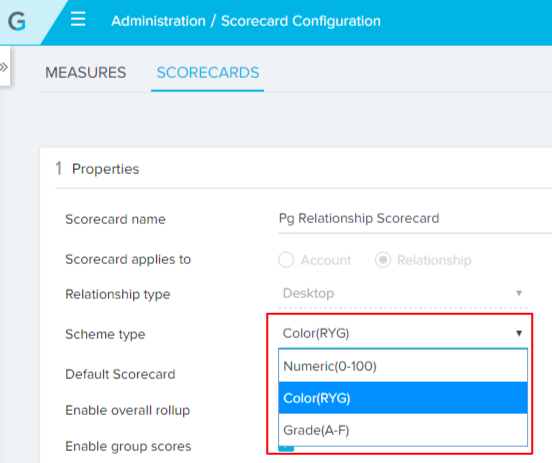
- Change the Scorecard scheme type (Numeric, Color, or Grade): Admins can now change the scorecard Scheme Type after it is created.
- Navigate to Administration > Scorecards 2.0.
- Edit an existing scorecard.
- In the Properties section, select a new scheme type. A background job is triggered which recalculates all of the Measures, Groups, and Overall Scores in all consumption areas (for example, C360/R360 and Set Score in Rules Engine).
- Delete a scheme range from the Scheme Configuration: Admins can now delete and customize scheme ranges. A minimum of two scheme ranges must be present in the Scheme Configuration and cannot be deleted.
Cockpit / Playbooks / Success Plans
- Success Plans can now be shared (as a link) with Contacts & Users:
- Share a plan independently: CSMs can now share read-only Success Plans as a link with an internal user or to external contacts via email. Use this option to share an individual Success Plan. The Success Plan must be configured for sharing by the admin, with optional security settings. In C360 > Success Plan section > Under the three dots, an option is added which enables you to share a Success Plan. Once you click the Share Plan option, the Success Plan Export Configuration pane is displayed.
For information on how to configure a Success Plan for sharing (admin), see the Configure Success Plan for Sharing article.
For information on how to share the Success Plan (CSM/User), see the Share Success Plan article.
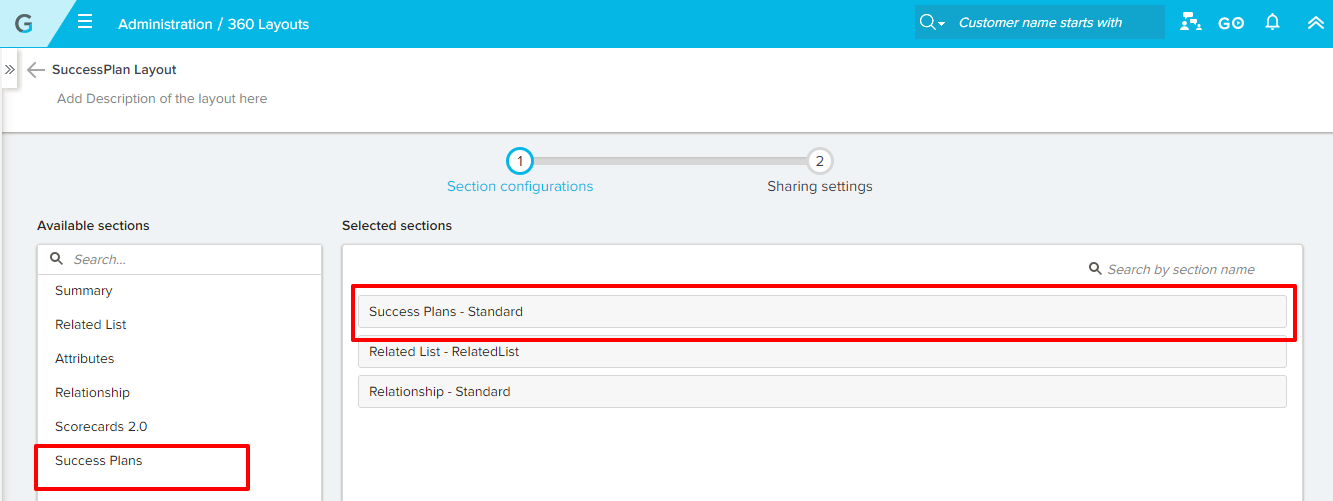
- Share a plan as a section in External 360: A Success Plan section can now be added in External 360 as well. Use this option to share multiple Success Plans at a time. See the Configure Shared 360 article for more information.
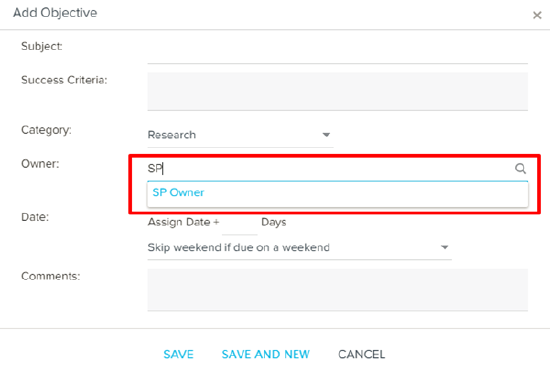
- Success Plan owner can now be added as a token in the (Objective) Owner field in the Success Plan template: Admins can now add the Success Plan Owner (SP Owner) by searching for the dynamic objective owner in the Success Plan template.
- Navigate to Administration > Workflow > Success Plans > Success Plan Template.
- Click +OBJECTIVE.
In the Owner field, you can type in the SP Owner field, and the actual name will be dynamically replaced when the template is applied to a Success Plan.
- The “Description” field label is now editable in Success Plan info: Admins can now edit the Description field label name while configuring a Success Plan.
- Navigate to Administration > Workflow > Success Plans.
- Edit a Success Plan in the Success Plan Type section by clicking the Edit icon.
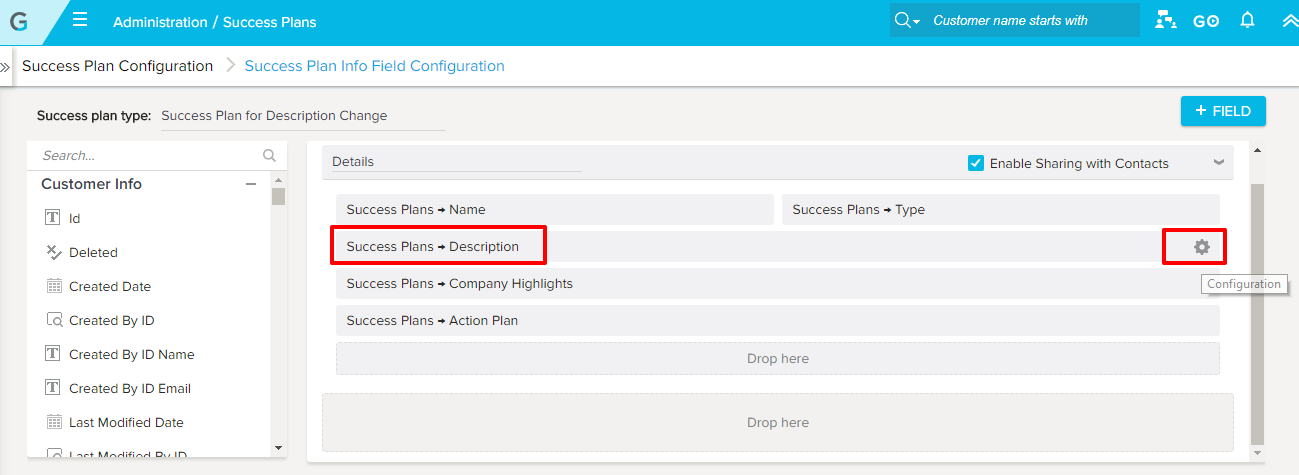
- In the Details section, click the Configuration
icon corresponding to the Success Plan → Description field. The Search Configuration pane is displayed.
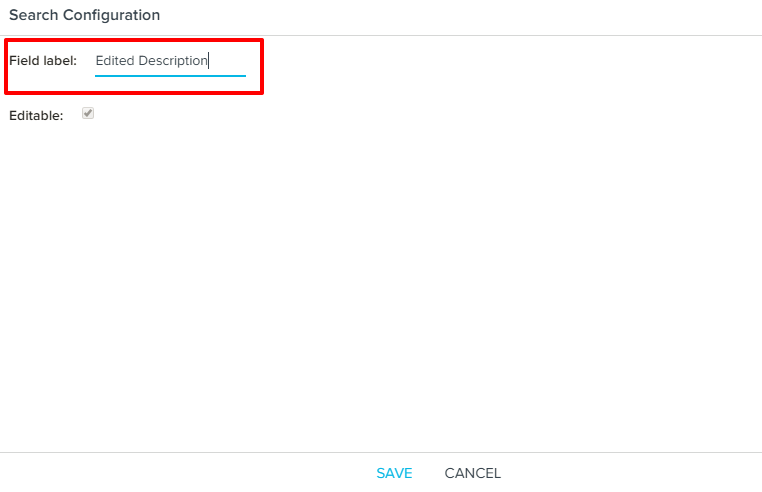
- Enter the new description field label name in the Field label field. Click SAVE.
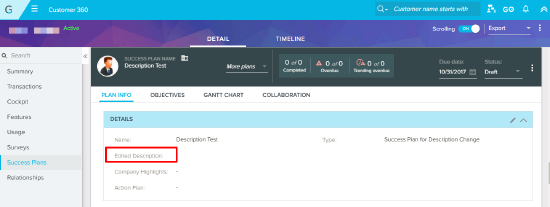
- Navigate to the C360 section where the Success Plan is added. The edited field label for description is displayed.
- Custom fields in Success Plan can now be populated through Bionic Rules: Admins can now add custom fields while configuring a Success Plan through Bionic Rules. While using the “Success Plan” action type to create a Success Plan, you can now add other fields (configured in the Success Plan type layout) and map them to a custom field.
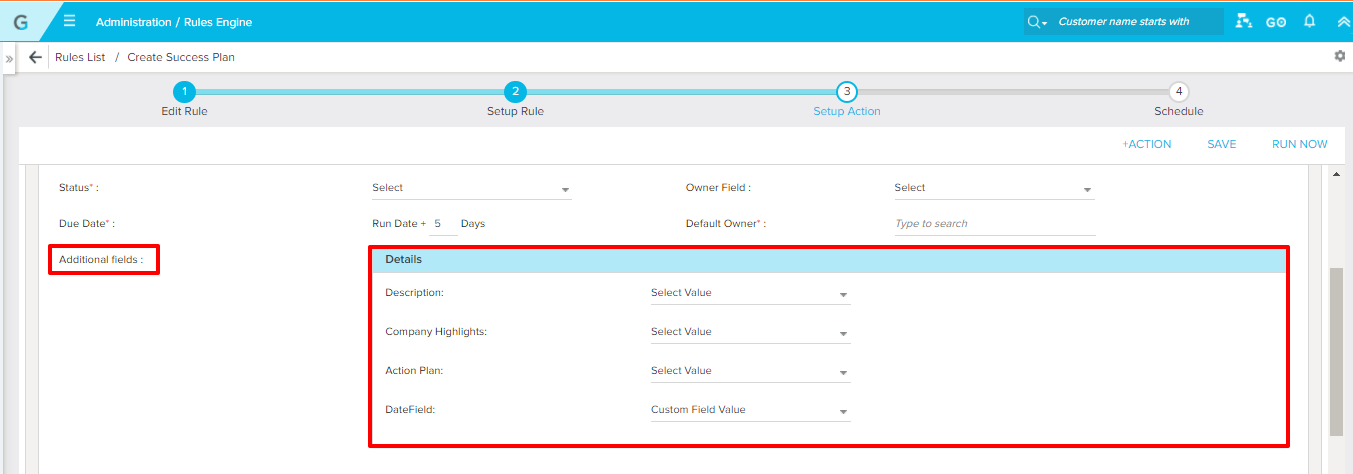
Note: This enhancement is only available in bionic rules and NOT custom rules.
 CTA type limit is increased to 20 per entity/account: Admins can now create a maximum of 20 CTA types per entity. To add a new CTA type, navigate to Administration > Calls to Action > Call to action type and click +TYPE.
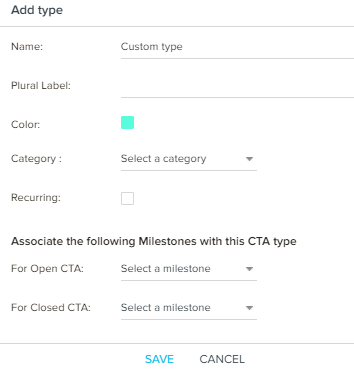
Note: For Global CTAs, you can add 15 CTA types, apart from the five pre-configured Gainsight CTA types.
Reporting
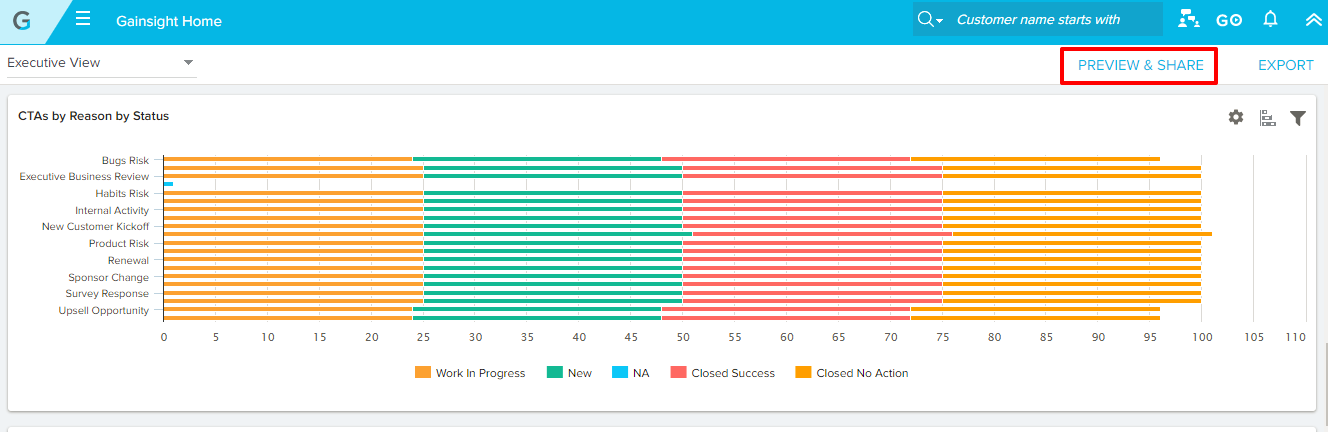
- Gainsight dashboards can now be shared as a link with users: From the Gainsight Home tab, CSMs can now share a dashboard as a link via email with a user. The dashboard link displays dynamic data, rather than static data as in the existing PPT option. After the dashboard is configured for sharing by the admin, the dashboard can then be shared through email as a link, with optional security settings. The recipient must be added as a GS user into the GS User object (in MDA). For example, a CSM could share the Monthly Renewals dashboard with the CRO of the company, which is delivered as a link in an email.
For more information on how a GS user can be added, refer to the Gainsight User Object article. Dashboards can be shared with anyone who is added to the GS User object, regardless of their Gainsight or Salesforce license status. Admins can choose to add an optional One Time Password (OTP) which can be generated a maximum of five times per link, and the end-user can re-try it three times. There are also options to set up an expiration date and allow export of the shared dashboard.
For information on how to configure a dashboard for sharing (admin), see the Configure Dashboard for Sharing article.
For information on how to share the dashboard (CSM/user), see the Share Dashboards article.
CoPilot (Advanced Outreaches)
- Scheduler for Powerlist and Query Builder is available while bringing in participants: You can use the scheduler feature while fetching the participants from Powerlists and Query Builder sources in Advanced Outreach. The Scheduler can be configured on a Daily, Weekly, or Monthly schedule, with a Start Date, End Date, and a Preferred Time to run the query. When the schedule runs, it will run the Power List query for new contacts to be added as participants.
To access scheduler options in Powerlist:- Navigate to CoPilot > Advanced Outreach.
- Create or edit an Adv. Outreach.
- Click + SOURCE.
- Select Powerlist. The Powerlist screen appears.
- Select a powerlist from the list.
- Select Add all the participants in the power list and ensure to include any participant added in the future.
- Schedule the power list as required. The following options are available for scheduling:
- The Daily option allows you to select either every week day, or every day.
- The Weekly option allows you to select which day of the week you would like to run the query.
- The Monthly option allows you to select a specific day within the month to run the query (1st - 31st as well as the Last day of the month). You can also choose to run the query on a timed day of the week such as the 1st Sunday, or 3rd Tuesday of the month.
To access scheduler in Query Builder:
- Navigate to CoPilot > Advanced Outreach.
- Create or edit an Adv. Outreach.
- Click + SOURCE.
- Select Query Builder. The Query Builder screen appears.
- Provide a name for the Query Builder and click Save.
- Click the button labeled SCHEDULE in the top right of the Query Builder configuration page and select the option Add all the participants in the query builder and be sure to include any participant added in the future.
- Preview email steps in Advanced Outreach: For each Email step in an Advanced Outreach, you can preview the email, as well as send a test email to an email address, or use the Send to me option. To access this feature, edit any Email step within an Advanced Outreach.
To preview an email step in Adv. Outreach:- Navigate to CoPilot > Advanced Outreaches.
- Edit or create an Adv. Outreach and add an email step.
- Add participants to the AO model and ensure participants are in Review, New, or Active status.
- Edit the email step in AO model.
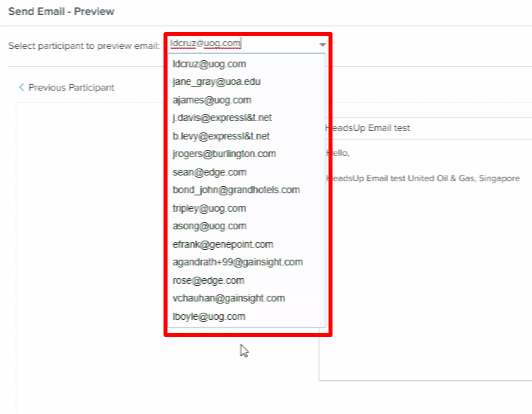
- Click PREVIEW. The Email Preview dialog appears.
- Select a participant from the drop-down list. The email preview changes according to the selected participant and tokens will also be updated.
- You can also use Previous Participant and Next Participant options to view the email preview for each participant.
- Click Send to me to send an email preview to the logged-in user, or click Send test email to and enter an email address to send the email preview.
Notes:
- This option is only available for Advanced Outreaches with participants in Review, New, or Active Status.
- To create an accurate preview email, the participant mapping must be completed correctly. If this mapping is incorrect, the Preview may look incorrect.
- This feature can be used without publishing the Advanced Outreach.
- Participant Activity Feed: Advanced Outreach offers an activity feed view for each participant. The activity feed appears as a flow diagram and displays each step of the participant journey in the Advanced Outreach. This includes when the participant was sent an email, how long the participant waited between each step, the participant responses to a survey, and when the participant was dropped from the AO journey and also the failure reason. You can also use the Refresh feed option on the Activity Feed page to view the latest updates. To learn more about Activity Feed, see Participant Activity Feed.
Note: For Advanced Outreaches created before the 5.10 release, the Participant Activity Feed may not appear correctly.
- Send Shared C360 Layouts through Advanced Outreach: Advanced Outreach emails can now send Shared C360 Layouts with contacts who are loaded to GS Person/ Internal User. You can add a link or button to an Email Template and send it to participants using an Advanced Outreach.
Prerequisite: To successfully use this feature, you must populate the Company Person object using the Load to Person action in a rule.
To add a Shared C360 Layout in Adv. Outreach:- Navigate to CoPilot > Email Templates.
- Either edit an existing template or click +TEMPLATE to create a new one.
- Click the Layout drop-down and select either a Link or Button.
- For each option, you can select the display text and decide to Enable Link Tracking.
- For the Button option, you can set the Width and Height.
- Navigate to CoPilot > Advanced Outreach page.
- Create or edit an Adv. Outreach.
- In the Adv. Outreach model, edit an email step.
- Select an email template that contains the C360 link or button. The email template preview loads on the screen.
- Click on the Link or button in the preview. The Map Layout Token dialog appears.
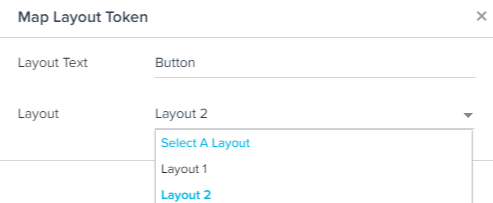
- Select a layout from the list and click Update. This dialog lists all of the available Shared C360 layouts in the Gainsight Org.
- Click SAVE and schedule the outreach as required.
Notes:
- Each email step in the AO model can have only one Shared C360 Layout. Even if you have multiple placeholders in the email template, all of the links will point to the same shared C360 Layout in the email step.
- You can select a different Shared C360 Layout for each email in the Adv. Outreach model.
- Only participants who are synced to the Gainsight Users and Gainsight Persons object can receive emails with C360 views.
- Participants that aren’t synced will be dropped from the Adv. Outreach if they come to a step that has a link, and moved to a completed status.
- If the Adv. Outreach has a Shared C360 link and you preview the email, a dummy link appears.
- If you use the Email Copy option, and a Shared C360 Layout link/button is present, the email copy will be sent to the intended participant.
- Use External Events to Trigger an Advanced Outreach: Gainsight now provides you the capability to publish events from an external system (apart from SFDC and MDA). See the Tutorial: Use External Events to Trigger an Advanced Outreach for more information.
Rules Engine
- Support for setting up actions on outputs of multiple tasks in Bionic Rules: Navigate to Administration > Rules Engine > +RULES > Setup Action. In Bionic Rules, actions now support using multiple tasks’ outputs as source. This allows you to set up actions for intermediate tasks’ outputs apart from the final output task from Setup Rule. This ability to consume the outputs of intermediate tasks enables the admin to model a business process more efficiently, provides the flexibility to achieve multiple actions on similar datasets in one rule, and thus reduces the number of rules created for a similar criteria.
- Click +ACTION to view the Select Task dialog box. All the tasks defined in the Setup Rule screen are available in the drop-down list.
- Select the required task from the list.
- Click SAVE to set up an action for the selected task.
Note: You can now find SAVE and RUN NOW in the top right corner of the page.
- New action types are available in Bionic Rules: Navigate to Administration > +RULE > Setup Action > Action Type. The following new action types are now available in Bionic Rules:
- Load to Relationship Person: Supports loading data to the Person and Relationship Person standard objects at the same time.
- Load to Scorecard History: Supports loading data to the Scorecard History object. This action type is helpful during onboarding, for example, when you’re integrating historical customer health score data.
Also, the action type Load to Person is now renamed to Load to Company Person. This action type supports loading data to the Person and Company Person standard objects at the same time.
For more information on the Gainsight Person object model, refer to Gainsight Person Object Model, and for details on different Action types in Rules Engine, refer to Setup Rule Action Types.
 New functions are available in Formula Builder of Transformation task in Bionic Rules: Navigate to Administration > Rules Engine > +RULE > Setup Rule.
To provide more flexibility, the new String and Date functions are now supported in the Transformation task.
- Click +TASK > Transformation.
- Click +Formula Field. The Formula Field dialog box is displayed.
- Select the Function option.
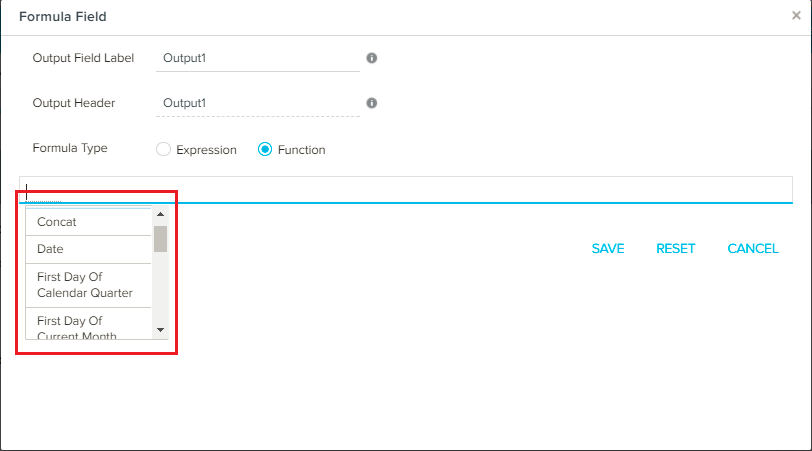
The following is the list of new functions:
| Function | Description | Valid input Data types |
|---|---|---|
| Concat | Concatenates the selected arguments | String, Picklist, Multi-picklist |
| To Lower Case | Converts the selected argument values to Lowercase | |
| To Upper Case | Converts the selected argument values to Uppercase | |
| Date | Converts Date-time argument to Date | Datetime |
| Date Diff | Returns difference of the two selected dates in the selected unit | |
| First Day of Calendar Quarter | Returns the first day of Calendar Quarter | Date, Datetime |
| First Day of Current Month | Returns the first day of Current Month | |
| First Day of Current Week | Returns the first day of Current Week | |
| Last Day of Calendar Quarter | Returns the last day of Calendar Quarter | |
| Last Day of Current Month | Returns the last day of Current Month | |
| Last Day of Current Week | Returns the last day of Current Week |
Trend and Trend % functions are renamed to Period Over Period Comparison and Period Over Period Comparison in % respectively.

An option to treat null values as zero is added in Expression formula type.
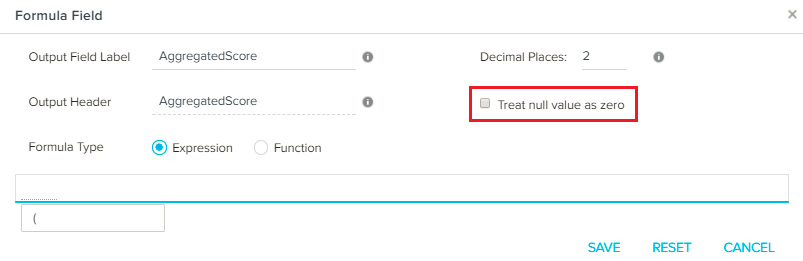
Treat null value as zero check box:
- Select this to replace any null field values with zero while performing calculations using the expression provided.
- Deselect this to use any null value as is in the calculations.
Sally
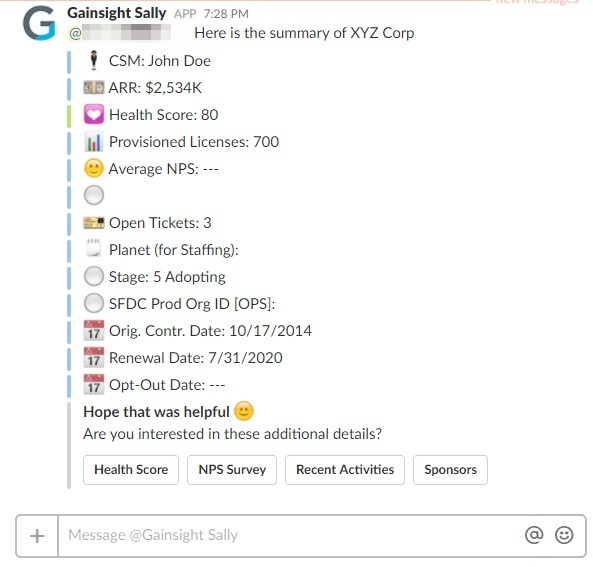
- View C360 Summary based on layout configuration: Sally will return the C360 Summary based on the C360 Layout configuration. The Summary layout configuration created in C360 layout will be visible in Slack messaging as well.
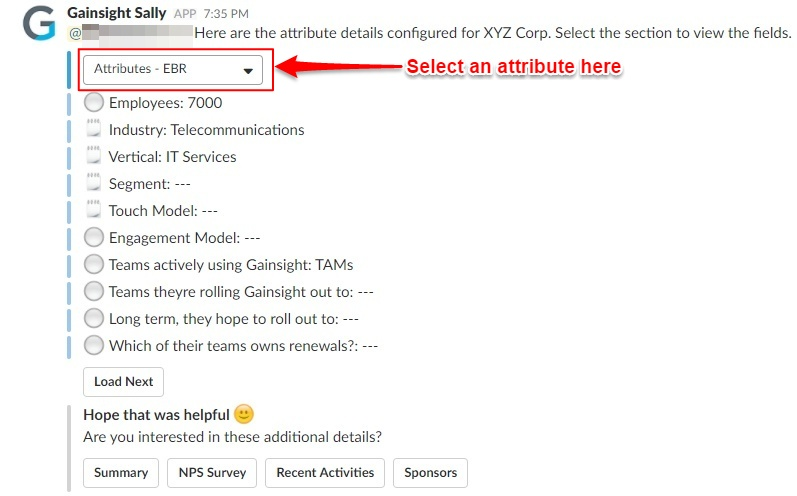
- View C360 Attributes in Sally: Sally will provide information from the C360 Attributes section. If there are multiple Attribute sections, a drop-down appears from which you can select a section and view related information. Similar to Summary response, the layout configuration will be respected here.
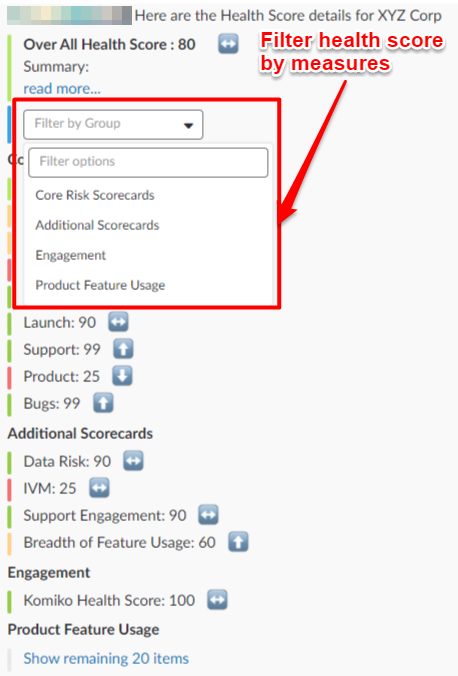
- Filter scorecard responses by measure group: Scorecard response can now be filtered based on the measure group. After you query for a health score for a company, you can filter the score by selecting a measure from the drop-down list.
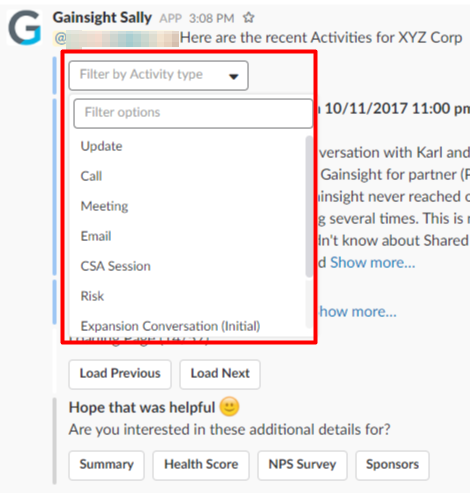
- Filter timeline entries by Activity Type*: Timeline Activities can now be filtered by Activity Type. Sally will now return information about custom activity types along with standard activity types such as Updates, Calls, Meetings, Emails.
- Query for CSM of a customer*: You can now query for the name of the CSM assigned to an account. Sample Query: CSM for <Customer Name>.
Note: Admins can map the appropriate field in your org to the CSM field in Administration > Customers. However, Sally only recognizes <CSM Name> in queries at this time.
*These enhancements were released via patch in October.
Data Management
- Self Object Lookup: Admins can now populate GSID from another record by looking up to one or more fields in the same standard object. Admins can use Data import lookup functionality with all of the capabilities to ingest the correct GSID. This enhancement supports creating hierarchies up to one level.
Example: In the User object, you can populate a value in the field named Manager by self object lookup where manager is another record in the same object.
Use cases:
- User - Manager Hierarchy
- To create ‘My team’ and ‘Portfolio view’ reports
To support creating User - Manager hierarchies, Gainsight provides a new standard field named Manager in the User object.
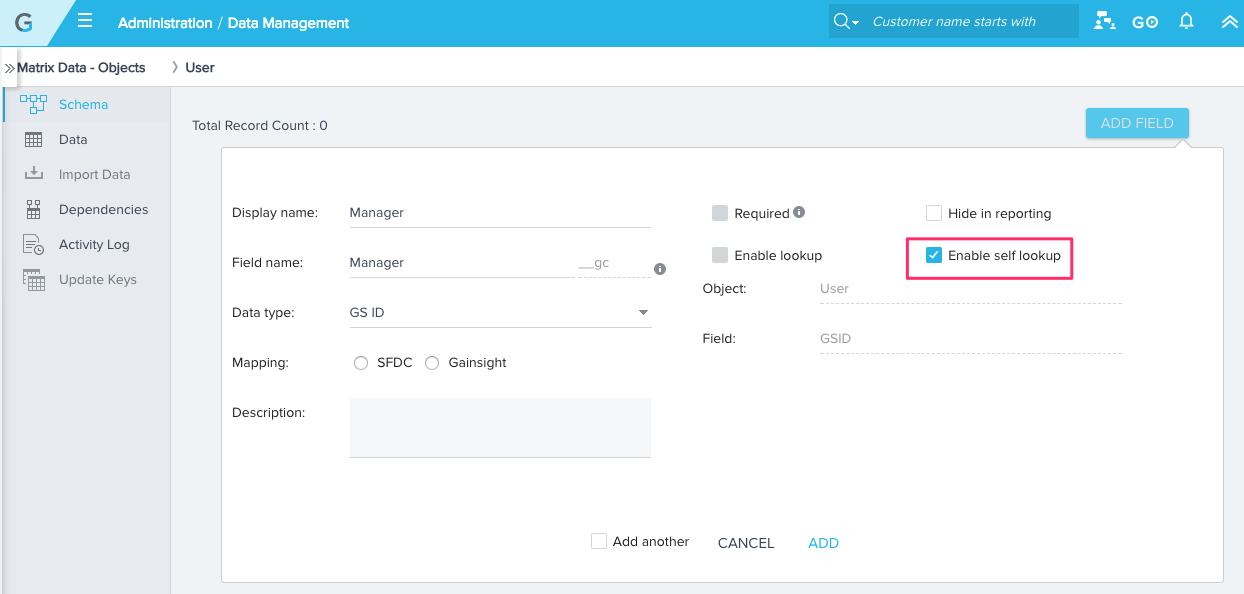
To populate GSID from another record, the field should be enabled with self lookup in the Data Management page as shown below:
- Navigate to Administration > Data Management. Select a standard object.
- Click ADD FIELD. Add a field of data type GSID.
- Select the new option Enable self lookup. It creates an MDA join to the GSID of the self object as shown below:
Note: Once the Enable self lookup option is enabled, you cannot disable it.
You can configure self object lookup in the derived field mappings section in Gainsight Connect, Gainsight Bulk API, User Management page, and S3 Connector. To see this enhancement in Gainsight Connect:
- Navigate to Administration > Gainsight Connect.
- Select an object (User here) into which you want to import GSID through self object lookup.
- Click + Field Mappings in the Derived Field Mappings section. The data import lookup configuration dialog appears.
- Select Lookup Type as Self. The lookup object is automatically is selected as the same object (User here).
- Click + icon to add multiple field mappings. You can match up to six fields in the same object to retrieve correct GSID from another record.
Note: You can match by SFDC ID, GSID, String, Email, and Dropdown list data type fields during data import lookup.
You can observe the same functionality while ingesting data through User Management, Gainsight S3 Connector, and GS Bulk API. For more information, refer Data Import Lookup.
- Relationship Person: It is a new MDA object in the Person object model introduced to store the attributes of a person in association with a Relationship, for example: Role played by the person in a Relationship. Admins can view the Relationship Person object in Administration > Data Management.
A set of standard fields with predefined mappings are shipped by Gainsight in the Relationship Person object. Customers can add custom fields and update the schema. A few custom fields that you might want to add in this object:
- Last touched: When was the person contacted last in association with this relationship
- Last Met: When was the last meeting in association with this relationship
- Last NPS® Score
- Last NPS® submit date
You can ingest data into this object through Bionic Rule action type: Load to Relationship Person. For more information on this new action type, refer Setup Rule Action Types. For more information on the Person object model, refer Gainsight Person Object Model.
Connectors
- Use Connectors 2.0 and Data Aggregations with Bionic Rules: After the V5.10 release, Gainsight does not support creating new projects in the older versions of Mixpanel, Segment, and Data Load Configuration in Administration > Connectors. Gainsight recommends using V2.0 of Mixpanel and Segment in Administration > Connectors 2.0. Similarly, it is recommended to use Bionic Rules for data aggregations instead of Data Load Configuration. Following are the advantages of Connectors 2.0:
- Separate UI for Connectors 2.0 along with in-line help.
- Flexibility to select an MDA object and to map the required fields between the MDA object and the connector.
- Create multiple connections in Connectors 2.0.
- Automatic field mapping on the required fields between the connector and the MDA object.
- Preview of the imported data in the Review Data Imported & Reports section.
- Out-of-the-box Data validation Reports.
- Improved logs to view the Successful and Failed records with the ability to download the failed records and the data anomalies.
- Ability to select a timezone for the data source for Date and DateTime fields while configuring a data ingestion job.
For instructions on enabling the Mixpanel and Segment integrations with Gainsight, refer Mixpanel: Enabling the Integration and Segment: Enabling the Integration. For more information on usage data aggregations with Bionic Rules, refer Tutorial - Aggregate Usage Data with Bionic Rules.
Note: We do not recommend making changes to the existing project configurations in Segment 1.0. Please use Segment 2.0 to set up new projects.
Related Articles
The Release Notes are organized into the following articles:
5.10 Permissions, Components, and Issues
If you have feedback or questions on these enhancements or the documentation, please share them on community.gainsight.com.
| NPS, Net Promoter, and Net Promoter Score are registered trademarks of Satmetrix Systems, Inc., Bain & Company and Fred Reichheld. |