Gainsight NXT Release Notes 6.4 July 2019
Check out this 6-min. video for an overview of what's new in the 6.4 release!
New Features
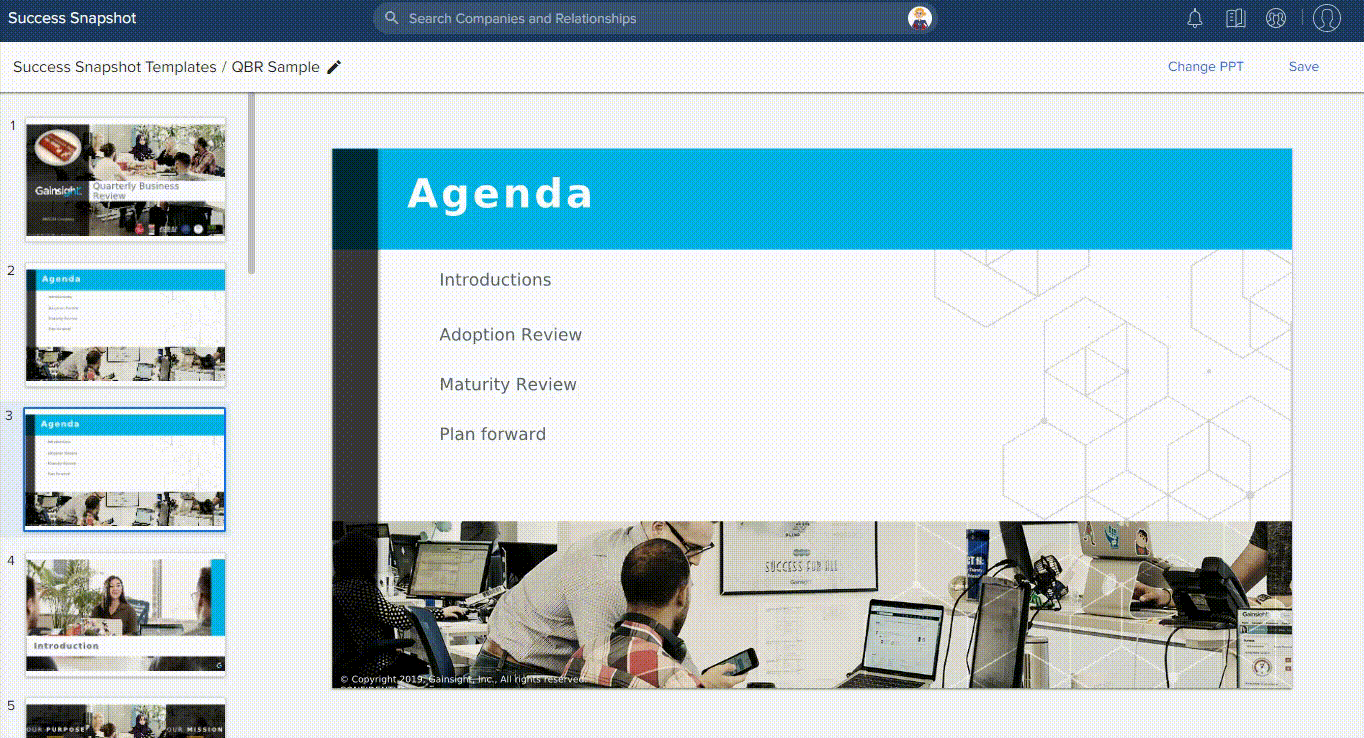
Success Snapshots
This feature enables admins to generate PowerPoint presentations with customer data and graphs from Gainsight, using your own customized presentation (business review deck) uploaded to the Success Snapshots repository, which helps CSMs run their customer meetings (such as EBRs and QBRs).
Navigate to the Success Snapshots page from Administration > Success Snapshots. Success Snapshots is available for both Company and Relationships (if your org has configured Relationships in Gainsight). Once a Success Snapshot template is created and saved, CSMs will be able to export it from the C360 and R360 pages respectively.
Use Case: For instance, you may want to add a report from Gainsight to one of the slides in the business review PPTX and describe the report in the form of a story. You can achieve this by selecting an element or a placeholder in the required slide and replacing it with the required report. Similarly, you can insert data such as an Image, Text or Tokens from Gainsight into the appropriate elements of the slide. Once admins configure the PPTX, CSMs can then export the Success Snapshot PPTX from the Export menu in the C360/R360.
Additional Resources:
- To learn more about the benefits and use cases of this feature, refer to the Overview of Success Snapshots article.
- To create a Success Snapshot template, admins must first upload the fully customized business review presentation (pptx) to Gainsight, and then setup one or more Success Snapshots. For more information on how to create a Success Snapshot, refer to the Configure Success Snapshots Template article.
- To export a Success Snapshot template from the C360 page for an individual customer, refer to Export Success Snapshots Presentations article.
Renewal Center
*Please note that Renewal Center is available as an add-on to our Customer Success platform. For more information on how to license it, please contact your Gainsight account manager. This feature will be available shortly.
Renewal Center helps quota carrying CSMs and Renewal Managers forecast and manage their book of business. By enriching Salesforce Opportunities with Customer Success insights, as well as calculating a Likelihood to Renew score for each opportunity, Renewal Center enables your team to efficiently manage and predict renewals and related upsell, recognize risks in a timely fashion, and report on key metrics.
An admin can then configure the field mappings and other parameters. Based on these configurations, end users can view the Renewal Center page as shown below. The fields may vary based on the configurations set by your administrator.
Note: To use Renewal Center, your Opportunity data must reside in Salesforce Opportunity object. You must use Gainsight Salesforce Connector to import this data into Gainsight.
.png?revision=1)
Enhancements
Adoption Explorer
Adoption Explorer helps manage your customer’s usage data in the Gainsight environment, and quickly surface the most relevant view of usage data across your customer base. Adoption Explorer offers powerful segmentation capabilities to manage multiple product lines, more robust control of aggregations and calculations, and totally re-imagined visualizations to surface deep insights. Customer’s usage data at Company and/or Person level can be stored at both daily and weekly level along with their entitlements. Using the ingested data, admins can define new derived fields without the need of Rules Engine.
Important: After a successful beta program, Adoption Explorer is now available to all customers and is included with the Gainsight CS license.
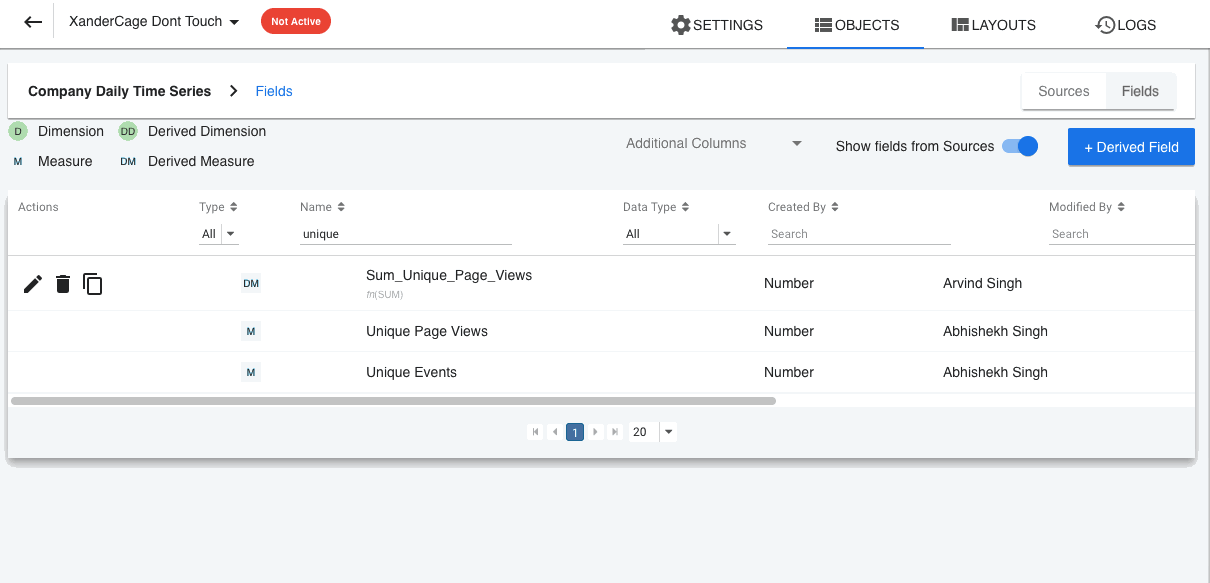
- Ability to Clone Derived Fields: Previously, if a user wanted to apply 2 different functions on a single field, they had to manually create 2 derived fields. With this enhancement, users can directly clone the existing derived field and change the function list, based on their business needs.
Use Case: For instance, if you have already created a derived field called ‘Sum of Unique Page Views, and now you may want a report on ‘Avg of Unique Page Views’ as well, for your business needs. Using this enhancement, you can now directly clone the existing ‘Aggregate > Sum of Unique Page Views derived field, and just modify the function list to ‘Aggregate > Avg’.
To use this enhancement:- Navigate to Administration > Adoption Explorer > Administration.
- Hover on the required project name and click the Objects icon to view the Objects page.
- Hover on the required object in which you want to clone a Derived Field, and click Fields. You will see the list of ingested fields and already created derived fields.
- Choose the derived field you wish to clone, and click Clone this field. Clone Field window appears.
- Enter the field name of your choice, in the Field Label text box.
- Click SAVE, and you will see that the newly cloned field is added to the list of available fields.
- Click the Edit Field (pencil) icon.
- Select Average from the Function List dropdown.
- Click Save.
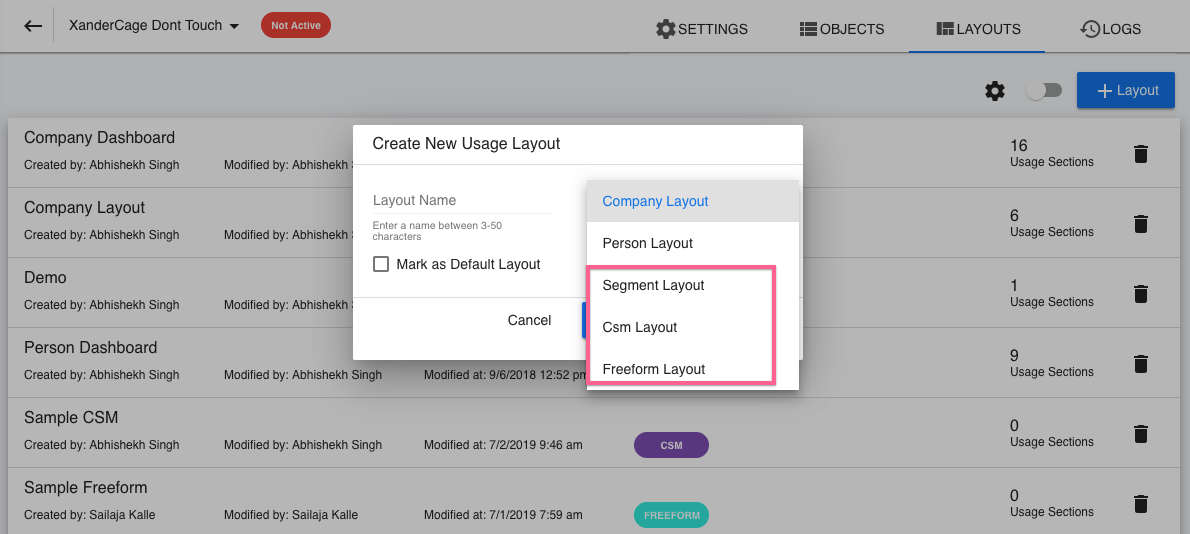
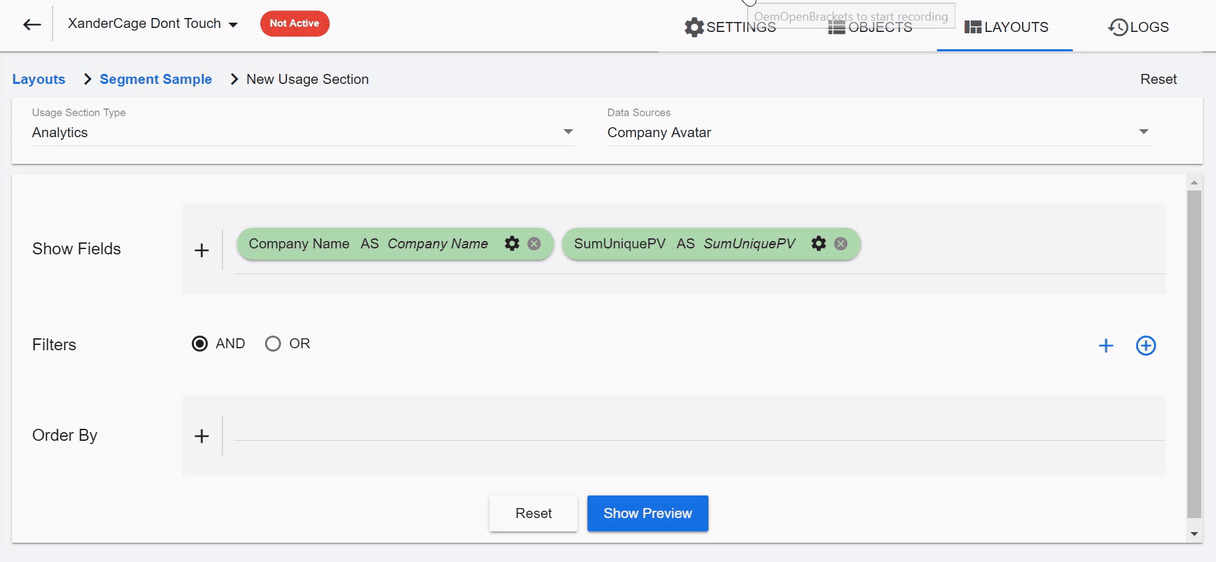
- Introducing Freeform, CSM and Segment Layouts: With the existing functionality in Adoption Explorer, users could build layouts on a single company, instance and/or person. With this release, the Freeform, CSM and Segment Layouts are introduced in Adoption Explorer, where users can see the records being fetched from all of the companies data loaded to the Adoption Explorer project.
To use these Layouts:
- Navigate to the Adoption Explorer > LAYOUTS screen in an Adoption Explorer project.
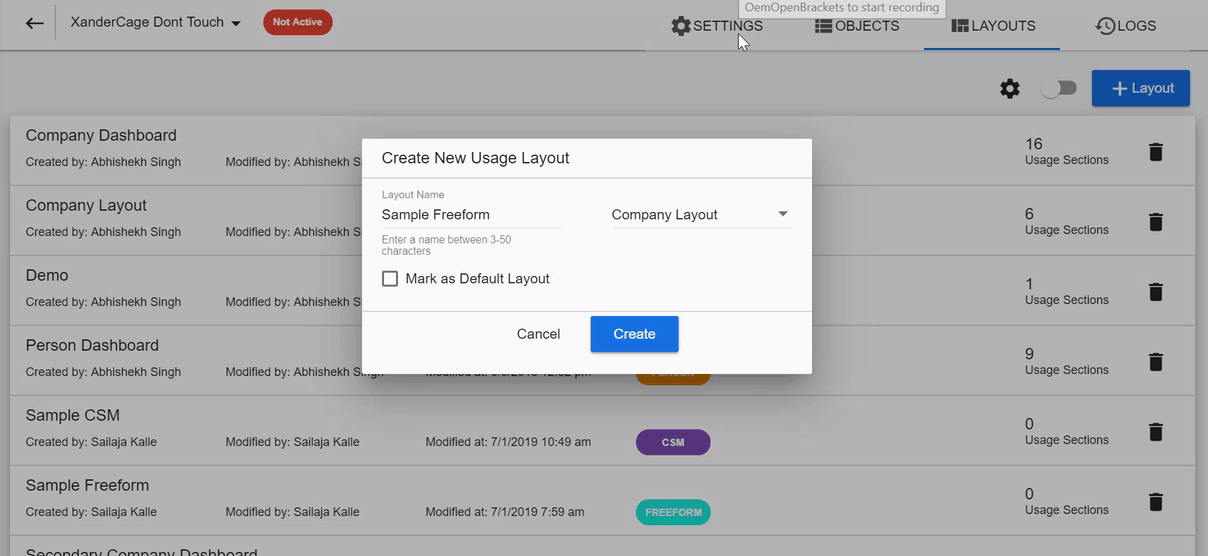
- Click + Layout. Create New Usage Layout window appears.
- Enter the Name of your choice, in the Layout Name textbox.
- Select the required layout from the Layout dropdown list and click Create.
- Freeform Layout: Freeform layout displays the records across all of the companies data loaded to the Adoption Explorer project. For instance, you have a Segmented ARR field in Company Usage Info object, and now you may want to know the list of Companies that fall under Low band, and take necessary business actions.
-
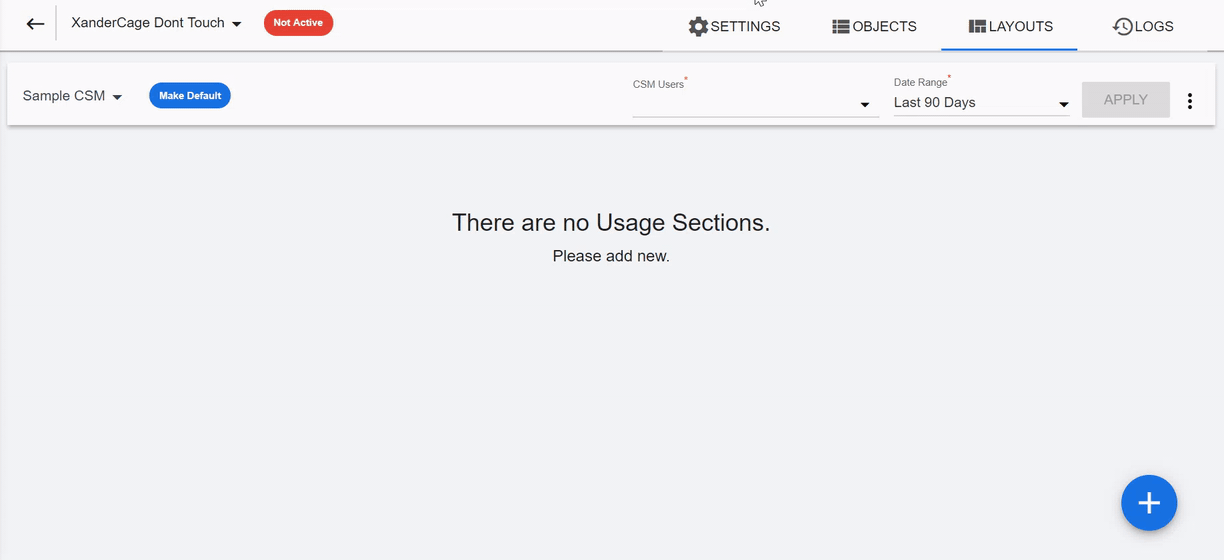
CSM Layout: CSM layout displays the company records that are managed by the selected CSM User. The Users you see in the CSM Users dropdown list are fetched from the Gainsight User Object. For more instructions on how to create a Layout, refer to Create Layouts article.
-
Segment Layout: Segment layout allows the user to set the filter criteria using the already created Segmented fields in Company and Person Usage Info objects. For instance, if you want to see the ‘Sum of Unique Page Views’ of Companies with High ARR, you can set the Segmented ARR filter criteria as High. For more instructions on how to create a Layout, refer to Create Layouts article.
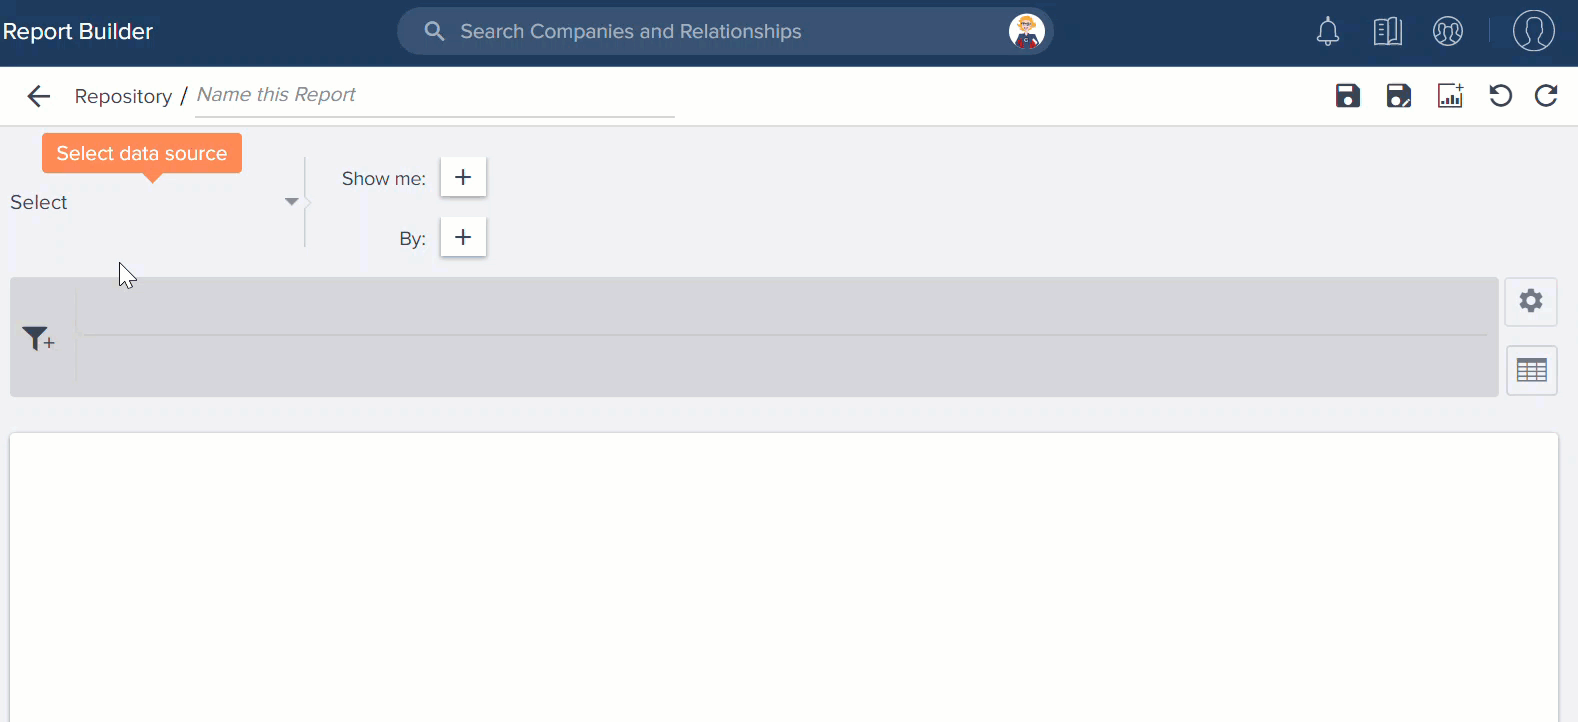
Report Builder
Gain deep customer insight with Reports and Dashboards. Gainsight’s ability to blend together multiple data sources provides a structured, holistic picture of the customer across all types of vendor/customer interactions. Using an intuitive interface and compelling visualizations, each of your customer-facing functions can build their own strategic view to get actionable insights, fast.
- Reporting on Self-look up Fields: Admins can now add the details of the Self-look up fields, while building reports. For instance, when you build a report on User object, you will now be able to add the Manager details by using the expandable fields (by clicking +). Similarly, when you build a report on Company object, you will be able to add the Parent Company details to the report.
Company and User objects have the standard self-lookup to Parent Company and Manager respectively. But, you can also create custom self-look up fields. For more information on how to create lookup fields, refer to Gainsight Data Management article.
Notes:
- In Reporting, only one self lookup in an object is supported. For example, if Company has 2 self-lookup fields namely: Parent Company and Partner Company; you can only select the details of one self-lookup field.
- Currently, only one level of self lookup is supported. For example, if Company has a self-look up to Parent Company, you can see the + button at the Parent Company level only, but not at the details of the Parent Company field.
Success Snapshots
Generate client-ready presentations that leverage your corporate Powerpoint template and populate key insights from Gainsight to more easily prepare for customer meetings. Create multiple Success Snapshot templates with information tailored to specific business needs.
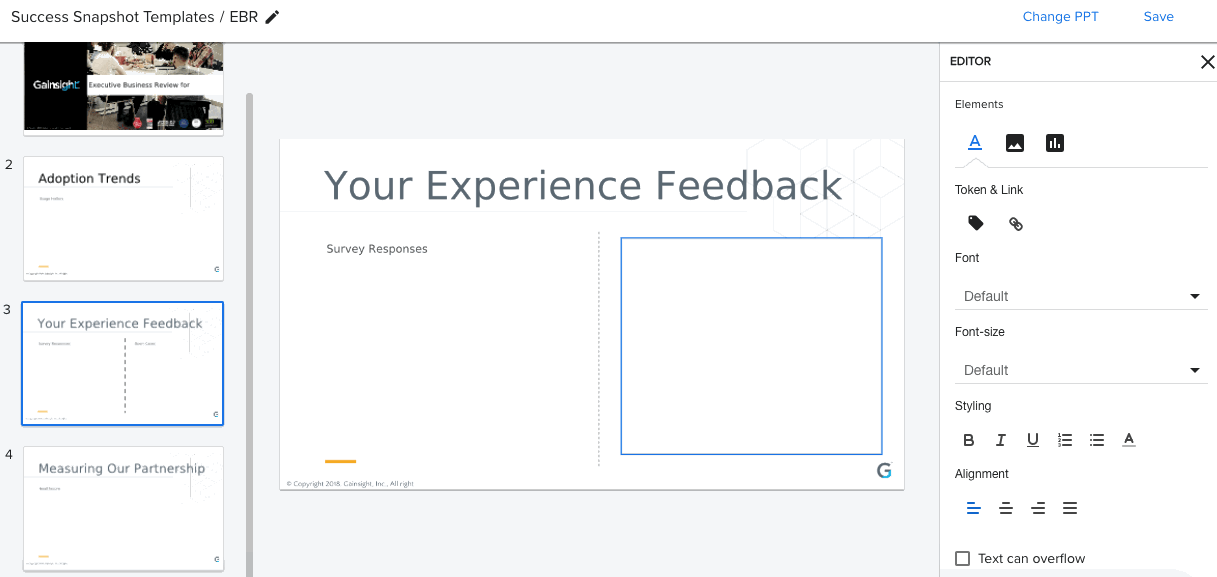
- Ability to Clone or Delete a Slide: With this enhancement, admins can now Clone or Delete the existing slides, based on their business requirements.
To use this enhancement:- In the Success Snapshot template, select the slide you want to Clone or Delete.
- Click Clone to clone the slide (or) click the trash icon to delete the slide.
- Ability to select details of Look up fields as Tokens: While building a Success Snapshot template, admins can now add the details of the look up fields as Tokens. For example, you can now expand the CSM lookup in the Company object, and select the Name field to add it to Snapshot as a token.
Scorecards
Scorecards provide a robust, comprehensive framework that accurately measures customer health. Gainsight scorecards can capture the nuances of customer health by supporting multiple scorecard models, measuring both objective and subjective inputs, calculating weighted overall health and accounting for scoring exceptions.
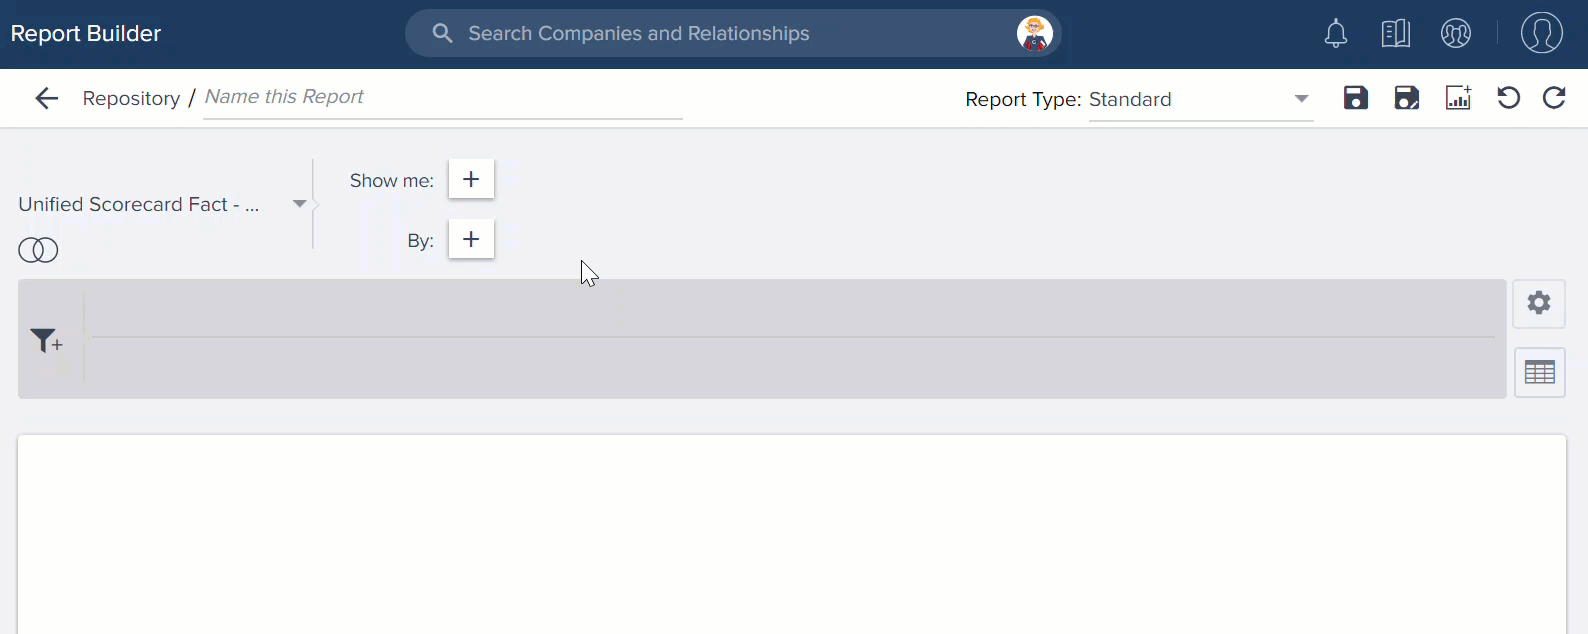
- Mass Edit report creation limited to Unified Fact object: Previously, you could create a Mass edit report either on an individual Scorecard Fact object or on a Unified Fact object. However, with this release you can create a Mass edit report only on a Unified Fact object. When you select a Fact object as the source of the report, you cannot view the option which allows you to select a Mass Edit report on the top right corner. This option would now be available only for a Unified Fact object.
You can apply appropriate filters to view data only from the required Scorecard. For example, if you wished to create a Mass Edit report for a Scorecard called “Support Tickets”, you can do the same by creating a Mass Edit report on the Unified Fact object. You can add the Scorecard ID = “Id of Support Tickets” filter. This filters data specific to Support tickets Scorecard in the Unified mass edit report. You can also filter by the Scorecard Name field, if you have not changed the name of your scorecard.
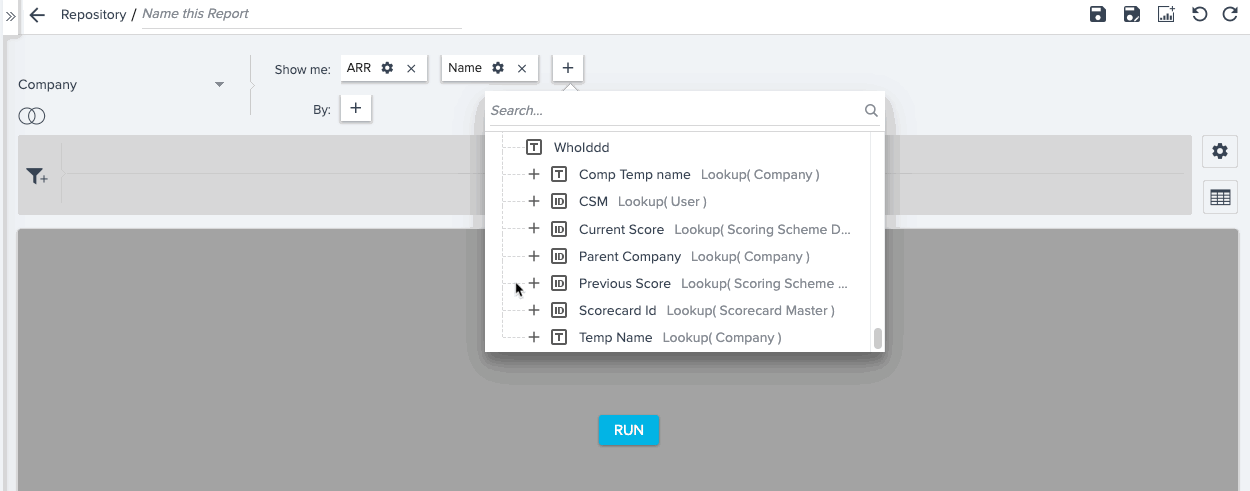
- Ability to perform Self Lookup on company object: The Company object now has a self lookup through the Parent Company on the Company object. You can use this feature while creating reports on fact object or unified fact object.
Business use case: You can create a report of all Parent companies whose current Health Score is Red.
To use this enhancement:- Navigate to Administration > Analytics > Report Builder.
- Click + REPORT.
- Select a fact object or Unified Fact object.
- In the Show me section, expand Company, and then Parent Company.
- Select the required fields from the Parent Company field and click RUN.
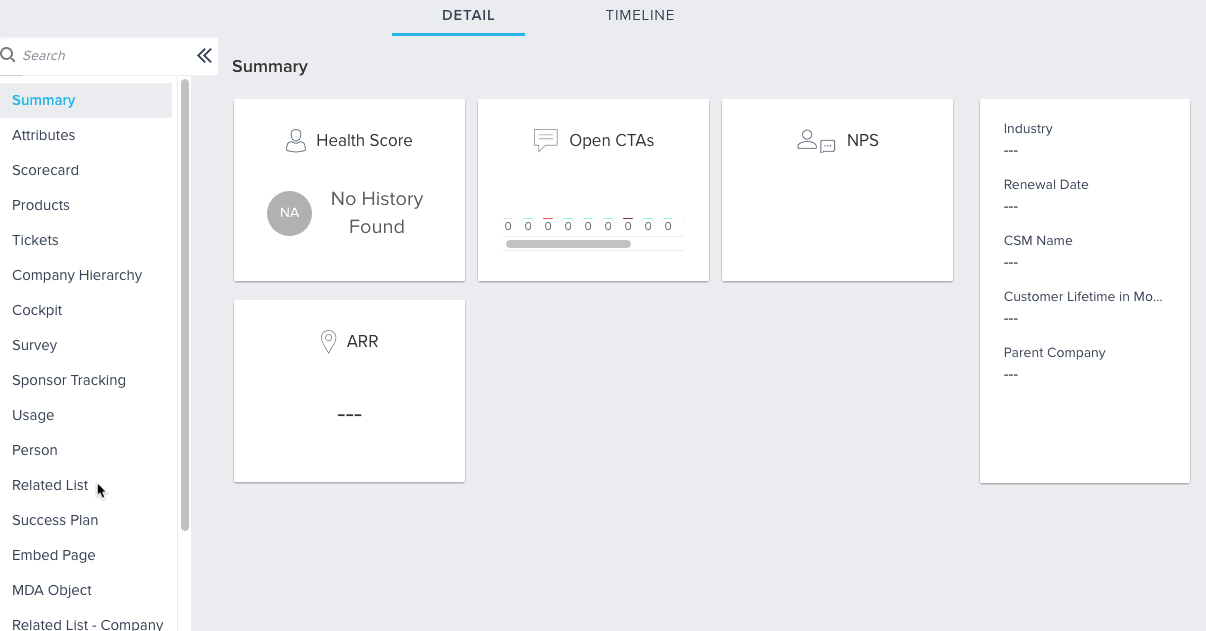
C360
The Customer 360 (C360) is a central hub of your customer’s business information in Gainsight. It synthesizes business data from various sources and provides you with a holistic view of your customers. This minimizes the preparation time for your customer meetings.
-
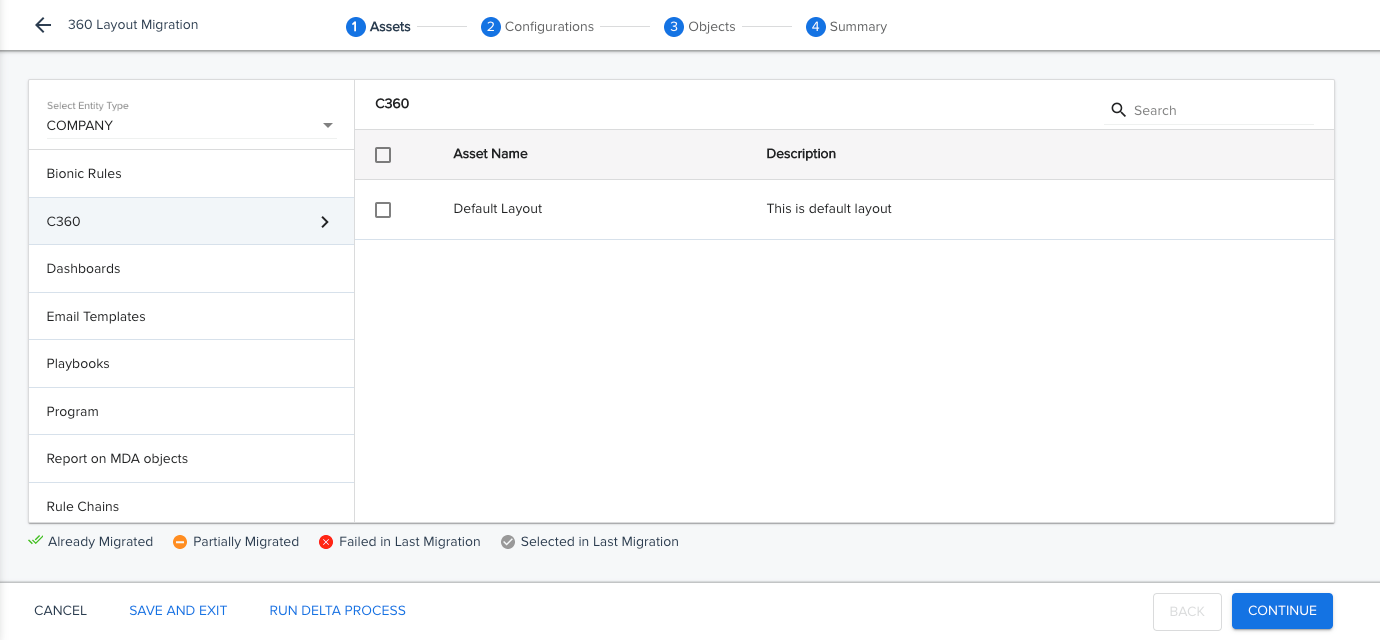
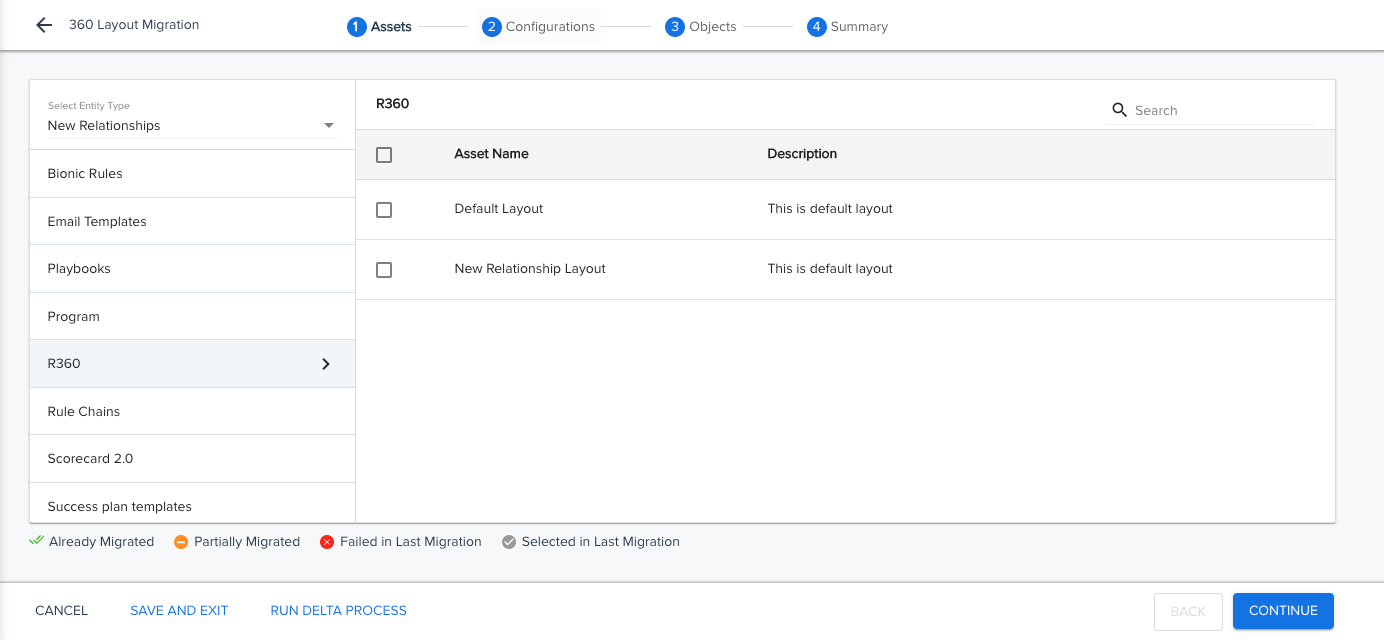
C360/R360 Layout Support for Cross-Org Migration: Previously, when migrating data across orgs, you would have to manually recreate any C360 or R360 Layouts in the target org. With this release, you can now select C360 and R360 layouts as assets in a cross-org migration, so you do not have to manually recreate them. For more information on migrating 360 layouts, refer to Migrate C360/R360 Layouts article.
Note: If the layouts contain a report you also wish to migrate, the report needs to be migrated to the target org before, or at the same time as, the layout migration. If the report is migrated to the target org after the layout migration, the layout will not contain the report.
-
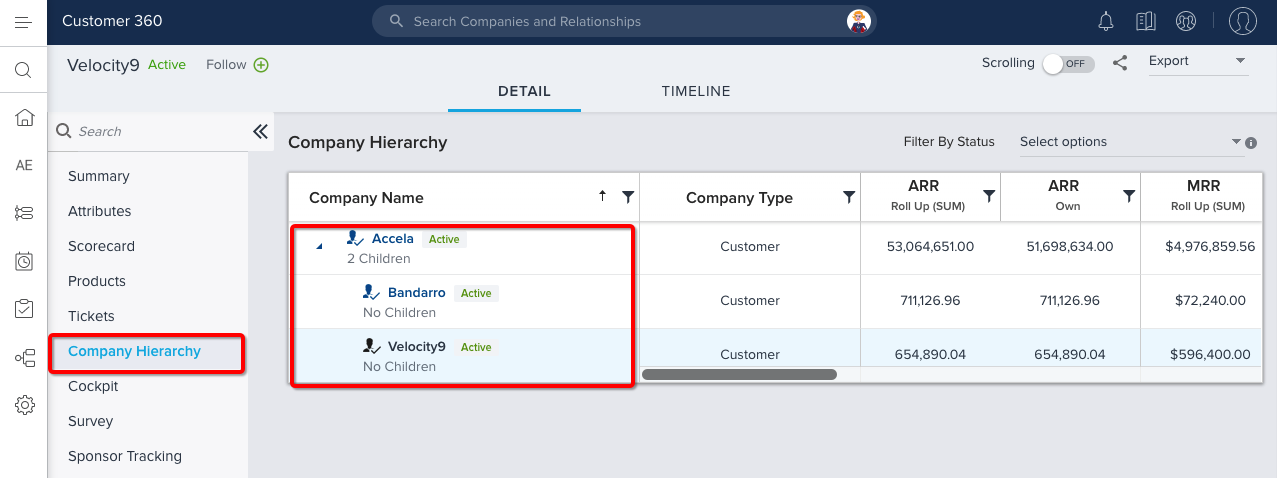
View Sibling Companies in C360: Previously, when viewing the Company Hierarchy section in the C360 of a child company, you could view the associated parent company, but you could not view any other child companies associated with the parent. In order to view the entire list of child companies, you would need to navigate to the Company Hierarchy section in the C360 of the parent company.
With this release, you can view the sibling companies of any child company in the Company Hierarchy section.
-
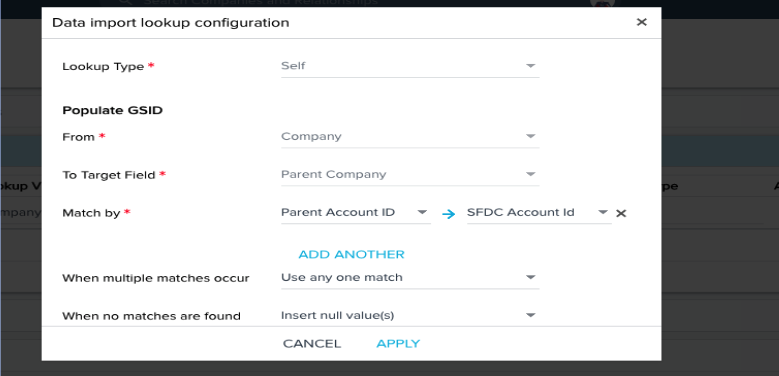
Custom Field not needed for Self-Lookup: Previously, the Company object did not have a field equivalent to the SFDC Parent ID. The Company object has the Parent Company ID, but previously this always was used to contain the GSID. This meant that admins had to create a custom field on the Company object in order to capture the data of these SFDC fields as part of a data ingestion channel.
This is no longer required as of this release. The Company object has been enhanced so that the Parent Company ID field can contain the SFDC Parent ID. It is no longer required for admins to create a custom field as part of a Self-Lookup. Whenever a Self-Lookup is configured, the SFDC account ID can be populated directly to the Parent Company ID field.
Note: This enhancement is only available for new customers at this time, and will be available to them by default going forward. It will not affect the self-lookup configuration already set up by existing customers.
-
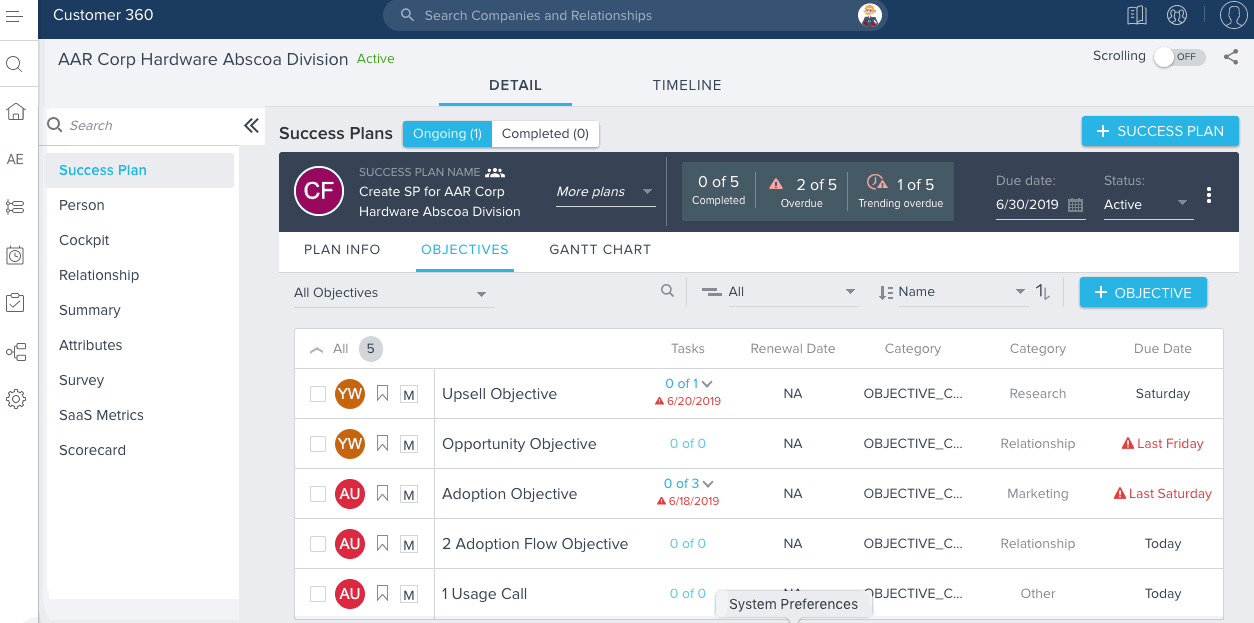
Edit records in a Low Volume custom object from the C360/R360 > Related List section: Admins can add a report created on any custom object into the Related List section, for any C360/R360 Layout. For more information on how to configure a Related List section in the C360 layout, refer Configure the Customer360 Details Sections.
If the Admin has added a report created on the Low Volume custom object to the Related List section, CSMs/end users can see the report in the C360/R360 > Related List page. For more information on the Low Volume custom objects, refer the first enhancement in Data Management.
CSMs can now create new records and edit existing records on the Low Volume custom object through this report
Prerequisites for this enhancement:- Low Volume custom object should have a field lookup to Company > Name. For more information on enabling lookup from any field, refer the Gainsight Data Management article.
- Create a Report on the required Low Volume custom object from Report Builder. This report should have GSID field from the source object (Low Volume custom). For more information on this, refer Create New Report section of the How to Build Basic reports article.
- Add this Report while configuring the Related List section. For more information on this, refer Configure Related List.
To view or edit the existing records:
- Navigate to the C360 page > configured Related List section of a customer. You can see all of the records from the Low Volume custom object through the report.
- Click the View button against a specific record. VIEW RECORD window is displayed which shows values in all the fields.
- Click the Edit button against a specific record. EDIT RECORD window is displayed.
- Edit values in the required fields.
- Click UPDATE.
To add a new record into the object:
- Click ADD to create a new record in the object. ADD RECORD window is displayed.
- Enter values into the fields.
- Click SAVE.
-
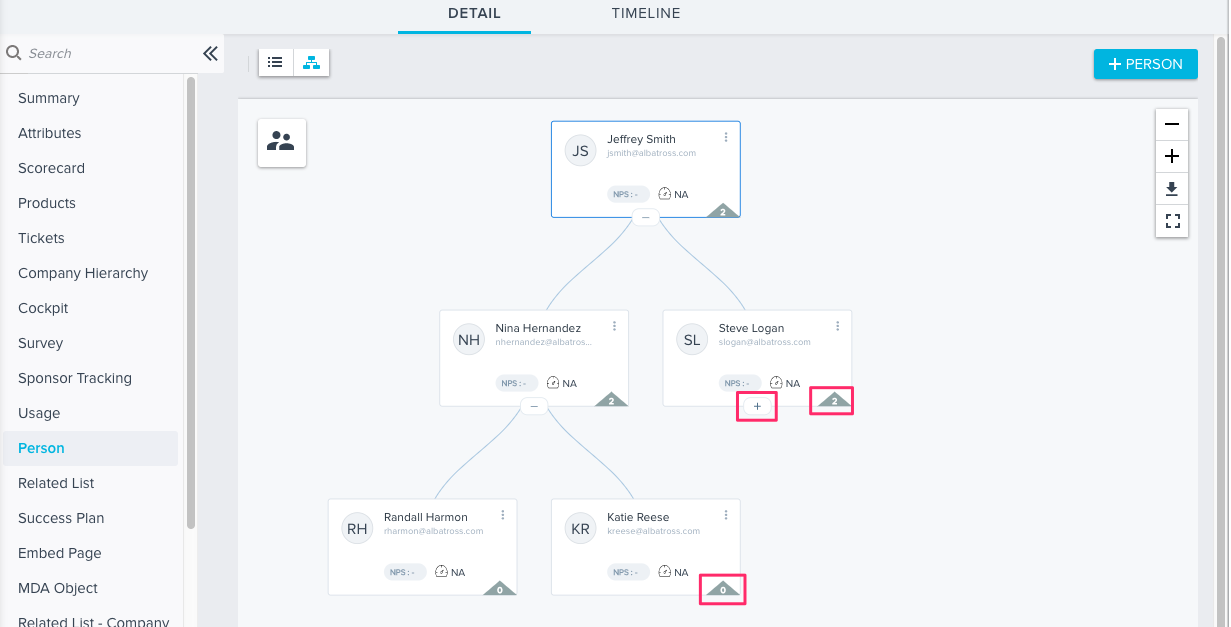
Display number of Direct Reports in the Person Map: People Maps provide a graphical view of the hierarchy in an organization. Using this hierarchy, you can visualize who reports to whom, which in turn helps you to contact the right people. CSMs can build People maps in the Org chart view in the C360 > Person section. For more information on this, refer to Build People Maps article.
People Maps is now enhanced to display the number of direct reports for every person in the Org chart. If there any direct reports to a person (display number is more than 0), you can click + and see the respective cards of the direct reports. The + button does not appear if there are no direct reports.
- Display Manager Name in the Person Detail view: Person Maps is now enhanced to display Manager name in the Manager field in the Person detail view. Previously, Manager’s GSID was displayed in the Manager field; this is now replaced with Manager’s name.
To see this enhancement:
- Navigate to the C360/R360 > Person section of a specific company or Relationship.
- Navigate to the Org Chart view of the People associated to the Company or Relationship.
- Click any Person in the Org chart. Person Detail view is displayed in which you can see Manager’s Name in the Manager field as shown below:
Cockpit
Cockpit is the day-to-day workspace for CSMs. As a turbo-charged “to-do list” that integrates with the rest of your system, it turns customer insights into tangible action items for your team. Calls-to-action, or CTAs, are tied to customers and are the backbone of Cockpit. CTAs can be created manually, but more often are triggered by business rules that analyze usage data. For each CTA that appears in the CSM's Cockpit, a prescribed playbook of best practice tasks can help guide the CSM through the right steps.
-
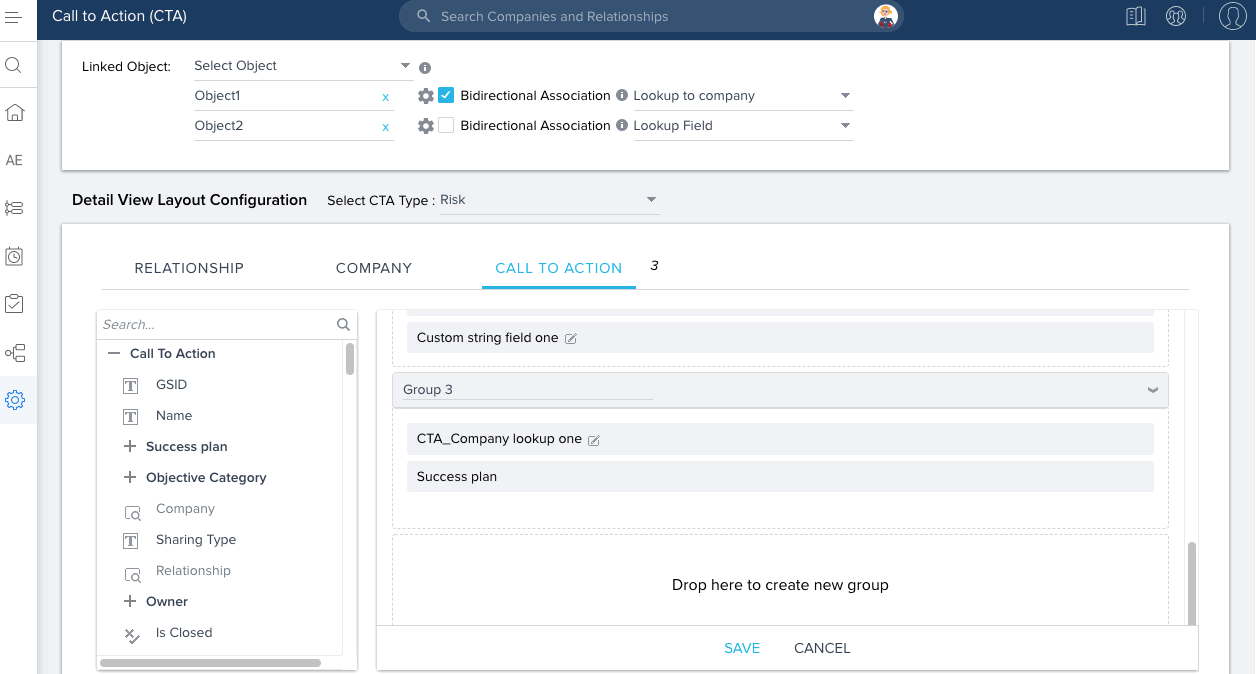
Improved CTA Search Filter options: Using Filter options, admins can now define the filter criteria on the fields added to the Search Fields section, using the fields with a lookup to the Company object.
Previously, admins couldn’t set the desired filter criteria on the search fields, and because of this, users had a difficult time identifying the correct record. With this enhancement, Filter options are introduced in the CTA Detail View configuration screen, for Admins to add additional filter criteria using the lookup fields.
Use Case: For instance, while creating a CTA, a CSM wants to see only the customer (Company Names) that are assigned to them. Using this enhancement, admins can apply a search criteria on the Company Name search field, using the CSM Name field that has a lookup to Company.
To use this enhancement:- Navigate to Admin > Call to Action (CTA) > Detail View Layout Configuration.
- Click the Gear icon of the lookup field you want to set the filter criteria.
- In the Filters section, click + FILTER to add search filters, as required.
- Select the desired field from the Select a Field dropdown list, and define the Value based on your business requirements.
- Click SAVE.
Note: Admins can add any number of filters and can use the Advanced Logic option to set the filter logic.
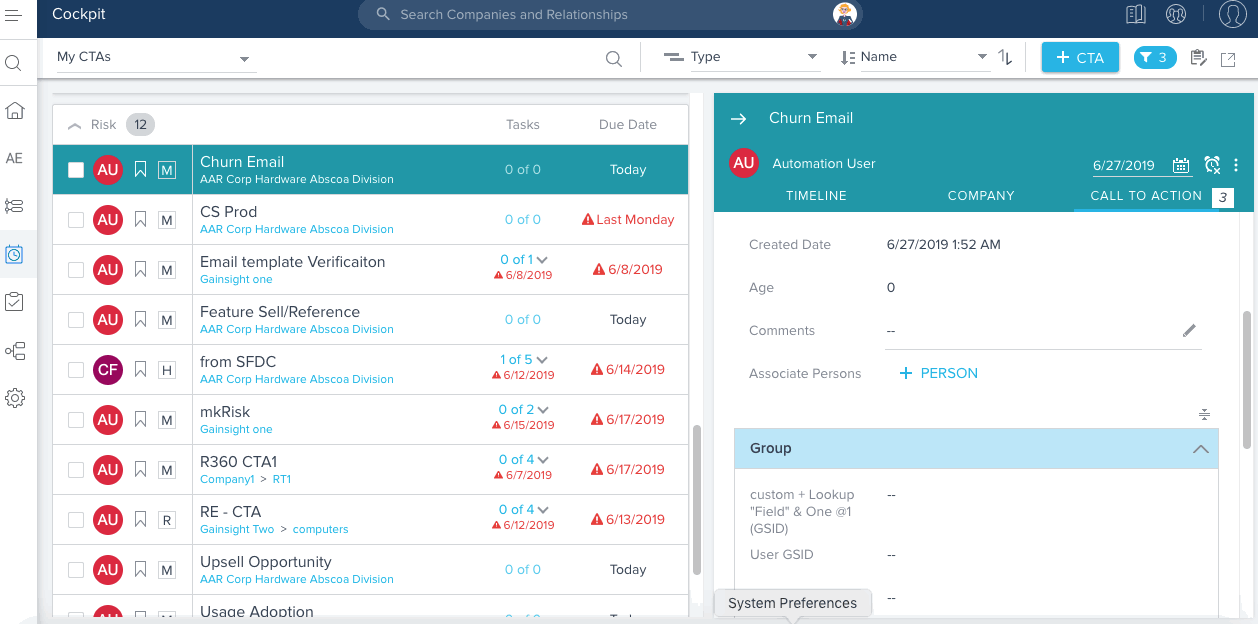
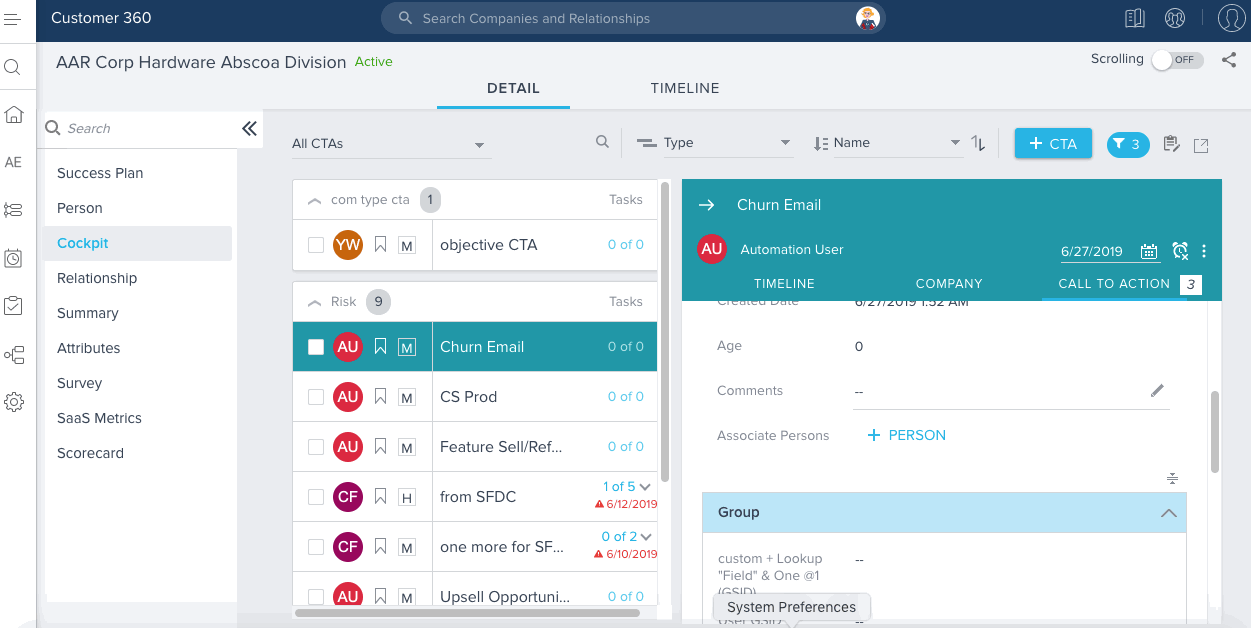
- Ability to Sort By CTA Name in Cockpit: With this release, a new sort option called Name is introduced, which allows CSMs to sort their CTAs by the Name of the CTA. If required, CSMs can modify the order from ascending to descending.
To use this enhancement:- Navigate to Cockpit list view page.
- Select Name from the Sort By dropdown list. This will sort the CTAs in ascending order, and if required you can change the order.
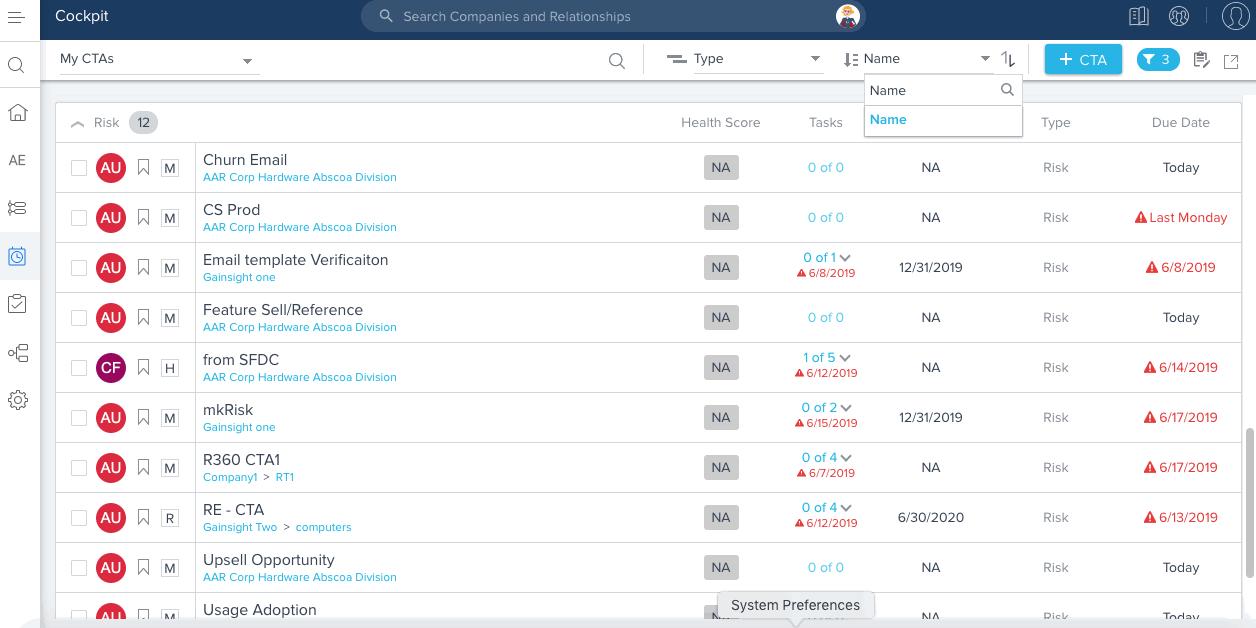
Note: This functionality is also applicable to 360 > Cockpit.
- Ability to Expand/Collapse Sections/Groups in CTA Detail View: In the CTA Detail View, CSMs can see multiple Groups that contain fields for viewing and/or updating, as configured by the admins. Previously, CSM has to scroll down these multiple groups to view or update the desired field. But, with this enhancement, CSMs can now expand and collapse all the fields in a single group or all Groups, based on their business needs.
For more information on how admins configure CTA detail view layouts, refer to Configure CTA Detail View Layouts article.
Use Case: For instance, assume that you have multiple Groups like: Support, Marketing, Sales and Finance in a CTA Detail View, and you may want only the Support Group to remain expanded. Using this enhancement, you can now achieve this by collapsing all the other groups in the detail view, to avoid unnecessary scrolling.
To use this functionality:- Navigate to Cockpit list view page.
- Open the CTA Detail View of any CTA that has multiple Groups in it.
- Click the
 (Expand) and
  (Collapse) buttons to expand and collapse a single group. If required, you can also expand and collapse all the groups using
  (Expand all groups) and
  (Collapse all groups buttons) respectively.
Note: This functionality is also applicable to 360 > Cockpit/Success Plans.
- Call to Action and CS Task Objects added to Default Mapping for Email Templates: Previously, while defining an email template, admins were able to map a token to any field from Company, Relationship, Person and User objects but not to the fields from Call to Action and CS Task objects. But, with this enhancement, admins can now do the default token mapping to any field from Call to Action and CS Task objects.
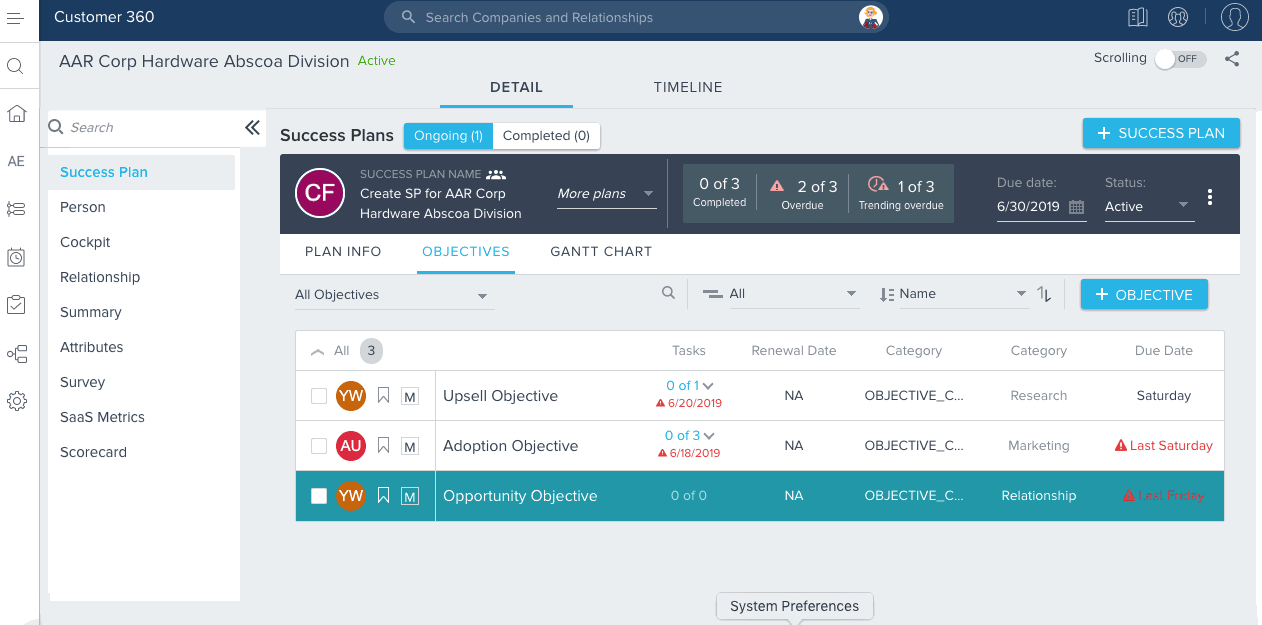
Success Plans
Develop, deliver and demonstrate customers outcomes with Success Plans. Success Plans organize your team’s activities to realize a customer’s desired outcomes. The plan’s discrete objectives and tasks help your team execute the right actions and demonstrate to your customer how your efforts translate to results. The Gantt Chart visualization and ability to export the Success Plan into a presentation-ready PowerPoint makes it easy to collaborate and share updates directly with the customer.
- Ability to Sort By Objective Names: With this release, a new sort option called Name is introduced, enabling CSMs to sort Objectives by their Names. If required, CSMs can modify the order from ascending to descending.
To use this enhancement:- Navigate to 360 > Success Plan section.
- Select Name from the Sort By dropdown list. This will sort the Objectives in ascending order, if required you can change the order.
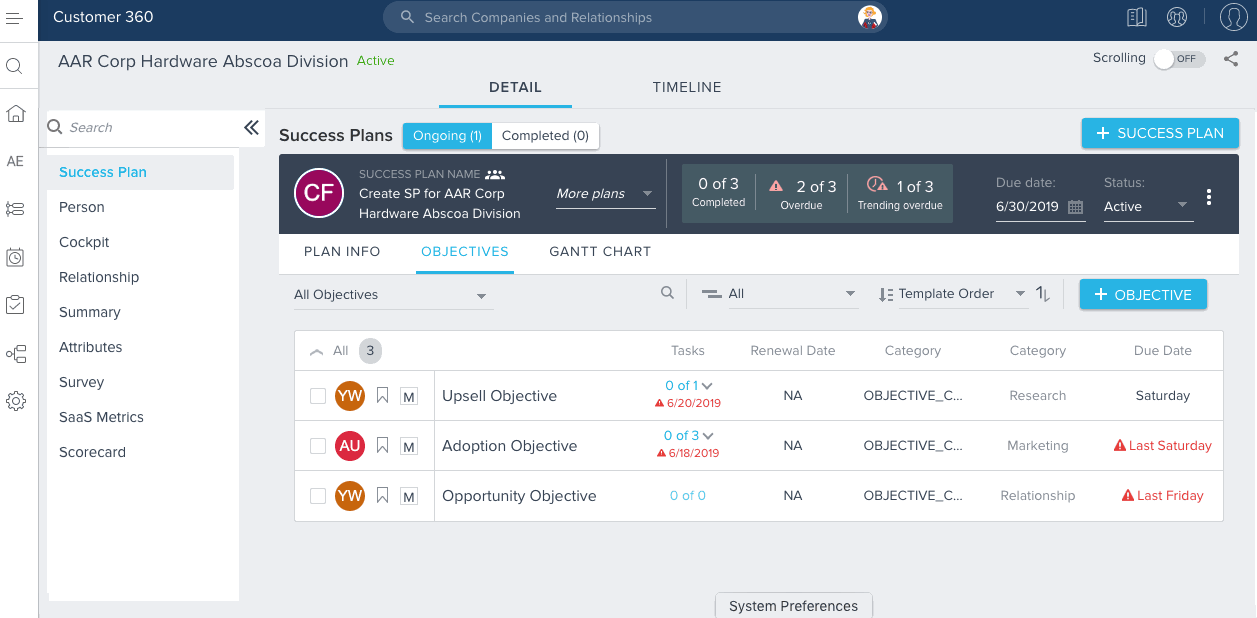
Note: If your Success Plan has a list of objectives, whose names include numbers before the name, when you sort by Name, the objectives that include numbers are displayed first, followed by the remaining objectives.
Gainsight Data Management
Gainsight Data Management offers you the flexibility and full control over your object structure, schema and data within Gainsight. Create and edit all aspects of your data design through an administrative interface to continually develop your Gainsight schema with your evolving business.
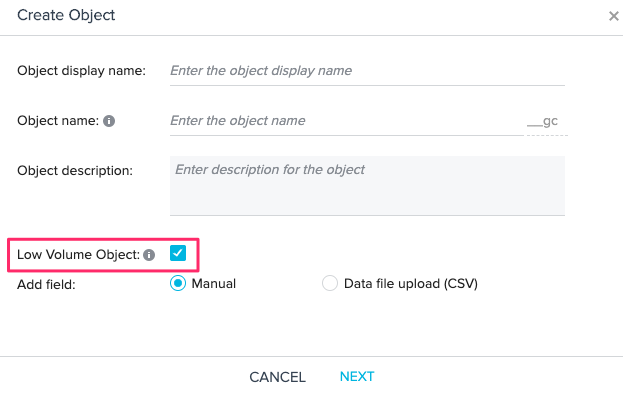
- Low Volume Custom Objects: Low Volume Objects are custom objects that can be created by Admins from the data management page to store low volume data which needs to be edited frequently. Previously, these objects were called Transactional custom objects, and Admins could only create them after consultation and approval from Gainsight Support.
Admins can now create these objects directly from the data management page without having to contact Gainsight Support. To create a Low volume object:- Navigate to Administration > Operations > Data Management.
- Click +OBJECT.
- In the Create Object dialog box, enter the following details:
- Object display name: The easily understandable object display name that you want to create.
- Object name: System defined object name with a suffix of __gc (Auto-generated, based on the name entered in Object display name).
- Object description: A description of the object being created.
- Low Volume Object: Select this Checkbox to create the custom object of type Low Volume.
- Select either Manual or Data file upload (CSV) as required.
- Click NEXT to continue creating a Low Volume object. For more information, refer to Gainsight Data Management article.
Post upgrade to latest Gainsight version, following are the limitations applied to the Low Volume custom objects:
- A maximum of 50 Low Volume custom objects can be created in an Org.
- A maximum of 50 fields can be created in each Low Volume custom object.
- A maximum of 1 million records can be stored in a Low Volume custom object.
- All the fields in this object of type, Rich Text Area, can store values having up to 150k characters, whereas RTA fields in the High Volume objects can store values with up to 15,000 characters.
You can load data into Low Volume custom objects from one of the following data loading channels:
- Data Management > Import Data
- Bulk API
- S3 Connector
- Rules Engine > Load to Gainsight Object Action type
- Custom Object APIs
You can create, view, edit, and delete existing records in a Low Volume custom object from the Data Operation page. For more information on this, reference the enhancement under Data Operation.
Following are the major advantages of using Low Volume object over high volume:
- Users/CSMs can edit any record in this object, from a report added to the C360/R360 > Related List section, corresponding to the Company or Relationship. For more information, refer to the enhancement from the C360/R360 section.
- Data can be loaded into the Low Volume custom objects using Custom Object APIs. For more information on using these APIs, refer to Custom Object API Documentation article.
If you do not select the Low Volume Object checkbox while creating a custom object as shown in the image above, the objects are considered High Volume Objects. None of the limitations shown above are applicable to High Volume custom objects.
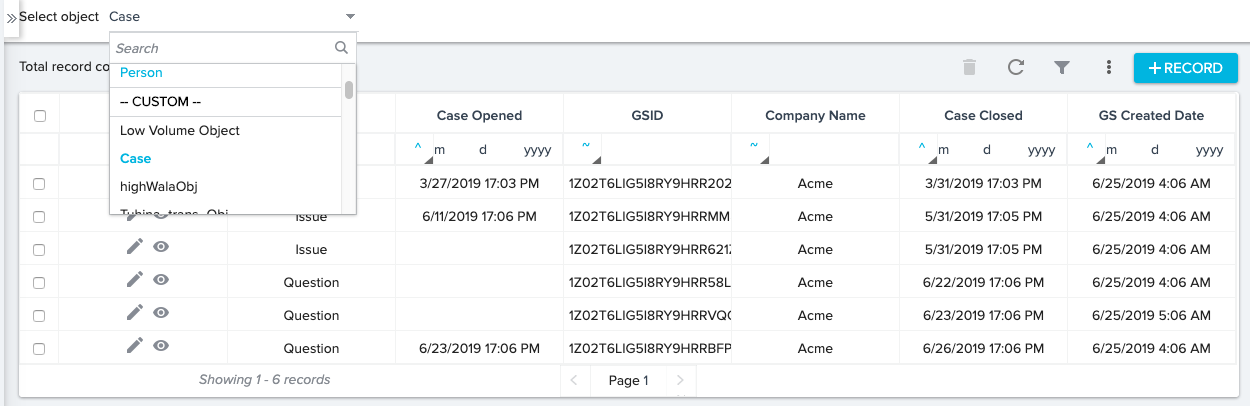
- Manage records in the Low Volume Custom objects from the Data Operation page: You can now add, view, edit, and delete existing records in a Low Volume custom object from the Data Operation page. Earlier this page has been supported to manage records from the Company, Relationship, and High Volume custom objects only.
To manage records from the Low Volume custom objects:- Navigate to Administration > Data Operation.
- Select the required Low Volume custom object from the dropdown as shown below. You can now see all the records from the selected object.
You can now create new records, view, edit, and delete the existing records from this page. For detailed instructions, refer to Data Operation article.
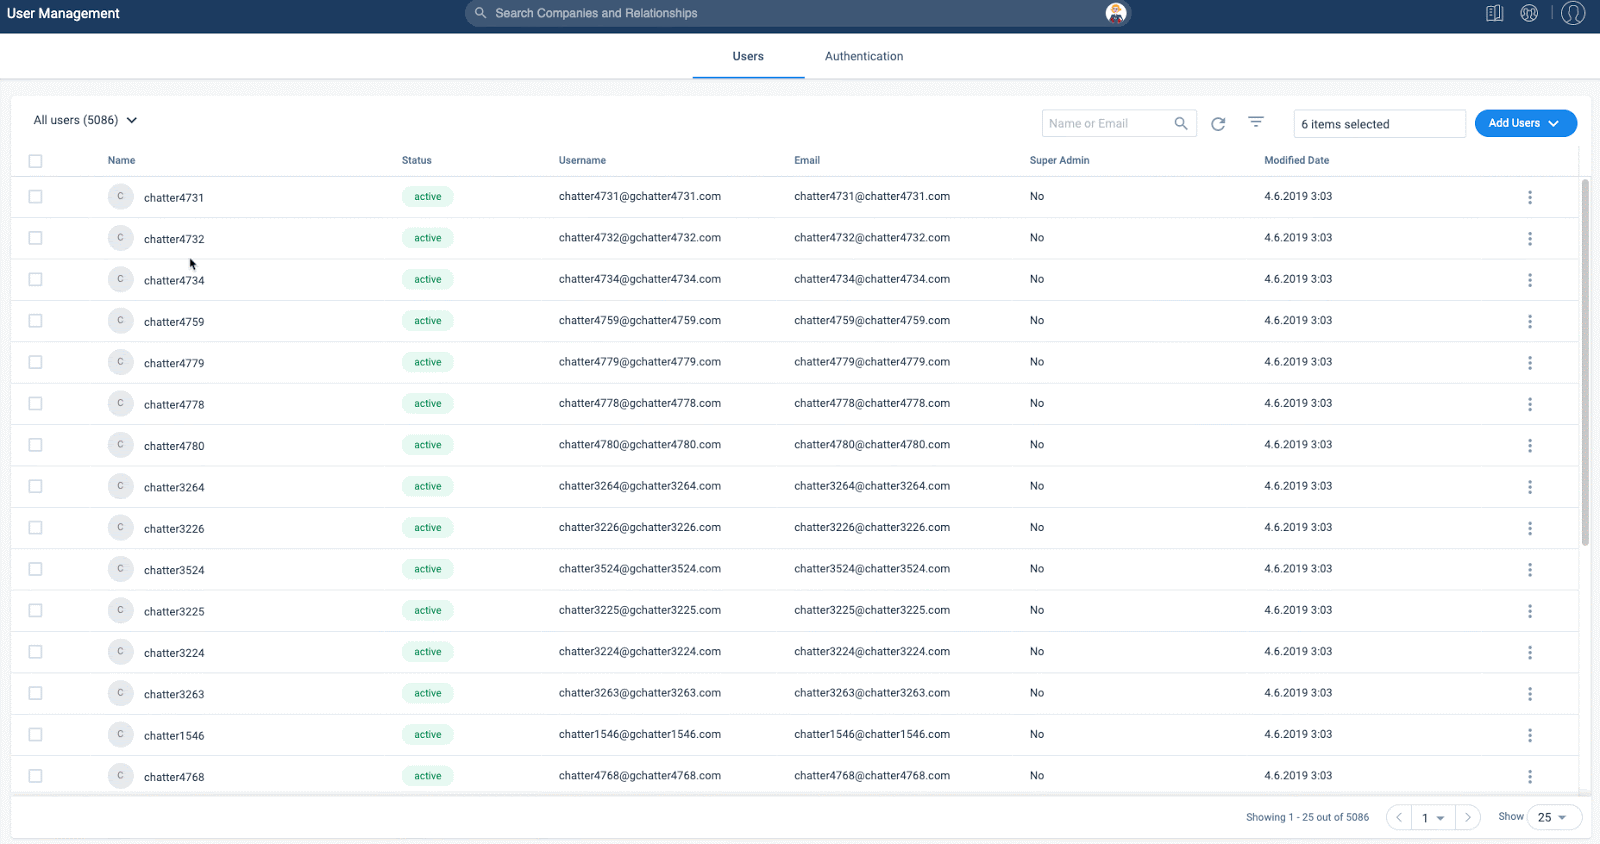
- Major Functional and UI enhancements to the User Management page: User Management is an administration feature which allows an Admin to add and manage users in the Gainsight User object.
Admins can also grant users access to Gainsight NXT and Sally. This feature supports the configuration of different authentication mechanisms supported in Gainsight NXT, through which users can verify their identity and login to Gainsight.
Gainsight’s User management is now enhanced to provide a better Admin experience by making functional and UI changes that make it easier to manage Gainsight users.
Following are the major functional enhancements in the User Management page:
- Avatars tab is now removed. You can now add users from an external system through Add Users > Add User from External Systems. You can now filter Gainsight users by selecting an External System (Ex: Slack, Salesforce, etc.) and Connection in the system directly from the Users tab and grant Sally access to the selected users. This enhancement helps Admins by reducing navigation time to add users from external systems and grant Sally access. To add users from an external system:
- Navigate to Administration > User Management.
- Select Add Users > Add User from External Systems.
- Select Connection Type, Ex: SLACK, SFDC, etc. from the dropdown.
- Select the required Connection from the dropdown.
- Select the required users.
- Click Load Users.
Note: While adding users from any channel, you should always adhere to Gainsight license entitlement numbers.

- You can now grant Sally access from the User Management Homepage to the users added from any Slack channel. To grant Sally access to Gainsight users:
- Select Slack and the required connection from the dropdown list in the Users page. This action loads all of the users added from the selected connection.
- Select the required users.
- Click Enable Sally Access from options in the top left of the page.
- Click Disable Sally Access from options to withdraw Sally access for the selected users.
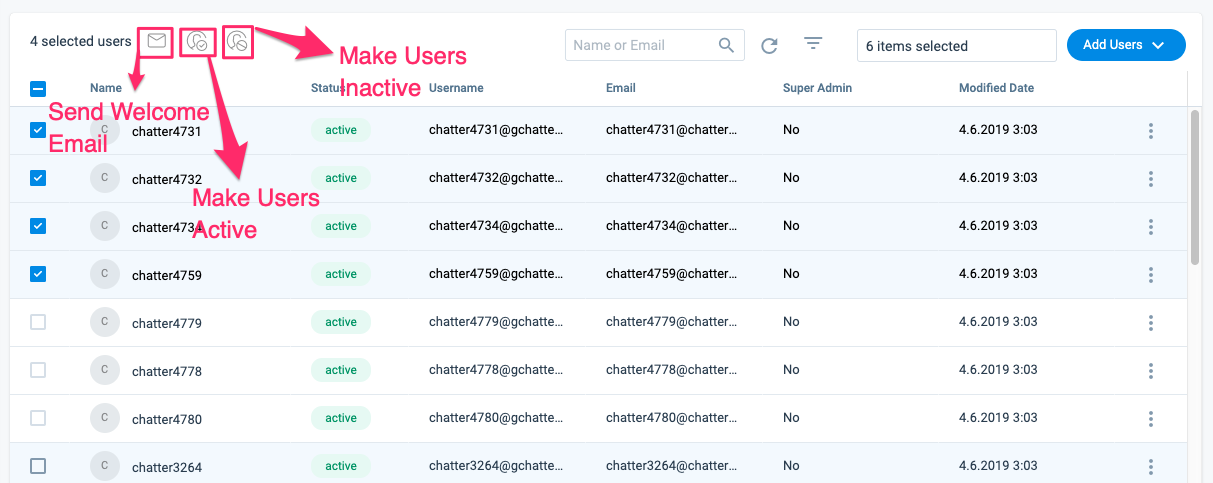
- You can now send Welcome Email, Mark Users Active, Mark User Inactive for multiple users in a single instance. To see this enhancement:
- Select the required users directly or filter Active users/Inactive users or users from a specific Connection (Ex: Slack, Salesforce, etc.) using dropdown at the top left of the page.
- Click one of the following options as required:
- Send Welcome Email: To send Welcome Email to all the active users.
- Make users Active: To mark selected users as Active.
- Make users Inactive: To mark selected users as Inactive.
Note: You can also perform the above actions for a single user as earlier.
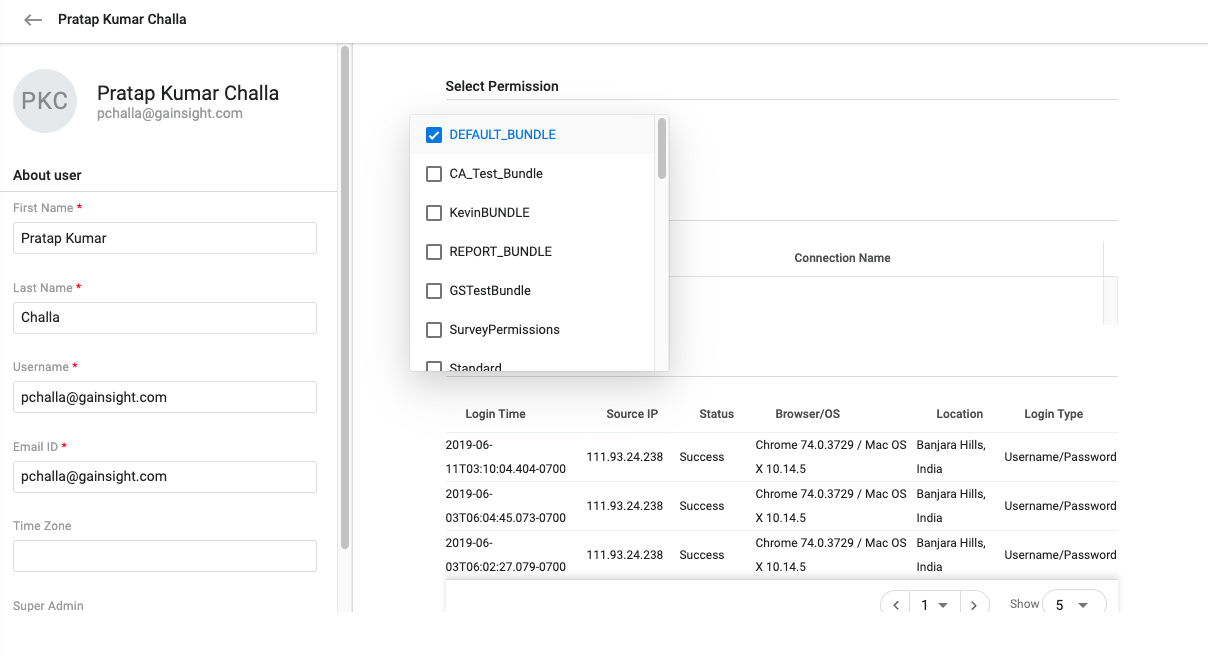
- While editing a user record, you can now see all the standard fields from the User object in the left pane and all the custom fields on the right pane. You can edit the values in these fields as required. To see this enhancement, select Edit User from the options of a user record.

- While editing a user record, you can now see all the permission groups assigned to a user in a dropdown. Earlier, these permission groups have been shown in a table in the Permission List section.
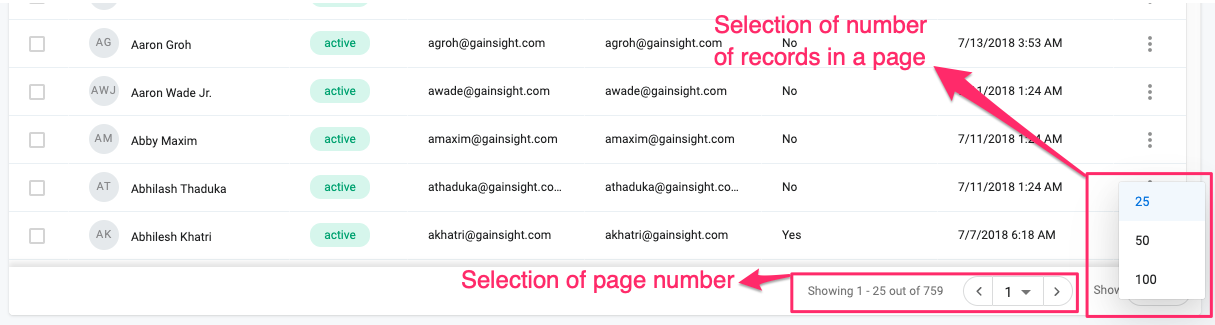
- You can now select the number of user records that you want to display in a Users list page. You can select a number, either 25, 50, or 100, from the Show dropdown at the bottom right of the page. You can also select the page number to see user records in the respective page.
Along with the functional enhancements, user interface of the User Management page is now fully enhanced to provide better user experience. For detailed information, refer to User Management article.
Surveys (CX)
With Surveys, you can create highly customized surveys that capture customer insights and transform them into actionable next steps for your organization. You can easily create multi-page surveys with a variety of question types, including multiple choice, matrix, and a standard NPS® question type. Surveys gives admins the ability to design and distribute surveys in Gainsight without a dependency on sites or features.
-
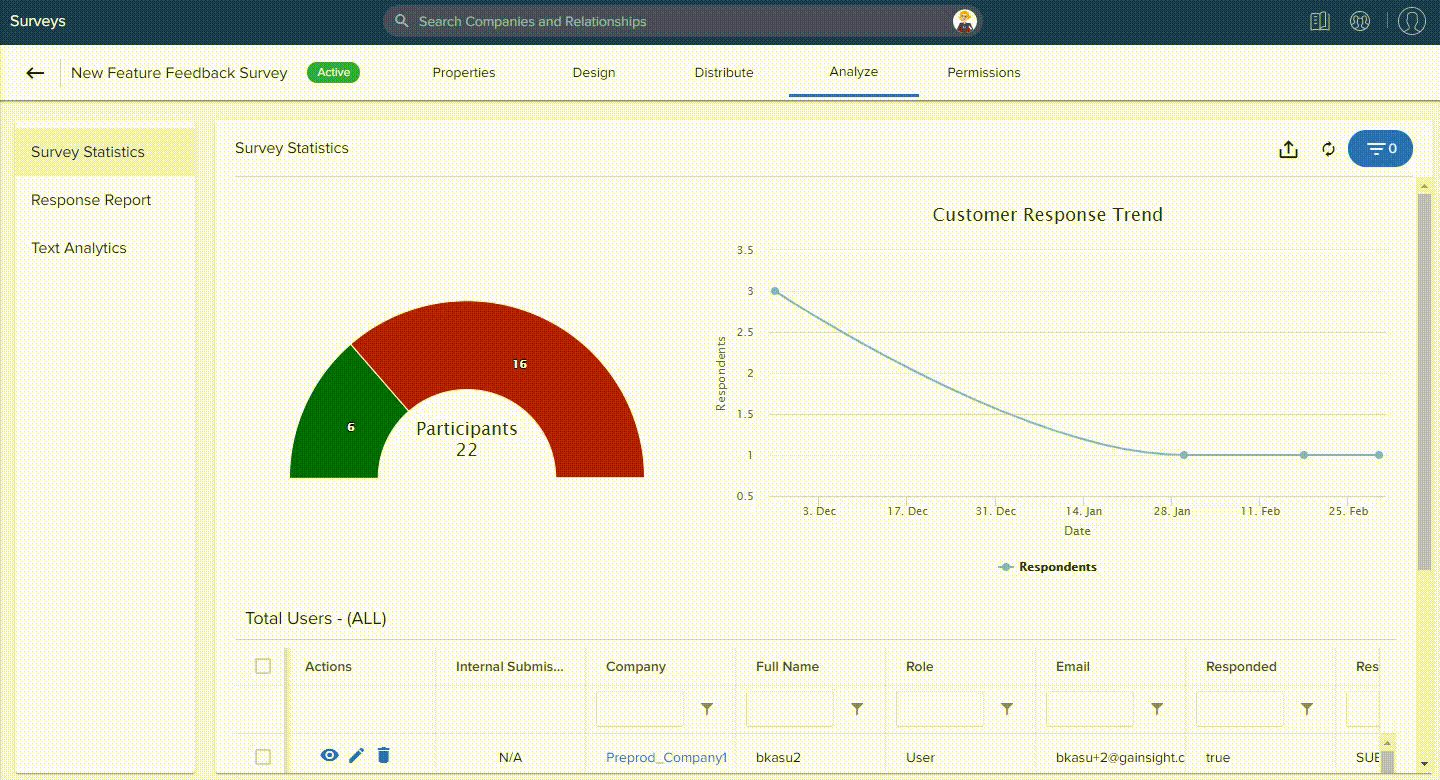
Ability to Edit or Delete submitted survey responses: Previously, Admins could only View the responses of submitted surveys. With this release, Survey Analyze page is enhanced with Editing and Deleting capabilities, which allows Admins to Edit or Delete any submitted responses. For more information on Survey Analytics, refer to Survey Analytics Overview article.
Use Cases:
- The Edit option in the Survey Statistics tab allows Admins to correct or complete responses from participants on their behalf, or remove redundant or incorrect values from the responses.
- If you receive invalid responses from participants, and you don’t want those invalid responses to effect the survey analytics, you can delete the invalid responses using the Delete option in the Survey Statistics tab.
To use the Edit option:
- Navigate to Survey > Survey List > Select the Survey > Analyze > Survey Statistics.
- Select the response you want to Edit, from the participant chart.
- Click the Edit icon in the Actions column. A new window opens and displays the survey question(s).
- Edit the responses.
- Click SUBMIT, and you will see the “This will change the response. Do you want to continue?” message.
- Click Yes to save the changes.
To use the Delete option:
- Navigate to Survey > Survey List > Select the Survey > Analyze > Survey Statistics..
- Select the response you want to Delete, from the participant chart.
- Click the Delete icon in the Actions column, and you will see the “The selected records will be deleted from the system and will not be available for the analytics or any other use.” message.
- Click DELETE.

All the edited/deleted response information is stored in the Survey Audit Log object. Admins can build reports using the Survey Audit Log object to see who has edited/deleted the responses for a specific survey, modified date of the responses, etc.
To build a report on edited surveys:
- Navigate to Administration > Analytics > Report Builder.
- Click + REPORT to create a new report.
- Select the Survey Audit Logs as the source object.
- Add Action Type, Person Id and Modified Date fields to Show me section.
- Click RUN to see the records in the report.

Notes:
- You can select and delete a maximum of 10 responses at a time.
- You cannot edit SurveyMonkey responses that are imported to Survey.
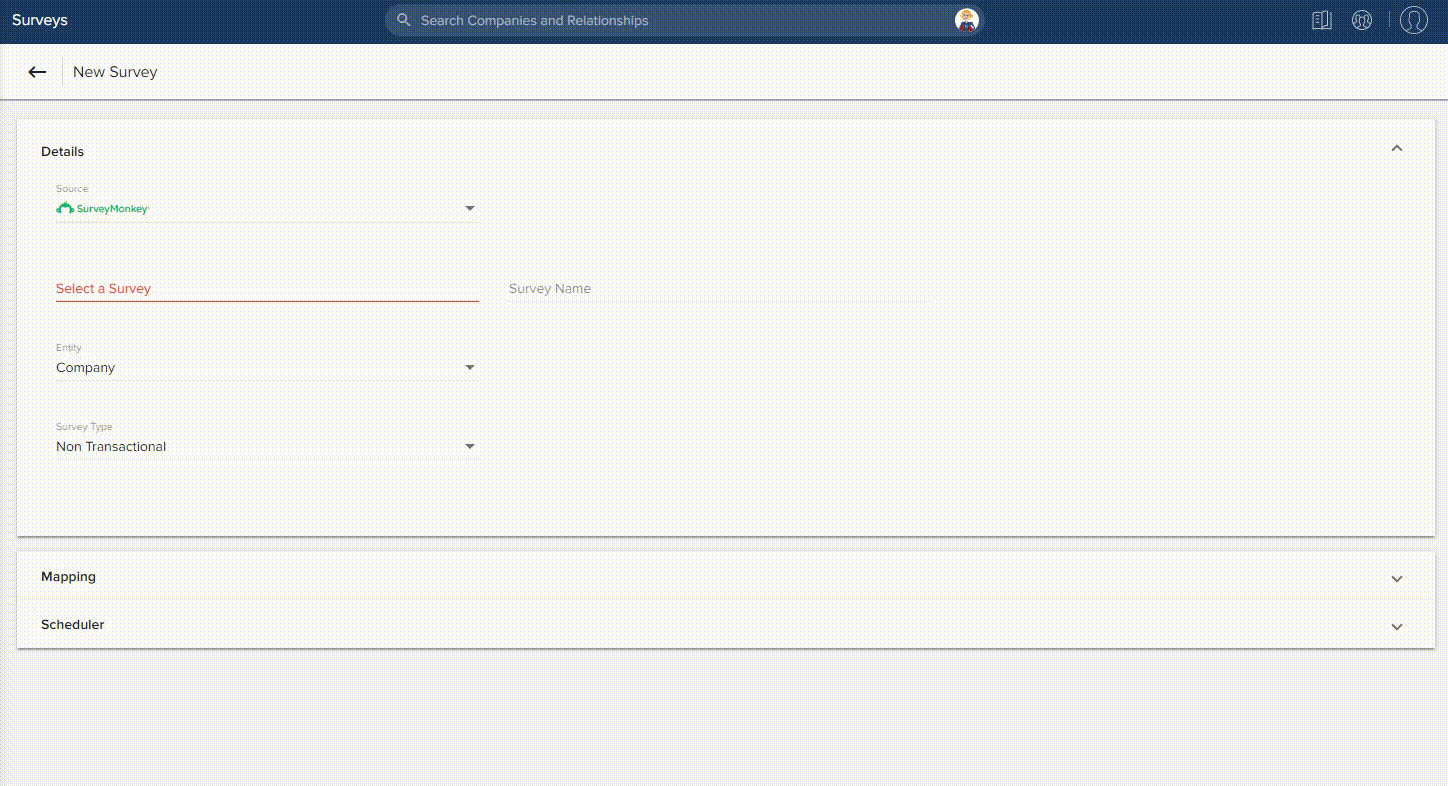
- Ability to import Transactional survey type from SurveyMonkey to Gainsight Survey: Previously, Admins could only import surveys of Non Transactional survey type from SurveyMonkey. With this enhancement, Admins can now import surveys of Transactional survey type from SurveyMonkey.
Transactional surveys are event based, such as after training or a conference, after case closure, or after an opportunity is closed. For more information on how to integrate SurveyMonkey with Gainsight Surveys, refer to SurveyMonkey Integration article.
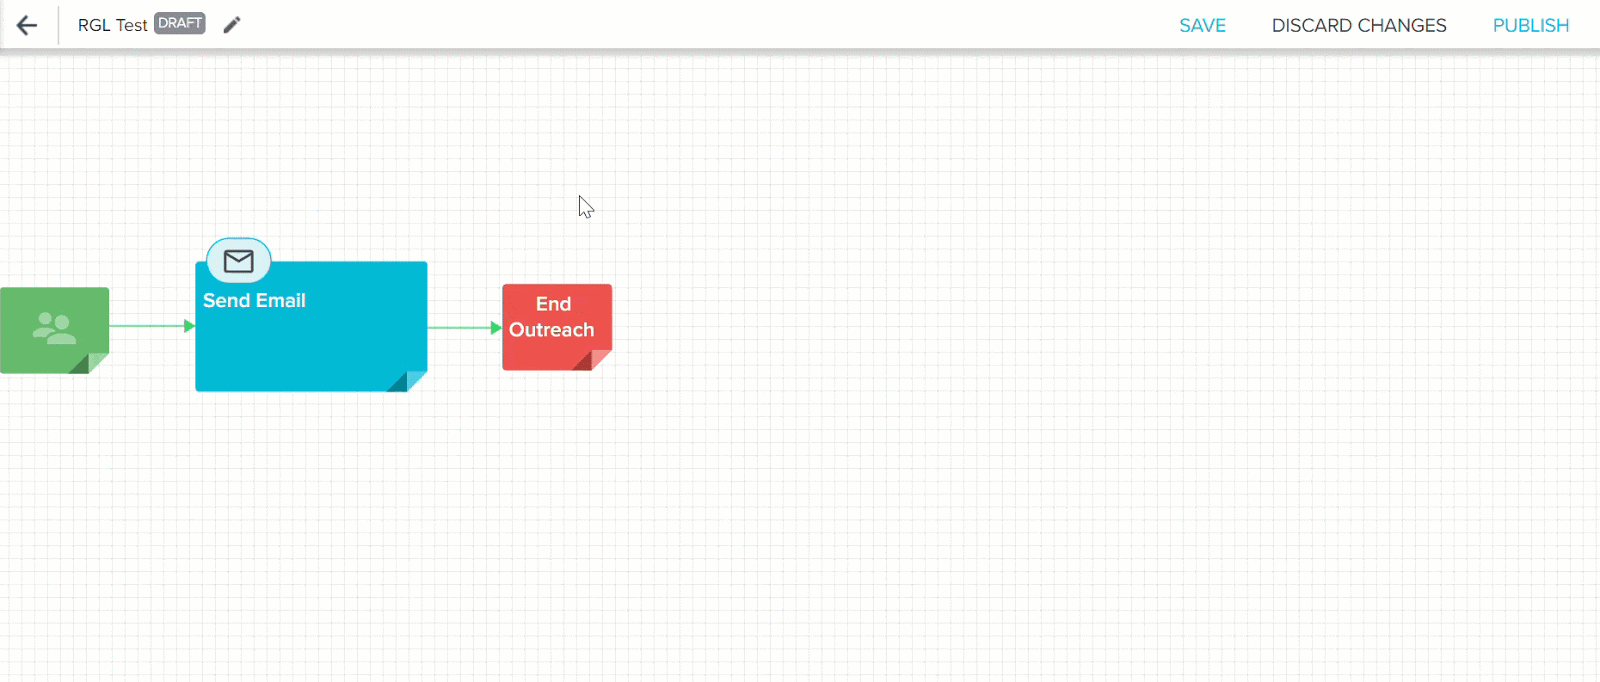
Journey Orchestrator
Journey Orchestrator enables you to design integrated customer journeys that blend human and digital touchpoints to guide customers to enhanced outcomes. Journey Orchestrator can simultaneously analyze multiple sources of customer data to uncover the trends that affect your customers’ success. Then you can orchestrate dynamic, multi-step journeys that adjust to each customer to create effective, personalized engagement at scale. For more information, refer to Journey Orchestrator & Automated Email Overview article.
-
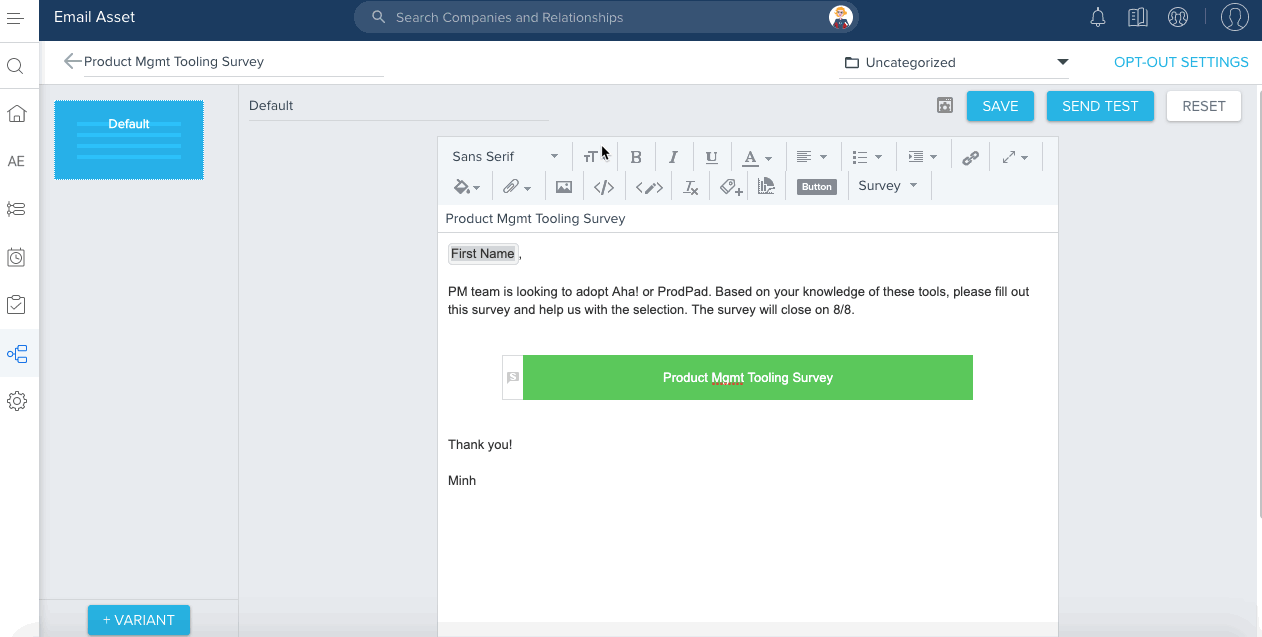
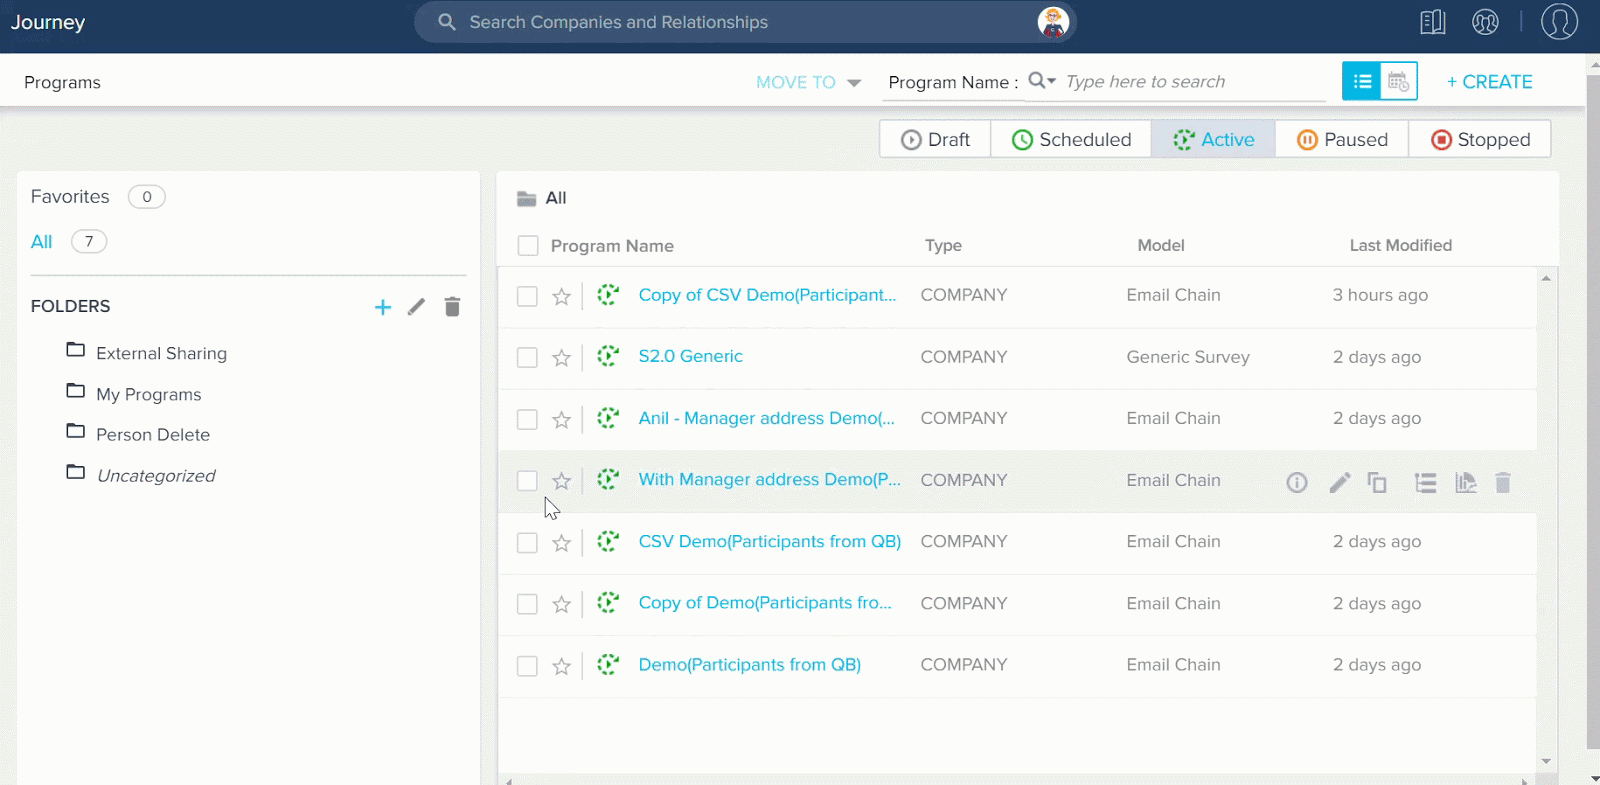
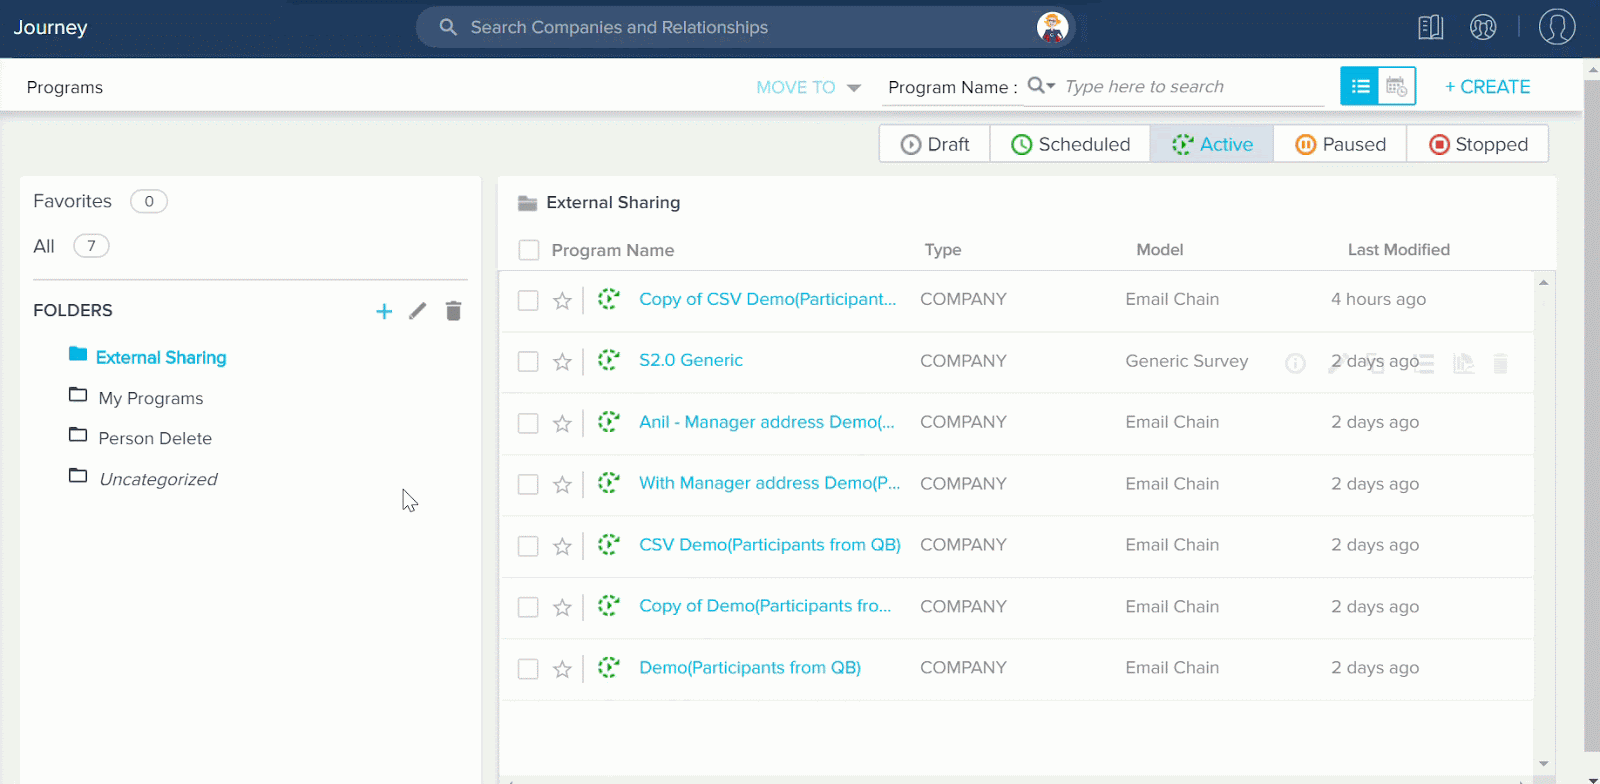
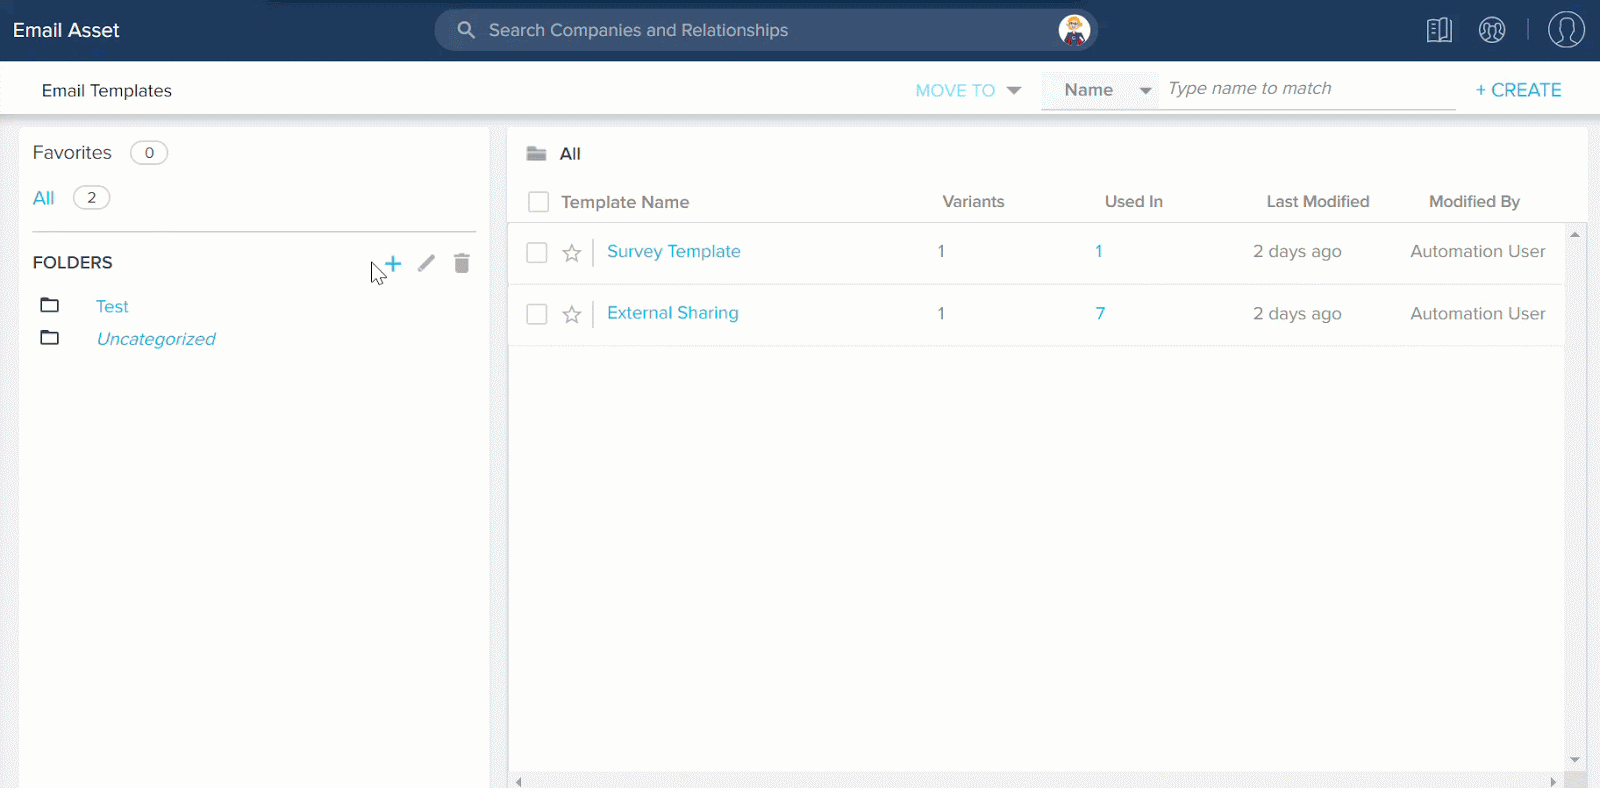
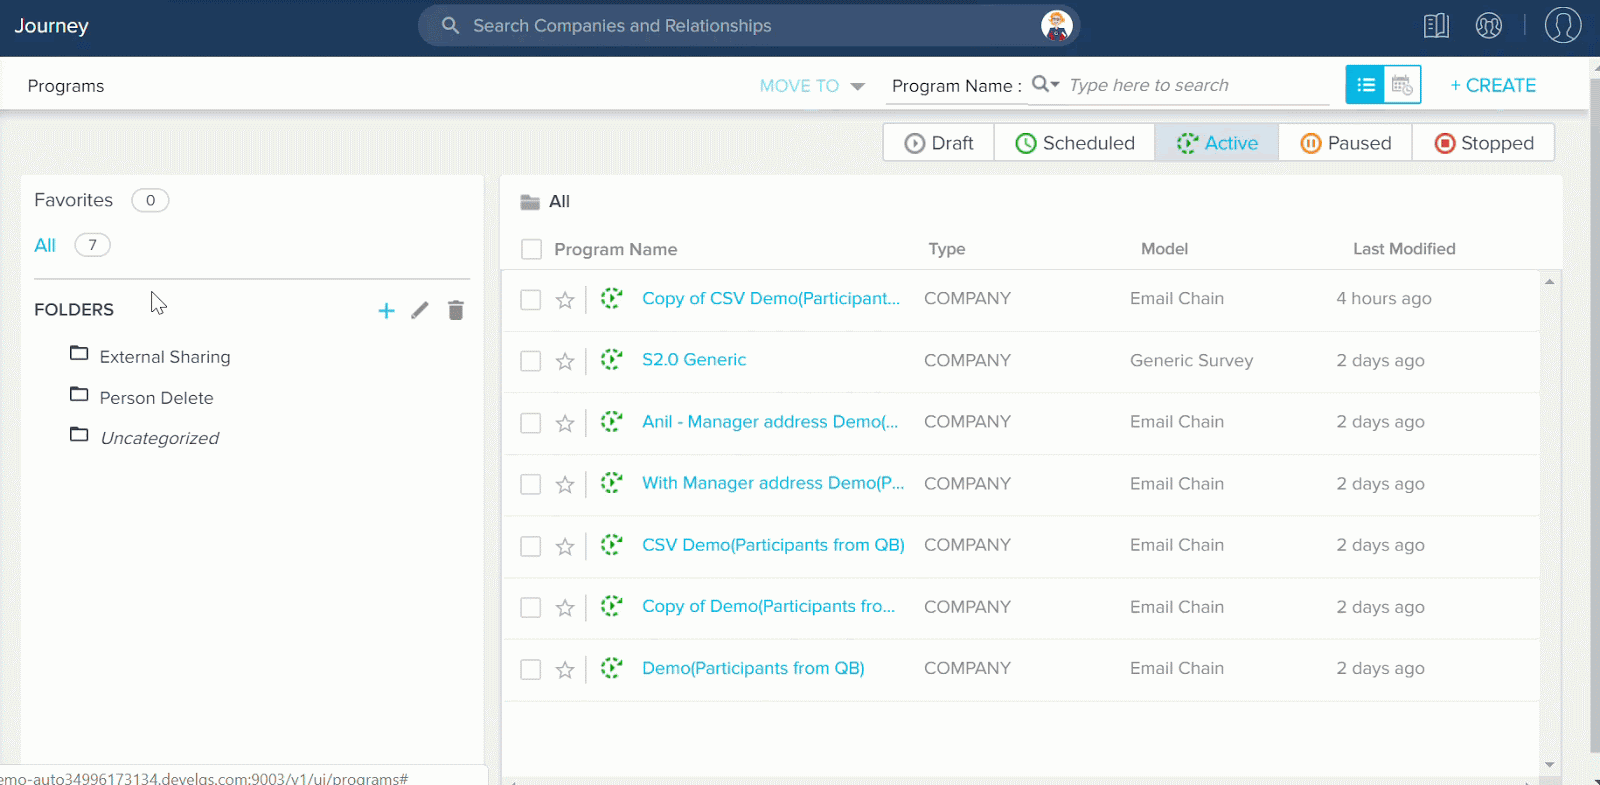
Ability to Create Folders in Email Templates and Programs pages: With this release, you can now create folders in Email Templates and Programs pages to organize your templates and programs respectively. All the folders are displayed in the left pane on the respective page. If you click any particular folder name, all the templates or programs included in that folder are displayed in the right pane. Gainsight provides a default folder called Uncategorized where all of the existing Email Templates and Programs are stored. You cannot modify the name of this folder or delete it.
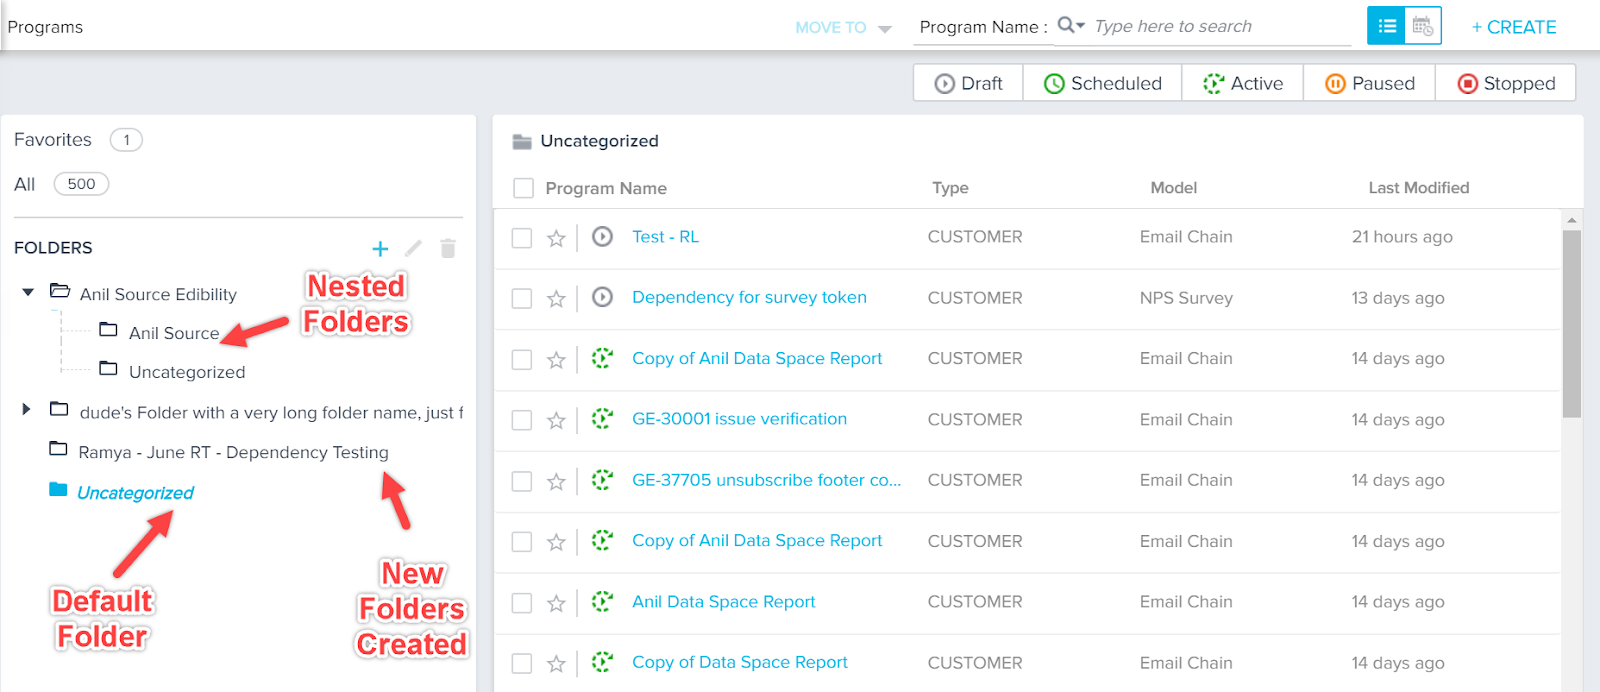
You can create new folders and move the existing email templates and programs into the new folder. You can also nest any number of folders in another folder.
You can perform the following tasks with folders:
- Create Folder
To create a new folder:
- Click the + icon.
- (Optional) Select the folder under which you want to nest this folder.
- In the Folder Name field, enter a name for the folder.
- Click ADD.

- Move Email Templates/Programs to Folder
Once you create a folder, you can move the Email Templates and Programs created into the newly created folder.
Note: Single Email Template or Program cannot be part of multiple folders.
To move the email templates/programs to a folder:
- Select the check box for the required email template(s)/programs(s).
- From the MOVE TO dropdown list, select the required folder or drag and drop to a particular folder.
- Click OK.
- Delete Folders
You can delete a folder if it has no other sub folders under it or it does not contain any Email Templates/Programs. You cannot delete the Uncategorized folder.
To delete a folder:- Select the required folder and click the delete icon.
- Click OK.
-
Folders for new Email Templates and Programs
In Email Templates
The New Email Template page is now updated with the Folder dropdown list. You can now select a folder for the new email template. By default, Uncategorized folder is selected in the Folder dropdown list. If no folder is selected, the Email Template is moved to the Uncategorized folder.
In Programs
The New Program page is now updated with the Folder field. You can now select a folder for the new Program. If no folder is selected, the Program is moved to the Uncategorized folder.
- Add contact to CC while sending Operational Emails: Previously, users could not add contact to the CC list for emails sent through Journey Orchestrator. With this release, users have an option to add the cc list to the email by selecting CC checkbox, which is enabled while sending only Operational Emails in JO. Currently, only 3 email recipients can be added to the cc list.
In Email Logs and Program emails, users can also track individual email events, such as open, click, and others, for ‘to’ and ‘cc’ emails.
Note: Analytics report is only generated on ‘To’ emails and not yet supported on ‘CC’ emails.
If CCed Email participant responds to a Survey, the system considers this as an actual participant response and journey moves ahead for that particular participant. If ‘Thank you Email’ is configured, it is sent to the actual (To) participant.
-
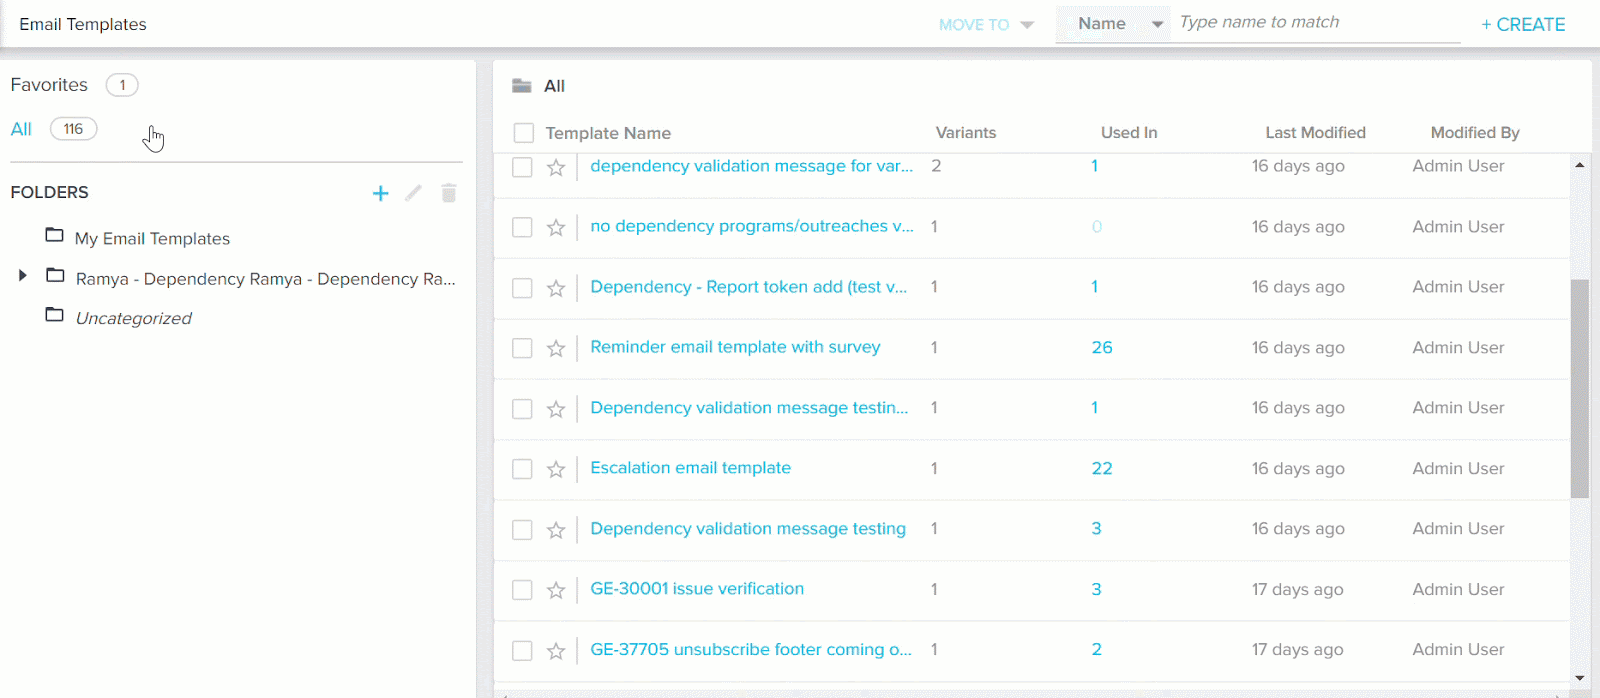
Ability to view Email Templates Used In Programs and Outreaches: Previously, Admins could not easily see which Programs or Outreaches used a particular email template, which created problems when templates were edited or deleted. With this release, Admins can view which Programs or Outreaches the email templates are used in.
To view the list of dependencies of a particular email template:- Navigate to the Journey Orchestrator > Email Templates page.
- In the Used In column of the Email templates list panel, click on the number adjacent to a particular email template. The Dependencies screen of the selected email template appears.
The Admin can view a list of all the Programs and Outreaches, in which this particular Email Template is used, in the PROGRAMS and OUTREACHES tab respectively.
Note: Admins can either click on the particular Program or Outreach to navigate to the respective page, and also search for a Program or Outreach in the Search field. - Click Close icon to close the dependencies screen.

Note: If the Email Template is not used in either Programs or Outreaches, that particular tab is not displayed in the Email Template Dependencies screen.
-
Ability to Edit Sources Post Publish in Journey Orchestrator: Previously, admins did not have the ability to edit sources such as Powerlist, Bionic Query, CSV, and Events in Journey Orchestrator, after the relevant Program was published. Admins can now edit/delete the sources of an Active program even after it is published. This solves many problems for customers. For example, if an admin adds a CSV file or a sample source to test the program for some participants, now they can come back and delete the existing source and add a new source, to the same set of participants, before making the program live.
Admins can perform the following actions to the Sources of an Active Program after it is published:
- Add and merge tasks in Bionic Query.
- Add new fields to the existing source.
- Map the new fields and also modify the existing mapping.
- Make modifications in source filter criteria.
- Add/Delete participant source(s). But, at least one source must be present.
- Delete existing Custom fields if they are not used in any other criteria or steps.
By default, source modifications performed by an admin are only applicable to the new participants added in the program, and do not impact the already synced participants. Admins must use the Sync icon to manually sync the participants to immediately apply the modifications to the source. After the sync is done manually, participants are added to the Program list in the REVIEW state.
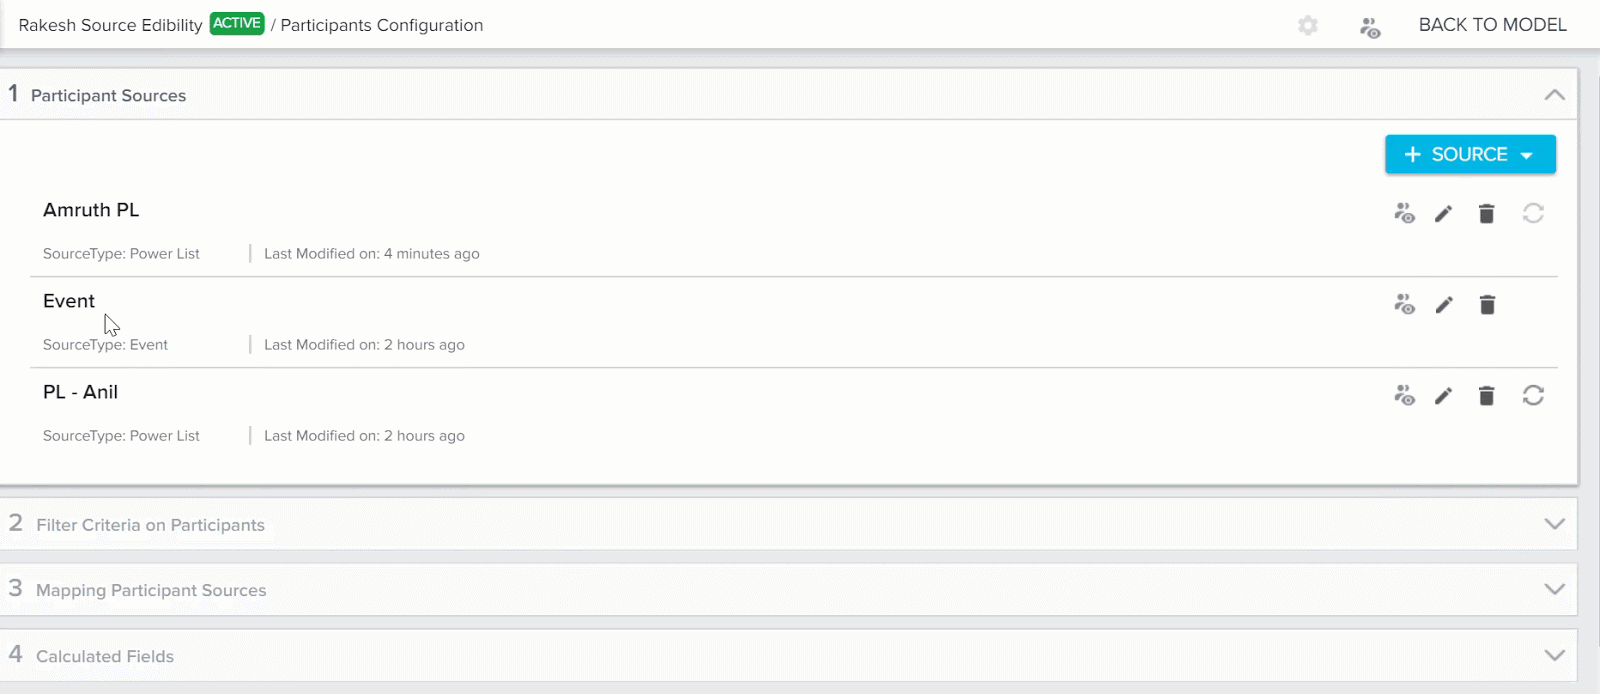
If Admins sync the participants manually, they must navigate to the Participants list page and perform the following actions as per their requirement:
- ADD TO PROGRAM: Adds participants to the existing Program.
- KNOCK OFF: Knocks off the participant from the program and they no longer receive messages as part of the Program.
- REMOVE: Removes the existing participants from the Program, if added unintentionally.
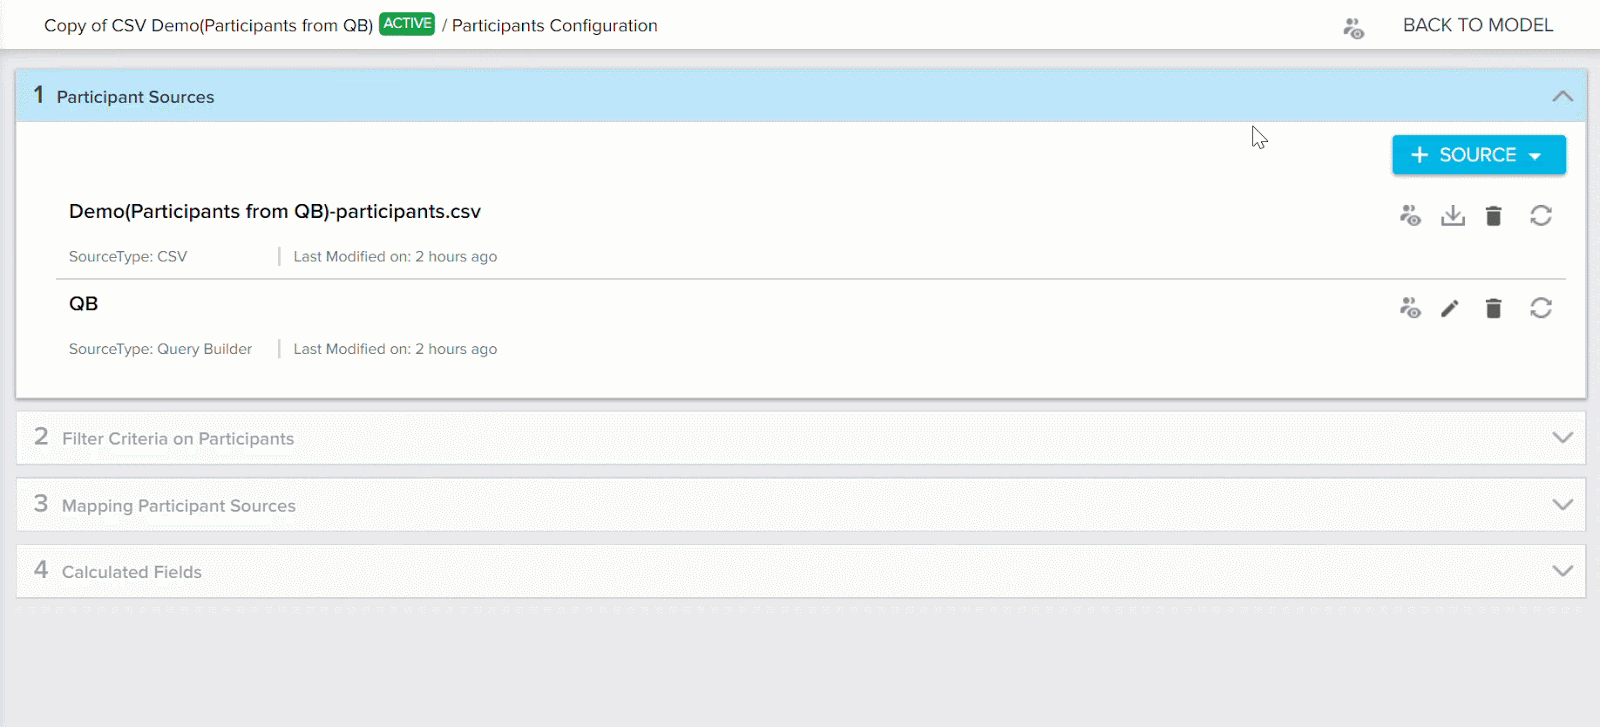
Additionally, bulk KNOCK OFF and REMOVE options are supported in this feature. Admins can use this feature to move all of the participants to Knock off state and even remove them completely from the Program, if they are not required.
Note: Select all checkbox, for bulk Knock off and Remove options, is only enabled when the participants are filtered by REVIEW, NEW, or ACTIVE state.
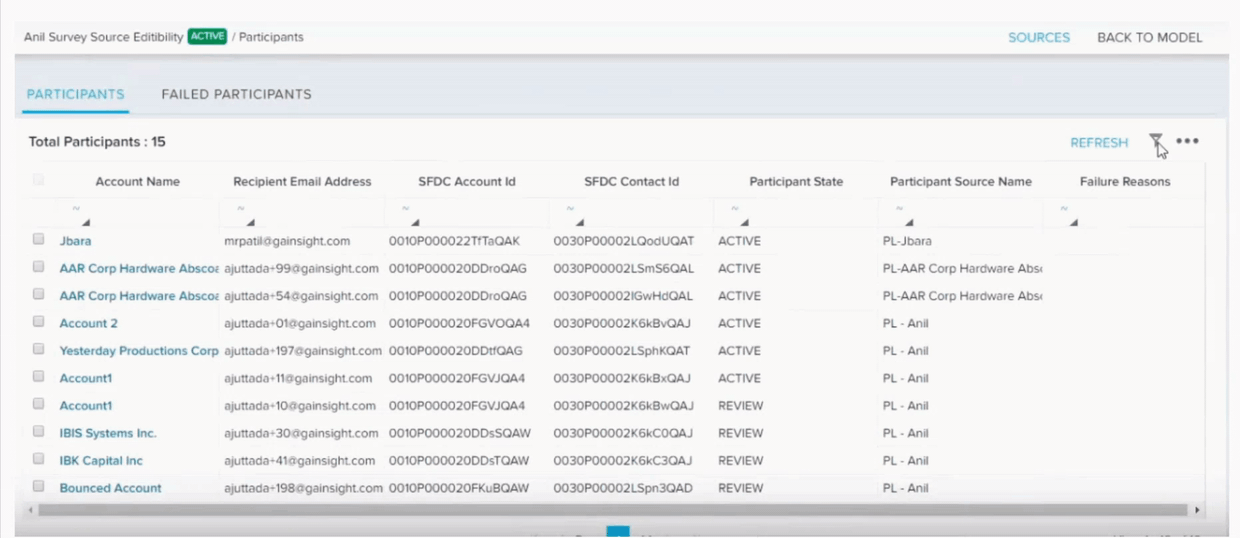
If syncing of the participants for an Active program is scheduled for an automatic syncing after adding new source to a program, this also publishes all the Review participants present in the system. Before the schedule runs, user must manually KNOCK OFF/REMOVE if they do not want to publish any participant who are already in REVIEW state.
Rules Engine
The Rules Engine is designed to improve your underlying customer data to produce superior customer outcomes. It can perform powerful multi-step, in-memory data transformations for large datasets in Gainsight within one rule. Transformations include aggregations, multi-dataset merges, formulas and time-series calculations; helping your team to better identify meaningful data signals.
Note: The following feature was released in the 6.3.X patch.
-
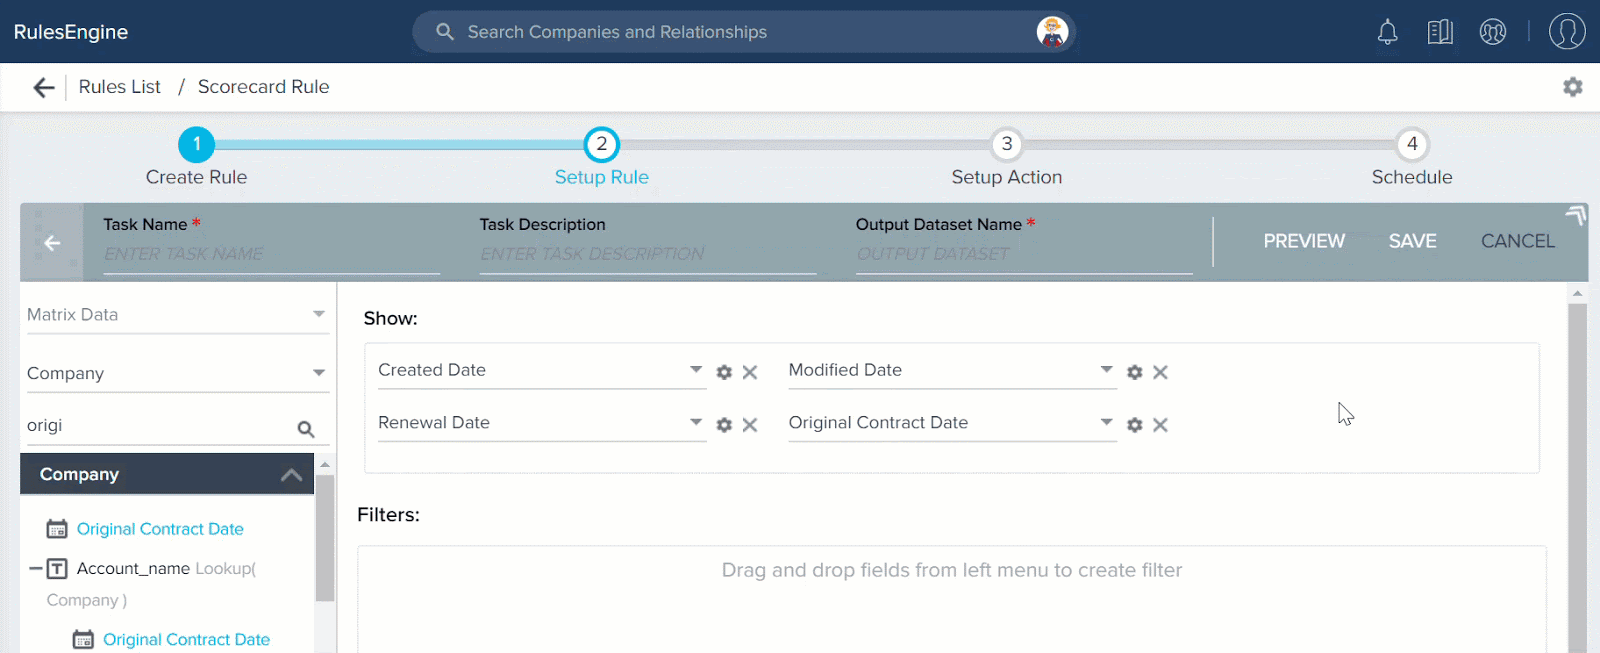
Ability to add or subtract a date: You can now perform addition and subtraction operations on a date. These operations can be performed either on a date used in the dataset, or on the rule execution date. You can add or subtract any number of days or weeks to a date.
Business use case: You can create a field as Renewal Reminder which displays a date which is 30 days prior to the Renewal date field. You can use the Renewal Date field and subtract 30 days from this field.
To use this enhancement:
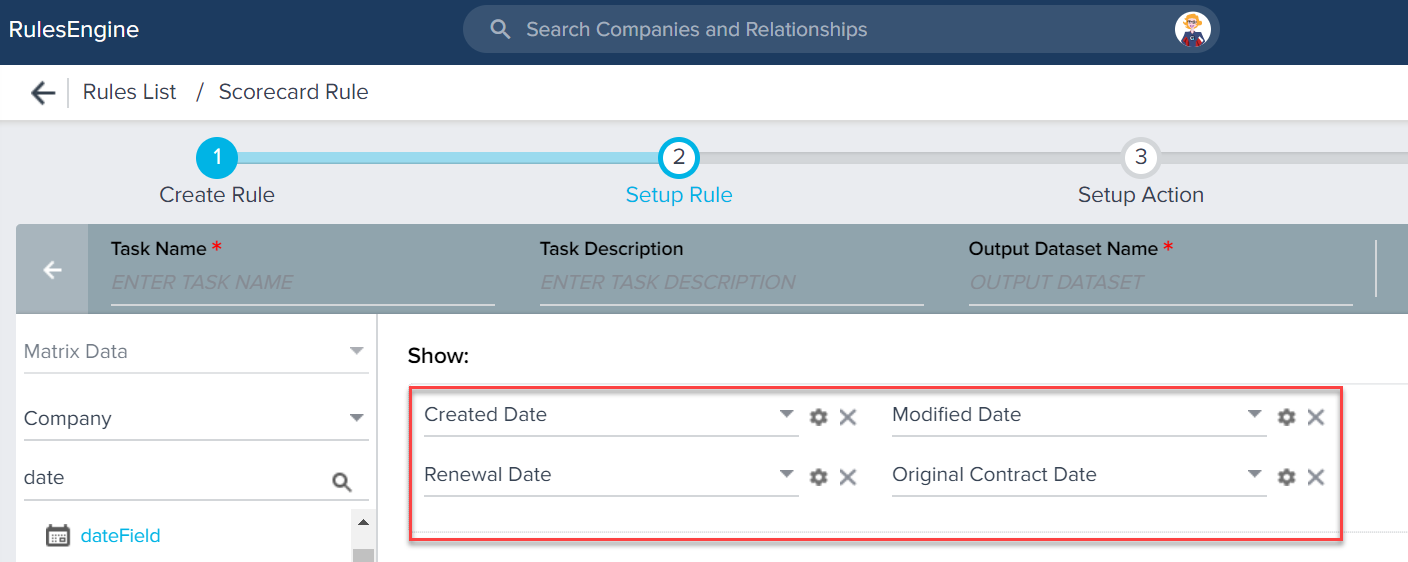
- Click + TASK and select Transformation.
- Select the Dataset created in Step 2 as the source object (here Fetch from Company)
- Expand Date formulas.
- Drag and drop Add / Subtract Date to Show section.
- Enter a name in the Output Field Label field.
- Select a date field either form the Dataset or Rule Date.
- Select either the + or - operator.
- Enter a number in the Value field.
- Select either Days or Weeks in the Value field.
- Click SAVE.
Timeline
Timeline is the official record of your customers. It allows you to log information regarding customer interactions in a way that enables you to quickly gather insights and drive action. The Timeline View in the Customer or Relationship 360 allows you to log and view activities that help you track customer interactions over the course of a customer’s life-cycle. The Timeline View in the Customer or Relationship 360 allows you to log and view activities that help you track customer interactions over the course of a customer’s life-cycle. The Timeline tab in the CTA Detail View allows you to log activities for a specific CTA. These activities will also appear in the Timeline View in the Customer 360.
Note: The following enhancements were released in 6.3.4 patch, on June 4, 2019.
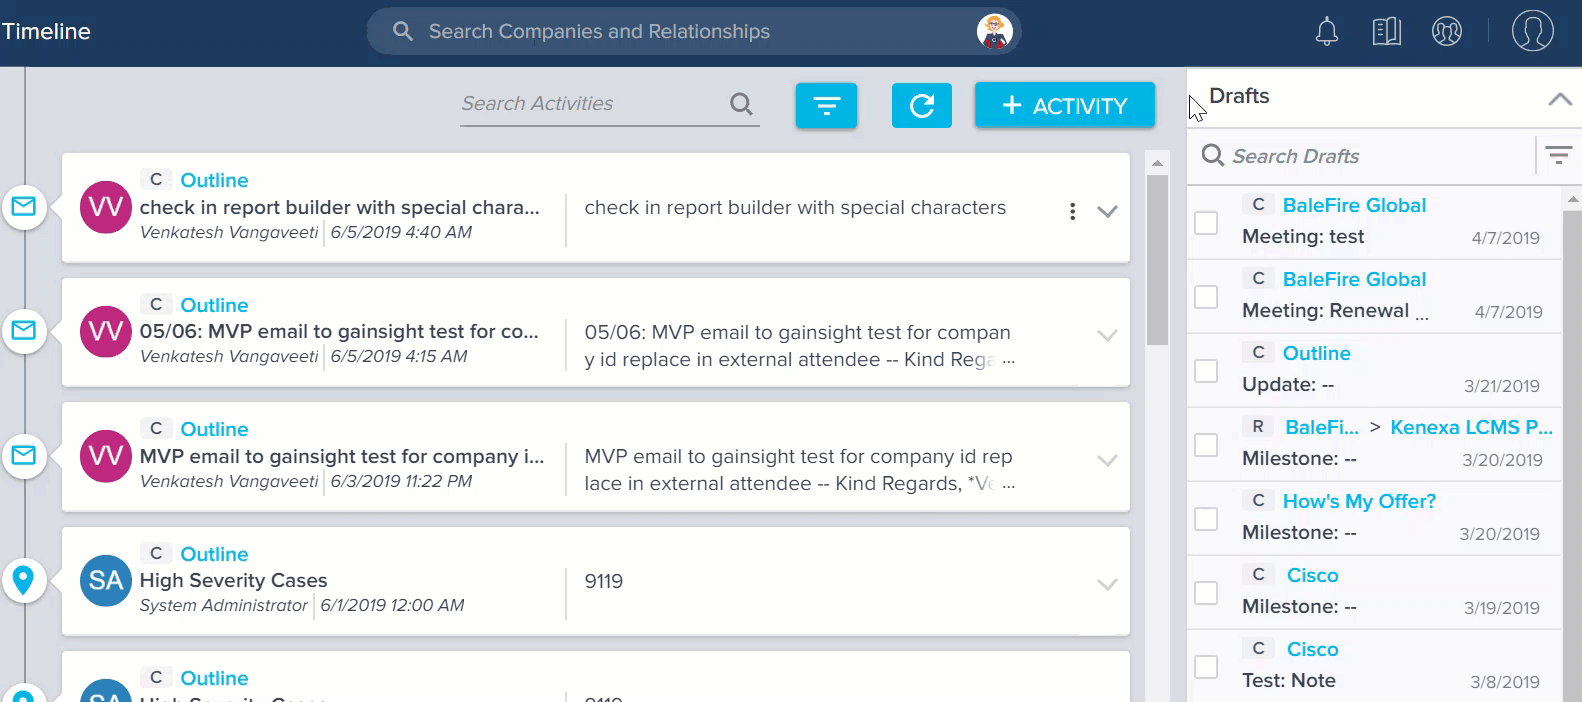
- Draft Activity Limit Per User: Gainsight now calculates your draft limits at the User level and not at the org level. Previously, draft limit was set to 2000 per tenant. This limit will now be calculated at the User level. Each user can log a maximum of 50 drafts. This limit includes:
- Activities which were auto saved as drafts
- E2T emails which were logged as drafts
-
Ability to Mass Delete Draft Activities: Previously, you had to manually delete each draft activity. This was cumbersome when you had many drafts to be deleted. Gainsight now allows you to delete multiple drafts simultaneously. A check box has been introduced for each draft to accomplish this task.
To mass delete drafts:- Select the check box for the required draft(s)
- Click the delete icon.
-
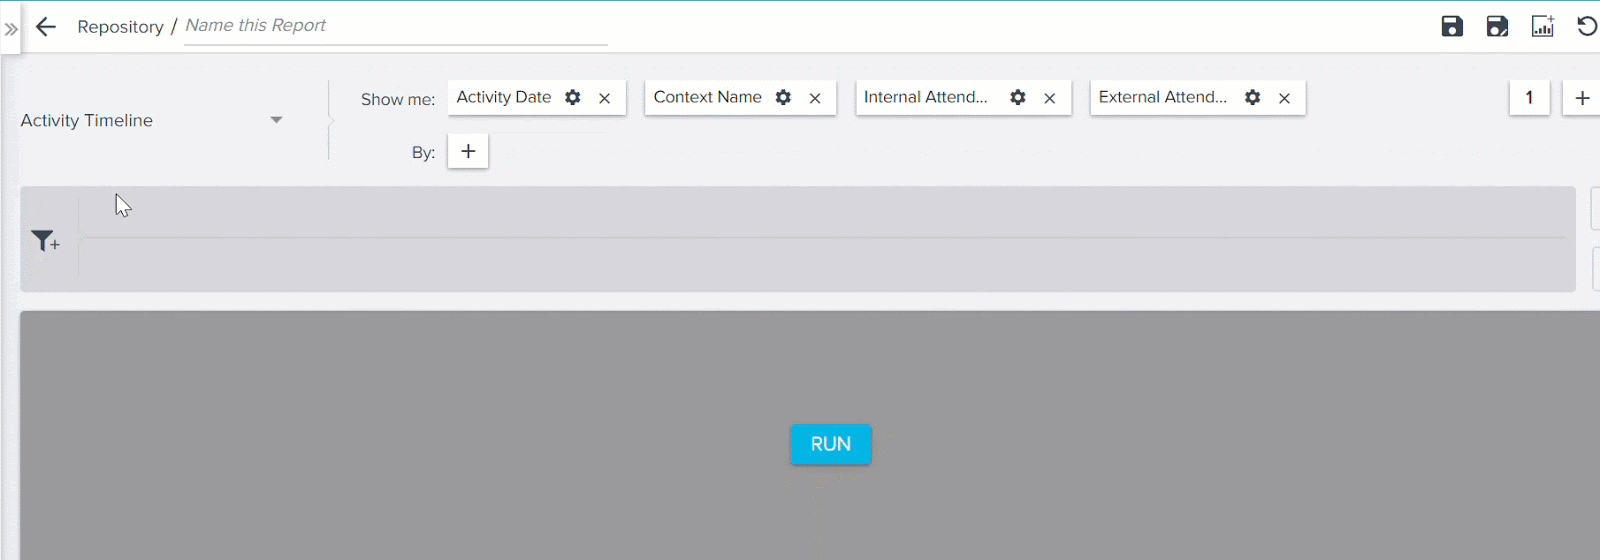
Ability to Create Reports, Rules, and Surveys on Attendees: You can now use the Timeline Internal Attendees and External Attendees fields in various analytical and action based modules of Gainsight. To accomplish this task, Gainsight has introduced the following new components:
- Internal Attendees and External Attendees fields: The Activity Timeline object is now enhanced with two new fields; Internal Attendees and External Attendees. These fields return the list of internal and external attendees (respectively), who attended a particular meeting.
- Activity Attendee Object: A new junction object called Activity Attendee has been introduced. This object has Activity ID and internal and external Attendee ID fields. You can use this object while creating rules or reports which are based on an attribute of a person.
Note: When you type the name of a Person (attendee) in the filter field, ensure that you enter the exact name of the person. You cannot find name suggestions based on the characters entered.
Business Use cases:
-
Reporting: In reporting, you can use this enhancement to address the following use cases:
-
Create a report on the list of activities, organized with a particular person(s) (internal or external) in the past one month, quarter, or year. To accomplish this, use Activity Timeline as the source object and add the required fields in the Show me section. Use the Internal Attendees/External Attendees field in the filter area and enter the name of the required person.
-
- Create a report in which a particular internal or external attendee was involved.
- Create a report which enlists internal or external attendees who have not attended any meeting in a given period of time.
- Review the internal attendees who attended meetings with a customer, who recently churned out.
- Surveys: You can send out a survey to a list of external attendees with whom you recently had an EBR meeting
- Rules Engine: You can create a rule to check when exactly was the last time you met an executive (with a specific role) from a particular company.
-
Failure Reason emails when E2T Email is not logged successfully: Previously, if an email failed to log to E2T or was logged as a draft, there was no notification sent. With this release Gainsight now sends you a email notification when your emails are not logged to E2T or are logged as drafts. To learn about various reasons for which you receive an email notification, refer to the Failure reasons when E2T Emails are not successful section of the Log Customer Emails as Timeline Activities article.
X-Org Migration
In Administration > Migration, Gainsight offers a migration tool to migrate your Custom Object's schema, Reports, Rules, Playbook assets, Data Spaces, Power Lists, and Reports from a source org to a target org. For example, if you have built and tested rules in your sandbox org, you may want to migrate them to your production org. This feature saves Admins valuable time and is enabled by default.
-
Relationship Types Support for Cross-Org Migration: Previously, it was not possible to migrate Relationship types across orgs without manually recreating them. With this release, when you migrate an asset with a dependency on a Relationship type, such as a Rule, the Relationship Type is migrated automatically so you do not have to manually recreate them.
Limitations: When you migrate a Relationship type in NXT, all of the associated layouts and objects will be migrated automatically.
Notes:
- Relationship association will be migrated from a source org to a target org. If the source org contains a global association, then it will be recreated in the target org at the local level.
- If a relationship is associated with a custom object, and that object is not present in the target org, then it will be recreated there as part of the migration.
- It is not possible to explicitly select a Relationship type for migration.
For more information on Relationship Types, refer to Define and Configure Relationship Types article.
-
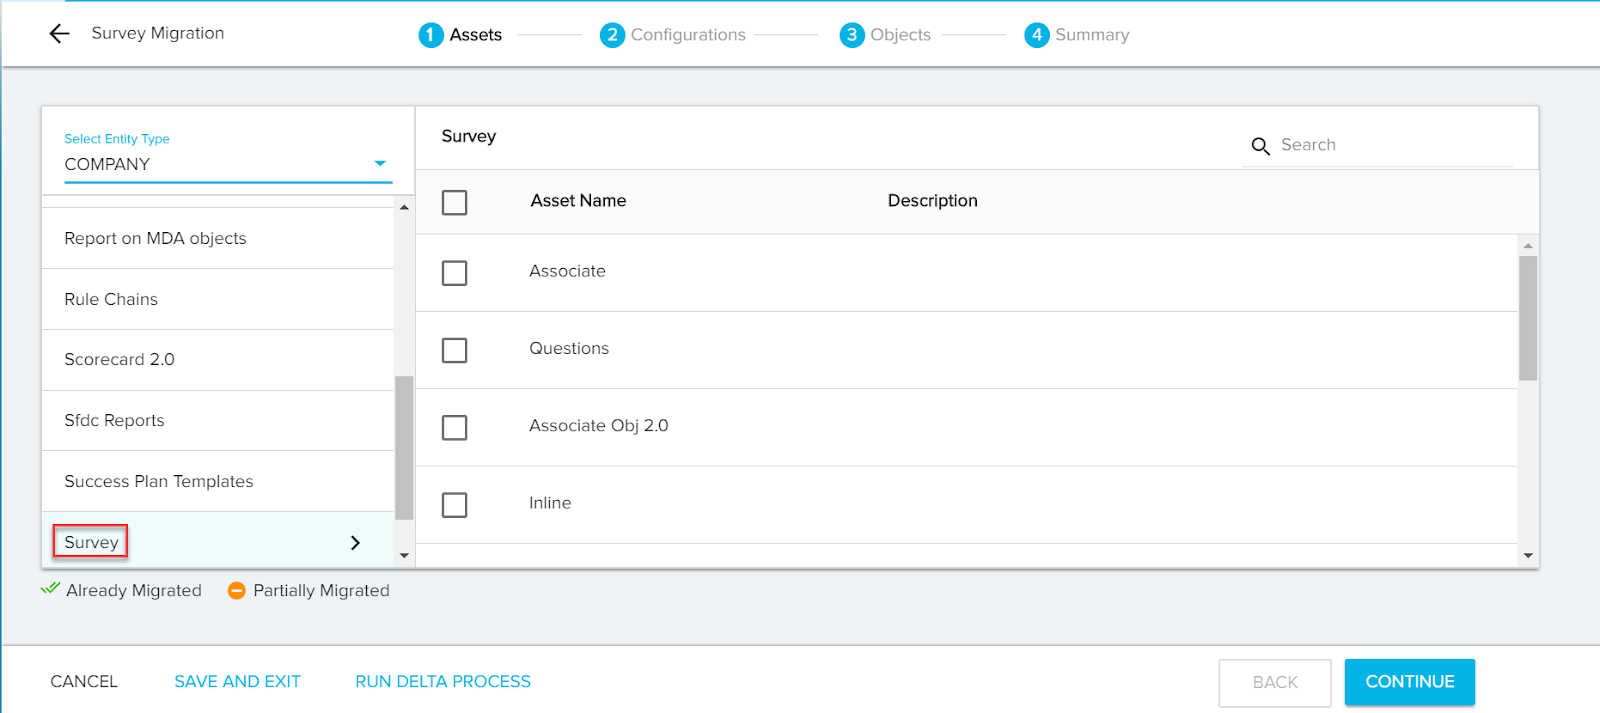
Ability to Migrate Survey Library Question and Folder in Survey: Previously, when you migrated Survey assets, the questions referenced from the folders within the Question Library were not migrated. With this release when you migrate a Survey having questions referenced from the Question Library, the question from the library and its folder structure is also migrated to the target org.
Issues Addressed
R360
-
Name Change of Person Section Respected in R360: Previously, when renaming the Person section in the R360, the name change would be reflected on the left-hand column of the R360, but the header of the section would remain Person. This could be confusing as the sections would not match.
As of this release, both the column name and header name of the Person section will change when the section name is updated. For more information on updated R360 section names, refer to Configure R360 Page and Section Types article.
Journey Orchestrator
- Unable to open Survey Response Page when Survey Email is sent through Email Assist: Previously, default page was opened when a Survey email is sent through Email Assist. But, when the same Survey email is sent through Journey Orchestrator, the survey response page was opening correctly. This issue is now resolved and users can access the Survey Response page even if the Survey Email is sent through Email Assist.
- Non Operation Email Templates appear in Survey Model: Previously, only operational email templates were displayed in the email chain of a Survey model. But, when the users change the Survey email templates from non-operational template to operational template, it still appears in the Survey model. This issue is now resolved by allowing both operational and non-operational templates to be displayed in the survey model.
| NPS, Net Promoter, and Net Promoter Score are registered trademarks of Satmetrix Systems, Inc., Bain & Company and Fred Reichheld. |