Add Participants to a Program
Gainsight NXT
This article explains the different configurations available to add participants to a Program.
Overview
The customers that you select to receive Program emails are called Participants. Admins can add participants to a program from four potential sources: Segments, Events, CSV files, and the Query Builder.
You can click the green participants' icon at the beginning of every Program model to open the Participant Configuration page.
On the Participant Configuration page, you can complete the steps needed to add Participant Sources to a Program. These steps include: Adding Participant Sources, Filter Criteria on Participants, Mapping Participant Sources, adding Calculated Fields, and configuring Email Settings.
Add Participant Sources
Multiple sources can be selected and used in a single Program. The participants from all of the sources can be synced into a single list.
Note: Users can add multiple sources for each source type to a Program. However, the total count for adding multiple sources must not exceed the limit of five. If you need to add more than five sources, please contact Gainsight Support.
To begin adding participant sources, perform the following actions:
- Navigate to Journey Orchestrator > Programs.
- Click to open an existing program, or click the +CREATE to create a new program. For more information on creating a new program, refer to Program List View and Create New Program.
- On the program model configuration screen, click the green Participants icon to open the Participant Configuration page.
- Click the + SOURCE button and select a source type from the Participant Sources section.
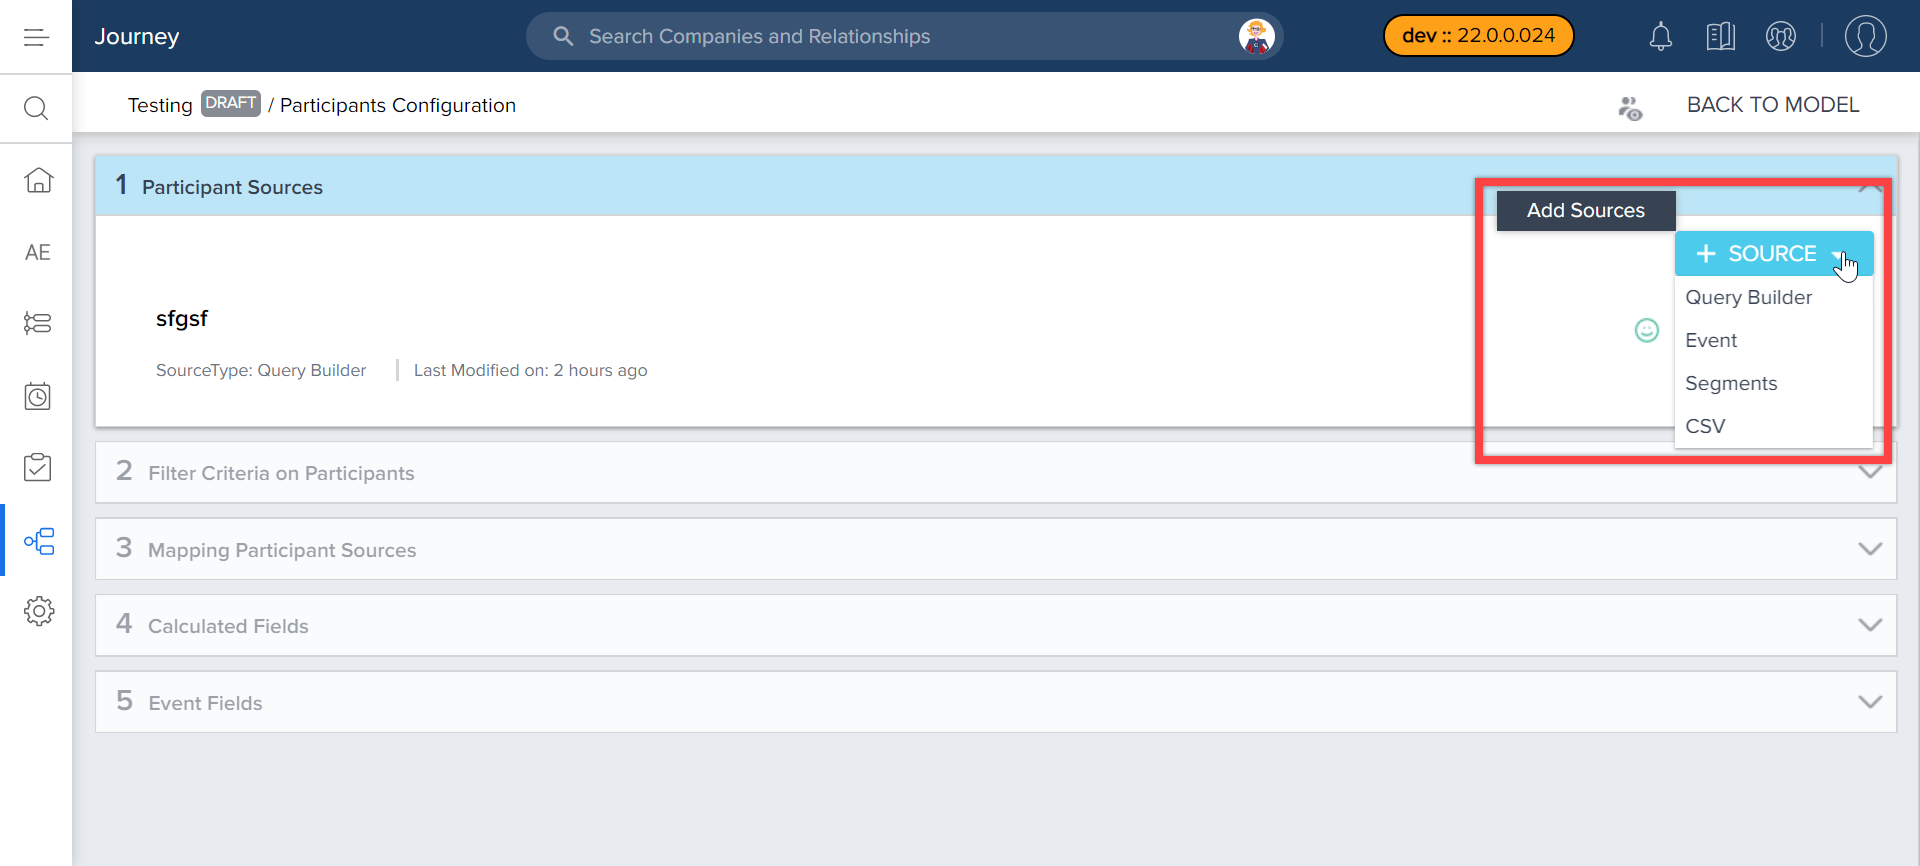
For instructions on configuring each source type, refer to Segments, Event, CSV, or Query Builder.
Segments
Segments can be created to fetch a sub-group of customers, relationships, and contacts that meet your selected criteria using source objects. Once the segment is created, Admins can use it as one of the Source types to add participants in Programs. For more information on how to create Segments, refer to the Segments article.
Notes:
- Admins can add up to five Segments per program.
- Segments and Data Designer limit is capped at participants daily limit or 500,000, whichever is lower.
Participants can be added from Segments in one of the following two ways:
-
Statically: Where all members of the list at the time of selection are added as participants to the Program.
-
Dynamically: Where new members who later meet the criteria of the Segment are also added as participants. If the dynamic option is selected, you have access to the scheduler feature to decide when the Segment is queried for new participants. The Scheduler can be configured on a Daily, Weekly, or Monthly schedule, with a Start Date, End Date, and a Preferred Time to run the query. This schedule can also be edited after the Program is published. When the schedule runs, it runs the Segment query for new contacts to be added as participants. Each scheduling options has different selections available:
-
DAILY: The Daily option allows you to select either every weekday or every day.
-
WEEKLY: The Weekly option allows you to select which day of the week you would like to run the query.
-
MONTHLY: The Monthly option allows you to select a specific day within the month to run the query (1st - 31st as well as the Last day of the month). You can also choose to run the query on a timed day of the week such as the 1st Sunday, or 3rd Tuesday of the month.
-
Notes:
- A Segment is only refreshed based on the schedule configured while creating a Segment. It is not refreshed while syncing the segment source.
- Admins cannot add Segments as a source type if the User option is selected as the Program Type.
- Segment records are filtered based on the relationship type selected in the program.
Events
Events source allows users to add participants triggered from Gainsight’s Event Framework. Events are the activities triggered as a result of some other activity. For example, a case satisfaction survey to be sent whenever a case is closed can be configured as an event, or a notification email to be sent whenever a participant responds to a survey. Admins can configure Events from Administration > Events.
Events source is completely flexible and supports all the events configured in Events Framework. Also, the PX custom events can be used in a Program. Using Events as a source in Programs, admins can take the following actions:
- Configure filters for the events
- Select lookup fields for filters
- Map lookup fields in the Mapping selection
In the Event source, an Event Source Filter is applied to the source to define which contacts must be added as Program participants. Based on the filter criteria, contacts from the event source are added as participants.
Additionally, Journey Orchestrator honors the resolution of Event Fields functionality in the Event Framework. For more information on the event fields resolution configuration, refer to the Events Framework article.
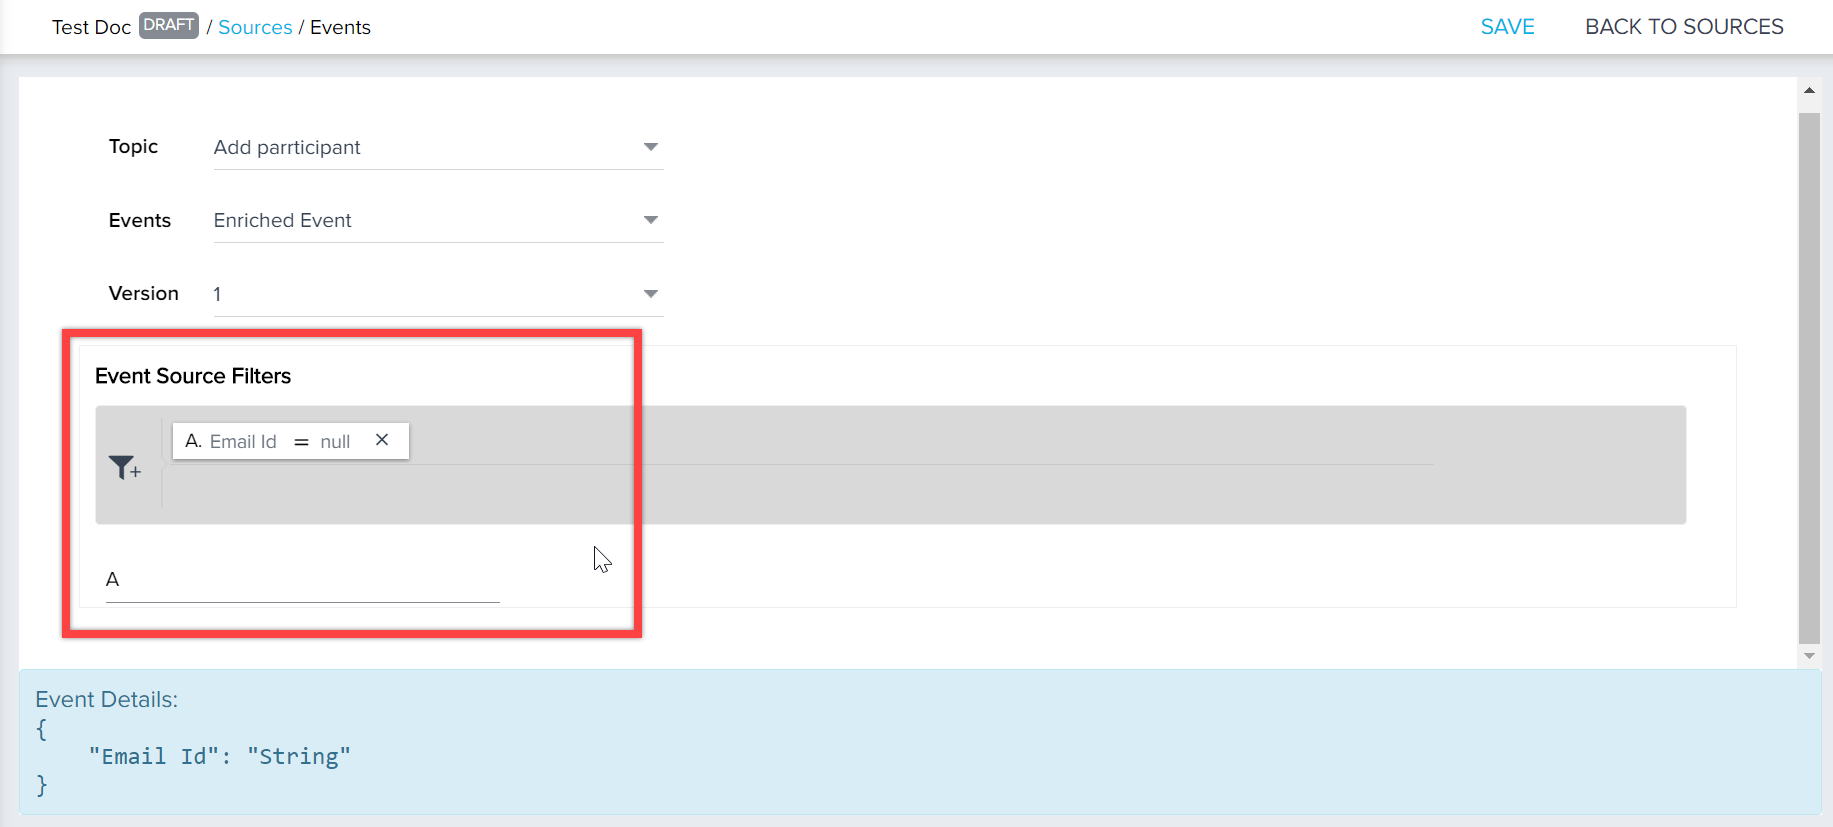
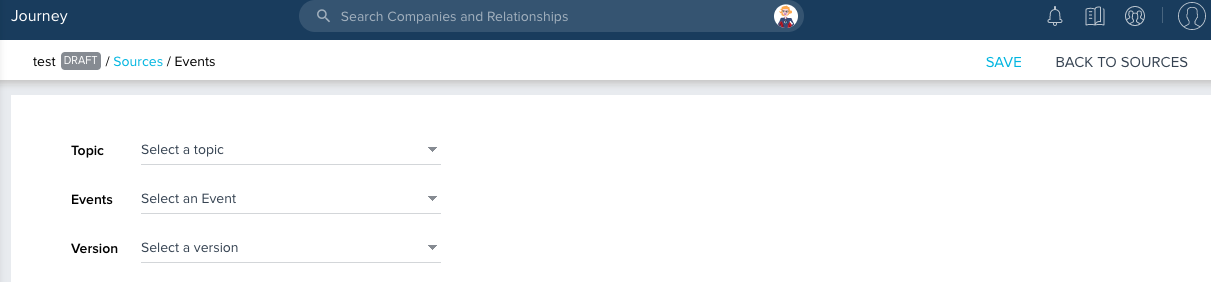
To add an event source, perform the following steps:
- Select Event from the + SOURCE menu.
- Select the required topic from the drop-down list.
- Select an event associated with the topic.
Note: Values in the Event menu are populated based on the topic selected in the previous step. - Select a version associated with the event, and click SAVE. The required event is added as a participant in the Program.
Note: You can add only one Event source per Program.
For more information on the Events framework and how they are configured, refer to Events Framework.
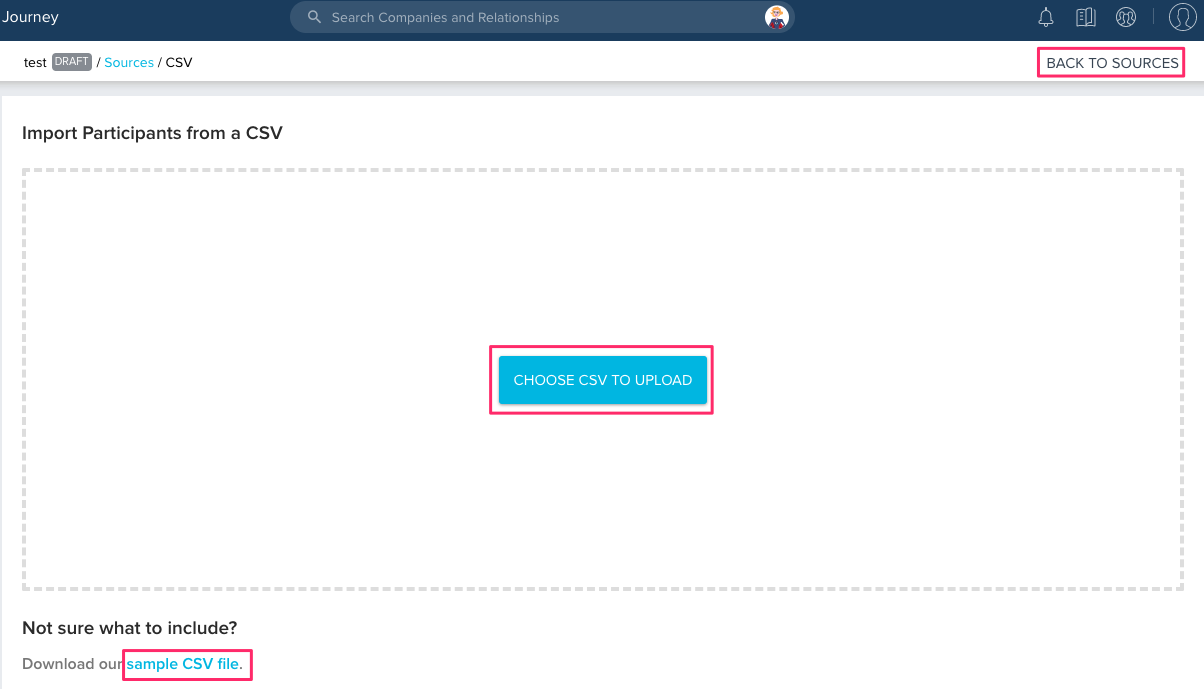
CSV
This option allows users to upload participants from CSV files. You can directly upload a CSV file with a limit of 100,000 records per CSV with a maximum size of 50MB and up to 5 CSVs total can be uploaded to a Program. Users can download a sample CSV template from the link highlighted below.
- Select CSV from the + SOURCE menu. The Import Participants from a CSV page is displayed.
- Click sample CSV file to download the sample CSV file. This helps to customize your source CSV file with a list of participants.
- Click CHOOSE CSV TO UPLOAD to browse and upload CSV file from your machine.
- Click BACK TO SOURCES to navigate back to the Source configuration page.
Query Builder
You can query person records in Gainsight to add them as program participants. The query builder functionality allows you to pull in Person object records using tools identical to what’s found in the Rules Engine. For more information on Rules Engine, refer to Getting Started with Rules Engine.
To configure a Query Builder source, take the following steps:
- On the Participants Configuration page, click the +SOURCE button and select Query Builder.
- Enter a name for the Query Builder source.
- Click SAVE.
- Click DATASET TASK. Dataset configuration page appears.
- Enter the Task Name, Task Description, and Output Dataset Name.
Note: The Task Name and Output Dataset Name must be filled out before the Dataset Task can be saved. These fields allow users to differentiate between different Dataset Tasks that might be added to the query. Output Dataset Name auto populates from Task Name and it can be changed to a different name. It has no dependency on Task Name. - Select the source object that you want to query from Matrix Data. You can select any Gainsight object that stores the Person records. Typically, you can select the Company Person object and the Relationship Person object for the Programs associated to the Company and Relationship respectively.
Gainsight NXT in Salesforce CRMContent in this section supports Gainsight NXT accessing through Salesforce Login. To learn more about Gainsight NXT in Salesforce, click here.
- Click here to expand for more information on how to build a query using Salesforce objects
-
If a Salesforce connection is established in your org, using Salesforce Connector, you can also select Salesforce objects (such as Contact) as their participant source.
- Click and drag the fields that you want to query to the Show section. The data from these fields is available after mapping with the participants. For more information on mapping fields, refer to Map Participant Sources. Depending on the type of program, you will need to query certain fields to successfully map participant data back to the source object from the Program.
- Company Programs: You will need to query the fields Recipient Email Address and Company Id to successfully map fields for programs associated to the Company.
- Relationship Programs: You will need to query the fields Recipient Email Address and Relationship Id to successfully map fields for Programs associated to the Relationships.
Gainsight NXT in Salesforce CRMContent in this section supports Gainsight NXT accessing through Salesforce Login. To learn more about Gainsight NXT in Salesforce, click here.
- Click here to expand for more information on the Account and Contact fields required to build a query using Salesforce objects
-
If a Salesforce connection is established in your org, using Salesforce Connector, you can build queries based off of SFDC objects will need to query the Account ID field to successfully map responses back to the Account object and the Contact ID to successfully map responses back to the Contact object.
- Click and drag the fields that you want to use as criteria to the Filter section. Only people that meet this criteria are added as participants.
- (Optional) Click PREVIEW to see the query results of the task. This is to help admins monitor the output of each task to ensure that the configured task is accurate and meets the needs of the Program.
- Click SAVE. This completes configuring your initial Dataset task.
- (Optional) Click CANCEL to navigate back to the Query Builder configuration page.
- (Optional) Click +TASK to continue adding additional Dataset Tasks.
You can apply Transformation, Merge, and Pivot tasks on multiple Datasets. For more information on Dataset, Merge, Pivot, and Transformation tasks, refer to the Rules Engine - Task Creation, Merge Tasks in Rules Engine, Pivot Tasks in Rules Engine, and Transformation Tasks in Rules Engine articles respectively. - (Optional) Click SCHEDULE at the top-right of the query configuration page to configure the timing and frequency for the query to run and add new participants. This schedule can be configured in one of the following two ways:
- Statically, where all people that are pulled in by the query at the time, are added as participants to the Program. This option is selected by default.
- Dynamically, where new members who later meet the criteria of the query will be added as participants. If the dynamic option is selected, you will have access to the scheduler feature to decide when the query should run for new participants. The Scheduler can be configured on a Daily, Weekly, or Monthly schedule, with a Start Date, End Date, and a Preferred Time to run the query. When the schedule runs, it runs the query for the new person records that are added as participants. This schedule can be edited after the Program has been published. The query will follow the new schedule going forward. Each scheduling option has different selections available:
- The Daily option allows you to select either every weekday, or every day.
- The Weekly option allows you to select which day of the week you would like to run the query.
- The Monthly option allows you to select a specific day within the month to run the query (1st - 31st as well as the Last day of the month). You can also choose to run the query on a timed day of the week such as the 1st Sunday, or 3rd Tuesday of the month.
Notes:
- A scheduled Query Builder query will not run unless the Program is in the Active state. For more information on Program statuses, refer to Program List View and Create New Program.
- If the participants’ sync from the query builder exceeds the 500,000 participants limit in Tenant Management, then the remaining participants are not synced. The admins who have created the program in Gainsight, the super admin of Tenant Management and the CSMs of tenants are alerted through an email notification.
- Admins can use the People Maps Influencers object while configuring a Participant list by using the Query Builder option and send a Program only to the Influencers. This Program may contain a Survey or an Email addressing only the Influencers. For the list of fields in this object and their descriptions, refer to the Gainsight Object Glossary article.
PX as a Source in Query Builder
Admins can select PX custom events as one of the participant sources in the Query Builder source type. Admins can select this source to improve customer journeys based on usage data. Like any other source/object in Query Builder, admins can add show fields/filters based on the selected PX custom event and also perform merge/transformation tasks.
Prerequisite: Admins must first configure the PX Connector in the Gainsight CS application. For more information, refer to the Gainsight PX Connector article.
Business Use Cases:
- Admins want to track the users who viewed article 1 or article 2 in the last 60 days.
- Admins can find the list of users who used the new application more than 10 times in the last 30 days.
To configure PX as a source in Query Builder:
- On the Participants Configuration page, click the +SOURCE button and select Query Builder.
- Enter a name for the Query Builder source.
- Click SAVE.
- Click DATASET TASK. The New Dataset Task page appears.
- Select the name of the PX connection which you have configured.
Note: By default, Custom Events is selected in the events dropdown. - Select the source product name for which you have configured the custom event.
- Select the event.
- Click and drag the fields that you want to query to the Show section.
- Click SAVE to create a query based on all Event attributes, account, and user attributes.
Limitations: The following are some of the limitations in using PX usage data:
- The Date field is mandatory and it must be bounded such that you need to have a start date and end date.
- Only the data from the past 180 days is considered.
- Event level data is not supported. Gainsight always aggregates EventID to Count (EventID) when dropped in the Show section.
- Only 100K records are fetched per rule.
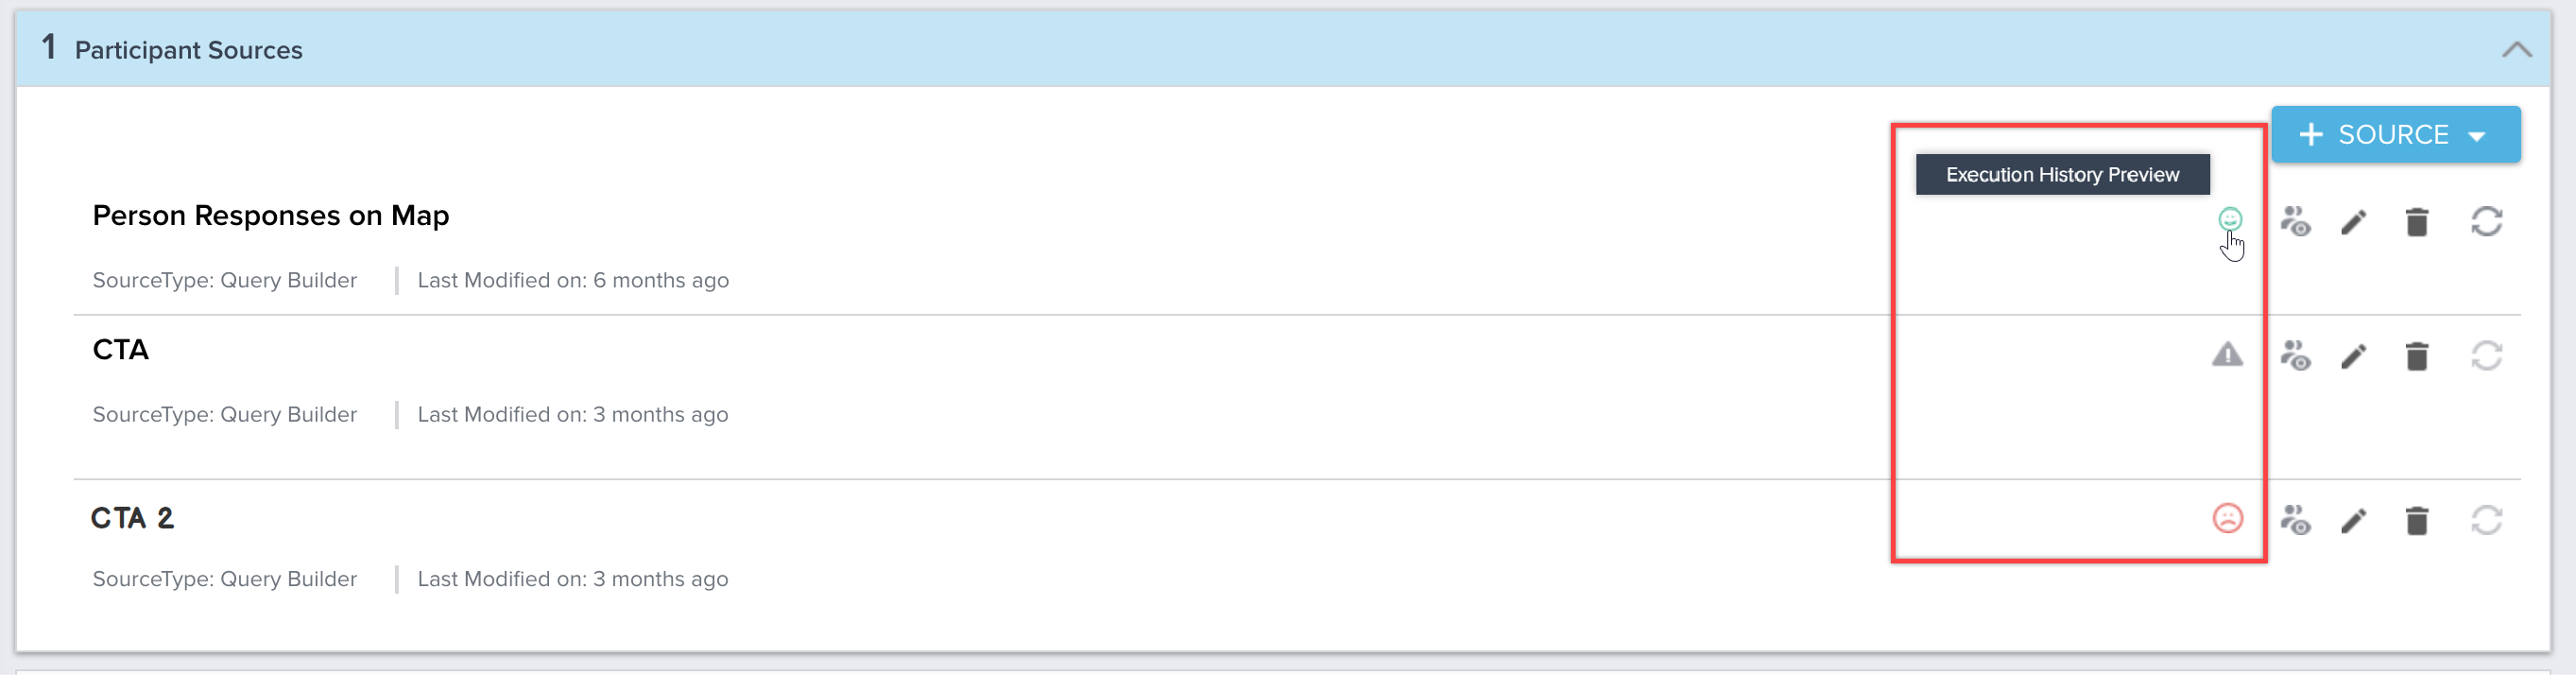
Query Builder Execution History
Admins can view the detailed logs for the activities that are performed while building and fetching data in Query Builder. Apart from logs, it also provides other details such as execution history of query builder source in programs, status, data flow diagram, and downloading option for the result set.
Besides each Query Builder source in the Participants Configuration page, an Execution History Preview option is added for admins to view the logs, history, status, and flow diagram of the Query Builder.
Admins can view the following status symbols as Execution History Preview options:
-
 - This status is displayed when the query builder source is successfully executed.
 -
 - This status is displayed when the query builder source is partially executed.
 -
 - This status is displayed when the execution of the query builder source has failed.
Admins can click on the Execution History Preview option to view the preview of that particular Query Builder source in the following tabs:
- QUERY SETUP
- EXECUTION HISTORY
Query Setup Tab
In the QUERY SETUP tab, admins can view the data flow diagram of the tasks created and also the information related to each task or merge details they have provided while creating a query builder.
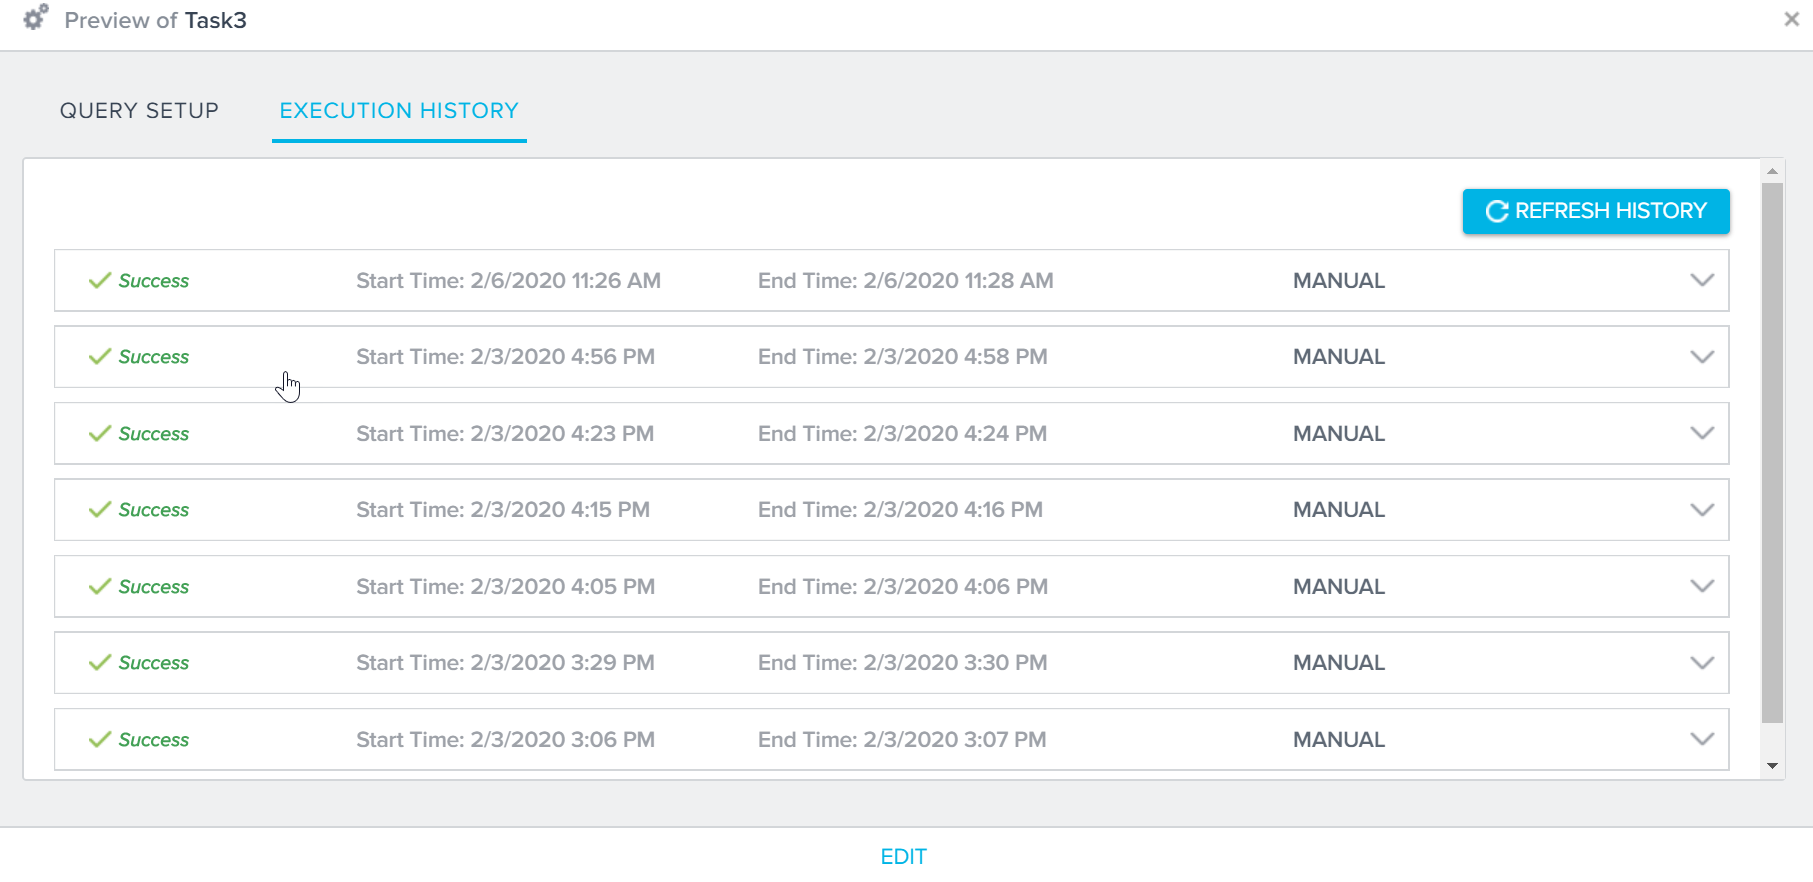
Execution History Tab
In the EXECUTION HISTORY tab, admins can view the execution history of all the tasks in query builder along with the following information:
-
Status of the Query Builder source.
-
Query Builder Start and End time.
-
Query Builder schedule type, either Manual or Scheduled.
Note: Admins can click the REFRESH HISTORY option to view the latest query builder executions.
Select any task in the EXECUTION HISTORY tab to view the following output details of that task:
-
Task Type: The type of task defined while creating the Query Builder.
-
Status: The status of the Query Builder.
-
Records: The Number of records fetched for the task defined.
-
Duration: The duration of the query builder run.
-
Results: Admins can:
-
Preview Results: Click the preview icon to preview the task results in a new window.
-
Download Results: Click the download icon to download the results of the selected task.
-
Click the + icon next to View Logs to view the detailed information about the execution history of the query builder.
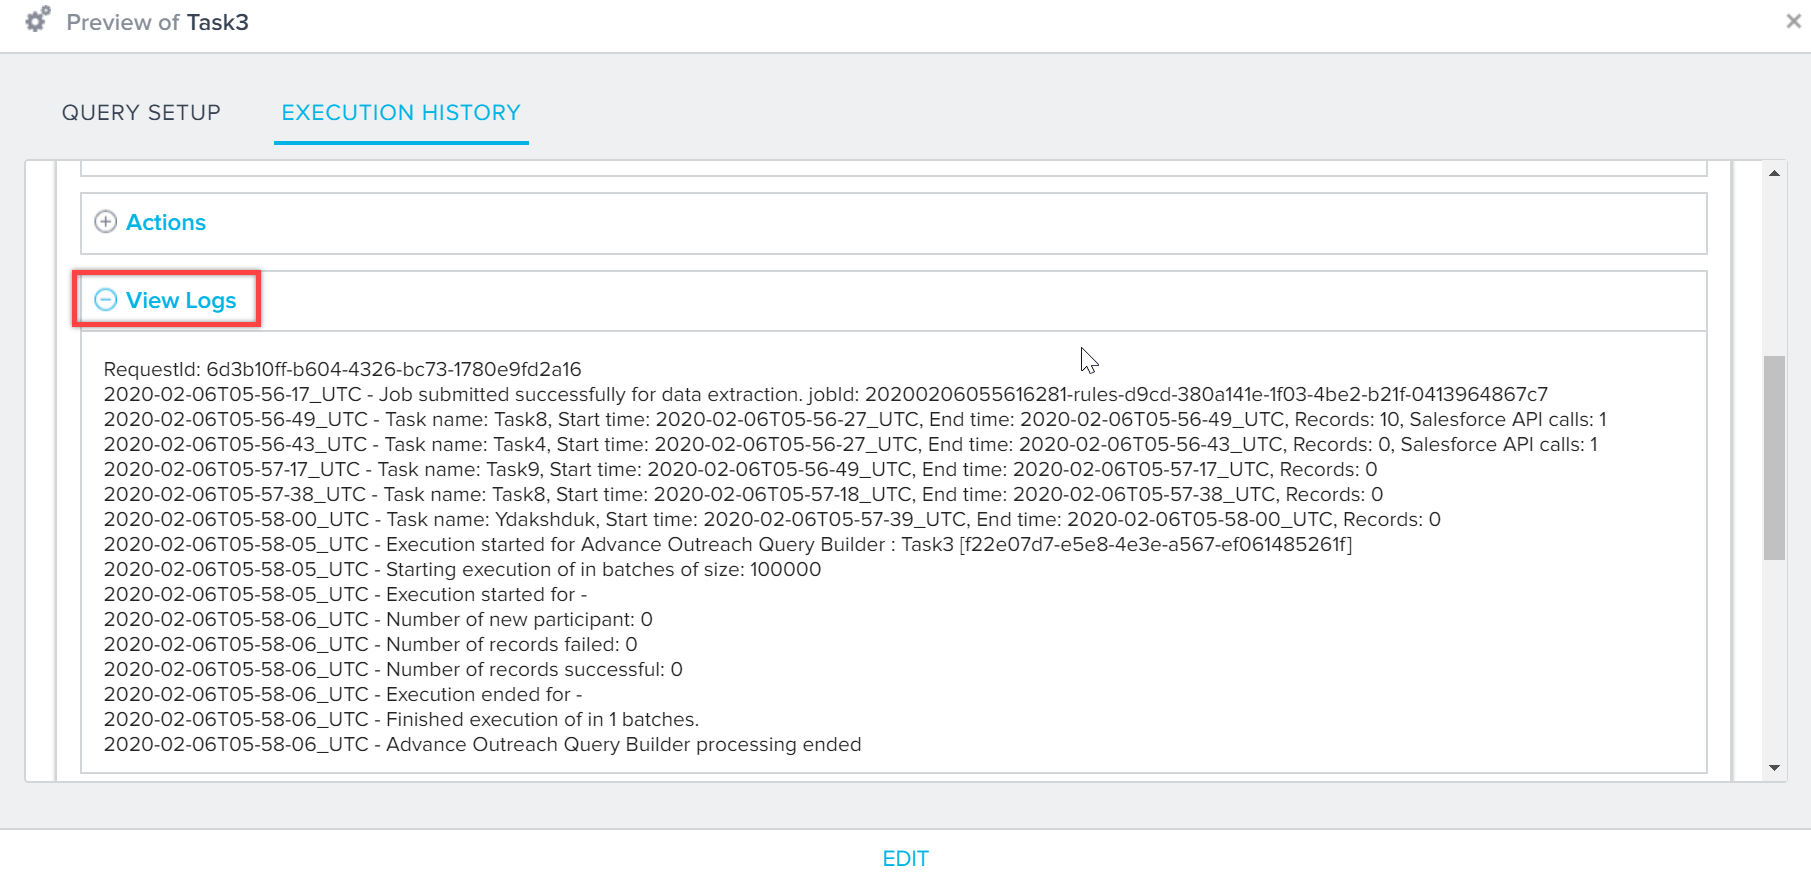
Admins can click the EDIT option, if required, to edit the tasks in the query builder source directly from this new window.
Filter Criteria on Participants
This section provides several options to further define and configure how Participants are filtered and added to a Program.
Uniqueness Criteria
Configure this section to determine how a participant is considered unique from other participants in the program, and how to handle participants with the same uniqueness criteria. Only unique participants will be included in the Program. This prevents participants from being sent multiple, identical emails as part of the Program. Admins can configure the following:
- Filter Participants by __: Select the field that is used to determine if an individual participant is unique from other participants.
Limitation: Do not select the Date field as a uniqueness criterion to determine how a participant is considered unique from other participants. If you choose the Date field, participants are duplicated by following the timestamp. - Select either:
- Participant with same unique criteria can enter once in lifetime: A participant with unique criteria can enter the Program lifecycle one time only. It can not be re-added once it leaves the program’s lifecycle.
- Participant with same unique criteria can enter after __: A participant with unique criteria can be re-added after reaching a participant state that you select. For example, if you would like people to be re-added after they leave the Participant Lifecycle, as they were “Knocked Off” or encountered a “System Error”, you can select those options. This option can also be configured after the Program is published.
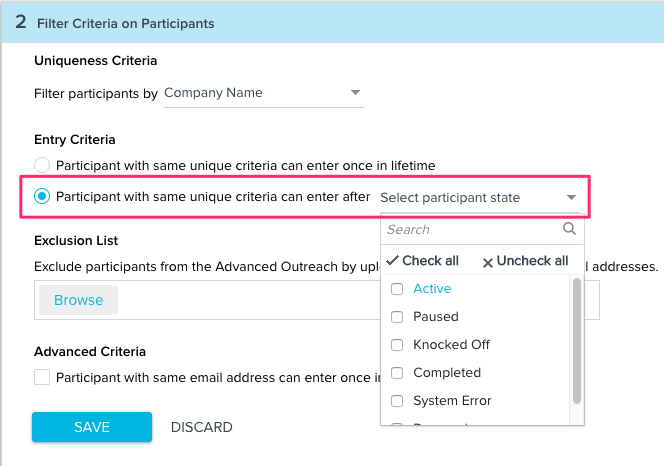
IMPORTANT! Prevent Participants from Receiving Surveys Repeatedly: When selecting the option for users to be re-added after they reach a participant state, it is recommended to use the option Participant with same email address can enter once in X days in Advanced Criteria. This will prevent the participant from being added to the program again if they have already been added to it within a set amount of time, even if they meet other criteria set within the Uniqueness Criteria section. This will prevent the participant from receiving duplicate messages. Refer to the Advanced Criteria section for more information.
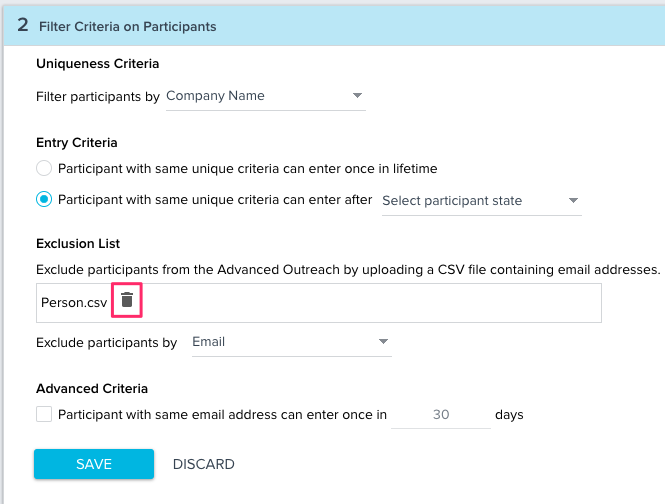
Exclusion List
You can upload a CSV that contains people to exclude from the program, even if they are added as unique participants from a source. This list will be considered when the sync feature consolidates each source into a single participant list. A person on the Exclusion List will not be added by a source during the sync. To add an exclusion list, take the following steps:
- Click Browse to view files saved on your local machine.
- Select a CSV file to upload.
- Click Open to upload the CSV.
- Select criteria to exclude the participants. The available values will be pulled from the uploaded CSV’s headers.
Exclusion lists can be deleted after a Program has been published by clicking on the trash can icon next to an uploaded list. After the list is deleted, if a participant that would have been excluded by the list is added by another source, it will enter the participant cycle of the Program again.
Advanced Criteria
You can select advanced options for determining how participants are added to the program lifecycle. You can select the following:
- Participant with same email address can enter once in X days: Check this to prevent a Participant with the same email address from being added to the Program within a number of days that you select.
- Allow participants without valid Company Id to enter this outreach: Check this to allow participants without valid Company Id to enter the Program.

SAVE/DISCARD: Click SAVE or DISCARD the changes you have made to the Participant Criteria.
Map Participant Sources
In this section, you can map data from each participant source to the standard and custom fields. You can select both the Standard and Custom fields as tokenization options in a Program's email steps. Field mapping are only available after you have added at least one participant source.
Standard Field Mapping
In this section, you map data from each participant source to the Gainsight Standard Fields. Since it is possible to add participants from multiple sources in a single Program, it is important to map the data being pulled from each source.
The Standard Fields column on the far left displays a list of standard fields from the participant object. Each Participant source displays an adjacent column with a drop down to Select a field for Mapping. You can select which source field is mapped to a standard participant field.
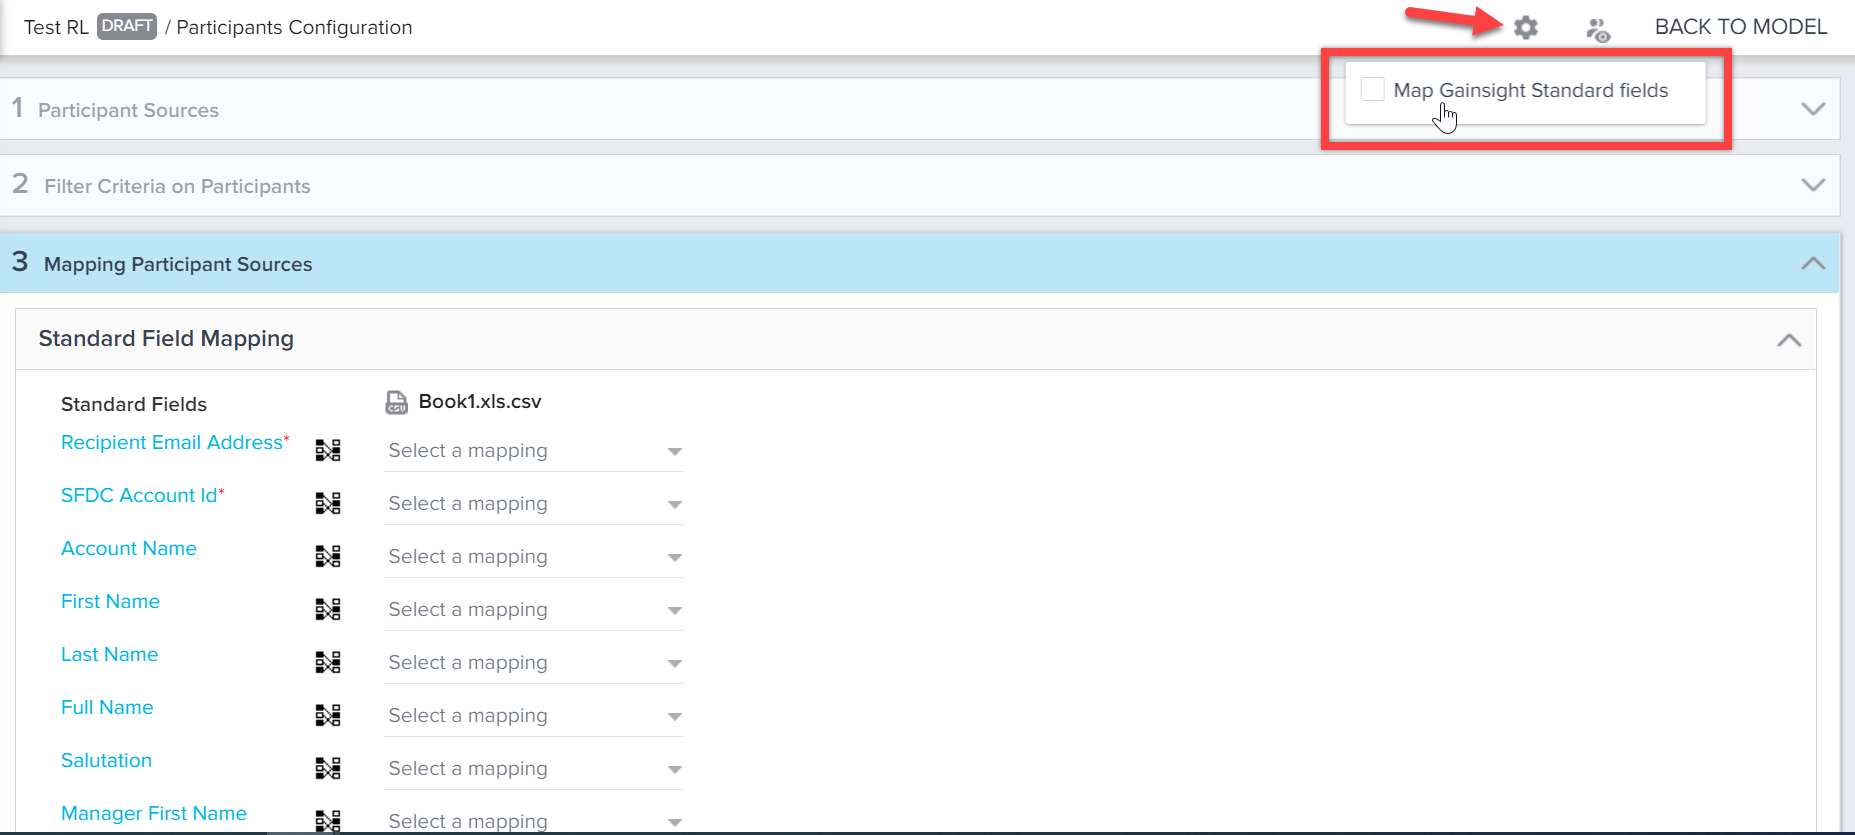
Gainsight NXT in Salesforce CRMContent in this section supports Gainsight NXT accessing through Salesforce Login. To learn more about Gainsight NXT in Salesforce, click here.
- Click here to expand for more information on how to set a program to work on SFDC Ids or GS Ids
-
Use the Gear icon on the top of the page to set the program to work on either SFDC Ids or GS Ids. If the Map Gainsight Standard fields checkbox is selected, you must map the source with Company GS id. If it is not selected, you can map the source with Company External id.
Context ID
For certain models, such as the Customer Satisfaction Survey, you are required to map to a field called the Context ID. This field is used to define the context for why the survey is being sent, and to link the survey's responses to the appropriate files in Gainsight. For example, when sending a case closure survey, we need to pull in the Case ID field as part of a Participant Source, and then map it to the Context ID field. This enables us to tie participant's survey responses to the appropriate case.

Custom Field Mapping
In this section, you can add custom fields, and map the data from each participant source to them.
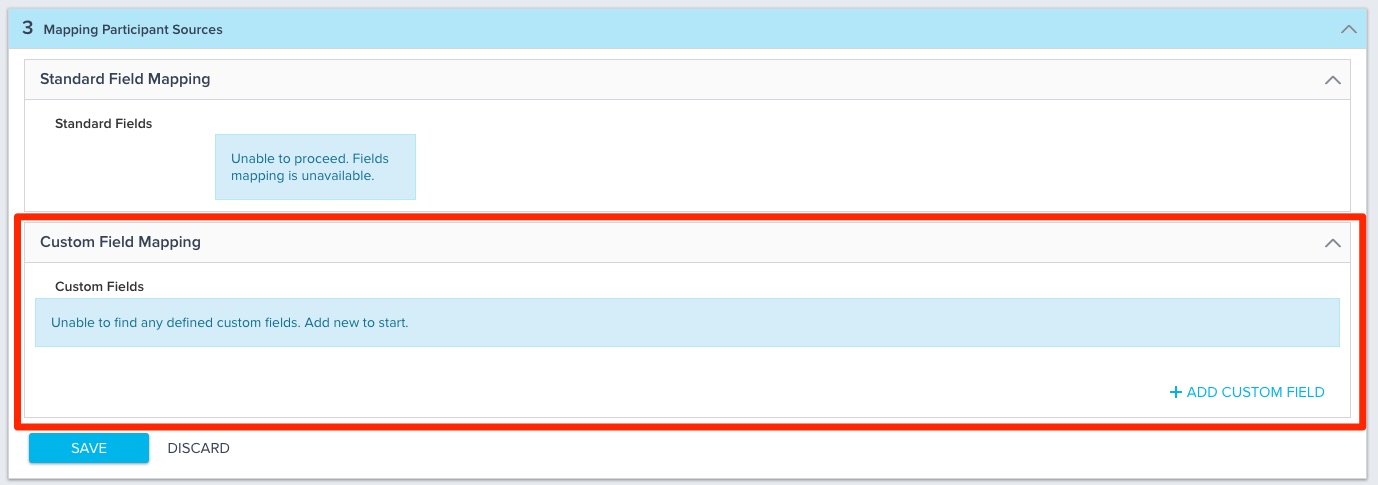
Take the following steps to add a custom field:
- Click + ADD CUSTOM FIELD.
- Select the type of field to add.
Each field type has a different symbol associated with it to help differentiate them (Integer and Double use the same symbol). You can add the following types of custom fields:
- String
- Integer
- Double
- Boolean
- Date
- External Id
- Picklist
Note: Both Integer and Double types of custom fields are number fields. But, if Integer is selected, the system rounds off the values when the field is having decimal values.
After adding a custom field, you can configure the display name and map it as you would do for a standard field. Click the trash can icon to delete the field.

Notes:
- Syntax Validation for the content of the custom email fields will occur during Participant Sync. If the validation fails, the participant will move to the list of Failed Participants.
- Custom email fields can be used to configure the fields “To”, “Reply-to”, “From Email”, and “Email Copy to”; as well as the tokens within a Program’s email steps. For more information on configuring email steps, refer to Configure Model and Emails for Programs.
The user can add a maximum of 50 fields for all data types together or any one data type, in the Participant List configuration area of a Program. This eases the configuration of complex multi step programs, and also allows admins to define programs easily.
This configuration is only applicable for newly created Programs. The user cannot add any Custom Fields if the Program already exists and it’s in an Active status. However, if the created Program is in Draft stage, the user can add more fields by deleting the existing Custom Fields.
Notes:
- The same functionality is also applicable for cloned Programs. The user must delete the existing Custom Fields and can add a maximum of 50 fields.
- If you need to add more than 50 fields, raise a request to support@gainsight.com.
Use Case: Consider a scenario where you need to add many Email steps or CTAs in a Program. Admins can define up to 50 custom fields which can be used as Tokens in the Email/CTA steps of a Program.
Reporting on Custom Fields
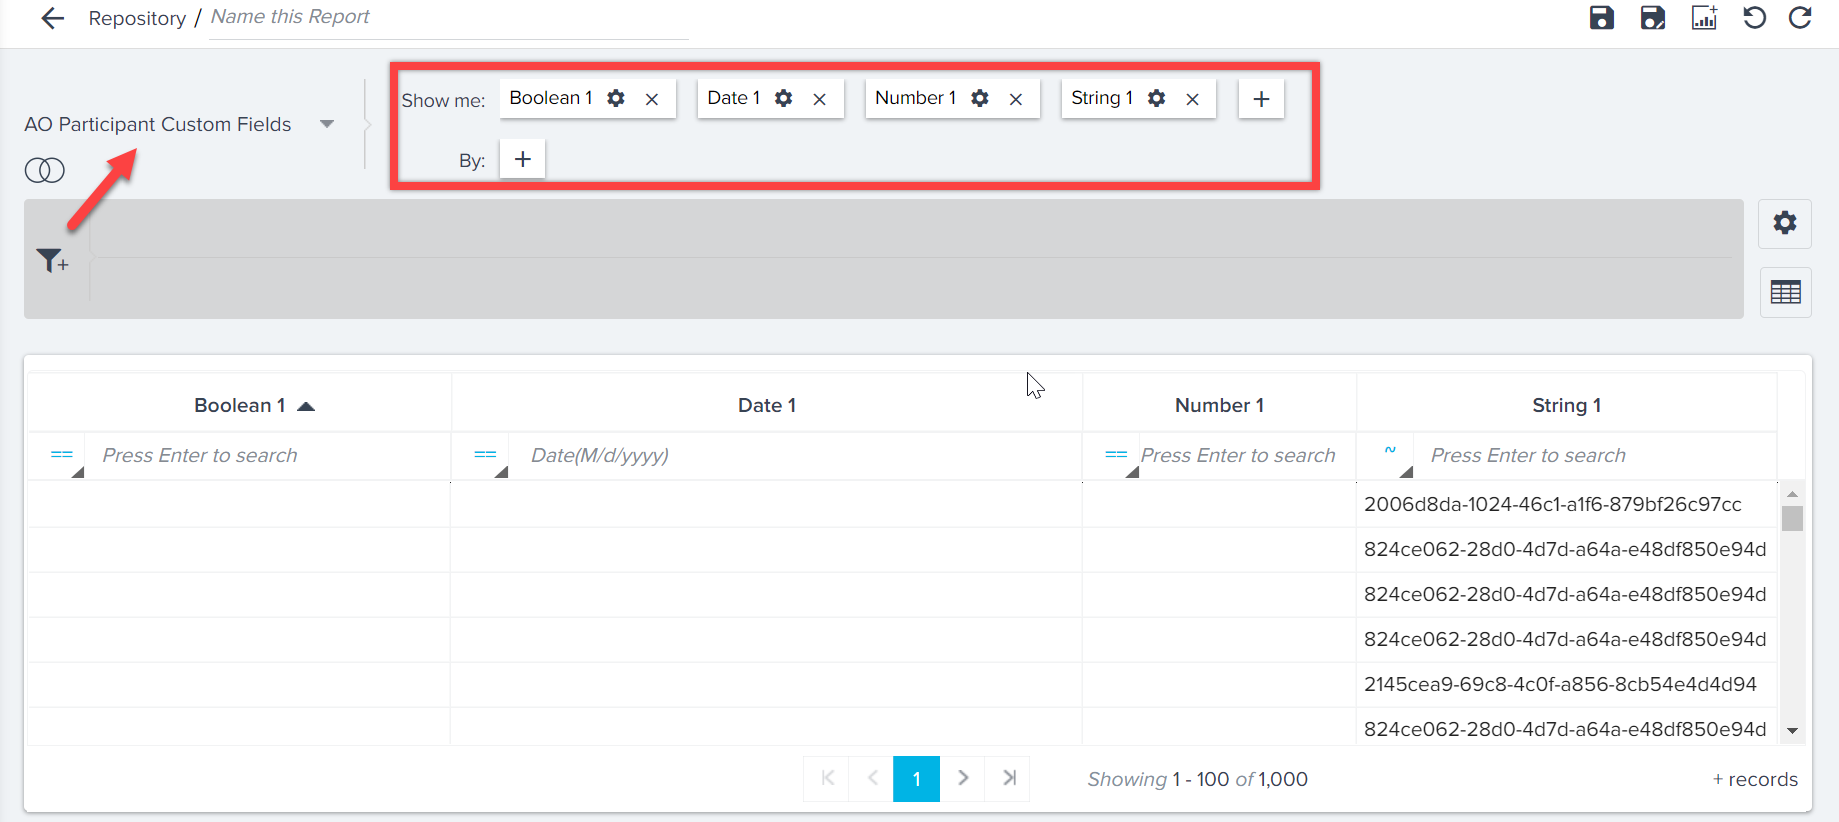
Journey Orchestrator custom fields are now available to generate reports from Report Builder as well as used as a source in Query Builder under the AO Participants Custom Fields object name.
LIMITATIONs:
- The actual custom field names are not available in the object since it is common across programs. It has generic names such as String1, String2, Date1, and Date 2. However, admins can update the names in the Report Builder.
- Multiple Programs data cannot be assumed to have in the same String field (String 1) as it is entirely random. It is always advisable to report filter by Program ID. For example, if a user created a string field ‘NAME’ as the first custom field in Program 1 and created a string field ‘NAME’ as the second custom field in Program 2. In the above example, NAME data might be present as String 1 in Program 1 and String 2 in Program 2.
Pick List Datatype Fields
When customers map Picklist fields of an MDA objects to a token, mails were sent with ID's instead of resolved values. In order to solve this use case, Gainsight is supporting the Picklist data type fields in Programs.
To use the picklist fields in Programs, admins must first create custom fields in the standard and custom objects with datatype as Dropdown List and select an associated category for mapping to this field. For more information on how to create a custom category, refer to the Dropdown List and Multi-Select Dropdown List article.
Admins can then use the Custom Field Mapping section in the Participants Configuration page to add the Picklist fields defined in the Data Management page with datatype as Dropdown List.
To add a Picklist datatype field in Program:
- Navigate to Journey Orchestrator > Programs.
- Click to open an existing program, or click the +CREATE to create a new program
- In the program model configuration screen, click the green Participants icon. The Participant Configuration page appears.
- In the Participants Configuration page, click the Mapping Participant Sources section.
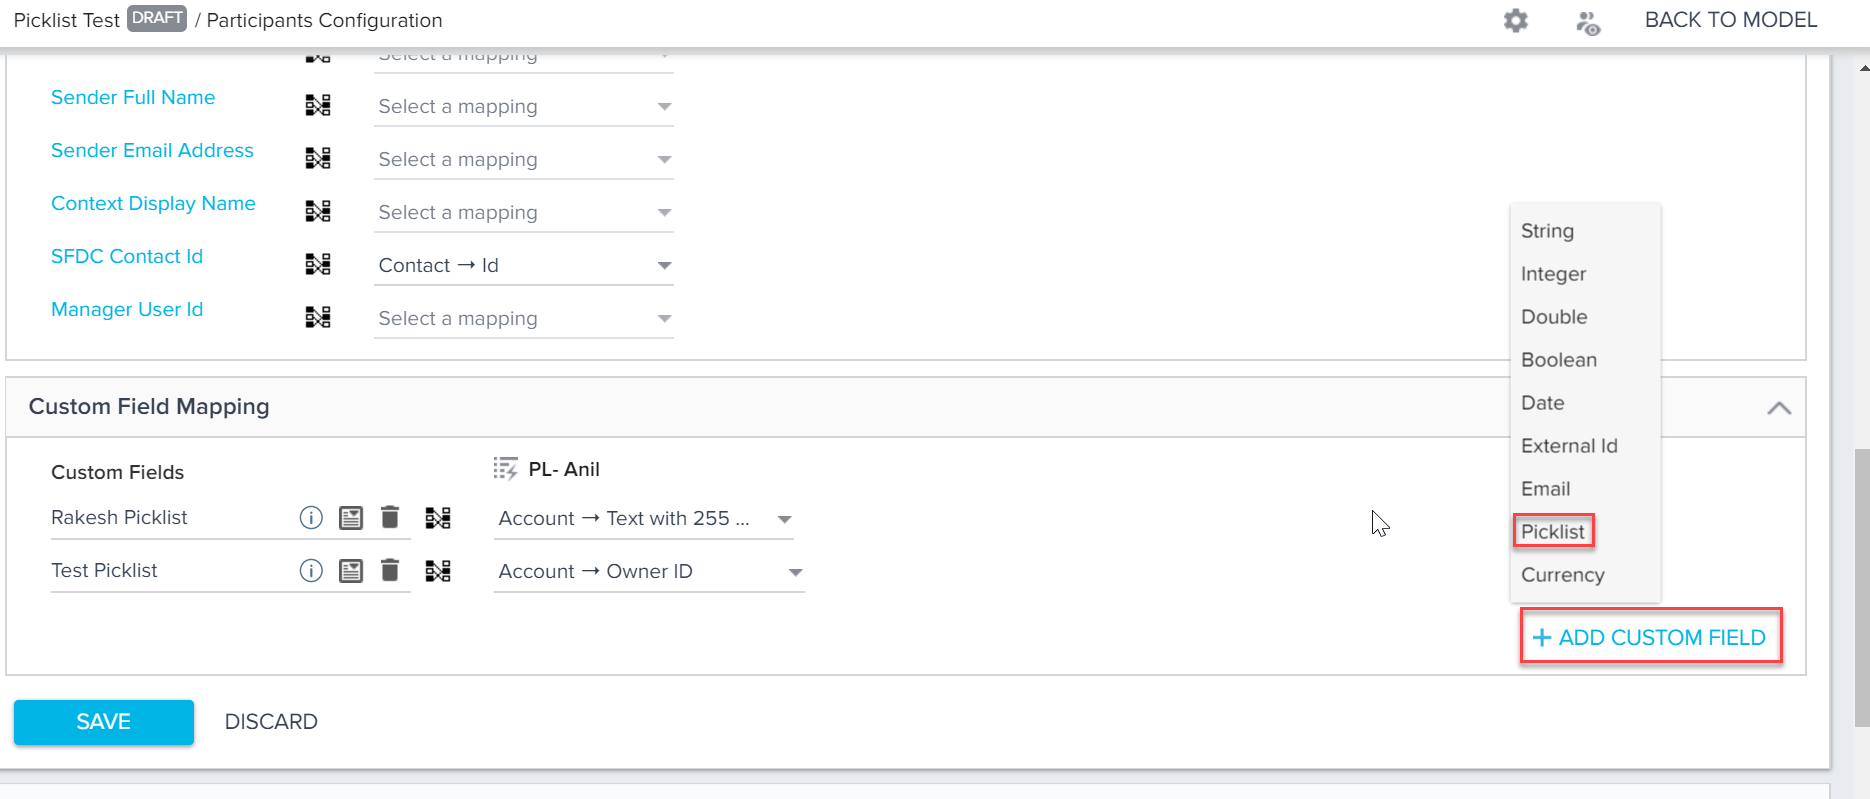
- In the Custom Field Mapping section, click +ADD CUSTOM FIELD and select Picklist datatype field. The Category dialog appears.
- Select the Picklist type from the dropdown option.
- Click SAVE.
- Select which source field to be mapped for the picklist field.
After a Picklist Field is created, admins can add it as a tokenization option while configuring any program Email Step and can be used in the tokenization option while configuring any text field in the Create CTA and Close CTA steps.
Admins can select the conditions in the Conditional Wait step based on the Calculated Field configured on the picklist field created. These picklist fields can also be used as a filter option while configuring Calculated Fields and using reports in email templates.
If admin previews the Conditional Wait and Email Template steps, it displays the actual values of the Picklist field configured.
Save/Discard
After mapping your fields, click SAVE at the bottom of this section to save your configurations. You can also click DISCARD to discard any changes you made and revert the section back to its previous configuration.
Note: After you save your field mapping configurations, a pop-up window will appear asking if you want to sync your participant sources. For more information on syncing participant sources, refer to Sync Sources.
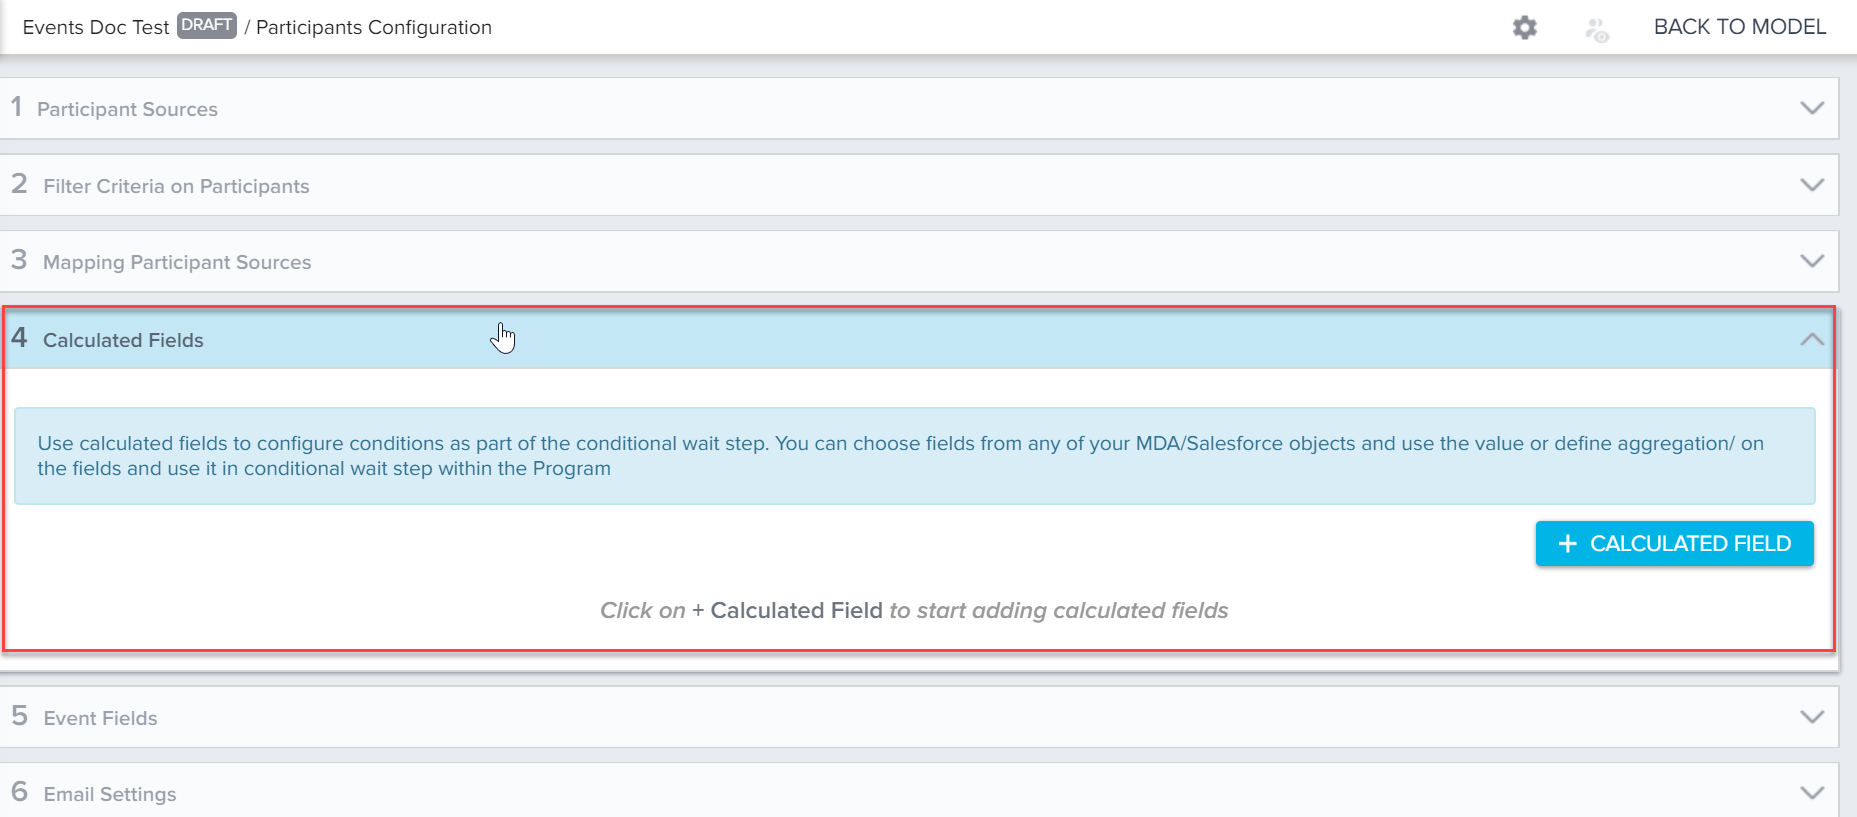
Calculated Fields
You can add Calculated Fields that can be used in the Send Email, CTA, and Conditional Wait steps in a Program. In this section, you can add Calculated Fields by clicking +CALCULATED FIELD. You can also view any calculated fields that have been added to this program. For more information on adding Calculated fields, refer to Using Calculated Fields in Programs.
Limitation: Admins can create only 10 calculated fields in a Program.
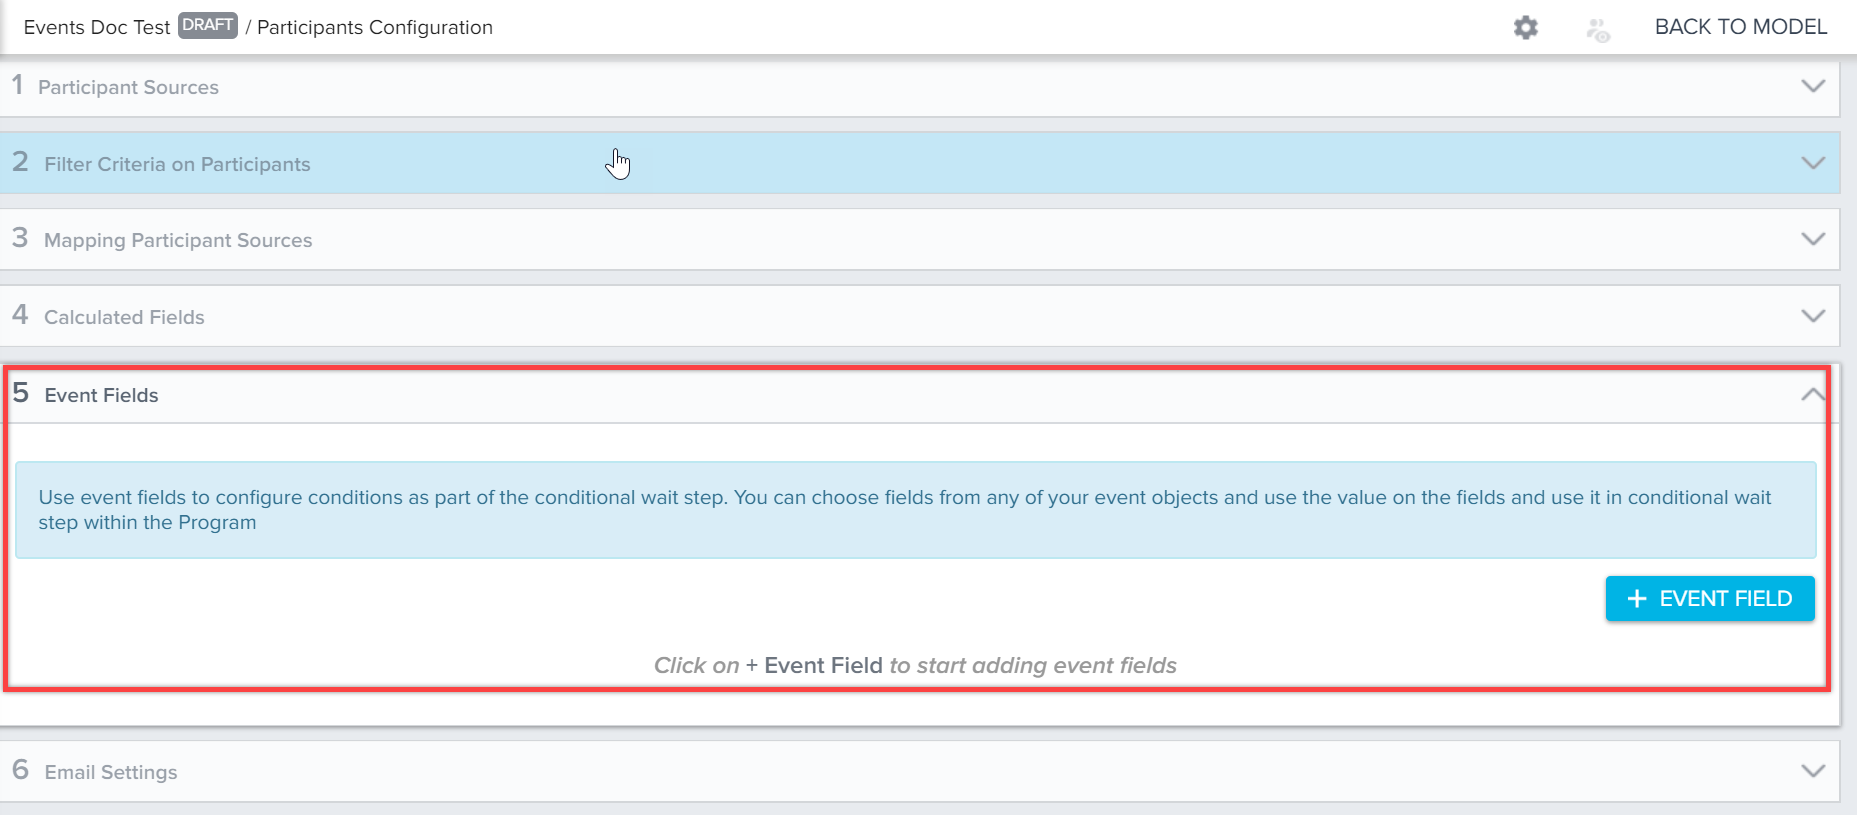
Event Fields
Use this option to configure a new Event Field. Once it is created, it can be accessed in other Conditional Wait steps in the AO and in the Event Field within the Participants Configuration section. Use this option to configure Event Fields without having to navigate to the Participants Configuration section. For more information on configuring event fields within Conditional Wait, refer to the Use Event Fields in Programs article.
Email Settings
Gainsight NXT in Salesforce CRMContent in this section supports Gainsight NXT accessing through Salesforce Login. To learn more about Gainsight NXT in Salesforce, click here.
- Click here to expand for more information on Email Settings
-
Under Email Settings, admins can configure Programs to log all emails in Salesforce on the Contact record. If this setting is enabled for a Program which is in the Active state, it will log all emails sent in future to Salesforce. By default, this setting is turned off.
To enable this option, navigate to a specific Program, and the Participants Configuration > Email Settings section.
Note: To successfully log emails to Salesforce Activities for Accounts, it’s mandatory to map the SFDC Contact Id in the mapping Participant Sources step.
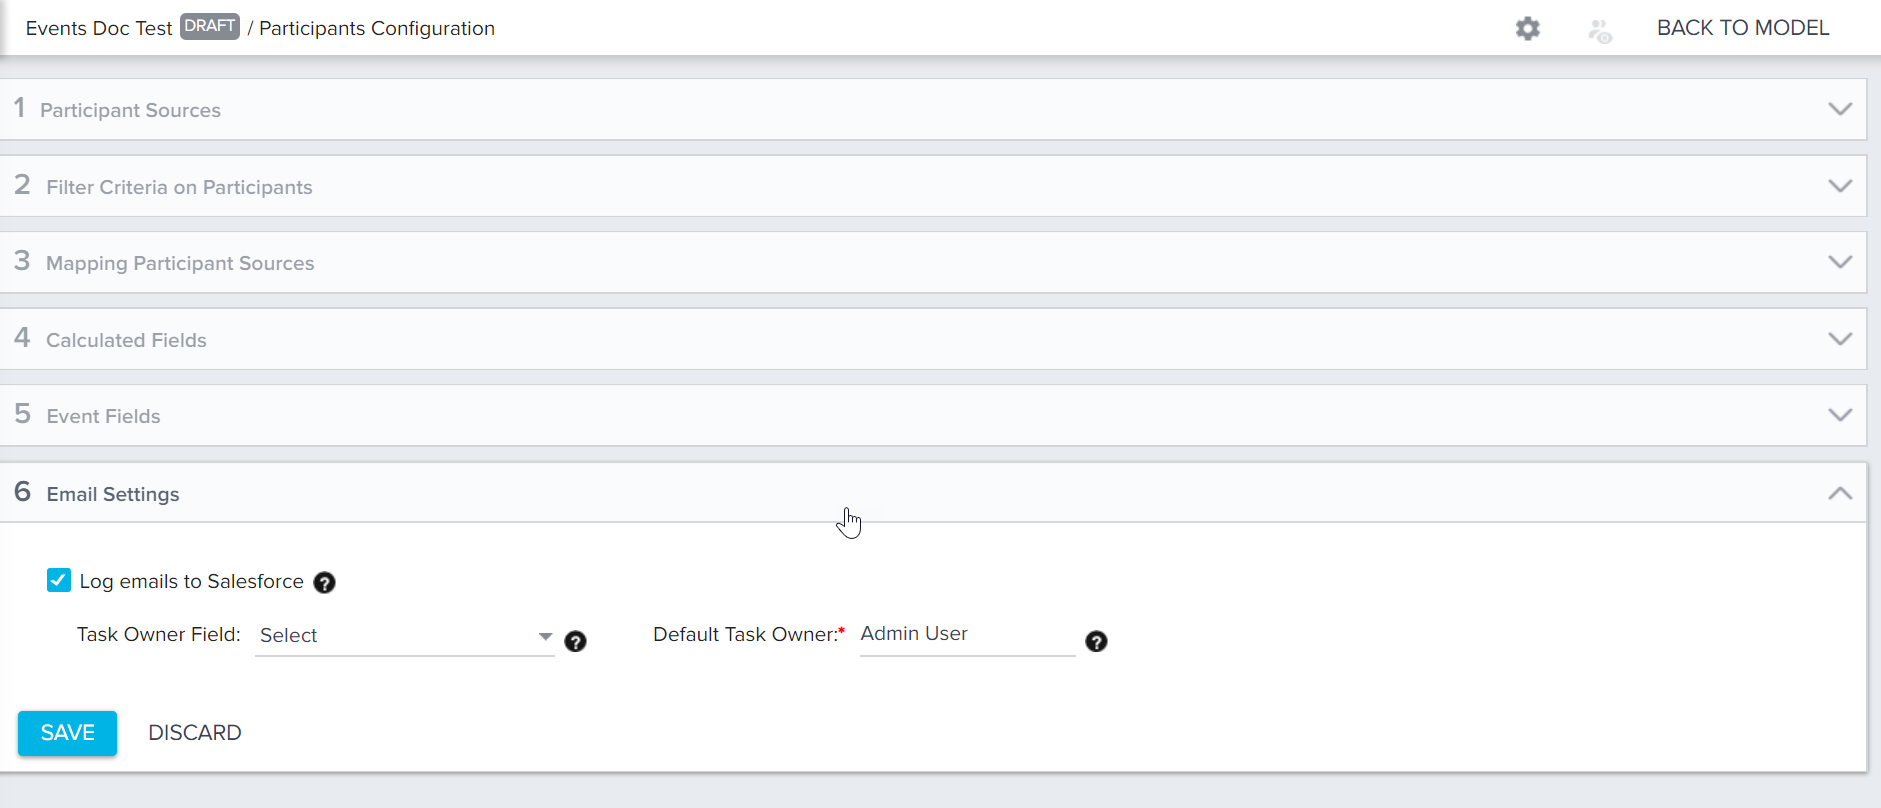
Click the checkbox and Save to activate the feature. Each email will be saved in the Contact’s Activity History.
Admins can configure the Task Owner Field to select who will own the email activity record in Salesforce. The Default Task Owner can be configured to assign the task to a default user, in case the owner field is not available.
Click the SAVE button to save configurations you have made, or the DISCARD button to remove your changes.
Note: Emails are not logged to Salesforce if a user using Salesforce Connector does not have a Gainsight managed package installed in the Org.
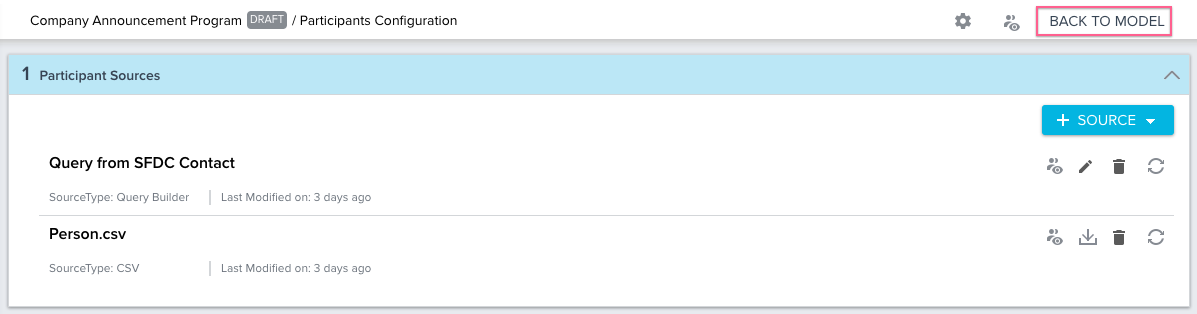
Additional Participant Configuration Options
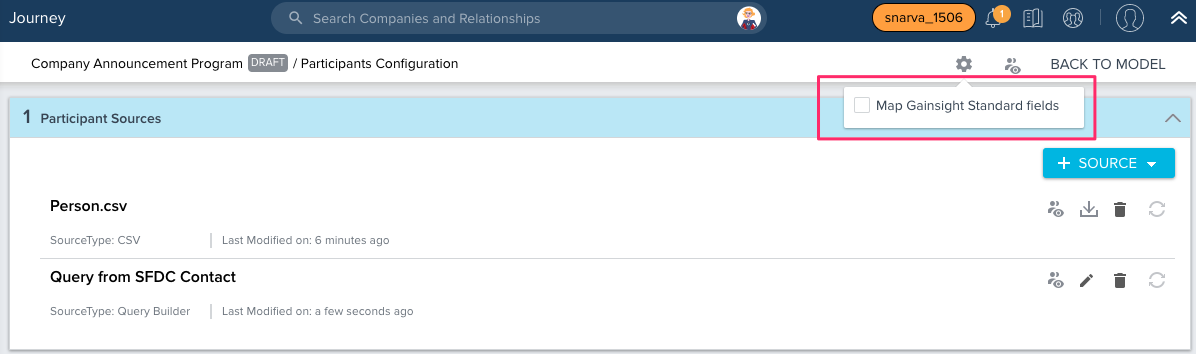
You can access additional options at the top-right of the participant configuration page. These options include: Map Gainsight Standard Fields, Participant List, Sync Sources, and BACK TO MODEL.
Map Gainsight Standard Fields
Gainsight NXT in Salesforce CRMContent in this section supports Gainsight NXT accessing through Salesforce Login. To learn more about Gainsight NXT in Salesforce, click here.
- Click here to expand for more information on mapping Gainsight Standard fields
-
If a Salesforce connection is established in your org, using Salesforce Connector, you can map Salesforce fields (retrieved from Query Builder in the Participant Source configuration) to Gainsight Standard Fields in the Mapping Participant Sources section. This is not selected by default. Click the gear icon at the top-right of the participant configuration screen to display this checkbox. Selecting this option enables resolving Salesforce fields to Gainsight fields, instead of mapping Salesforce fields (Ex: Contact fields) to Participant fields.
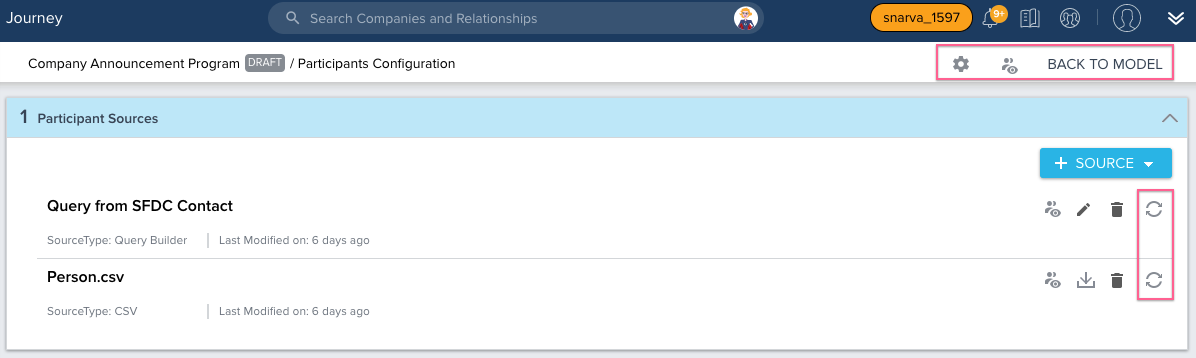
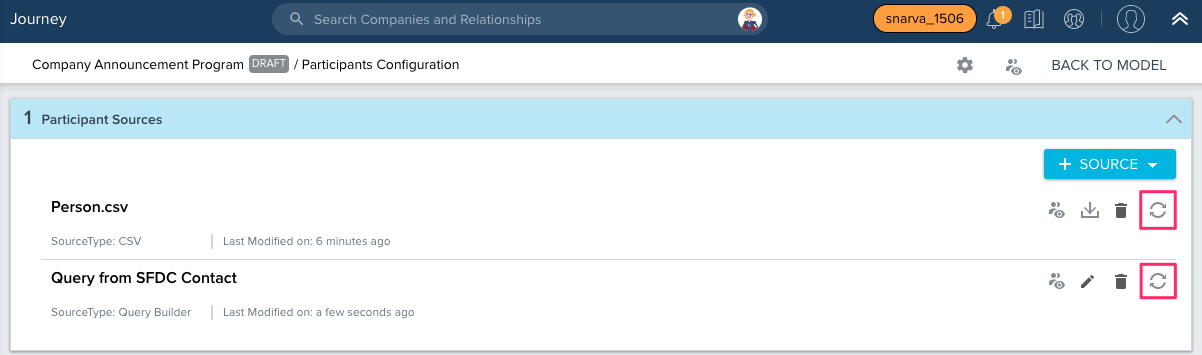
Sync Sources
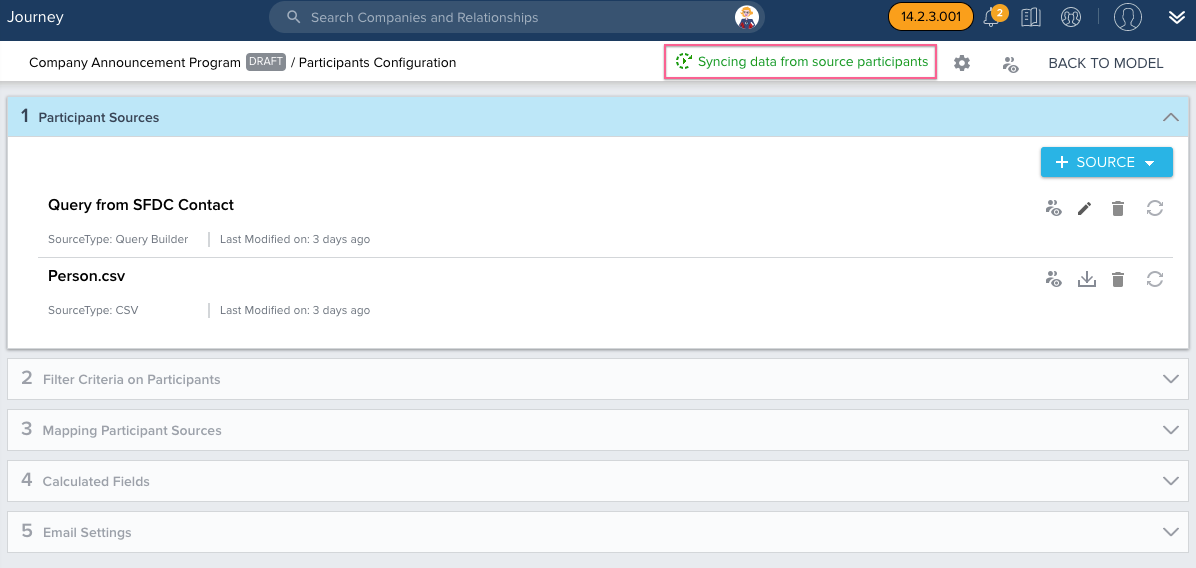
After you add any Participant source (Event, CSV, or Dataset Query) and complete Participant configuration, you must sync the records from each source into the single participant list. To initiate this process, click the Sync icon of each Participant source to sync participants from the respective source with other sources.
Note: The participant sync can only be completed after you have defined the program’s Uniqueness Criteria and mapped each participant source. For more information on completing these steps, refer to Filter Criteria on Participants and Map Participant Sources.
After clicking the sync icon, the following message is displayed:
“This will clear and sync all participants from the sources again. Do you wish to continue?”
You can see the following options:
- YES: Clicking YES will clear any existing participants from the list and sync participants from all sources again.
- NO, SYNC ONLY NEW PARTICIPANTS: Clicking NO, SYNC ONLY NEW PARTICIPANTS will only sync new participants to the existing participant list.
It is normal for the data sync to take some time to complete after it is initiated. After the sync has been initiated, the following message displays at the top of the participant configuration page:
“Syncing data from participant sources”
Participants List/Failed Participants List
You can view a list of all program participants, as well as a list of failed participants, by clicking on the Participant icon on the top-right of the participant configuration screen.
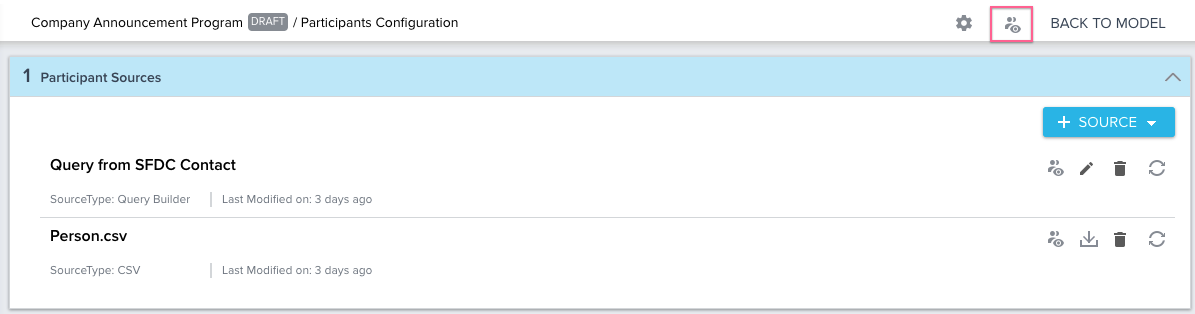
Note: You must sync your participant sources to create the participant list. For more information on syncing sources, refer to Sync Sources.
Participant List
The participant list displays the state of each participant within the Participant Lifecycle, and can display up to 1,000 records.
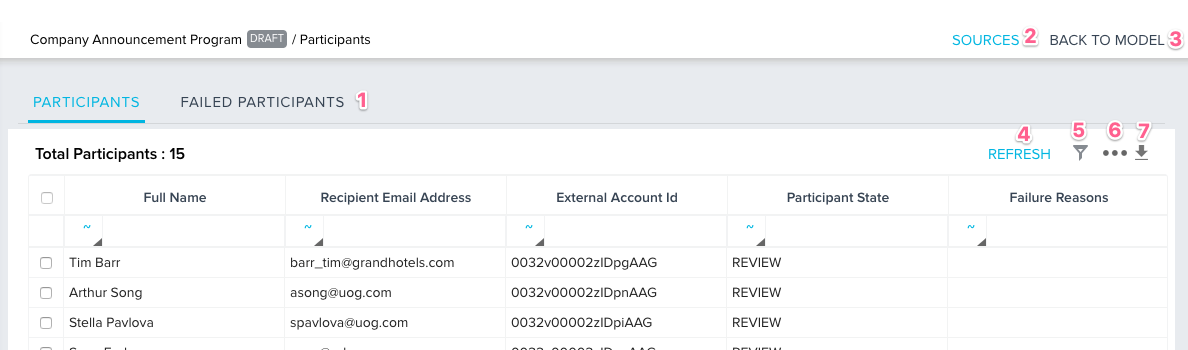
- FAILED PARTICIPANTS: Click to display the failed participants list.
- SOURCES: Click to navigate to the participant configuration page.
- BACK TO MODEL: Click to navigate to the program model configuration page.
- REFRESH: Click to refresh the list of participants. This option is only available for programs with a status of DRAFT.
- Filter Participants: Click to filter the participant list by source type and participant state.
- Select Participant fields: Click to configure the fields displayed in the participant list.
- Download CSV: Click to download the participants list in a CSV, to your machine.
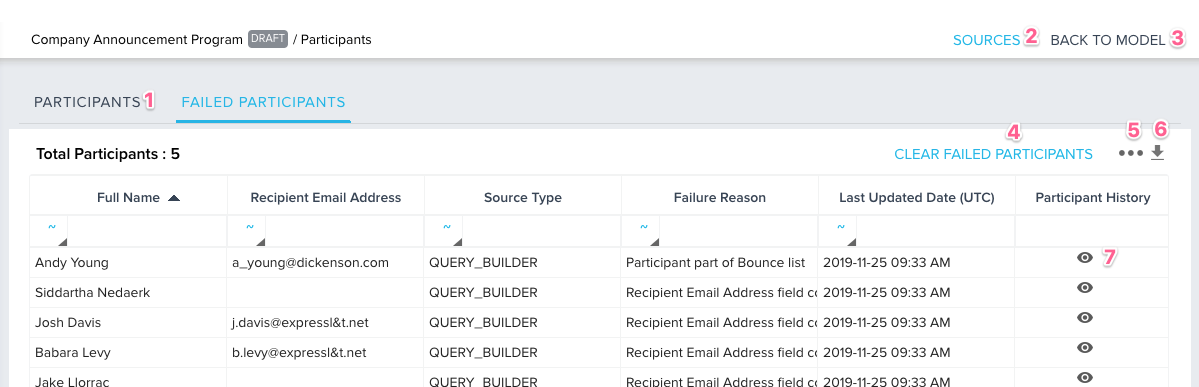
Failed Participant List
You can view the list of all people, who were not added as a program participant, for any reason. To view these records, click the Failed Participants tab. The list is generated after participants are synced (manually or via schedule), and after uniqueness criteria and advanced criteria are applied.
The list will include a column displaying the Failure Reason. For more information on why a potential participant might fail, refer to the Participant Failure Conditions section.
- PARTICIPANTS: Click to display the Participants List.
- SOURCES: Click to navigate to the participant configuration page.
- BACK TO MODEL: Click to navigate to the program model configuration page.
- CLEAR FAILED PARTICIPANTS: Click to remove all records from the failed participant list. This option is only available for programs with a status of DRAFT.
- Select Participant Fields: Click to configure the fields displayed in the failed participant list.
- Download CSV: Click to download the failed participants list in a CSV, to your machine.
- View Participant History: Click to open a window displaying the history of the failed participant. This includes the record’s source type, failure reason, and created date.
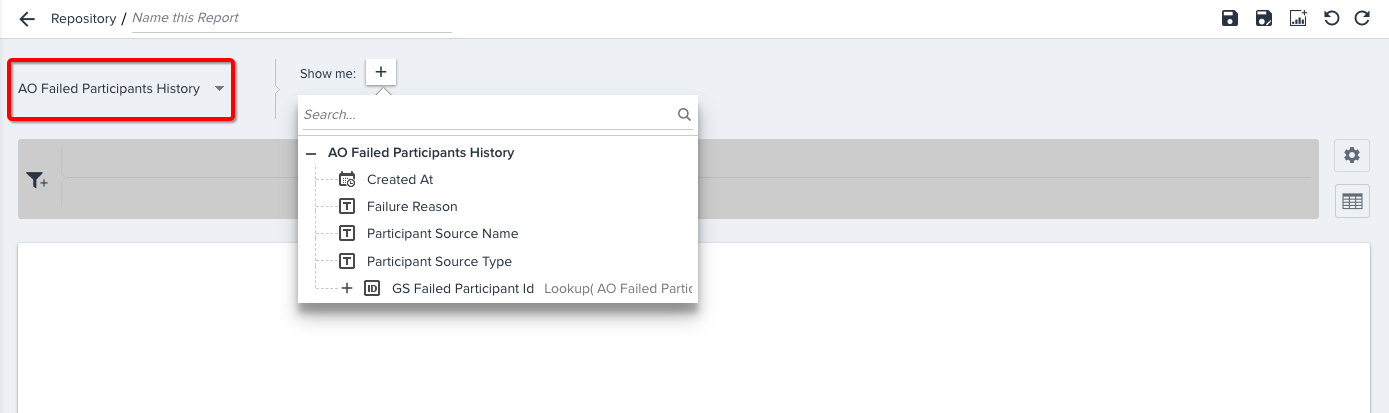
Admins can also create reports on failed participant data in Report Builder to see failure reasons for participants across all Programs. To create a report on this data, take the following steps:
- Navigate to Administration > Report Builder.
- Select AO Failed Participants History as the source object.
- Build the remainder of your report. For more information on building reports, refer to How to Build Basic Reports.
Note: Failed participant data can also be found under the AO Failed Participants source object. However, filtering is not supported for participant fields on this object.
Participant Failure Conditions
Programs can fail adding records as participants for a variety of reasons. The following are conditions for why a participant might fail to sync and the message associated with that condition:
| Condition | Failure Message |
|---|---|
| Unique Criteria | Participant filtered due to unique criteria, Participant already exists in Participant List |
| Don’t Send Emails in X days | Participant filtered due to advanced criteria |
| Hard Bounce | Participant email address part of hard bounce list |
| Soft Bounce | Participant email address part of soft bounce list |
| Unsubscribed Email | Participant has unsubscribed from Survey/Journey Orchestrator Emails |
| Invalid Email | Invalid Email Address |
| Exclusion List CSV | Participant part of CSV Exclusion List uploaded into the Program |
| Operational Email - Rule 1 | Operational Email - More than 5000 active participants in the Program |
| Operational Email - Rule 2 | Operational Email - More than 5000 participants synced per day |
| No Company Id or Relationship Id or GSID | Participant Company/Relationship Id not synced correctly |
| Token misconfiguration | Token “Place Holder 1” is not mapped in variant “Default” of step “Survey Email” |
BACK TO MODEL
Click this option to navigate back to the Program model configuration page.
Knock-Off or Remove Participants
You can remove one or multiple participants that have been added to a program with a status of DRAFT. To perform this, take the following steps:
- Click the Participants icon at the top-right of the Participant Configuration page to open the participants list.
- You can select the required participants that should be deleted from one of the following options:
- Select one or multiple participants using the checkbox next to each participant name.
- Click the Filter icon at the top-right of the page and apply criteria by Source and Participant State, as required.
- Enter value in the required field search box to filter participants and then select the required participants from the filtered list.
- Click either KNOCK OFF or REMOVE to select the participant as “Knocked Off” from the Program or removed from the Program permanently.
Notes:
- Before you select one of the options, ensure that you know the difference between the options.
- Once you Knock-off any participant(s) using this option, you can add them again using the option Entry Criteria in the Participant configuration Filter Criteria on Participants. For more information, refer to the Filter Criteria on Participants section.
- Once you knock-off any participant(s), you can remove them only after adding them again using the above option.
You can search for specific Participants using the fields within the Participant List. You can not delete Participants in a Completed or Paused Participant State.
Notes:
- It is not possible to remove participants from a program with a status of ACTIVE.
- If the Uniqueness Criteria of a Program is configured to allow "Knocked Off" participants to be re-added to the Participant Lifecycle, it is possible for participants who were removed using this method to be re-added to the Program as they are considered "Knocked Off".
Exporting Participants
Admins can now export the list of participants either by downloading the CSV file or as an attachment to email based on the report read limit.
This functionality is applicable to the following types of participants list in the tabular formats:
- Program analytics
- Snapshot view
- Participant list view
- Failed Participants
- Summary View
- Participant Activity
Note: The export option is disabled if the participants grids has zero records.
If any filters are applied to the participant grid or inline search is performed, only those list of participants applicable for the applied filters are downloaded or exported based on the report read limit for that tenant.
Similarly, the columns which are selected to display in the grid are downloaded or exported based on the report read limit for that tenant.
Impact of Data Operation on Participants
When Gainsight Admins delete any Company or Relationship record from the Data Operation page, Participants that are added to a Program from the respective Company or Relationship are dropped and deleted.
When this action is taken as part of a company delete from the Data Operation page, affected participants that are currently active in a Program will be dropped and the company ID value in the participant record is set to null.
When this action is taken as part of a Relationship delete from the Data Operation page, all participants that belong to the Relationship are dropped. Any Programs that belong to the Relationship are stopped, and the Relationship ID is marked as null at the Program and participant level.
Unsubscribe Process
After a participant has received a Program, they can select the option to unsubscribe. When a user clicks this option there are two categories they can unsubscribe from: Customer Success Communication and Survey Communication. Depending on how a user has unsubscribed, a Program will perform in the following ways:
- When a Program is published, a check is performed against the list of unsubscribed person records (people who have unsubscribed earlier from all communications). Participants that match this list are dropped from the Program. This is applicable for all survey models: NPS®, CSAT, and Generic Survey Model.
- If the Participant unsubscribes within the Program NPS® journey and selects either the Survey Communication or the Customer Success Communication categories, they will be dropped from the NPS® journey and will not receive any further communications such as reminder emails or escalation emails.
- Within an Email Chain model, only participants who have unsubscribed from the category - Customer Success Communication are not added to the Program and are dropped from the journey.
- If there is an opt-out field on both the Person and Company Person objects, the Person object field is considered while sending a Program.
- The Custom object is considered when it is used in any type of source to build the participant list.
You can see the number of emails which were unsubscribed as part of each email step using the Stepwise Report on the Program Analytics page. For more information on this report, refer to Reports for a Single Program.
Edit Sources after Publishing a Program
Admins can edit/delete the sources of an Active program even after it is published. This solves many problems for customers. For example, if an admin adds a CSV file or a sample source to test the program for some participants, now they can come back and delete the existing source and add a new source, to the same set of participants, before making the program live.
Admins can perform the following actions to the Sources of an Active Program after it is published:
- Add and merge tasks in Bionic Query.
- Add new fields to the existing source.
- Map the new fields and also modify the existing mapping.
- Make modifications in source filter criteria.
- Update Email Template.
- Add/Delete participant source(s). But, at least one source must be present.
- Delete existing Custom fields if they are not used in any other criteria or steps.
By default, source modifications performed by an admin are only applicable to the new participants added in the program, and do not impact the already synced participants. Admins must use the Sync icon to manually sync the participants to immediately apply the modifications to the source. After the sync is done manually, participants are added to the Program list in the REVIEW state.
If Admins sync the participants manually, they must navigate to the Participants list page and perform the following actions as per their requirement:
- ADD TO PROGRAM: Adds participants to the existing Program.
- KNOCK OFF: Knocks off the participant from the program and they no longer receive messages as part of the Program.
- REMOVE: Removes the existing participants from the Program, if added unintentionally.
Additionally, bulk KNOCK OFF and REMOVE options are supported in this feature. Admins can use this feature to move all of the participants to Knock off state and even remove them completely from the Program, if they are not required.
Note: Select all checkboxes, for bulk Knock off and Remove options, is only enabled when the participants are filtered by REVIEW, NEW, or ACTIVE state.
If syncing of the participants for an Active program is scheduled for an automatic syncing after adding new source to a program, this also publishes all of the Review participants available in the system. Before the schedule runs, user must manually KNOCK OFF/REMOVE if they do not want to publish any participant who are already in REVIEW state.
Bounced/Unsubscribed Participants
Bounced and Unsubscribed person records will not be added to the Participants data table in a Program. Gainsight will safely drop this data before adding Participants to the data table.
If you have questions or feedback about the feature explained in this article, please share them on community.gainsight.com.
Enable Communication Usage Email Notifications
You can view the total and available daily, monthly, and operational email communication limits for your Gainsight instance from the Communication Usage window. Furthermore, you can enable email alerts when specific communication usage limits are reached.
To enable communication usage email notifications:
- Navigate to Journey Orchestrator > Programs. The programs list page appears.
- Click Communication Usage from the top-right corner. The Communication Usage window appears.
- Turn ON the respective toggle switches for Daily Usage, Daily Operational Email Usage or Monthly Usage to send email notification to JO admins when the 100% limit is reached.
- (Optional) Turn ON the 75% or 60% toggle switch for Monthly Usage Limit to send email notifications to JO admins when the 75% or 60% monthly usage limit is consumed, respectively.
![list -5 - V4 Advanced Programs [Q1-2023] - Zeplin 2023-07-26 at 2.26.49 PM.jpg](https://support.gainsight.com/@api/deki/files/22902/list_-5_-_V4_Advanced_Programs_%255BQ1-2023%255D_-_Zeplin_2023-07-26_at_2.26.49_PM.jpg?revision=1)
IMPORTANT: The above Communication Usage window appears only for new customers who have purchased packages or add-ons after July 29, 2023. The existing customers will continue with the old communication usage limits.