Rules Engine Horizon Experience Overview
Gainsight NXT
This article explains the Rules Engine Horizon Experience’s overall insights and its impact on different modules.
Overview
The Rules Engine Horizon Experience helps admins create rules to trigger CTAs, update scorecard measures, load data into Gainsight objects and analyze data from Gainsight objects.
Rules Engine can also perform multiple fetches and transformations in a single rule, including tasks to fetch data from multiple sources, merge, aggregate, pivot, and then load to an object.
Gainsight has redesigned the Rules Engine, powered by Gainsight Horizon Experience. The new Rules Engine comes with an enriched visual experience to make it easier for the admins to build and understand rules. In addition to enhanced user experience, new features are added and the existing functionalities are improved. For more information on the changes implemented, refer to the Change Document for Rules Engine Horizon Experience article.
Create a New Rule
Rules Engine is a one-stop location where the admins can set up a rule with the preferred data setup, add criteria, and set up actions on the datasets and schedule rules based on time or event.
To create a new rule:
- Navigate to Rules Engine > Rules List tab.
- From the Create Rule dropdown list, select Horizon Rules. The Rule Details screen appears, with the following four tabs:
Rule Details
The Rules Details section enables admins to work with multiple data sets from multiple Objects; as well as process the data and perform actions.
Provide the following details in the Rule Details tab:
- Rule For: Select the Company or Relationship option.
- Rule Name: Enter the name.
- Folder: From the Folder dropdown list, select the desired Folder.
- Relationship Types (Optional): From the Relationship Types dropdown list, select the Relationship Type.
- Rule Description: Enter the description and click Continue.The Rule Details are saved successfully and the Data Setup screen appears.
- Additional Options:
- Execution Logs: Navigate to the Execution Logs page to view the details of execution.
- Run Now: Schedule rule runs for a specific date.
For more information, refer to the Run Now section in the Rule Chain article.
_(1).jpg?revision=1)
Data Setup
For a new rule, data can be set up from different data sources.
Following two options are available for the admins:
- Import data from a single object where a data set is already created or stored.
- Import data from a prepared dataset in which you can bring the data from different objects from different resources, transform them, and merge them.
Select an Object
In this section, the data is imported from a single object where a data set is already created or stored.
To set up a data from a single object:
- Navigate to Rules List > Create Rule > Horizon Rules > Data Setup. The Data Setup screen appears.
- Select the Select an object option.
- From Select an Object dropdown list, select the object.
- Click Preview Dataset. The selected object pane appears with the data which are already stored in it.
- Click plus icon to select the columns to be displayed on the selected object pane. The Add or Remove Columns dialog box appears on the screen.
- Select or Unselect the desired columns.
- Click Apply. The selected columns appear on the screen.
5. Click Continue. The Data Setup for the Rule is saved successfully.
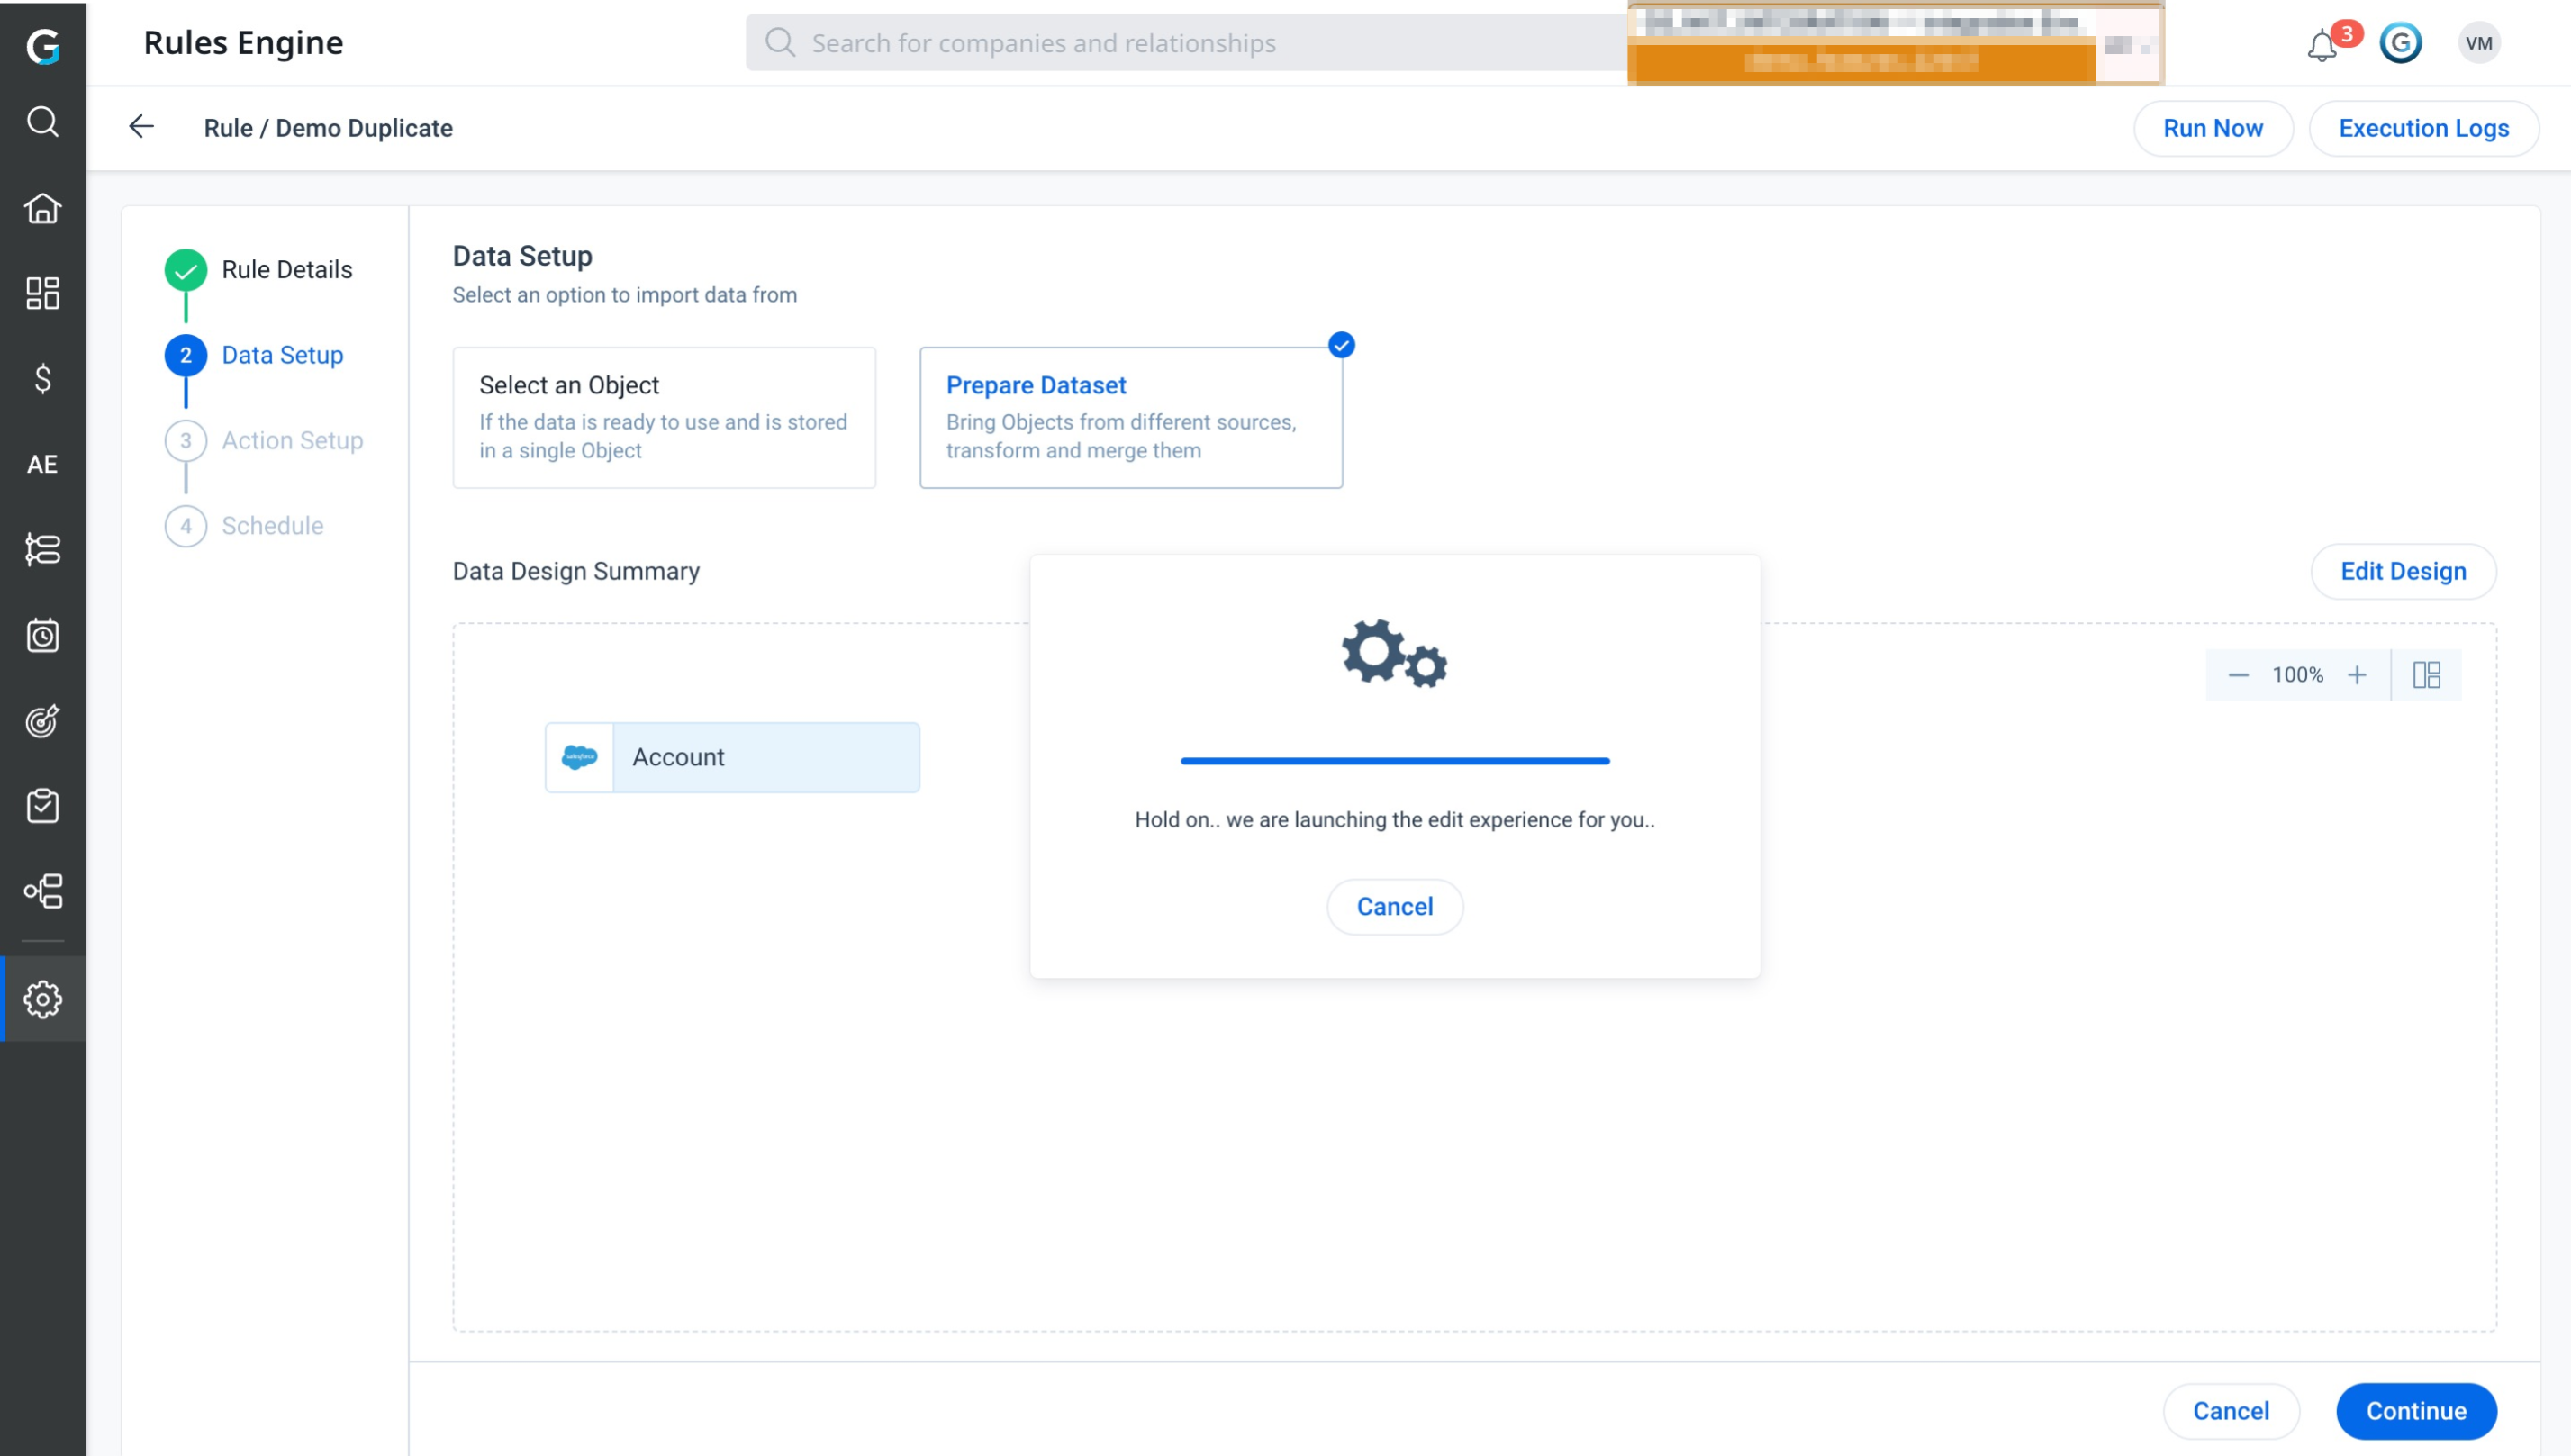
Prepare Dataset
In Prepare Dataset you can transform, merge, and union two different objects and create a Dataset. It helps you to explore and analyze the data to see its usability and make it permanent across Gainsight.
To prepare dataset for a rule:
- Navigate to Rules List > Create Rule > Horizon Rules > Data Setup. The Data Setup screen appears.
- Select Prepare Dataset option.
- From the Data Source dropdown list, select a source.
Following functionalities can be used while preparing a dataset:
- Edit Dataset
- Transform
- Merge
- Union
- Pivot
- Auto Arrange Datasets
- Preview Dataset
- Delete
- Preview Output Dataset
- Export to S3
- Save Dataset as Design Template
Edit Dataset
To edit a Dataset, click the Edit icon (or) click Options, and then click Edit to edit a dataset. You are navigated to the page where you can see Details & Summary, Fields, and Filters tabs.
Details & Summary
You can see the following options in the Details & Summary tab:
- Object Name: Displays the Original Name of the Object that specific Dataset is built on.
- Data Source Name: Displays the name of the Data Source.
- Output Dataset Name: In the Output Dataset Name text box, type In the Dataset Name, if you want to edit the Dataset Name.
- Description: Enter the Description of the Dataset as required.
- Fields & Filters: You can view a list of Fields (including Group By, if any) and Filters in the Dataset.
Fields
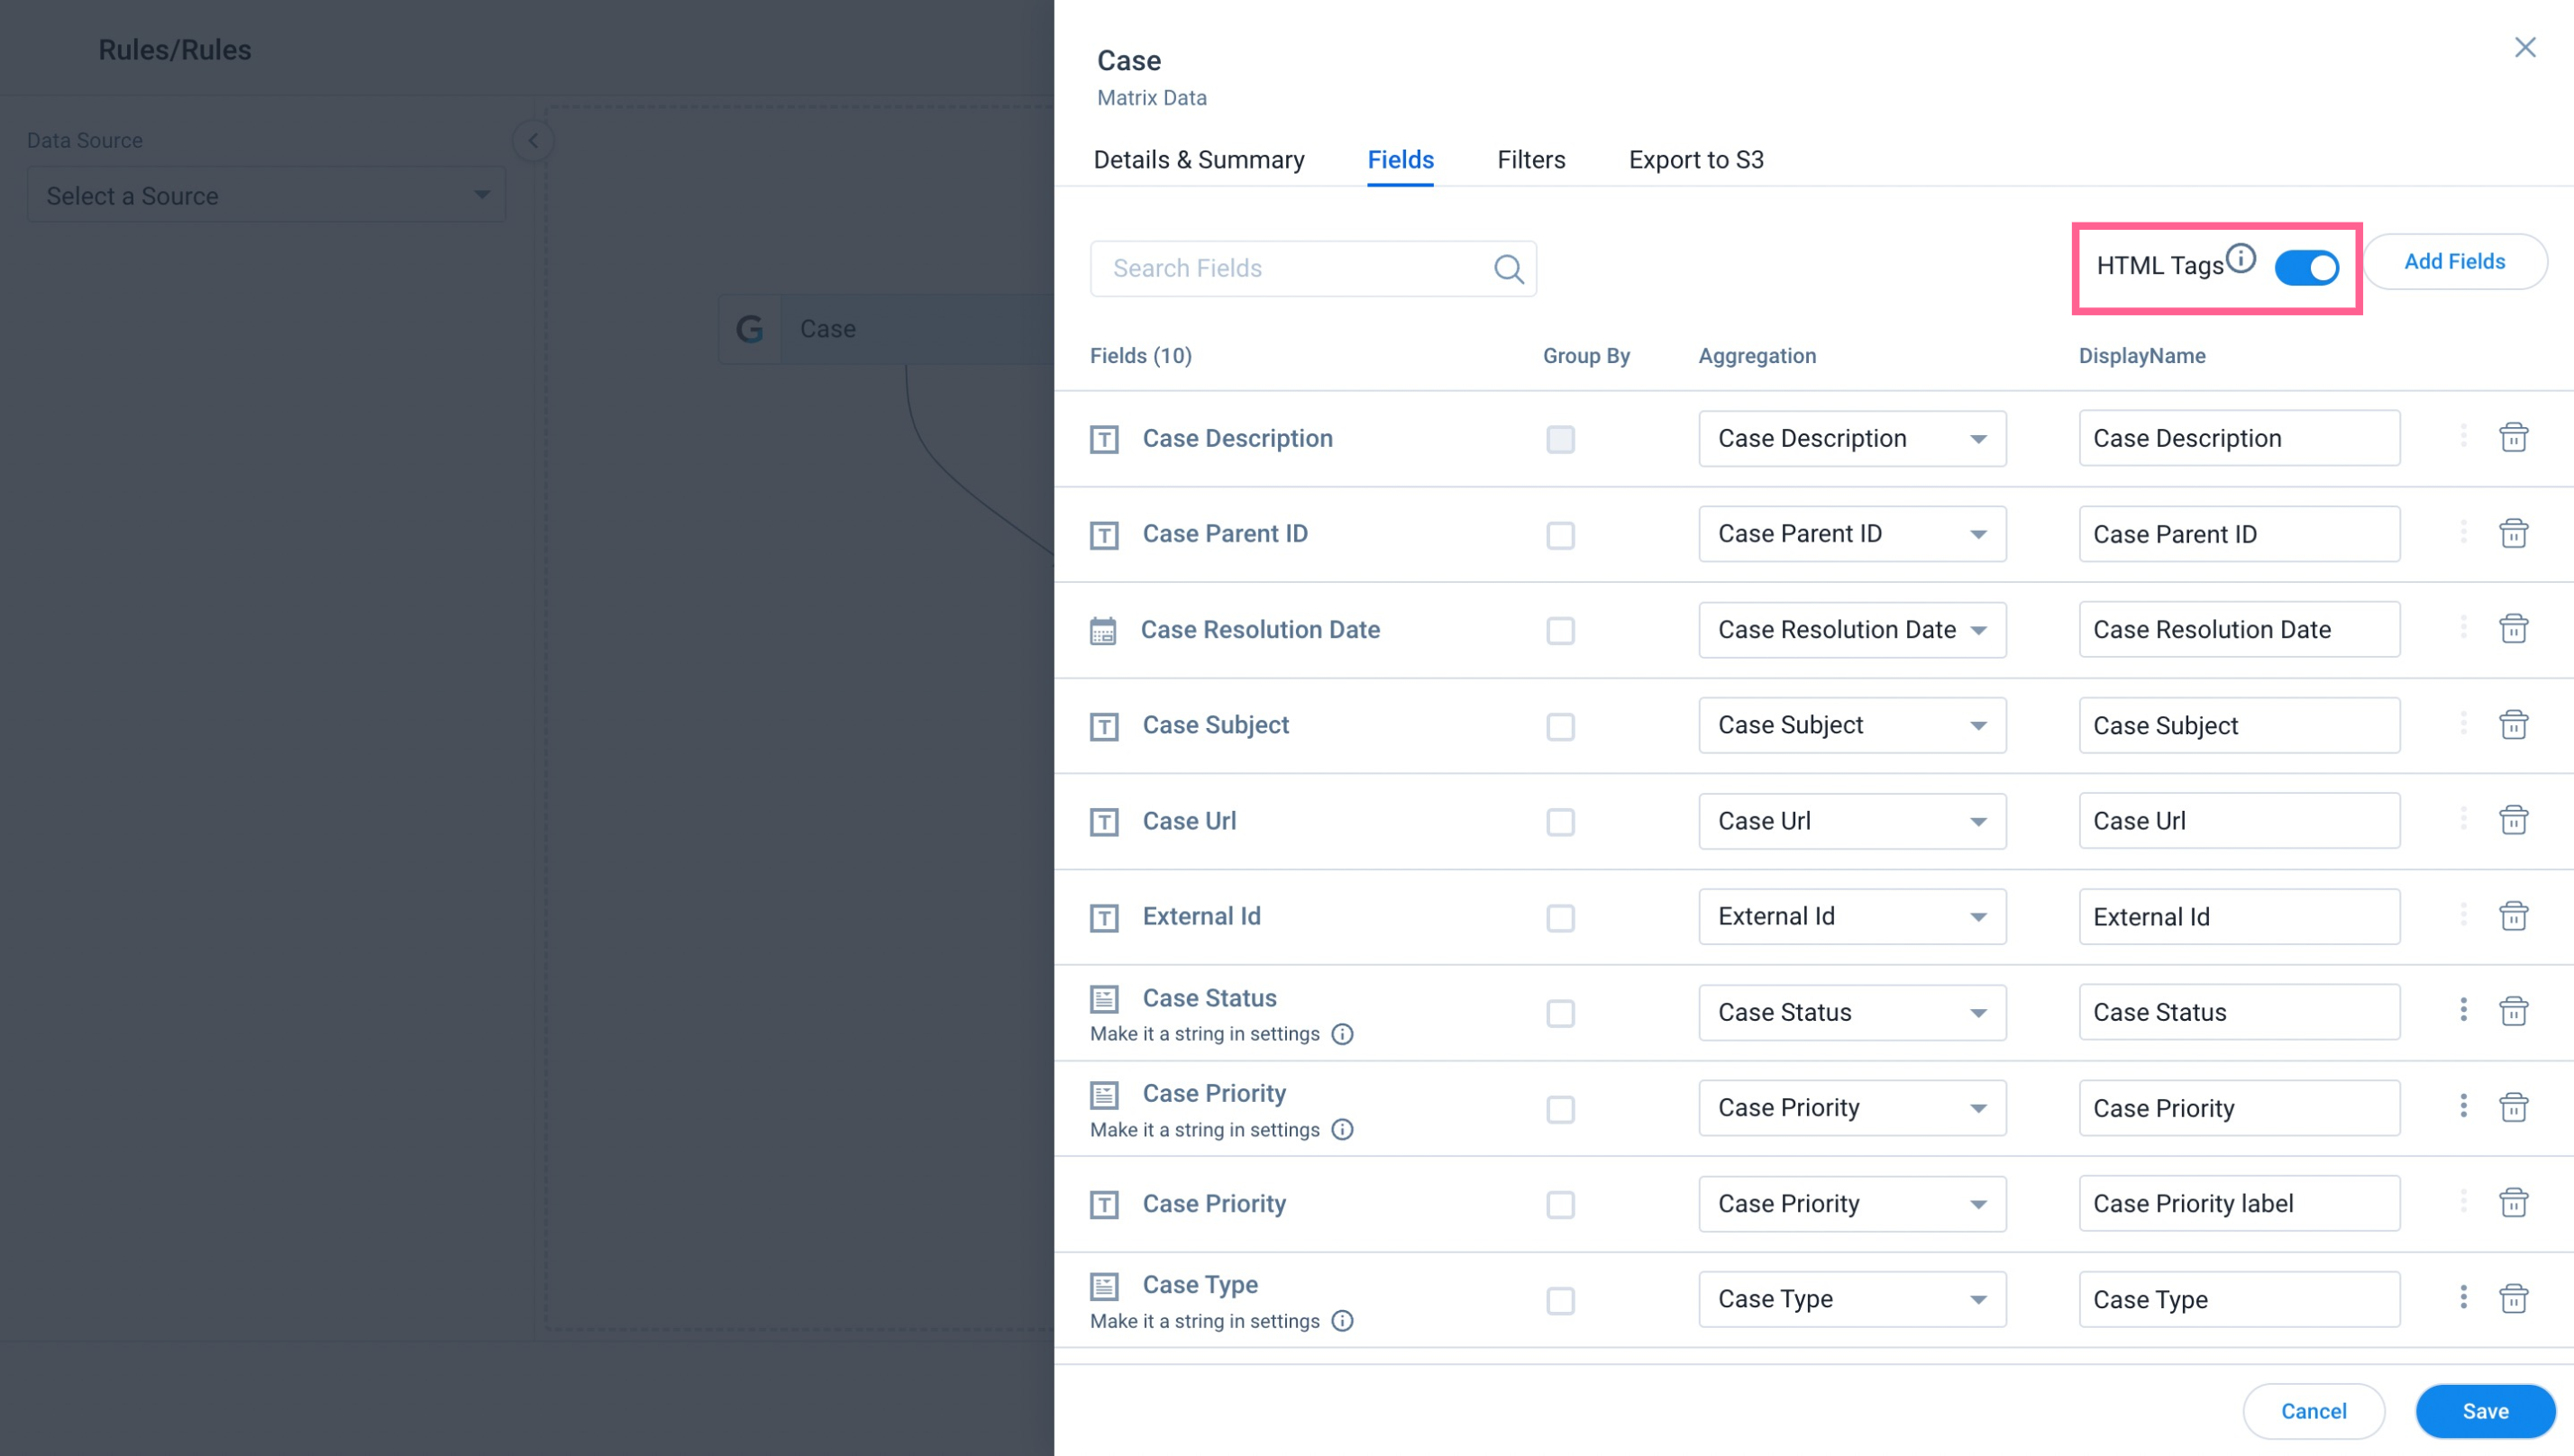
You can see the following options in the Fields tab:
- Search Fields: In the Search Fields text box, type in the Field Name you want to search for. Search operation happens on the fields available in the Dataset.
- Note: When a user enters the Field name, the search functionality fetches the fields from the base object. To further extend your search on lookup objects, ensure that you expand the lookup object before you make a search.
- Add Fields: Click Add Fields to select the required fields you want to add to the dataset, and then click Select.
- Group By: You can select the required fields to Group By, to slice and dice the data in the dataset. Once you select a Field to Group By, all the other fields in the dataset become aggregated.
- Aggregation: You can select the required aggregation type from the Aggregation dropdown list.
- Display Name: By default, Field Name name appears in the Display Name text box, if required you can modify it. Display Names are shown in the Datasets/reports.
- Settings:
-
For the numeric data type fields, you can set the decimal places. Click the Settings icon to enter the decimal places you want to set
-
If the Salesforce Picklist/Multi-picklist fields you wish to set-up has already been added to the dataset:
-
Click the Settings icon in the right corner.
-
Enable the Convert to Picklist toggle button
-
Select the required dropdown list from the Map to MDA Dropdown List.
Notes:-
Before you map the Salesforce Picklist to Gainsight’s Dropdown list, ensure that you have already created an equivalent Dropdown list in Gainsight. For more information on how to create a Dropdown/Multi-select Dropdown list, refer to the Dropdown List and Multi Select Dropdown List article.
-
If you have not created an equivalent MDA Dropdown in Gainsight and mapped to the required Salesforce Picklist, the values are shown as null.
-
After the setup is complete, users can see the Picklists in Gainsight’s Filters and Global Filters.
-
-
-
To change the data type of a Picklist:
-
Click Settings and select Duplicate Field. The String data type of Picklist is displayed.
-
-
- Delete: Click the Delete icon to remove a field from the dataset.
Note: If you try deleting a field from a dataset that is a dataspace, Data Designer displays a notification that informs you to Check Dependencies. This prevents you from accidentally deleting a field that is already used in a dataspace.
- Save: Click Save to save the changes made in the dataset.
- HTML Tags: The HTML Tags automatically detects Rich Text fields. By default the HTML Tags switch is Toggled On.
Note: The HTML Tag is useful for exporting to S3 and for maintaining single data consistency.
Cascade Add
Cascade Add functionality allows you to add a field to a dataset, and thereafter this field automatically gets added to all of the next datasets (end tasks) in that design.
Notes:
- The default aggregation of the Measure type field added using Cascade Add functionality is Sum. Once the field is added, you can change the aggregation based on your requirement.
- The default aggregation of the Dimension type field added using Cascade Add functionality is Count. Once the field is added, you can change the aggregation based on your requirement.
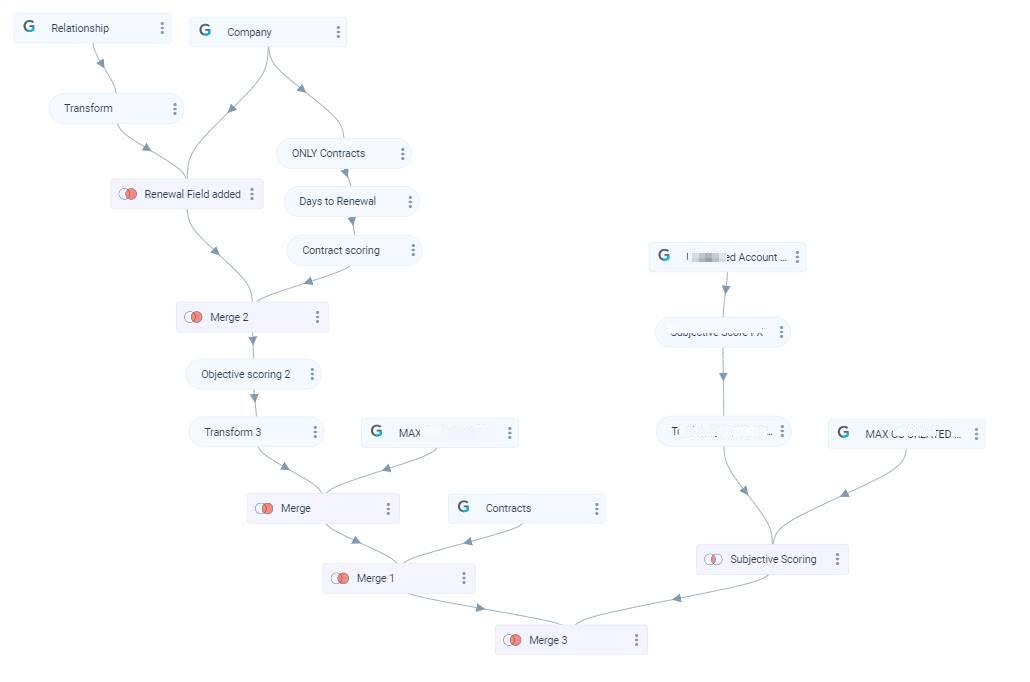
Assume, you have a design as shown in the following image, and you might want to add a new field to the end task. Instead of adding the new field to each of the tasks separately from the starting, using Cascade Add functionality you can add the new field to all the tasks at a time by adding that field to the parent dataset.
To perform Cascade Add:
- Click Add Fields.
- Select the required fields.
- Click Select.
- Click Save. The Newly added fields window appears.
Note: You can see the list of new fields in this window.
- Click Yes Add, to add the selected new fields to the end tasks.
Cascade Delete
Cascade Delete allows you to delete a field from a dataset, and thereafter this field automatically gets deleted from all of the subsequent datasets in that design.
If the design is a Dataspace, and when you try deleting a field from the last dataset, a notification is displayed to Check Dependencies across other functionalities of Gainsight.
To perform Cascade Delete (Design is a Dataset):
- Click the Delete icon.
- The Field(s) being used in other tasks dialog appears.
- Click Yes Delete to delete the field from the subsequent datasets.
- Click Save.
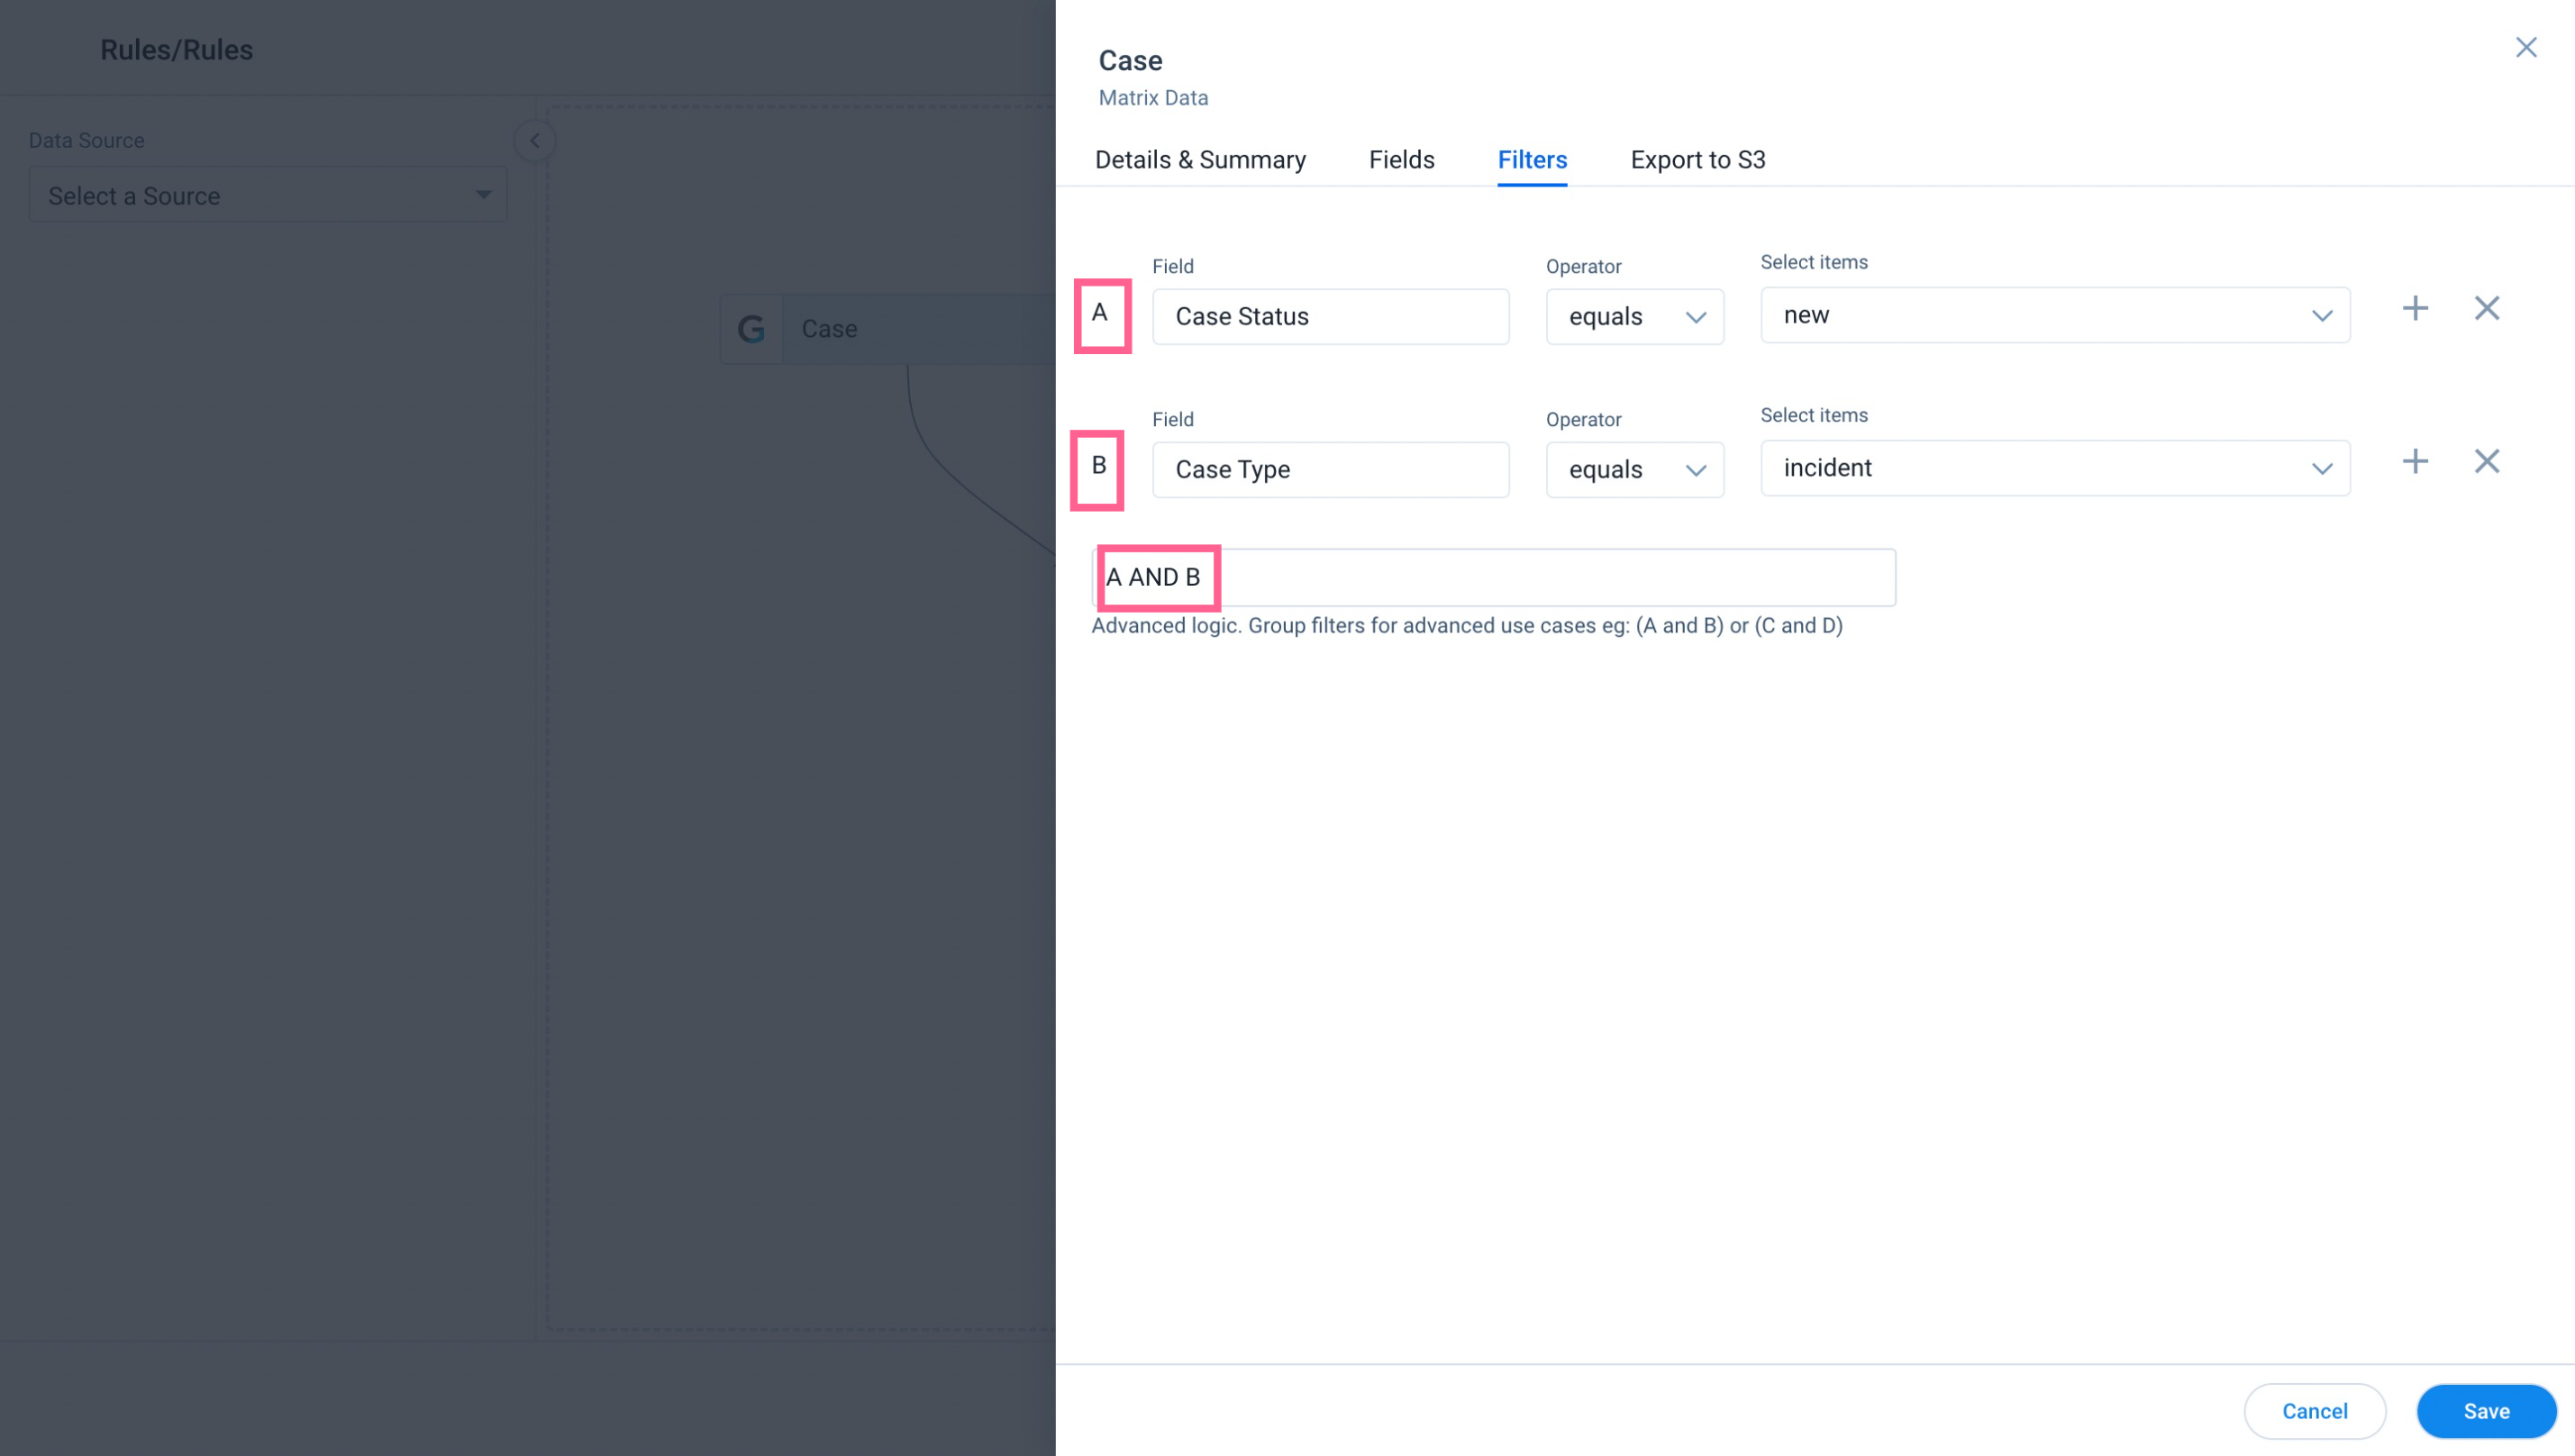
Filters
To apply Filters:
- Navigate to the Filters tab.
- Click Add Filter.
- Select the field you want to filter on.
- Choose the operator and then input the data in the Value text box.
Notes:
- You can also Add more filters by clicking the + icon next to Value text box.
- You can Delete a filter by clicking the x icon.
- You can add advance filters such as (A OR B) AND C, type in your desired expression in the Advanced Logic text box.
- Click Save.
Transform
Transform allows you to apply Formula Fields and Case Expressions on the fields added to the dataset.
To apply Transformation on a dataset, click Options on the dataset you want to apply transformation, and then click Transform. A new window with the dataset name Transform appears, where you can see Details & Summary, Fields and Filters tabs.
Fields
After you apply Transformation on a dataset, you can create Formula Fields and Case Fields upon the fields added to the transformed dataset.
Formula Fields and Case Fields in the Preparation Details of Data Designer work as the Formula Fields and Case Fields in Horizon Rules.
Add Formula Field
To create a Formula Field:
- Click Add Formula Field.
- Enter the Formula Field name in the Label text box.
- Select the required Data Type (String or Date or Number).
Notes:
- Select the data type, based on the output field you want. For example, if you want to see the output as the number of days/weeks/months, then select the output data type as the number.
- Functions and Fields may differ based on the selection of the data type.
- For Number data type, you can select the Expression Type as Function or Expression from the Expression Type dropdown list.
- Select the required Function of your choice, and then select/enter the Values and/or Fields.
- Click Save to save the formula field.
- Click Save to save the Transform dataset.
You can preview the records of the newly created formula fields, by clicking Preview on the Transform dataset.
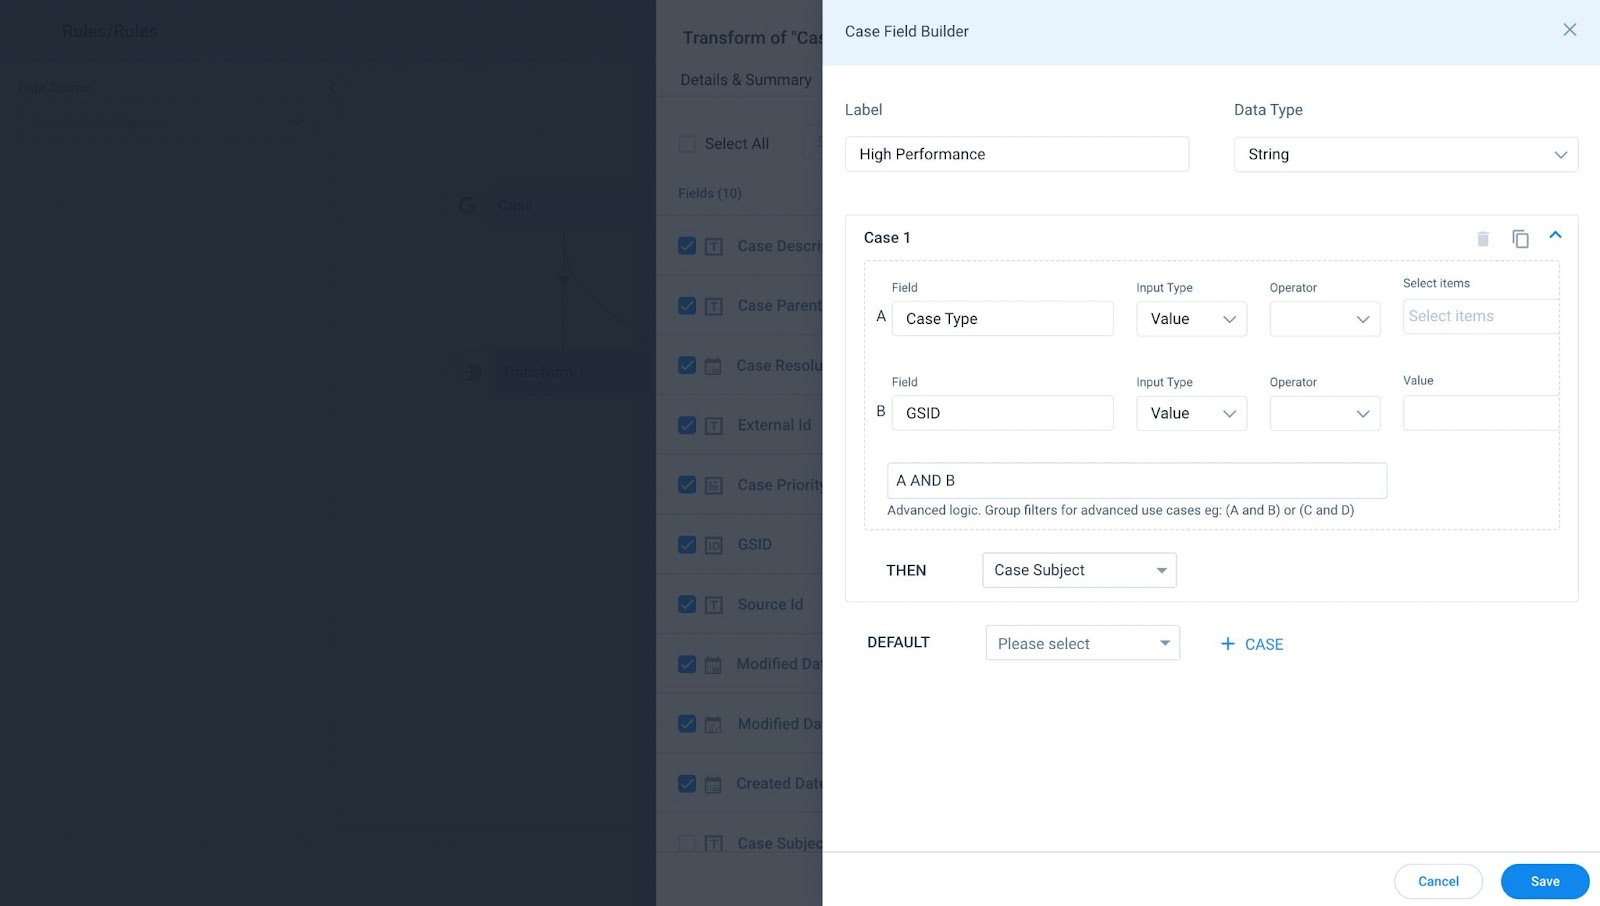
Add Case Field
You can use the Case Expression formula field to categorize data, based on a specific set of requirements. You can use this Formula function to create an output Field. This output field has values for the records that match your specific set of requirements.
Case Fields in the Preparation Details of Data Designer work as the Case Fields in Bionic Rules.
To create a Case Field:
-
Click Add Case Field.
-
Label: Enter the Formula Field name in the Label text box.
-
Select the required Data Type (Number/String/Boolean). The options present in the Case Output depends on the Output data type.
Note: If you select Number in the Data Type, select the number of decimal places up to which the output must be displayed, for floating point numbers. -
Case: Case consists of the Criteria(s). You can add multiple criteria by clicking +.
-
Criteria. The various fields present in a Criteria are:
-
Field: Select the field on which the Criteria must be applied. All the fields included in the Dataset are displayed.
-
Operator: Select an Operator to be applied on the field. The operators are displayed based on the field selected.
-
Matching Criteria: Select the matching criteria which must be satisfied, for this criteria to be successful. You can either select:
-
Value: Enter a value which must match the field value.
-
Field: Select a field whose value must match the value of the field, selected in the first field.
-
-
-
Advanced Logic: When you have multiple criteria, select the logical operator to be applied between those criteria(s). By Default, the AND logic is applied.
-
Then: If all the criteria(s) are matched, the action specified in this field is executed. The options available in this field depend on the value selected in the Output Data Type field.
-
Default: This field represents the default case. There are no criteria for this case. It only has action. If all the cases fail, this case is executed.
-
Click Save to save the case expression.
-
Click Save to Transform dataset.
Execution of the Case Expression in detail:
-
Execution of the Case Expression begins with the evaluation of the first case on a record. If all the criteria, in this case, are satisfied by the record, the action associated with this case is executed. The execution of Case expression halts here for this record and none of the other cases are evaluated.
-
However, if the first case is not satisfied, the system evaluates the second case on the same record, and so on. If none of the available cases are satisfied by the record, the default case is executed.
Filters
Filters in Transform work as Filters in Edit Dataset. For more information, refer to the Filters section.
Details & Summary
Summary details in Transform are the same as Details & Summary details in Edit Dataset. For more information, refer to the Details & Summary section.
Merge
You can merge datasets in the following ways:
- Click Options on the dataset you want to merge, and then click Merge and select the required dataset. (OR)
- Drag and drop the first dataset on to the second dataset.
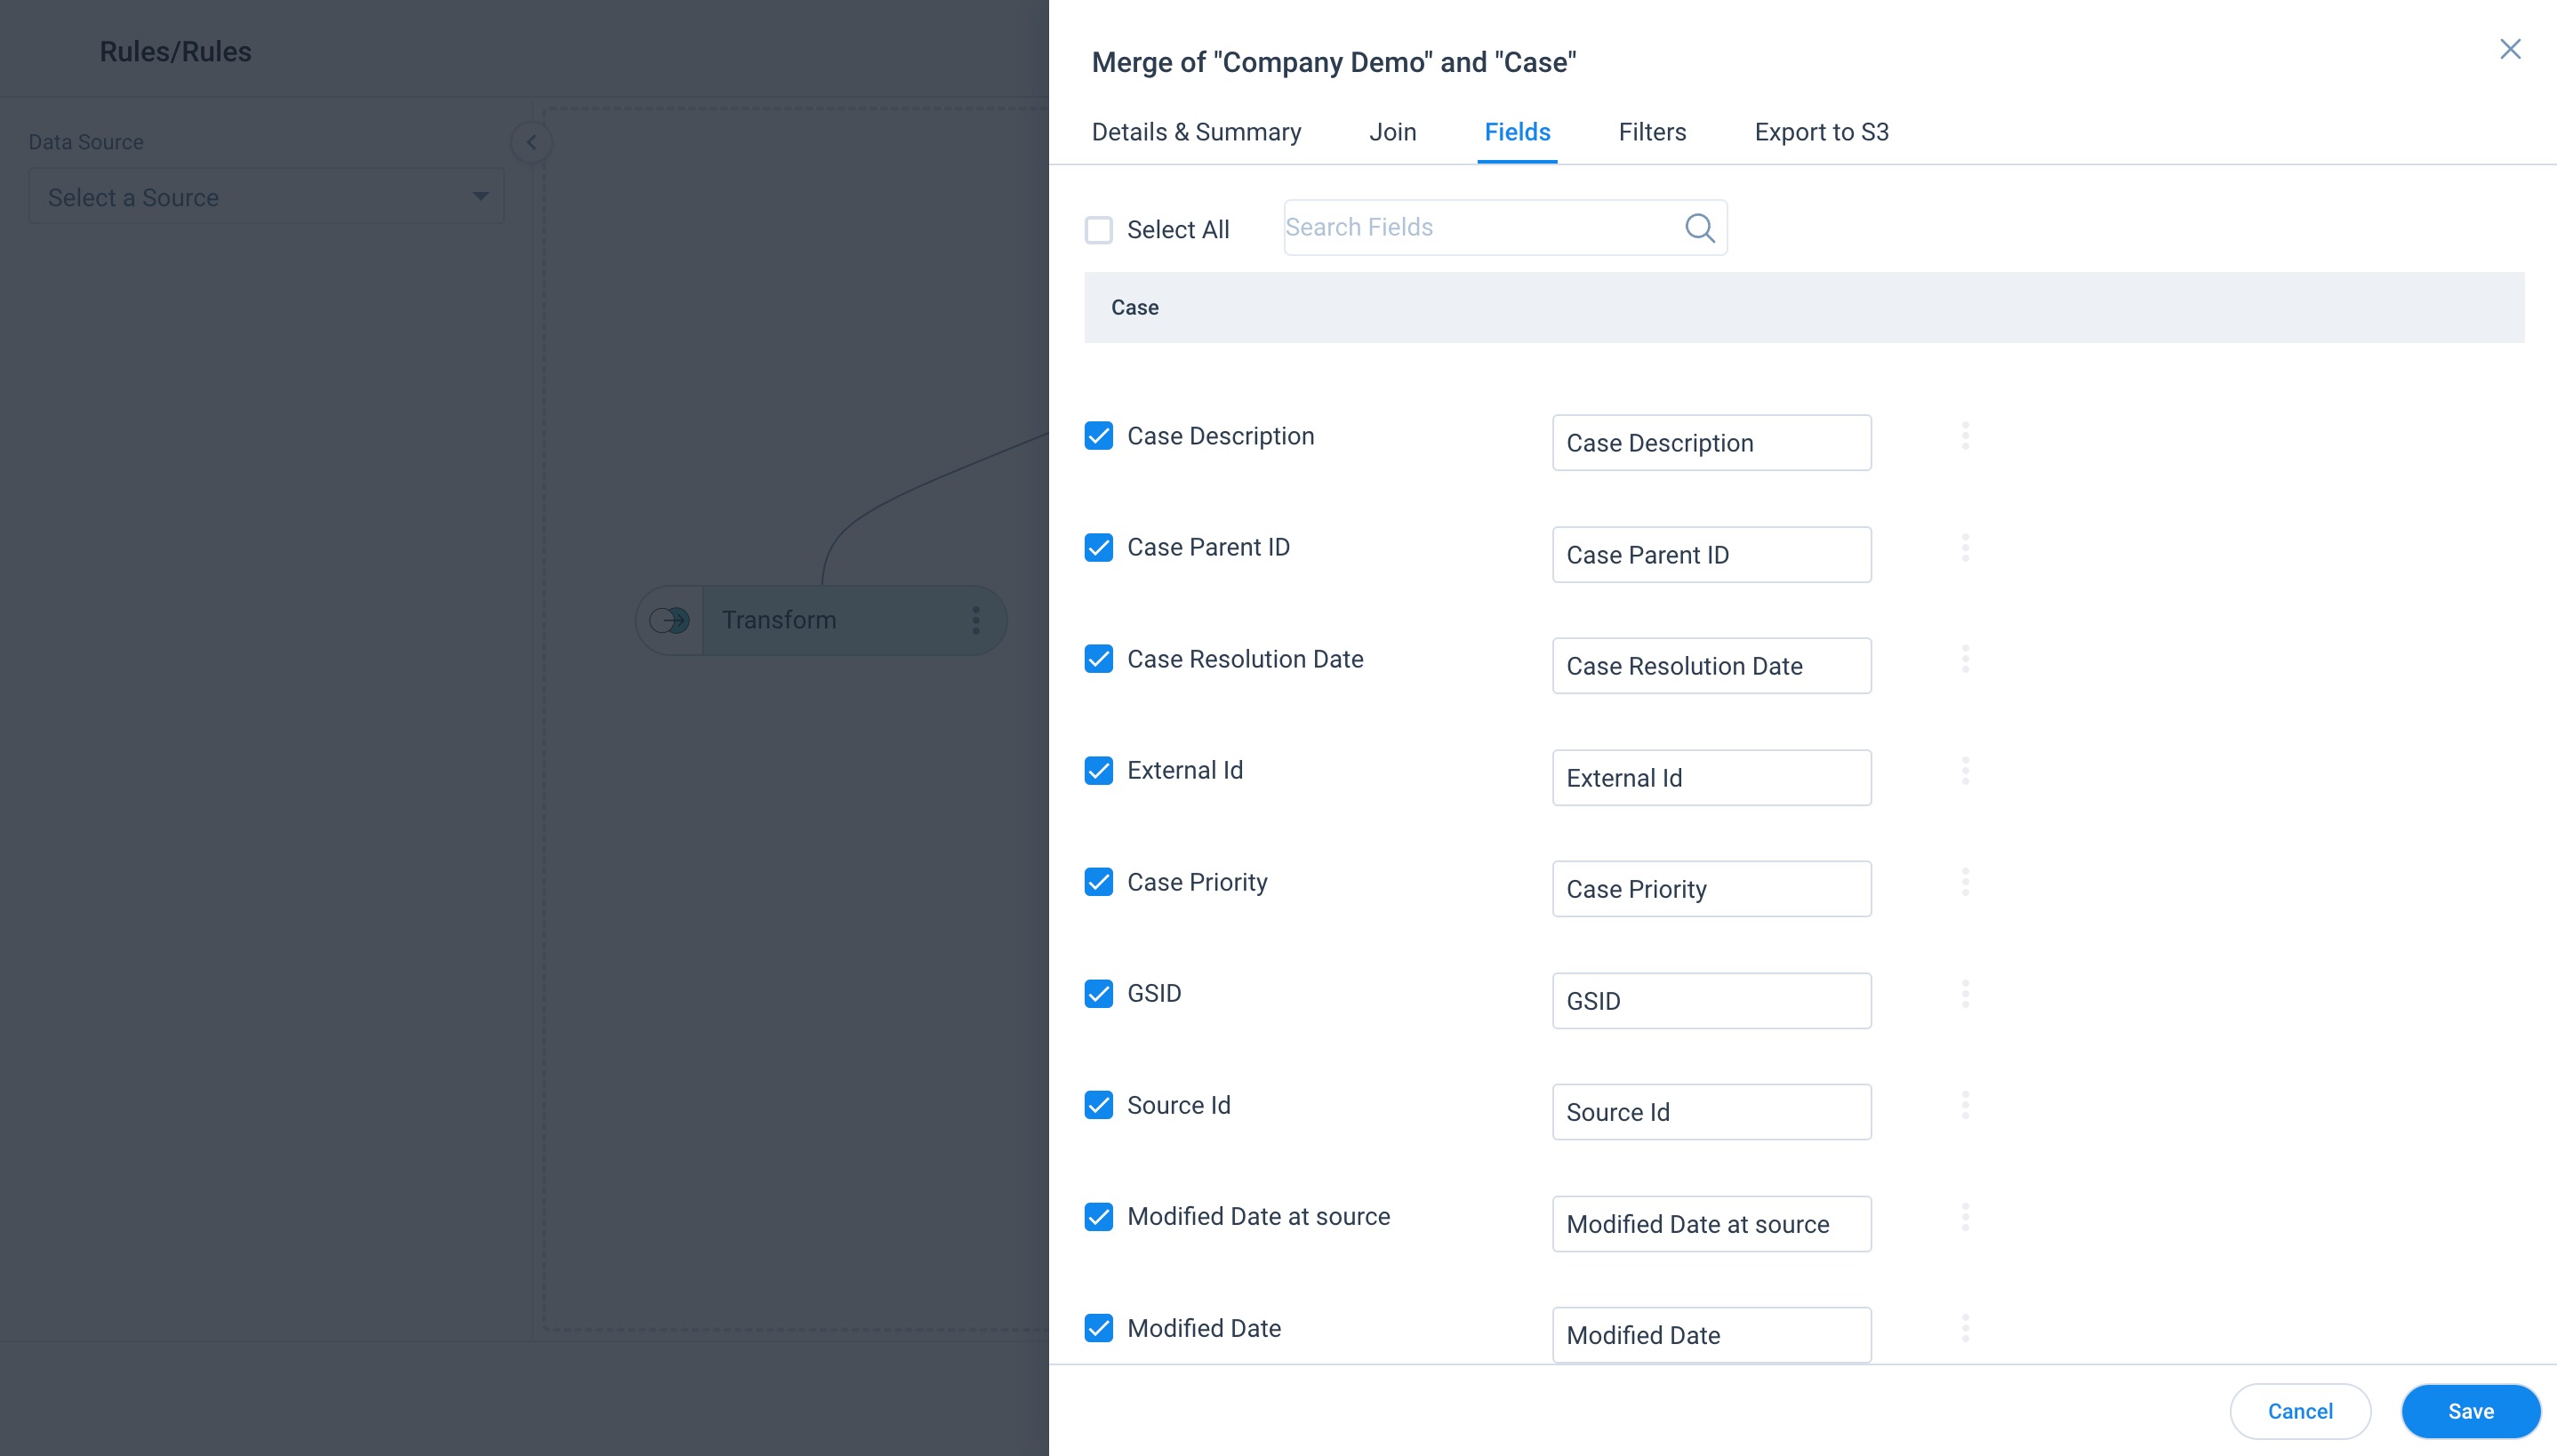
After you merge the datasets, a new window with the dataset name Merge appears, where you can see Details & Summary, Join, Fields and Filters tabs.
.jpg?revision=1)
Join
Basic JOIN clauses are used to combine rows from two or more tables, based on a common field between them. There are four types of Joins supported in Gainsight: Inner Join, Left Join, Right Join, and Outer Join. Each join type, when used with a Merge task in Data Designer, produces a slightly different data set.
- Inner Join: this join retains common records from both datasets.
- Left Join: this join retains all the records from the left dataset.
- Right Join: this join retains all the records from the right dataset.
- Outer Join: this join Retain all records from both datasets.
To Join two datasets:
- Navigate to the Join tab.
- Select the required Join type.
- Select a field from each dataset to set the criteria. For example, the Company Name in the first dataset is Name, and Company Name in the second dataset is Company Name.
- Click + to add multiple field mappings. This helps filter the records.
- Click Save.
Fields
You can see the following options in the Fields tab:
- Search Fields: In the Search Fields text box, type in the Field Name you want to search. Search operation happens on the fields available in the Dataset.
- Select All: Select/Deselect the checkbox to Add/Remove the fields from the merged dataset (or) You can also select/deselect the individual field checkboxes.
- Display Name: By default, Field Name name appears in the Display Name text box, if required you can modify it. Display Names are shown in the Datasets/reports.
- Save: Click Save to save the changes made in the merged dataset.
Filters
Filters in Merge work as Filters in Edit Dataset. For more information, refer to the Filters section.
Details & Summary
Summary details in Merge are the same as Details & Summary details in Edit Dataset. For more information, refer to the Details & Summary section.
Union
Union function in Data Designer combines the two datasets in a way that all the similar type fields automatically get unified into one dataset. If there are any other fields in the two datasets that are not similar, you can select and add them.
Example Business Use Case: For example, you want to combine the data of two objects (with similar fields) that have the data from Europe and US region customers.
Notes:
- Unified fields inherit the properties of Master fields such as Data Type, Decimal Points etc.
- Other than Unified fields, you can also add additional fields from the datasets. If there is no data in the columns, it is considered as Null.
- You can select either to remove or not to remove the duplicate fields in the output data.
To use Union function:
-
Click Options on the dataset you want to apply union, and then click Union and select the dataset. You are navigated to the Union tab.
-
Select the Union Type. You can select from the following options:
-
Union: Select this to remove duplicates in the output data.
-
Union All: Select this to retain duplicates in the output data.
-
-
In the Map Fields to Merge section, select a field from each dataset to set the merge criteria.
-
Click + to add multiple field mappings, if required. This helps you filter the records.
-
Navigate to the Fields tab to view the Unified Fields, select the Master Field (from the datasets), select/deselect the fields, and change the Display Name of the fields.
Note: You can also select additional fields from the dataset, if required. -
Click Save.
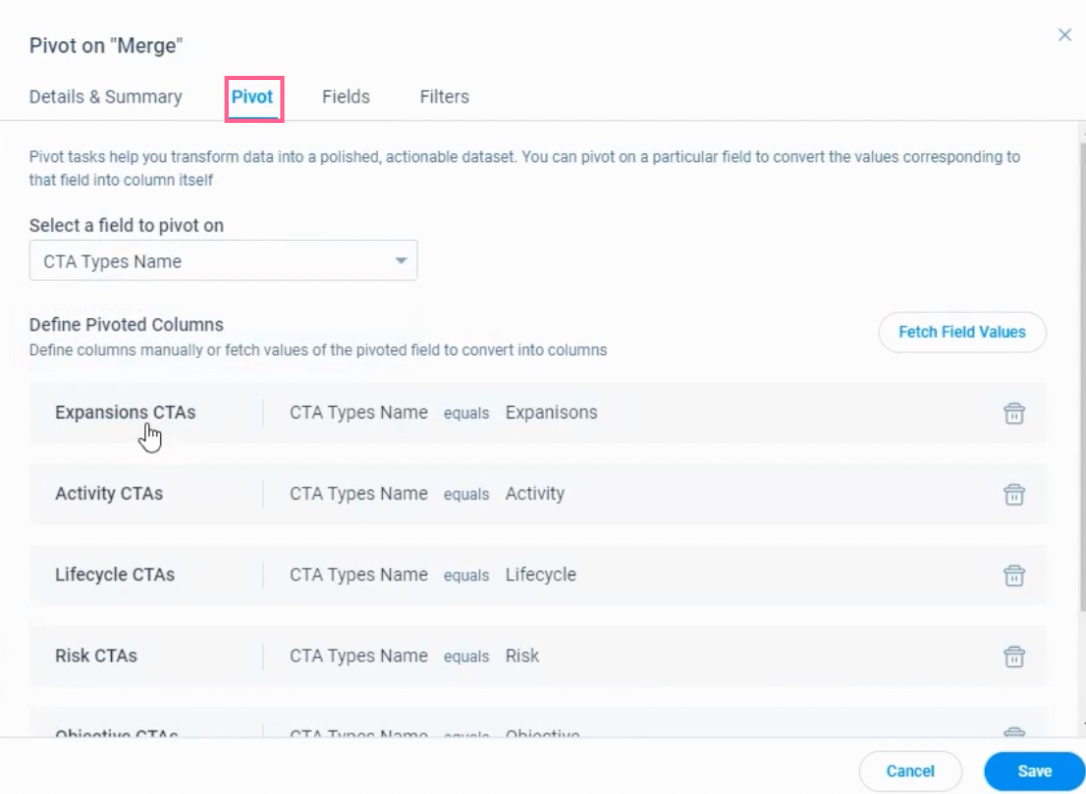
Pivot
In a dataset, the Pivot task transforms the data available in a single table column into multiple columns in one go. The Pivot task creates a column for every single data value in the table column. This enhances the data summarization process to get better insights into the data.
Pivot Function: Pivot rotates a table-valued expression by turning the unique values from one column in the expression into multiple columns in the output.
Example Business Use Case: A Customer Success Director wants to find patterns in CTA Type by CSM and optimize CTA Types, and so on.
To use the Pivot functionality, navigate to the Administration > Data Designer > Open a Dataset > click Options > click Pivot.
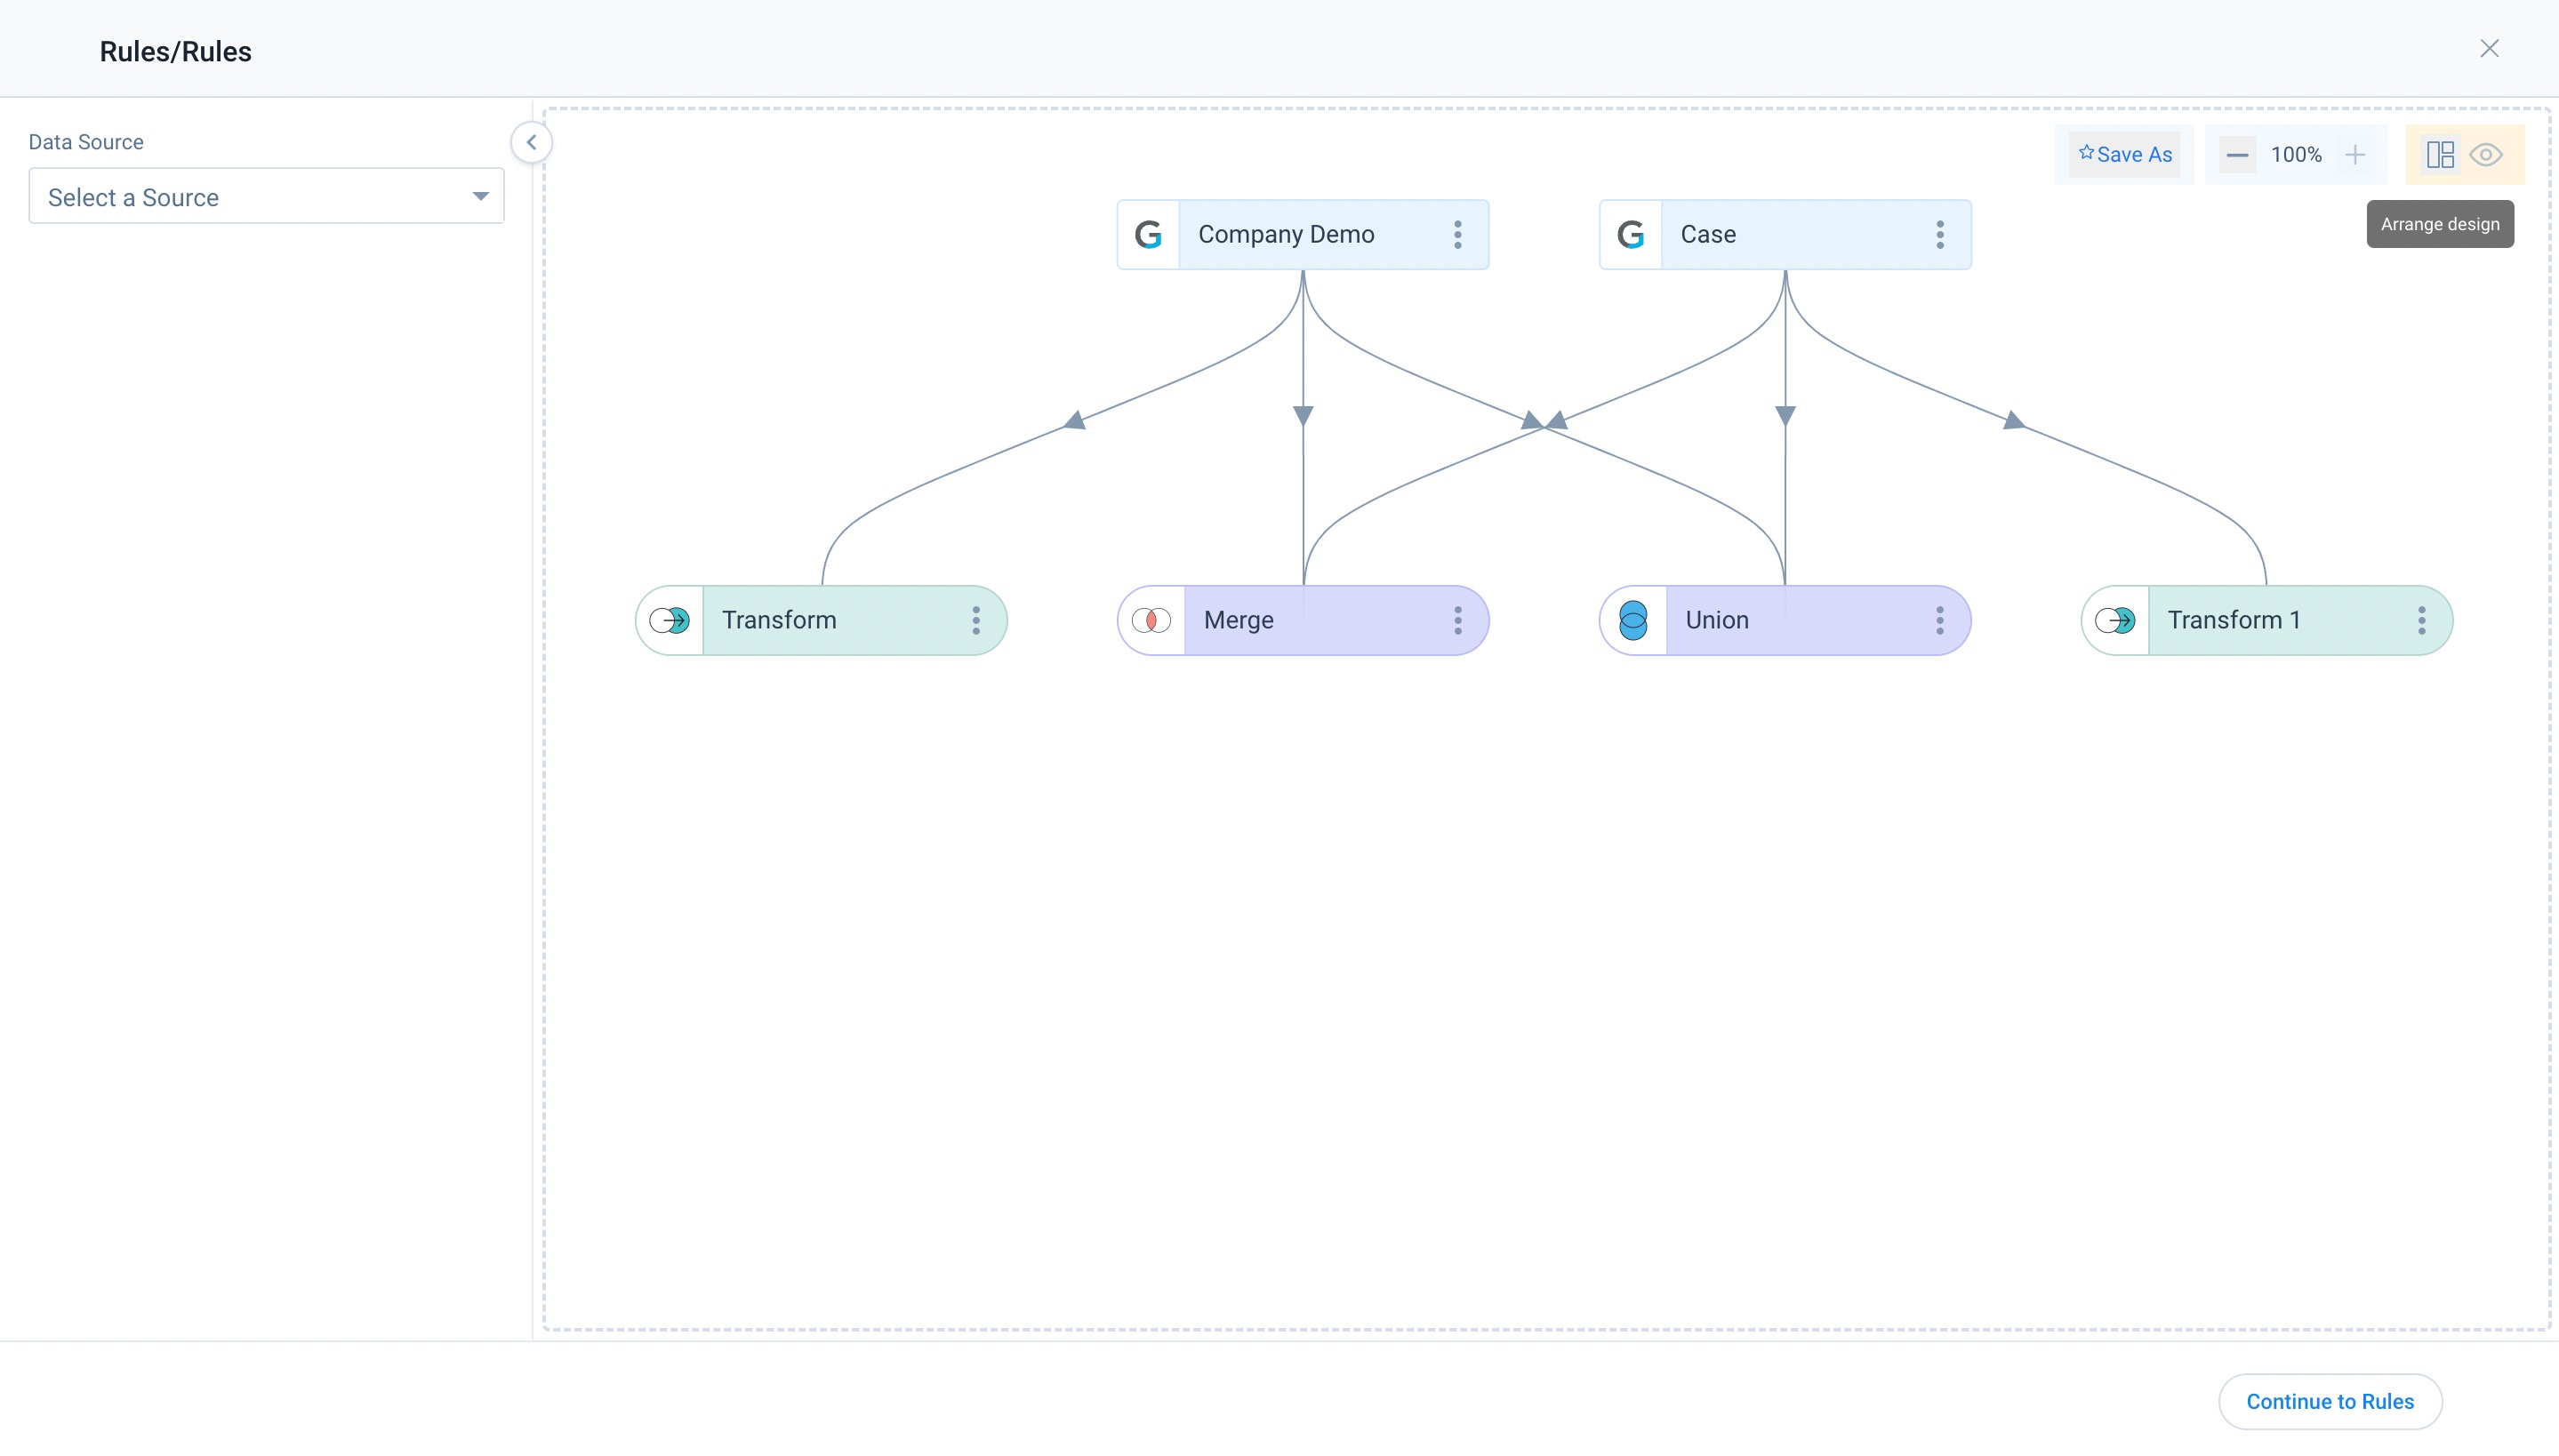
Auto Arrange Datasets
With Arrange Design option, you can automatically arrange the datasets in the Preparation tab, with a single click. If there are numerous datasets in your design, you can make use of the options such as, Zoom In and Zoom Out and Pan as shown in the following image.
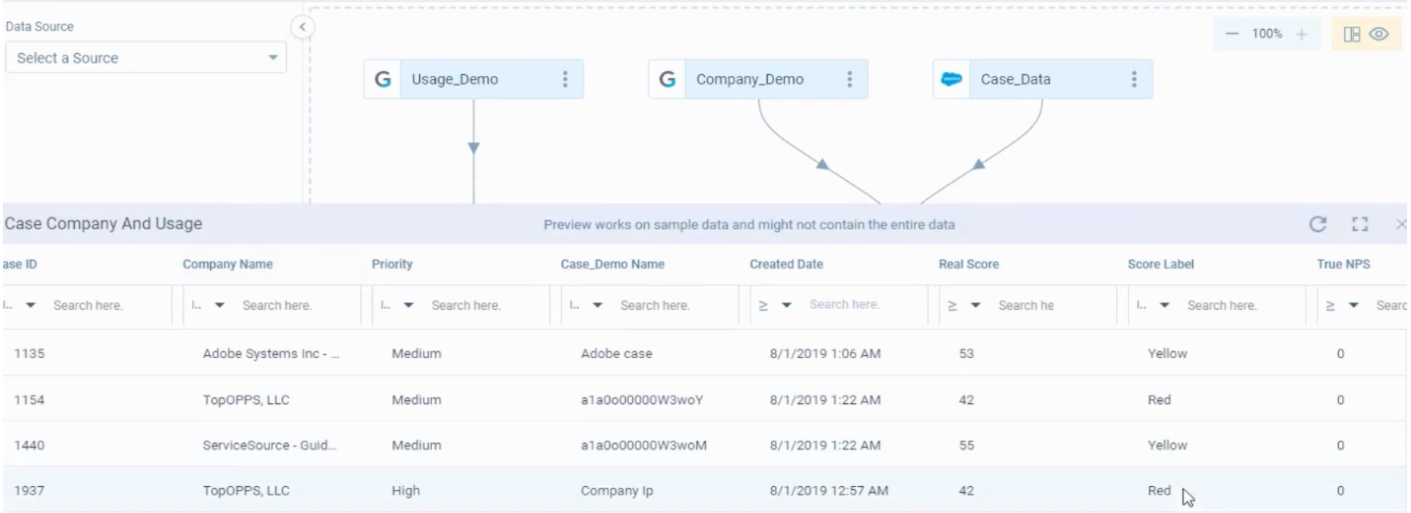
Preview Dataset
To Preview Dataset, click the eye icon (or) click options, and then click Preview Dataset. In Preview, you can view upto 2k records.
Preview for Merge and Transform, will display initial 2k records and in some cases this might result in smaller datasets or no rows.
Maximize: You can also view the sample data in a full screen view by clicking the Maximize icon on the Preview tab.
Refresh: Click the Refresh icon on the Preview tab to refresh the sample data, if you have edited the dataset.
Sort operation: This option enables you to sort all the records when there is a large dataset.
Delete
If you wish to delete a dataset permanently from a Data Design, click Options, and then click the Delete icon.
Preview (Output Dataset)
To Preview Output Dataset:
- Click Preview on the upper right corner of the Design page (or) Navigate to the output/last dataset in the design.
- Click the eye icon (or) click Options
- Click Preview.
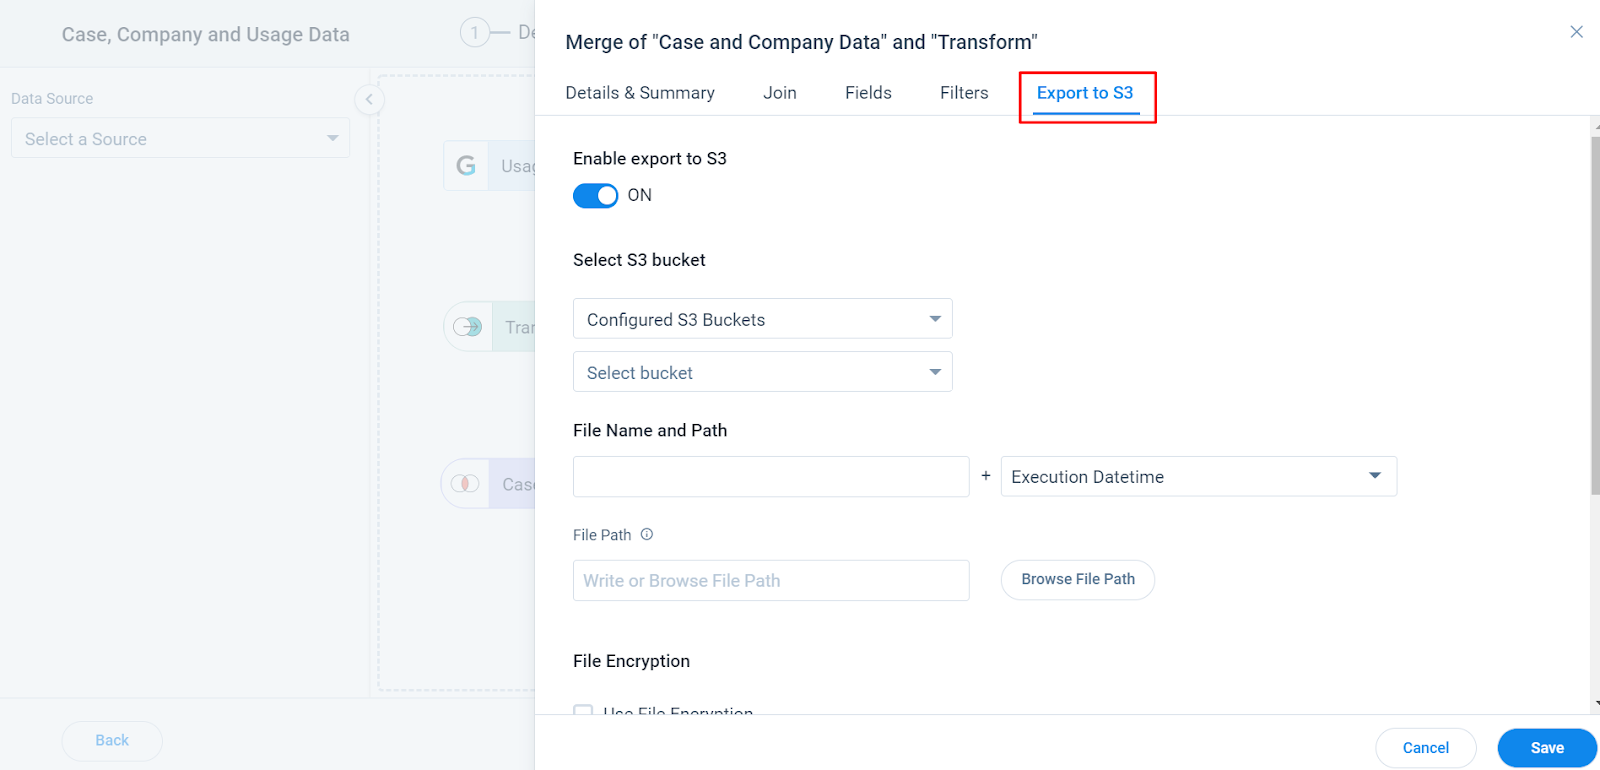
Export to S3
The Export to S3 feature allows you to export output data at a dataset level directly.
Save Dataset as Design Templates
Once the dataset is created, users can save this design as Design Template, that can be used a base design for create similar dataset with variations.
To save a dataset as Design Template:
-
Click Save As.The Save As Design Template dialog is displayed.
-
From Save as Design Template dialog, select one of the following options:
- Save as New to save a new Design Template.
- Select Update Existing, to update an already existing template.
-
Click Save Template.
Note: For an existing rule, you are automatically directed to the Data Setup step, where you can make necessary changes and continue to the Actions Setup step.
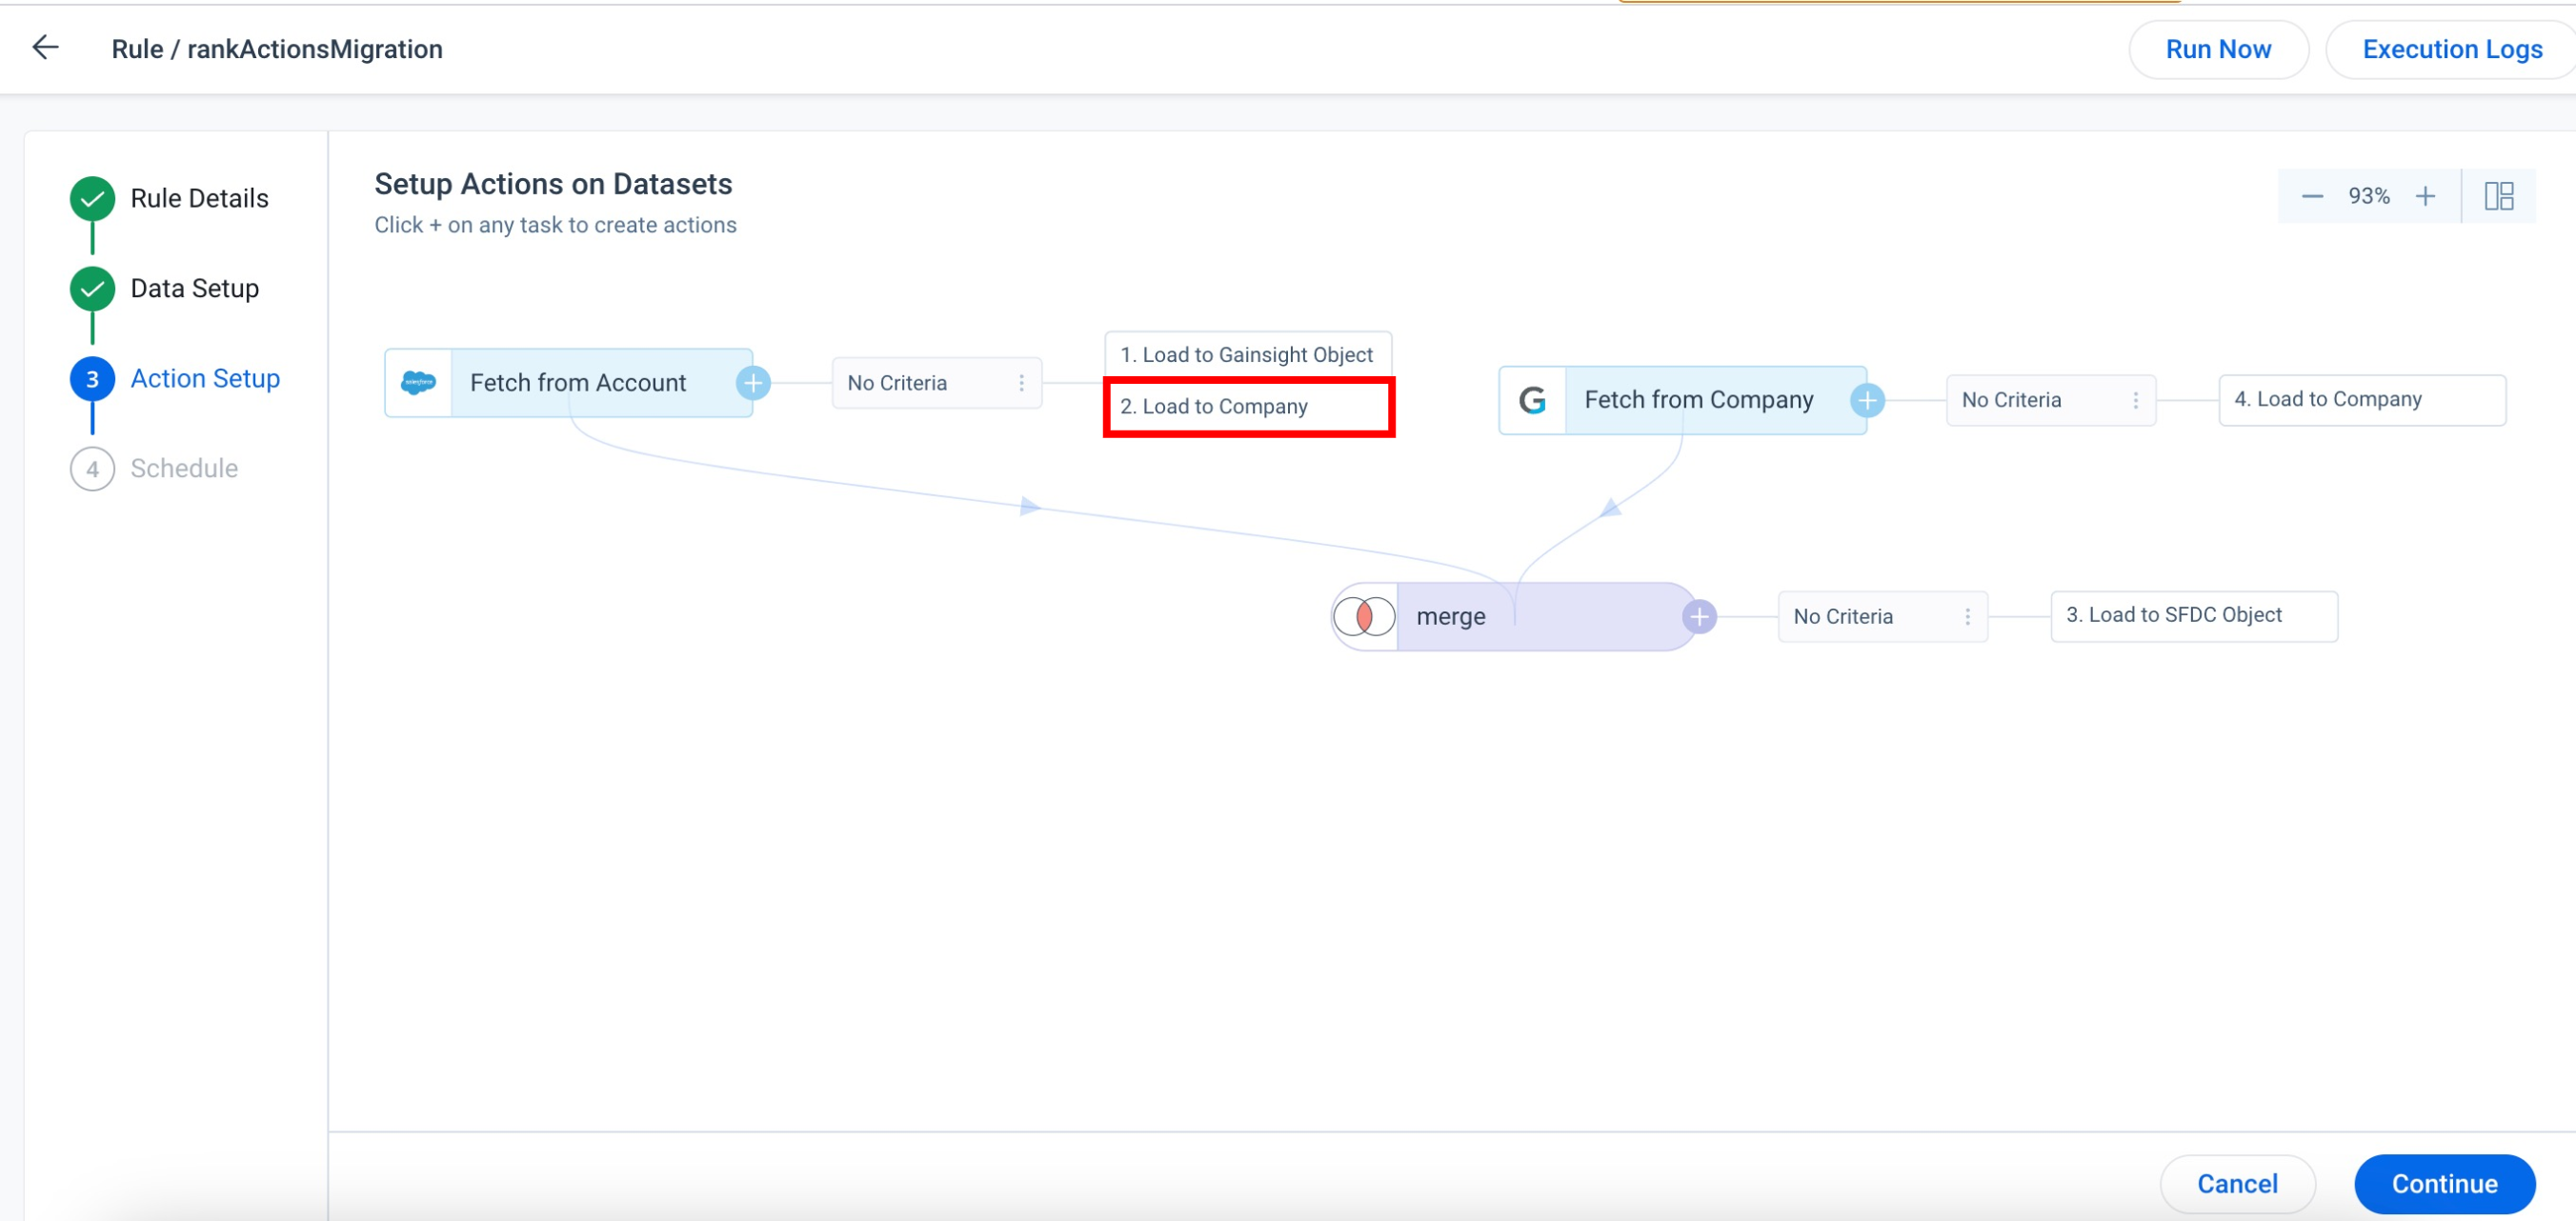
Action Setup
Following Gainsight modules plays an important role in the Rules Engine Action Setup as:
Success Plan
Success Plans Action Type
The update Success Plan action type enables admins to update the fields values for Success Plans automatically. For example, admins can create a rule that reassigns the ownership of all Success Plans belonging to a selected type to one user. Once the rule is triggered, all the Success Plans belonging to the selected type will be reassigned to the new owner automatically. For more information on how to configure the Success Plans action type, refer to the Success Plans Action Type article.
Scorecard
Load to Scorecard History
The Load to Scorecard History action type allows admins to update new records or insert new records in the history of the scorecard. For more information on how to configure the Load to Scorecard History action type, refer to the Load to Scorecard History Action Type article.
Set Score 2.0
The Set Score 2.0 action type allows admins to automatically update scores for selected measures. For more information on how to configure the Set Score 2.0 action, refer to the Set Score 2.0 Action Type article.
People Load
Load to People Action Type
The Load to People action type is used to load data into the Person, Company Person, and Relationship Person objects. For more information on Load to People, refer to Load to People Action Type article.
Cockpit
Create Call to Action
This action type enables admins to create CTAs automatically using Rules Engine. For example, admins can define a rule that automatically creates a CTA if there is a drop in revenue, low NPS® score etc. For more information on how to configure the Create CTA action type, refer to the Create CTA Action Type article.
Update Call to Action
This action type enables admins to update CTAs automatically using Rules Engine. For example, admins can create a rule that updates the owner of CTAs in case the current is deactivated. The CTAs that are to be updated can be added to the dataset while configuring the rule. For more information on how to configure the Update CTA action type, refer to the Update CTA Action Type article.
Close Call to Action
This action type enables admins to close CTAs automatically using Rules Engine. For example, consider a scenario where CTAs were created automatically due to low usage. Once the usage increases above a certain threshold, the admin needs to close these CTAs. In such cases, the Close Call to Action action type enables admins to close CTAs automatically through Rules Engine. For more information on how to configure the Close CTA action type, refer to the Close CTA Action Type article.
Survey
Load to Survey
When the survey engagements are built for third-party applications, the responses and metrics cannot be automatically viewed in Gainsight CX. The Load to Survey action type in the Rules Engine allows end-users to have automated ingestion of such external survey responses into Gainsight in order to build enriched CX Analytics. For more information on how to configure the Load to Survey action type, refer to Load to Survey Action Type article.
Connectors
Load to Cases
The Load to Cases action type allows admins to use Upsert/Update records in the case object. For more information on how to configure the Load to Cases, refer to the Load to Cases article.
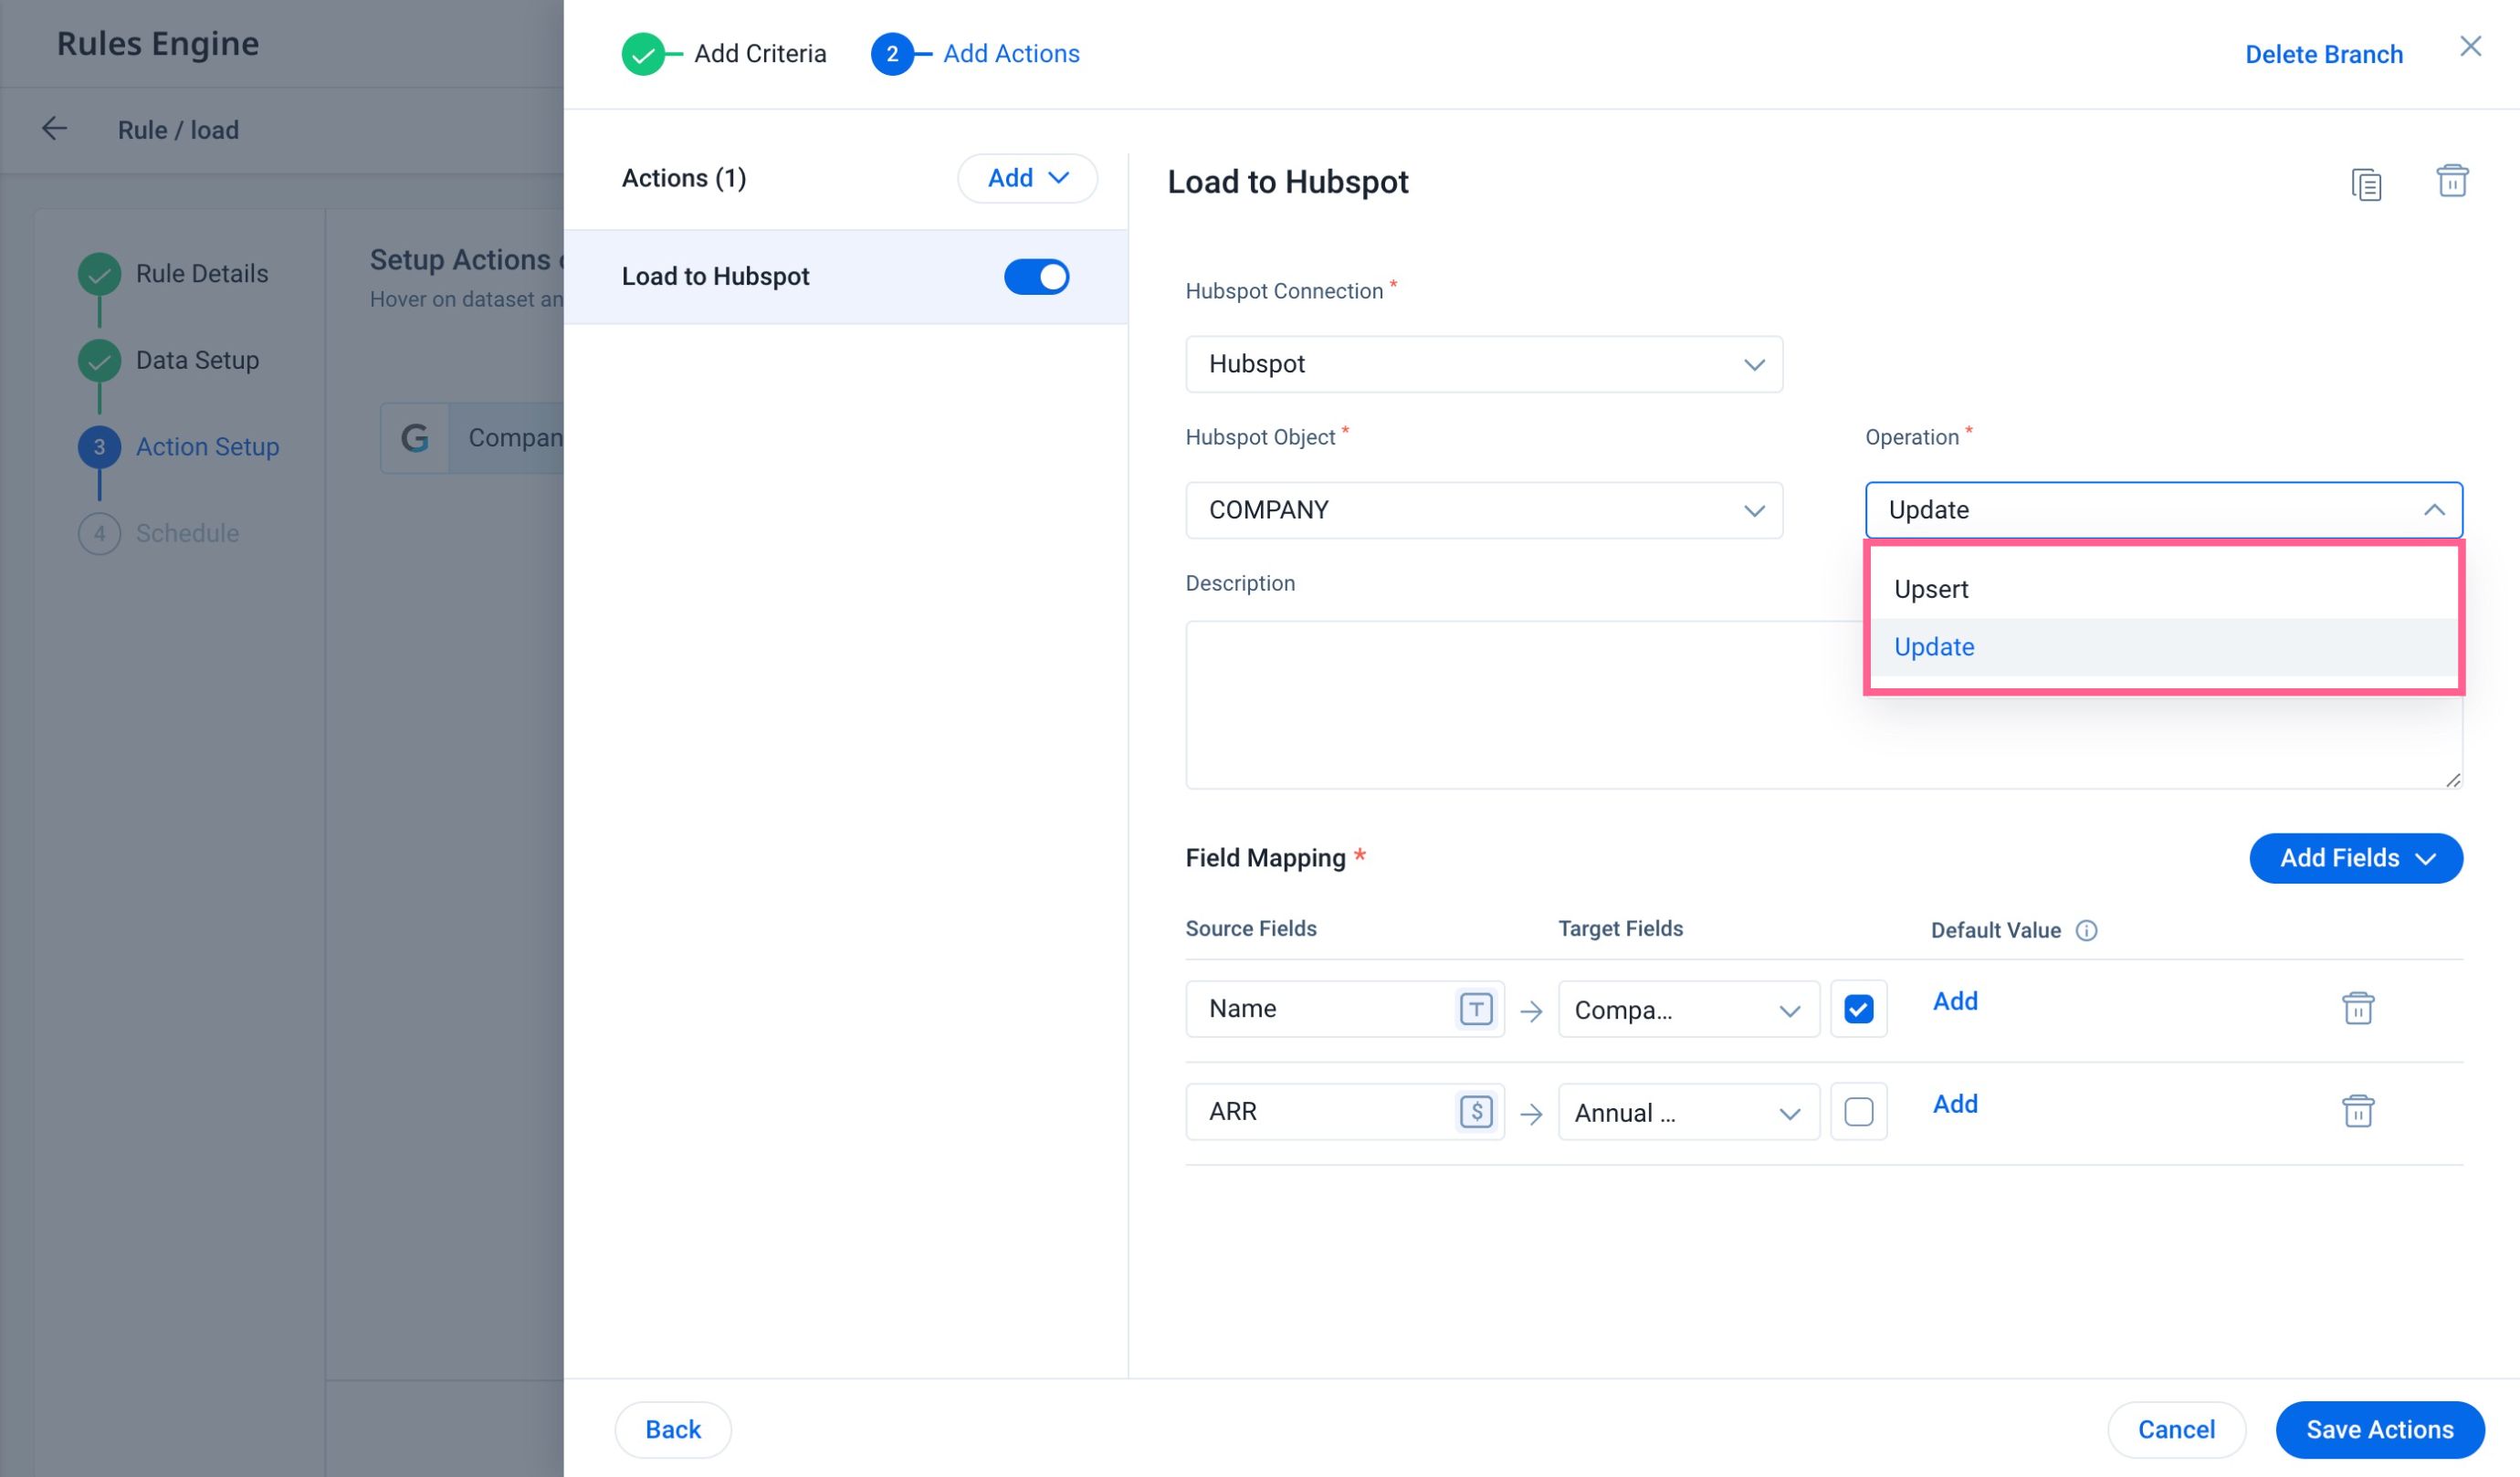
Load to HubSpot
The Load to HubSpot action enables data synchronization from Gainsight and HubSpot. Use Rules Engine to prepare the dataset from various standard and custom objects in Gainsight, followed by the Load to HubSpot Action to send the data to the Company and Contact objects in HubSpot.
For more information on how to configure the Load to HubSpot action type, refer to the Load to HubSpot Action Type article.
User
Load to User
The Load to User action type enables admins to Update existing records in the user object. For more information on how to configure the Load to Cases, refer to the Load to User Action Type article.
PX Connection
Load to PX
The Load to PX action type allows admins to load data into PX Account and User entities. For more information on how to configure the load to PX, refer to the Load to PX Action Type article.
Business Modeller
Load to RelationshipV2
Load to RelationshipV2 action type helps admins to create Relationships automatically. This action type is useful when admins want to create a relationship for every new opportunity won.For more information on how to configure Load to RelationshipV2, refer to Load to RelationshipV2 Action Type article.
Load to Company
Load to Company action type helps admins load data into the Company standard object from the dataset created in the Setup Rule page. For more information on how to configure Load to Company, refer to Load to Company Action Type article.
Revenue Optimization
Load to GS Opportunity
The Load to GS Opportunity action type enables admins to load or update the data available in any Gainsight object that is relevant to the GS Opportunity object. For more information on how to configure the Load to GS Opportunity action, refer to the Load to GS Opportunity Action Type article.
Load to GS Lead Action Type
The Load to GS Lead action type enables admins to load the data available in any Gainsight object to the GS Lead object. The action also enables them to import leads data available in different Customer Relationship Management (CRM) tools to Gainsight. This helps admins to maintain information about leads at one place. For more information on how to configure the Load to GS Lead action, refer to the Load to GS Lead Action Type article.
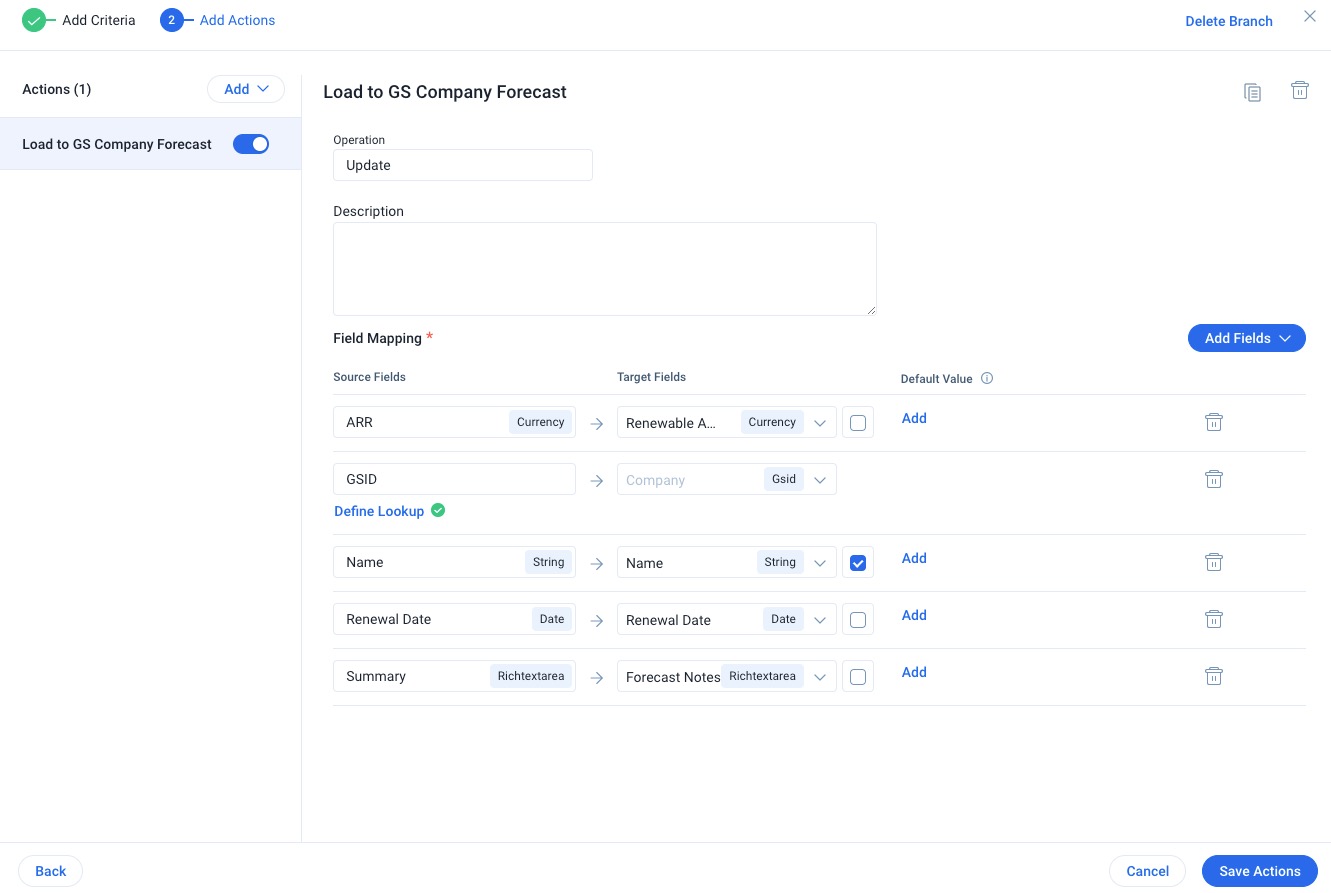
Load to GS Company Forecast Action Type
The Load to GS Company Forecast action type allows admins to load updated data in the account level view to reflect changes that happen post the initial deployment of account based forecasting. They can also use this rule action to load custom fields from the Company object. For more information on how to configure the Load to GS Company Forecast action, refer to the Load to GS Company Forecast Action Type article.
Timeline
Load to Activities
The Load To Activities action type helps create rules that automatically create Milestone Activities from Rules Engine. Admins can select system-defined or custom milestone types, provided that they are currently in active state. The milestone activities appear on the Timeline list view page, once the rule is triggered. For more information on how to configure Load to Activities action type, select the Load to Activities article.
Others
Call External API
The Call External API action type allows admins to establish a connection with external systems from within Gainsight and request action from the external system via an API For more information on how to configure Call External API, refer to the Call External API article.
Load to Gainsight Object
The Load to Gainsight Object action type allows admins to load data into Gainsight objects.
For more information on how to configure the Load to Gainsight Object , refer to the Load to Gainsight Object Action Type article.
Load to SFDC Object
The Load to SFDC action type allows admins to load Gainsight data into Salesforce objects.
For more information on how to configure the load to SFDC Object, refer to the Configure Load to SFDC Objects Action Type article.
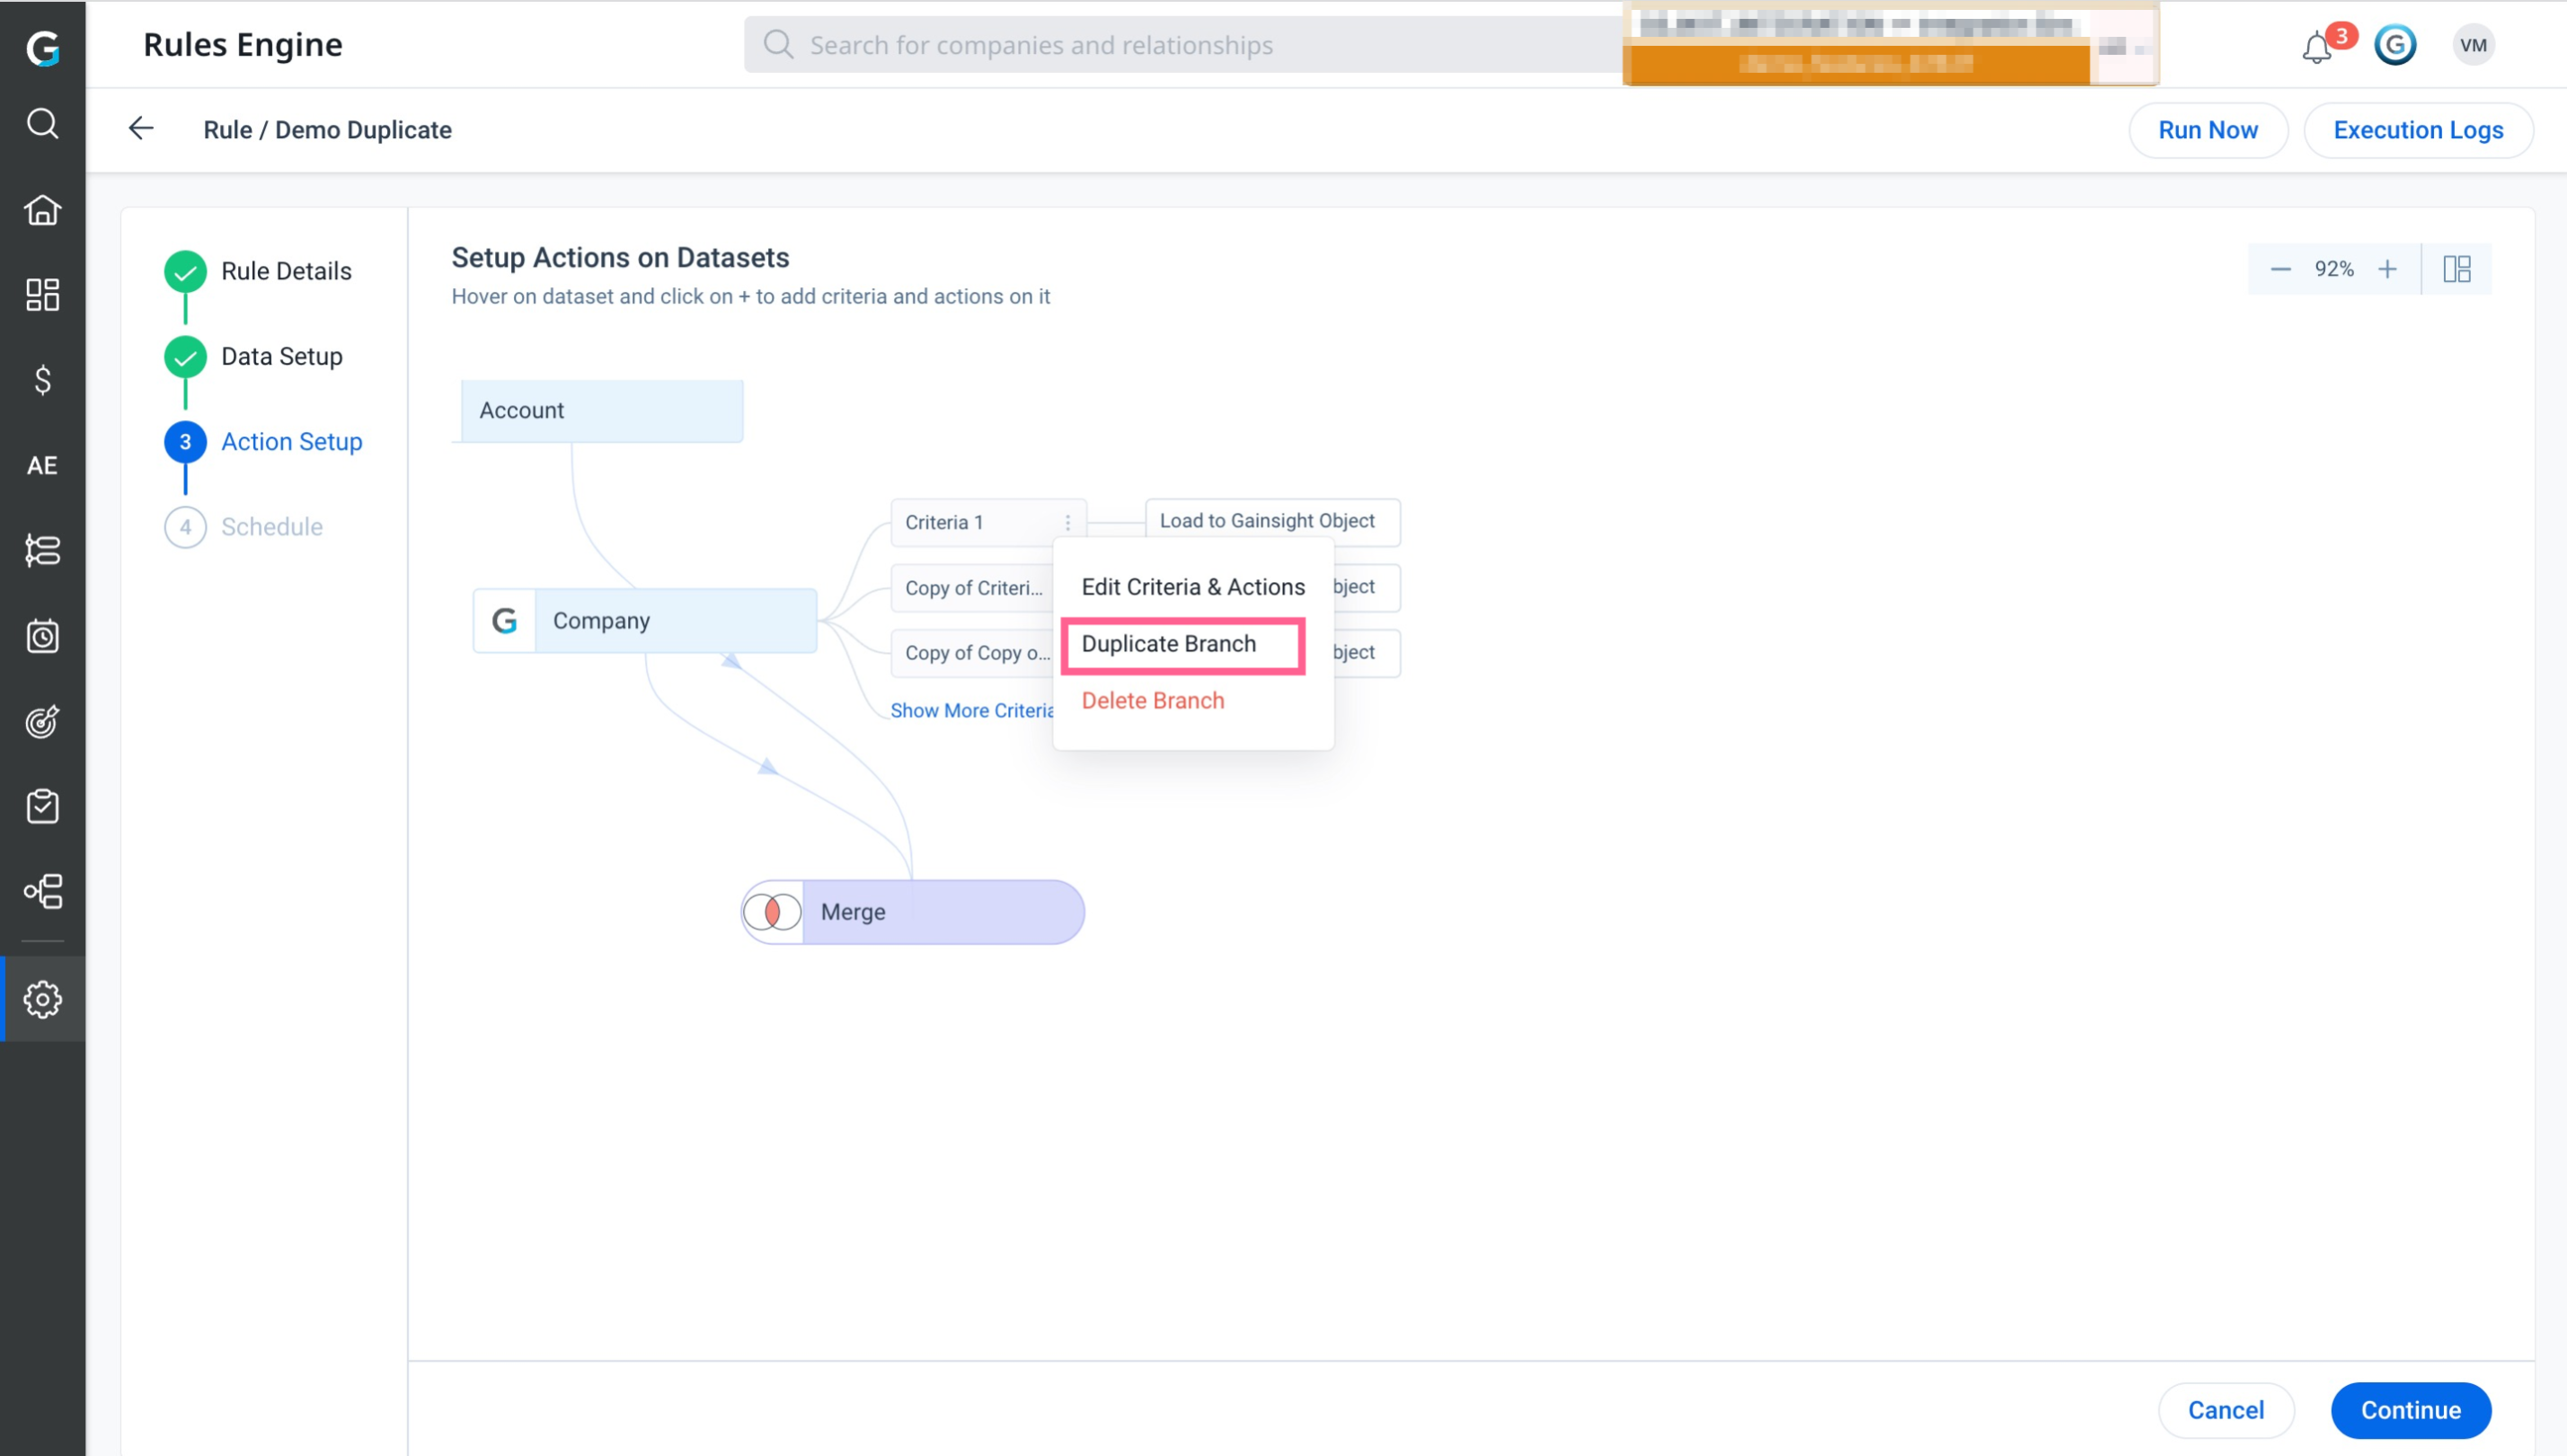
Duplicate a Branch in an Action Setup
The duplicate branch feature in Horizon Rule allows admins to easily duplicate a whole branch of actions for any rule. This feature is particularly useful when admins need to implement distinct actions based on different conditions while creating rules.
Instead of recreating the criteria and actions from scratch, admins can duplicate an existing set of criteria + actions that closely resemble their requirements.
They can then make modifications to the duplicated branch to tailor it to their specific business needs. This not only saves admins valuable time but also ensures efficient rule creation.
Methods to Duplicate a Branch:
There are two ways to duplicate a branch
Method 1:
- Navigate to any existing rule Action Setup step.
- From the Criteria, click the three vertical dots.
- From the list, select Duplicate Branch. The Criteria page appears.
- Rename the Criteria and Click Continue. The Action page appears.
- Make the necessary changes on the Action page and Click Save Actions. The Duplicate Branch is created successfully.
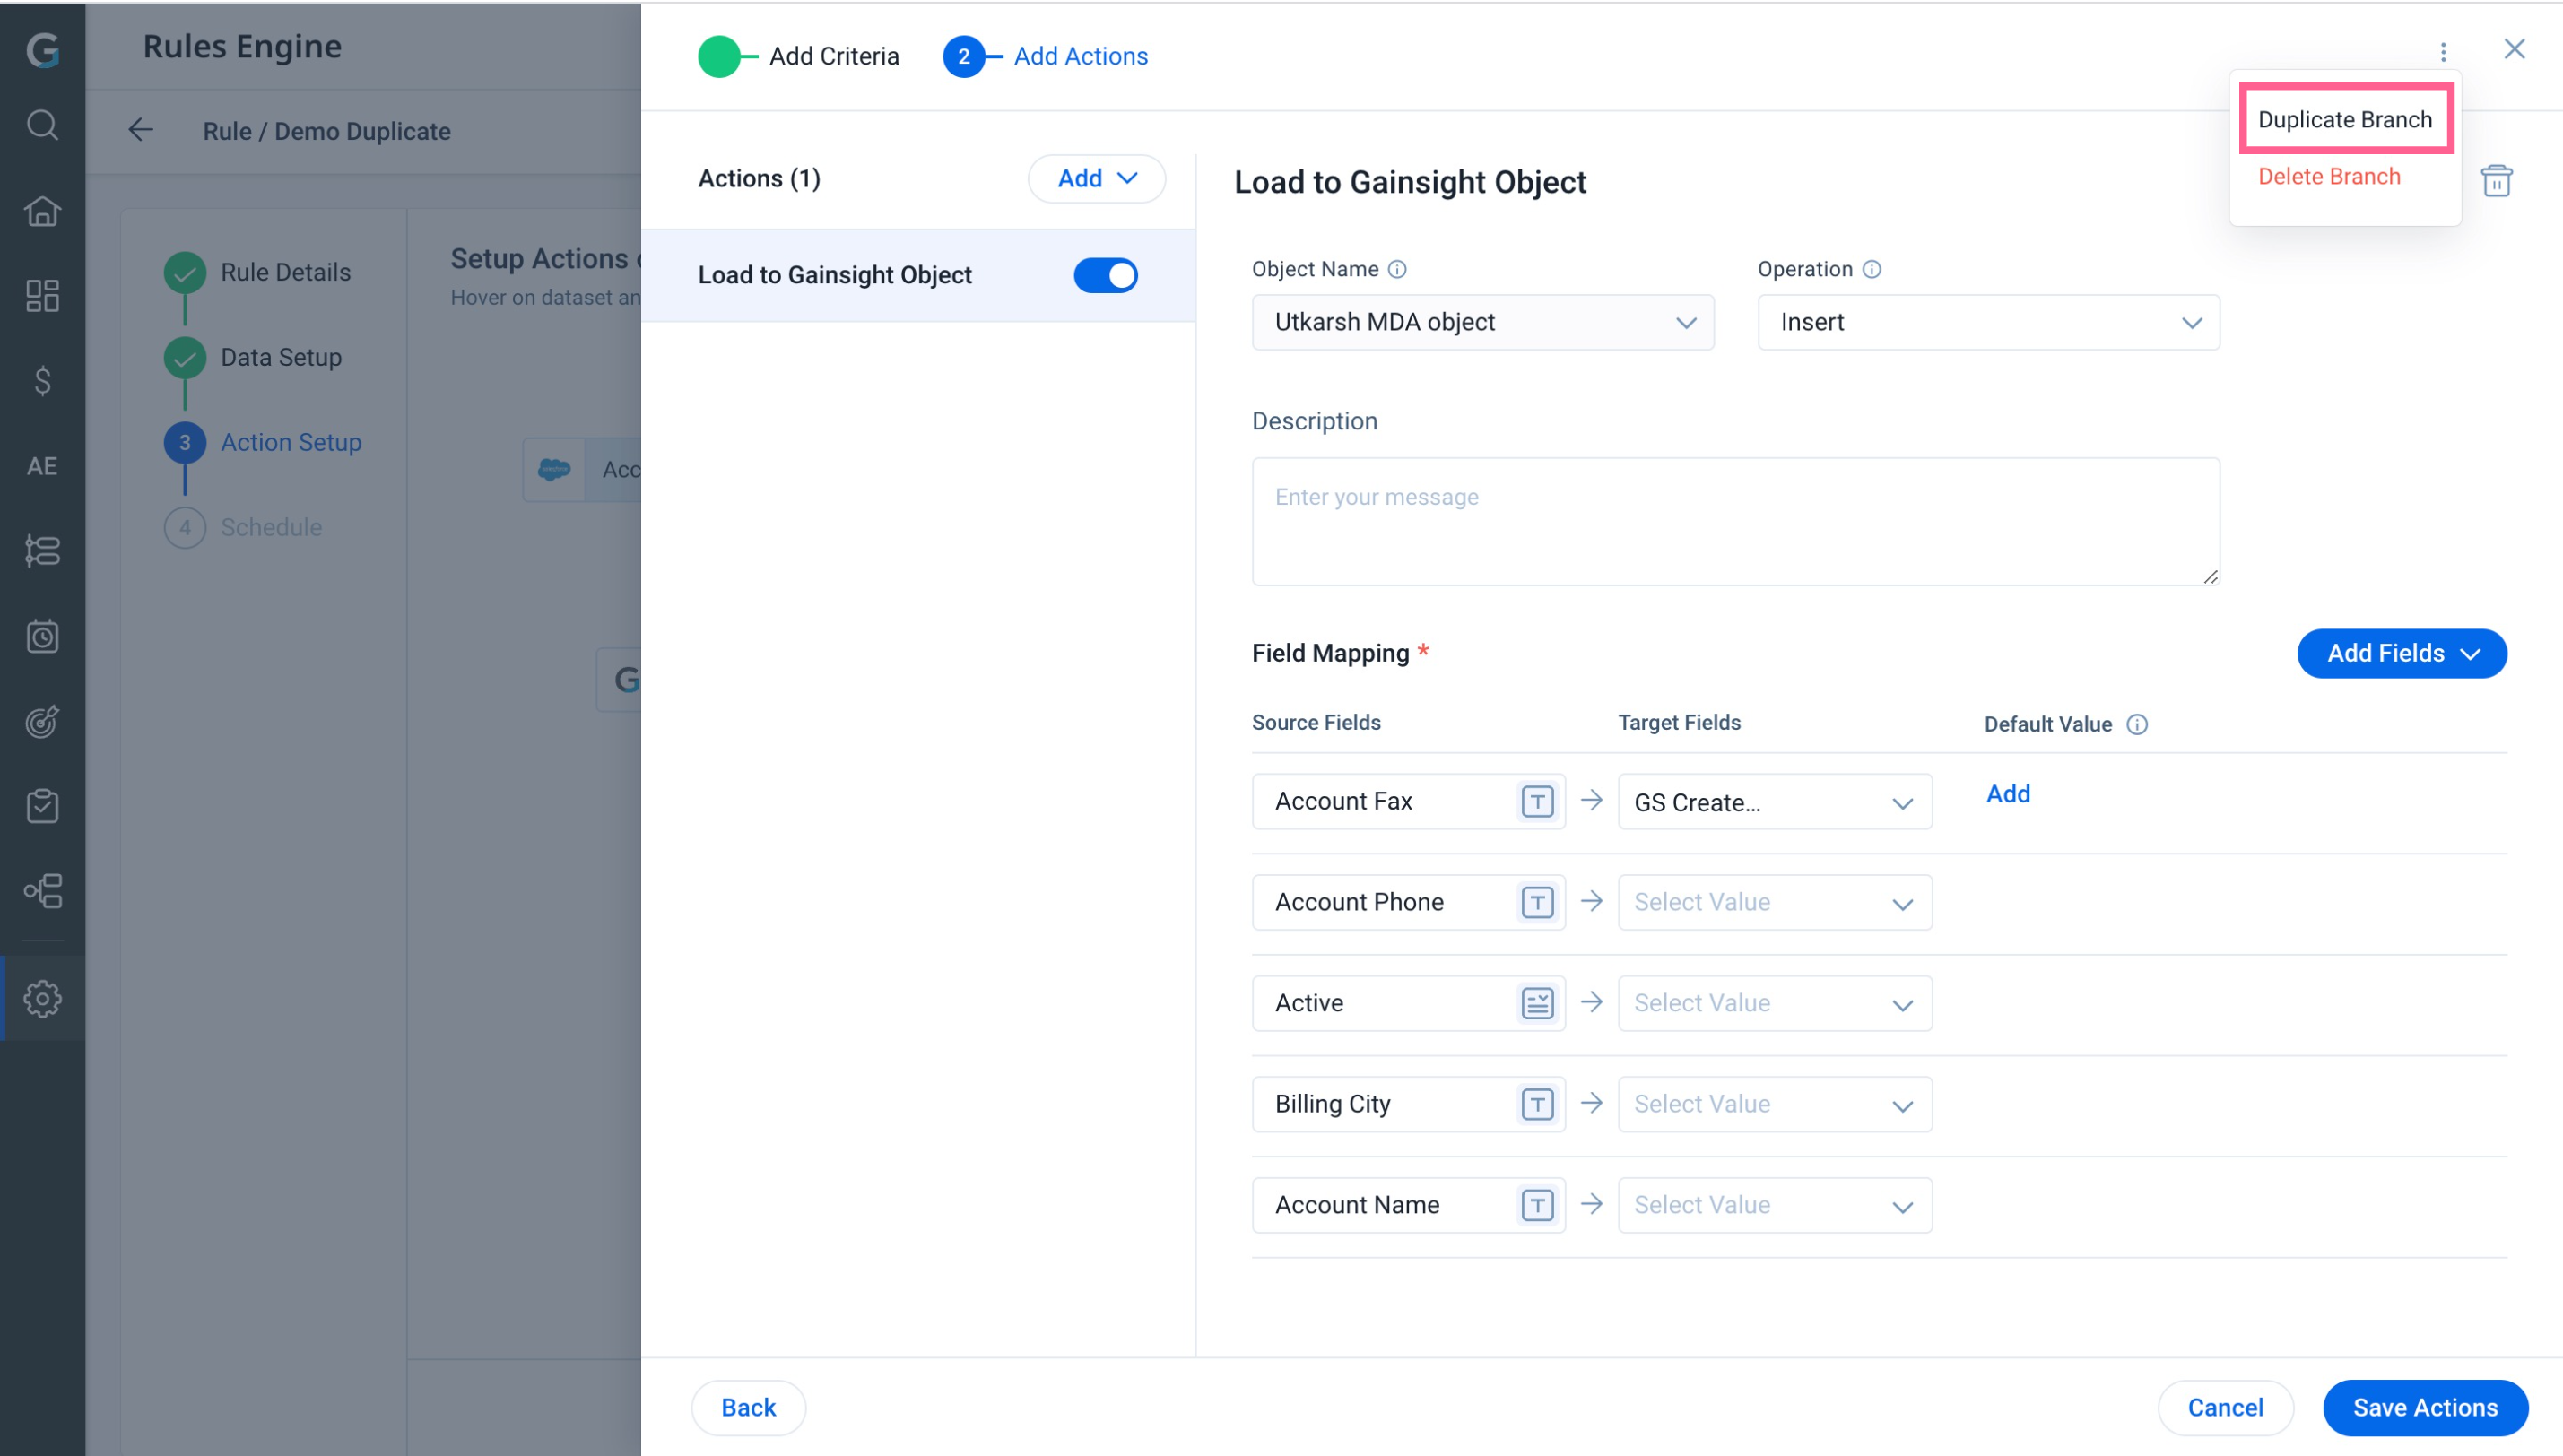
Method 2:
- Navigate to any existing rule Action Setup step.
- Click Action. The Add Actions page appears.
- Click the three vertical dots.
- Select Duplicate Branch.
- Make the necessary changes in the Add Actions page and Click Save Actions. The Duplicate Branch is created successfully.
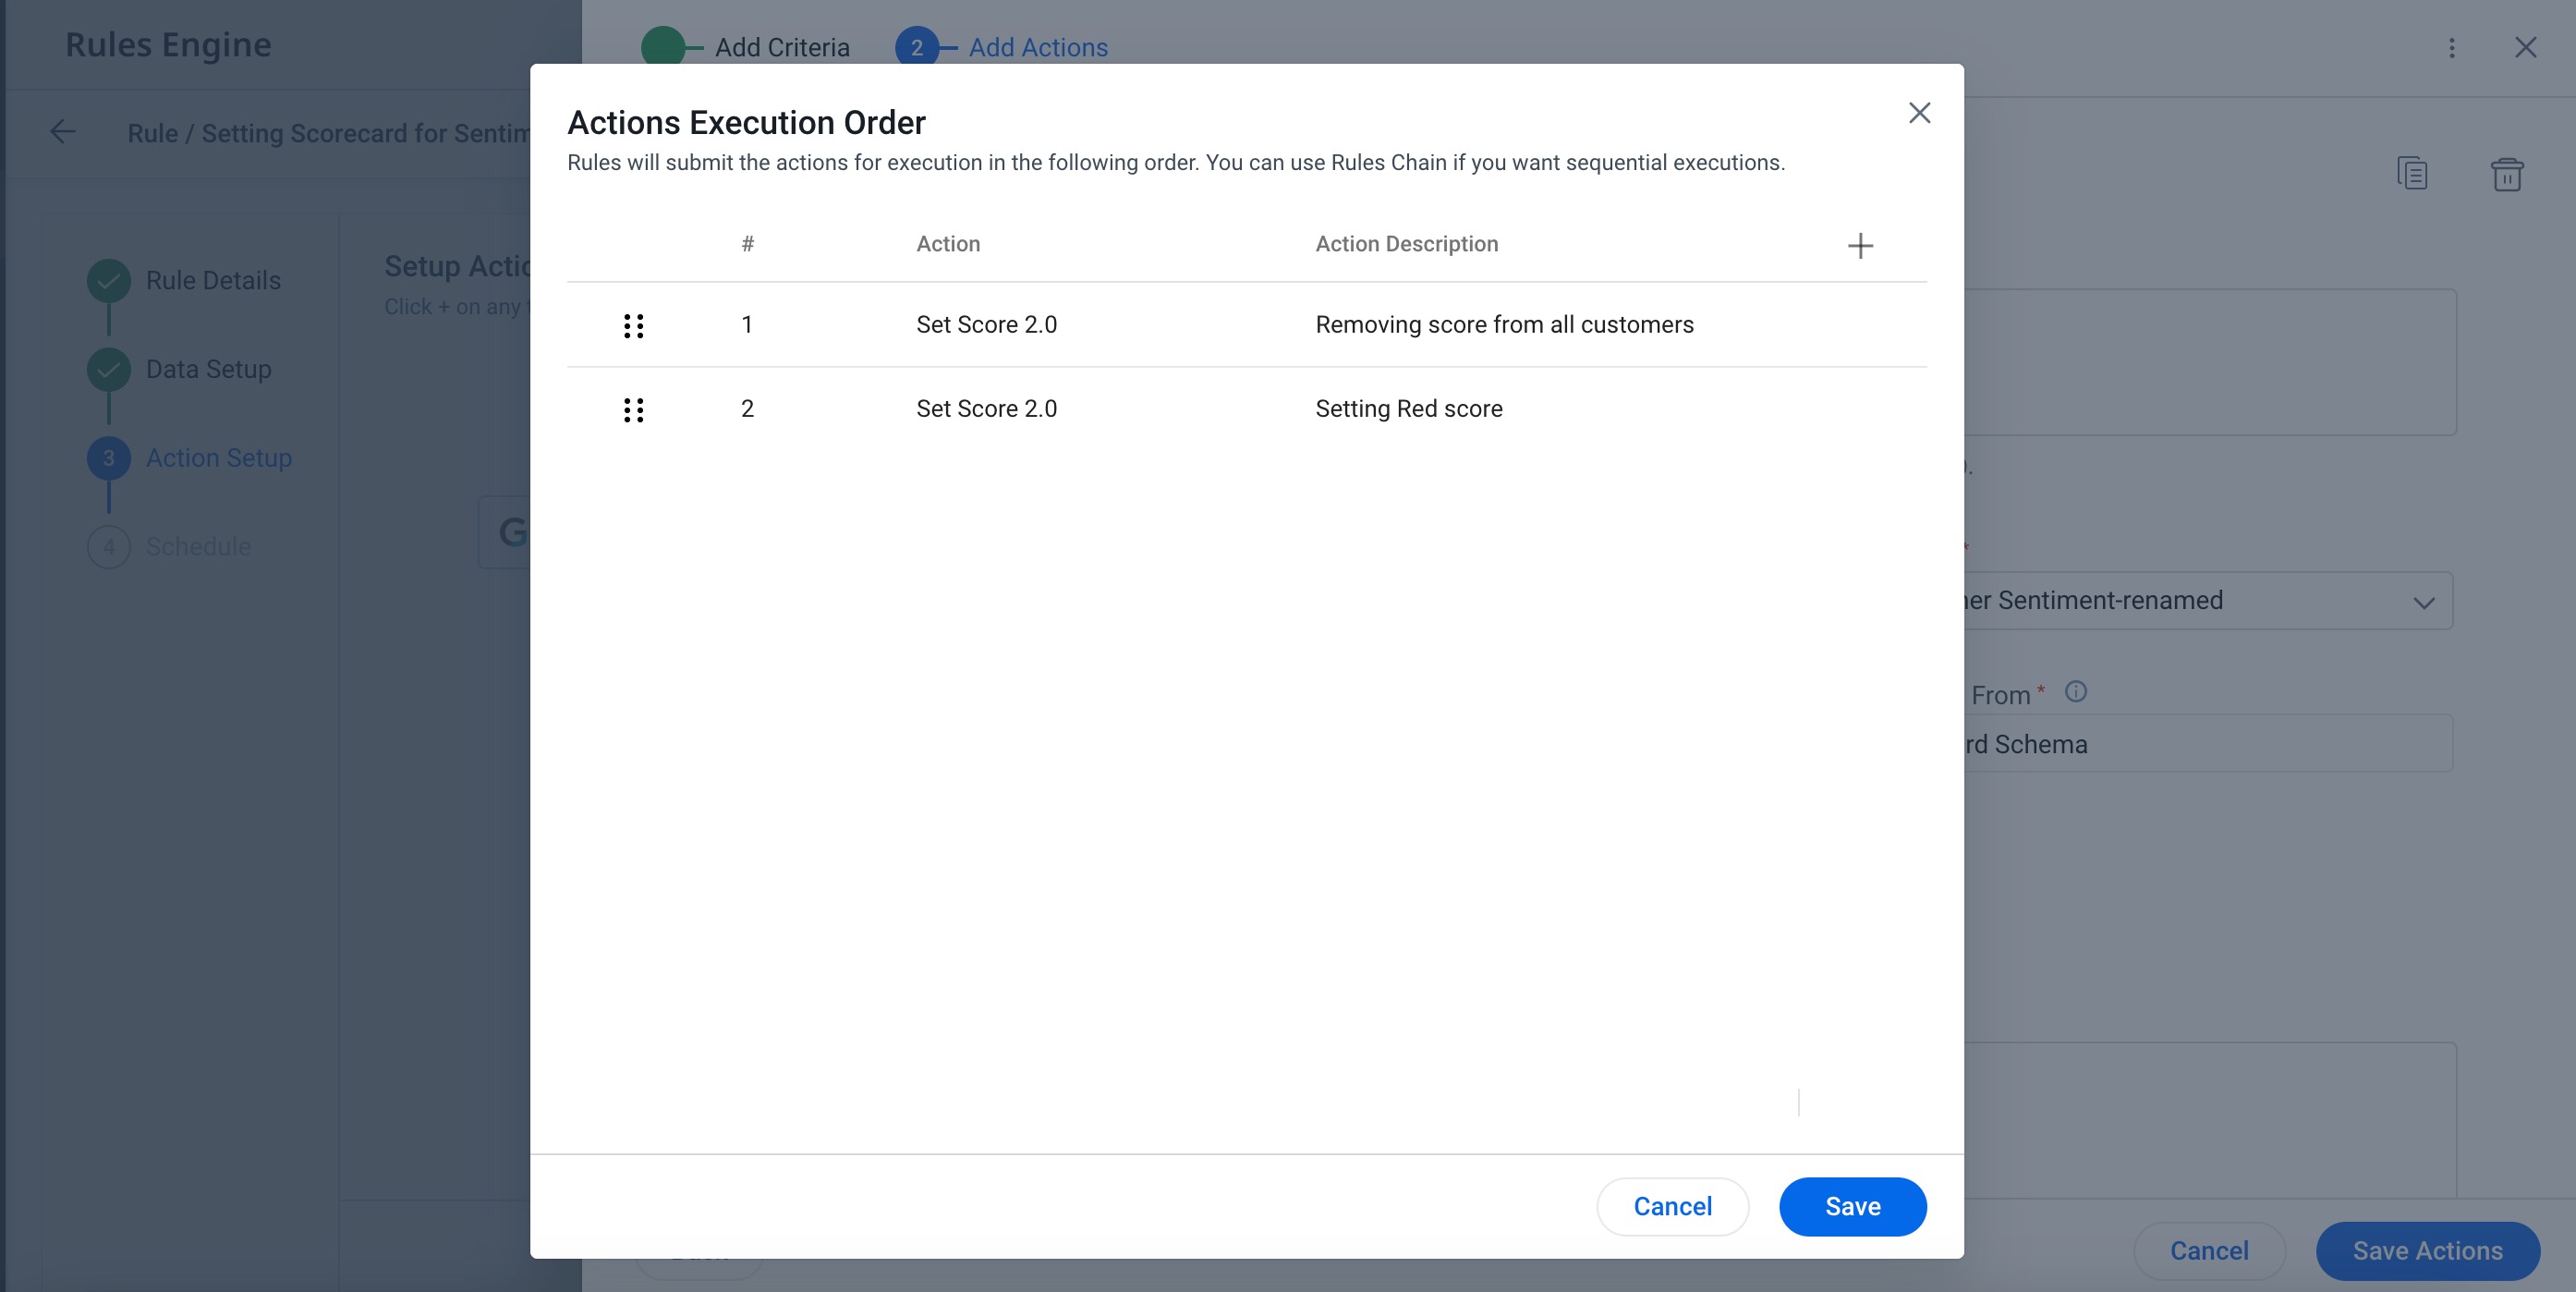
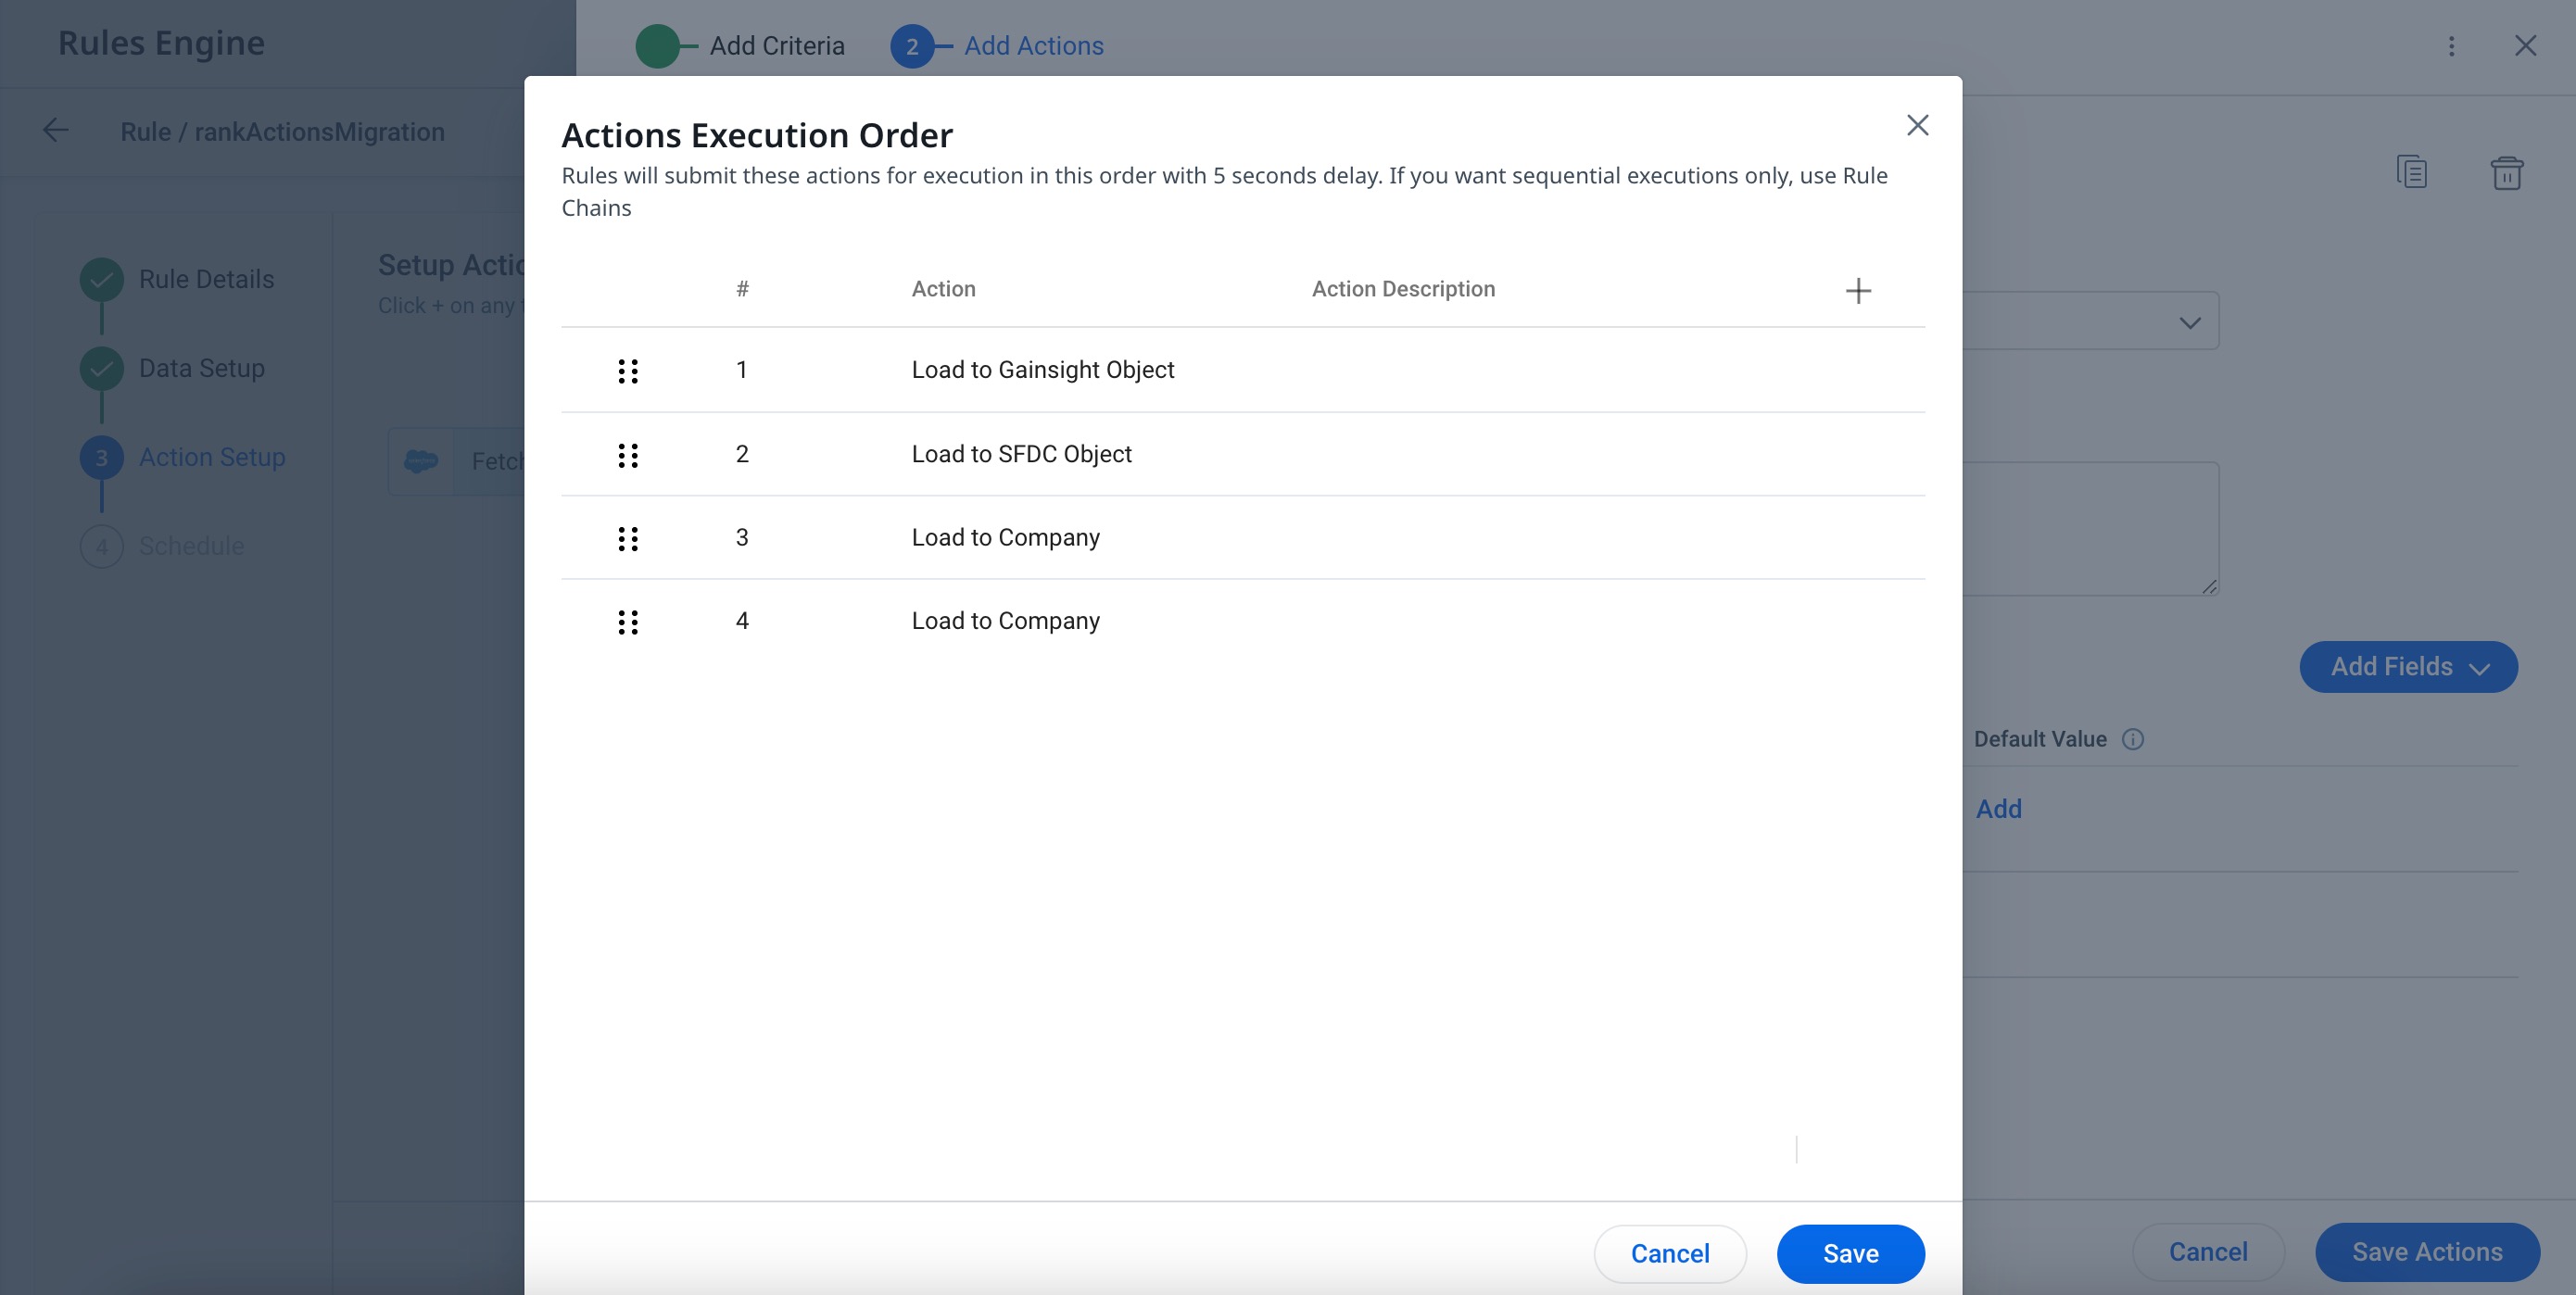
Ranking Actions for Execution Order
Admins can set the ranking order of actions based on their requirements. This empowers admins to fine-tune the Actions Execution Order.
For instance, let's consider a scenario where admins want to optimize data management by first removing outdated scores before assigning a green status to high-usage accounts. This capability ensures that data operations align precisely with the business objectives, contributing to a more streamlined and effective workflow.
In the following image, actions are displayed with assigned rankings. Shifting Load to SFDC Object from rank 4 to rank 2 causes a reorganization. The action originally at rank 2 - Load to Company, is subsequently positioned at rank 3, while the one initially at rank 3, Load to Company is now moved down to rank 4. This illustrates the dynamic impact of modifying the ranking order.
.jpg?revision=1)
To reorder the ranking order of an action:
- Navigate to any existing rule Action Setup step.
- Click on any action. The Add Action page appears.
- Click the three vertical dots menu.
- Select Actions Executions Order. The Actions Execution Order dialog box appears.
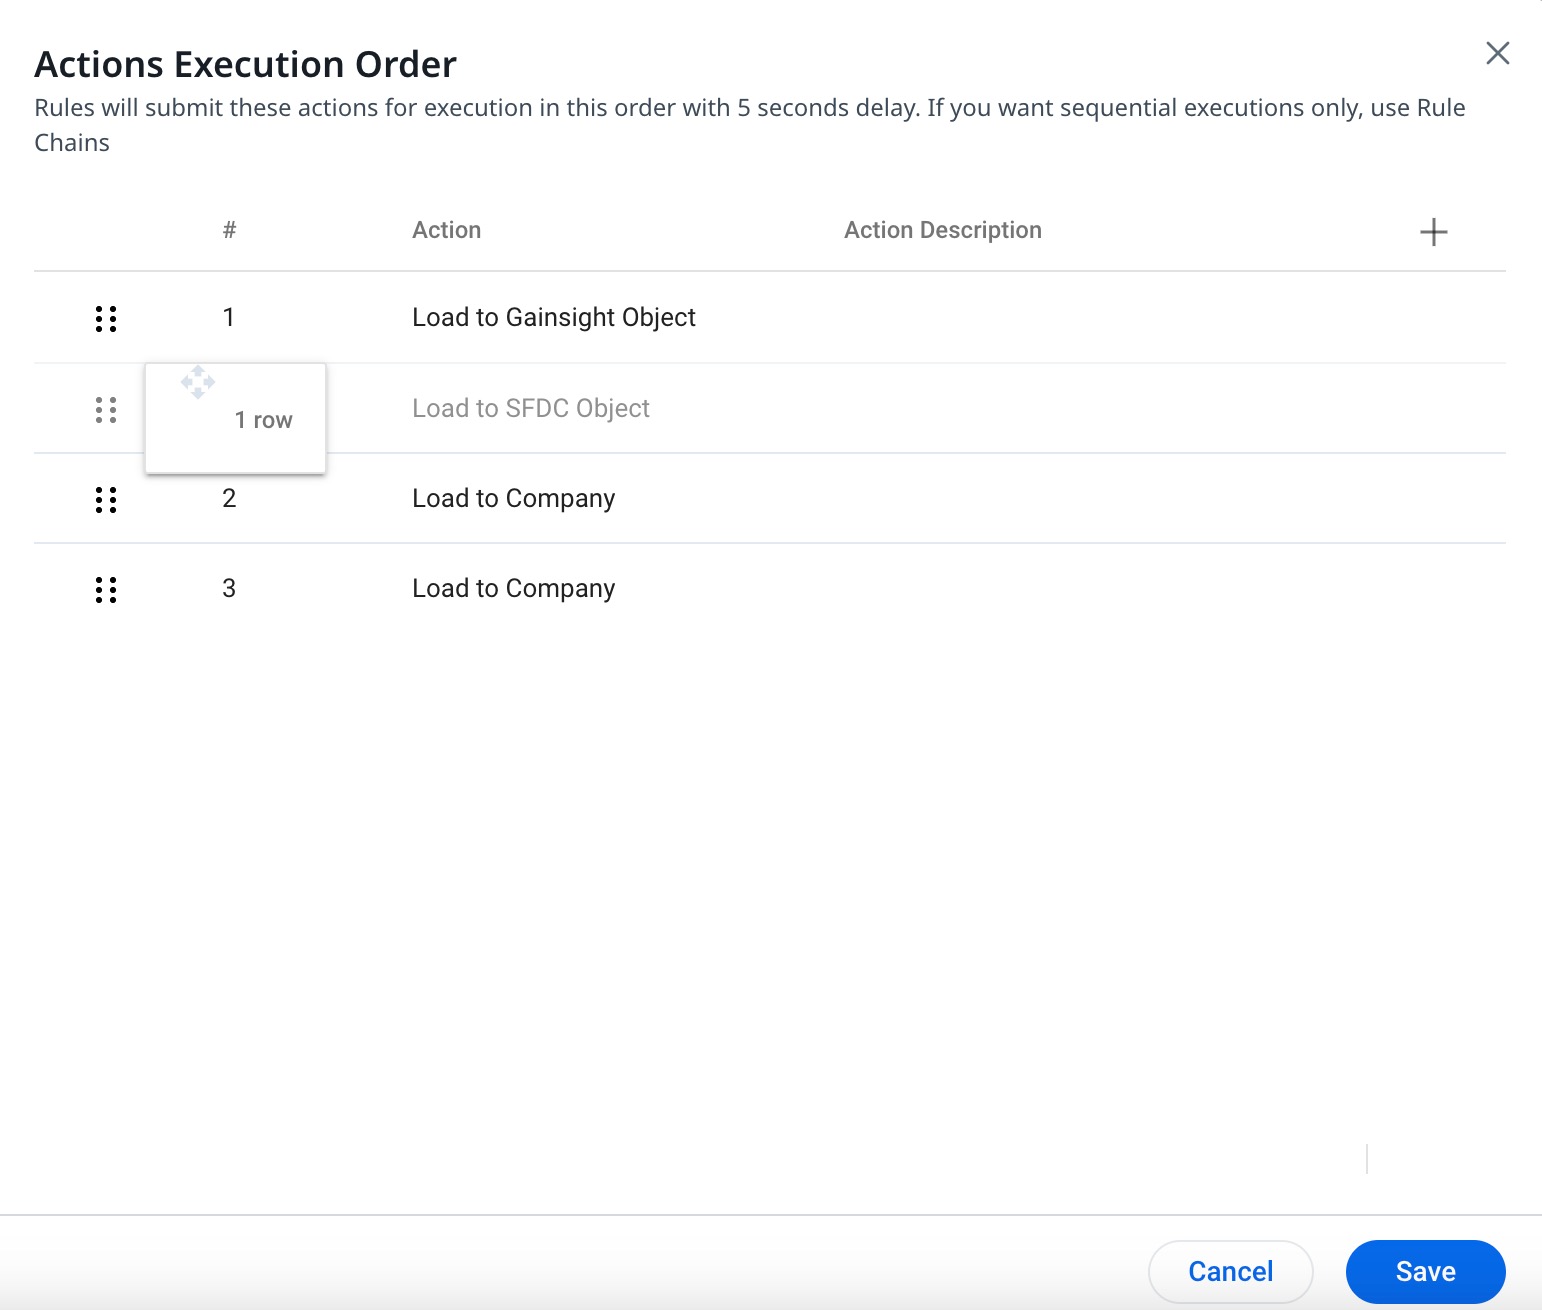
-
Click + icon to select either Criteria, Task, or both as additional columns.
Note: The Actions Execution Order feature allows you to reorder the sequence of actions and add two additional columns, Criteria and Task, alongside the default column headings for better clarity.
![]()
- Click Apply. The selected columns are added to the Actions Execution dialog box.
![]()
- To Rank an action, there are two methods:
-
Click on the number and change it (or)
-
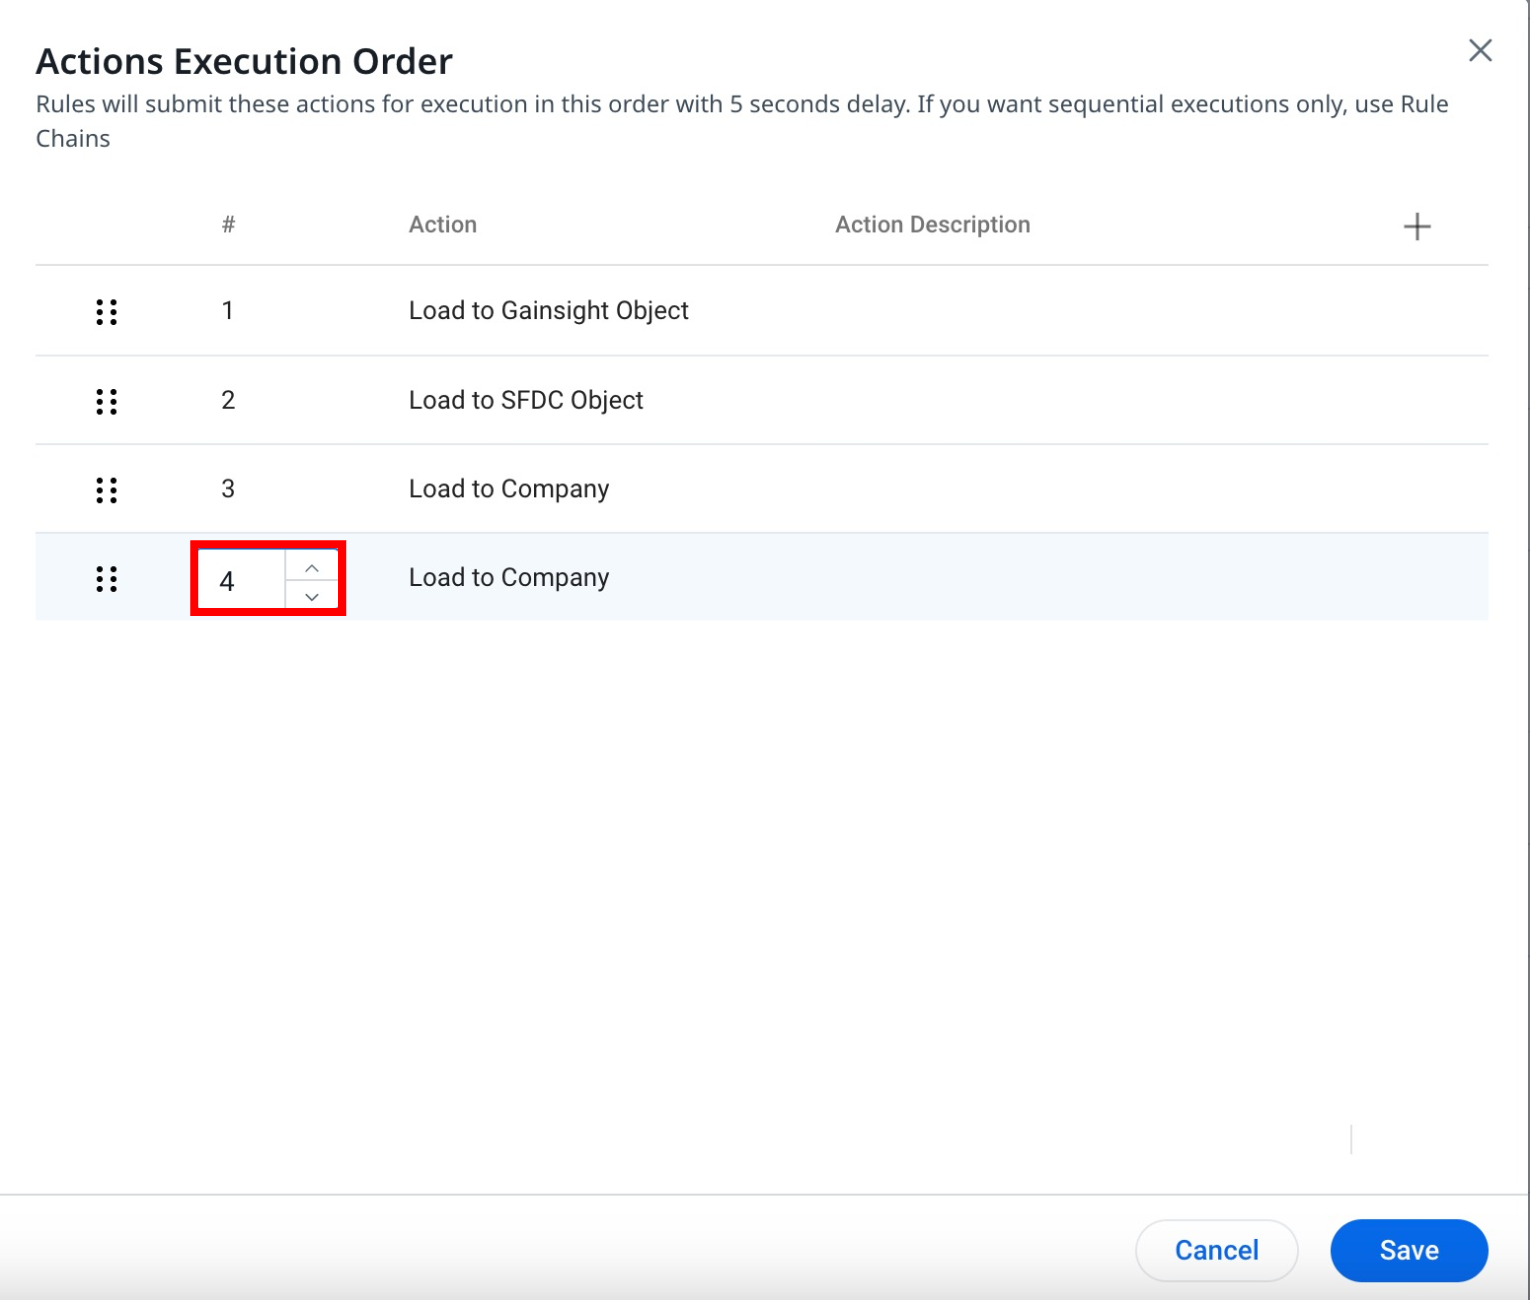
-
Drag-and-Drop the action.
- Click Save. The ranking order of the actions gets changed.
Schedule
A particular rule can be scheduled for execution, or you can create a Rule Chain to manage running a collection of connected rules in reverse chronological order.
For more information on how to schedule a rule, refer to the Schedule and Execute Rules article.
Limitation
- The Rules Engine can follow the below given functions, but does not support the delete function, and should not be used to try and delete data in Gainsight.
Insert: It creates new records.
Update: Updates the existing record as per the chosen identifier.
Upsert: Updates any matching records, and if no matching records are found, new records are created. -
Salesforce does not support retrieving data from lookup fields in the Opportunity object's Contact ID field, thus we do not provide support for this functionality.
Additional Resources
- Change Document for Rules Engine Horizon Experience.
- Success Plans Action Type
- Load to Scorecard History Action Type
- Set Score 2.0 Action Type
- Load to People Action Type
- Create CTA Action Type
- Update CTA Action Type
- Close CTA Action Type
- Load to Survey Action Type
- Load to Cases
- Load to User Action Type
- Load to PX Action Type
- Load to RelationshipV2 Action Type
- Load to Company Action Type
- Load to GS Opportunity Action Type
- Load to GS Lead Action Type
- Load to GS Company Forecast Action Type
- Load to Activities
- Call External API
- Load to Gainsight Object Action Type
- Configure Load to SFDC Objects Action Type
- Schedule and Execute Rules
- Rule Chain